ECO NISSAN TIIDA 2007 Service Repair Manual
[x] Cancel search | Manufacturer: NISSAN, Model Year: 2007, Model line: TIIDA, Model: NISSAN TIIDA 2007Pages: 5883, PDF Size: 78.95 MB
Page 5359 of 5883
CONTROL UNIT (RAM), CONTROL UNIT (ROM)
TM-413
< COMPONENT DIAGNOSIS >[TYPE 2 (4AT: RE4F03B)]
C
E
F
G
H
I
J
K
L
MA
B
TM
N
O
P
CONTROL UNIT (RAM), CONTROL UNIT (ROM)
DescriptionINFOID:0000000001713102
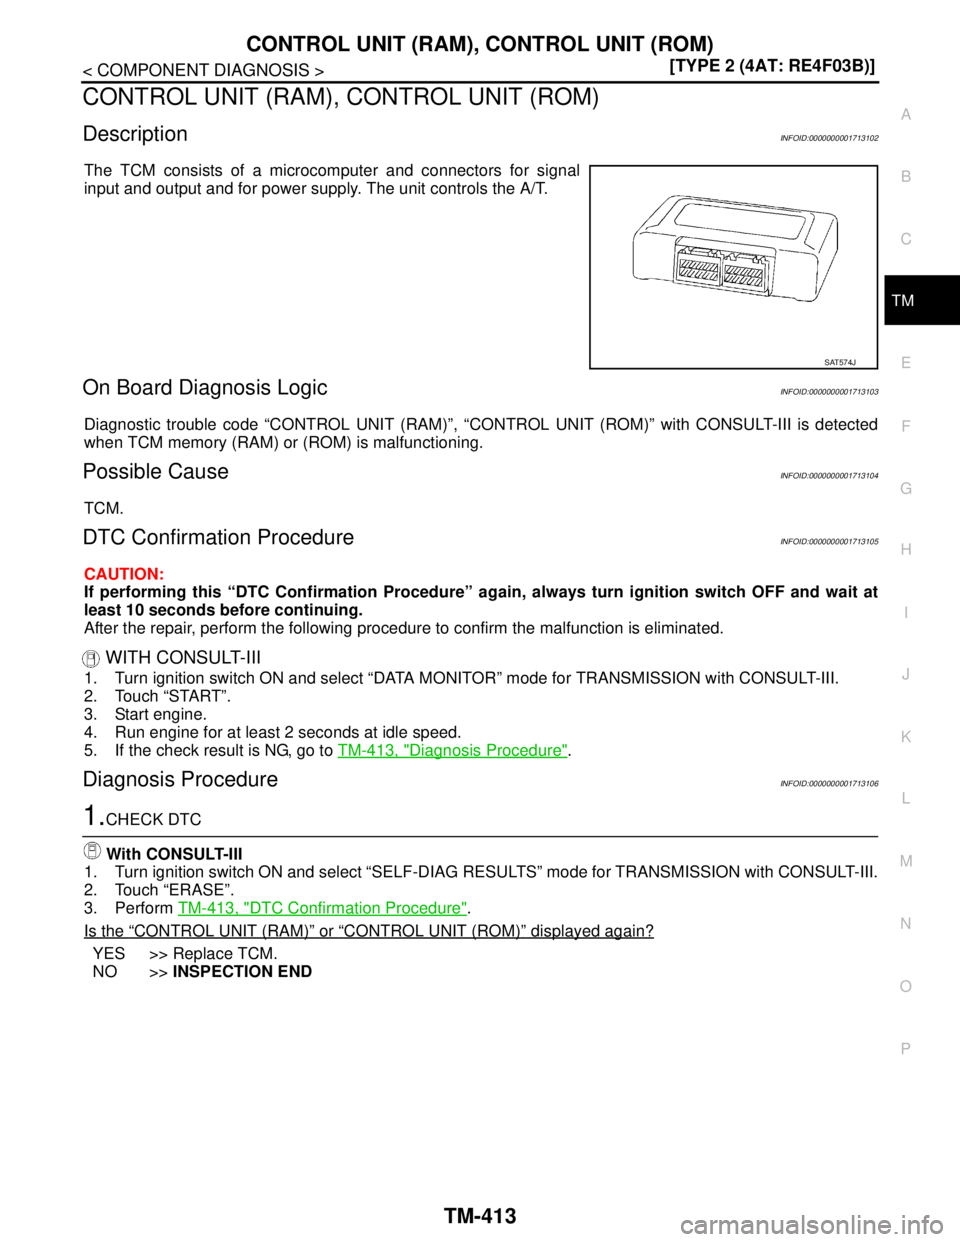
The TCM consists of a microcomputer and connectors for signal
input and output and for power supply. The unit controls the A/T.
On Board Diagnosis LogicINFOID:0000000001713103
Diagnostic trouble code “CONTROL UNIT (RAM)”, “CONTROL UNIT (ROM)” with CONSULT-III is detected
when TCM memory (RAM) or (ROM) is malfunctioning.
Possible CauseINFOID:0000000001713104
TCM.
DTC Confirmation ProcedureINFOID:0000000001713105
CAUTION:
If performing this “DTC Confirmation Procedure” again, always turn ignition switch OFF and wait at
least 10 seconds before continuing.
After the repair, perform the following procedure to confirm the malfunction is eliminated.
WITH CONSULT-III
1. Turn ignition switch ON and select “DATA MONITOR” mode for TRANSMISSION with CONSULT-III.
2. Touch “START”.
3. Start engine.
4. Run engine for at least 2 seconds at idle speed.
5. If the check result is NG, go to TM-413, "
Diagnosis Procedure".
Diagnosis ProcedureINFOID:0000000001713106
1.CHECK DTC
With CONSULT-III
1. Turn ignition switch ON and select “SELF-DIAG RESULTS” mode for TRANSMISSION with CONSULT-III.
2. Touch “ERASE”.
3. Perform TM-413, "
DTC Confirmation Procedure".
Is the
“CONTROL UNIT (RAM)” or “CONTROL UNIT (ROM)” displayed again?
YES >> Replace TCM.
NO >>INSPECTION END
SAT574J
Page 5373 of 5883
TCM
TM-427
< ECU DIAGNOSIS >[TYPE 2 (4AT: RE4F03B)]
C
E
F
G
H
I
J
K
L
MA
B
TM
N
O
P
The SELF-DIAGNOSIS results will be as follows:
The first SELF-DIAGNOSIS will indicate damage to the vehicle speed sensor or the revolution sensor.
During the next SELF-DIAGNOSIS, performed after checking the sensor, no damages will be indicated.
FAIL-SAFE FUNCTION
The following fail-safe functions allow vehicles to be driven even when sensor, switch or solenoid malfunction
occurs.
Vehicle Speed Sensor·A/T (Revolution Sensor)
Vehicle speed sensor·MTR signal is input from combination meter.
Accelerator Pedal Position Sensor Signal and Throttle Position Sensor Signal
TCM controls the throttle opening angle to a predetermined fixed position to enable driving if a malfunctioning
signal is input to TCM.
PNP Switch
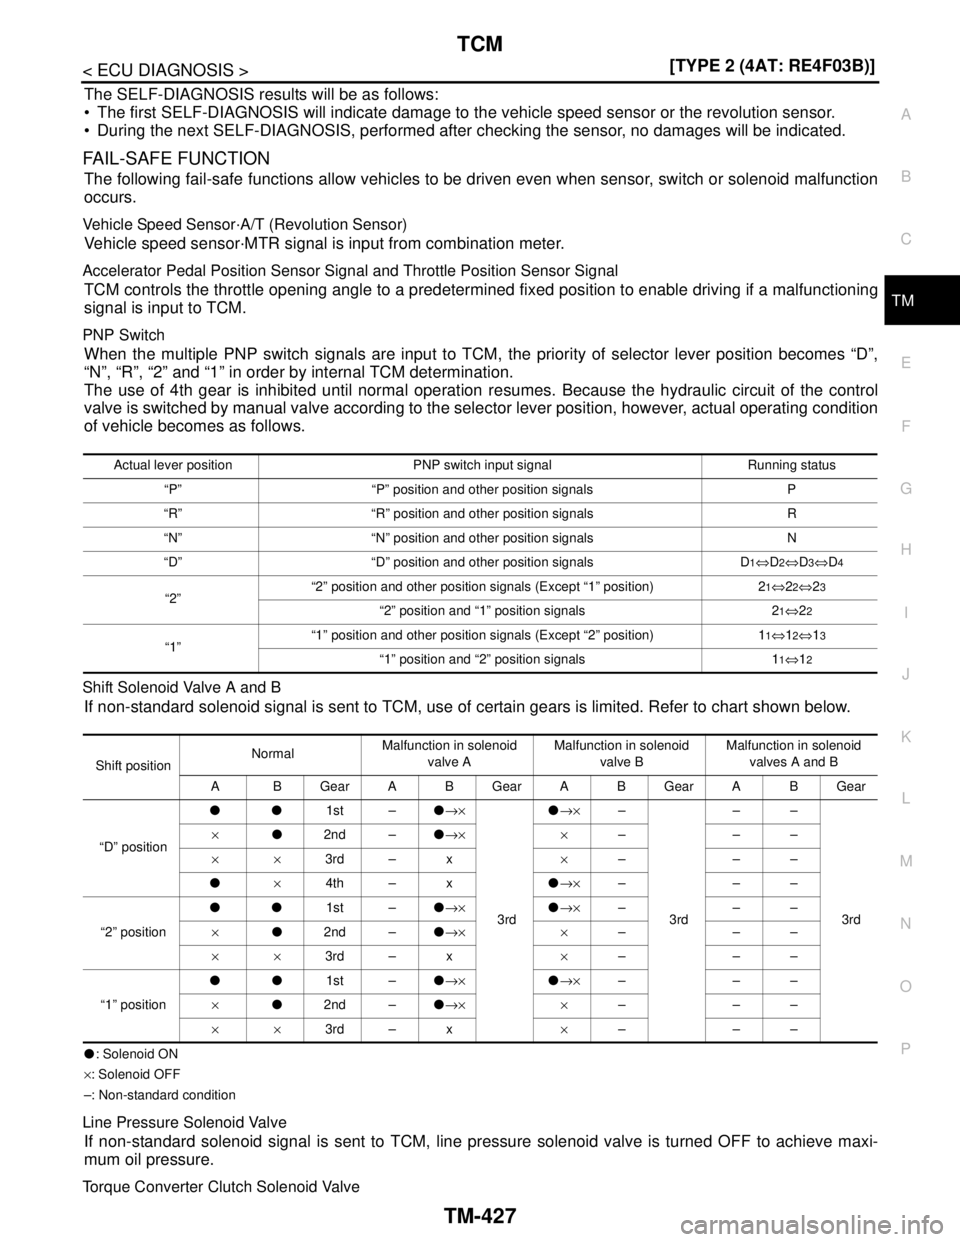
When the multiple PNP switch signals are input to TCM, the priority of selector lever position becomes “D”,
“N”, “R”, “2” and “1” in order by internal TCM determination.
The use of 4th gear is inhibited until normal operation resumes. Because the hydraulic circuit of the control
valve is switched by manual valve according to the selector lever position, however, actual operating condition
of vehicle becomes as follows.
Shift Solenoid Valve A and B
If non-standard solenoid signal is sent to TCM, use of certain gears is limited. Refer to chart shown below.
●: Solenoid ON
×: Solenoid OFF
–: Non-standard condition
Line Pressure Solenoid Valve
If non-standard solenoid signal is sent to TCM, line pressure solenoid valve is turned OFF to achieve maxi-
mum oil pressure.
Torque Converter Clutch Solenoid Valve
Actual lever position PNP switch input signal Running status
“P” “P” position and other position signals P
“R” “R” position and other position signals R
“N” “N” position and other position signals N
“D” “D” position and other position signals D
1⇔D2⇔D3⇔D4
“2”“2” position and other position signals (Except “1” position) 21⇔22⇔23
“2” position and “1” position signals 21⇔22
“1”“1” position and other position signals (Except “2” position) 11⇔12⇔13
“1” position and “2” position signals 11⇔12
Shift positionNormalMalfunction in solenoid
valve AMalfunction in solenoid
valve BMalfunction in solenoid
valves A and B
A BGearABGearABGearABGear
“D” position●●1st –●→×
3rd ●→×–
3rd ––
3rd ×●2nd –●→× ×–––
××3rd – x×–––
●×4th – x●→×–––
“2” position●●1st –●→×●→×–––
×●2nd –●→× ×–––
××3rd – x×–––
“1” position●●1st –●→×●→×–––
×●2nd –●→× ×–––
××3rd – x×–––
Page 5386 of 5883
TM-440
< SYMPTOM DIAGNOSIS >[TYPE 2 (4AT: RE4F03B)]
SYSTEM SYMPTOM
OD OFF Indicator Lamp Does Not Come On
INFOID:0000000001714346
SYMPTOM:
OD OFF indicator lamp does not come on for about 2 seconds when turning ignition switch to ON.
1.CHECK CAN COMMUNICATION LINE
Perform self-diagnosis. Refer to XX-XX, "*****"
or TM-350, "Diagnosis Procedure without CONSULT-III".
Is a malfunction in CAN communication indicated in the results?
YES >> Check CAN communication line. Refer to XX-XX, "*****" (type 1) or XX-XX, "*****" (type 2).
NO >> GO TO 2.
2.CHECK TCM POWER SOURCE
1. Turn ignition switch ON. (Do not start engine.)
2. Check voltage between TCM connector terminals and ground.
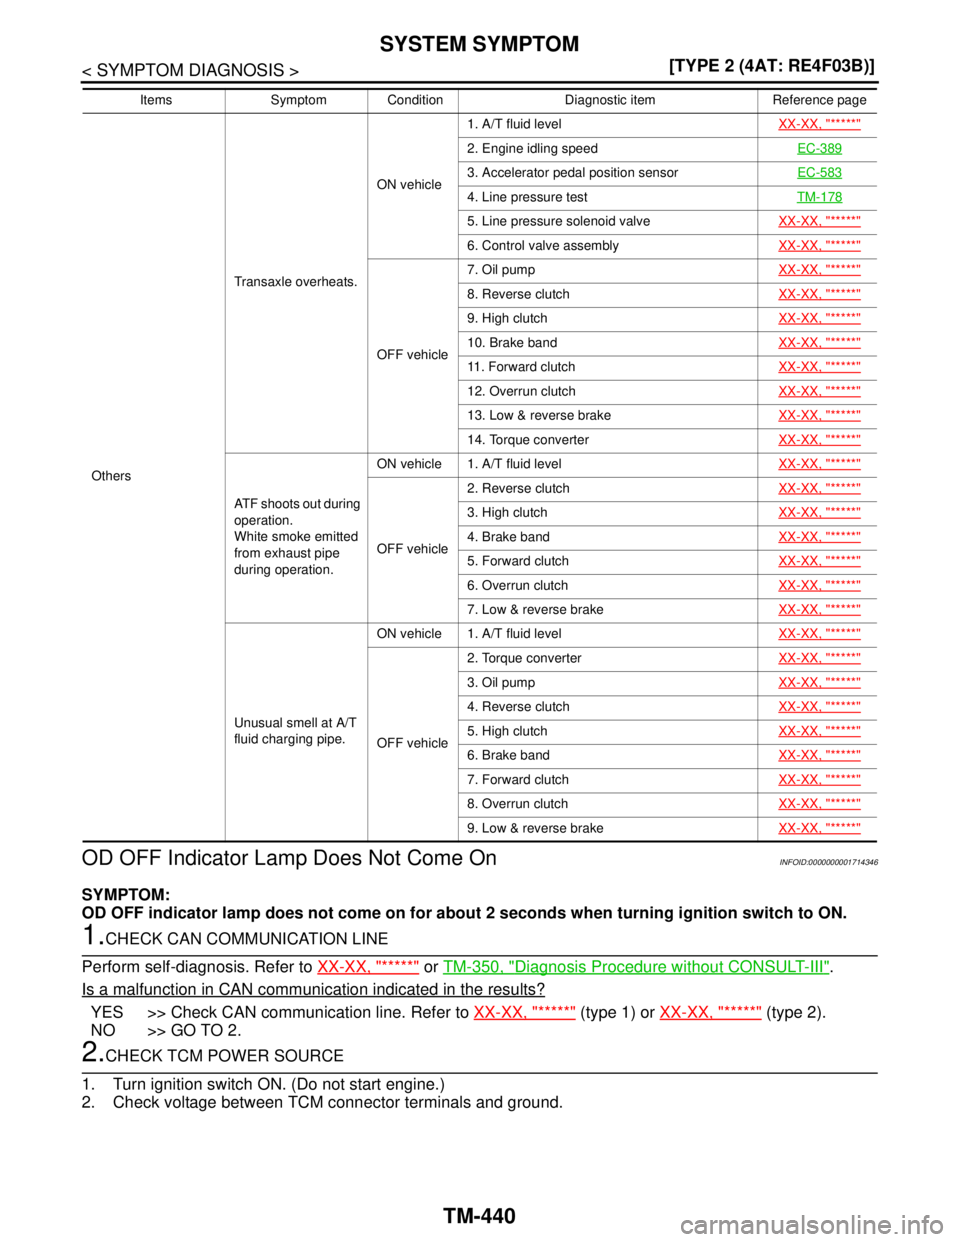
OthersTransaxle overheats.ON vehicle1. A/T fluid levelXX-XX, "*****"
2. Engine idling speedEC-389
3. Accelerator pedal position sensorEC-583
4. Line pressure testTM-178
5. Line pressure solenoid valveXX-XX, "*****"
6. Control valve assemblyXX-XX, "*****"
OFF vehicle7. Oil pumpXX-XX, "*****"
8. Reverse clutchXX-XX, "*****"
9. High clutchXX-XX, "*****"
10. Brake bandXX-XX, "*****"
11. Forward clutchXX-XX, "*****"
12. Overrun clutchXX-XX, "*****"
13. Low & reverse brakeXX-XX, "*****"
14. Torque converterXX-XX, "*****"
ATF shoots out during
operation.
White smoke emitted
from exhaust pipe
during operation.ON vehicle 1. A/T fluid levelXX-XX, "*****"
OFF vehicle2. Reverse clutchXX-XX, "*****"
3. High clutchXX-XX, "*****"
4. Brake bandXX-XX, "*****"
5. Forward clutchXX-XX, "*****"
6. Overrun clutchXX-XX, "*****"
7. Low & reverse brakeXX-XX, "*****"
Unusual smell at A/T
fluid charging pipe.ON vehicle 1. A/T fluid levelXX-XX, "*****"
OFF vehicle2. Torque converterXX-XX, "*****"
3. Oil pumpXX-XX, "*****"
4. Reverse clutchXX-XX, "*****"
5. High clutchXX-XX, "*****"
6. Brake bandXX-XX, "*****"
7. Forward clutchXX-XX, "*****"
8. Overrun clutchXX-XX, "*****"
9. Low & reverse brakeXX-XX, "*****"
Items Symptom Condition Diagnostic item Reference page
Page 5399 of 5883
SYSTEM SYMPTOM
TM-453
< SYMPTOM DIAGNOSIS >[TYPE 2 (4AT: RE4F03B)]
C
E
F
G
H
I
J
K
L
MA
B
TM
N
O
P
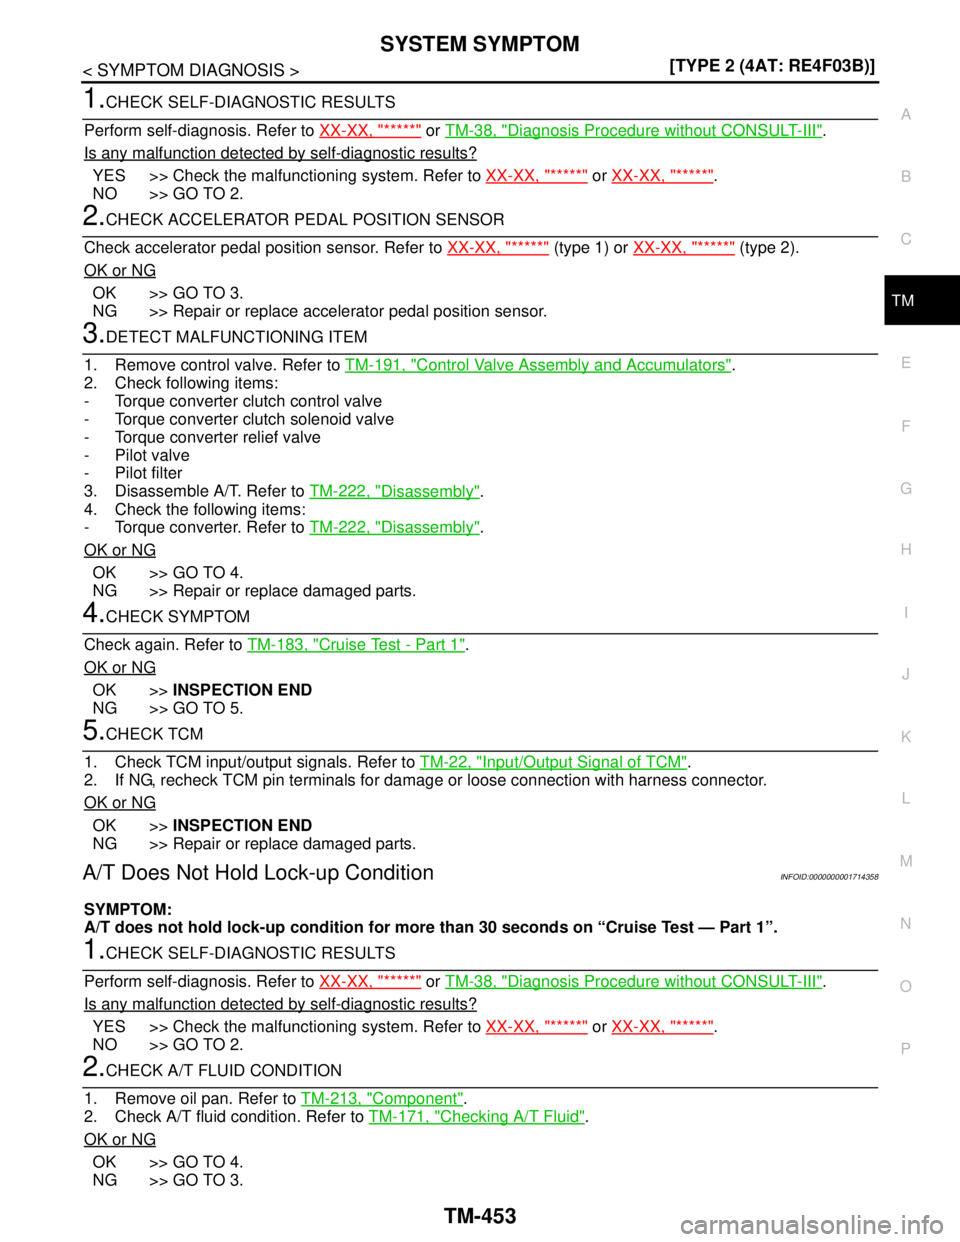
1.CHECK SELF-DIAGNOSTIC RESULTS
Perform self-diagnosis. Refer to XX-XX, "*****"
or TM-38, "Diagnosis Procedure without CONSULT-III".
Is any malfunction detected by self-diagnostic results?
YES >> Check the malfunctioning system. Refer to XX-XX, "*****" or XX-XX, "*****".
NO >> GO TO 2.
2.CHECK ACCELERATOR PEDAL POSITION SENSOR
Check accelerator pedal position sensor. Refer to XX-XX, "*****"
(type 1) or XX-XX, "*****" (type 2).
OK or NG
OK >> GO TO 3.
NG >> Repair or replace accelerator pedal position sensor.
3.DETECT MALFUNCTIONING ITEM
1. Remove control valve. Refer to TM-191, "
Control Valve Assembly and Accumulators".
2. Check following items:
- Torque converter clutch control valve
- Torque converter clutch solenoid valve
- Torque converter relief valve
- Pilot valve
- Pilot filter
3. Disassemble A/T. Refer to TM-222, "
Disassembly".
4. Check the following items:
- Torque converter. Refer to TM-222, "
Disassembly".
OK or NG
OK >> GO TO 4.
NG >> Repair or replace damaged parts.
4.CHECK SYMPTOM
Check again. Refer to TM-183, "
Cruise Test - Part 1".
OK or NG
OK >>INSPECTION END
NG >> GO TO 5.
5.CHECK TCM
1. Check TCM input/output signals. Refer to TM-22, "
Input/Output Signal of TCM".
2. If NG, recheck TCM pin terminals for damage or loose connection with harness connector.
OK or NG
OK >>INSPECTION END
NG >> Repair or replace damaged parts.
A/T Does Not Hold Lock-up ConditionINFOID:0000000001714358
SYMPTOM:
A/T does not hold lock-up condition for more than 30 seconds on “Cruise Test — Part 1”.
1.CHECK SELF-DIAGNOSTIC RESULTS
Perform self-diagnosis. Refer to XX-XX, "*****"
or TM-38, "Diagnosis Procedure without CONSULT-III".
Is any malfunction detected by self-diagnostic results?
YES >> Check the malfunctioning system. Refer to XX-XX, "*****" or XX-XX, "*****".
NO >> GO TO 2.
2.CHECK A/T FLUID CONDITION
1. Remove oil pan. Refer to TM-213, "
Component".
2. Check A/T fluid condition. Refer to TM-171, "
Checking A/T Fluid".
OK or NG
OK >> GO TO 4.
NG >> GO TO 3.
Page 5411 of 5883
PRECAUTIONS
TM-465
< PRECAUTION >[TYPE 2 (4AT: RE4F03B)]
C
E
F
G
H
I
J
K
L
MA
B
TM
N
O
P
PRECAUTION
PRECAUTIONS
Precaution for Supplemental Restraint System (SRS) "AIR BAG" and "SEAT BELT
PRE-TENSIONER"
INFOID:0000000001723044
The Supplemental Restraint System such as “AIR BAG” and “SEAT BELT PRE-TENSIONER”, used along
with a front seat belt, helps to reduce the risk or severity of injury to the driver and front passenger for certain
types of collision. Information necessary to service the system safely is included in the SRS and SB section of
this Service Manual.
WARNING:
To avoid rendering the SRS inoperative, which could increase the risk of personal injury or death in
the event of a collision which would result in air bag inflation, all maintenance must be performed by
an authorized NISSAN/INFINITI dealer.
Improper maintenance, including incorrect removal and installation of the SRS, can lead to personal
injury caused by unintentional activation of the system. For removal of Spiral Cable and Air Bag
Module, see the SRS section.
Do not use electrical test equipment on any circuit related to the SRS unless instructed to in this
Service Manual. SRS wiring harnesses can be identified by yellow and/or orange harnesses or har-
ness connectors.
Precaution Necessary for Steering Wheel Rotation After Battery Disconnect
INFOID:0000000001723045
NOTE:
This Procedure is applied only to models with Intelligent Key system and NATS (NISSAN ANTI-THEFT SYS-
TEM).
Remove and install all control units after disconnecting both battery cables with the ignition knob in the
″LOCK″ position.
Always use CONSULT-II to perform self-diagnosis as a part of each function inspection after finishing work.
If DTC is detected, perform trouble diagnosis according to self-diagnostic results.
For models equipped with the Intelligent Key system and NATS, an electrically controlled steering lock mech-
anism is adopted on the key cylinder.
For this reason, if the battery is disconnected or if the battery is discharged, the steering wheel will lock and
steering wheel rotation will become impossible.
If steering wheel rotation is required when battery power is interrupted, follow the procedure below before
starting the repair operation.
OPERATION PROCEDURE
1. Connect both battery cables.
NOTE:
Supply power using jumper cables if battery is discharged.
2. Use the Intelligent Key or mechanical key to turn the ignition switch to the ″ACC″ position. At this time, the
steering lock will be released.
3. Disconnect both battery cables. The steering lock will remain released and the steering wheel can be
rotated.
4. Perform the necessary repair operation.
5. When the repair work is completed, return the ignition switch to the ″LOCK″ position before connecting
the battery cables. (At this time, the steering lock mechanism will engage.)
6. Perform a self-diagnosis check of all control units using CONSULT-II.
Precaution for On Board Diagnosis (OBD) System of A/T and Engine (For Type1 Only)
INFOID:0000000001723046
The ECM has an on board diagnostic system. It will light up the malfunction indicator lamp (MIL) to warn the
driver of a malfunction causing emission deterioration.
CAUTION:
Page 5412 of 5883
TM-466
< PRECAUTION >[TYPE 2 (4AT: RE4F03B)]
PRECAUTIONS
Be sure to turn the ignition switch OFF and disconnect battery negative cable from battery negative
terminal before any repair or inspection work. The open/short circuit of related switches, sensors,
solenoid valves, etc. will cause the MIL to light up.
Be sure to connect and lock the connectors securely after work. A loose (unlocked) connector will
cause the MIL to light up due to an open circuit. (Be sure the connectors are free from water, grease,
dirt, bent terminals, etc.)
Be sure to route and secure the harnesses properly after work. Interference of the harness with a
bracket, etc. may cause the MIL to light up due to a short circuit.
Be sure to erase the unnecessary malfunction information (repairs completed) from the TCM and
ECM before returning the vehicle to the customer.
PrecautionINFOID:0000000001723047
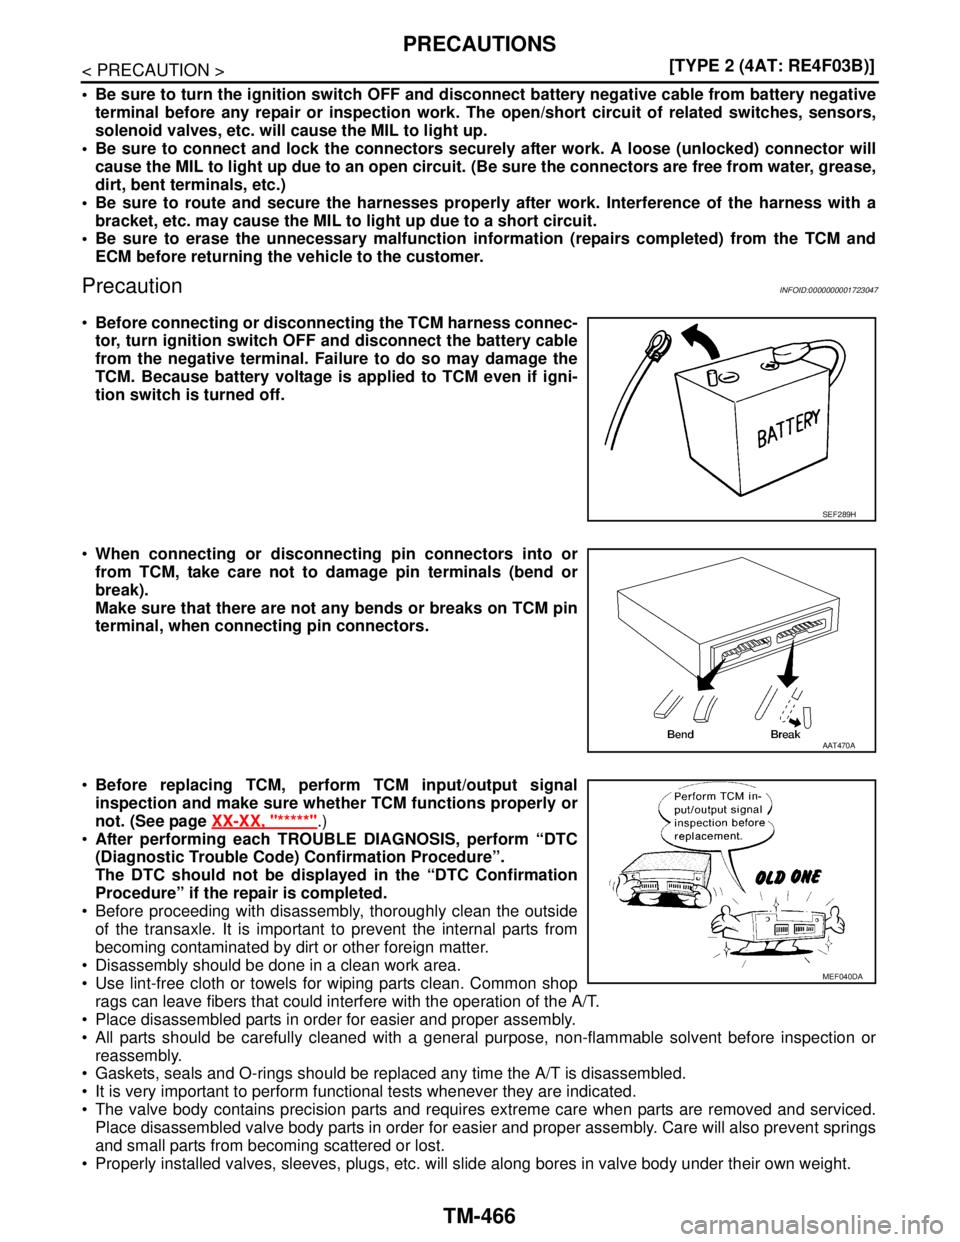
Before connecting or disconnecting the TCM harness connec-
tor, turn ignition switch OFF and disconnect the battery cable
from the negative terminal. Failure to do so may damage the
TCM. Because battery voltage is applied to TCM even if igni-
tion switch is turned off.
When connecting or disconnecting pin connectors into or
from TCM, take care not to damage pin terminals (bend or
break).
Make sure that there are not any bends or breaks on TCM pin
terminal, when connecting pin connectors.
Before replacing TCM, perform TCM input/output signal
inspection and make sure whether TCM functions properly or
not. (See page XX-XX, "*****"
.)
After performing each TROUBLE DIAGNOSIS, perform “DTC
(Diagnostic Trouble Code) Confirmation Procedure”.
The DTC should not be displayed in the “DTC Confirmation
Procedure” if the repair is completed.
Before proceeding with disassembly, thoroughly clean the outside
of the transaxle. It is important to prevent the internal parts from
becoming contaminated by dirt or other foreign matter.
Disassembly should be done in a clean work area.
Use lint-free cloth or towels for wiping parts clean. Common shop
rags can leave fibers that could interfere with the operation of the A/T.
Place disassembled parts in order for easier and proper assembly.
All parts should be carefully cleaned with a general purpose, non-flammable solvent before inspection or
reassembly.
Gaskets, seals and O-rings should be replaced any time the A/T is disassembled.
It is very important to perform functional tests whenever they are indicated.
The valve body contains precision parts and requires extreme care when parts are removed and serviced.
Place disassembled valve body parts in order for easier and proper assembly. Care will also prevent springs
and small parts from becoming scattered or lost.
Properly installed valves, sleeves, plugs, etc. will slide along bores in valve body under their own weight.
SEF289H
AAT470A
MEF040DA
Page 5413 of 5883
PRECAUTIONS
TM-467
< PRECAUTION >[TYPE 2 (4AT: RE4F03B)]
C
E
F
G
H
I
J
K
L
MA
B
TM
N
O
P
Before assembly, apply a coat of recommended ATF to all parts. Apply petroleum jelly to protect O-rings and
seals, or hold bearings and washers in place during assembly. Do not use grease.
Extreme care should be taken to avoid damage to O-rings, seals and gaskets when assembling.
After overhaul, refill the A/T with new ATF.
When the A/T drain plug is removed, only some of the fluid is drained. Old A/T fluid will remain in torque con-
verter and ATF cooling system.
Always follow the procedures under “Changing A/T Fluid” in the AT section when changing A/T fluid. Refer to
XX-XX, "*****"
, XX-XX, "*****".
Service Notice or PrecautionINFOID:0000000001723048
TORQUE CONVERTER SERVICE
The torque converter should be replaced under any of the following conditions:
External leaks in the hub weld area.
Converter hub is scored or damaged.
Converter pilot is broken, damaged or fits poorly into crankshaft.
Steel particles are found after flushing the cooler and cooler lines.
Pump is damaged or steel particles are found in the converter.
Vehicle has TCC shudder and/or no TCC apply. Replace only after all hydraulic and electrical diagnoses
have been made. (Converter clutch material may be glazed.)
Converter is contaminated with engine coolant containing antifreeze.
Internal malfunction of stator roller clutch.
Heavy clutch debris due to overheating (blue converter).
Steel particles or clutch lining material found in fluid filter or on magnet when no internal parts in unit are
worn or damaged — indicates that lining material came from converter.
The torque converter should not be replaced if:
The fluid has an odor, is discolored, and there is no evidence of metal or clutch facing particles.
The threads in one or more of the converter bolt holes are damaged.
A/T malfunction did not display evidence of damaged or worn internal parts, steel particles or clutch plate lin-
ing material in unit and inside the fluid filter.
Vehicle has been exposed to high mileage (only). The exception may be where the torque converter clutch
dampener plate lining has seen excess wear by vehicles operated in heavy and/or constant traffic, such as
taxi, delivery or police use.
OBD SELF-DIAGNOSIS (FOR TYPE 1 ONLY)
A/T self-diagnosis is performed by the TCM in combination with the ECM. The results can be read through
the blinking pattern of the OD OFF indicator lamp or the malfunction indicator lamp (MIL). Refer to the table
on XX-XX, "*****"
for the indicator used to display each self-diagnostic result.
The self-diagnostic results indicated by the MIL are automatically stored in both the ECM and TCM memo-
ries.
Always perform the procedure “HOW TO ERASE DTC” on XX-XX, "*****"
to complete the repair and
avoid unnecessary blinking of the MIL.
The following self-diagnostic items can be detected using ECM self-diagnostic results mode* only when the
OD OFF indicator lamp does not indicate any malfunctions.
-PNP switch
- A/T 1st, 2nd, 3rd, or 4th gear function
*: For details of OBD, refer to XX-XX, "*****"
.
Wiring Diagram and Trouble DiagnosisINFOID:0000000001723049
When reading wiring diagrams, refer to the following:
XX-XX, "*****"
XX-XX, "*****"
When performing trouble diagnosis, refer to the following:
XX-XX, "*****"
XX-XX, "*****"
Page 5420 of 5883
TM-474
< ON-VEHICLE MAINTENANCE >[TYPE 2 (4AT: RE4F03B)]
A/T FLUID
5. Refill the transaxle with new specified A/T fluid through the A/T fluid charging pipe. Always refill the tran-
saxle with the same volume of A/T fluid that was drained out.
6. Run engine at idle speed for 5 minutes.
7. Check A/T fluid level and condition. Refer to TM-473, "
Checking A/T Fluid".
A/T Fluid Cooler CleaningINFOID:0000000001731917
Whenever the A/T is repaired, overhauled, or replaced, the A/T fluid cooler mounted in the radiator must be
inspected and cleaned.
Metal debris and friction material, if present, can become trapped in the A/T fluid cooler. This debris can con-
taminate the newly serviced A/T or, in severe cases, can block or restrict the flow of A/T fluid. In either case,
malfunction of the newly serviced A/T may result.
Debris, if present, may build up as A/T fluid enters the cooler inlet. It will be necessary to back flush the cooler
through the cooler outlet in order to flush out any built up debris.
A/T FLUID COOLER CLEANING PROCEDURE
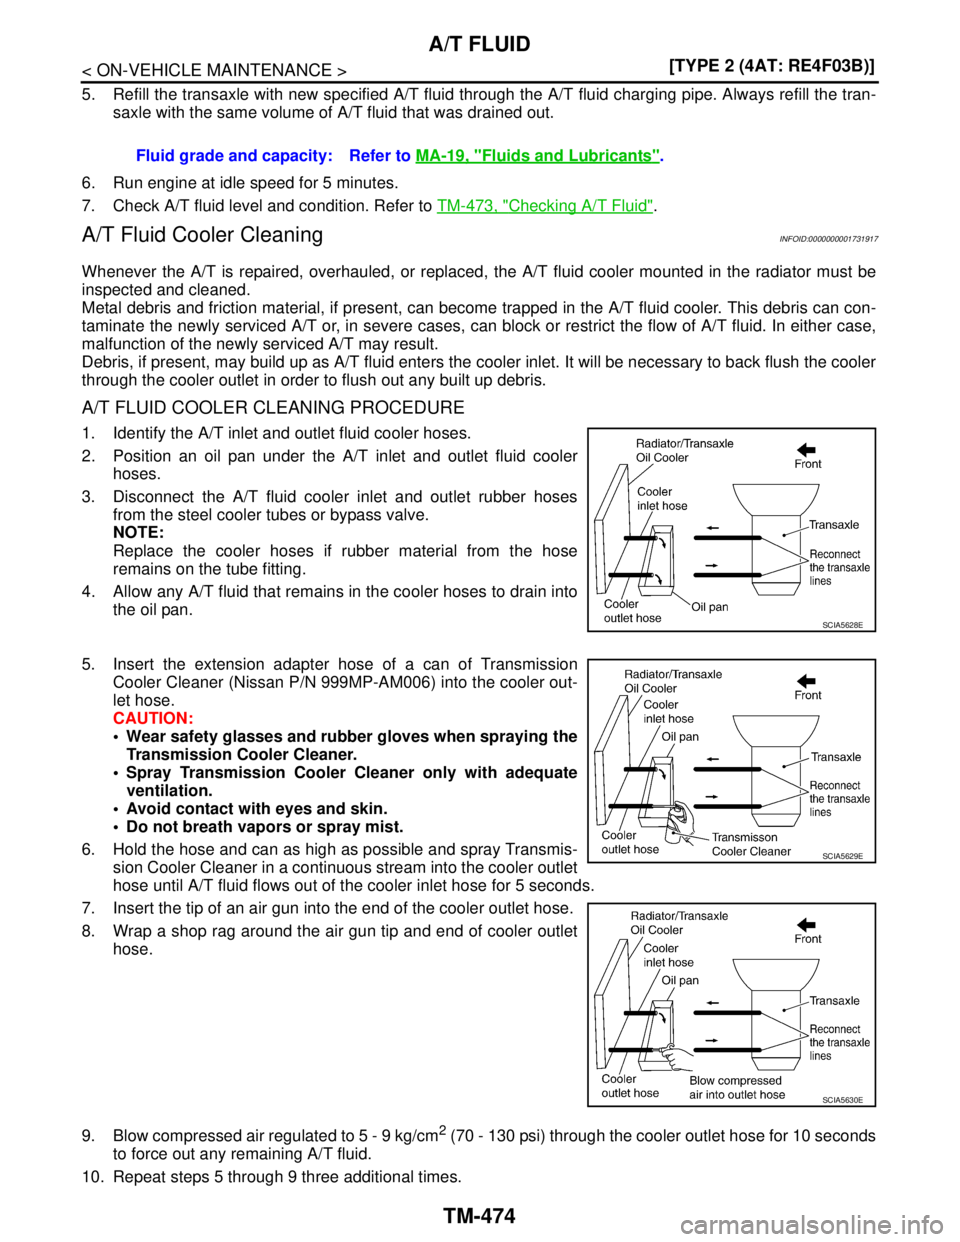
1. Identify the A/T inlet and outlet fluid cooler hoses.
2. Position an oil pan under the A/T inlet and outlet fluid cooler
hoses.
3. Disconnect the A/T fluid cooler inlet and outlet rubber hoses
from the steel cooler tubes or bypass valve.
NOTE:
Replace the cooler hoses if rubber material from the hose
remains on the tube fitting.
4. Allow any A/T fluid that remains in the cooler hoses to drain into
the oil pan.
5. Insert the extension adapter hose of a can of Transmission
Cooler Cleaner (Nissan P/N 999MP-AM006) into the cooler out-
let hose.
CAUTION:
Wear safety glasses and rubber gloves when spraying the
Transmission Cooler Cleaner.
Spray Transmission Cooler Cleaner only with adequate
ventilation.
Avoid contact with eyes and skin.
Do not breath vapors or spray mist.
6. Hold the hose and can as high as possible and spray Transmis-
sion Cooler Cleaner in a continuous stream into the cooler outlet
hose until A/T fluid flows out of the cooler inlet hose for 5 seconds.
7. Insert the tip of an air gun into the end of the cooler outlet hose.
8. Wrap a shop rag around the air gun tip and end of cooler outlet
hose.
9. Blow compressed air regulated to 5 - 9 kg/cm
2 (70 - 130 psi) through the cooler outlet hose for 10 seconds
to force out any remaining A/T fluid.
10. Repeat steps 5 through 9 three additional times.Fluid grade and capacity: Refer to MA-19, "
Fluids and Lubricants".
SCIA5628E
SCIA5629E
SCIA5630E
Page 5421 of 5883
A/T FLUID
TM-475
< ON-VEHICLE MAINTENANCE >[TYPE 2 (4AT: RE4F03B)]
C
E
F
G
H
I
J
K
L
MA
B
TM
N
O
P
11. Position an oil pan under the banjo bolts that connect the A/T fluid cooler steel lines to the A/T.
12. Remove the banjo bolts.
13. Flush each steel line from the cooler side back toward the A/T by spraying Transmission Cooler Cleaner
in a continuous stream for 5 seconds.
14. Blow compressed air regulated to 5 - 9 kg/cm
2 (70 - 130 psi) through each steel line from the cooler side
back toward the A/T for 10 seconds to force out any remaining A/T fluid.
15. Ensure all debris is removed from the steel cooler lines.
16. Ensure all debris is removed from the banjo bolts and fittings.
17. Perform "A/T FLUID COOLER DIAGNOSIS PROCEDURE".
A/T FLUID COOLER DIAGNOSIS PROCEDURE
NOTE:
Insufficient cleaning of the cooler inlet hose exterior may lead to inaccurate debris identification.
1. Position an oil pan under the A/T inlet and outlet cooler hoses.
2. Clean the exterior and tip of the cooler inlet hose.
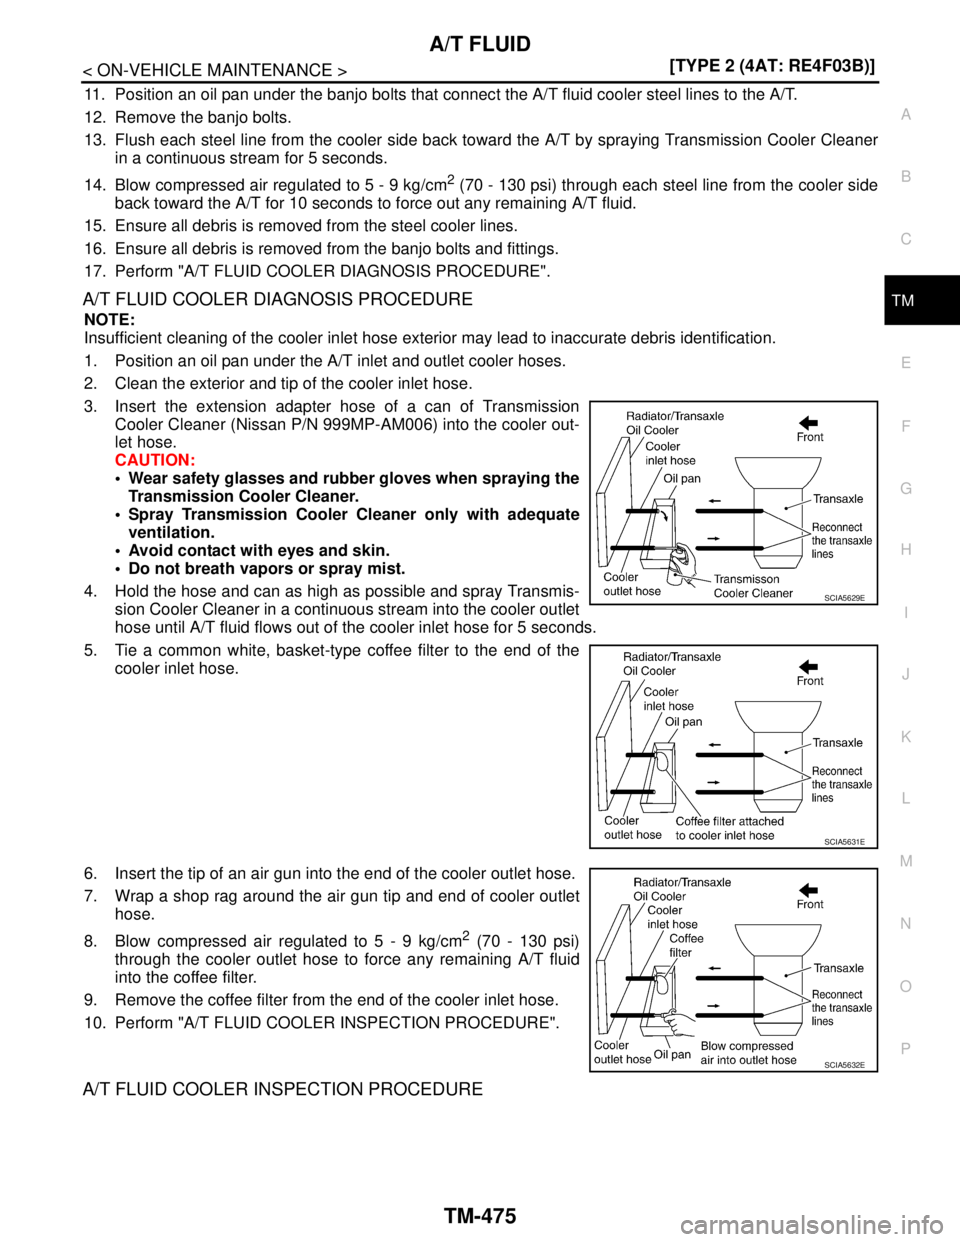
3. Insert the extension adapter hose of a can of Transmission
Cooler Cleaner (Nissan P/N 999MP-AM006) into the cooler out-
let hose.
CAUTION:
Wear safety glasses and rubber gloves when spraying the
Transmission Cooler Cleaner.
Spray Transmission Cooler Cleaner only with adequate
ventilation.
Avoid contact with eyes and skin.
Do not breath vapors or spray mist.
4. Hold the hose and can as high as possible and spray Transmis-
sion Cooler Cleaner in a continuous stream into the cooler outlet
hose until A/T fluid flows out of the cooler inlet hose for 5 seconds.
5. Tie a common white, basket-type coffee filter to the end of the
cooler inlet hose.
6. Insert the tip of an air gun into the end of the cooler outlet hose.
7. Wrap a shop rag around the air gun tip and end of cooler outlet
hose.
8. Blow compressed air regulated to 5 - 9 kg/cm
2 (70 - 130 psi)
through the cooler outlet hose to force any remaining A/T fluid
into the coffee filter.
9. Remove the coffee filter from the end of the cooler inlet hose.
10. Perform "A/T FLUID COOLER INSPECTION PROCEDURE".
A/T FLUID COOLER INSPECTION PROCEDURE
SCIA5629E
SCIA5631E
SCIA5632E
Page 5428 of 5883
TM-482
< ON-VEHICLE MAINTENANCE >[TYPE 2 (4AT: RE4F03B)]
ROAD TEST
ROAD TEST
DescriptionINFOID:0000000001726682
DESCRIPTION
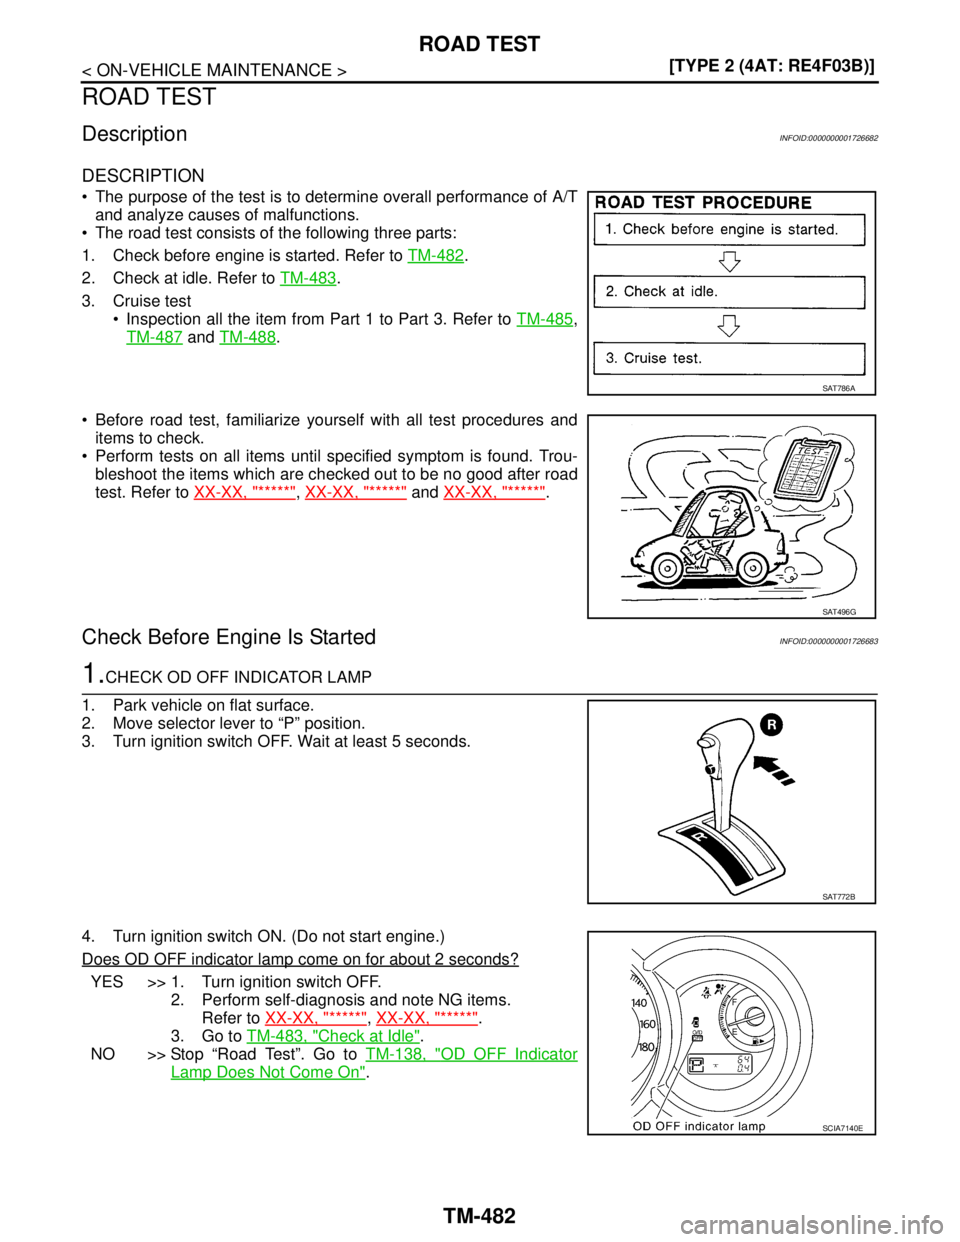
The purpose of the test is to determine overall performance of A/T
and analyze causes of malfunctions.
The road test consists of the following three parts:
1. Check before engine is started. Refer to TM-482
.
2. Check at idle. Refer to TM-483
.
3. Cruise test
Inspection all the item from Part 1 to Part 3. Refer to TM-485
,
TM-487
and TM-488.
Before road test, familiarize yourself with all test procedures and
items to check.
Perform tests on all items until specified symptom is found. Trou-
bleshoot the items which are checked out to be no good after road
test. Refer to XX-XX, "*****"
, XX-XX, "*****" and XX-XX, "*****".
Check Before Engine Is StartedINFOID:0000000001726683
1.CHECK OD OFF INDICATOR LAMP
1. Park vehicle on flat surface.
2. Move selector lever to “P” position.
3. Turn ignition switch OFF. Wait at least 5 seconds.
4. Turn ignition switch ON. (Do not start engine.)
Does OD OFF indicator lamp come on for about 2 seconds?
YES >> 1. Turn ignition switch OFF.
2. Perform self-diagnosis and note NG items.
Refer to XX-XX, "*****"
, XX-XX, "*****".
3. Go to TM-483, "
Check at Idle".
NO >> Stop “Road Test”. Go to TM-138, "
OD OFF Indicator
Lamp Does Not Come On".
SAT786A
SAT496G
SAT772B
SCIA7140E