NISSAN TIIDA 2008 Service Repair Manual
Manufacturer: NISSAN, Model Year: 2008, Model line: TIIDA, Model: NISSAN TIIDA 2008Pages: 2771, PDF Size: 60.61 MB
Page 331 of 2771
ASSEMBLY
AT-319
< SERVICE INFORMATION >
D
E
F
G
H
I
J
K
L
MA
B
AT
N
O
P
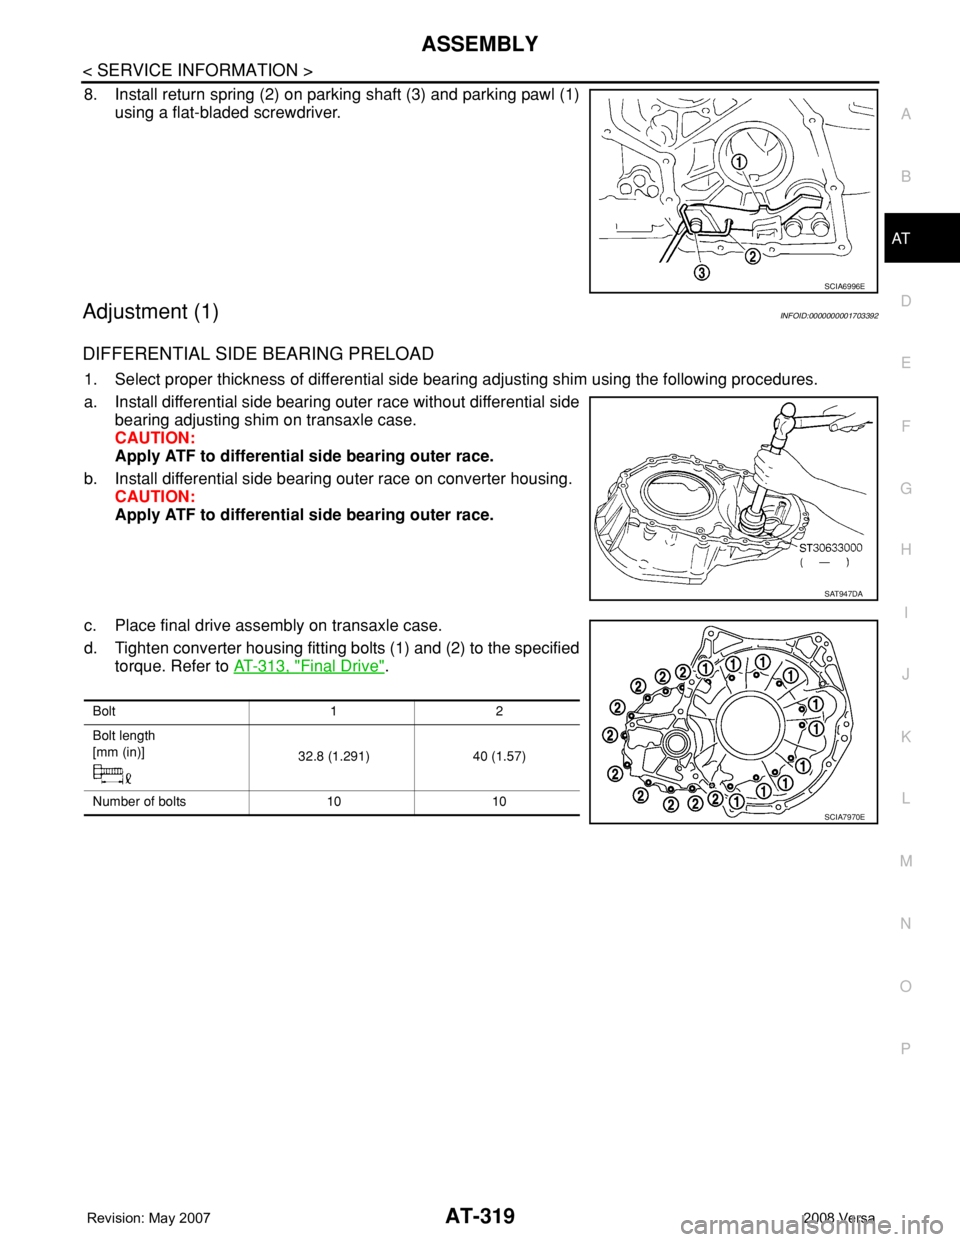
8. Install return spring (2) on parking shaft (3) and parking pawl (1)
using a flat-bladed screwdriver.
Adjustment (1)INFOID:0000000001703392
DIFFERENTIAL SIDE BEARING PRELOAD
1. Select proper thickness of differential side bearing adjusting shim using the following procedures.
a. Install differential side bearing outer race without differential side
bearing adjusting shim on transaxle case.
CAUTION:
Apply ATF to differential side bearing outer race.
b. Install differential side bearing outer race on converter housing.
CAUTION:
Apply ATF to differential side bearing outer race.
c. Place final drive assembly on transaxle case.
d. Tighten converter housing fitting bolts (1) and (2) to the specified
torque. Refer to AT-313, "
Final Drive".
SCIA6996E
SAT947DA
Bolt 1 2
Bolt length
[mm (in)]
32.8 (1.291) 40 (1.57)
Number of bolts 10 10
SCIA7970E
Page 332 of 2771
AT-320
< SERVICE INFORMATION >
ASSEMBLY
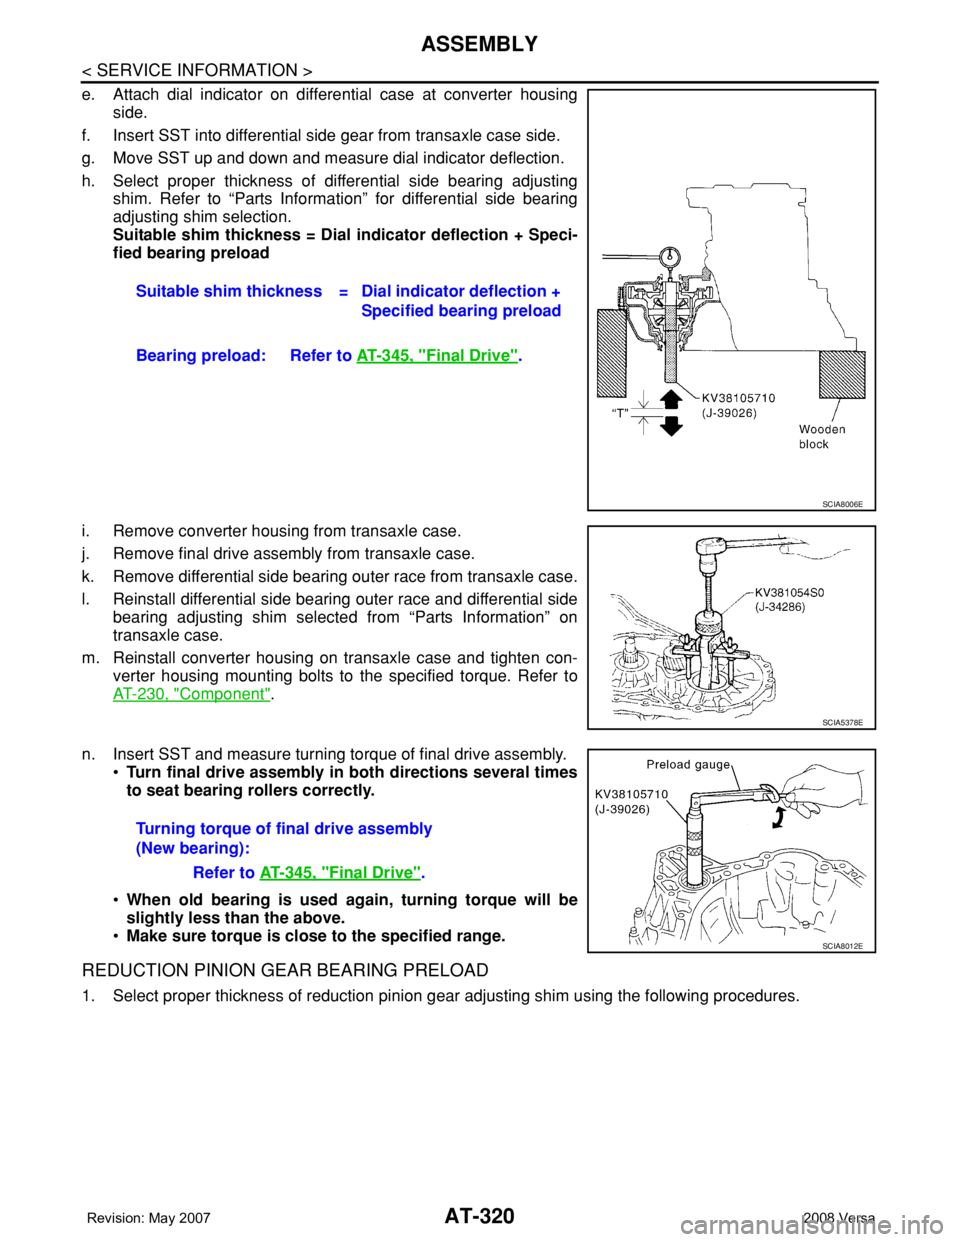
e. Attach dial indicator on differential case at converter housing
side.
f. Insert SST into differential side gear from transaxle case side.
g. Move SST up and down and measure dial indicator deflection.
h. Select proper thickness of differential side bearing adjusting
shim. Refer to “Parts Information” for differential side bearing
adjusting shim selection.
Suitable shim thickness = Dial indicator deflection + Speci-
fied bearing preload
i. Remove converter housing from transaxle case.
j. Remove final drive assembly from transaxle case.
k. Remove differential side bearing outer race from transaxle case.
l. Reinstall differential side bearing outer race and differential side
bearing adjusting shim selected from “Parts Information” on
transaxle case.
m. Reinstall converter housing on transaxle case and tighten con-
verter housing mounting bolts to the specified torque. Refer to
AT-230, "
Component".
n. Insert SST and measure turning torque of final drive assembly.
•Turn final drive assembly in both directions several times
to seat bearing rollers correctly.
•When old bearing is used again, turning torque will be
slightly less than the above.
•Make sure torque is close to the specified range.
REDUCTION PINION GEAR BEARING PRELOAD
1. Select proper thickness of reduction pinion gear adjusting shim using the following procedures.Suitable shim thickness = Dial indicator deflection +
Specified bearing preload
Bearing preload: Refer to AT-345, "
Final Drive".
SCIA8006E
SCIA5378E
Turning torque of final drive assembly
(New bearing):
Refer to AT-345, "
Final Drive".
SCIA8012E
Page 333 of 2771
ASSEMBLY
AT-321
< SERVICE INFORMATION >
D
E
F
G
H
I
J
K
L
MA
B
AT
N
O
P
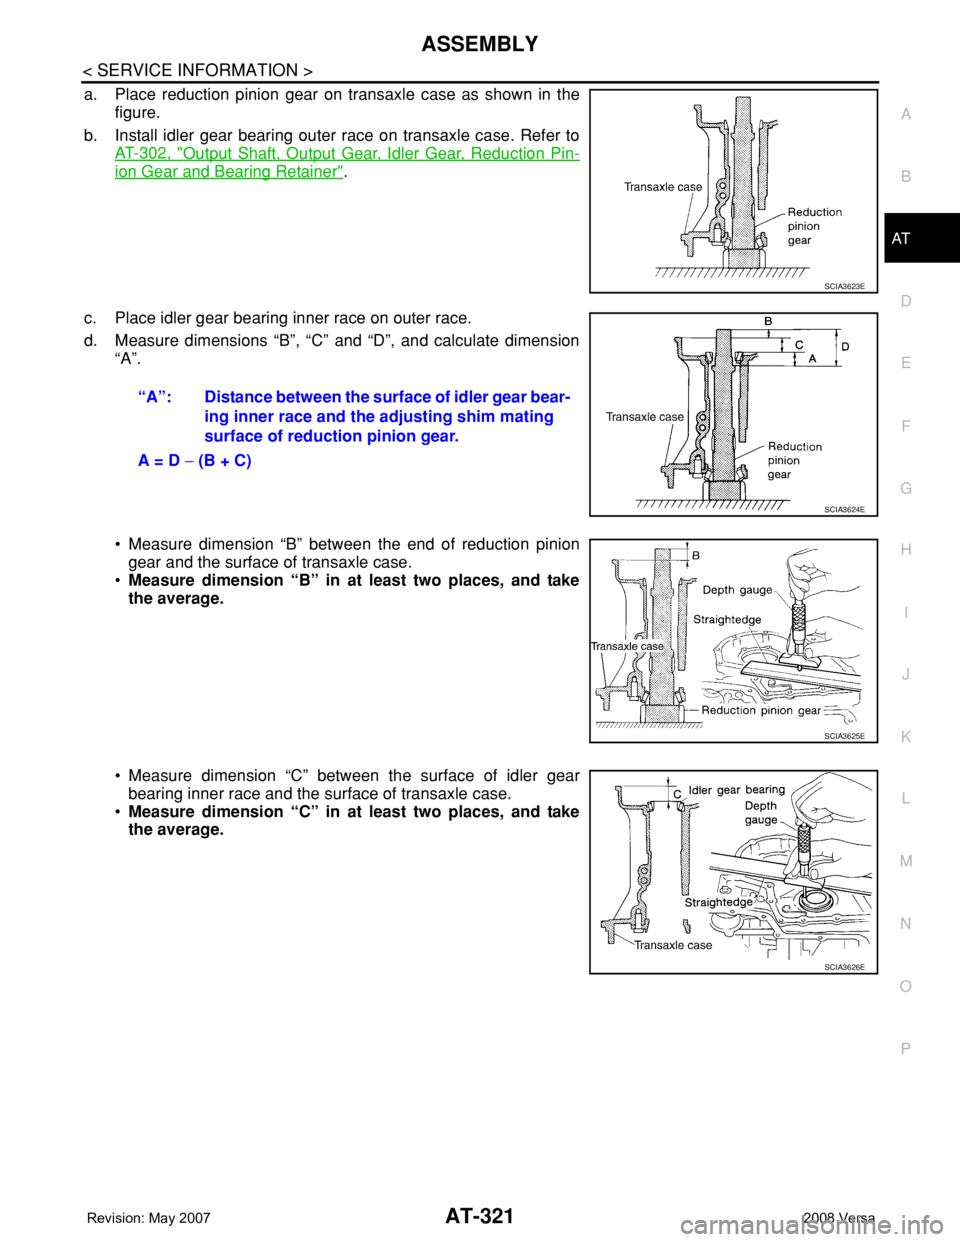
a. Place reduction pinion gear on transaxle case as shown in the
figure.
b. Install idler gear bearing outer race on transaxle case. Refer to
AT-302, "
Output Shaft, Output Gear, Idler Gear, Reduction Pin-
ion Gear and Bearing Retainer".
c. Place idler gear bearing inner race on outer race.
d. Measure dimensions “B”, “C” and “D”, and calculate dimension
“A”.
• Measure dimension “B” between the end of reduction pinion
gear and the surface of transaxle case.
•Measure dimension “B” in at least two places, and take
the average.
• Measure dimension “C” between the surface of idler gear
bearing inner race and the surface of transaxle case.
•Measure dimension “C” in at least two places, and take
the average.
SCIA3623E
“A”: Distance between the surface of idler gear bear-
ing inner race and the adjusting shim mating
surface of reduction pinion gear.
A = D − (B + C)
SCIA3624E
SCIA3625E
SCIA3626E
Page 334 of 2771
AT-322
< SERVICE INFORMATION >
ASSEMBLY
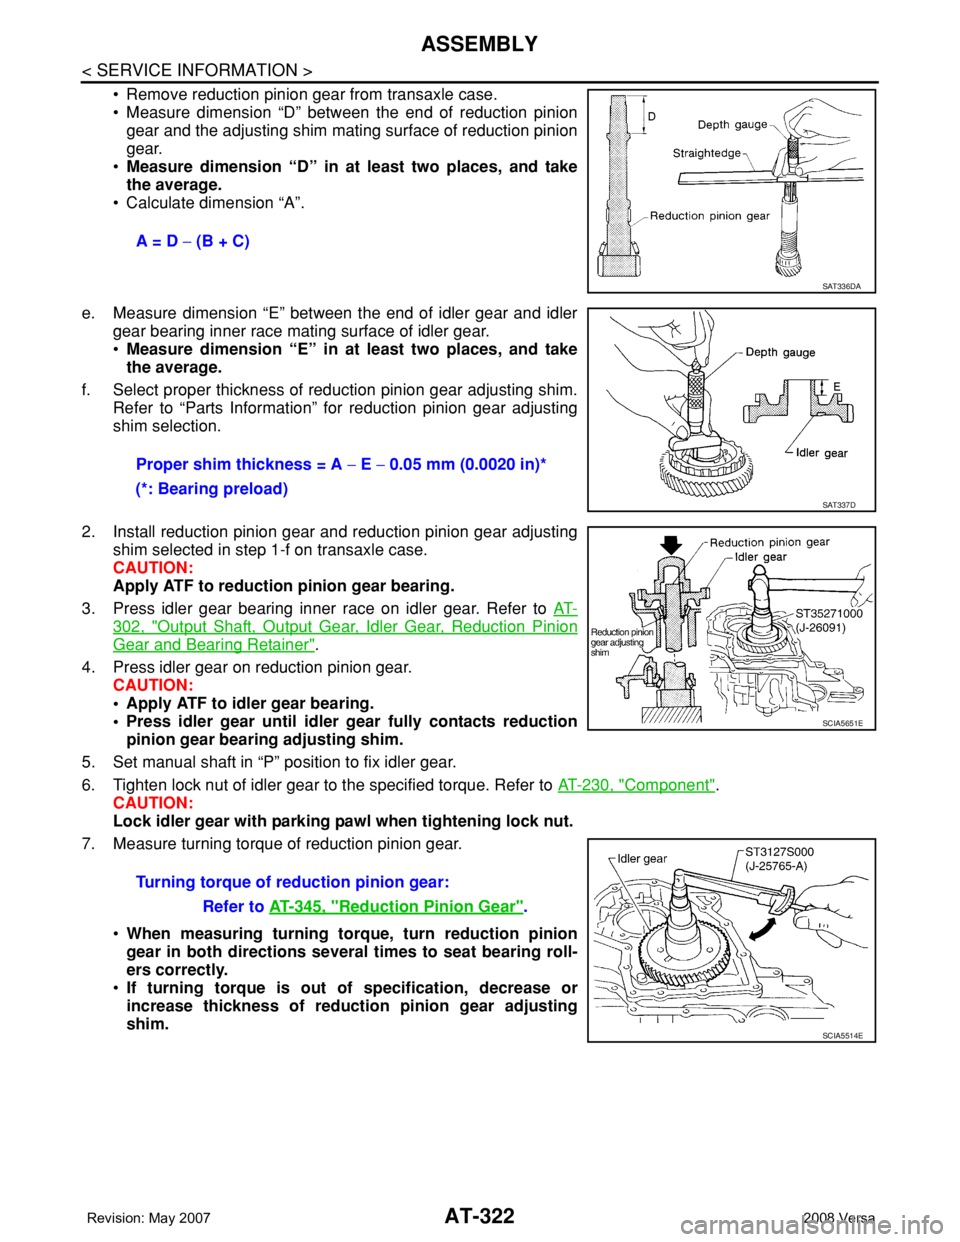
• Remove reduction pinion gear from transaxle case.
• Measure dimension “D” between the end of reduction pinion
gear and the adjusting shim mating surface of reduction pinion
gear.
•Measure dimension “D” in at least two places, and take
the average.
• Calculate dimension “A”.
e. Measure dimension “E” between the end of idler gear and idler
gear bearing inner race mating surface of idler gear.
•Measure dimension “E” in at least two places, and take
the average.
f. Select proper thickness of reduction pinion gear adjusting shim.
Refer to “Parts Information” for reduction pinion gear adjusting
shim selection.
2. Install reduction pinion gear and reduction pinion gear adjusting
shim selected in step 1-f on transaxle case.
CAUTION:
Apply ATF to reduction pinion gear bearing.
3. Press idler gear bearing inner race on idler gear. Refer to AT-
302, "Output Shaft, Output Gear, Idler Gear, Reduction Pinion
Gear and Bearing Retainer".
4. Press idler gear on reduction pinion gear.
CAUTION:
• Apply ATF to idler gear bearing.
• Press idler gear until idler gear fully contacts reduction
pinion gear bearing adjusting shim.
5. Set manual shaft in “P” position to fix idler gear.
6. Tighten lock nut of idler gear to the specified torque. Refer to AT-230, "
Component".
CAUTION:
Lock idler gear with parking pawl when tightening lock nut.
7. Measure turning torque of reduction pinion gear.
•When measuring turning torque, turn reduction pinion
gear in both directions several times to seat bearing roll-
ers correctly.
•If turning torque is out of specification, decrease or
increase thickness of reduction pinion gear adjusting
shim.A = D − (B + C)
SAT336DA
Proper shim thickness = A − E − 0.05 mm (0.0020 in)*
(*: Bearing preload)
SAT337D
Turning torque of reduction pinion gear:
Refer to AT-345, "
Reduction Pinion Gear".
SCIA5651E
SCIA5514E
Page 335 of 2771
ASSEMBLY
AT-323
< SERVICE INFORMATION >
D
E
F
G
H
I
J
K
L
MA
B
AT
N
O
P
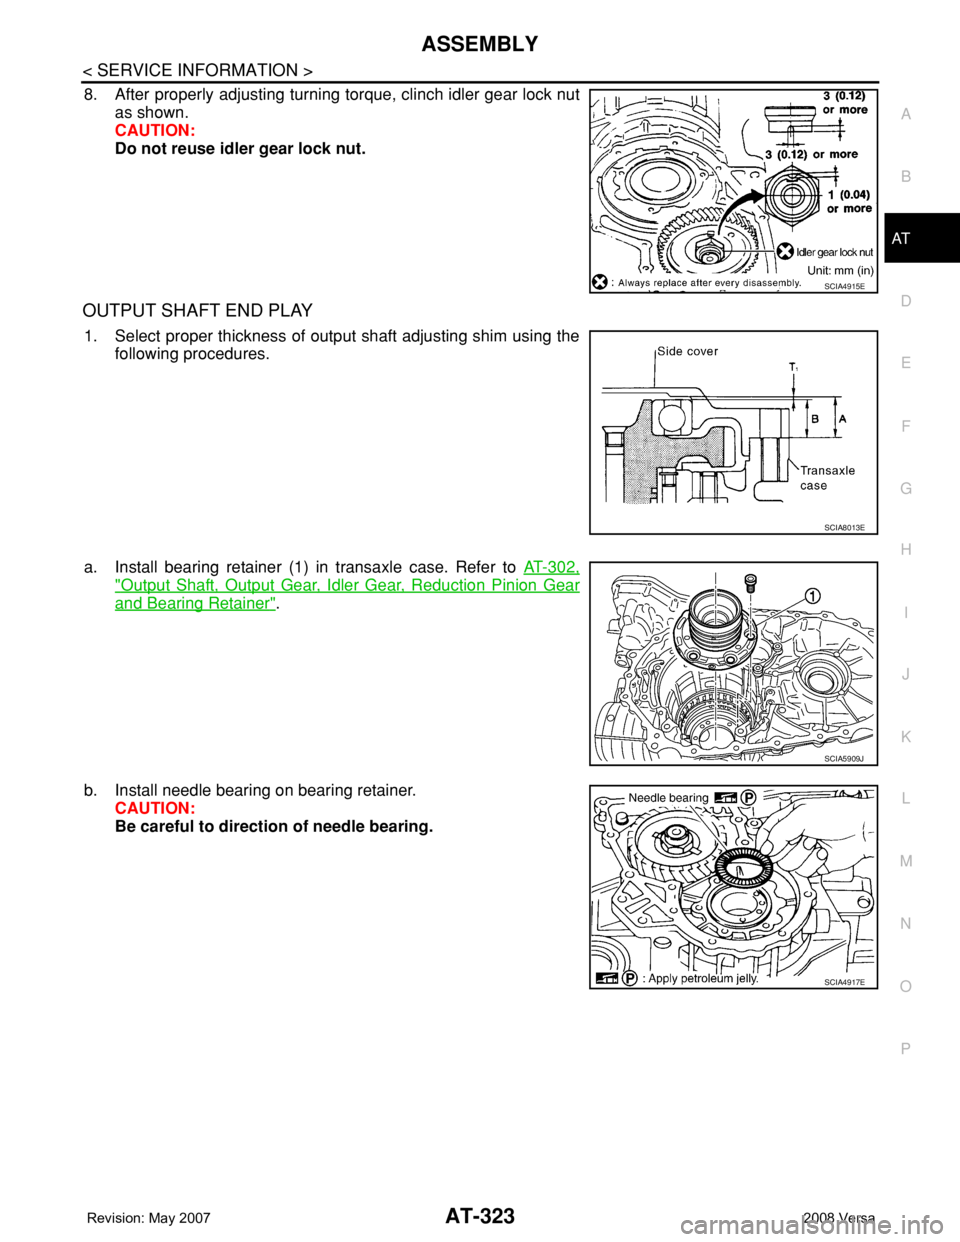
8. After properly adjusting turning torque, clinch idler gear lock nut
as shown.
CAUTION:
Do not reuse idler gear lock nut.
OUTPUT SHAFT END PLAY
1. Select proper thickness of output shaft adjusting shim using the
following procedures.
a. Install bearing retainer (1) in transaxle case. Refer to AT-302,
"Output Shaft, Output Gear, Idler Gear, Reduction Pinion Gear
and Bearing Retainer".
b. Install needle bearing on bearing retainer.
CAUTION:
Be careful to direction of needle bearing.
SCIA4915E
SCIA8013E
SCIA5909J
SCIA4917E
Page 336 of 2771
AT-324
< SERVICE INFORMATION >
ASSEMBLY
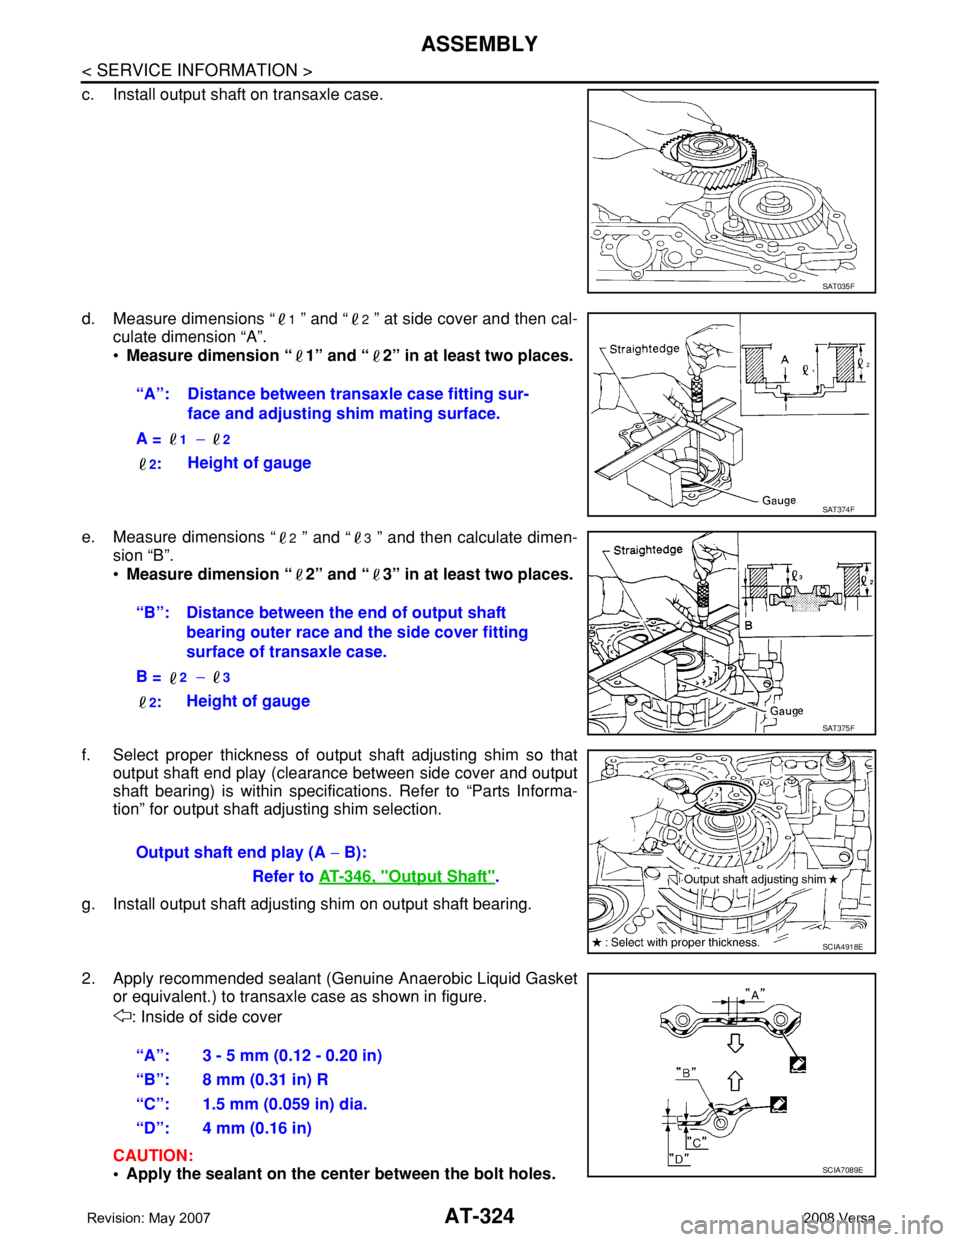
c. Install output shaft on transaxle case.
d. Measure dimensions “
1 ” and “2 ” at side cover and then cal-
culate dimension “A”.
•Measure dimension “ 1” and “ 2” in at least two places.
e. Measure dimensions “
2 ” and “3 ” and then calculate dimen-
sion “B”.
•Measure dimension “ 2” and “ 3” in at least two places.
f. Select proper thickness of output shaft adjusting shim so that
output shaft end play (clearance between side cover and output
shaft bearing) is within specifications. Refer to “Parts Informa-
tion” for output shaft adjusting shim selection.
g. Install output shaft adjusting shim on output shaft bearing.
2. Apply recommended sealant (Genuine Anaerobic Liquid Gasket
or equivalent.) to transaxle case as shown in figure.
: Inside of side cover
CAUTION:
• Apply the sealant on the center between the bolt holes.
SAT035F
“A”: Distance between transaxle case fitting sur-
face and adjusting shim mating surface.
A =
1 − 2
2
:Height of gauge
SAT374F
“B”: Distance between the end of output shaft
bearing outer race and the side cover fitting
surface of transaxle case.
B =
2 − 3
2
:Height of gauge
SAT375F
Output shaft end play (A − B):
Refer to AT-346, "
Output Shaft".
SCIA4918E
“A”: 3 - 5 mm (0.12 - 0.20 in)
“B”: 8 mm (0.31 in) R
“C”: 1.5 mm (0.059 in) dia.
“D”: 4 mm (0.16 in)
SCIA7089E
Page 337 of 2771
ASSEMBLY
AT-325
< SERVICE INFORMATION >
D
E
F
G
H
I
J
K
L
MA
B
AT
N
O
P
• Completely remove all moisture, oil and old sealant, etc. from the transaxle case and side cover
mounting surfaces.
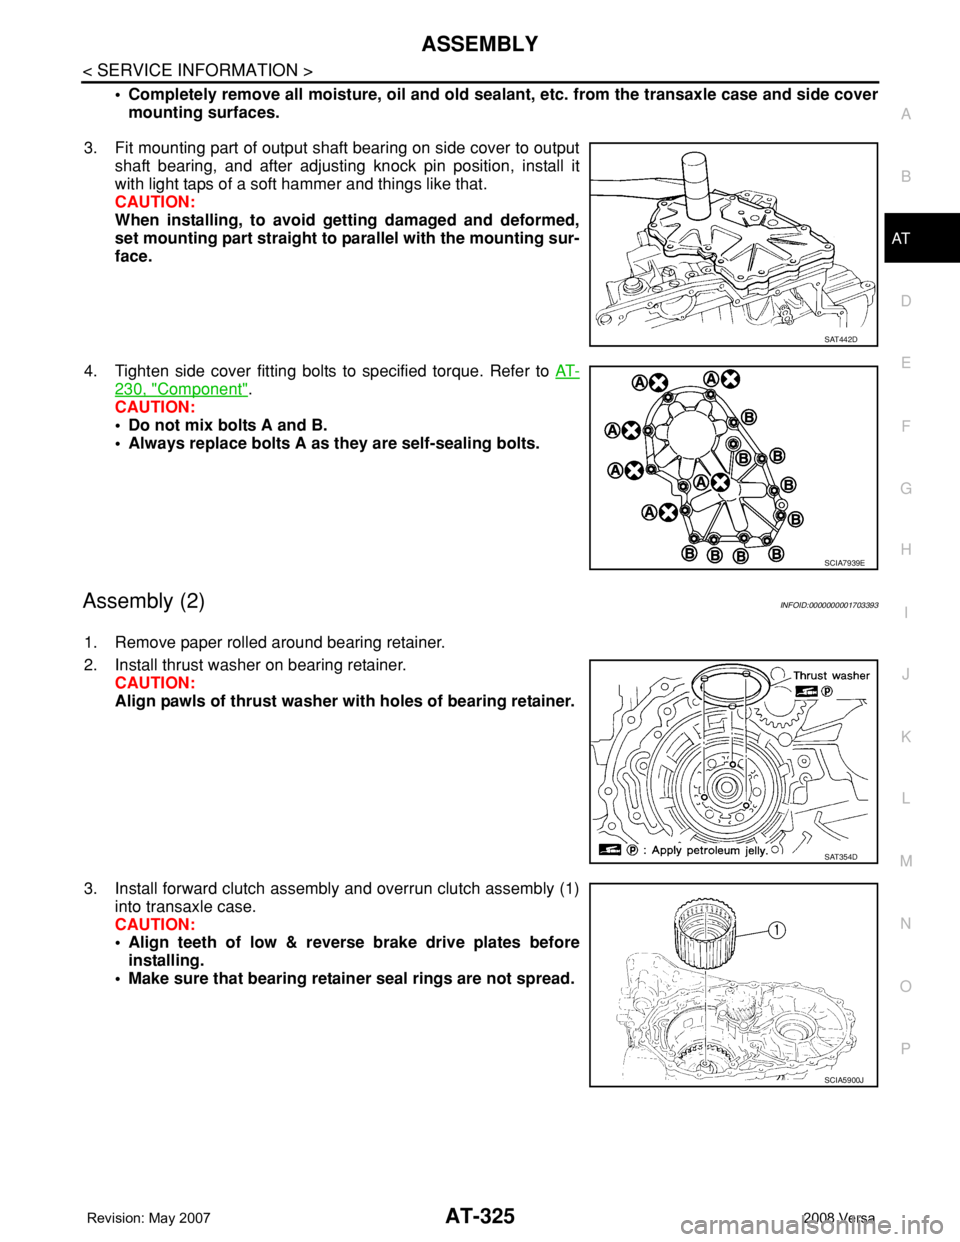
3. Fit mounting part of output shaft bearing on side cover to output
shaft bearing, and after adjusting knock pin position, install it
with light taps of a soft hammer and things like that.
CAUTION:
When installing, to avoid getting damaged and deformed,
set mounting part straight to parallel with the mounting sur-
face.
4. Tighten side cover fitting bolts to specified torque. Refer to AT-
230, "Component".
CAUTION:
• Do not mix bolts A and B.
• Always replace bolts A as they are self-sealing bolts.
Assembly (2)INFOID:0000000001703393
1. Remove paper rolled around bearing retainer.
2. Install thrust washer on bearing retainer.
CAUTION:
Align pawls of thrust washer with holes of bearing retainer.
3. Install forward clutch assembly and overrun clutch assembly (1)
into transaxle case.
CAUTION:
• Align teeth of low & reverse brake drive plates before
installing.
• Make sure that bearing retainer seal rings are not spread.
SAT442D
SCIA7939E
SAT354D
SCIA5900J
Page 338 of 2771
AT-326
< SERVICE INFORMATION >
ASSEMBLY
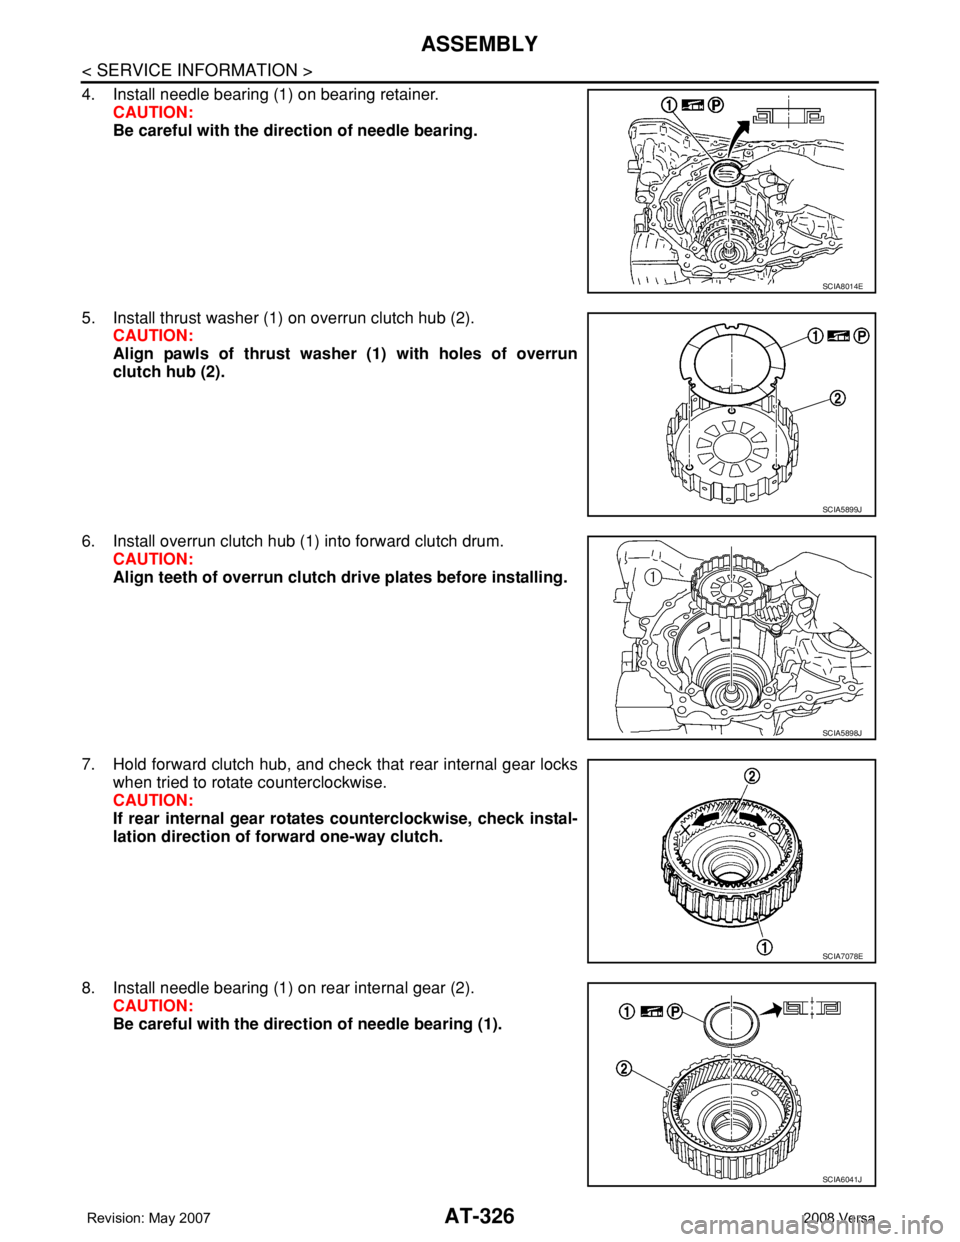
4. Install needle bearing (1) on bearing retainer.
CAUTION:
Be careful with the direction of needle bearing.
5. Install thrust washer (1) on overrun clutch hub (2).
CAUTION:
Align pawls of thrust washer (1) with holes of overrun
clutch hub (2).
6. Install overrun clutch hub (1) into forward clutch drum.
CAUTION:
Align teeth of overrun clutch drive plates before installing.
7. Hold forward clutch hub, and check that rear internal gear locks
when tried to rotate counterclockwise.
CAUTION:
If rear internal gear rotates counterclockwise, check instal-
lation direction of forward one-way clutch.
8. Install needle bearing (1) on rear internal gear (2).
CAUTION:
Be careful with the direction of needle bearing (1).
SCIA8014E
SCIA5899J
SCIA5898J
SCIA7078E
SCIA6041J
Page 339 of 2771
ASSEMBLY
AT-327
< SERVICE INFORMATION >
D
E
F
G
H
I
J
K
L
MA
B
AT
N
O
P
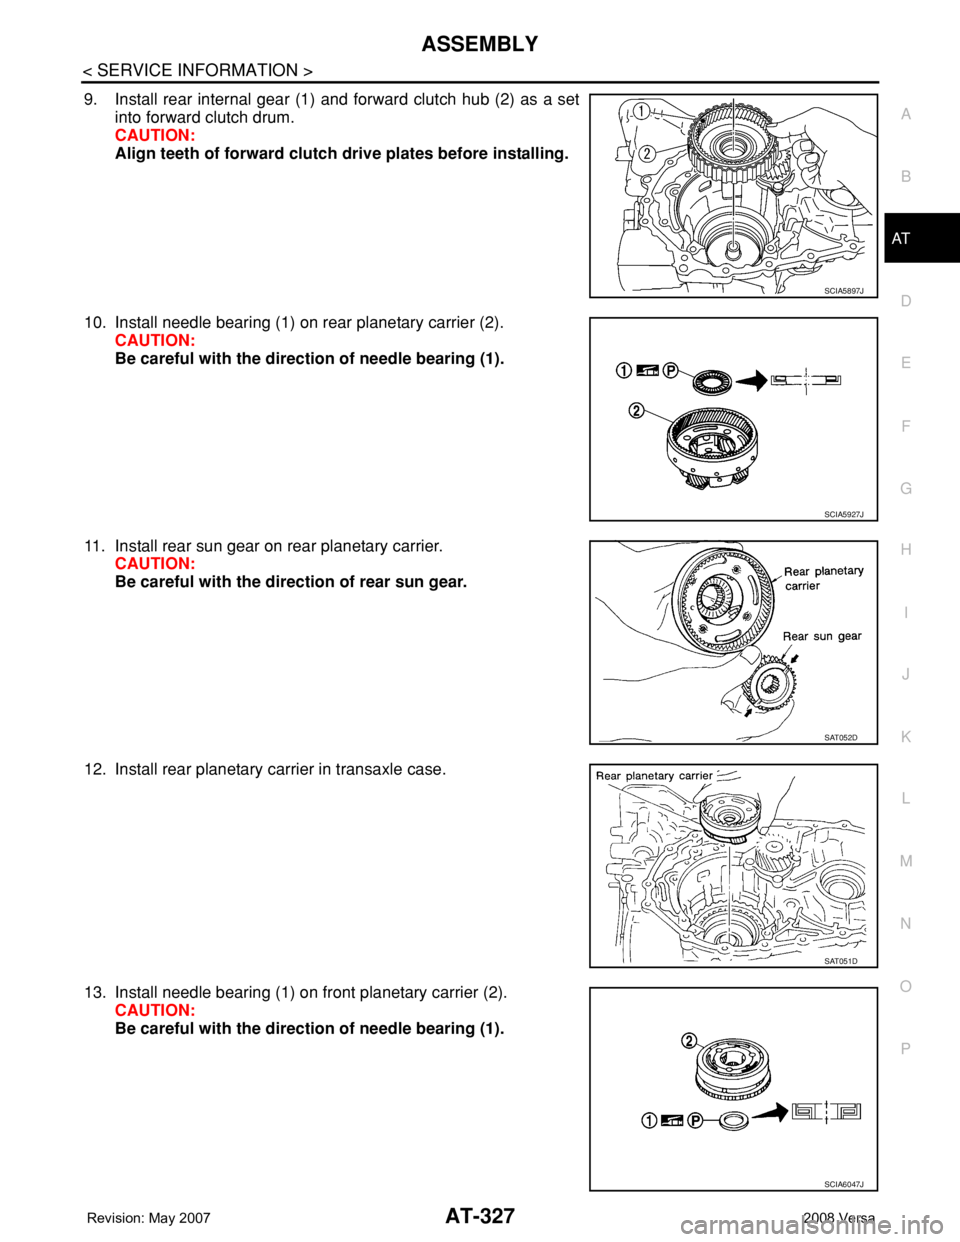
9. Install rear internal gear (1) and forward clutch hub (2) as a set
into forward clutch drum.
CAUTION:
Align teeth of forward clutch drive plates before installing.
10. Install needle bearing (1) on rear planetary carrier (2).
CAUTION:
Be careful with the direction of needle bearing (1).
11. Install rear sun gear on rear planetary carrier.
CAUTION:
Be careful with the direction of rear sun gear.
12. Install rear planetary carrier in transaxle case.
13. Install needle bearing (1) on front planetary carrier (2).
CAUTION:
Be careful with the direction of needle bearing (1).
SCIA5897J
SCIA5927J
SAT052D
SAT051D
SCIA6047J
Page 340 of 2771
AT-328
< SERVICE INFORMATION >
ASSEMBLY
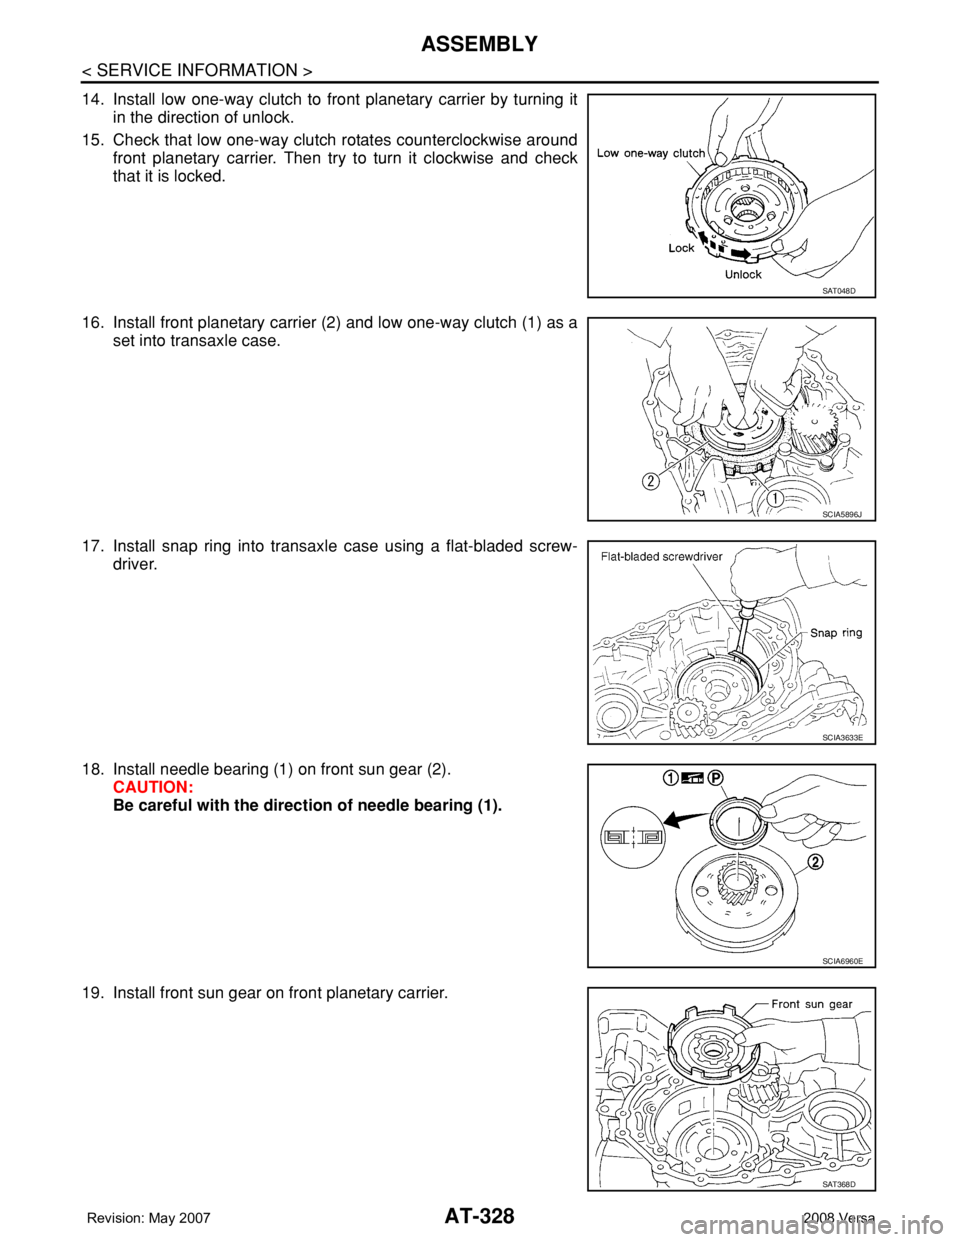
14. Install low one-way clutch to front planetary carrier by turning it
in the direction of unlock.
15. Check that low one-way clutch rotates counterclockwise around
front planetary carrier. Then try to turn it clockwise and check
that it is locked.
16. Install front planetary carrier (2) and low one-way clutch (1) as a
set into transaxle case.
17. Install snap ring into transaxle case using a flat-bladed screw-
driver.
18. Install needle bearing (1) on front sun gear (2).
CAUTION:
Be careful with the direction of needle bearing (1).
19. Install front sun gear on front planetary carrier.
SAT048D
SCIA5896J
SCIA3633E
SCIA6960E
SAT368D