NISSAN X-TRAIL 2001 Service Repair Manual
Manufacturer: NISSAN, Model Year: 2001, Model line: X-TRAIL, Model: NISSAN X-TRAIL 2001Pages: 3833, PDF Size: 39.49 MB
Page 2701 of 3833
REAR FINAL DRIVE ASSEMBLY
RFD-25
C
E
F
G
H
I
J
K
L
MA
B
RFD
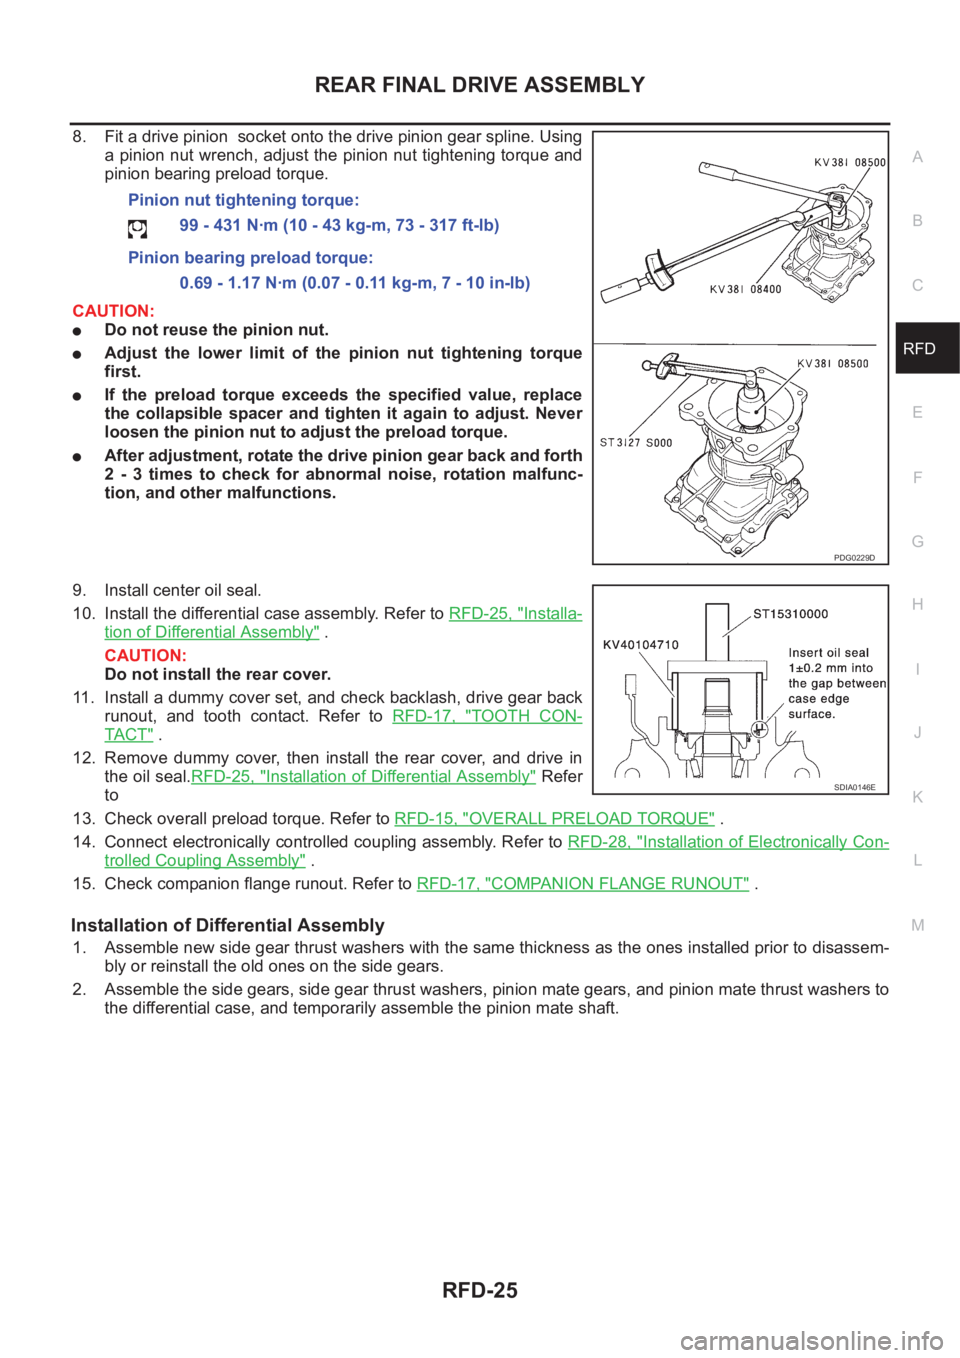
8. Fit a drive pinion socket onto the drive pinion gear spline. Using
a pinion nut wrench, adjust the pinion nut tightening torque and
pinion bearing preload torque.
CAUTION:
●Do not reuse the pinion nut.
●Adjust the lower limit of the pinion nut tightening torque
first.
●If the preload torque exceeds the specified value, replace
the collapsible spacer and tighten it again to adjust. Never
loosen the pinion nut to adjust the preload torque.
●After adjustment, rotate the drive pinion gear back and forth
2 - 3 times to check for abnormal noise, rotation malfunc-
tion, and other malfunctions.
9. Install center oil seal.
10. Install the differential case assembly. Refer to RFD-25, "
Installa-
tion of Differential Assembly" .
CAUTION:
Do not install the rear cover.
11. Install a dummy cover set, and check backlash, drive gear back
runout, and tooth contact. Refer to RFD-17, "
TOOTH CON-
TA C T" .
12. Remove dummy cover, then install the rear cover, and drive in
the oil seal.RFD-25, "
Installation of Differential Assembly" Refer
to
13. Check overall preload torque. Refer to RFD-15, "
OVERALL PRELOAD TORQUE" .
14. Connect electronically controlled coupling assembly. Refer to RFD-28, "
Installation of Electronically Con-
trolled Coupling Assembly" .
15. Check companion flange runout. Refer to RFD-17, "
COMPANION FLANGE RUNOUT" .
Installation of Differential Assembly
1. Assemble new side gear thrust washers with the same thickness as the ones installed prior to disassem-
bly or reinstall the old ones on the side gears.
2. Assemble the side gears, side gear thrust washers, pinion mate gears, and pinion mate thrust washers to
the differential case, and temporarily assemble the pinion mate shaft. Pinion nut tightening torque:
99 - 431 N·m (10 - 43 kg-m, 73 - 317 ft-lb)
Pinion bearing preload torque:
0.69 - 1.17 N·m (0.07 - 0.11 kg-m, 7 - 10 in-lb)
PDG0229D
SDIA0146E
Page 2702 of 3833
RFD-26
REAR FINAL DRIVE ASSEMBLY
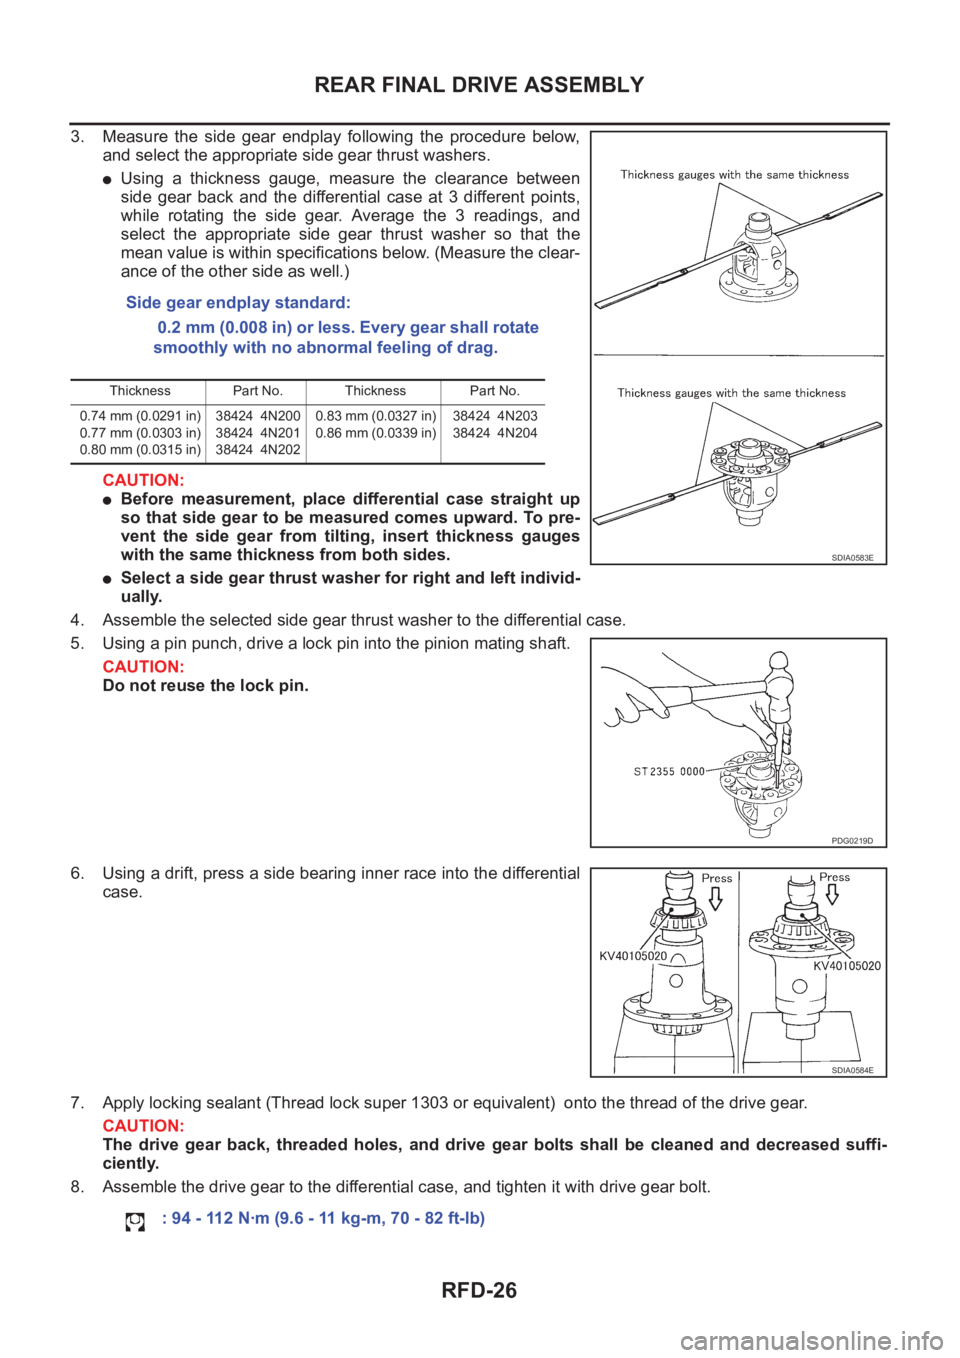
3. Measure the side gear endplay following the procedure below,
and select the appropriate side gear thrust washers.
●Using a thickness gauge, measure the clearance between
side gear back and the differential case at 3 different points,
while rotating the side gear. Average the 3 readings, and
select the appropriate side gear thrust washer so that the
mean value is within specifications below. (Measure the clear-
ance of the other side as well.)
CAUTION:
●Before measurement, place differential case straight up
so that side gear to be measured comes upward. To pre-
vent the side gear from tilting, insert thickness gauges
with the same thickness from both sides.
●Select a side gear thrust washer for right and left individ-
ually.
4. Assemble the selected side gear thrust washer to the differential case.
5. Using a pin punch, drive a lock pin into the pinion mating shaft.
CAUTION:
Do not reuse the lock pin.
6. Using a drift, press a side bearing inner race into the differential
case.
7. Apply locking sealant (Thread lock super 1303 or equivalent) onto the thread of the drive gear.
CAUTION:
The drive gear back, threaded holes, and drive gear bolts shall be cleaned and decreased suffi-
ciently.
8. Assemble the drive gear to the differential case, and tighten it with drive gear bolt. Side gear endplay standard:
0.2 mm (0.008 in) or less. Every gear shall rotate
smoothly with no abnormal feeling of drag.
Thickness Part No. Thickness Part No.
0.74 mm (0.0291 in)
0.77 mm (0.0303 in)
0.80 mm (0.0315 in)38424 4N200
38424 4N201
38424 4N2020.83 mm (0.0327 in)
0.86 mm (0.0339 in)38424 4N203
38424 4N204
SDIA0583E
PDG0219D
SDIA0584E
: 94 - 112 N·m (9.6 - 11 kg-m, 70 - 82 ft-lb)
Page 2703 of 3833
REAR FINAL DRIVE ASSEMBLY
RFD-27
C
E
F
G
H
I
J
K
L
MA
B
RFD
9. Apply differential oil to the side bearings, and assemble new side bearing adjusting shims (2 pieces for
one side) with the same thickness as the ones installed prior to disassembly or re-install the old ones, with
a side bearing outer race to the differential case.
If the side bearing adjusting shims have been already selected, use them.
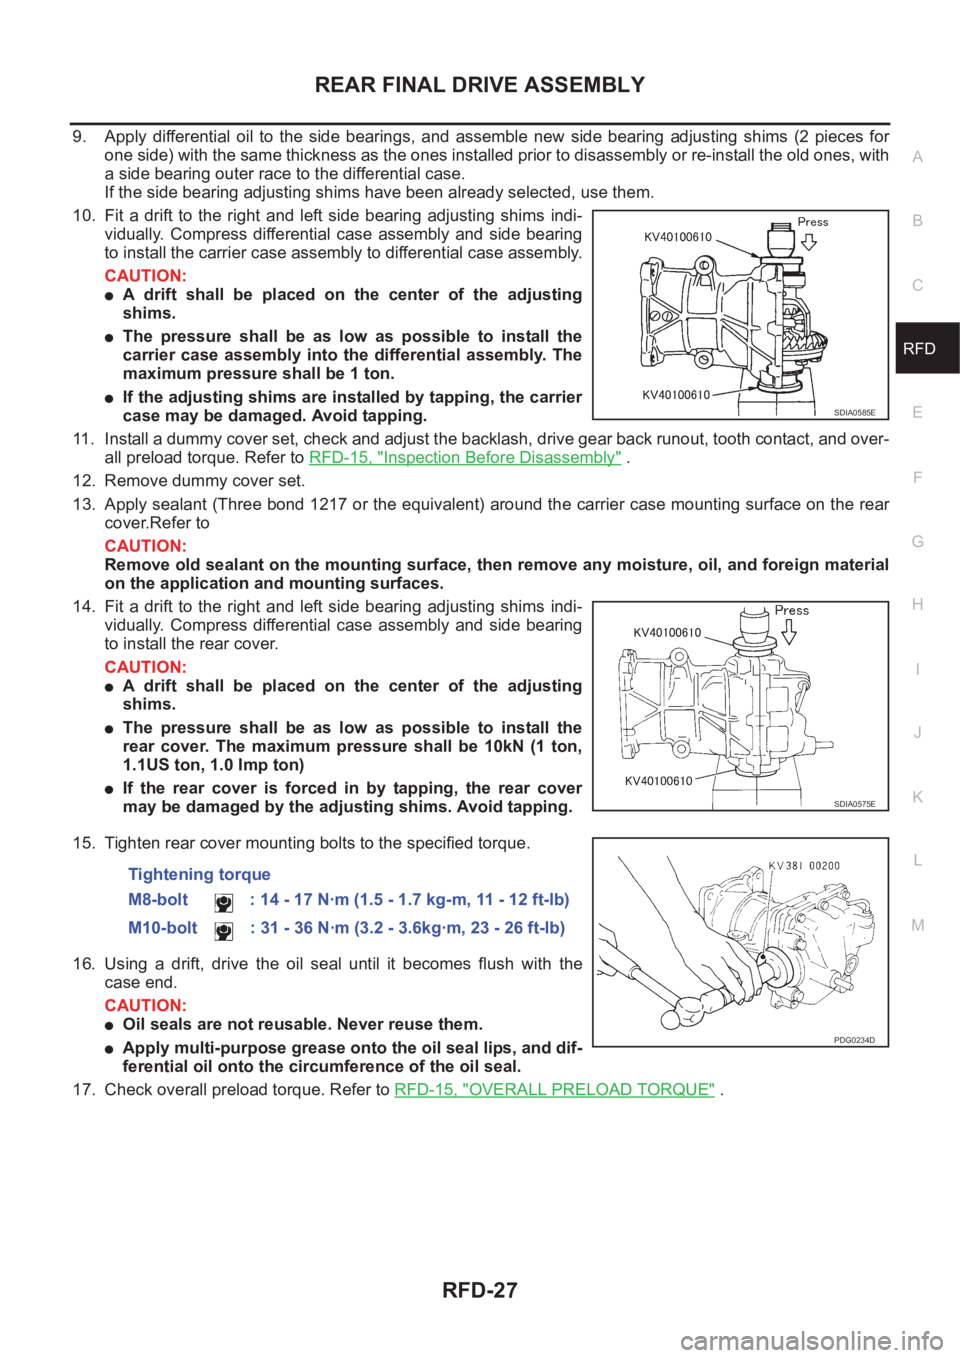
10. Fit a drift to the right and left side bearing adjusting shims indi-
vidually. Compress differential case assembly and side bearing
to install the carrier case assembly to differential case assembly.
CAUTION:
●A drift shall be placed on the center of the adjusting
shims.
●The pressure shall be as low as possible to install the
carrier case assembly into the differential assembly. The
maximum pressure shall be 1 ton.
●If the adjusting shims are installed by tapping, the carrier
case may be damaged. Avoid tapping.
11. Install a dummy cover set, check and adjust the backlash, drive gear back runout, tooth contact, and over-
all preload torque. Refer to RFD-15, "
Inspection Before Disassembly" .
12. Remove dummy cover set.
13. Apply sealant (Three bond 1217 or the equivalent) around the carrier case mounting surface on the rear
cover.Refer to
CAUTION:
Remove old sealant on the mounting surface, then remove any moisture, oil, and foreign material
on the application and mounting surfaces.
14. Fit a drift to the right and left side bearing adjusting shims indi-
vidually. Compress differential case assembly and side bearing
to install the rear cover.
CAUTION:
●A drift shall be placed on the center of the adjusting
shims.
●The pressure shall be as low as possible to install the
rear cover. The maximum pressure shall be 10kN (1 ton,
1.1US ton, 1.0 Imp ton)
●If the rear cover is forced in by tapping, the rear cover
may be damaged by the adjusting shims. Avoid tapping.
15. Tighten rear cover mounting bolts to the specified torque.
16. Using a drift, drive the oil seal until it becomes flush with the
case end.
CAUTION:
●Oil seals are not reusable. Never reuse them.
●Apply multi-purpose grease onto the oil seal lips, and dif-
ferential oil onto the circumference of the oil seal.
17. Check overall preload torque. Refer to RFD-15, "
OVERALL PRELOAD TORQUE" .
SDIA0585E
SDIA0575E
Tightening torque
M8-bolt : 14 - 17 N·m (1.5 - 1.7 kg-m, 11 - 12 ft-lb)
M10-bolt : 31 - 36 N·m (3.2 - 3.6kg·m, 23 - 26 ft-lb)
PDG0234D
Page 2704 of 3833
RFD-28
REAR FINAL DRIVE ASSEMBLY
Installation of Electronically Controlled Coupling Assembly
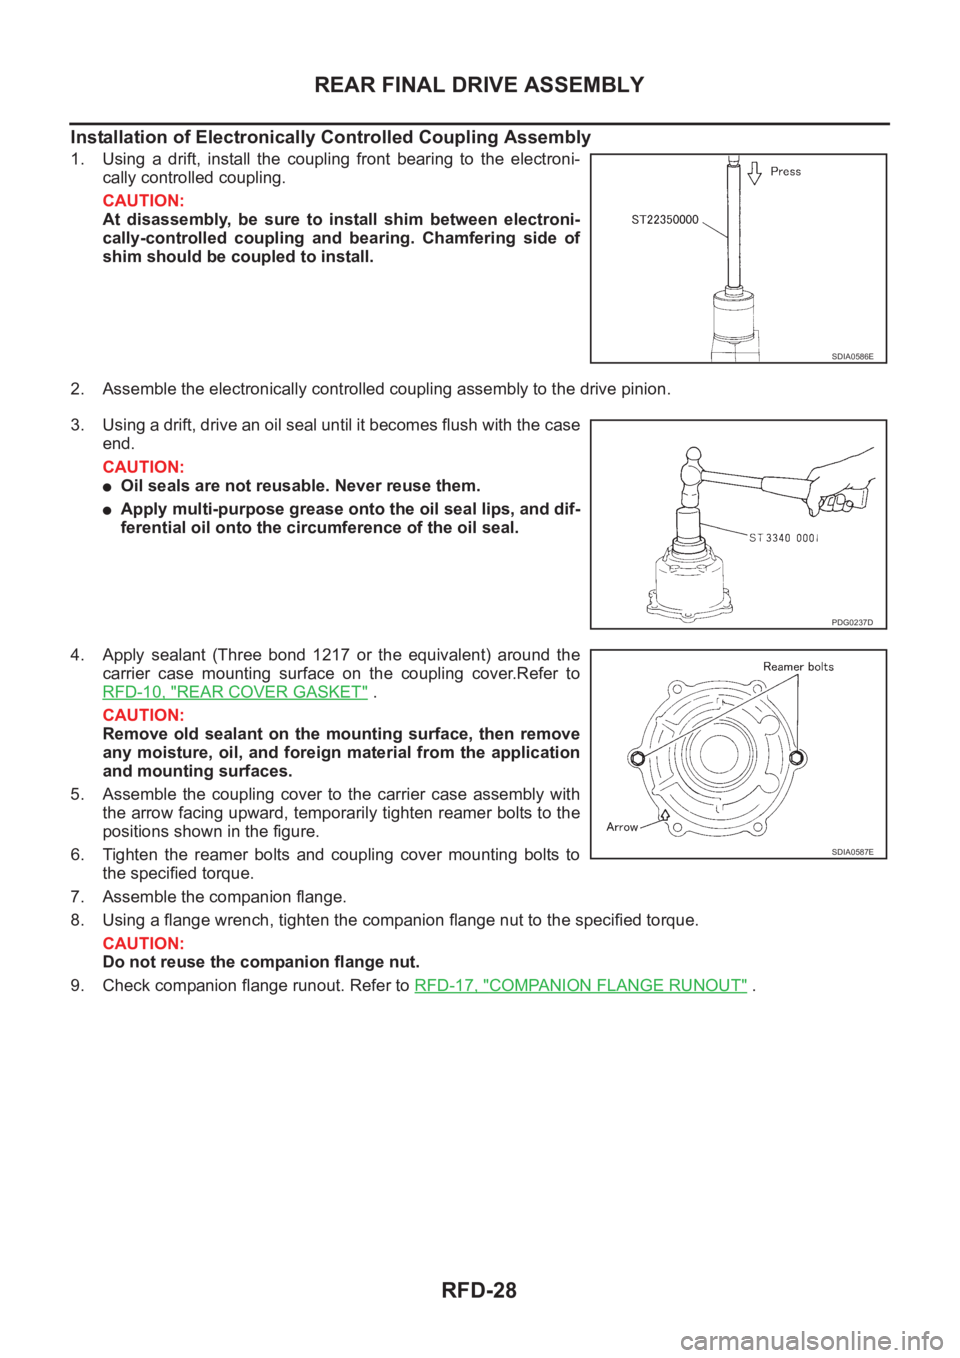
1. Using a drift, install the coupling front bearing to the electroni-
cally controlled coupling.
CAUTION:
At disassembly, be sure to install shim between electroni-
cally-controlled coupling and bearing. Chamfering side of
shim should be coupled to install.
2. Assemble the electronically controlled coupling assembly to the drive pinion.
3. Using a drift, drive an oil seal until it becomes flush with the case
end.
CAUTION:
●Oil seals are not reusable. Never reuse them.
●Apply multi-purpose grease onto the oil seal lips, and dif-
ferential oil onto the circumference of the oil seal.
4. Apply sealant (Three bond 1217 or the equivalent) around the
carrier case mounting surface on the coupling cover.Refer to
RFD-10, "
REAR COVER GASKET" .
CAUTION:
Remove old sealant on the mounting surface, then remove
any moisture, oil, and foreign material from the application
and mounting surfaces.
5. Assemble the coupling cover to the carrier case assembly with
the arrow facing upward, temporarily tighten reamer bolts to the
positions shown in the figure.
6. Tighten the reamer bolts and coupling cover mounting bolts to
the specified torque.
7. Assemble the companion flange.
8. Using a flange wrench, tighten the companion flange nut to the specified torque.
CAUTION:
Do not reuse the companion flange nut.
9. Check companion flange runout. Refer to RFD-17, "
COMPANION FLANGE RUNOUT" .
SDIA0586E
PDG0237D
SDIA0587E
Page 2705 of 3833
SERVICE DATA AND SPECIFICATIONS (SDS)
RFD-29
C
E
F
G
H
I
J
K
L
MA
B
RFD
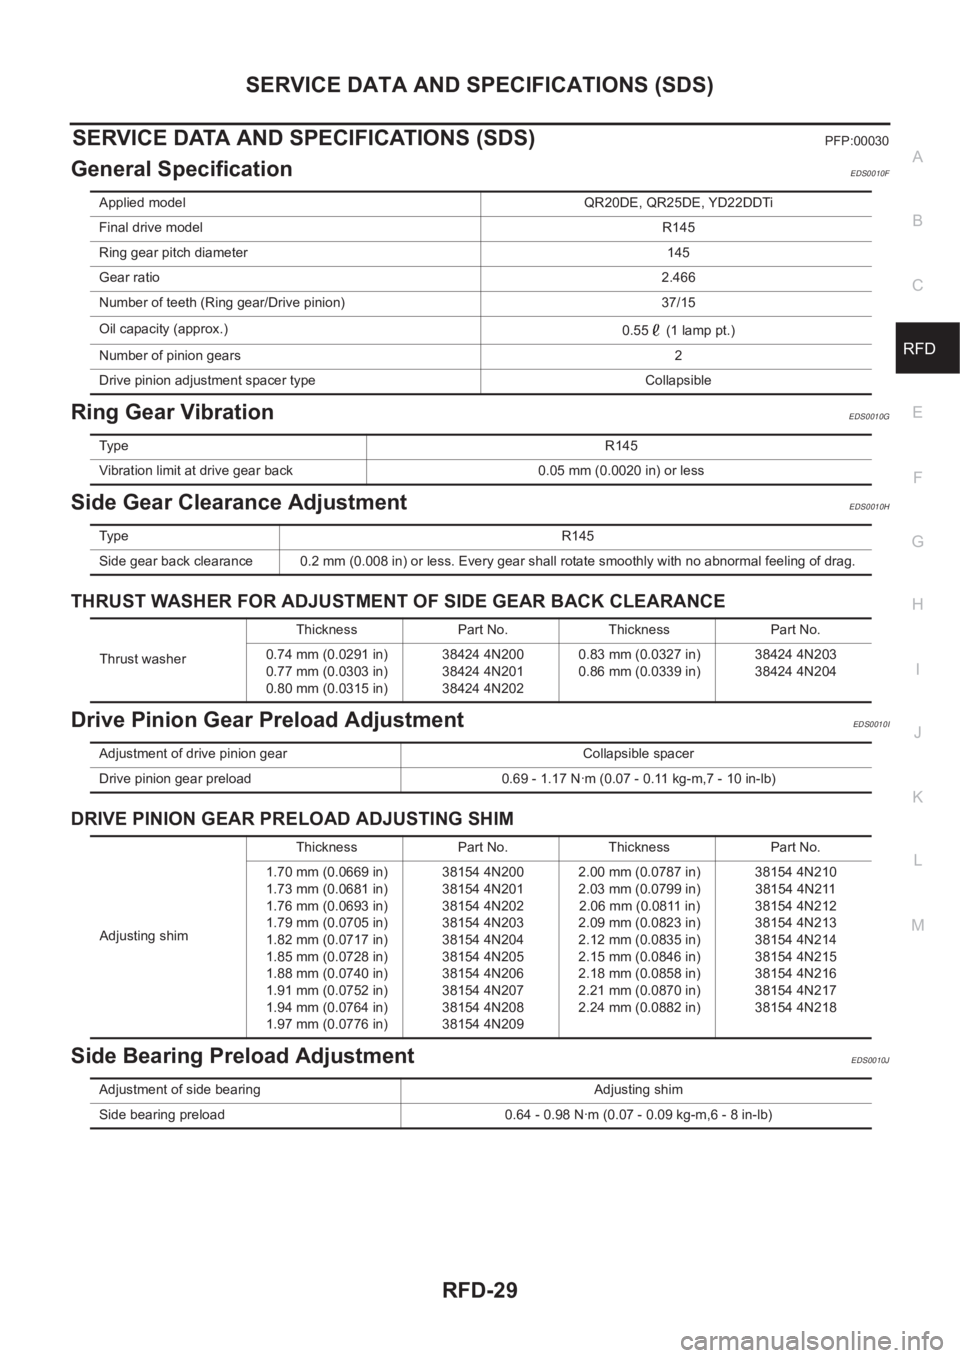
SERVICE DATA AND SPECIFICATIONS (SDS)PFP:00030
General SpecificationEDS0010F
Ring Gear VibrationEDS0010G
Side Gear Clearance AdjustmentEDS0010H
THRUST WASHER FOR ADJUSTMENT OF SIDE GEAR BACK CLEARANCE
Drive Pinion Gear Preload AdjustmentEDS0010I
DRIVE PINION GEAR PRELOAD ADJUSTING SHIM
Side Bearing Preload AdjustmentEDS0010J
Applied model QR20DE, QR25DE, YD22DDTi
Final drive modelR145
Ring gear pitch diameter 145
Gear ratio2.466
Number of teeth (Ring gear/Drive pinion) 37/15
Oil capacity (approx.)
0.55 (1 lamp pt.)
Number of pinion gears2
Drive pinion adjustment spacer type Collapsible
Ty p eR145
Vibration limit at drive gear back 0.05 mm (0.0020 in) or less
Ty p e R 1 4 5
Side gear back clearance 0.2 mm (0.008 in) or less. Every gear shall rotate smoothly with no abnormal feeling of drag.
Thrust washerThickness Part No. Thickness Part No.
0.74 mm (0.0291 in)
0.77 mm (0.0303 in)
0.80 mm (0.0315 in)38424 4N200
38424 4N201
38424 4N2020.83 mm (0.0327 in)
0.86 mm (0.0339 in)38424 4N203
38424 4N204
Adjustment of drive pinion gear Collapsible spacer
Drive pinion gear preload 0.69 - 1.17 N·m (0.07 - 0.11 kg-m,7 - 10 in-lb)
Adjusting shimThickness Part No. Thickness Part No.
1.70 mm (0.0669 in)
1.73 mm (0.0681 in)
1.76 mm (0.0693 in)
1.79 mm (0.0705 in)
1.82 mm (0.0717 in)
1.85 mm (0.0728 in)
1.88 mm (0.0740 in)
1.91 mm (0.0752 in)
1.94 mm (0.0764 in)
1.97 mm (0.0776 in)38154 4N200
38154 4N201
38154 4N202
38154 4N203
38154 4N204
38154 4N205
38154 4N206
38154 4N207
38154 4N208
38154 4N2092.00 mm (0.0787 in)
2.03 mm (0.0799 in)
2.06 mm (0.0811 in)
2.09 mm (0.0823 in)
2.12 mm (0.0835 in)
2.15 mm (0.0846 in)
2.18 mm (0.0858 in)
2.21 mm (0.0870 in)
2.24 mm (0.0882 in)38154 4N210
38154 4N211
38154 4N212
38154 4N213
38154 4N214
38154 4N215
38154 4N216
38154 4N217
38154 4N218
Adjustment of side bearing Adjusting shim
Side bearing preload 0.64 - 0.98 N·m (0.07 - 0.09 kg-m,6 - 8 in-lb)
Page 2706 of 3833
RFD-30
SERVICE DATA AND SPECIFICATIONS (SDS)
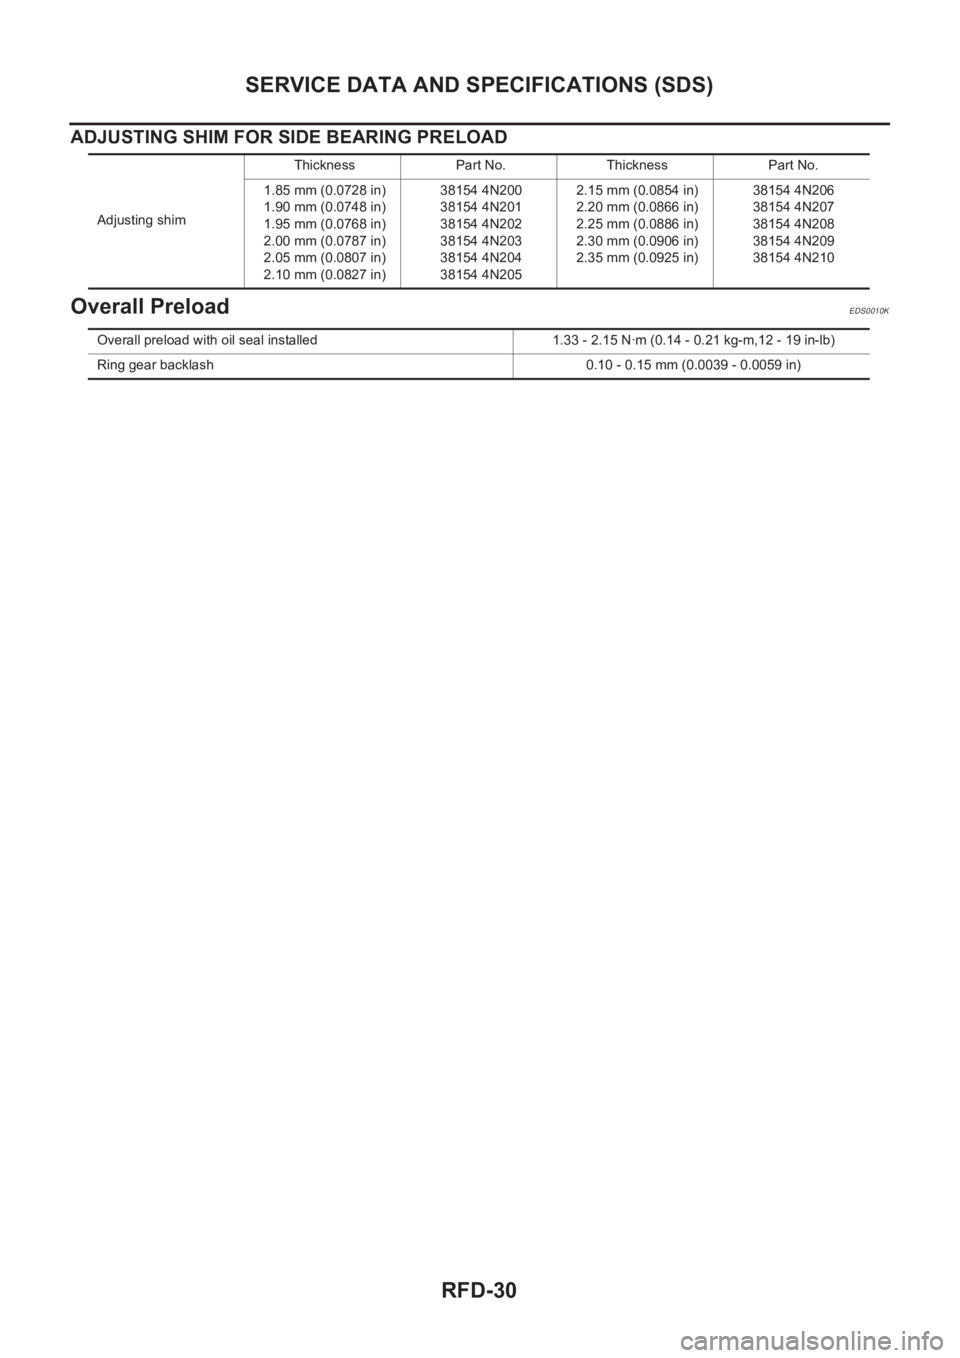
ADJUSTING SHIM FOR SIDE BEARING PRELOAD
Overall PreloadEDS0010K
Adjusting shimThickness Part No. Thickness Part No.
1.85 mm (0.0728 in)
1.90 mm (0.0748 in)
1.95 mm (0.0768 in)
2.00 mm (0.0787 in)
2.05 mm (0.0807 in)
2.10 mm (0.0827 in)38154 4N200
38154 4N201
38154 4N202
38154 4N203
38154 4N204
38154 4N2052.15 mm (0.0854 in)
2.20 mm (0.0866 in)
2.25 mm (0.0886 in)
2.30 mm (0.0906 in)
2.35 mm (0.0925 in)38154 4N206
38154 4N207
38154 4N208
38154 4N209
38154 4N210
Overall preload with oil seal installed 1.33 - 2.15 N·m (0.14 - 0.21 kg-m,12 - 19 in-lb)
Ring gear backlash 0.10 - 0.15 mm (0.0039 - 0.0059 in)
Page 2707 of 3833
FSU-1
FRONT SUSPENSION
E SUSPENSION
CONTENTS
C
D
F
G
H
I
J
K
L
M
SECTION
A
B
FSU
FRONT SUSPENSION
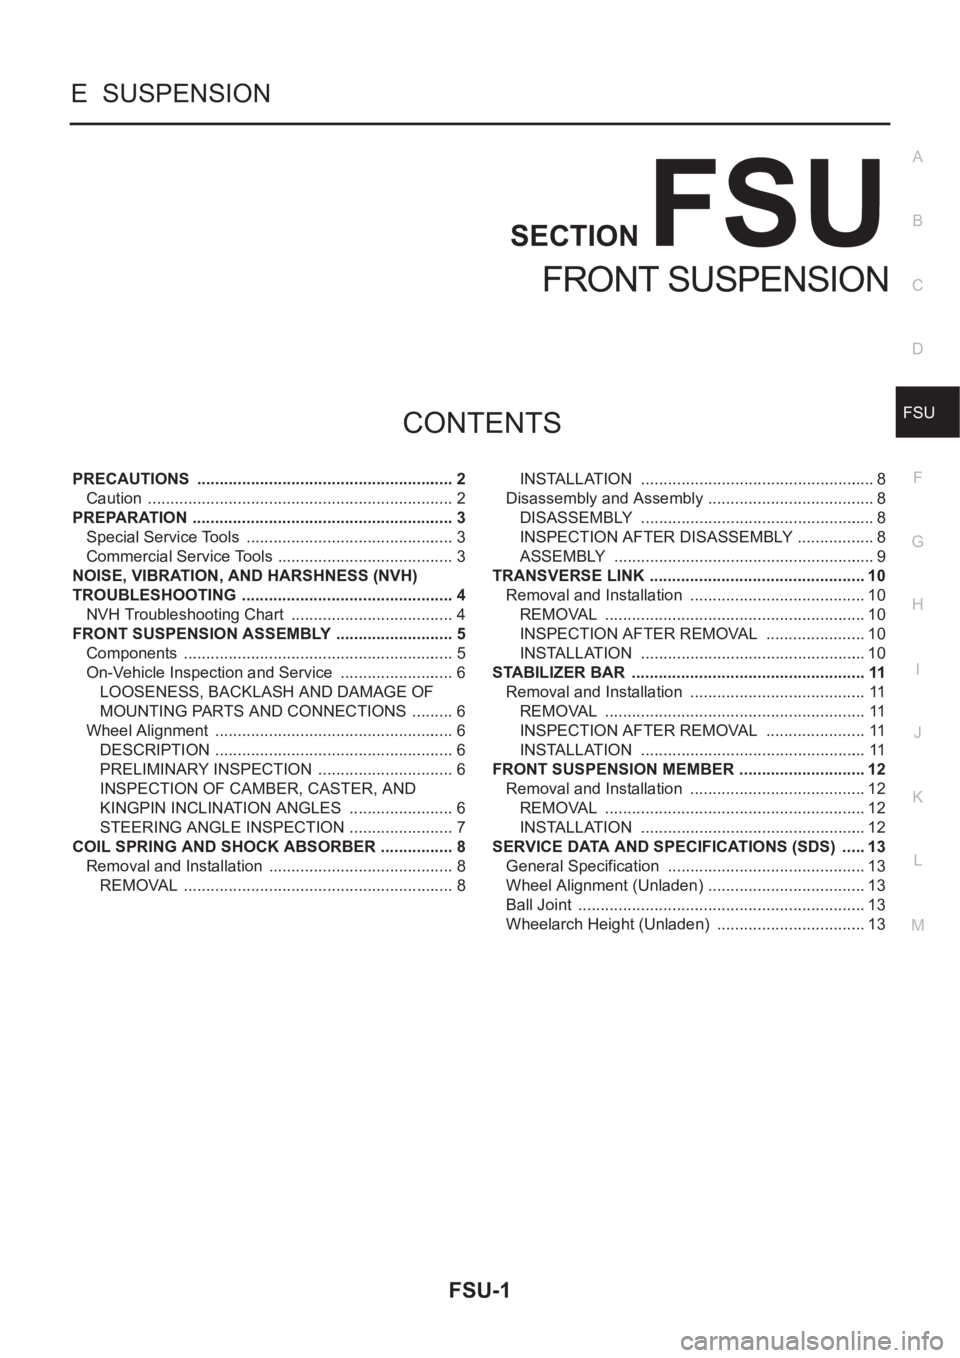
PRECAUTIONS .......................................................... 2
Caution ..................................................................... 2
PREPARATION ........................................................... 3
Special Service Tools ............................................... 3
Commercial Service Tools ........................................ 3
NOISE, VIBRATION, AND HARSHNESS (NVH)
TROUBLESHOOTING ................................................ 4
NVH Troubleshooting Chart ..................................... 4
FRONT SUSPENSION ASSEMBLY ........................... 5
Components ............................................................. 5
On-Vehicle Inspection and Service .......................... 6
LOOSENESS, BACKLASH AND DAMAGE OF
MOUNTING PARTS AND CONNECTIONS .......... 6
Wheel Alignment ...................................................... 6
DESCRIPTION ...................................................... 6
PRELIMINARY INSPECTION ............................... 6
INSPECTION OF CAMBER, CASTER, AND
KINGPIN INCLINATION ANGLES ........................ 6
STEERING ANGLE INSPECTION ........................ 7
COIL SPRING AND SHOCK ABSORBER ................. 8
Removal and Installation .......................................... 8
REMOVAL ............................................................. 8INSTALLATION ..................................................... 8
Disassembly and Assembly ...................................... 8
DISASSEMBLY ..................................................... 8
INSPECTION AFTER DISASSEMBLY .................. 8
ASSEMBLY ........................................................... 9
TRANSVERSE LINK ................................................. 10
Removal and Installation ........................................ 10
REMOVAL ........................................................... 10
INSPECTION AFTER REMOVAL ....................... 10
INSTALLATION ................................................... 10
STABILIZER BAR ..................................................... 11
Removal and Installation ........................................ 11
REMOVAL ........................................................... 11
INSPECTION AFTER REMOVAL ....................... 11
INSTALLATION ................................................... 11
FRONT SUSPENSION MEMBER ............................. 12
Removal and Installation ........................................ 12
REMOVAL ........................................................... 12
INSTALLATION ................................................... 12
SERVICE DATA AND SPECIFICATIONS (SDS) ...... 13
General Specification ............................................. 13
Wheel Alignment (Unladen) .................................... 13
Ball Joint ................................................................. 13
Wheelarch Height (Unladen) .................................. 13
Page 2708 of 3833
FSU-2
PRECAUTIONS
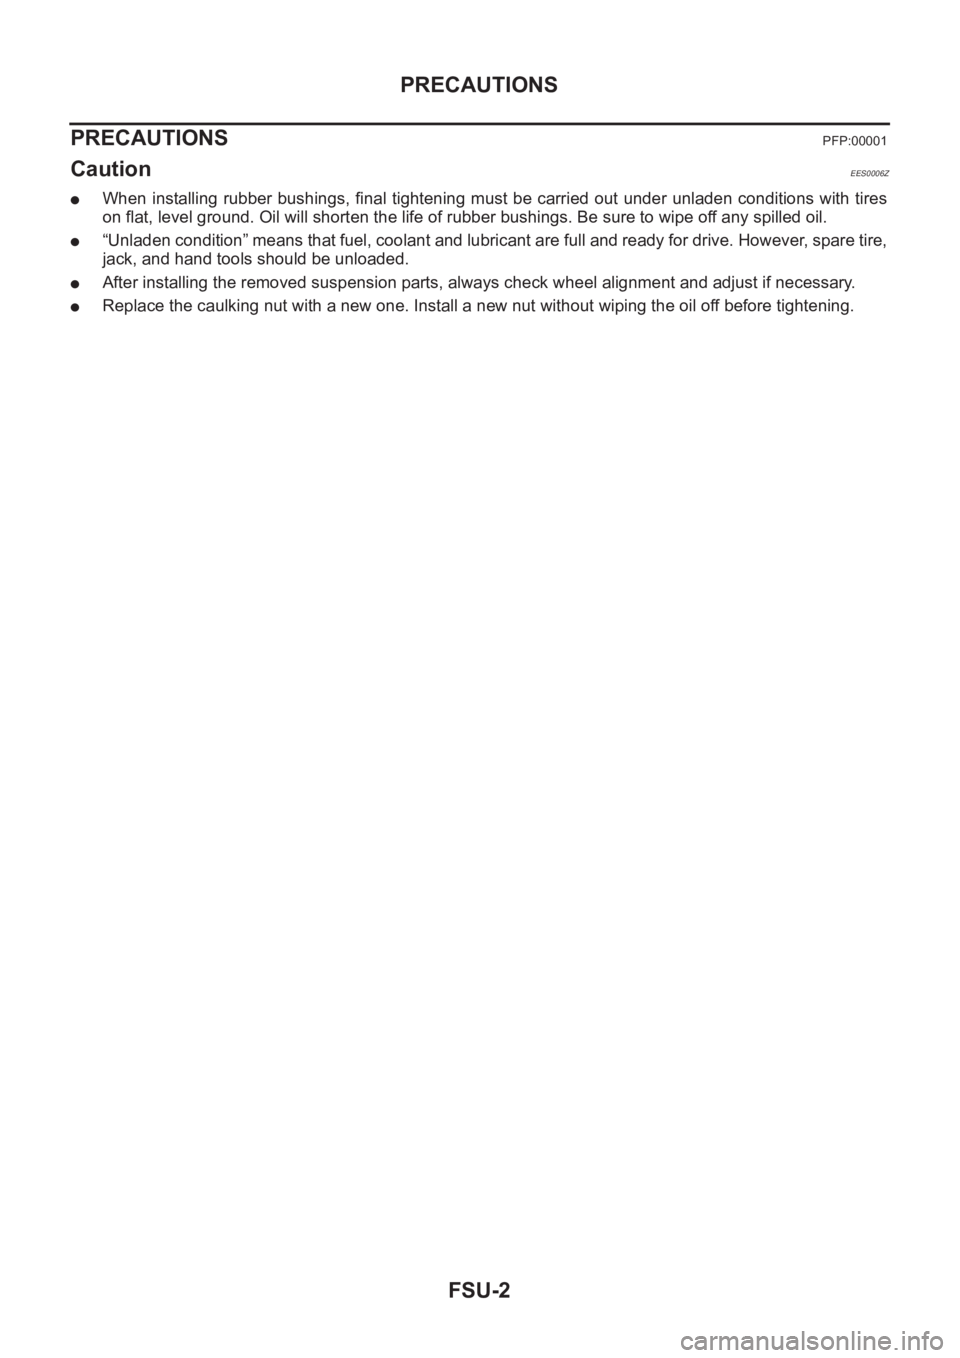
PRECAUTIONS
PFP:00001
CautionEES0006Z
●When installing rubber bushings, final tightening must be carried out under unladen conditions with tires
on flat, level ground. Oil will shorten the life of rubber bushings. Be sure to wipe off any spilled oil.
●“Unladen condition” means that fuel, coolant and lubricant are full and ready for drive. However, spare tire,
jack, and hand tools should be unloaded.
●After installing the removed suspension parts, always check wheel alignment and adjust if necessary.
●Replace the caulking nut with a new one. Install a new nut without wiping the oil off before tightening.
Page 2709 of 3833
PREPARATION
FSU-3
C
D
F
G
H
I
J
K
L
MA
B
FSU
PREPARATIONPFP:00002
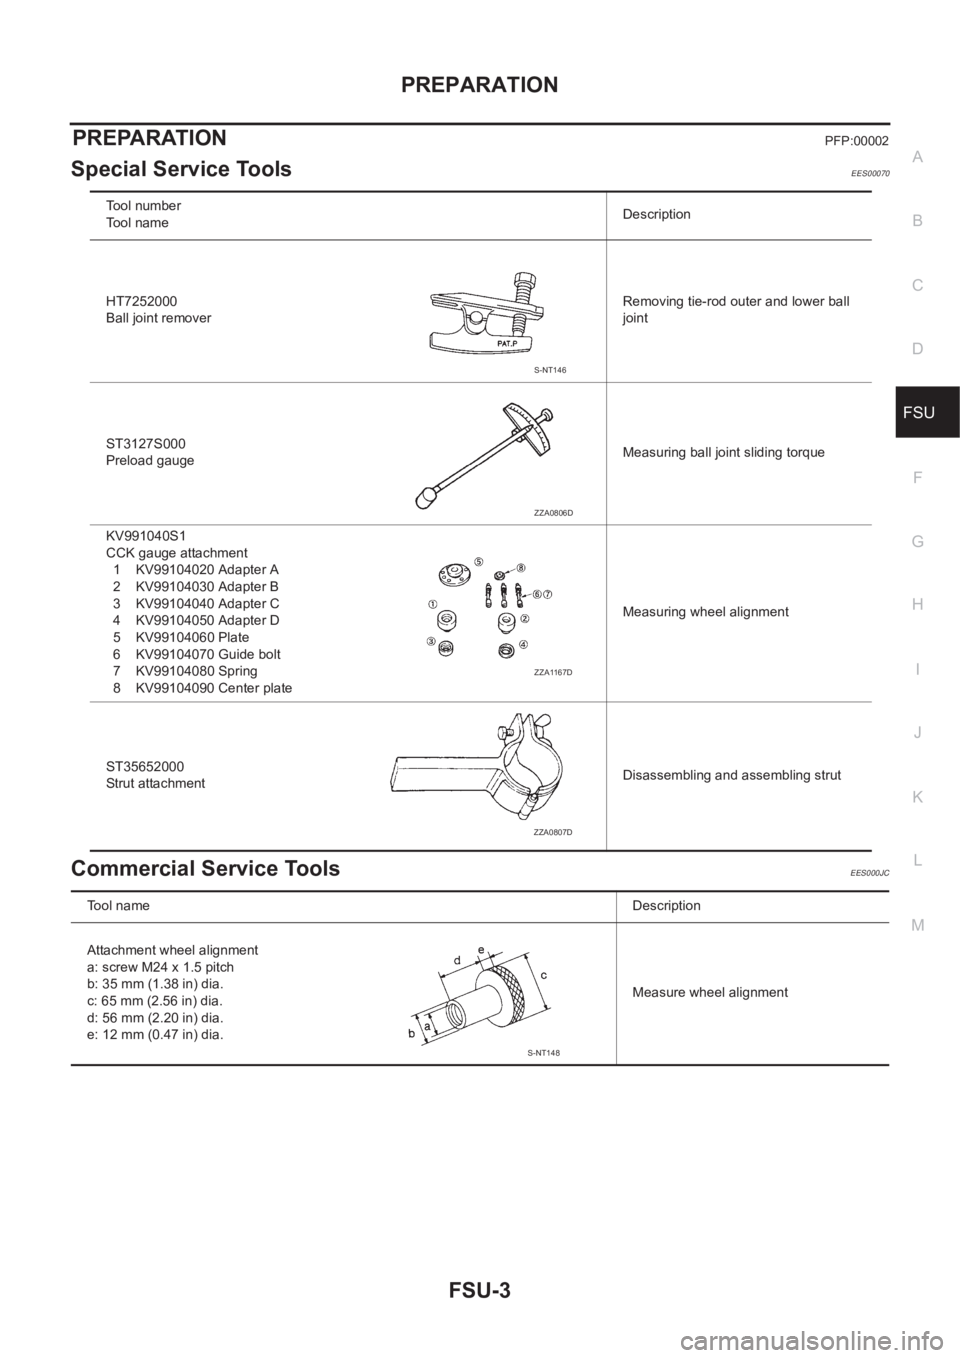
Special Service ToolsEES00070
Commercial Service ToolsEES000JC
Tool number
Tool nameDescription
HT7252000
Ball joint removerRemoving tie-rod outer and lower ball
joint
ST3127S000
Preload gaugeMeasuring ball joint sliding torque
KV991040S1
CCK gauge attachment
1 KV99104020 Adapter A
2 KV99104030 Adapter B
3 KV99104040 Adapter C
4 KV99104050 Adapter D
5 KV99104060 Plate
6 KV99104070 Guide bolt
7 KV99104080 Spring
8 KV99104090 Center plateMeasuring wheel alignment
ST35652000
Strut attachmentDisassembling and assembling strut
S-NT146
ZZA0806D
ZZA1167D
ZZA0807D
To o l n a m eDescription
Attachment wheel alignment
a: screw M24 x 1.5 pitch
b: 35 mm (1.38 in) dia.
c: 65 mm (2.56 in) dia.
d: 56 mm (2.20 in) dia.
e: 12 mm (0.47 in) dia.Measure wheel alignment
S-NT148
Page 2710 of 3833
FSU-4
NOISE, VIBRATION, AND HARSHNESS (NVH) TROUBLESHOOTING
NOISE, VIBRATION, AND HARSHNESS (NVH) TROUBLESHOOTING
PFP:00003
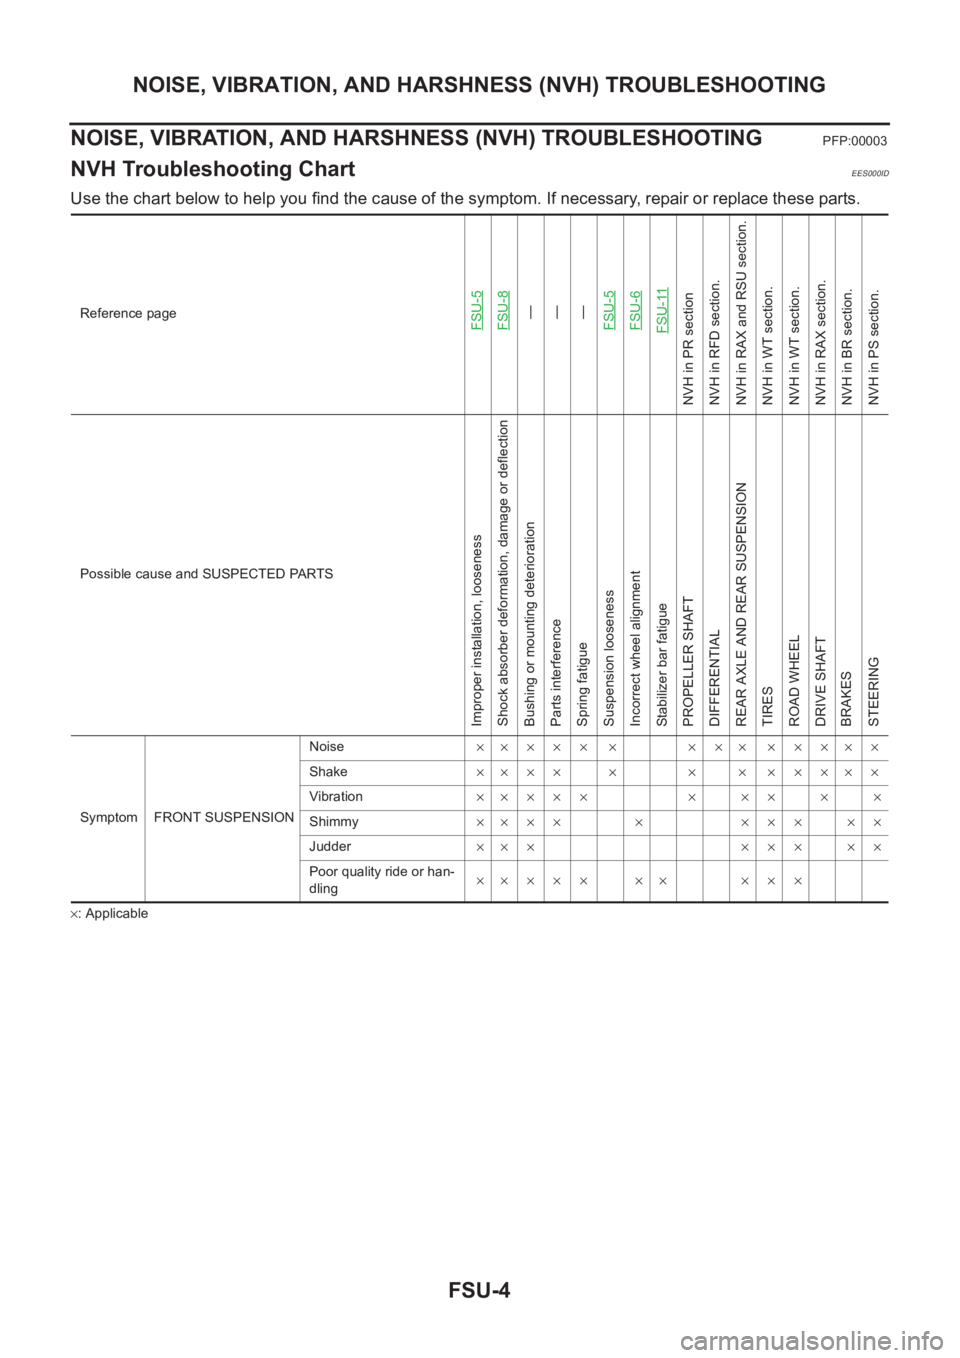
NVH Troubleshooting ChartEES000ID
Use the chart below to help you find the cause of the symptom. If necessary, repair or replace these parts.
×: ApplicableReference page
FSU-5FSU-8—
—
—
FSU-5FSU-6FSU-11
NVH in PR section
NVH in RFD section.
NVH in RAX and RSU section.
NVH in WT section.
NVH in WT section.
NVH in RAX section.
NVH in BR section.
NVH in PS section.
Possible cause and SUSPECTED PARTS
Improper installation, looseness
Shock absorber deformation, damage or deflection
Bushing or mounting deterioration
Parts interference
Spring fatigue
Suspension looseness
Incorrect wheel alignment
Stabilizer bar fatigue
PROPELLER SHAFT
DIFFERENTIAL
REAR AXLE AND REAR SUSPENSION
TIRES
ROAD WHEEL
DRIVE SHAFT
BRAKES
STEERING
Symptom FRONT SUSPENSIONNoise××××× × ××× ×××××
Shake×××× × × × ×××××
Vibration××××× × ×× × ×
Shimmy×××× × ××× ××
Judder××× ××× ××
Poor quality ride or han-
dling×× × × × ×× × × ×