OPEL FRONTERA 1998 Workshop Manual
FRONTERA 1998
OPEL
OPEL
https://www.carmanualsonline.info/img/37/57409/w960_57409-0.png
OPEL FRONTERA 1998 Workshop Manual
Trending: oil type, technical data, change time, dimensions, Seat, washer fluid, oil temperature
Page 2341 of 6000
MANUAL TRANSMISSION7B–23
3. Using the M8 1.25 bolt, remove the gear control
rod and the shift lever hausing.
NOTE: Turn the M8 bolt a few times, before remove the
gear control rod.
220RW098
4. Remove the 10 bolts and clamp.
220RW016
5. Using a plastic hammer, tap the transfer adapter.
NOTE:
Be careful not to lose the pin.
Cover the mainshaft splines with adhesive tape.
This will prevent damage to the oil seal lip.
220RW015
7. Disassemble the transfer adapter assembly.
1. Using a torx socket wrench(T40), remove the
plug.
220RW013
Page 2342 of 6000
7B–24MANUAL TRANSMISSION
2. Using a pin punch and hammer, drive out the
slotted spring pin. Remove the reverse restrict
pin.
220RW012
3. Remove the oil receiver pipe.
220RW011
4. Remove the oil seal.
5. Using socket hexagon wrench, remove the plug.
220RW014
8. Remove the front cover.
1. Remove the 8 bolts.
220RW018
Page 2343 of 6000
MANUAL TRANSMISSION7B–25
2. Using a plastic hammer, carefully tap the front
cover.
220RW017
9. Remove the front cover oil seal.
1. Mount the front cover through the aluminum plate
in a vise.
2. Using screwdriver, remove oil seal (1).
220RW019
10. Remove the transmission case.
1. Using a snap ring expander, remove the 2 snap
rings (1)(2).
226RW004
2. Using a plastic hammer, carefully tap the
transmission case.
220RW020
Page 2344 of 6000
7B–26MANUAL TRANSMISSION
11. Mount the intermediate plate.
1. Mount the intermediate plate through the
aluminum plate in a vise.
226RW005
12. Remove the slotted spring pin.
1. Using a pin punch and hammer, drive out the pin
from the arm.
226RW025
13. Remove the shift arm set bolt.
1. Remove the 2 bolts from the shift arm.
226RW023
14. Remove the counter 5th gear.
1. Using 2 screwdrivers and hammer, tap out the
snap ring.
226RW024
Page 2345 of 6000
MANUAL TRANSMISSION7B–27
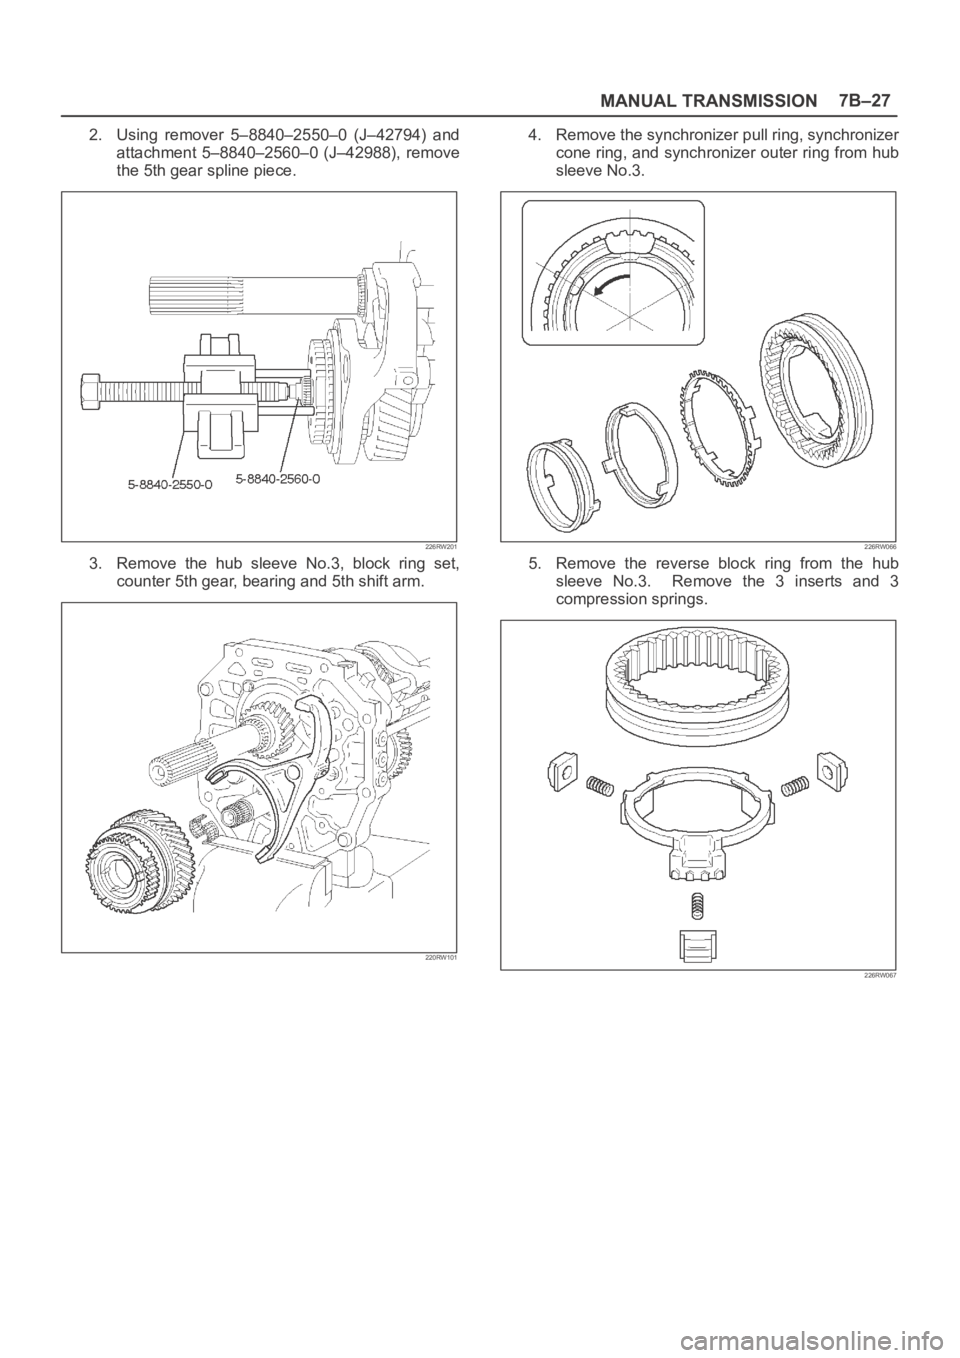
2. Using remover 5–8840–2550–0 (J–42794) and
attachment 5–8840–2560–0 (J–42988), remove
the 5th gear spline piece.
226RW201
3. Remove the hub sleeve No.3, block ring set,
counter 5th gear, bearing and 5th shift arm.
220RW101
4. Remove the synchronizer pull ring, synchronizer
cone ring, and synchronizer outer ring from hub
sleeve No.3.
226RW066
5. Remove the reverse block ring from the hub
sleeve No.3. Remove the 3 inserts and 3
compression springs.
226RW067
Page 2346 of 6000
7B–28MANUAL TRANSMISSION
15. Remove the thrust washer.
1. Remove the thrust washer from counter gear
shaft.
2. Remove the thrust washer pin from counter gear
shaft.
226RW018
16. Remove the bearing plate.
1. Remove the 4 bolts and bearing retainer.
226RW016
17. Remove the reverse idle gear.
1. Pull out the shaft foward the rear and remove the
reverse idle gear.
226RW020
18. Remove the counter gear shaft.
1. Using snap ring plier, remove counter gear shaft
center bearing snap ring.
226RW015
Page 2347 of 6000
MANUAL TRANSMISSION7B–29
2. Using remover 5–8840–2551–0 (J–42795) and
attachment 5–8840–2560–0 (J–42988), remove
counter gear shaft center bearing.
NOTE: Be careful not to drop the counter gear, when
removing the bearing.
226RW199
3. Remove the counter gear from intermediate
plate.
226RW030
19. Disassemble the counter gear shaft assembly.
1. Using snap ring pliers, remove the counter gear
shaft front bearing snap ring.
226RW065
2. Using bearing separator 5–8840–0015–0
(J–22912–01) and a press, remove the bearing.
226RW200
Page 2348 of 6000
7B–30MANUAL TRANSMISSION
20. Remove the top gear shaft.
1. Remove the top gear shaft from mainshaft.
NOTE: Don’t fall needle roller bearing.
226RW029
2. Remove the 4th block ring and roller bearing.
226RW031
21. Disassemble the top gear shaft assembly.
1. Check for wear or damage.
226RW033
2. Remove the front bearing shaft snap ring.
226RW062
Page 2349 of 6000
MANUAL TRANSMISSION7B–31
3. Using bearing separator 5–8840–0015–0
(J–22912–01) and a press, remove the bearing.
226RW202
22. Remove the mainshaft.
1. Remove mainshaft bearing snap ring.
226RW035
2. Using a plastic hammer, tap the 5th-reverse shift
rod at the reverse shift side.
226RW034
3. Remove the intermediate plate from a vise.
4. Remove the mainshaft, 1st-2nd shift arm and
3rd-4th shift arm.
226RW014
Page 2350 of 6000
7B–32MANUAL TRANSMISSION
23. Disassemble the mainshaft assembly.
1. Inspect each gear thrust clearance.
1. Using thickness gauge, inspect thrust
clearance (1st gear, 3rd gear).
226RW077
2. Mount the mainshaft through the aluminum
plate in a vise.
3. Using a dial indicator, measure each gear
thrust clearance.
Gear
Standard Clearanse
1st0.15 – 0.45 mm (0.0059 – 0.0177 in)
2nd0.10 – 0.25 mm (0.0039 – 0.0098 in)
3rd0.10 – 0.25 mm (0.0039 – 0.0098 in)
226RW070
2. Inspect each gear radial clearance
1. Using a dial indicator, measure the radial
clearance of each gear.
Gear
Standard Clearanse
1st0.020 – 0.074 mm (0.00078 – 0.00291 in)
2nd0.015 – 0.068 mm (0.00059 – 0.00268 in)
3rd0.015 – 0.068 mm (0.00059 – 0.00268 in)
226RW071
3. Using 2 screwdrivers and hammer, tap out the
snap ring.
226RW053
Trending: trailer, start stop button, change time, light, fuse box diagram, recommended oil, jump start


