Front ach OPEL FRONTERA 1998 Owner's Guide
[x] Cancel search | Manufacturer: OPEL, Model Year: 1998, Model line: FRONTERA, Model: OPEL FRONTERA 1998Pages: 6000, PDF Size: 97 MB
Page 1031 of 6000
6A–75
ENGINE MECHANICAL
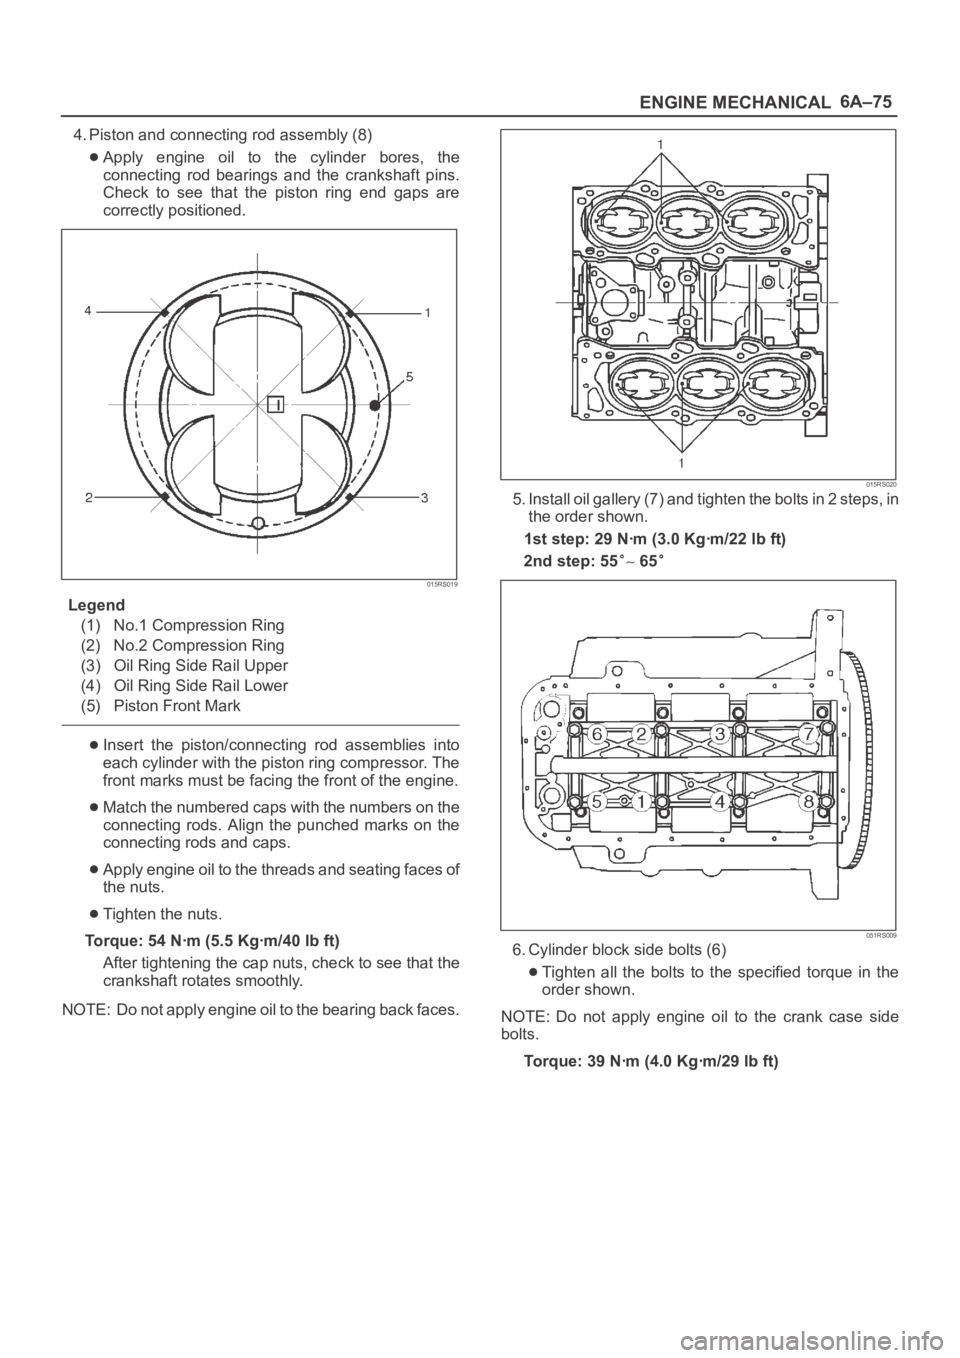
4. Piston and connecting rod assembly (8)
Apply engine oil to the cylinder bores, the
connecting rod bearings and the crankshaft pins.
Check to see that the piston ring end gaps are
correctly positioned.
015RS019
Legend
(1) No.1 Compression Ring
(2) No.2 Compression Ring
(3) Oil Ring Side Rail Upper
(4) Oil Ring Side Rail Lower
(5) Piston Front Mark
Insert the piston/connecting rod assemblies into
each cylinder with the piston ring compressor. The
front marks must be facing the front of the engine.
Match the numbered caps with the numbers on the
connecting rods. Align the punched marks on the
connecting rods and caps.
Apply engine oil to the threads and seating faces of
the nuts.
Tighten the nuts.
Torque: 54 Nꞏm (5.5 Kgꞏm/40 lb ft)
After tightening the cap nuts, check to see that the
crankshaft rotates smoothly.
NOTE: Do not apply engine oil to the bearing back faces.
015RS020
5. Install oil gallery (7) and tighten the bolts in 2 steps, in
the order shown.
1st step: 29 Nꞏm (3.0 Kgꞏm/22 lb ft)
2nd step: 55
65
051RS009
6. Cylinder block side bolts (6)
Tighten all the bolts to the specified torque in the
order shown.
NOTE: Do not apply engine oil to the crank case side
bolts.
Torque: 39 Nꞏm (4.0 Kgꞏm/29 lb ft)
Page 1039 of 6000
6A–83
ENGINE MECHANICAL
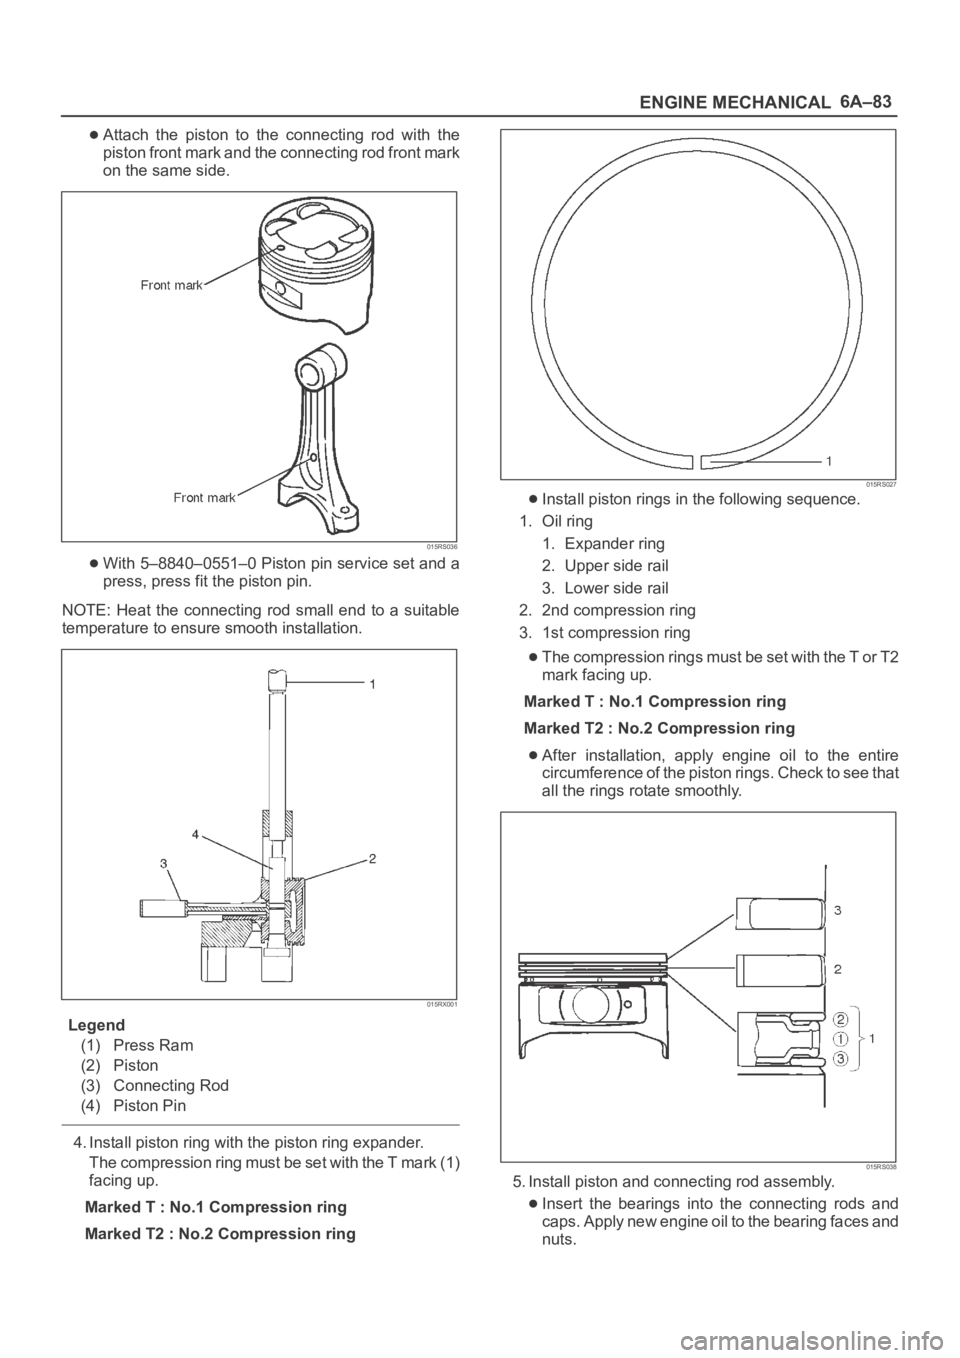
Attach the piston to the connecting rod with the
piston front mark and the connecting rod front mark
on the same side.
015RS036
With 5–8840–0551–0 Piston pin service set and a
press, press fit the piston pin.
NOTE: Heat the connecting rod small end to a suitable
temperature to ensure smooth installation.
015RX001
Legend
(1) Press Ram
(2) Piston
(3) Connecting Rod
(4) Piston Pin
4. Install piston ring with the piston ring expander.
The compression ring must be set with the T mark (1)
facing up.
Marked T : No.1 Compression ring
Marked T2 : No.2 Compression ring
015RS027
Install piston rings in the following sequence.
1. Oil ring
1. Expander ring
2. Upper side rail
3. Lower side rail
2. 2nd compression ring
3. 1st compression ring
The compression rings must be set with the T or T2
mark facing up.
Marked T : No.1 Compression ring
Marked T2 : No.2 Compression ring
After installation, apply engine oil to the entire
circumference of the piston rings. Check to see that
all the rings rotate smoothly.
015RS038
5. Install piston and connecting rod assembly.
Insert the bearings into the connecting rods and
caps. Apply new engine oil to the bearing faces and
nuts.
Page 1044 of 6000

6A–88
ENGINE MECHANICAL
015RW001
4. Install flywheel
1. Thoroughly clean and remove the oil from the
threads of crankshaft.
2. Remove the oil from the crankshaft and flywheel
mounting faces.
3. Mount the flywheel on the crankshaft and then
install the washer.
4. Holding the crankshaft stationary, tighten the
flywheel bolts in the order shown.
Torque: 54 Nꞏm (5.5 Kgꞏm/40 lb ft)
NOTE: Do not reuse the bolts and do not apply oil or
thread lock to the bolts.
015RS018
5. Install piston and connecting rod assembly.
Apply engine oil to the cylinder bores, the
connecting rod bearings and the crankshaft pins.
NOTE: Do not apply engine oil to the bearing back faces.
Check to see that the piston ring end gaps are
correctly positioned.
015RS019
Legend
(1) No.1 Compression Ring
(2) No.2 Compression Ring
(3) Oil Ring Side Rail Upper
(4) Oil Ring Side Rail Lower
(5) Piston Front Mark
Insert the piston/connecting rod assemblies into
each cylinder with the piston ring compressor.
The front marks (1) must be facing the front of the
engine.
015RS020
6. Install oil gallery and tighten the bolts in 2 steps in the
order shown.
1st step : 29 Nꞏm (3.0 Kgꞏm/22 lb ft)
2nd step : 55
65
Page 1116 of 6000
6D3–25 STARTING AND CHARGING SYSTEM
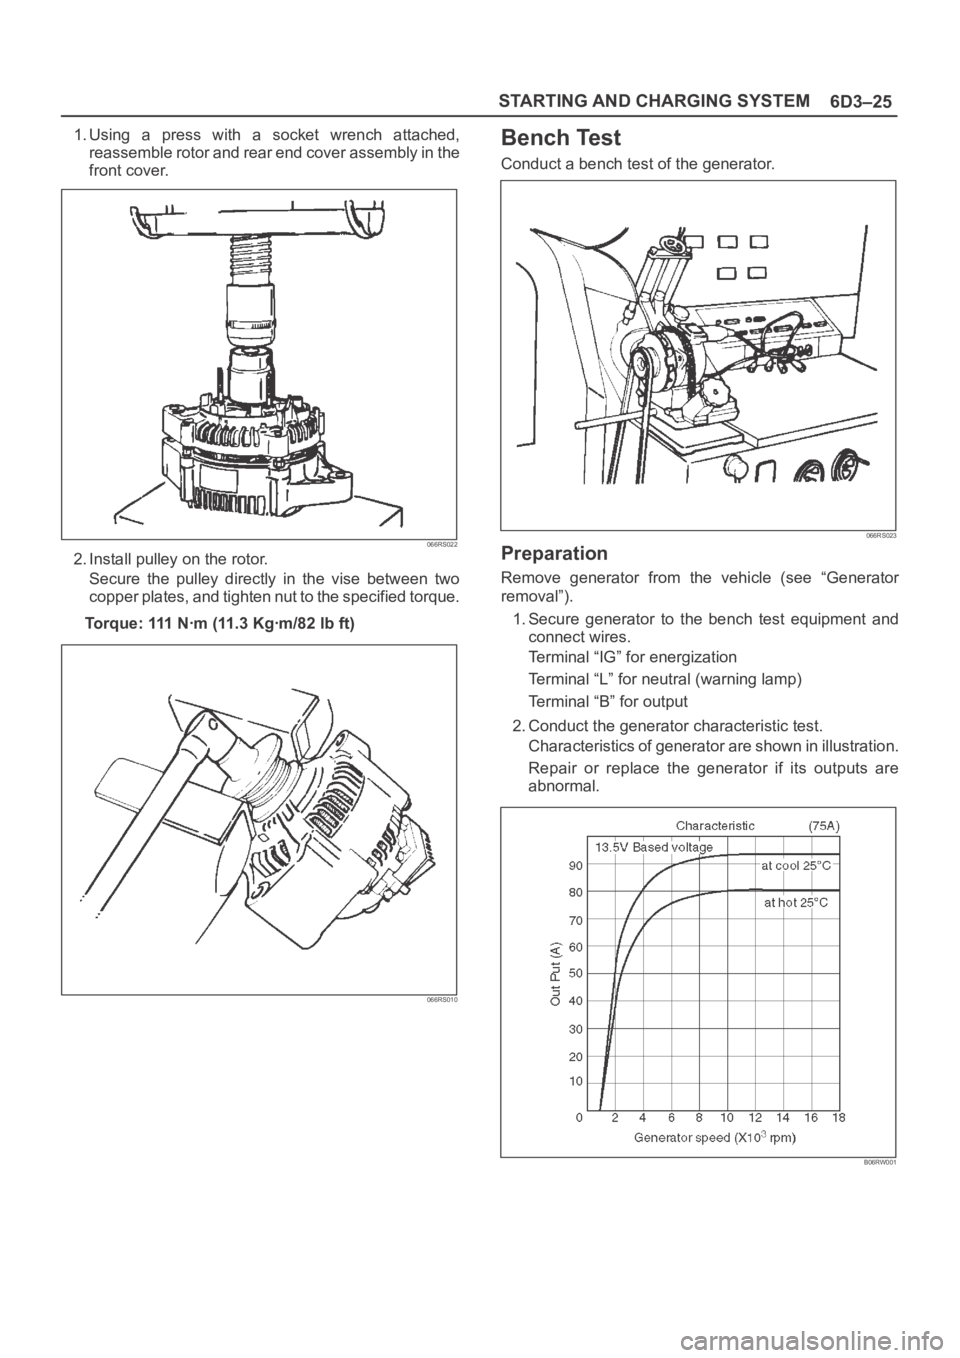
1. Using a press with a socket wrench attached,
reassemble rotor and rear end cover assembly in the
front cover.
066RS022
2. Install pulley on the rotor.
Secure the pulley directly in the vise between two
copper plates, and tighten nut to the specified torque.
Torque: 111 Nꞏm (11.3 Kgꞏm/82 lb ft)
066RS010
Bench Test
Conduct a bench test of the generator.
066RS023
Preparation
Remove generator from the vehicle (see “Generator
removal”).
1. Secure generator to the bench test equipment and
connect wires.
Terminal “IG” for energization
Terminal “L” for neutral (warning lamp)
Terminal “B” for output
2. Conduct the generator characteristic test.
Characteristics of generator are shown in illustration.
Repair or replace the generator if its outputs are
abnormal.
B06RW001
Page 1146 of 6000
6E–29 ENGINE DRIVEABILITY AND EMISSIONS
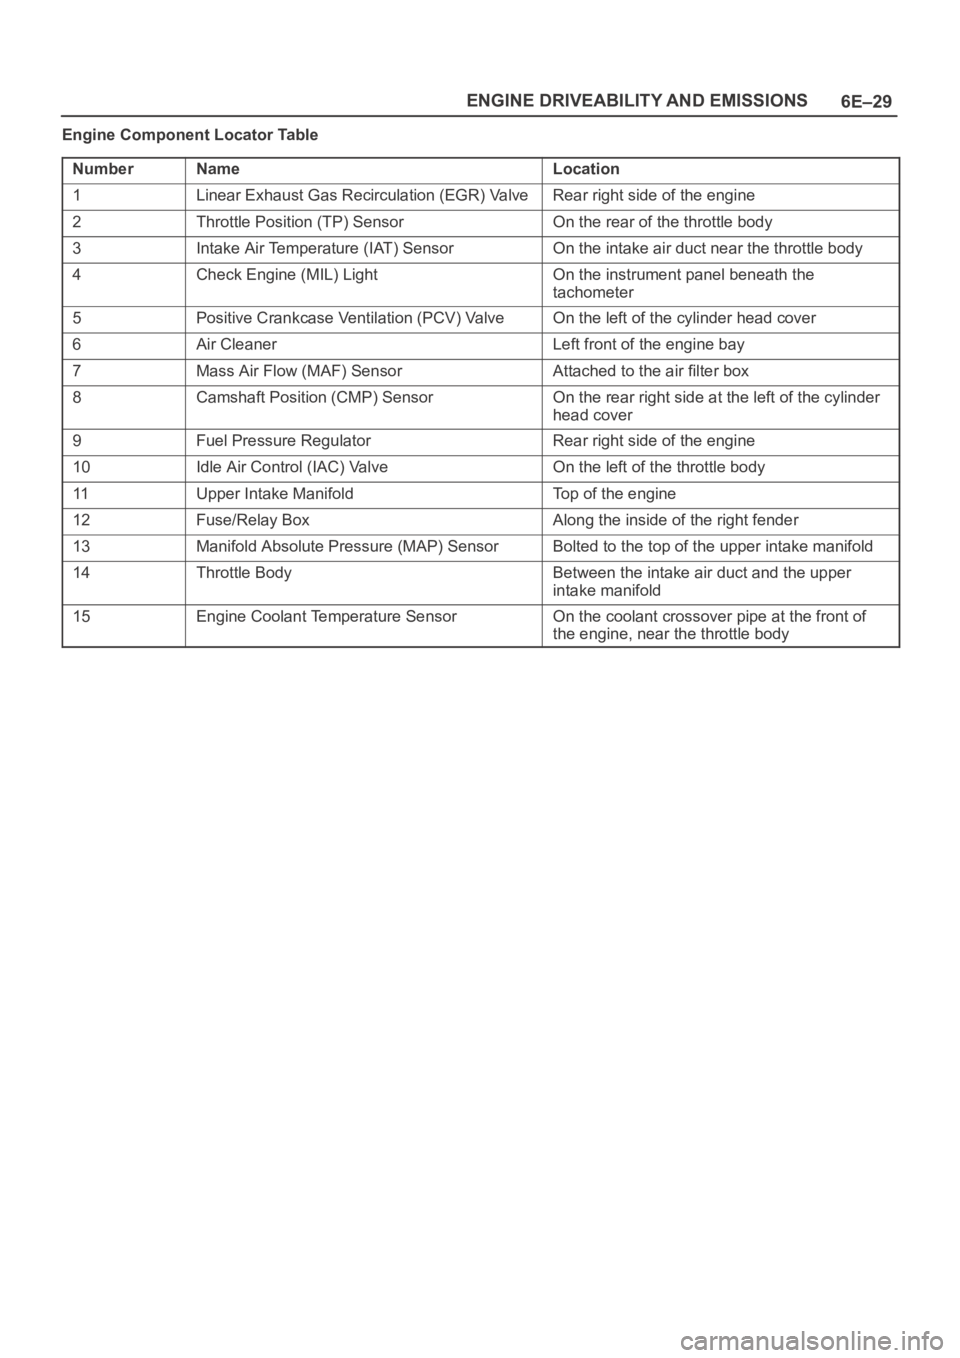
Engine Component Locator Table
Number
NameLocation
1Linear Exhaust Gas Recirculation (EGR) ValveRear right side of the engine
2Throttle Position (TP) SensorOn the rear of the throttle body
3Intake Air Temperature (IAT) SensorOn the intake air duct near the throttle body
4Check Engine (MIL) LightOn the instrument panel beneath the
tachometer
5Positive Crankcase Ventilation (PCV) ValveOn the left of the cylinder head cover
6Air CleanerLeft front of the engine bay
7Mass Air Flow (MAF) SensorAttached to the air filter box
8Camshaft Position (CMP) SensorOn the rear right side at the left of the cylinder
head cover
9Fuel Pressure RegulatorRear right side of the engine
10Idle Air Control (IAC) ValveOn the left of the throttle body
11Upper Intake ManifoldTop of the engine
12Fuse/Relay BoxAlong the inside of the right fender
13Manifold Absolute Pressure (MAP) SensorBolted to the top of the upper intake manifold
14Throttle BodyBetween the intake air duct and the upper
intake manifold
15Engine Coolant Temperature SensorOn the coolant crossover pipe at the front of
the engine, near the throttle body
Page 1148 of 6000
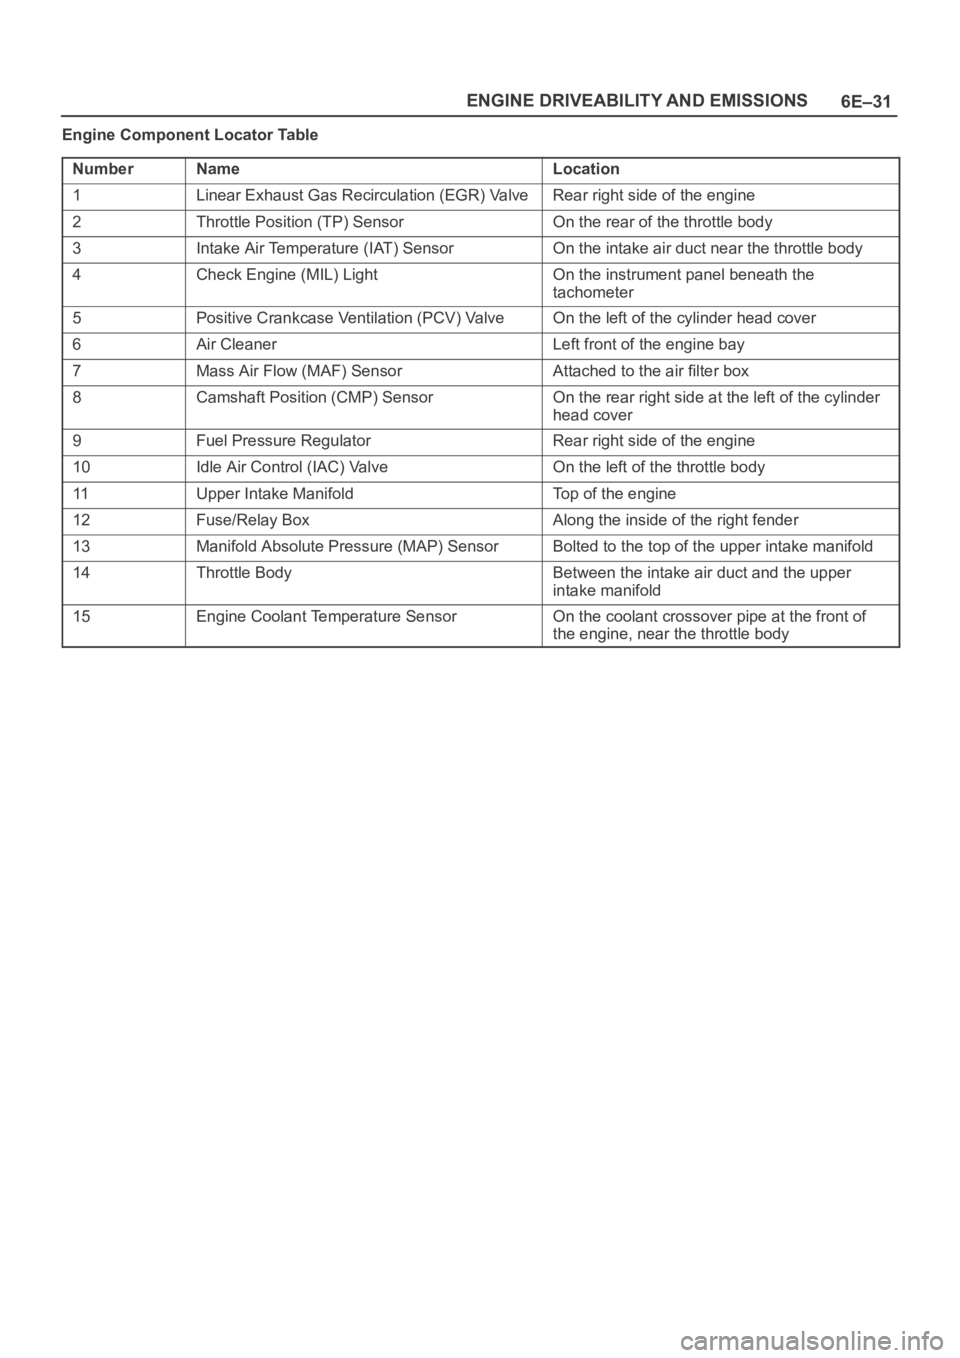
6E–31 ENGINE DRIVEABILITY AND EMISSIONS
Engine Component Locator Table
Number
NameLocation
1Linear Exhaust Gas Recirculation (EGR) ValveRear right side of the engine
2Throttle Position (TP) SensorOn the rear of the throttle body
3Intake Air Temperature (IAT) SensorOn the intake air duct near the throttle body
4Check Engine (MIL) LightOn the instrument panel beneath the
tachometer
5Positive Crankcase Ventilation (PCV) ValveOn the left of the cylinder head cover
6Air CleanerLeft front of the engine bay
7Mass Air Flow (MAF) SensorAttached to the air filter box
8Camshaft Position (CMP) SensorOn the rear right side at the left of the cylinder
head cover
9Fuel Pressure RegulatorRear right side of the engine
10Idle Air Control (IAC) ValveOn the left of the throttle body
11Upper Intake ManifoldTop of the engine
12Fuse/Relay BoxAlong the inside of the right fender
13Manifold Absolute Pressure (MAP) SensorBolted to the top of the upper intake manifold
14Throttle BodyBetween the intake air duct and the upper
intake manifold
15Engine Coolant Temperature SensorOn the coolant crossover pipe at the front of
the engine, near the throttle body
Page 1287 of 6000
6E–170
ENGINE DRIVEABILITY AND EMISSIONS
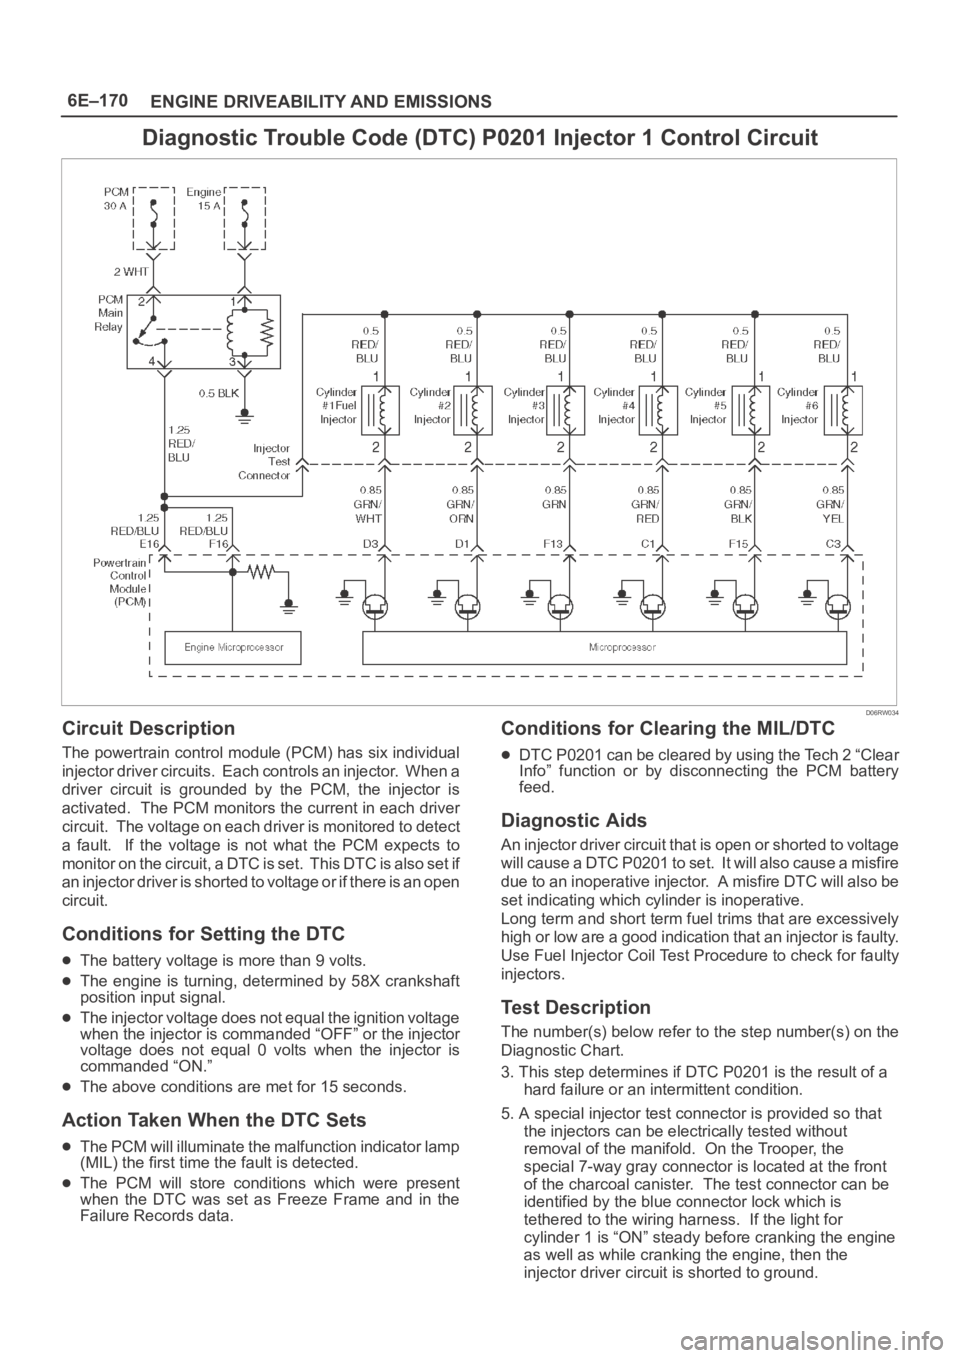
Diagnostic Trouble Code (DTC) P0201 Injector 1 Control Circuit
D06RW034
Circuit Description
The powertrain control module (PCM) has six individual
injector driver circuits. Each controls an injector. When a
driver circuit is grounded by the PCM, the injector is
activated. The PCM monitors the current in each driver
circuit. The voltage on each driver is monitored to detect
a fault. If the voltage is not what the PCM expects to
m o n i t o r o n t h e c i r c u i t , a D T C i s s e t . T h i s D T C i s a l s o s e t i f
an injector driver is shorted to voltage or if there is an open
circuit.
Conditions for Setting the DTC
The battery voltage is more than 9 volts.
The engine is turning, determined by 58X crankshaft
position input signal.
The injector voltage does not equal the ignition voltage
when the injector is commanded “OFF” or the injector
voltage does not equal 0 volts when the injector is
commanded “ON.”
The above conditions are met for 15 seconds.
Action Taken When the DTC Sets
The PCM will illuminate the malfunction indicator lamp
(MIL) the first time the fault is detected.
The PCM will store conditions which were present
when the DTC was set as Freeze Frame and in the
Failure Records data.
Conditions for Clearing the MIL/DTC
DTC P0201 can be cleared by using the Tech 2 “Clear
Info” function or by disconnecting the PCM battery
feed.
Diagnostic Aids
An injector driver circuit that is open or shorted to voltage
will cause a DTC P0201 to set. It will also cause a misfire
due to an inoperative injector. A misfire DTC will also be
set indicating which cylinder is inoperative.
Long term and short term fuel trims that are excessively
high or low are a good indication that an injector is faulty.
Use Fuel Injector Coil Test Procedure to check for faulty
injectors.
Test Description
The number(s) below refer to the step number(s) on the
Diagnostic Chart.
3. This step determines if DTC P0201 is the result of a
hard failure or an intermittent condition.
5. A special injector test connector is provided so that
the injectors can be electrically tested without
removal of the manifold. On the Trooper, the
special 7-way gray connector is located at the front
of the charcoal canister. The test connector can be
identified by the blue connector lock which is
tethered to the wiring harness. If the light for
cylinder 1 is “ON” steady before cranking the engine
as well as while cranking the engine, then the
injector driver circuit is shorted to ground.
Page 1290 of 6000

6E–173 ENGINE DRIVEABILITY AND EMISSIONS
Diagnostic Trouble Code (DTC) P0202 Injector 2 Control Circuit
D06RW034
Circuit Description
The powertrain control module (PCM) has six individual
injector driver circuits. Each controls an injector. When a
driver circuit is grounded by the PCM, the injector is
activated. The PCM monitors the current in each driver
circuit. The voltage on each driver is monitored to detect
a fault. If the voltage is not what the PCM expects to
m o n i t o r o n t h e c i r c u i t , a D T C i s s e t . T h i s D T C i s a l s o s e t i f
an injector driver is shorted to voltage or if there is an open
circuit.
Conditions for Setting the DTC
The battery voltage is more than 9 volts.
The engine is turning, determined by 58X crankshaft
position input signal.
The injector voltage does not equal the ignition voltage
when the injector is commanded “OFF” or the injector
voltage does not equal 0 volts when the injector is
commanded “ON.”
The above conditions are met for 15 seconds.
Action Taken When the DTC Sets
The PCM will illuminate the malfunction indicator lamp
(MIL) the first time the fault is detected.
The PCM will store conditions which were present
when the DTC was set as Freeze Frame and in the
Failure Records data.
Conditions for Clearing the MIL/DTC
DTC P0202 can be cleared by using the Tech 2 “Clear
Info” function or by disconnecting the PCM battery
feed.
Diagnostic Aids
An injector driver circuit that is open or shorted to voltage
will cause a DTC P0202 to set. It will also cause a misfire
due to an inoperative injector. A misfire DTC will also be
set indicating which cylinder is inoperative.
Long term and short term fuel trims that are excessively
high or low are a good indication that an injector is faulty.
Use Fuel Injector Coil Test Procedure to check for faulty
injectors.
Test Description
The number(s) below refer to the step number(s) on the
Diagnostic Chart.
3. This step determines if DTC P0202 is the result of a
hard failure or an intermittent condition.
5. A special injector test connector is provided so that
the injectors can be electrically tested without
removal of the manifold. On the Trooper, the
special 7-way gray connector is located at the front
of the charcoal canister. The test connector can be
identified by the blue connector lock which is
tethered to the wiring harness. If the light for
cylinder 2 is “ON” steady before cranking the engine
as well as while cranking the engine, then the
injector driver circuit is shorted to ground.
Page 1293 of 6000

6E–176
ENGINE DRIVEABILITY AND EMISSIONS
Diagnostic Trouble Code (DTC) P0203 Injector 3 Control Circuit
D06RW034
Circuit Description
The powertrain control module (PCM) has six individual
injector driver circuits. Each controls an injector. When
the driver circuit is grounded by the PCM, the injector is
activated. The PCM monitors the current in each driver
circuit. The voltage on each driver is monitored to detect
a fault. If the voltage is not what the PCM expects to
m o n i t o r o n t h e c i r c u i t , a D T C i s s e t . T h i s D T C i s a l s o s e t i f
an injector driver is shorted to voltage or if there is an open
circuit.
Conditions for Setting the DTC
The battery voltage is more than 9 volts.
The engine is turning, determined by the 58X
crankshaft position input signal.
The injector voltage does not equal the ignition voltage
when the injector is commanded “OFF” or the injector
voltage does not equal 0 volts when the injector is
commanded “ON.”
The above conditions are met for 15 seconds.
Action Taken When the DTC Sets
The PCM will illuminate the malfunction indicator lamp
(MIL) the first time the fault is detected.
The PCM will store conditions which were present
when the DTC was set as Freeze Frame and in the
Failure Records data.
Conditions for Clearing the MIL/DTC
DTC P0203 can be cleared by using the Tech 2 “Clear
Info” function or by disconnecting the PCM battery
feed.
Diagnostic Aids
An injector driver circuit that is open or shorted to voltage
will cause a DTC P0203 to set. It will also cause a misfire
due to an inoperative injector. A misfire DTC will also be
set indicating which cylinder is inoperative.
Long term and short term fuel trims that are excessively
high or low are a good indication that an injector is faulty.
Use Fuel Injector Coil Test Procedure to check for faulty
injectors.
Test Description
The number(s) below refer to the step number(s) on the
Diagnostic Chart.
3. This step determines if DTC P0203 is the result of a
hard failure or an intermittent condition.
5. A special injector test connector is provided so that
the injectors can be electrically tested without
removal of the manifold. On the Trooper, the
special 7-way gray connector is located at the front
of the charcoal canister. The test connector can be
identified by the blue connector lock which is
tethered to the wiring harness. If the light for
cylinder 3 is “ON” steady before cranking the engine
as well as while cranking the engine, then the
injector driver circuit is shorted to ground.
Page 1296 of 6000

6E–179 ENGINE DRIVEABILITY AND EMISSIONS
Diagnostic Trouble Code (DTC) P0204 Injector 4 Control Circuit
D06RW034
Circuit Description
The powertrain control module (PCM) has six individual
injector driver circuits. Each controls an injector. When
the driver circuit is grounded by the PCM, the injector is
activated. The PCM monitors the current in each driver
circuit. The voltage on each driver is monitored to detect
a fault. If the voltage is not what the PCM expects to
m o n i t o r o n t h e c i r c u i t , a D T C i s s e t . T h i s D T C i s a l s o s e t i f
an injector driver is shorted to voltage or if there is an open
circuit.
Conditions for Setting the DTC
The battery voltage is more than 9 volts.
The engine is turning, determined by the 58X
crankshaft position input signal.
The injector voltage does not equal the ignition voltage
when the injector is commanded “OFF” or the injector
voltage does not equal 0 volts when the injector is
commanded “ON.”
The above conditions are met for 15 seconds.
Action Taken When the DTC Sets
The PCM will illuminate the malfunction indicator lamp
(MIL) the first time the fault is detected.
The PCM will store conditions which were present
when the DTC was set as Freeze Frame and in the
Failure Records data.
Conditions for Clearing the MIL/DTC
DTC P0204 can be cleared by using the Tech 2 “Clear
Info” function or by disconnecting the PCM battery
feed.
Diagnostic Aids
An injector driver circuit that is open or shorted to voltage
will cause a DTC P0204 to set. It will also cause a misfire
due to an inoperative injector. A misfire DTC will also be
set indicating which cylinder is inoperative.
Long term and short term fuel trims that are excessively
high or low are a good indication that an injector is faulty.
Use Fuel Injector Coil Test Procedure to check for faulty
injectors.
Test Description
The number(s) below refer to the step number(s) on the
Diagnostic Chart.
3. This step determines if DTC P0204 is the result of a
hard failure or an intermittent condition.
5. A special injector test connector is provided so that
the injectors can be electrically tested without
removal of the manifold. On the Trooper, the
special 7-way gray connector is located at the front
of the charcoal canister. The test connector can be
identified by the blue connector lock which is
tethered to the wiring harness. If the light for
cylinder 4 is “ON” steady before cranking the engine
as well as while cranking the engine, then the
injector driver circuit is shorted to ground.