Peugeot 206 SW 2003 Owners Manual
Manufacturer: PEUGEOT, Model Year: 2003, Model line: 206 SW, Model: Peugeot 206 SW 2003Pages: 171, PDF Size: 2.12 MB
Page 91 of 171
26-05-2003
SPECIAL FEATURES
156
Deadlocking Deadlocking the doors is an additional security device. When it is used it means that the interior and exterior door locking controls cannot open the doors. There are two methods of operation:
Ð with the ignition key,
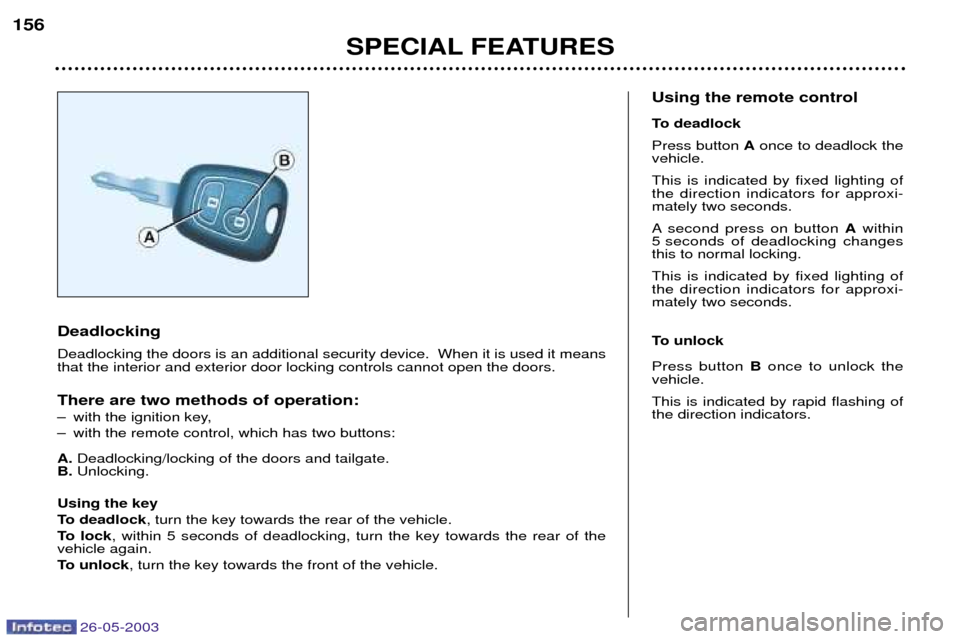
Ð with the remote control, which has two buttons: A.
Deadlocking/locking of the doors and tailgate.
B. Unlocking.
Using the key
To deadlock , turn the key towards the rear of the vehicle.
To lock , within 5 seconds of deadlocking, turn the key towards the rear of the
vehicle again.
To unlock , turn the key towards the front of the vehicle. Using the remote control
To deadlock Press button
Aonce to deadlock the
vehicle.This is indicated by fixed lighting of the direction indicators for approxi-mately two seconds.
A second press on button Awithin
5 seconds of deadlocking changes this to normal locking. This is indicated by fixed lighting of the direction indicators for approxi-mately two seconds.
To unlock Press button Bonce to unlock the
vehicle. This is indicated by rapid flashing of the direction indicators.
Page 92 of 171

26-05-2003
YOUR 206 IN DETAIL
88
Make a careful note of the number on each key. The key number is coded on
the label attached to the key. If the keys are lost, your PEUGEOT dealer can rapidly supply you with new keys.The high frequency remote control is a sensitive system; do not operate it while
it is in your pocket as there is a possibility that it may unlock your vehicle, without you being aware of it. The remote control does not operate when the key is in the ignition, even when the ignition is switched off, except for reprogramming. Driving with the doors locked may make access to the passenger compartment by the
emergency services more difficult in an emergency. As a safety precaution (with children on board), remove the ignition key when you leave the vehicle, even for a short time. Do not repeatedly press the button of your remote control out of range of your vehicle.
You run the risk of stopping it from working and the remote control would have to be reprogrammed. When purchasing a second-hand vehicle: Ð ensure that you are given the confidential card;
Ð have the key codes memorised by a PEUGEOT dealer, to ensure that the keys in your possession are the only ones which can start the vehicle.
Do not make any modifications to the electronic engine immobiliser system.
Confidential card The confidential card contains the identification code necessary for anywork carried out by a PEUGEOT
dealer on the system. This code ishidden by a film, which should be
removed only if necessary. Keep your card in a safe place, never inside the vehicle. ELECTRONIC ENGINE IMMOBILISER This locks the engine management system as soon as the ignition has
been switched off and therefore pre-vents starting of the vehicle by any-
one who does not have the key. The ignition key has an electronic chip which has a special code. Whenthe ignition is switched on, the codeis recognised and starting is possible. If the system does not function correctly , contact a PEUGEOT
dealer as soon as possible.
Page 93 of 171

26-05-2003
SPECIAL FEATURES
158
THE ALARM* Setting and deactivating the alarm system Switching off the siren The alarm completes the security
equipment for your vehicle. It offerstwo types of protection. Ð
external protection: when it is set,
the alarm sounds if one of the doors, the boot or the bonnet is opened;
Ð internal protection: when it is set,
the alarm sounds if the sensorsdetect air movement in the passen-ger compartment (a broken window)
or movement within the car.
The alarm also has an anti-tamperfunction. If there is an attempt to tamper with the wires to the siren, control unit or
the battery, the siren sounds and thedirection indicators light.
* According to destination. Setting the alarm (external and internal protection)
Switch the ignition off and get out of the vehicle. Deadlock the vehicle.The doors lock.The direction indicators light for two seconds. The red light on the switch flashes once a second.
5 seconds later, internal protection is set.
45 seconds later, external protection is set. Note:
when the alarm is triggered, the
siren sounds for thirty seconds. After the thirty seconds it stops, but thealarm remains set.
Warning
When the alarm is set, if a door, the tailgate or bonnet are not closed cor-
rectly, the siren sounds for a moment.If the vehicle is closed correctly in thefollowing 45 seconds, the alarm isactivated and the direction indicatorsremain on for two seconds. In all
cases, the alarm is activated after45 seconds. Disarming the alarm(internal and external protection) Press the release button of the remote
control key. The doors unlock.The direction indicators flash for two seconds. The red light on the switch goes out. Note:
if the warning light continues to
flash after de-activation of the alarm, it is a sign that the alarm has been
triggered. The flashing will stop whenthe ignition is switched ON.
Page 94 of 171
26-05-2003
YOUR 206 IN DETAIL89
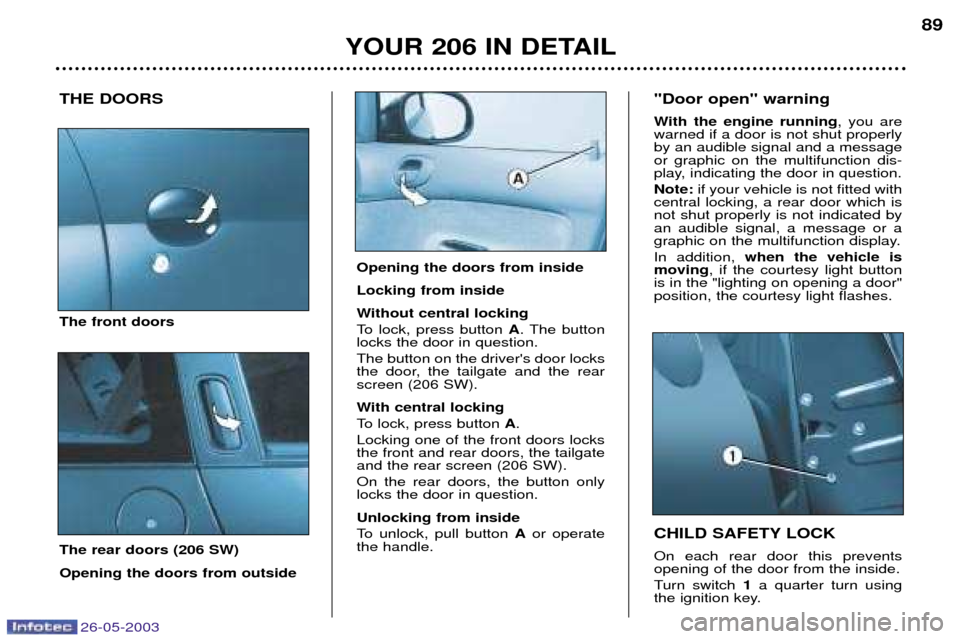
THE DOORS The front doors The rear doors (206 SW) Opening the doors from outside CHILD SAFETY LOCK On each rear door this prevents opening of the door from the inside.
Turn switch
1a quarter turn using
the ignition key.
"Door open" warning
With the engine running
, you are
warned if a door is not shut properly by an audible signal and a messageor graphic on the multifunction dis-
play, indicating the door in question. Note: if your vehicle is not fitted with
central locking, a rear door which is not shut properly is not indicated byan audible signal, a message or a
graphic on the multifunction display. In addition, when the vehicle is
moving , if the courtesy light button
is in the "lighting on opening a door" position, the courtesy light flashes.
Opening the doors from inside Locking from inside
Without central locking
To lock, press button A. The button
locks the door in question. The button on the driver's door locks
the door, the tailgate and the rearscreen (206 SW).
With central locking
To lock, press button A.
Locking one of the front doors locks the front and rear doors, the tailgateand the rear screen (206 SW). On the rear doors, the button only locks the door in question. Unlocking from inside
To unlock, pull button Aor operate
the handle.
Page 95 of 171
26-05-2003
YOUR 206 IN DETAIL
90
LOCKING/UNLOCKING OF
THE TAILGATE
(saloon and 206 GTi 180)
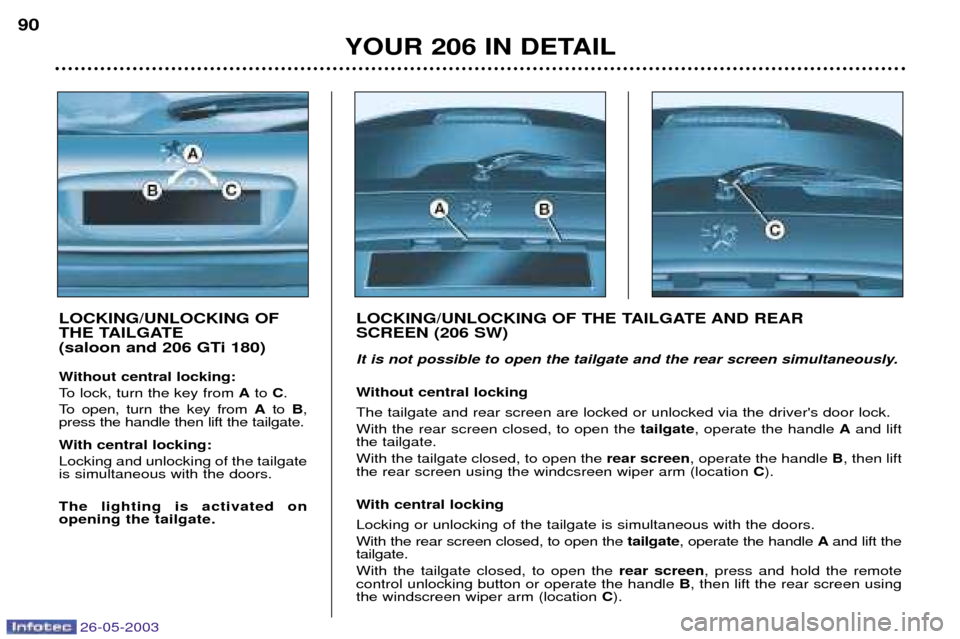
Without central locking:
To lock, turn the key from Ato C.
To open, turn the key from Ato B,
press the handle then lift the tailgate.
With central locking: Locking and unlocking of the tailgate is simultaneous with the doors. The lighting is activated on opening the tailgate. LOCKING/UNLOCKING OF THE TAILGATE AND REAR SCREEN (206 SW)
It is not possible to open the tailgate and the rear screen simultaneously.
Without central locking The tailgate and rear screen are locked or unlocked via the driver's door lock. With the rear screen closed, to open the
tailgate, operate the handle Aand lift
the tailgate.With the tailgate closed, to open the rear screen, operate the handle B, then lift
the rear screen using the windcsreen wiper arm (location C).
With central locking Locking or unlocking of the tailgate is simultaneous with the doors. With the rear screen closed, to open the tailgate, operate the handle Aand lift the
tailgate.With the tailgate closed, to open the rear screen, press and hold the remote
control unlocking button or operate the handle B, then lift the rear screen using
the windscreen wiper arm (location C).
Page 96 of 171
26-05-2003
YOUR 206 IN DETAIL91
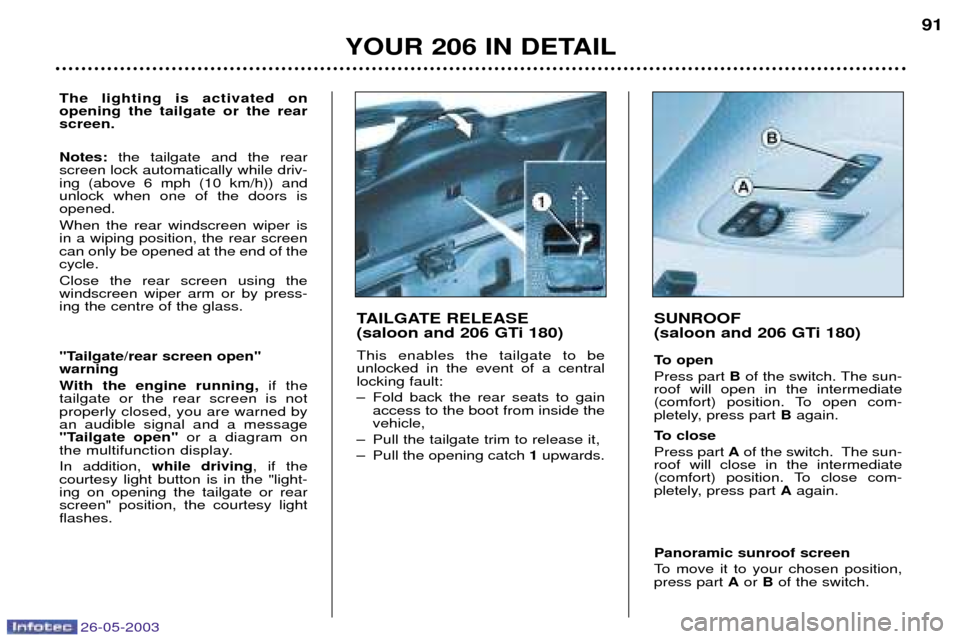
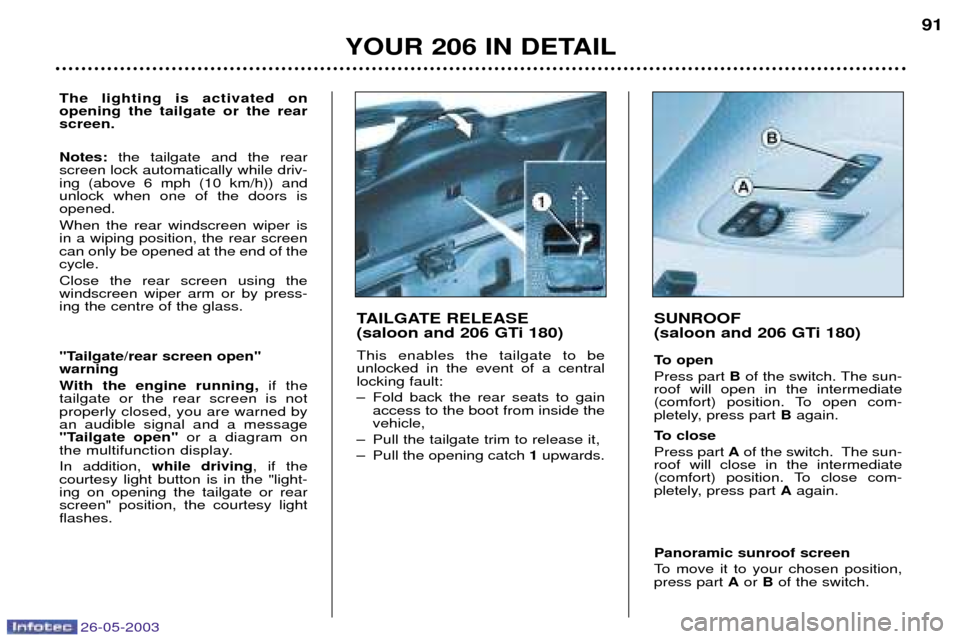
TAILGATE RELEASE
(saloon and 206 GTi 180) This enables the tailgate to be unlocked in the event of a centrallocking fault:
Ð Fold back the rear seats to gain access to the boot from inside the vehicle,
Ð Pull the tailgate trim to release it,
Ð Pull the opening catch 1upwards.
SUNROOF
(saloon and 206 GTi 180)
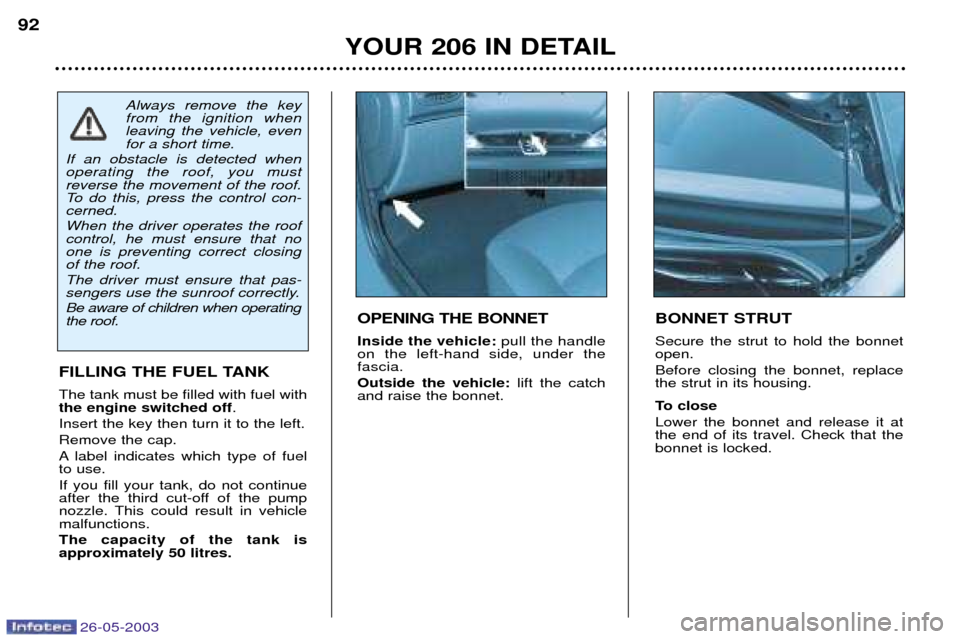
To open Press part Bof the switch. The sun-
roof will open in the intermediate
(comfort) position. To open com-
pletely, press part Bagain.
To close Press part Aof the switch. The sun-
roof will close in the intermediate
(comfort) position. To close com-
pletely, press part Aagain.
Panoramic sunroof screen
To move it to your chosen position, press part Aor Bof the switch.
The lighting is activated on opening the tailgate or the rearscreen. Notes: the tailgate and the rear
screen lock automatically while driv- ing (above 6 mph (10 km/h)) andunlock when one of the doors isopened. When the rear windscreen wiper is in a wiping position, the rear screencan only be opened at the end of thecycle. Close the rear screen using the windscreen wiper arm or by press-ing the centre of the glass.
"Tailgate/rear screen open" warning
With the engine running, if the
tailgate or the rear screen is not properly closed, you are warned byan audible signal and a message
"Tailgate open" or a diagram on
the multifunction display. In addition, while driving , if the
courtesy light button is in the "light- ing on opening the tailgate or rearscreen" position, the courtesy lightflashes.
Page 97 of 171
26-05-2003
YOUR 206 IN DETAIL91
TAILGATE RELEASE
(saloon and 206 GTi 180) This enables the tailgate to be unlocked in the event of a centrallocking fault:
Ð Fold back the rear seats to gain access to the boot from inside the vehicle,
Ð Pull the tailgate trim to release it,
Ð Pull the opening catch 1upwards.
SUNROOF
(saloon and 206 GTi 180)
To open Press part Bof the switch. The sun-
roof will open in the intermediate
(comfort) position. To open com-
pletely, press part Bagain.
To close Press part Aof the switch. The sun-
roof will close in the intermediate
(comfort) position. To close com-
pletely, press part Aagain.
Panoramic sunroof screen
To move it to your chosen position, press part Aor Bof the switch.
The lighting is activated on opening the tailgate or the rearscreen. Notes: the tailgate and the rear
screen lock automatically while driv- ing (above 6 mph (10 km/h)) andunlock when one of the doors isopened. When the rear windscreen wiper is in a wiping position, the rear screencan only be opened at the end of thecycle. Close the rear screen using the windscreen wiper arm or by press-ing the centre of the glass.
"Tailgate/rear screen open" warning
With the engine running, if the
tailgate or the rear screen is not properly closed, you are warned byan audible signal and a message
"Tailgate open" or a diagram on
the multifunction display. In addition, while driving , if the
courtesy light button is in the "light- ing on opening the tailgate or rearscreen" position, the courtesy lightflashes.
Page 98 of 171
26-05-2003
YOUR 206 IN DETAIL
92
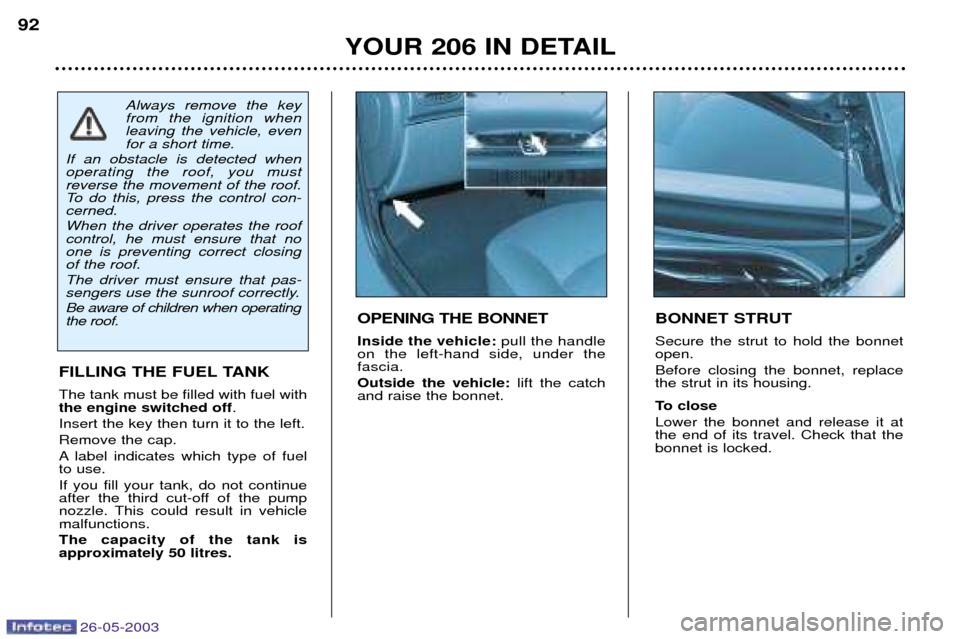
BONNET STRUT Secure the strut to hold the bonnet open. Before closing the bonnet, replace the strut in its housing.
To close Lower the bonnet and release it at the end of its travel. Check that thebonnet is locked.
FILLING THE FUEL TANK The tank must be filled with fuel with the engine switched off
.
Insert the key then turn it to the left. Remove the cap.
A label indicates which type of fuel to use. If you fill your tank, do not continue
after the third cut-off of the pump
nozzle. This could result in vehiclemalfunctions. The capacity of the tank is approximately 50 litres. OPENING THE BONNET Inside the vehicle: pull the handle
on the left-hand side, under the fascia. Outside the vehicle: lift the catch
and raise the bonnet.
Always remove the key from the ignition whenleaving the vehicle, evenfor a short time.
If an obstacle is detected whenoperating the roof, you mustreverse the movement of the roof.
To do this, press the control con-cerned. When the driver operates the roof control, he must ensure that noone is preventing correct closingof the roof. The driver must ensure that pas-
sengers use the sunroof correctly. Be aware of children when operating the roof.
Page 99 of 171
26-05-2003
YOUR 206 IN DETAIL
92
BONNET STRUT Secure the strut to hold the bonnet open. Before closing the bonnet, replace the strut in its housing.
To close Lower the bonnet and release it at the end of its travel. Check that thebonnet is locked.
FILLING THE FUEL TANK The tank must be filled with fuel with the engine switched off
.
Insert the key then turn it to the left. Remove the cap.
A label indicates which type of fuel to use. If you fill your tank, do not continue
after the third cut-off of the pump
nozzle. This could result in vehiclemalfunctions. The capacity of the tank is approximately 50 litres. OPENING THE BONNET Inside the vehicle: pull the handle
on the left-hand side, under the fascia. Outside the vehicle: lift the catch
and raise the bonnet.
Always remove the key from the ignition whenleaving the vehicle, evenfor a short time.
If an obstacle is detected whenoperating the roof, you mustreverse the movement of the roof.
To do this, press the control con-cerned. When the driver operates the roof control, he must ensure that noone is preventing correct closingof the roof. The driver must ensure that pas-
sengers use the sunroof correctly. Be aware of children when operating the roof.
Page 100 of 171
26-05-2003
YOUR 206 IN DETAIL93
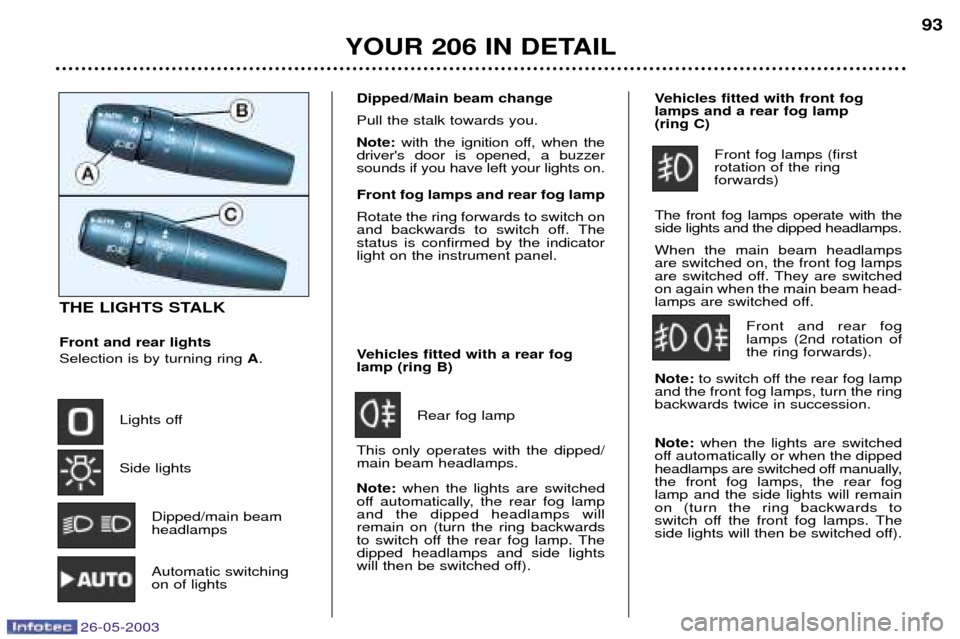
THE LIGHTS STALK Front and rear lights Selection is by turning ring
A.
Lights off Side lights Dipped/main beam headlamps
Automatic switchingon of lights Vehicles fitted with a rear foglamp (ring B)
Rear fog lamp
This only operates with the dipped/main beam headlamps. Note: when the lights are switched
off automatically, the rear fog lamp and the dipped headlamps willremain on (turn the ring backwards
to switch off the rear fog lamp. Thedipped headlamps and side lights
will then be switched off). Vehicles fitted with front foglamps and a rear fog lamp (ring C)
Front fog lamps (first rotation of the ring forwards)
The front fog lamps operate with theside lights and the dipped headlamps. When the main beam headlamps are switched on, the front fog lamps
are switched off. They are switchedon again when the main beam head-
lamps are switched off. Front and rear foglamps (2nd rotation ofthe ring forwards).
Note: to switch off the rear fog lamp
and the front fog lamps, turn the ringbackwards twice in succession. Note: when the lights are switched
off automatically or when the dipped
headlamps are switched off manually,the front fog lamps, the rear foglamp and the side lights will remainon (turn the ring backwards to
switch off the front fog lamps. The
side lights will then be switched off).
Dipped/Main beam change Pull the stalk towards you.Note: with the ignition off, when the
driver's door is opened, a buzzer sounds if you have left your lights on. Front fog lamps and rear fog lamp Rotate the ring forwards to switch on
and backwards to switch off. Thestatus is confirmed by the indicatorlight on the instrument panel.