Peugeot 206 SW 2003 Owner's Manual
Manufacturer: PEUGEOT, Model Year: 2003, Model line: 206 SW, Model: Peugeot 206 SW 2003Pages: 171, PDF Size: 2.12 MB
Page 151 of 171
26-05-2003
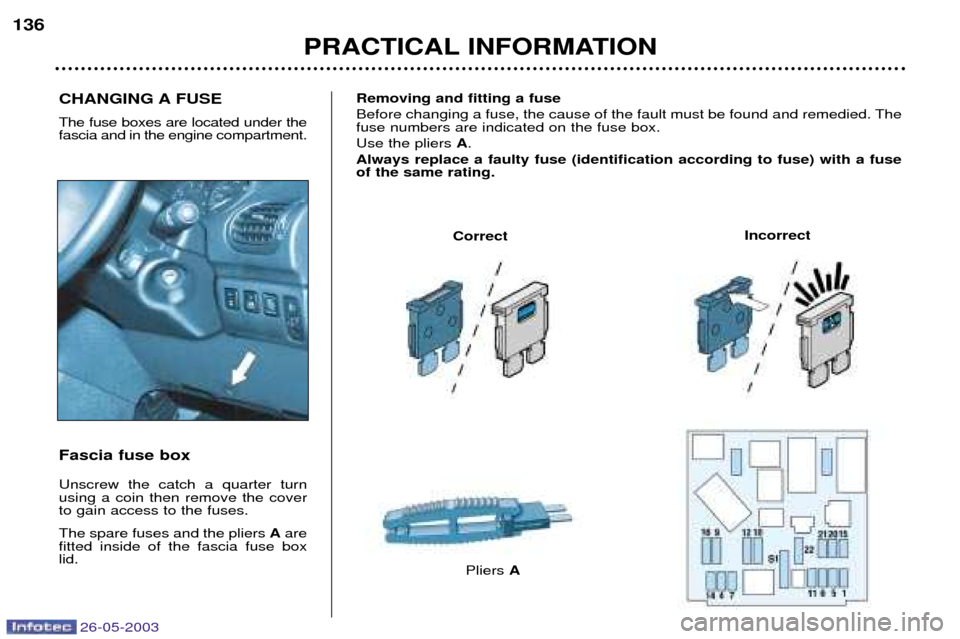
CHANGING A FUSE The fuse boxes are located under the fascia and in the engine compartment. Fascia fuse box Unscrew the catch a quarter turn using a coin then remove the coverto gain access to the fuses. The spare fuses and the pliers Aare
fitted inside of the fascia fuse box lid.
PRACTICAL INFORMATION
136
Removing and fitting a fuse
Before changing a fuse, the cause of the fault must be found and remedied. The fuse numbers are indicated on the fuse box. Use the pliers A.
Always replace a faulty fuse (identification according to fuse) with a fuse of the same rating.
Correct
Pliers A Incorrect
Page 152 of 171
26-05-2003
PRACTICAL INFORMATION
138
The electrical circuit of your vehicle is designedto operate with standardor optional equipment.
Before installing other electricalequipment or accessories in yourvehicle, consult a PEUGEOT deal-
er. Some electrical accessories or the way in which they are fitted mayhave an adverse effect on the oper-ation of your vehicle (its electroniccontrol circuits, the audio circuit andthe electrical charging circuit). PEUGEOT declines any responsi- bility for expenses incurred by therepair of your vehicle or for anymalfunctions resulting from theinstallation of auxiliary accessories,not supplied and not recommendedby PEUGEOT and not installed inaccordance with PEUGEOT'sinstructions, in particular for anyequipment the power consumptionof which exceeds 10 milliamps.
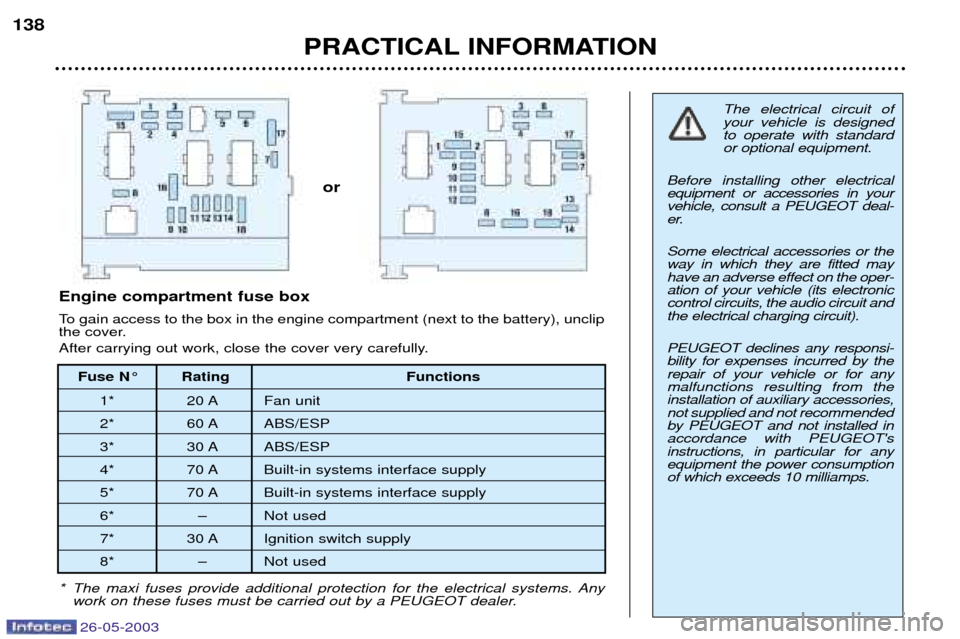
* The maxi fuses provide additional protection for the electrical systems. Any work on these fuses must be carried out by a PEUGEOT dealer.
Fuse N¡ Rating Functions
1* 20 A Fan unit
2* 60 A ABS/ESP
3* 30 A ABS/ESP
4* 70 A Built-in systems interface supply
5* 70 A Built-in systems interface supply
6* Ð Not used
7* 30 A Ignition switch supply
8* Ð Not used
Engine compartment fuse box
To gain access to the box in the engine compartment (next to the battery), unclip
the cover.
After carrying out work, close the cover very carefully.
or
Page 153 of 171
26-05-2003
PRACTICAL INFORMATION139
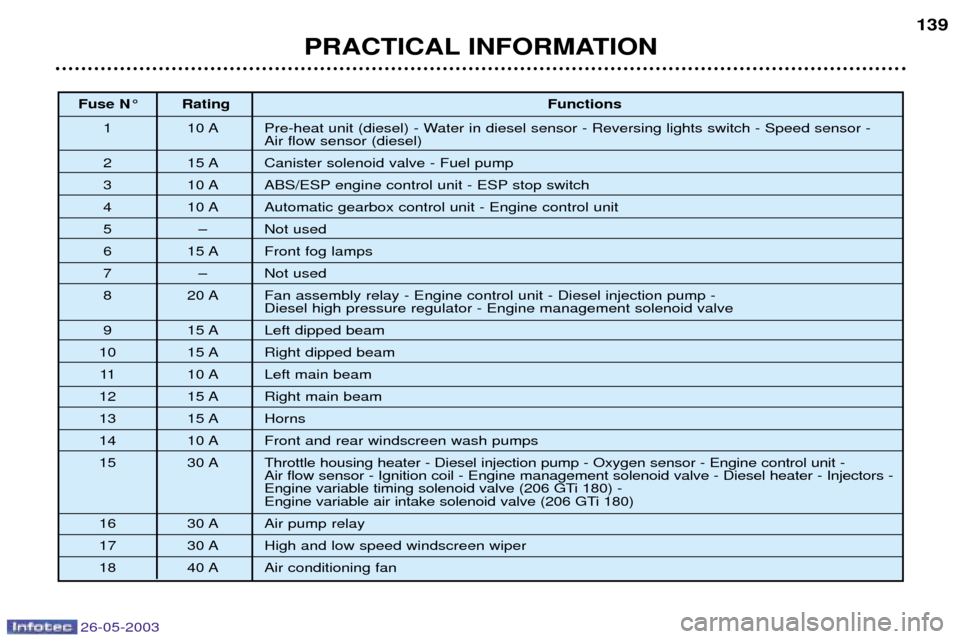
Fuse N¡ Rating
Functions
1 10 A Pre-heat unit (diesel) - Water in diesel sensor - Reversing lights switch - Speed sensor - Air flow sensor (diesel)
2 15 A Canister solenoid valve - Fuel pump
3 10 A ABS/ESP engine control unit - ESP stop switch
4 10 A Automatic gearbox control unit - Engine control unit
5 Ð Not used
6 15 A Front fog lamps
7 Ð Not used
8 20 A Fan assembly relay - Engine control unit - Diesel injection pump - Diesel high pressure regulator - Engine management solenoid valve
9 15 A Left dipped beam
10 15 A Right dipped beam 11 10 A Left main beam
12 15 A Right main beam
13 15 A Horns
14 10 A Front and rear windscreen wash pumps
15 30 A Throttle housing heater - Diesel injection pump - Oxygen sensor - Engine control unit - Air flow sensor - Ignition coil - Engine management solenoid valve - Diesel heater - Injectors -
Engine variable timing solenoid valve (206 GTi 180) -
Engine variable air intake solenoid valve (206 GTi 180)
16 30 A Air pump relay
17 30 A High and low speed windscreen wiper
18 40 A Air conditioning fan
Page 154 of 171
26-05-2003
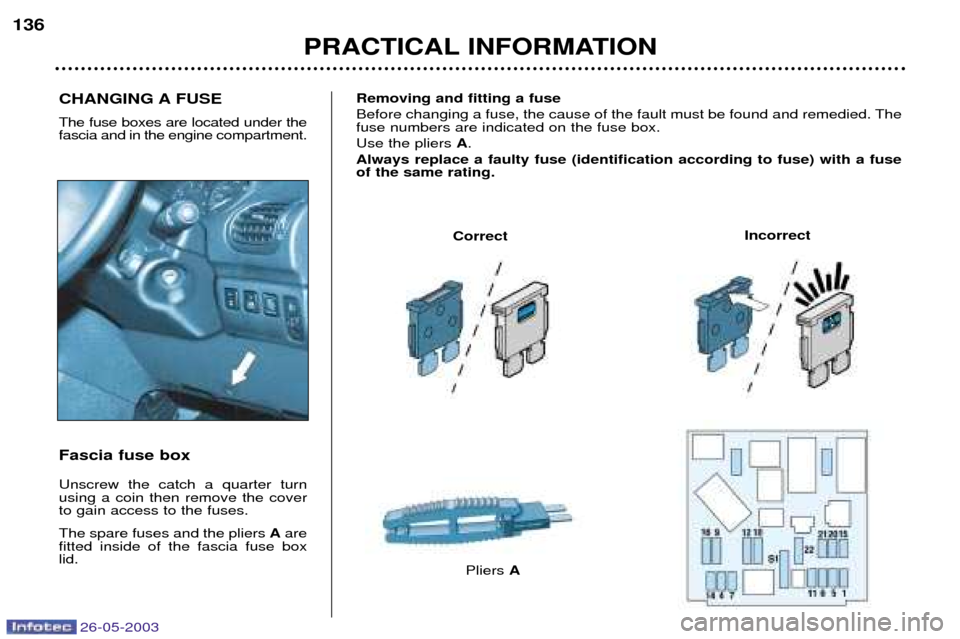
CHANGING A FUSE The fuse boxes are located under the fascia and in the engine compartment. Fascia fuse box Unscrew the catch a quarter turn using a coin then remove the coverto gain access to the fuses. The spare fuses and the pliers Aare
fitted inside of the fascia fuse box lid.
PRACTICAL INFORMATION
136
Removing and fitting a fuse
Before changing a fuse, the cause of the fault must be found and remedied. The fuse numbers are indicated on the fuse box. Use the pliers A.
Always replace a faulty fuse (identification according to fuse) with a fuse of the same rating.
Correct
Pliers A Incorrect
Page 155 of 171
26-05-2003
PRACTICAL INFORMATION137
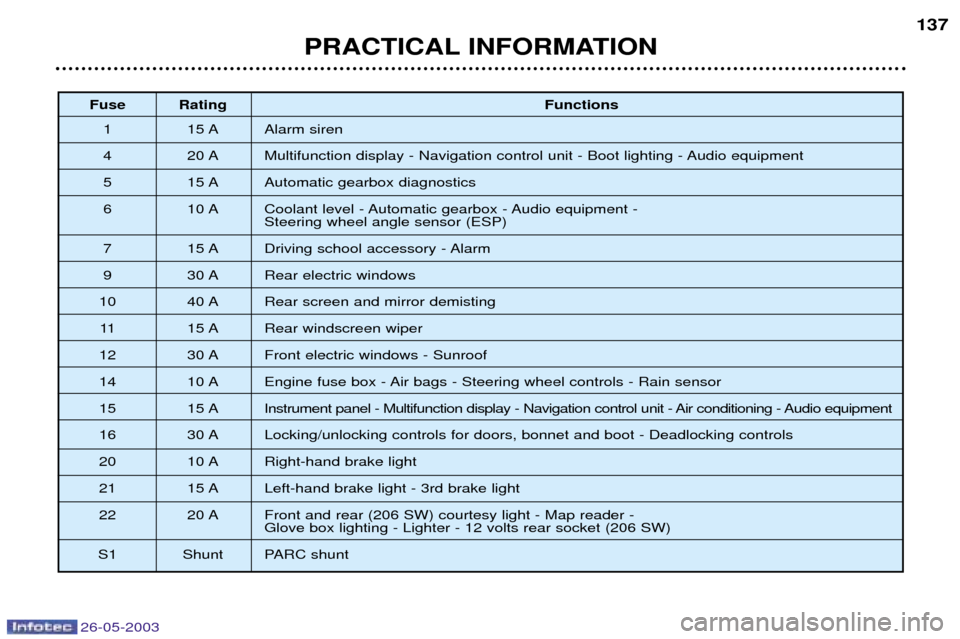
Fuse Rating
Functions
1 15 A Alarm siren
4 20 A Multifunction display - Navigation control unit - Boot lighting - Audio equipment
5 15 A Automatic gearbox diagnostics
6 10 A Coolant level - Automatic gearbox - Audio equipment - Steering wheel angle sensor (ESP)
7 15 A Driving school accessory - Alarm
9 30 A Rear electric windows
10 40 A Rear screen and mirror demisting
11 15 A Rear windscreen wiper
12 30 A Front electric windows - Sunroof
14 10 A Engine fuse box - Air bags - Steering wheel controls - Rain sensor
15 15 A Instrument panel - Multifunction display - Navigation control unit - Air conditioning - Audio equipment
16 30 A Locking/unlocking controls for doors, bonnet and boot - Deadlocking controls
20 10 A Right-hand brake light
21 15 A Left-hand brake light - 3rd brake light
22 20 A Front and rear (206 SW) courtesy light - Map reader - Glove box lighting - Lighter - 12 volts rear socket (206 SW)
S1 Shunt PARC shunt
Page 156 of 171

PRACTICAL INFORMATION
140
BATTERY
To charge the battery using a battery charger:
Ð Disconnect the battery,
Ð Follow the instructions for use given by the battery charger manufacturer,
Ð Reconnect starting with the negative (Ð) terminal,
Ð Check that the terminals and connectors are clean. If they are covered withsulphate (white or greenish deposit), disconnect them and clean them.
To start the vehicle from another battery:
Ð Connect the red cable to the positive (+) terminals of the two batteries,
Ð Connect one end of the green or black cable to the negative (Ð) terminal of the slave battery,
Ð Connect the other end of the green or black cable to an earth point on the bro- ken down vehicle as far as possible from the battery,
Operate the starter, let the engine run.
Wait for the engine to return to idle, then disconnect the cables.
Ð Before disconnecting the battery, you must wait for 2 minutes after switching off the ignition.
Ð Never disconnect a terminal when the engine is running.
Ð Never charge a battery without first disconnecting the terminals.
Ð Close the windows and sunroof before disconnecting the battery. If they do not operate normally following reconnection of the battery, they must be reintialised (see sections "Electric windows - Safety auto-reverse" and"Sunroof - Safety auto-reverse".
Ð After every reconnection of the battery, switch on the ignition and wait 1 minute before starting to allow the electronic systems to be initialised. Ifslight difficulties are experienced after this, please contact a PEUGEOT
dealer.
It is advisable to disconnect the battery if the vehicle is not to be used for a period of more than one month.
ECONOMY MODE FUNCTION After the engine has stopped, with the key in the accessories position,
certain functions (windscreen wiper,electric windows, courtesy lights,audio equipment etc.) can only beused for thirty minutes, to prevent
discharging the battery.
Once the thirty minutes are over, the message "Economy mode active"
appears on the multifunction displayand the active functions are put on
standby.
A flat battery will prevent the engine from starting.
26-05-2003
Page 157 of 171
26-05-2003
PRACTICAL INFORMATION141
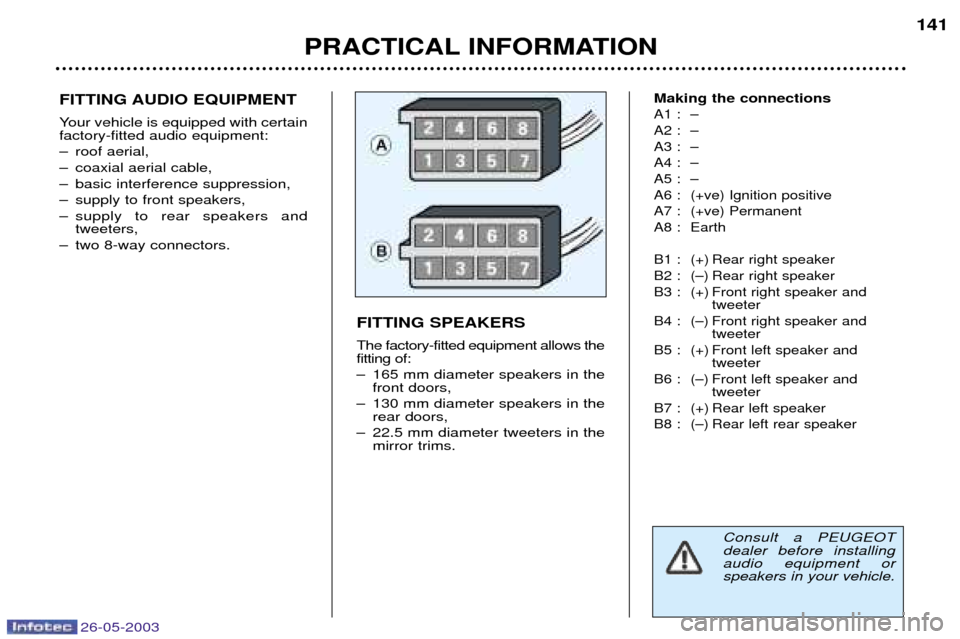
FITTING AUDIO EQUIPMENT
Your vehicle is equipped with certain factory-fitted audio equipment:
Ð roof aerial,
Ð coaxial aerial cable,
Ð basic interference suppression,
Ð supply to front speakers,
Ð supply to rear speakers and tweeters,
Ð two 8-way connectors. Making the connections
A1 : Ð
A2 : Ð
A3 : Ð
A4 : Ð
A5 : Ð
A6 : (+ve) Ignition positive
A7 : (+ve) Permanent
A8 : Earth
B1 : (+) Rear right speaker
B2 : (Ð) Rear right speaker
B3 : (+) Front right speaker and
tweeter
B4 : (Ð) Front right speaker and tweeter
B5 : (+) Front left speaker and tweeter
B6 : (Ð) Front left speaker and tweeter
B7 : (+) Rear left speaker
B8 : (Ð) Rear left rear speaker
FITTING SPEAKERS The factory-fitted equipment allows the fitting of:
Ð 165 mm diameter speakers in the front doors,
Ð 130 mm diameter speakers in the rear doors,
Ð 22.5 mm diameter tweeters in the mirror trims.
Consult a PEUGEOT dealer before installingaudio equipment orspeakers in your vehicle.
Page 158 of 171
26-05-2003
PRACTICAL INFORMATION
142
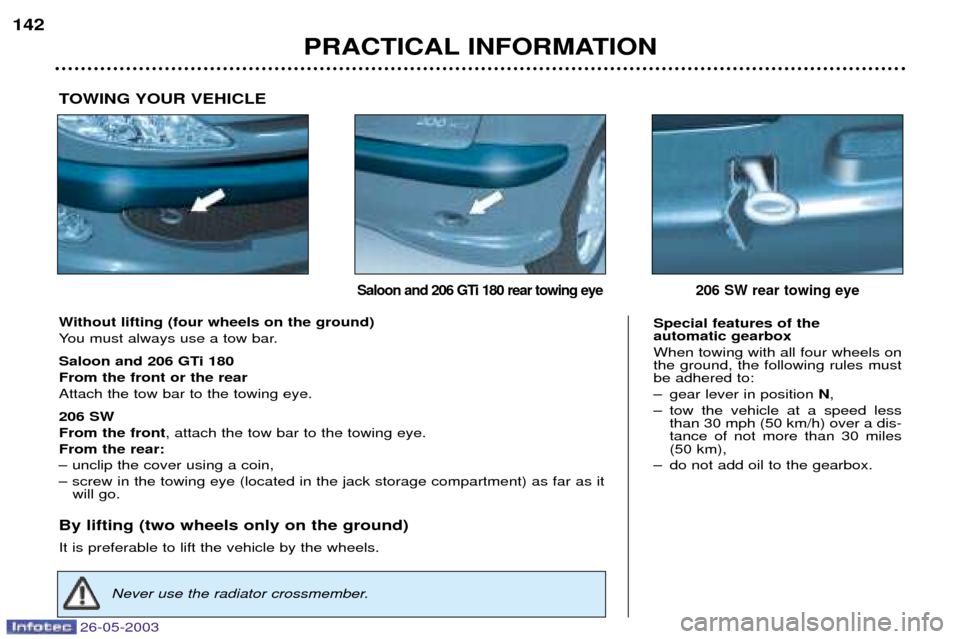
Without lifting (four wheels on the ground)
You must always use a tow bar.
Saloon and 206 GTi 180 From the front or the rearAttach the tow bar to the towing eye. 206 SW From the front , attach the tow bar to the towing eye.
From the rear:Ð unclip the cover using a coin,Ð screw in the towing eye (located in the jack storage compartment) as far as it will go.
By lifting (two wheels only on the ground) It is preferable to lift the vehicle by the wheels.
Special features of the automatic gearbox When towing with all four wheels on the ground, the following rules mustbe adhered to:
Ð gear lever in position N,
Ð tow the vehicle at a speed less than 30 mph (50 km/h) over a dis- tance of not more than 30 miles(50 km),
Ð do not add oil to the gearbox.
Saloon and 206 GTi 180 rear towing eye206 SW rear towing eye
Never use the radiator crossmember.
TOWING YOUR VEHICLE
Page 159 of 171
26-05-2003
PRACTICAL INFORMATION143
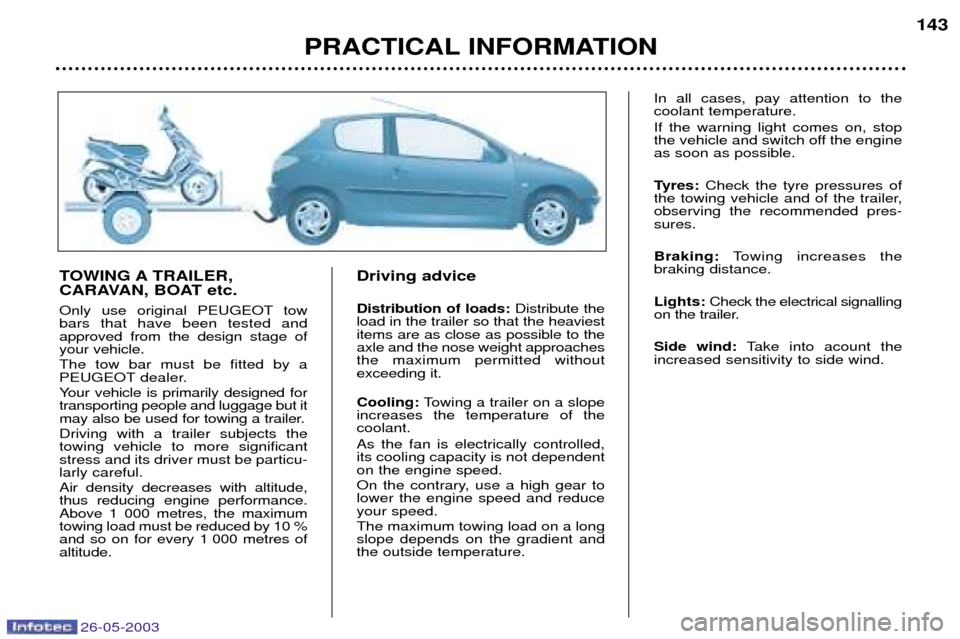
TOWING A TRAILER,
CARAVAN, BOAT etc.
Only use original PEUGEOT tow bars that have been tested andapproved from the design stage ofyour vehicle. The tow bar must be fitted by a
PEUGEOT dealer.
Your vehicle is primarily designed for transporting people and luggage but it
may also be used for towing a trailer. Driving with a trailer subjects the towing vehicle to more significantstress and its driver must be particu-larly careful. Air density decreases with altitude, thus reducing engine performance.Above 1 000 metres, the maximumtowing load must be reduced by 10 %
and so on for every 1 000 metres ofaltitude. Driving advice Distribution of loads:
Distribute the
load in the trailer so that the heaviest items are as close as possible to theaxle and the nose weight approachesthe maximum permitted withoutexceeding it. Cooling: Towing a trailer on a slope
increases the temperature of the coolant. As the fan is electrically controlled, its cooling capacity is not dependenton the engine speed.
On the contrary, use a high gear to lower the engine speed and reduceyour speed. The maximum towing load on a long slope depends on the gradient andthe outside temperature. In all cases, pay attention to thecoolant temperature. If the warning light comes on, stop
the vehicle and switch off the engineas soon as possible.
Tyres:
Check the tyre pressures of
the towing vehicle and of the trailer, observing the recommended pres-sures. Braking: Towing increases the
braking distance. Lights: Check the electrical signalling
on the trailer.Side wind: Take into acount the
increased sensitivity to side wind.
Page 160 of 171
26-05-2003
PRACTICAL INFORMATION
144
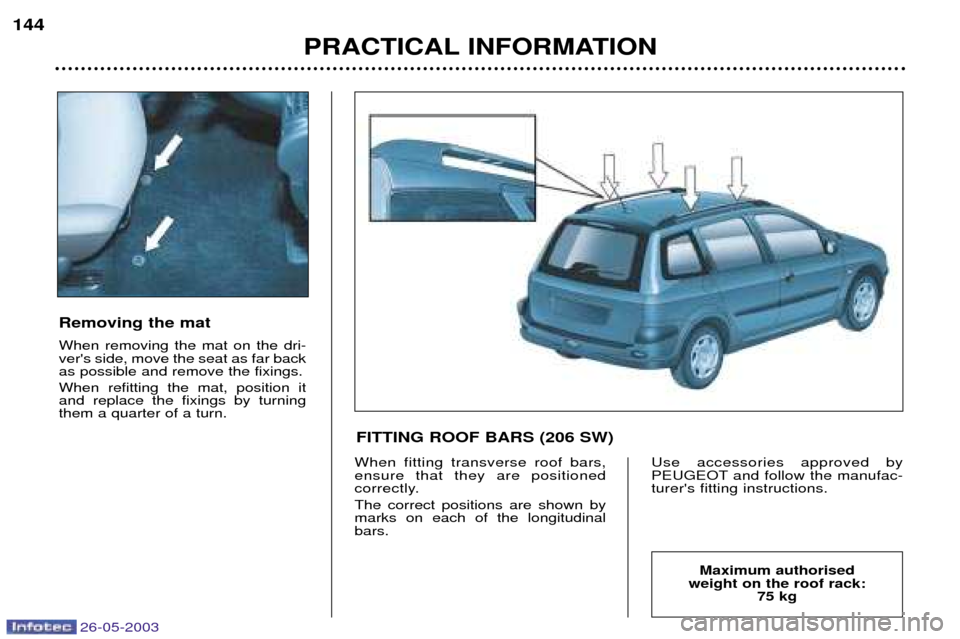
Removing the mat When removing the mat on the dri- ver's side, move the seat as far backas possible and remove the fixings. When refitting the mat, position it and replace the fixings by turningthem a quarter of a turn.
When fitting transverse roof bars, ensure that they are positioned
correctly. The correct positions are shown by marks on each of the longitudinalbars. Use accessories approved by
PEUGEOT and follow the manufac-turer's fitting instructions.
Maximum authorised
weight on the roof rack: 75 kg
FITTING ROOF BARS (206 SW)