audio Peugeot Bipper 2015 Owner's Manual
[x] Cancel search | Manufacturer: PEUGEOT, Model Year: 2015, Model line: Bipper, Model: Peugeot Bipper 2015Pages: 192, PDF Size: 7.97 MB
Page 4 of 192
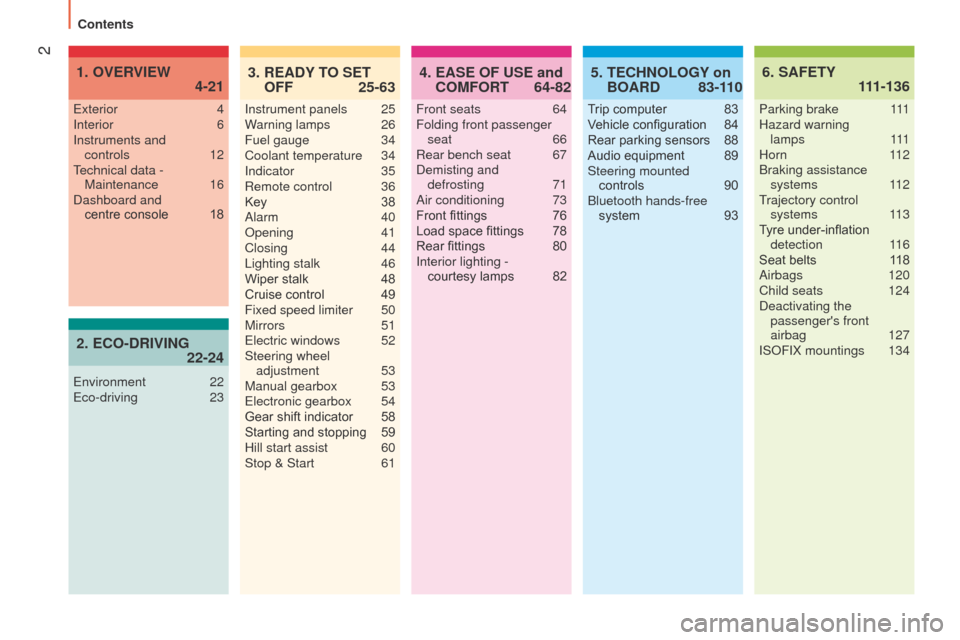
2
Bipper_en_Chap00a_sommaire_ed02-2014
EASE OF USE and
COMFORT
4. 64-82 SAFETY
6.
111-136
Front seats 64
Folding front passenger seat
66
Rear bench seat
67
Demisting and defrosting
71
Air conditioning
73
Front fittings
76
Load space fittings
78
Rear fittings
80
Interior lighting - courtesy lamps
82
e
xterior
4
Interior
6
Instruments and controls
12
technical data - Maintenance
16
Dashboard and centre
console
18
OVERVIEW
1.
4-21
Parking brake 1 11
Hazard warning lamps
111
Horn
112
Braking assistance systems
112
trajectory control systems
113
Tyre under-inflation detection
1
16
Seat belts
1
18
Airbags
120
Child seats
124
Deactivating the passenger's front
airbag
127
ISOFIX mountings
134
TECHNOLOGY on
BOARD
5. 83-1
10
Trip computer 83
V ehicle configuration 84
Rear parking sensors
88
Audio equipment
89
Steering mounted controls
90
Bluetooth hands-free system
93
READY TO SET
OFF
3.
25-63
Instrument panels 25
W arning lamps 26
Fuel gauge
34
Coolant temperature
34
Indicator
35
Remote control
36
Key
38
Alarm
40
Opening
41
Closing
44l
ighting stalk
46
Wiper stalk
48
Cruise control
49
Fixed speed limiter
50
Mirrors
51
e
lectric windows
52
Steering wheel adjustment
53
Manual gearbox
53e
lectronic gearbox
54
Gear shift indicator
58
Starting and stopping
59
Hill start assist
60
Stop & Start
61
ECO-DRIVING
2.
22-24
environment 22e
co-driving 23
Contents
Page 15 of 192
13
Bipper_en_Chap01_vue-ensemble_ed02-2014
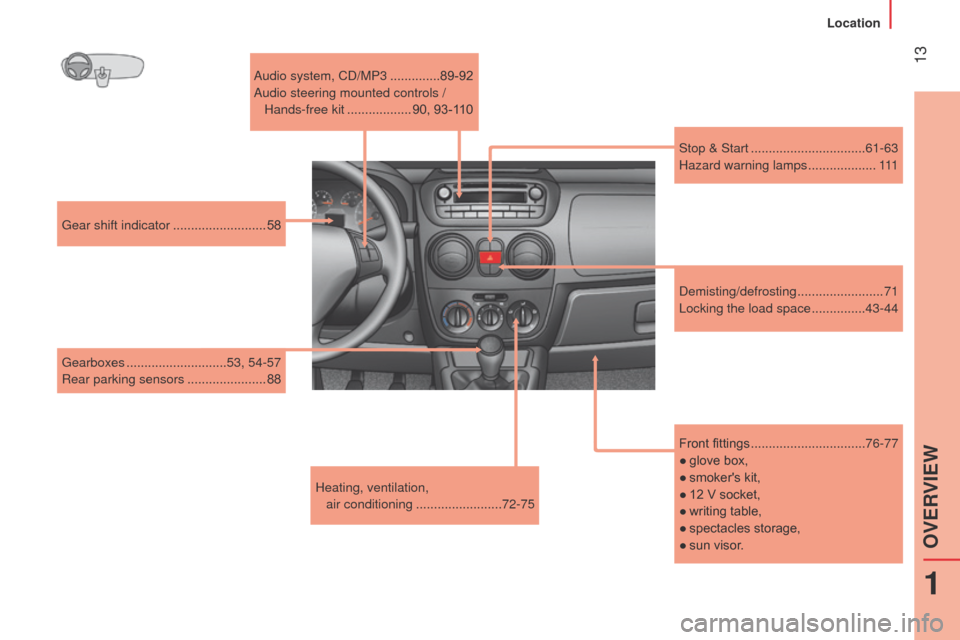
Front fittings ................................76-77
●
glove box,
●
smoker's kit,
●
12 V socket,
●
writing table,
●
spectacles storage,
●
sun visor
.
Audio system, CD/MP3
..............
89-92
Audio steering mounted controls / Hands-free kit
..................
90, 93-110
g
ear shift indicator
..........................
58
g
earboxes
............................
53, 54-57
Rear parking sensors
......................
88
Heating, ventilation, air conditioning
........................72-75 Demisting/defrosting
........................
71
l
ocking the load space
...............
43-44
Stop & Start ................................
61-63
Hazard warning lamps
...................
111
1
OVERVIEW
Location
Page 16 of 192
14
Bipper_en_Chap01_vue-ensemble_ed02-2014
INSTRUMENTS AND
CONTROLS
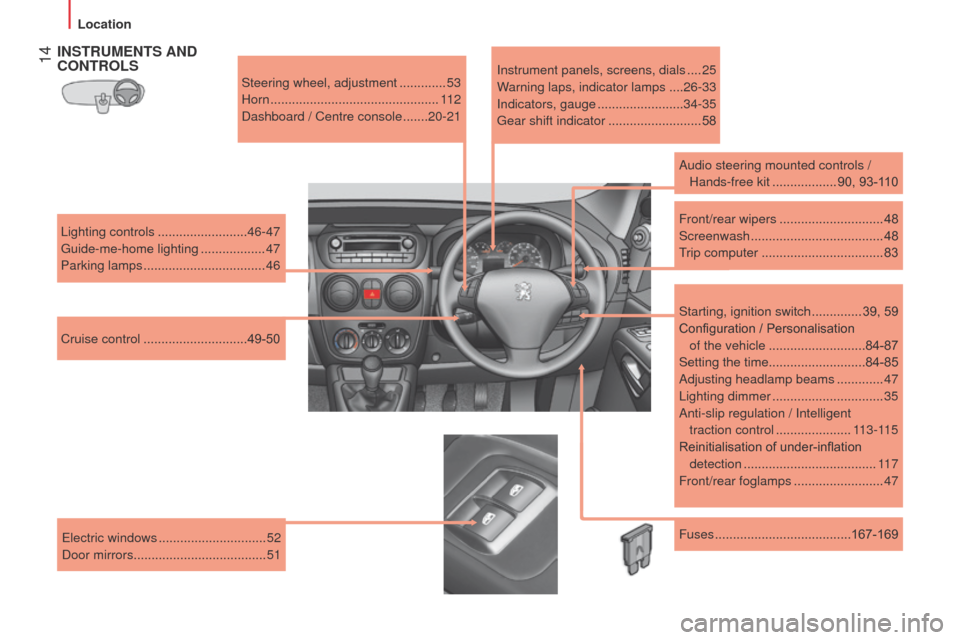
Steering wheel, adjustment .............53
Horn ............................................... 11 2
Dashboard / Centre console
.......20-21
l
ighting controls
......................... 46-47
g
uide-me-home lighting
.................. 47
Parking lamps
.................................. 46
Cruise control
............................. 49-50 Instrument panels, screens, dials
....
25
Warning laps, indicator lamps .... 26-33
Indicators, gauge
........................ 34-35
g
ear shift indicator
..........................58
Audio steering mounted controls / Hands-free kit
..................90, 93-110
Front/rear wipers
.............................48
Screenwash
.....................................48
trip computer
..................................83
Starting, ignition switch
..............39, 59
Configuration / Personalisation
of the vehicle
...........................84-87
Setting the time........................... 84-85
Adjusting headlamp beams
.............47
l
ighting dimmer
...............................35
Anti-slip regulation / Intelligent traction control
.....................113-115
Reinitialisation of under-inflation detection
.......
..............................11 7
Front/rear foglamps
.........................47
Fuses
......................................167-169
e
lectric windows
.............................. 52
Door mirrors
..................................... 51
Location
Page 17 of 192
15
Bipper_en_Chap01_vue-ensemble_ed02-2014
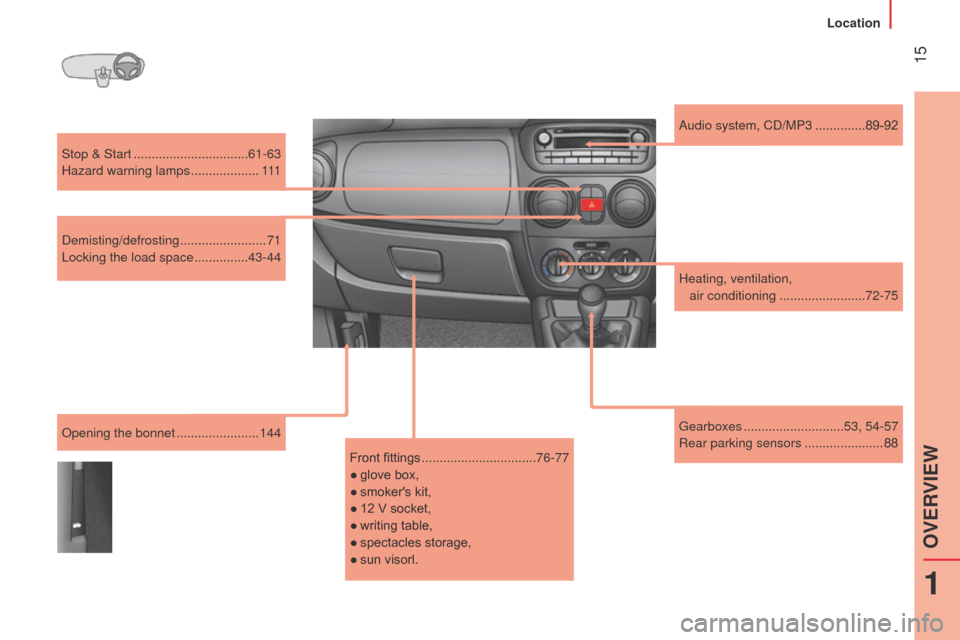
Stop & Start ................................61-63
Hazard warning lamps
...................111
Demisting/defrosting
........................71
l
ocking the load space
...............
43-44
Opening the bonnet
....................... 144
Front fittings
................................76-77
●
glove box,
●
smoker's kit,
●
12 V socket,
●
writing table,
●
spectacles storage,
●
sun visorl. Audio system, CD/MP3
..............
89-92
g
earboxes
............................53, 54-57
Rear parking sensors
......................88
Heating, ventilation,
air conditioning
........................72-75
1
OVERVIEW
Location
Page 20 of 192
18
Bipper_en_Chap01_vue-ensemble_ed02-2014
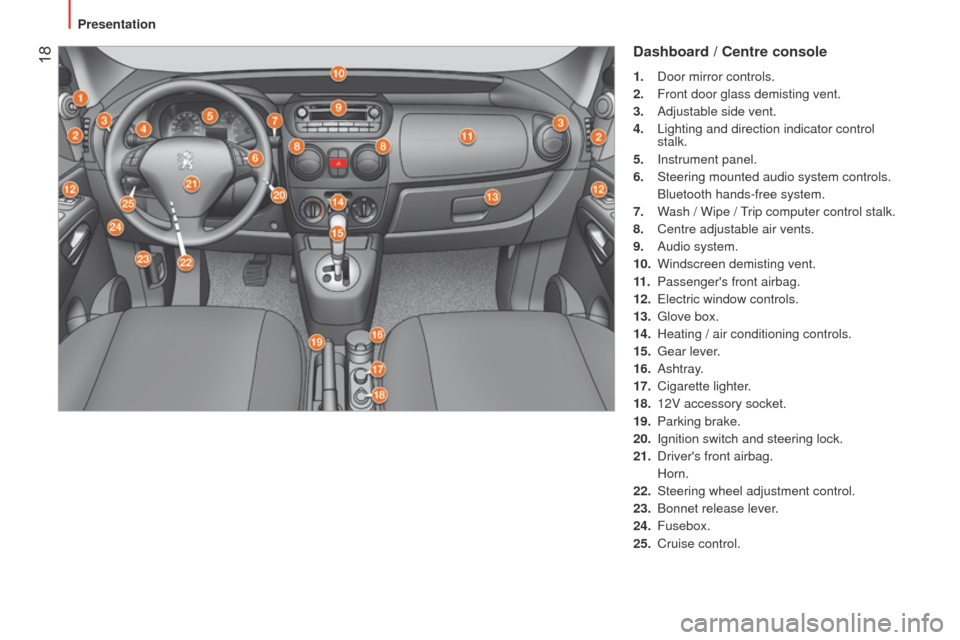
Dashboard / Centre console
1. Door mirror controls.
2.
Front door glass demisting vent.
3.
Adjustable side vent.
4.
l ighting and direction indicator control
stalk.
5.
Instrument panel.
6.
Steering mounted audio system controls.
Bluetooth hands-free system.
7.
W
ash / Wipe /
trip computer control stalk.
8.
Centre adjustable air vents.
9.
Audio system.
10.
Windscreen demisting vent.
11
.
Passenger's front airbag.
12.
e lectric window controls.
13.
g love box.
14.
Heating / air conditioning controls.
15.
g ear lever.
16.
Ashtray.
17.
Cigarette lighter
.
18.
12V accessory socket.
19.
Parking brake.
20.
Ignition switch and steering lock.
21.
Driver's front airbag.
Horn.
22.
Steering wheel adjustment control.
23.
Bonnet release lever
.
24.
Fusebox.
25.
Cruise control.
Presentation
Page 22 of 192
20
Bipper_en_Chap01_vue-ensemble_ed02-2014
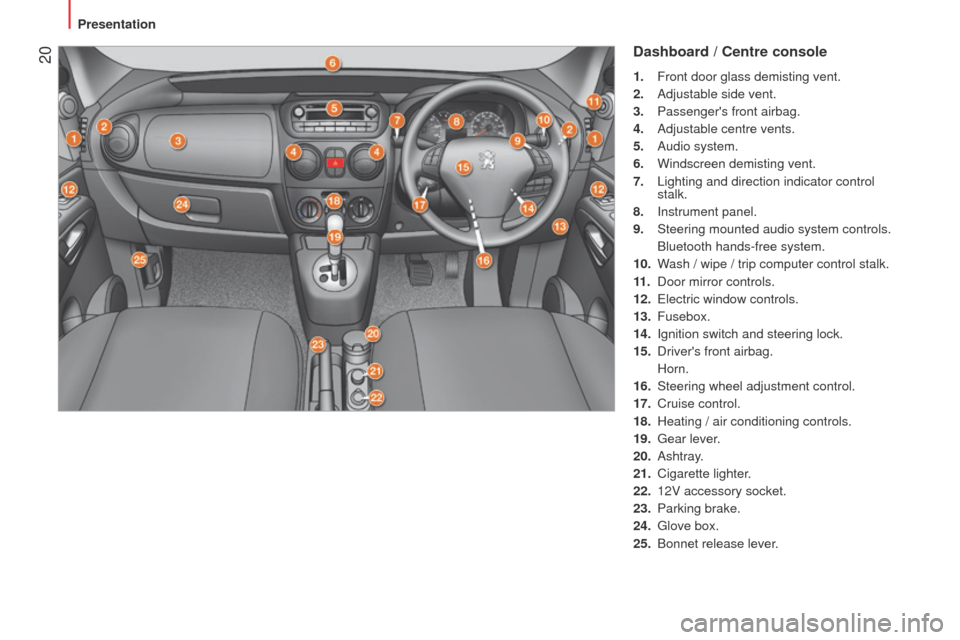
Dashboard / Centre console
1. Front door glass demisting vent.
2.
Adjustable side vent.
3.
Passenger's front airbag.
4.
Adjustable centre vents.
5.
Audio system.
6.
Windscreen demisting vent.
7.
l ighting and direction indicator control
stalk.
8.
Instrument panel.
9.
Steering mounted audio system controls.
Bluetooth hands-free system.
10.
W
ash / wipe / trip computer control stalk.
11 .
Door mirror controls.
12.
e lectric window controls.
13.
Fusebox.
14.
Ignition switch and steering lock.
15.
Driver's front airbag.
Horn.
16.
Steering wheel adjustment control.
17.
Cruise control.
18.
Heating / air conditioning controls.
19.
g ear lever.
20.
Ashtray.
21.
Cigarette lighter
.
22.
12V accessory socket.
23.
Parking brake.
24.
g love box.
25.
Bonnet release lever
.
Presentation
Page 37 of 192
35
Bipper_en_Chap03_pret-a-partir_ed02-2014
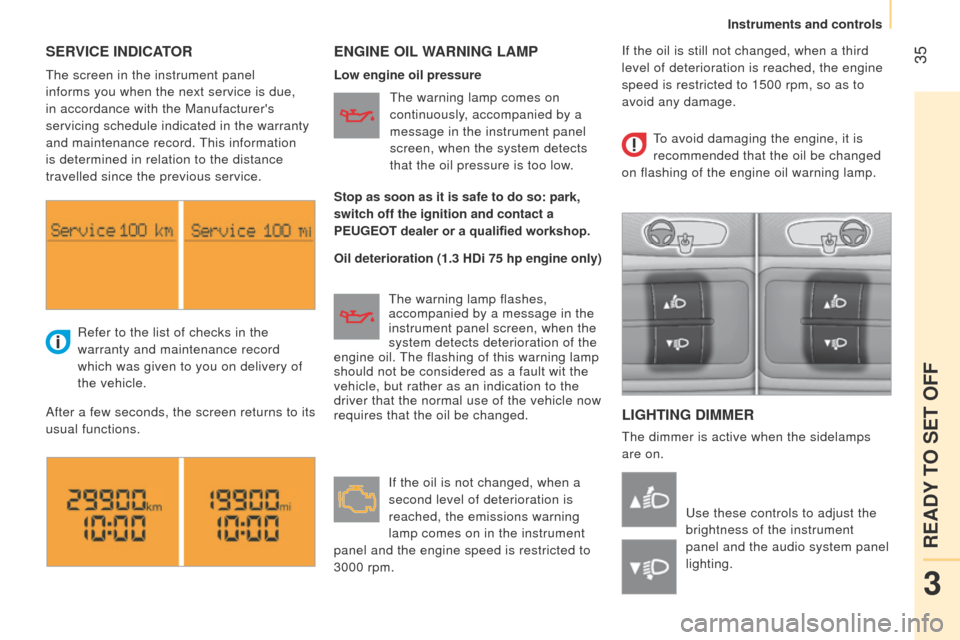
SERVICE INDICATORENGINE OIL WARNING LAMP
L IGHTING DIMMER
the dimmer is active when the sidelamps
are on.
Refer to the list of checks in the
warranty and maintenance record
which was given to you on delivery of
the vehicle.
After a few seconds, the screen returns to its
usual functions.
u
se these controls to adjust the
brightness of the instrument
panel and the audio system panel
lighting.
t
he screen in the instrument panel
informs you when the next service is due,
in accordance with the Manufacturer's
servicing schedule indicated in the warranty
and maintenance record.
t
his information
is determined in relation to the distance
travelled since the previous service. Low engine oil pressure
Oil deterioration (1.3 HDi 75 hp engine only)
t
he warning lamp comes on
continuously, accompanied by a
message in the instrument panel
screen, when the system detects
that the oil pressure is too low.
t
he warning lamp flashes,
accompanied by a message in the
instrument panel screen, when the
system detects deterioration of the
engine oil.
t
he flashing of this warning lamp
should not be considered as a fault wit the
vehicle, but rather as an indication to the
driver that the normal use of the vehicle now
requires that the oil be changed.
If the oil is not changed, when a
second level of deterioration is
reached, the emissions warning
lamp comes on in the instrument
panel and the engine speed is restricted to
3000 rpm.
to avoid damaging the engine, it is
recommended that the oil be changed
on flashing of the engine oil warning lamp.
Stop as soon as it is safe to do so: park,
switch off the ignition and contact a
PEUGEOT dealer or a qualified workshop. If the oil is still not changed, when a third
level of deterioration is reached, the engine
speed is restricted to 1500 rpm, so as to
avoid any damage.
3
READY TO SET OFF
Instruments and controls
Page 91 of 192
89
Bipper_en_Chap05_technologie_ed02-2014
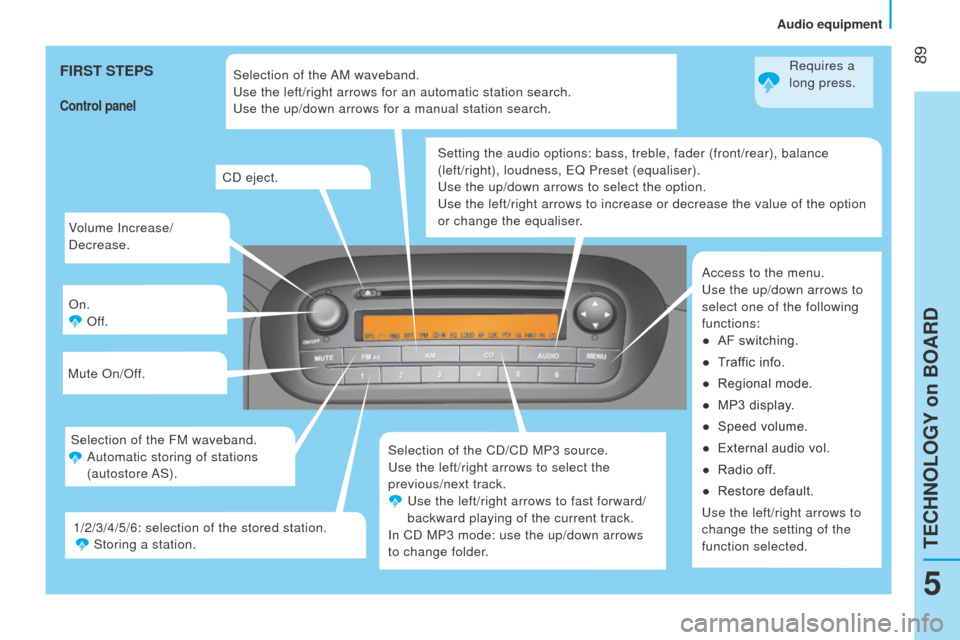
Volume Increase/
Decrease.
On.Off.
Mute On/Off.
Selection of the CD/CD MP3 source.
u
se the left/right arrows to select the
previous/next track.
u se the left/right arrows to fast forward/
backward playing of the current track.
In CD MP3 mode: use the up/down arrows
to change folder. Setting the audio options: bass, treble, fader (front/rear), balance
(left/right), loudness, e Q Preset (equaliser).
u
se the up/down arrows to select the option.
u
se the left/right arrows to increase or decrease the value of the option\
or change the equaliser.
Access to the menu.
u
se the up/down arrows to
select one of the following
functions: ●
AF switching.
●
T
raffic info.
●
Regional mode.
●
MP3 display
.
●
Speed volume.
●
External audio vol.
●
Radio of
f.
●
Restore default.
u
se the left/right arrows to
change the setting of the
function selected.
CD eject.
Selection of the FM waveband. Automatic storing of stations
(autostore AS). Selection of the AM waveband.
u
se the left/right arrows for an automatic station search.
u
se the up/down arrows for a manual station search.
1/2/3/4/5/6: selection of the stored station. Storing a station.
Control panel
FIRST STEPSRequires a
long press.
5
TECHNOLOGY on BOARD
Audio equipment
Page 92 of 192
90
Bipper_en_Chap05_technologie_ed02-2014
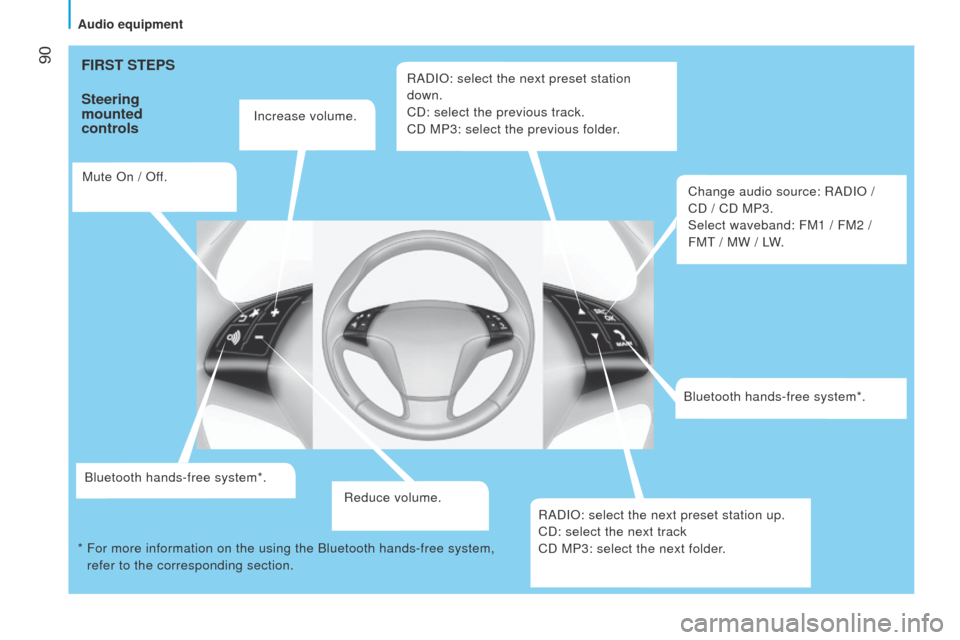
FIRST STEPS
Steering
mounted
controls
Increase volume.
Mute On / Off.
Bluetooth hands-free system*. Reduce volume.RADIO: select the next preset station
down.
CD: select the previous track.
CD MP3: select the previous folder.
Change audio source: RADIO /
CD / CD MP3.
Select waveband: FM1 / FM2 /
FM
t
/ MW /
l
W
.
Bluetooth hands-free system*.
RADIO: select the next preset station up.
CD: select the next track
CD MP3: select the next folder.
*
For more information on the using the Bluetooth hands-free system,
refer to the corresponding section.
Audio equipment
Page 93 of 192
91
Bipper_en_Chap05_technologie_ed02-2014
"AUDIO FUNCTIONS" MENU
RDS "AF Switching"
the RDS (Radio Data System) enables you
to continue listening to the same station,
regardless of the frequency that it uses in
your current location.
t
he audio equipment
continuously searches for the transmitter
which offers the best reception for the
station.
Press the " 3" or " 4" button to activate (ON)
or deactivate (OFF) the RDS.
On the FM waveband, "AF" appears on
the display if the RDS is activated and the
station is broadcasting with the RDS.
"Traffic Info"
All traffic information announcements will be
given priority regardless of which source is
currently playing.
t
he e ON ( e nhanced Other Networks) system
links stations which belong to the same network.
It allows you to receive traffic information
transmitted by a station which belongs to the
same network as the station to which you
are listening.
"Regional Mode"
Some stations, organised in a network,
broadcast regional programmes in the
various areas which they serve.
t
he regional
mode allows you to choose to continue
listening to the same programme.
Press the " 3" or " 4" button to activate (ON)
or deactivate (OFF) the R
eg function.
On the FM waveband, "
l OC" appears on the
display if the R
eg function is activated and
the station finds a local frequency.
"MP3 Display"
Press the " 3" or " 4" button to display the
track number or the MP3 CD information
(Artist/Album/Folder/File/
t
itle/
t
ime elapsed).
Automatic volume control
"Speed Volume"
Press the " 3" or " 4" button to minimise
( l OW), maximise (HI g H) or deactivate
(OFF) the automatic control of the volume in
relation to the vehicle speed.
The volume of the traffic information is
independent of the volume of the other sources.
You can adjust it using the volume button during
traffic announcements; this setting will be stored
for the next announcement.
Press the "
3" or " 4" button to activate (ON) or
deactivate (OFF) the tA
function.
On the FM waveband, "
t
A" appears on the
display if the
tA
function is activated and
"TPM" appears if the station broadcasts traffic
information.
"External Audio Vol"
Press the " 3" or " 4" button to decrease
(down to 0 minimum), increase (up to
40
maximum) or deactivate (OFF) the
volume of the external source (e.g.: hands-
free kit).
Programmed switching off "Radio Off"
Press the " 3" or " 4" button to programme
the switch-off time of "00 MIN" or "20 MIN".
t
his countdown is taken into account with
the doors closed and the key in the STOP
position.
"Restore Default"
Press the " 3" or " 4" button to retain the
modified values (NO) or restore the default
values (Y
e S).
"Restoring" appears on the display during
the resetting of the configuration values. "MP3" appears on the display if the function
is activated and the CD contains tracks in
the MP3 format.
Press the MENU
button
on the audio equipment to
gain access to the "Audio
functions" menu.
Press the "5" or "6" button to
select one of the configurable
audio functions below.
5
TECHNOLOGY on BOARD
Audio equipment