PEUGEOT PARTNER TEPEE 2020 Owners Manual
Manufacturer: PEUGEOT, Model Year: 2020, Model line: PARTNER TEPEE, Model: PEUGEOT PARTNER TEPEE 2020Pages: 216, PDF Size: 8.46 MB
Page 131 of 216
129
Travelling abroad
Certain fuels could damage your vehicle's
engine.
In certain countries, the use of a particular
fuel may be required (specific octane rating,
specific trade name, etc.) to ensure correct
operation of the engine.
For any additional information, contact a dealer.
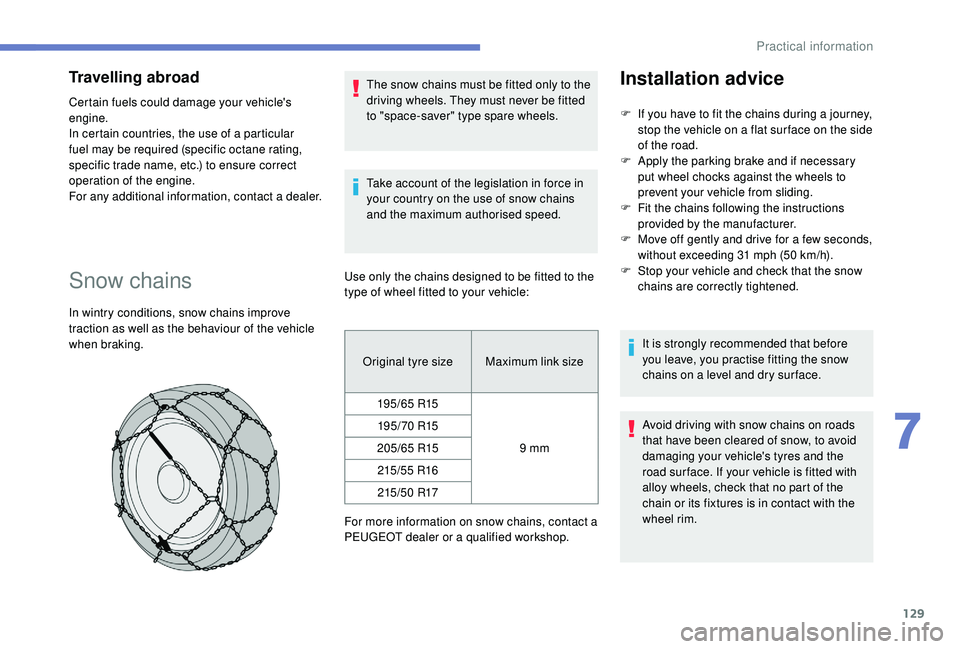
Snow chains
In wintry conditions, snow chains improve
traction as well as the behaviour of the vehicle
when braking.The snow chains must be fitted only to the
driving wheels. They must never be fitted
to "space-saver" type spare wheels.
Take account of the legislation in force in
your country on the use of snow chains
and the maximum authorised speed.
Use only the chains designed to be fitted to the
type of wheel fitted to your vehicle:
Original tyre size Maximum link size
195/65 R15
9
mm
19 5/ 70 R15
205/65 R15 215/5 5 R16215 / 5 0 R17
For more information on snow chains, contact a
PEUGEOT dealer or a qualified workshop. It is strongly recommended that before
you leave, you practise fitting the snow
chains on a level and dry sur face.
Avoid driving with snow chains on roads
that have been cleared of snow, to avoid
damaging your vehicle's tyres and the
road sur face. If your vehicle is fitted with
alloy wheels, check that no part of the
chain or its fixtures is in contact with the
wheel rim.
Installation advice
F If you have to fit the chains during a journey,
stop the vehicle on a flat sur face on the side
of the road.
F
A
pply the parking brake and if necessary
put wheel chocks against the wheels to
prevent your vehicle from sliding.
F
F
it the chains following the instructions
provided by the manufacturer.
F
M
ove off gently and drive for a few seconds,
without exceeding 31
mph (50 km/h).
F
S
top your vehicle and check that the snow
chains are correctly tightened.
7
Practical information
Page 132 of 216
130
Removable snow shield
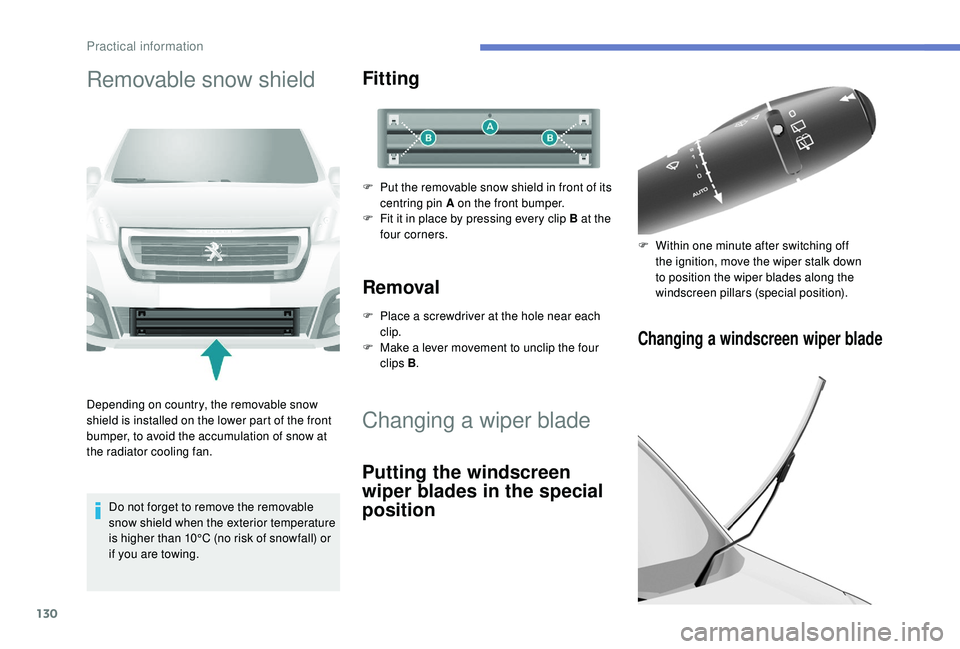
Depending on country, the removable snow
shield is installed on the lower part of the front
bumper, to avoid the accumulation of snow at
the radiator cooling fan.Do not forget to remove the removable
snow shield when the exterior temperature
is higher than 10°C (no risk of snowfall) or
if you are towing.
Fitting
F Put the removable snow shield in front of its centring pin A on the front bumper.
F
F
it it in place by pressing every clip B at the
four corners.
Removal
F Place a screwdriver at the hole near each clip.
F
M
ake a lever movement to unclip the four
clips B .
Changing a wiper blade
Putting the windscreen
wiper blades in the special
position
Changing a windscreen wiper blade
F Within one minute after switching off
the ignition, move the wiper stalk down
to position the wiper blades along the
windscreen pillars (special position).
Practical information
Page 133 of 216
131
To return the wiper blades to their normal
position, switch on the ignition and operate the
wiper stalk again.
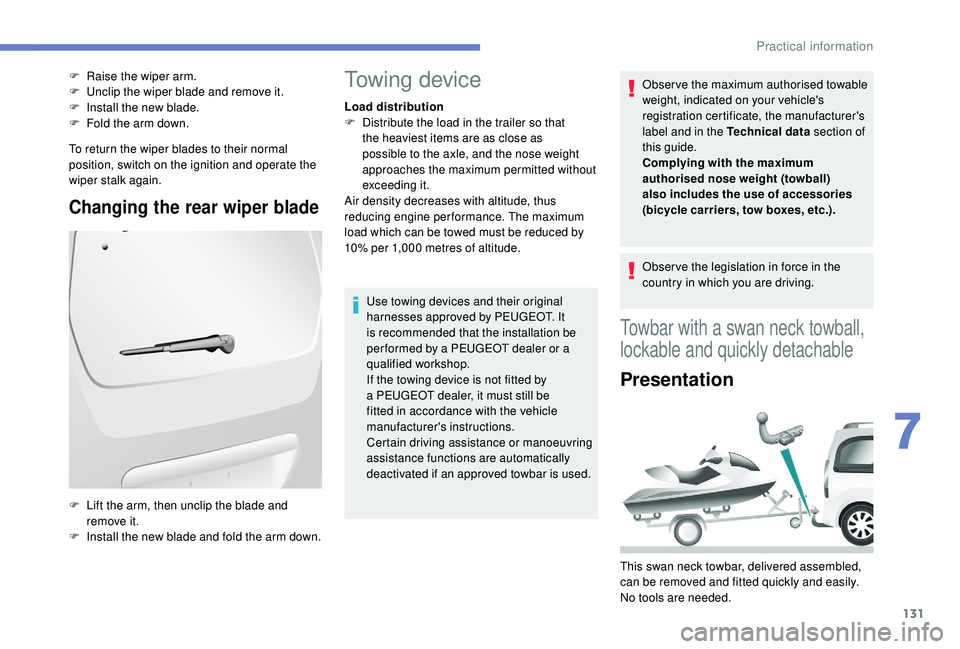
Changing the rear wiper blade
F Raise the wiper arm.
F U nclip the wiper blade and remove it.
F
I
nstall the new blade.
F
F
old the arm down.
F
L
ift the arm, then unclip the blade and
remove it.
F
I
nstall the new blade and fold the arm down.Towing device
Load distribution
F D istribute the load in the trailer so that
the heaviest items are as close as
possible to the axle, and the nose weight
approaches the maximum permitted without
exceeding
it.
Air density decreases with altitude, thus
reducing engine performance. The maximum
load which can be towed must be reduced by
10% per 1,000
metres of altitude.
Use towing devices and their original
harnesses approved by PEUGEOT. It
is recommended that the installation be
per formed by a PEUGEOT dealer or a
qualified workshop.
If the towing device is not fitted by
a PEUGEOT dealer, it must still be
fitted in accordance with the vehicle
manufacturer's instructions.
Certain driving assistance or manoeuvring
assistance functions are automatically
deactivated if an approved towbar is used. Obser ve the maximum authorised towable
weight, indicated on your vehicle's
registration certificate, the manufacturer's
label and in the Technical data
section of
this guide.
Complying with the maximum
authorised nose weight (towball)
also includes the use of accessories
(bicycle carriers, tow boxes, etc.).
Obser ve the legislation in force in the
country in which you are driving.
Towbar with a swan neck towball,
lockable and quickly detachable
Presentation
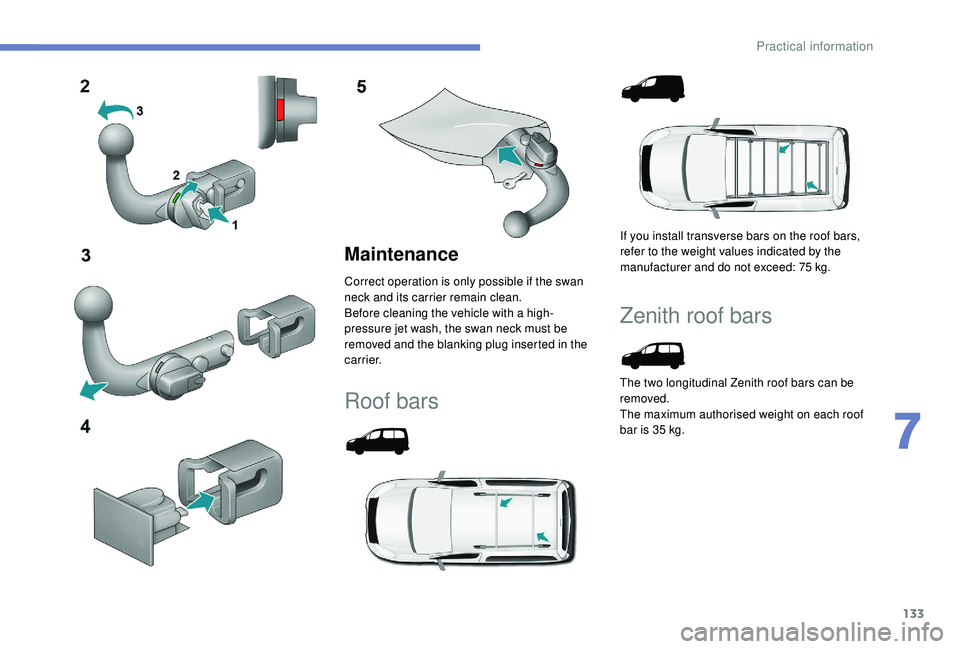
This swan neck towbar, delivered assembled,
can be removed and fitted quickly and easily.
No tools are needed.
7
Practical information
Page 134 of 216
132
Instructions for fitting and before
each use
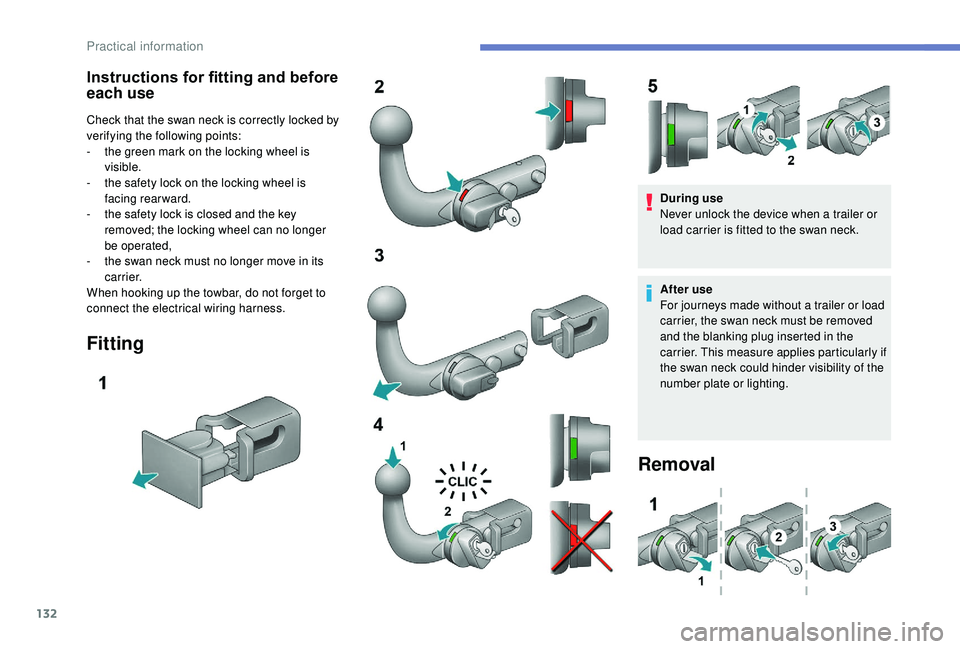
Check that the swan neck is correctly locked by
verifying the following points:
-
t
he green mark on the locking wheel is
visible.
-
t
he safety lock on the locking wheel is
facing rearward.
-
t
he safety lock is closed and the key
removed; the locking wheel can no longer
be operated,
-
t
he swan neck must no longer move in its
c a r r i e r.
When hooking up the towbar, do not forget to
connect the electrical wiring harness.
Fitting
During use
Never unlock the device when a trailer or
load carrier is fitted to the swan neck.
After use
For journeys made without a trailer or load
carrier, the swan neck must be removed
and the blanking plug inserted in the
carrier. This measure applies particularly if
the swan neck could hinder visibility of the
number plate or lighting.
Removal
Practical information
Page 135 of 216
133
Maintenance
Correct operation is only possible if the swan
neck and its carrier remain clean.
Before cleaning the vehicle with a high-
pressure jet wash, the swan neck must be
removed and the blanking plug inserted in the
c a r r i e r.
Roof bars
If you install transverse bars on the roof bars,
refer to the weight values indicated by the
manufacturer and do not exceed: 75 kg.
Zenith roof bars
The two longitudinal Zenith roof bars can be
removed.
The maximum authorised weight on each roof
bar is 35
kg.
7
Practical information
Page 136 of 216
134
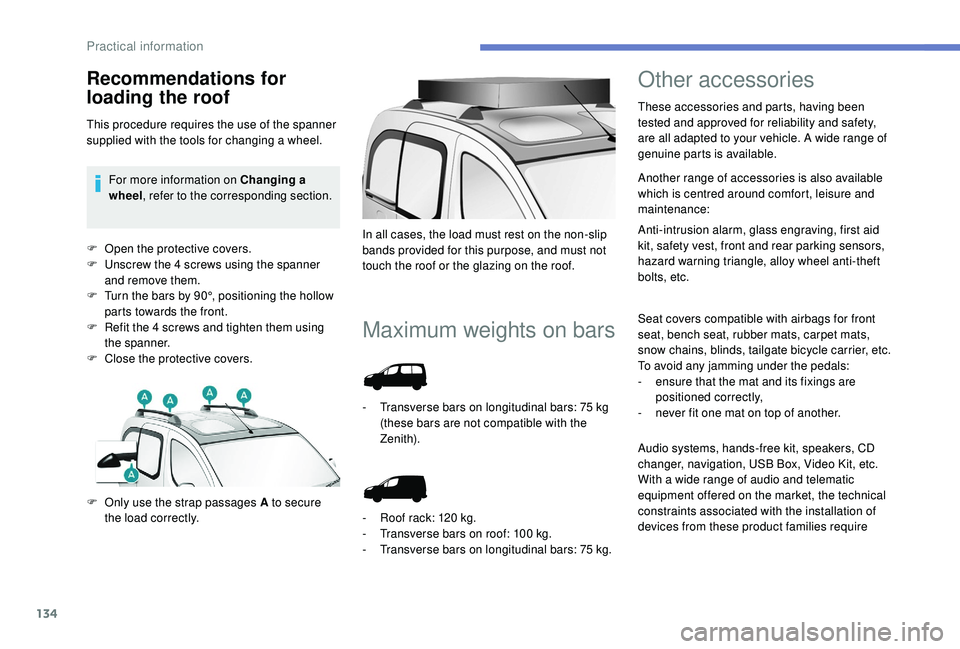
F Open the protective covers.
F U nscrew the 4 screws using the spanner
and remove them.
F
T
urn the bars by 90°, positioning the hollow
parts towards the front.
F
R
efit the 4 screws and tighten them using
the spanner.
F
C
lose the protective covers.
Maximum weights on bars
F Only use the strap passages A to secure the load correctly. In all cases, the load must rest on the non-slip
bands provided for this purpose, and must not
touch the roof or the glazing on the roof.
-
T
ransverse bars on longitudinal bars: 75 kg
(these bars are not compatible with the
Zenith).
-
R
oof rack: 120 kg.
-
T
ransverse bars on roof: 100 kg.
-
T
ransverse bars on longitudinal bars: 75
kg.
Other accessories
These accessories and parts, having been
tested and approved for reliability and safety,
are all adapted to your vehicle. A wide range of
genuine parts is available.
Another range of accessories is also available
which is centred around comfort, leisure and
maintenance:
Anti-intrusion alarm, glass engraving, first aid
kit, safety vest, front and rear parking sensors,
hazard warning triangle, alloy wheel anti-theft
bolts, etc.
Seat covers compatible with airbags for front
seat, bench seat, rubber mats, carpet mats,
snow chains, blinds, tailgate bicycle carrier, etc.
To avoid any jamming under the pedals:
-
e
nsure that the mat and its fixings are
positioned correctly,
-
n
ever fit one mat on top of another.
Recommendations for
loading the roof
This procedure requires the use of the spanner
supplied with the tools for changing a wheel.For more information on Changing a
wheel , refer to the corresponding section.
Audio systems, hands-free kit, speakers, CD
changer, navigation, USB Box, Video Kit, etc.
With a wide range of audio and telematic
equipment offered on the market, the technical
constraints associated with the installation of
devices from these product families require
Practical information
Page 137 of 216
135
taking into account the device specifics and
their compatibility with the capacities of the
standard equipment of your vehicle. Please
check this with a PEUGEOT dealer in advance.
The spare parts department publishes a
catalogue of accessories offering various
equipment and fittings, such as:
Load stops (all types).
Loading roller.
Towbar, towing harness: trailer towbar, which
must be installed by a PEUGEOT dealer.
Partition walls and dividing grilles, smooth
wood interior protection with non-slip floor.
Protective grilles.
Professional equipment
range
Bonnet
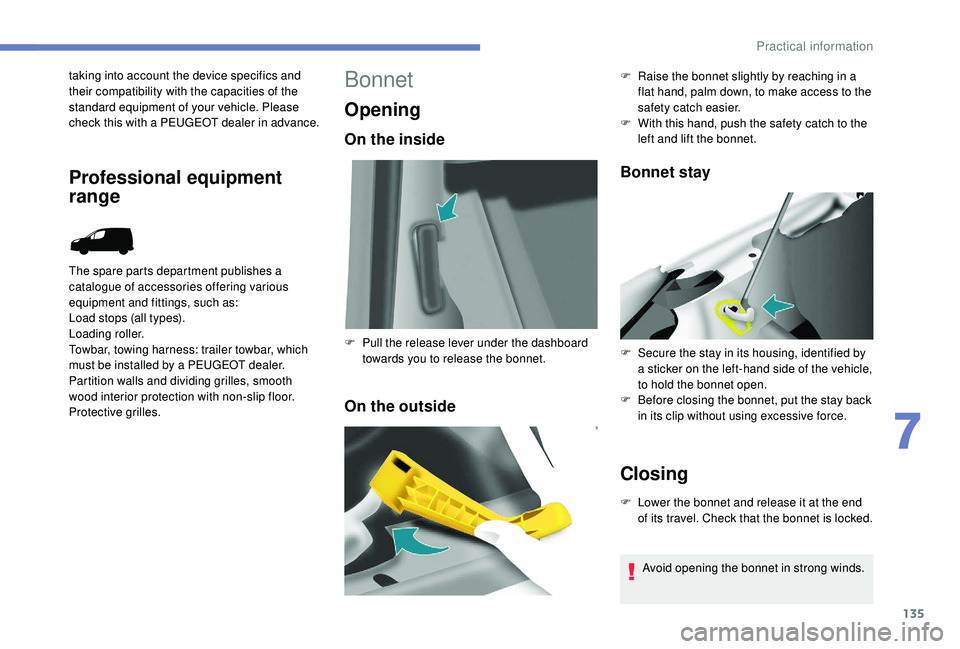
Opening
On the inside
On the outsideBonnet stay
Closing
F Lower the bonnet and release it at the end
of its travel. Check that the bonnet is locked.
F
P
ull the release lever under the dashboard
towards you to release the bonnet. F
R
aise the bonnet slightly by reaching in a
flat hand, palm down, to make access to the
safety catch easier.
F
W
ith this hand, push the safety catch to the
left and lift the bonnet.
F
S
ecure the stay in its housing, identified by
a sticker on the left-hand side of the vehicle,
to hold the bonnet open.
F
B
efore closing the bonnet, put the stay back
in its clip without using excessive force.
Avoid opening the bonnet in strong winds.
7
Practical information
Page 138 of 216
136
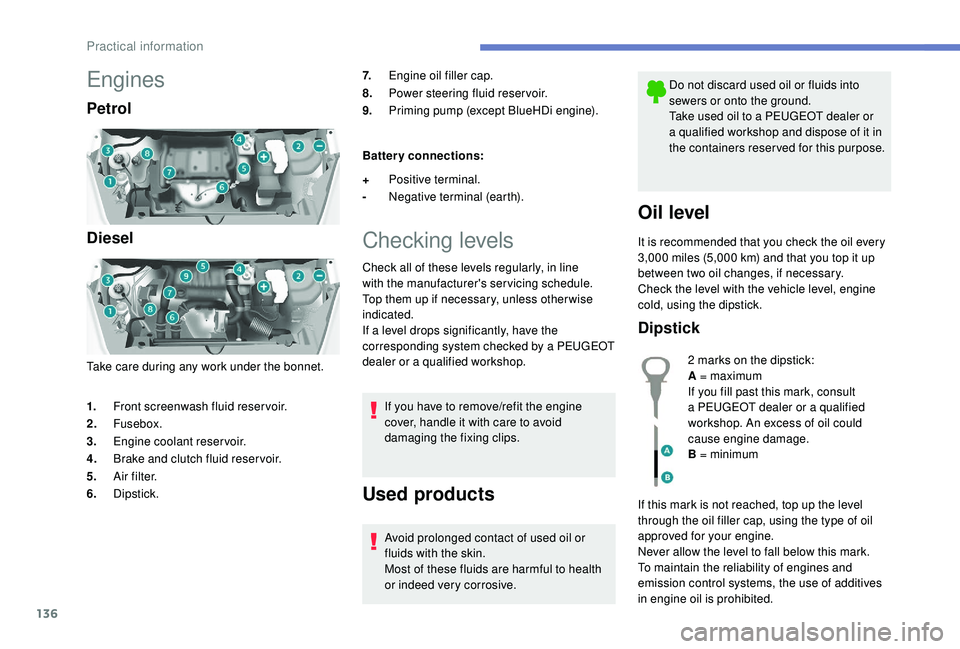
Engines
Petrol
Diesel
Take care during any work under the bonnet.7.
Engine oil filler cap.
8. Power steering fluid reservoir.
9. Priming pump (except BlueHDi engine).
Battery connections:
Checking levels
Check all of these levels regularly, in line
with the manufacturer's servicing schedule.
Top them up if necessary, unless other wise
indicated.
If a level drops significantly, have the
corresponding system checked by a PEUGEOT
dealer or a qualified workshop. If you have to remove/refit the engine
cover, handle it with care to avoid
damaging the fixing clips.
Used products
Avoid prolonged contact of used oil or
fluids with the skin.
Most of these fluids are harmful to health
or indeed very corrosive. Do not discard used oil or fluids into
sewers or onto the ground.
Take used oil to a PEUGEOT dealer or
a qualified workshop and dispose of it in
the containers reser ved for this purpose.
Oil level
It is recommended that you check the oil every
3,000
miles (5,000 km) and that you top it up
between two oil changes, if necessary.
Check the level with the vehicle level, engine
cold, using the dipstick.
Dipstick
1. Front screenwash fluid reser voir.
2. Fusebox.
3. Engine coolant reservoir.
4. Brake and clutch fluid reser voir.
5. A i r f i l t e r.
6. Dipstick. +
Positive terminal.
- Negative terminal (earth).
2 marks on the dipstick:
A = maximum
If you fill past this mark, consult
a PEUGEOT dealer or a qualified
workshop. An excess of oil could
cause engine damage.
B = minimum
If this mark is not reached, top up the level
through the oil filler cap, using the type of oil
approved for your engine.
Never allow the level to fall below this mark.
To maintain the reliability of engines and
emission control systems, the use of additives
in engine oil is prohibited.
Practical information
Page 139 of 216
137
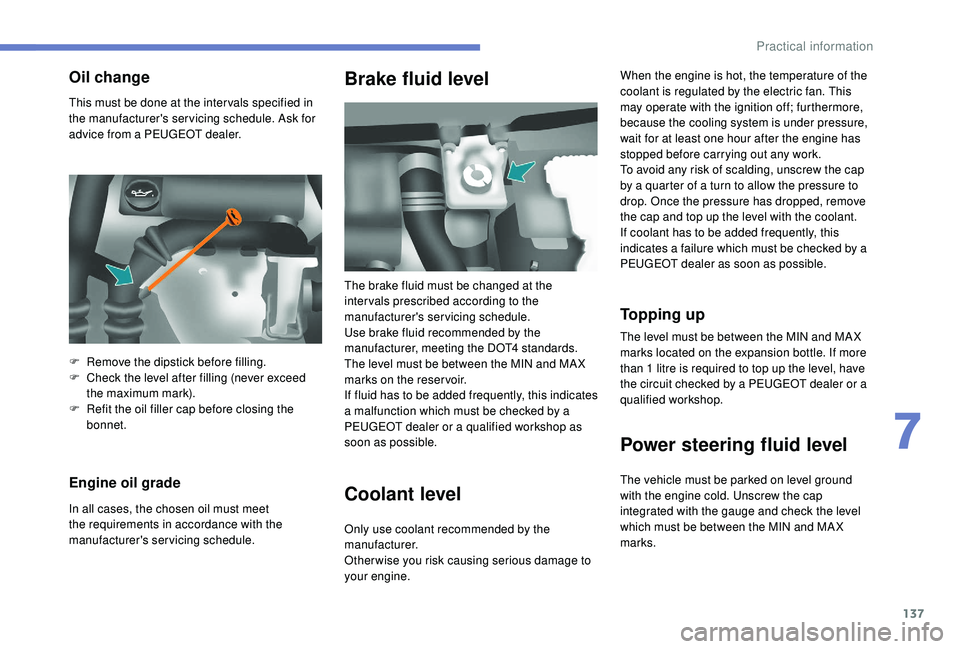
This must be done at the inter vals specified in
the manufacturer's servicing schedule. Ask for
advice from a PEUGEOT dealer.
Engine oil grade
In all cases, the chosen oil must meet
the requirements in accordance with the
manufacturer's servicing schedule.
Brake fluid level
Coolant levelWhen the engine is hot, the temperature of the
coolant is regulated by the electric fan. This
may operate with the ignition off; furthermore,
because the cooling system is under pressure,
wait for at least one hour after the engine has
stopped before carrying out any work.
To avoid any risk of scalding, unscrew the cap
by a quarter of a turn to allow the pressure to
drop. Once the pressure has dropped, remove
the cap and top up the level with the coolant.
If coolant has to be added frequently, this
indicates a failure which must be checked by a
PEUGEOT dealer as soon as possible.
To p p i n g u p
Oil change
The brake fluid must be changed at the
inter vals prescribed according to the
manufacturer's servicing schedule.
Use brake fluid recommended by the
manufacturer, meeting the DOT4 standards.
The level must be between the MIN and MA X
marks on the reservoir.
If fluid has to be added frequently, this indicates
a malfunction which must be checked by a
PEUGEOT dealer or a qualified workshop as
soon as possible.
Only use coolant recommended by the
manufacturer.
Otherwise you risk causing serious damage to
your engine.
F
R
emove the dipstick before filling.
F
C
heck the level after filling (never exceed
the maximum mark).
F
R
efit the oil filler cap before closing the
bonnet. The level must be between the MIN and MA X
marks located on the expansion bottle. If more
than 1
litre is required to top up the level, have
the circuit checked by a PEUGEOT dealer or a
qualified workshop.
Power steering fluid level
The vehicle must be parked on level ground
with the engine cold. Unscrew the cap
integrated with the gauge and check the level
which must be between the MIN and MA X
marks.
7
Practical information
Page 140 of 216
138
Screenwash fluid level
For optimal cleaning quality and safety, we
recommend that you use the PEUGEOT range
of products.
For optimum cleaning and to avoid freezing,
this fluid must not be topped up or replaced
with plain water.
Capacity of the screenwash reser voir:
approximately 3
litres.
Diesel additive level (Diesel
engine with particle filter)
A low additive level is indicated by
illumination of the Ser vice warning
lamp, accompanied by an audible
warning and a message on the screen.
If the message is still displayed and the Ser vice
warning lamp remains lit, consult a PEUGEOT
dealer or a qualified workshop.
To p p i n g u p
This additive must be topped up without delay
by a PEUGEOT dealer or a qualified workshop.
Checks
Battery
The battery does not require any
maintenance.
However, check regularly that the
terminals are correctly tightened
(versions without quick release
terminals) and that the connections
are clean.
Versions equipped with Stop & Start are
fitted with a 12
V lead-acid battery of
specific technology and specification.
Its replacement should be carried out
only by a PEUGEOT dealer or a qualified
workshop.
Brake pads
Brake wear depends on the style
of driving, particularly in the case
of vehicles used in town, over short
distances. It may be necessary to
have the condition of the brakes
checked, even between vehicle
services.
Unless there is a leak in the circuit, a drop in
the brake fluid level indicates that the brake
pads are worn.
Brake disc/drum wear
For information on checking
brake disc/drum wear, contact a
PEUGEOT dealer or a qualified
workshop.
Parking brake
If excessive travel or a loss of
effectiveness of this system is
noticed, the parking brake must
be checked, even between two
services.
This system must be checked by a PEUGEOT
dealer or a qualified workshop.
Once the engine is started, this signals that
the particle filter is starting to saturate (in
conditions of urban driving of exceptionally long
duration: low speeds, traffic jams, etc.).
To regenerate the filter, you are advised to
drive as soon as possible, as traffic conditions
allow, at a speed of at least 37
mph (around
60
km/h) for at least five minutes (until the
Ser vice warning lamp goes off and the
message disappears).
Relay noises may be heard under the
dashboard during regeneration of the particle
f i l t e r. At the start of winter, have your battery checked
by a PEUGEOT dealer or a qualified workshop.
Practical information