PEUGEOT PARTNER TEPEE 2020 Owners Manual
Manufacturer: PEUGEOT, Model Year: 2020, Model line: PARTNER TEPEE, Model: PEUGEOT PARTNER TEPEE 2020Pages: 216, PDF Size: 8.46 MB
Page 151 of 216
149
Comply with the wheel trim fitting
procedure to avoid breaking of the
fixing tab and distor tion on the edge of
the wheel trim.
Correct
valve position: above the ring.
Changing a bulb
Types of bulb
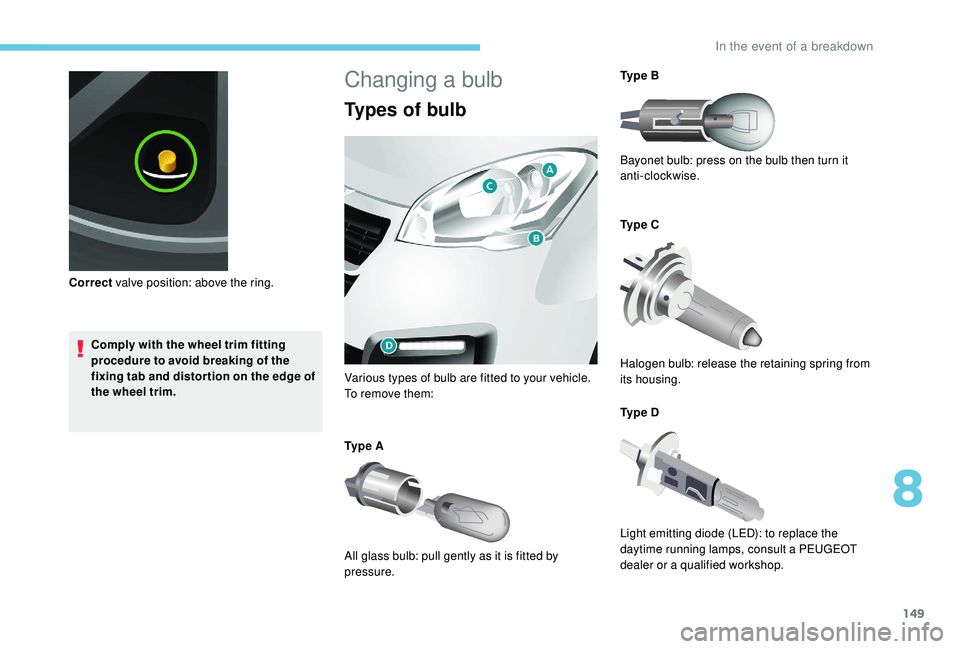
Various types of bulb are fitted to your vehicle.
To remove them:
Ty p e A
All glass bulb: pull gently as it is fitted by
pressure. Ty p e B
Bayonet bulb: press on the bulb then turn it
anti-clockwise.
Ty p e C
Halogen bulb: release the retaining spring from
its housing.
Ty p e D
Light emitting diode (LED): to replace the
daytime running lamps, consult a PEUGEOT
dealer or a qualified workshop.
8
In the event of a breakdown
Page 152 of 216
150
Open the bonnet. To access the bulbs, reach
behind the headlamp unit.
Carry out the operations in reverse order to
refit each bulb and check that the bonnet is
closed securely.Halogen bulbs must be changed with the
headlamps off. Wait a few minutes (risk
of serious burns). Do not touch the bulb
directly with your fingers, use a lint-free
cloth.
It is normal for condensation to form inside
the headlamps. Regular use of the vehicle
eliminates this misting.
The bulbs must be changed with the
ignition off or the battery disconnected.
Wait approximately three minutes after
changing the bulb before reconnecting the
battery.
Check that the lamps are working properly
after each operation.
High-pressure jet wash
When using this type of washer on
stubborn dirt, do not persist on the
headlamps, the lamps and their edges to
avoid damaging their coating and seals.
Front lampsDipped beam headlamps/Main
beam headlamps
Ty p e C , H4 – 55W
F R emove the centre cover by pulling on the
flexible rubber tab.
F
D
isconnect the electrical connector.
F
R
elease the retaining tab.
F
C
hange the bulb taking care to align the
metal part with the grooves on the lamp.
F
R
eposition the retaining tab.
F
E
nsure that the cover is refitted correctly all
around to ensure correct sealing.
Sidelamps
Ty p e A , W5W – 5W
F
R
emove the cover by pulling on the flexible
rubber tab.
F
R
emove the pressure-mounted bulb holder
by pulling the connector.
F
C
hange the bulb.
F
E
nsure that the cover is refitted correctly all
around to ensure correct sealing.
Direction indicators
Ty p e B , PY21W – 21W (amber)
F
R
emove the cover by pulling on the flexible
rubber tab.
F
T
urn the bulb holder a quarter turn
anticlockwise.
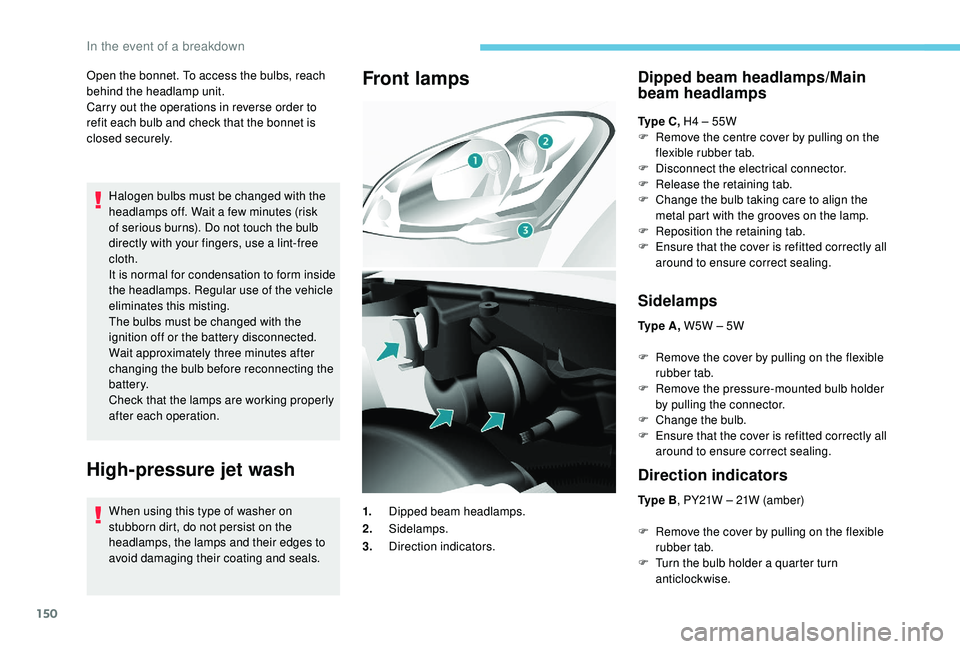
1.
Dipped beam headlamps.
2. Sidelamps.
3. Direction indicators.
In the event of a breakdown
Page 153 of 216
151
Foglamps
Ty p e C , H1 – 55W
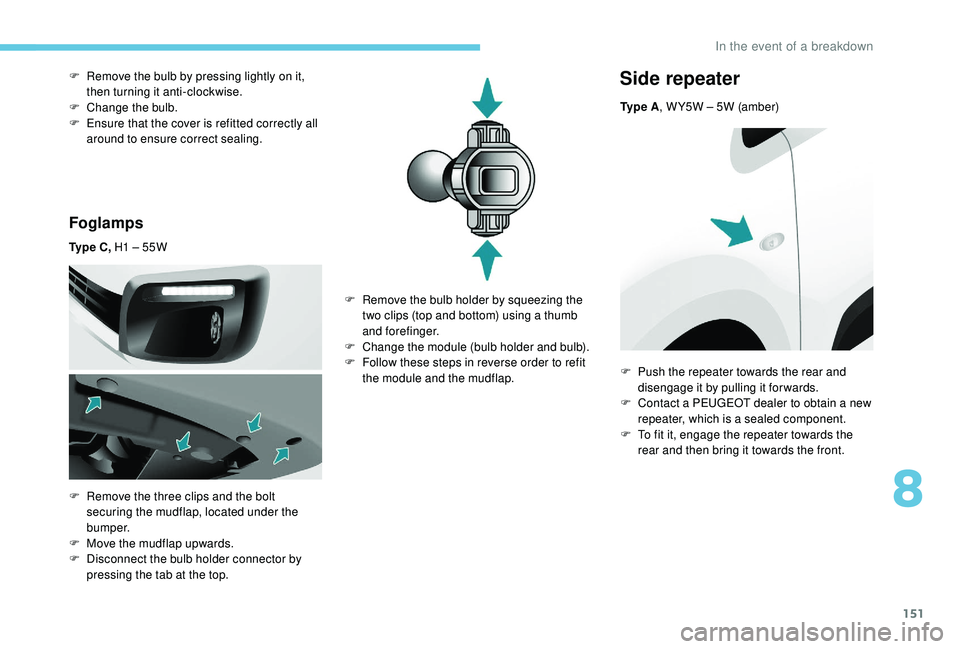
F
R
emove the three clips and the bolt
securing the mudflap, located under the
b u m p e r.
F
M
ove the mudflap upwards.
F
D
isconnect the bulb holder connector by
pressing the tab at the top.
F
R
emove the bulb by pressing lightly on it,
then turning it anti-clockwise.
F
C
hange the bulb.
F
E
nsure that the cover is refitted correctly all
around to ensure correct sealing.
Side repeater
Ty p e A , W Y5W – 5W (amber)
F
R
emove the bulb holder by squeezing the
two clips (top and bottom) using a thumb
and forefinger.
F
C
hange the module (bulb holder and bulb).
F
F
ollow these steps in reverse order to refit
the module and the mudflap. F
P
ush the repeater towards the rear and
disengage it by pulling it forwards.
F
C
ontact a PEUGEOT dealer to obtain a new
repeater, which is a sealed component.
F
T
o fit it, engage the repeater towards the
rear and then bring it towards the front.
8
In the event of a breakdown
Page 154 of 216
152
Rear lamps
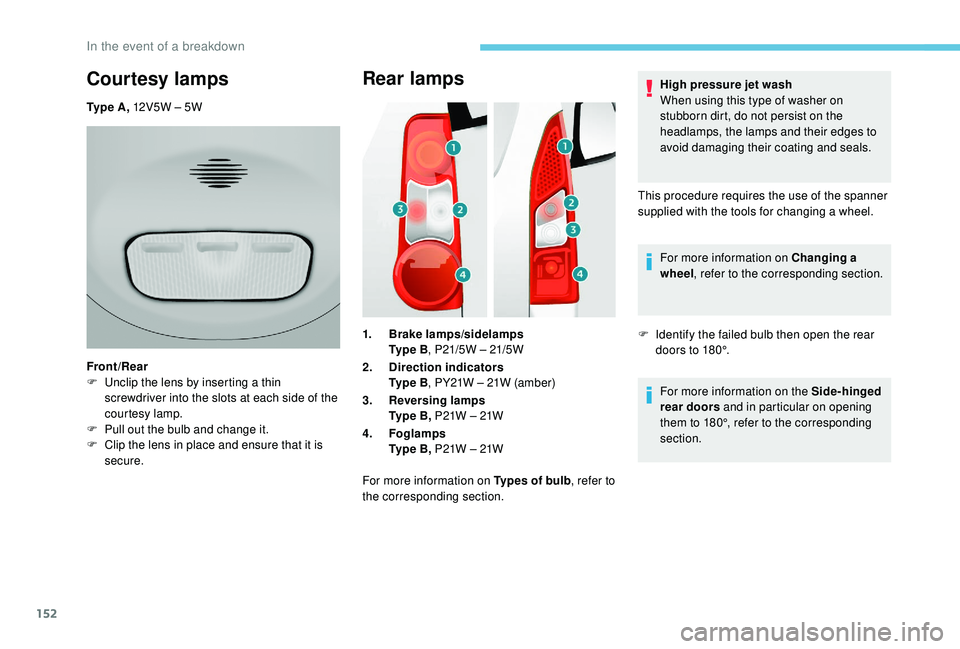
1.Brake lamps/sidelamps
Ty p e B , P21/5W – 21/5W
2. Direction indicators
Ty p e B , PY21W – 21W (amber)
3. Reversing lamps
Ty p e B , P21W – 21W
4. Foglamps
Ty p e B , P21W – 21W
For more information on Types of bulb , refer to
the corresponding section. High pressure jet wash
When using this type of washer on
stubborn dirt, do not persist on the
headlamps, the lamps and their edges to
avoid damaging their coating and seals.
This procedure requires the use of the spanner
supplied with the tools for changing a wheel. For more information on Changing a
wheel , refer to the corresponding section.
F I dentify the failed bulb then open the rear
doors to 180°.
For more information on the Side-hinged
rear doors and in particular on opening
them to 180°, refer to the corresponding
section.
Courtesy lamps
Ty p e A , 12V5W – 5W
Front/Rear
F
U
nclip the lens by inserting a thin
screwdriver into the slots at each side of the
courtesy lamp.
F
P
ull out the bulb and change it.
F
C
lip the lens in place and ensure that it is
secure.
In the event of a breakdown
Page 155 of 216
153
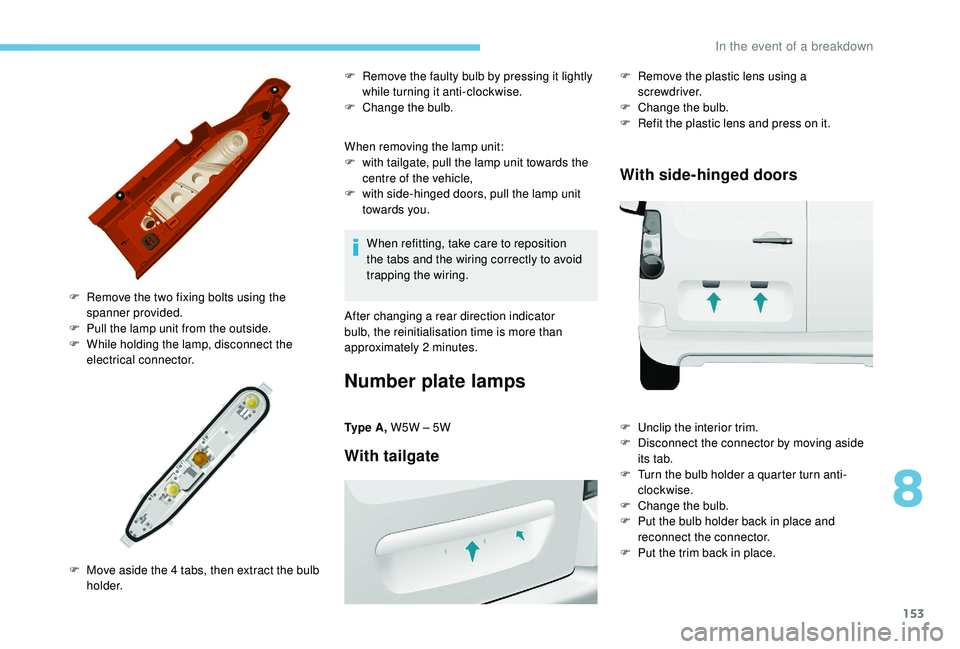
When removing the lamp unit:
F w ith tailgate, pull the lamp unit towards the
centre of the vehicle,
F
w
ith side-hinged doors, pull the lamp unit
towards you.
F
R
emove the two fixing bolts using the
spanner provided.
F
P
ull the lamp unit from the outside.
F
W
hile holding the lamp, disconnect the
electrical connector.
F
M
ove aside the 4 tabs, then extract the bulb
h o l d e r. F
R
emove the faulty bulb by pressing it lightly
while turning it anti-clockwise.
F
C
hange the bulb.
When refitting, take care to reposition
the tabs and the wiring correctly to avoid
trapping the wiring.
After changing a rear direction indicator
bulb, the reinitialisation time is more than
approximately 2
minutes.
Number plate lamps
Ty p e A , W5W – 5W
With tailgate
F Remove the plastic lens using a
screwdriver.
F
C
hange the bulb.
F
R
efit the plastic lens and press on it.
With side-hinged doors
F Unclip the interior trim.
F D isconnect the connector by moving aside
its tab.
F
T
urn the bulb holder a quarter turn anti-
clockwise.
F
C
hange the bulb.
F
P
ut the bulb holder back in place and
reconnect the connector.
F
P
ut the trim back in place.
8
In the event of a breakdown
Page 156 of 216
154
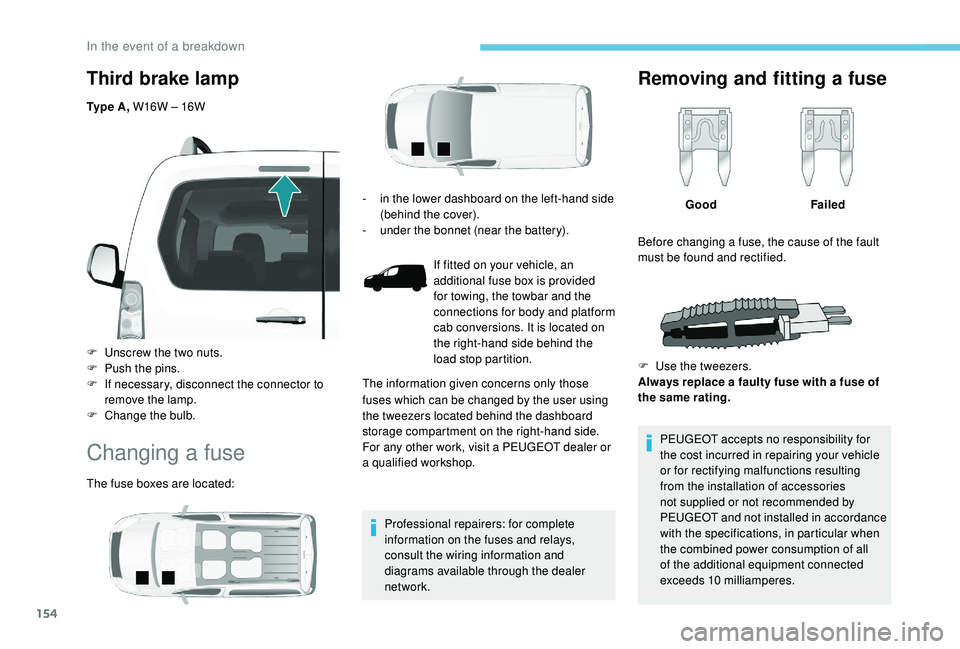
Third brake lamp
Ty p e A , W16W – 16W
F
U
nscrew the two nuts.
F
P
ush the pins.
F
I
f necessary, disconnect the connector to
remove the lamp.
F
C
hange the bulb.
Changing a fuse
The fuse boxes are located: Professional repairers: for complete
information on the fuses and relays,
consult the wiring information and
diagrams available through the dealer
network.
Removing and fitting a fuse
GoodFailed
PEUGEOT accepts no responsibility for
the cost incurred in repairing your vehicle
or for rectifying malfunctions resulting
from the installation of accessories
not supplied or not recommended by
PEUGEOT and not installed in accordance
with the specifications, in particular when
the combined power consumption of all
of the additional equipment connected
exceeds 10
milliamperes.
-
i
n the lower dashboard on the left-hand side
(behind the cover).
-
u
nder the bonnet (near the battery).
If fitted on your vehicle, an
additional fuse box is provided
for towing, the towbar and the
connections for body and platform
cab conversions. It is located on
the right-hand side behind the
load stop partition.
The information given concerns only those
fuses which can be changed by the user using
the tweezers located behind the dashboard
storage compartment on the right-hand side.
For any other work, visit a PEUGEOT dealer or
a qualified workshop. Before changing a fuse, the cause of the fault
must be found and rectified.
F
U
se the tweezers.
Always replace a faulty fuse with a fuse of
the same rating.
In the event of a breakdown
Page 157 of 216
155
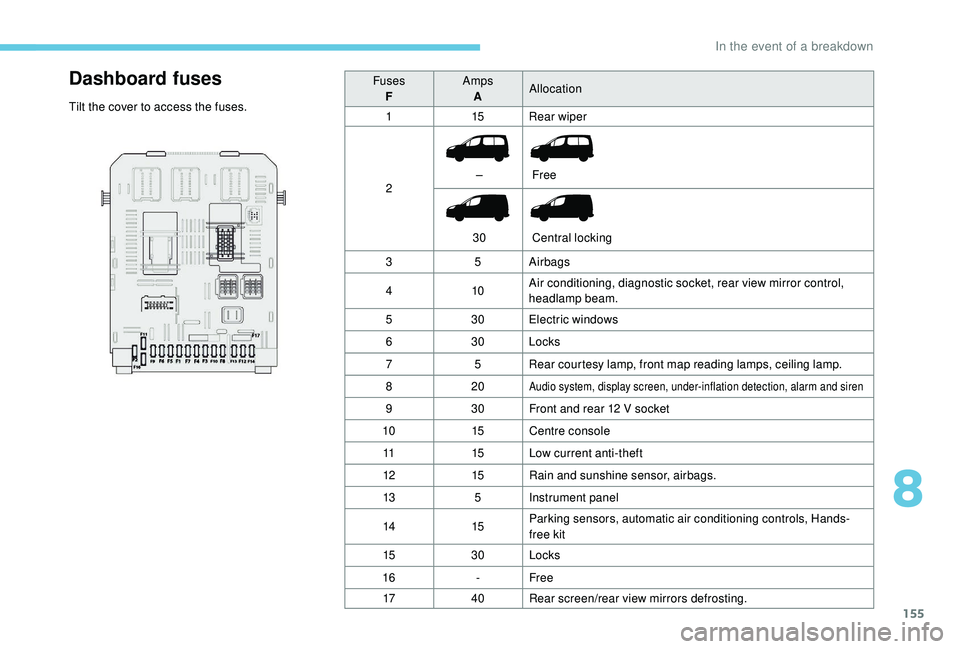
Dashboard fuses
Tilt the cover to access the fuses.Fuses
F Amps
A Allocation
1 15Rear wiper
2 –
30 Free
Central locking
3 5Airbags
4 10Air conditioning, diagnostic socket, rear view mirror control,
headlamp beam.
5 30Electric windows
6 30Locks
7 5Rear courtesy lamp, front map reading lamps, ceiling lamp.
8 20
Audio system, display screen, under-inflation detection, alarm and siren
930Front and rear 12 V socket
10 15Centre console
11 15Low current anti-theft
12 15Rain and sunshine sensor, airbags.
13 5Instrument panel
14 15Parking sensors, automatic air conditioning controls, Hands-
free kit
15 30Locks
16 -Free
17 40Rear screen/rear view mirrors defrosting.
8
In the event of a breakdown
Page 158 of 216
156
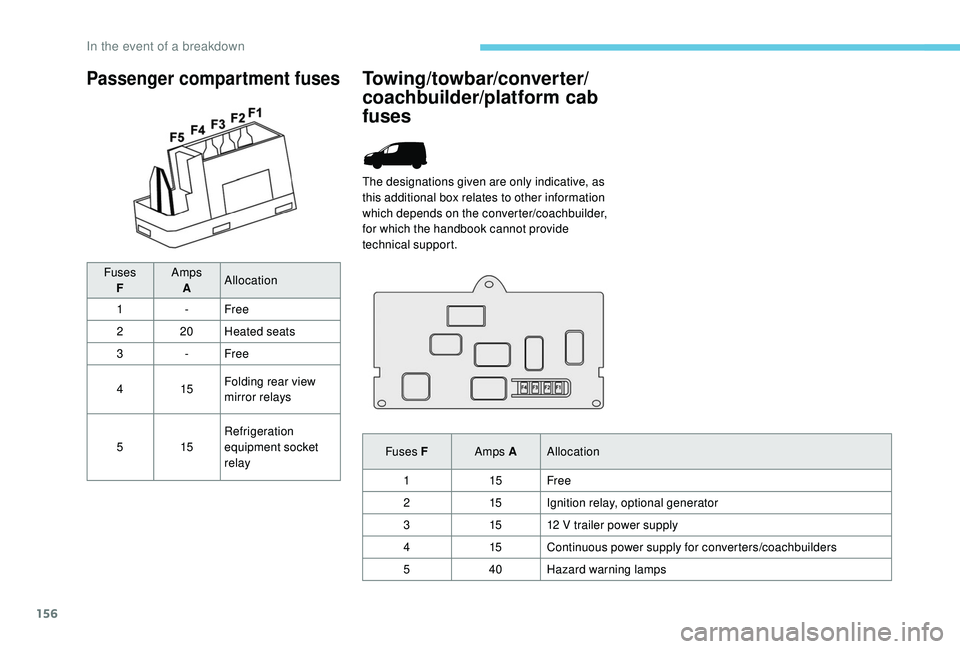
Passenger compartment fuses
FusesF Amps
A Allocation
1 -Free
2 20Heated seats
3 -Free
4 15Folding rear view
mirror relays
5 15Refrigeration
equipment socket
relay
Towing/towbar/converter/
coachbuilder/platform cab
fuses
The designations given are only indicative, as
this additional box relates to other information
which depends on the converter/coachbuilder,
for which the handbook cannot provide
technical support.
Fuses F Amps AAllocation
1 15Free
2 15Ignition relay, optional generator
3 1512
V trailer power supply
4 15Continuous power supply for converters/coachbuilders
5 40Hazard warning lamps
In the event of a breakdown
Page 159 of 216
157
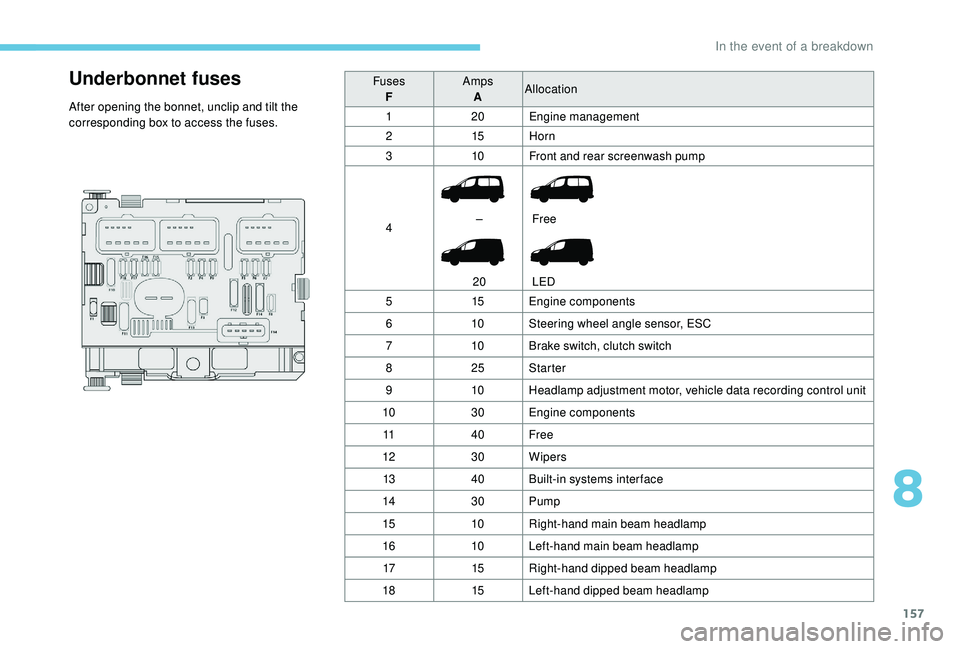
Underbonnet fuses
After opening the bonnet, unclip and tilt the
corresponding box to access the fuses.Fuses
F Amps
A Allocation
1 20Engine management
2 15Horn
3 10Front and rear screenwash pump
4 –
20 Free
LED
5 15Engine components
6 10Steering wheel angle sensor, ESC
7 10Brake switch, clutch switch
8 25Starter
9 10Headlamp adjustment motor, vehicle data recording control unit
10 30Engine components
11 40Free
12 30Wipers
13 40Built-in systems inter face
14 30Pump
15 10Right-hand main beam headlamp
16 10Left-hand main beam headlamp
17 15Right-hand dipped beam headlamp
18 15Left-hand dipped beam headlamp
8
In the event of a breakdown
Page 160 of 216
158
Battery
Procedure for starting the engine using another
battery or charging a discharged battery.After refitting the battery, the Stop & Start
will only be active after a continuous
period of immobilisation of the vehicle, the
duration of which depends on the climatic
conditions and the state of charge of the
battery (up to about 8
hours).
The Stop & Start battery does not have to
be disconnected for charging.
Charging the battery using
a battery charger
F Disconnect the battery.
F F ollow the instructions for use provided by
the manufacturer of the charger.
F
R
econnect starting with the negative (-)
terminal.
F
C
heck the condition of the terminals and
clamps. If they are covered with sulphate
(whitish or greenish deposits), disconnect
them and clean them all.
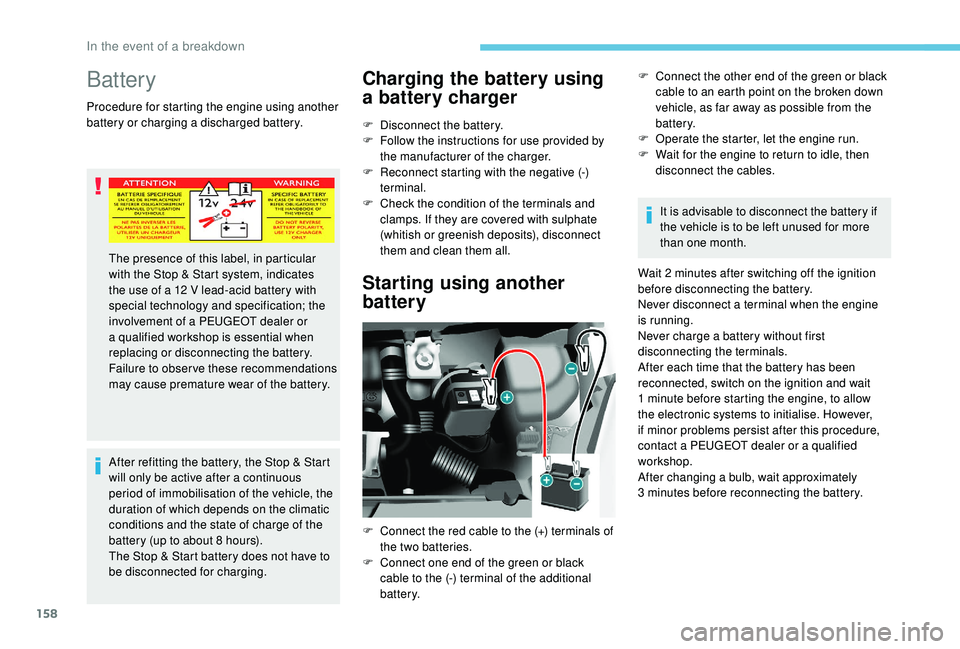
Starting using another
battery
F Connect the other end of the green or black cable to an earth point on the broken down
vehicle, as far away as possible from the
battery.
F
O
perate the starter, let the engine run.
F
W
ait for the engine to return to idle, then
disconnect the cables.
It is advisable to disconnect the battery if
the vehicle is to be left unused for more
than one month.
Wait 2
minutes after switching off the ignition
before disconnecting the battery.
Never disconnect a terminal when the engine
is running.
Never charge a battery without first
disconnecting the terminals.
After each time that the battery has been
reconnected, switch on the ignition and wait
1
minute before starting the engine, to allow
the electronic systems to initialise. However,
if minor problems persist after this procedure,
contact a PEUGEOT dealer or a qualified
workshop.
After changing a bulb, wait approximately
3
minutes before reconnecting the battery.
The presence of this label, in particular
with the Stop & Start system, indicates
the use of a 12
V lead-acid battery with
special technology and specification; the
involvement of a PEUGEOT dealer or
a qualified workshop is essential when
replacing or disconnecting the battery.
Failure to observe these recommendations
may cause premature wear of the battery.
F
C
onnect the red cable to the (+) terminals of
the two batteries.
F
C
onnect one end of the green or black
cable to the (-) terminal of the additional
battery.
In the event of a breakdown