PEUGEOT PARTNER TEPEE 2020 Owners Manual
Manufacturer: PEUGEOT, Model Year: 2020, Model line: PARTNER TEPEE, Model: PEUGEOT PARTNER TEPEE 2020Pages: 216, PDF Size: 8.46 MB
Page 141 of 216
139
Carbon filter and passenger
compartment filterOil filter
Change the oil filter each time the
engine oil is changed.
Refer to the manufacturer’s
ser vicing schedule for details of
the replacement inter val for this
component.
Particle filter (Diesel)
Maintenance of the particle filter must be
carried out by a PEUGEOT dealer.
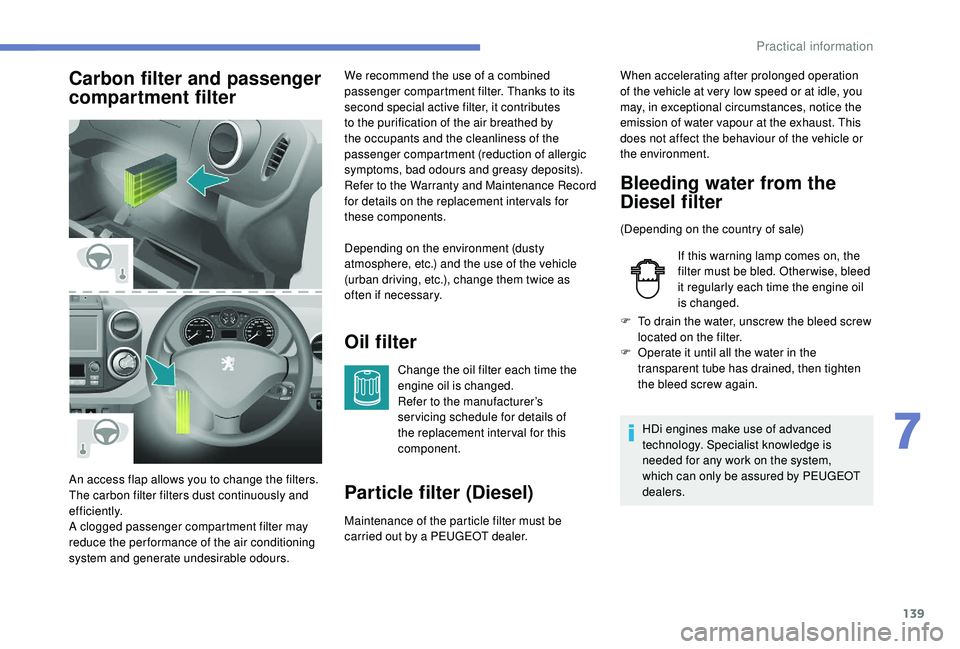
An access flap allows you to change the filters.
The carbon filter filters dust continuously and
ef f i c i e nt l y.
A clogged passenger compartment filter may
reduce the per formance of the air conditioning
system and generate undesirable odours. We recommend the use of a combined
passenger compartment filter. Thanks to its
second special active filter, it contributes
to the purification of the air breathed by
the occupants and the cleanliness of the
passenger compartment (reduction of allergic
symptoms, bad odours and greasy deposits).
Refer to the Warranty and Maintenance Record
for details on the replacement inter vals for
these components.
Depending on the environment (dusty
atmosphere, etc.) and the use of the vehicle
(urban driving, etc.), change them twice as
often if necessary.
Bleeding water from the
Diesel filter
(Depending on the country of sale)
If this warning lamp comes on, the
filter must be bled. Other wise, bleed
it regularly each time the engine oil
is changed.
F
T
o drain the water, unscrew the bleed screw
located on the filter.
F
O
perate it until all the water in the
transparent tube has drained, then tighten
the bleed screw again.
HDi engines make use of advanced
technology. Specialist knowledge is
needed for any work on the system,
which can only be assured by PEUGEOT
dealers.
When accelerating after prolonged operation
of the vehicle at very low speed or at idle, you
may, in exceptional circumstances, notice the
emission of water vapour at the exhaust. This
does not affect the behaviour of the vehicle or
the environment.
7
Practical information
Page 142 of 216
140
Manual gearbox
The gearbox does not require any
maintenance (no oil change).
Only use products recommended by
PEUGEOT or products of equivalent
quality and specification.
In order to optimise the operation of
components as important as those in the
braking system, PEUGEOT selects and
offers very specific products.
AdBlue® (BlueHDi
engines)
SCR system
Using a fluid called AdBlue® that contains
urea, a catalytic converter turns up to 85%
of nitrogen oxide (NOx) into nitrogen and
water, which are harmless to health and the
environment. The AdBlue
® is contained in a special tank with
a capacity of around 17 litres. An alert system
is triggered automatically once the reser ve
level is reached: you can then drive for a further
1,500
miles (2,400 km) before the tank is
emptied completely.
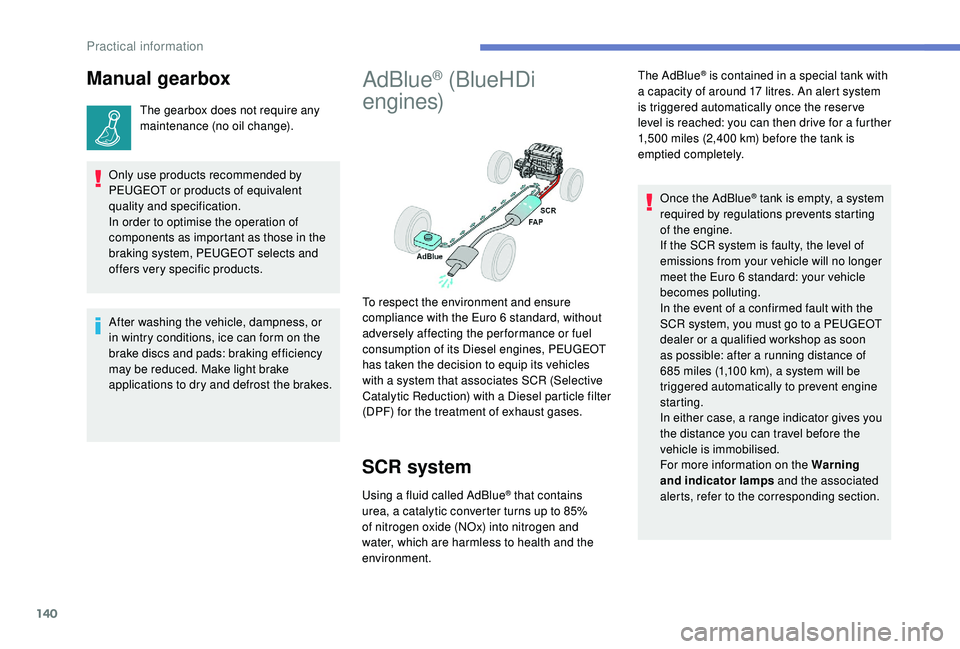
To respect the environment and ensure
compliance with the Euro 6 standard, without
adversely affecting the per formance or fuel
consumption of its Diesel engines, PEUGEOT
has taken the decision to equip its vehicles
with a system that associates SCR (Selective
Catalytic Reduction) with a Diesel particle filter
(DPF) for the treatment of exhaust gases. Once the AdBlue
® tank is empty, a system
r
equired by regulations prevents starting
of the engine.
If the SCR
system is faulty, the level of
emissions from your vehicle will no longer
meet the Euro 6 standard: your vehicle
becomes polluting.
In the event of a confirmed fault with the
SCR system, you must go to a PEUGEOT
dealer or a qualified workshop as soon
as possible: after a running distance of
685
miles (1,100
km), a system will be
triggered automatically to prevent engine
starting.
In either case, a range indicator gives you
the distance you can travel before the
vehicle is immobilised.
For more information on the Warning
and indicator lamps and the associated
alerts, refer to the corresponding section.
After washing the vehicle, dampness, or
in wintry conditions, ice can form on the
brake discs and pads: braking efficiency
may be reduced. Make light brake
applications to dry and defrost the brakes.
Practical information
Page 143 of 216
141
Freezing of AdBlue®
AdBlue® freezes at temperatures below
around -11°C.
The SCR system includes a heater for the
AdBlue
® tank, allowing you to continue
driving in all weather conditions.
Topping up with AdBlue®
Before topping up, please read the
following warnings carefully.
Precautions in use
In certain conditions (high ambient
temperature, for example), the risk of ammonia
being released cannot be discounted: do not
inhale the fluid. Ammonia vapour has an irritant
effect on mucous membranes (eyes, nose and
throat).
Keep AdBlue
® out of reach of children, in
its original container or bottle.
Never transfer AdBlue
® to another
container: it would lose its purity.
Use only AdBlue
® liquid that meets the
ISO
22241 standard.
AdBlue
® is a urea-based solution. This fluid is
non-flammable, colourless and odourless (kept
in a cool area).
In the event of contact with the skin, wash the
affected area with soap and running water. In
the event of contact with the eyes, immediately
rinse the eyes with large amounts of water
or with an eye wash solution for at least
15
minutes. If a burning sensation or irritation
persists, get medical attention.
If swallowed, immediately rinse the mouth with
clean water and then drink plenty of water.Never dilute AdBlue® with water.
Never pour AdBlue® into the Diesel fuel tank.
Containers or bottles are available from a
PEUGEOT dealer or a qualified workshop.
You can also visit a ser vice station
equipped with AdBlue pumps specially
designed for passenger vehicles and light
goods vehicles. Never top up from an AdBlue
® dispenser
reserved for heavy goods vehicles.
Recommendations on storage
AdBlue® freezes below around -11°C and
deteriorates above 25°C. It is recommended
that bottles or containers are stored in a cool
place and protected from direct sunlight.
Under these conditions, the fluid can be kept
for at least a year.
If the fluid has frozen, it can be used once
it has completely thawed out at ambient
temperature.
Never store bottles or containers of
AdBlue
® in your vehicle.
Do not dispose of AdBlue
® bottles or
containers in the household waste.
Place them in a container provided for
this purpose or take them to your dealer.
7
Practical information
Page 144 of 216
142
Procedure
Before topping up, ensure that the vehicle is
parked on a flat and level sur face.
In wintry conditions, ensure that the
temperature of the vehicle is above -11°C.
Otherwise the AdBlue
® may be frozen and
so cannot be poured into its tank. Park your
vehicle in a warmer area for a few hours to
allow the top-up to be carried out. F
O
btain an AdBlue
® container or bottle. After
first checking the use-by date, read the
instructions on the label carefully before
pouring the contents of the container or
bottle into your vehicle's AdBlue tank.
Or
F
I
nsert the AdBlue
® pump nozzle and refill
the tank until the nozzle stops automatically.
Important:
-
T
o avoid over flowing the AdBlue
® tank,
i
t is recommended:
•
T
o top up between 10 and 13
litres
using AdBlue
® containers or bottles.
Or
•
T
hat you stop after the nozzle’s first
automatic cut-out if you are refilling
at a ser vice station.
-
I
f your vehicle's AdBlue
® tank is
completely empty – which is confirmed
by the alert messages and the
impossibility of starting the engine –
you must add at least 5
litres. Impor tant: when topping up after
a breakdown due to running out
of AdBlue,
you must wait for at least
5 minutes before switching on the
ignition, opening the driver's door,
unlocking the vehicle or inser ting the
key in the switch.
Switch on the ignition, then after a
minimum of 10 seconds, start the engine.
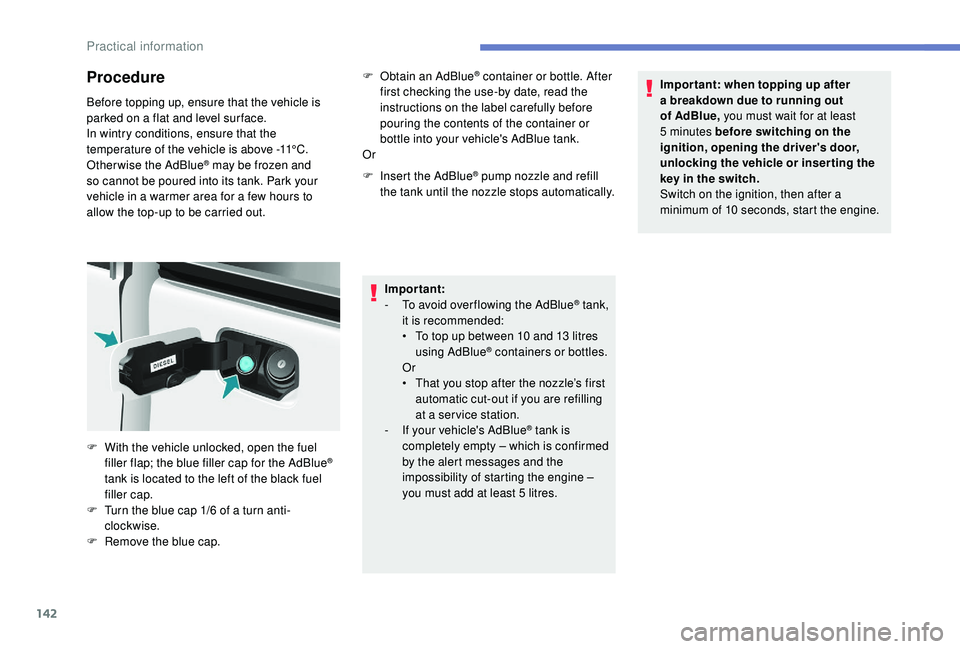
F
W
ith the vehicle unlocked, open the fuel
filler flap; the blue filler cap for the AdBlue
®
tank is located to the left of the black fuel
filler cap.
F
T
urn the blue cap 1/6 of a turn anti-
clockwise.
F
R
emove the blue cap.
Practical information
Page 145 of 216
143
Temporary puncture
repair kit
The kit is located in a storage compartment
under the front seat.
Vehicles supplied with a temporary puncture
repair kit do not have a spare wheel or the
corresponding tools ( jack, wheelbrace, etc.).
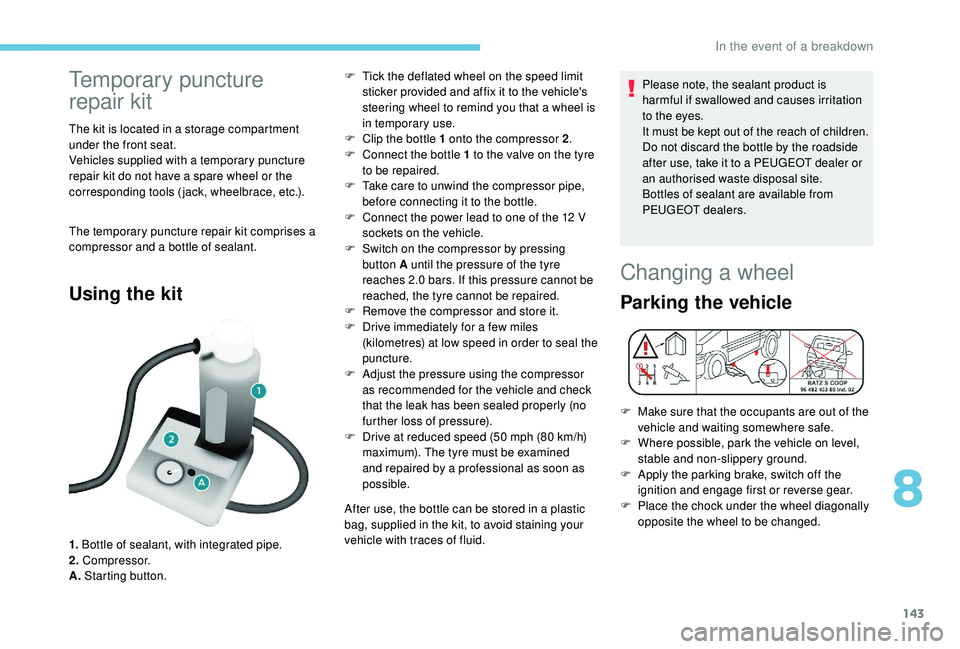
The temporary puncture repair kit comprises a
compressor and a bottle of sealant.
Using the kit
1. Bottle of sealant, with integrated pipe.
2. Compressor.
A. Starting button. F
T
ick the deflated wheel on the speed limit
sticker provided and affix it to the vehicle's
steering wheel to remind you that a wheel is
in temporary use.
F
C
lip the bottle 1 onto the compressor 2
.
F
C
onnect the bottle 1 to the valve on the tyre
to be repaired.
F
T
ake care to unwind the compressor pipe,
before connecting it to the bottle.
F
C
onnect the power lead to one of the 12 V
sockets on the vehicle.
F
S
witch on the compressor by pressing
button A until the pressure of the tyre
reaches 2.0 bars. If this pressure cannot be
reached, the tyre cannot be repaired.
F
R
emove the compressor and store it.
F
D
rive immediately for a few miles
(kilometres) at low speed in order to seal the
puncture.
F
A
djust the pressure using the compressor
as recommended for the vehicle and check
that the leak has been sealed properly (no
further loss of pressure).
F
D
rive at reduced speed (50 mph (80 km/h)
maximum). The tyre must be examined
and repaired by a professional as soon as
possible.
After use, the bottle can be stored in a plastic
bag, supplied in the kit, to avoid staining your
vehicle with traces of fluid. Please note, the sealant product is
harmful if swallowed and causes irritation
to the eyes.
It must be kept out of the reach of children.
Do not discard the bottle by the roadside
after use, take it to a PEUGEOT dealer or
an authorised waste disposal site.
Bottles of sealant are available from
PEUGEOT dealers.
Changing a wheel
Parking the vehicle
F Make sure that the occupants are out of the
vehicle and waiting somewhere safe.
F
W
here possible, park the vehicle on level,
stable and non-slippery ground.
F
A
pply the parking brake, switch off the
ignition and engage first or reverse gear.
F
P
lace the chock under the wheel diagonally
opposite the wheel to be changed.
8
In the event of a breakdown
Page 146 of 216
144
If the vehicle is equipped with a towbar, it is
sometimes necessary to raise the vehicle
slightly to make it easier to remove the spare
wheel from its carrier.
In certain ground conditions and/or when
transporting heavy loads, consult with a
PEUGEOT dealer or a qualified workshop.
The jack and the tool kit are specific to your
vehicle. Do not use them for any other purpose.
Access to tools
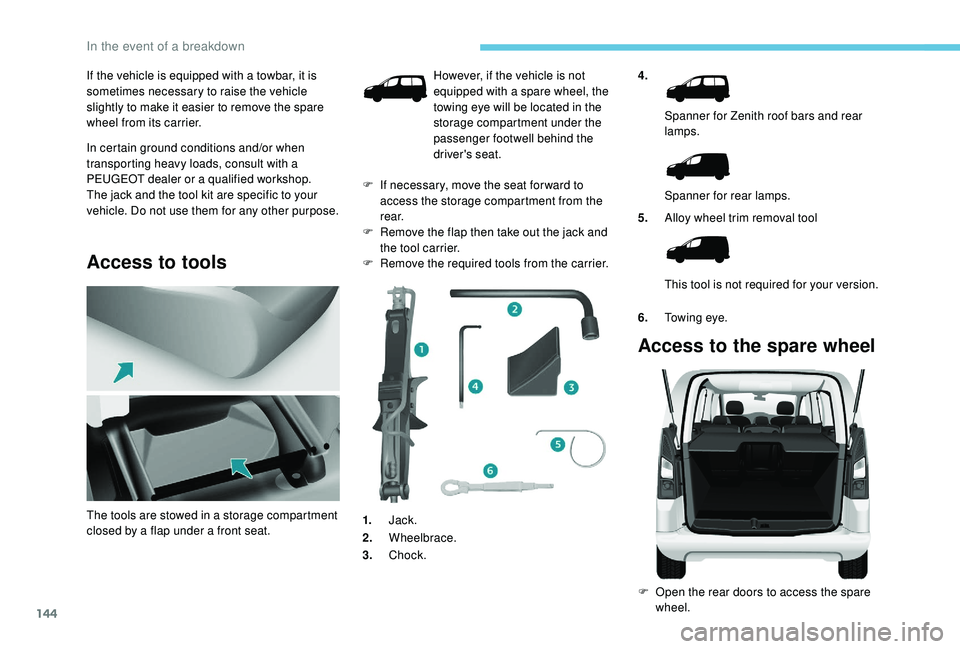
4.Spanner for Zenith roof bars and rear
lamps.
Spanner for rear lamps.
5. Alloy wheel trim removal tool
This tool is not required for your version.
6. Towing eye.
Access to the spare wheel
F Open the rear doors to access the spare
wheel.
The tools are stowed in a storage compartment
closed by a flap under a front seat. However, if the vehicle is not
equipped with a spare wheel, the
towing eye will be located in the
storage compartment under the
passenger footwell behind the
driver's seat.
F
I
f necessary, move the seat for ward to
access the storage compartment from the
r e a r.
F
R
emove the flap then take out the jack and
the tool carrier.
F
R
emove the required tools from the carrier.
1. Jack.
2. Wheelbrace.
3. Chock.
In the event of a breakdown
Page 147 of 216
145
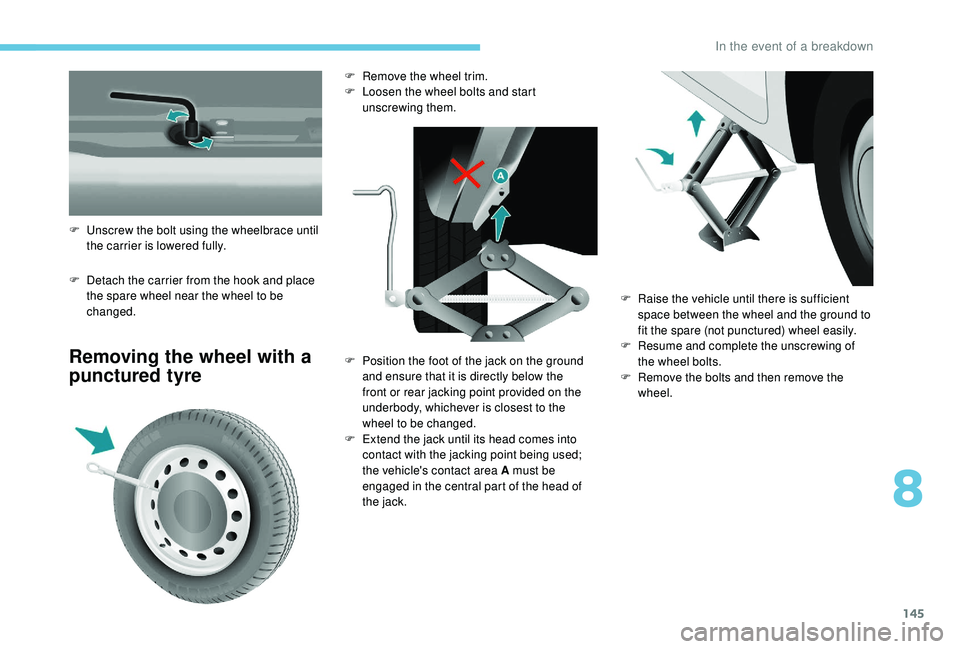
F Detach the carrier from the hook and place the spare wheel near the wheel to be
changed.
Removing the wheel with a
punctured tyre
F Unscrew the bolt using the wheelbrace until the carrier is lowered fully. F
R
emove the wheel trim.
F
L
oosen the wheel bolts and start
unscrewing them.
F
P
osition the foot of the jack on the ground
and ensure that it is directly below the
front or rear jacking point provided on the
underbody, whichever is closest to the
wheel to be changed.
F
E
xtend the jack until its head comes into
contact with the jacking point being used;
the vehicle's contact area A must be
engaged in the central part of the head of
the jack. F
Ra
ise the vehicle until there is sufficient
space between the wheel and the ground to
fit the spare (not punctured) wheel easily.
F
R
esume and complete the unscrewing of
the wheel bolts.
F
R
emove the bolts and then remove the
wheel.
8
In the event of a breakdown
Page 148 of 216
146
Fitting the spare wheel
When using a non-uniform spare wheel,
do not exceed 50 mph (80 km/h).
The spare wheel is not designed to
be used over long distances. Have
the tightening of the bolts and the tyre
pressure of the spare wheel checked by a
PEUGEOT dealer or a qualified workshop
as soon as possible.
Also, have the original wheel repaired
and refitted by a PEUGEOT dealer or a
qualified workshop as soon as possible.
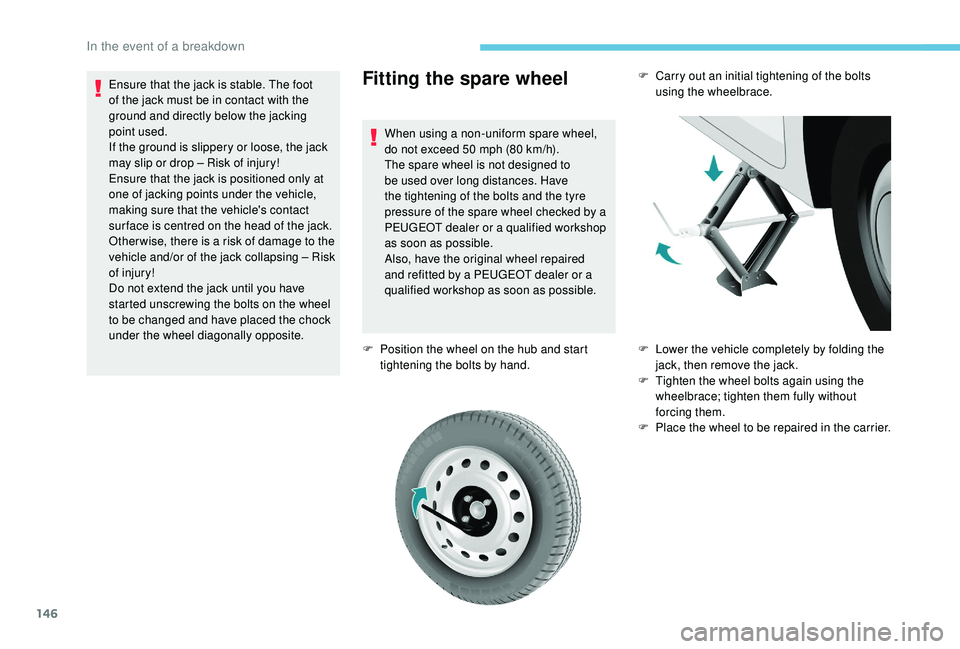
F
P
osition the wheel on the hub and start
tightening the bolts by hand.
Ensure that the jack is stable. The foot
of the jack must be in contact with the
ground and directly below the jacking
point used.
If the ground is slippery or loose, the jack
may slip or drop – Risk of injury!
Ensure that the jack is positioned only at
one of jacking points under the vehicle,
making sure that the vehicle's contact
sur face is centred on the head of the jack.
Other wise, there is a risk of damage to the
vehicle and/or of the jack collapsing – Risk
of injury!
Do not extend the jack until you have
started unscrewing the bolts on the wheel
to be changed and have placed the chock
under the wheel diagonally opposite.
F
C
arry out an initial tightening of the bolts
using the wheelbrace.
F
L
ower the vehicle completely by folding the
jack, then remove the jack.
F
T
ighten the wheel bolts again using the
wheelbrace; tighten them fully without
forcing them.
F
P
lace the wheel to be repaired in the carrier.
In the event of a breakdown
Page 149 of 216
147
Never go underneath a vehicle that is
supported only by a jack (use an axle stand).
Never use an electric screwdriver instead of
the wheelbrace.
Refitting the repaired wheel
The wheel is refitted in the same way as the
spare wheel; do not forget to refit the wheel
trim.For more information on Identification
markings
, including the tyre label, refer to
the corresponding section.
For more information on Tyre under-
inflation detection , including
recommendations after changing a wheel
with a tyre under-inflation detection
sensor, refer to the corresponding section.
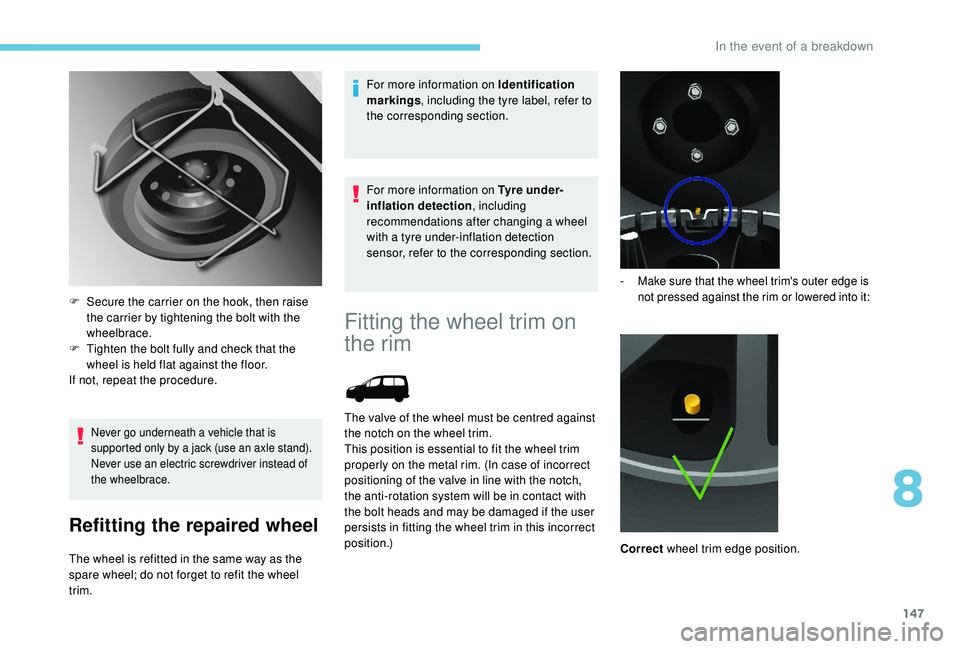
F
S
ecure the carrier on the hook, then raise
the carrier by tightening the bolt with the
wheelbrace.
F
T
ighten the bolt fully and check that the
wheel is held flat against the floor.
If not, repeat the procedure.
Fitting the wheel trim on
the rim
The valve of the wheel must be centred against
the notch on the wheel trim.
This position is essential to fit the wheel trim
properly on the metal rim. (In case of incorrect
positioning of the valve in line with the notch,
the anti-rotation system will be in contact with
the bolt heads and may be damaged if the user
persists in fitting the wheel trim in this incorrect
position.)
- Make sure that the wheel trim's outer edge is not pressed against the rim or lowered into it:
Correct wheel trim edge position.
8
In the event of a breakdown
Page 150 of 216
148
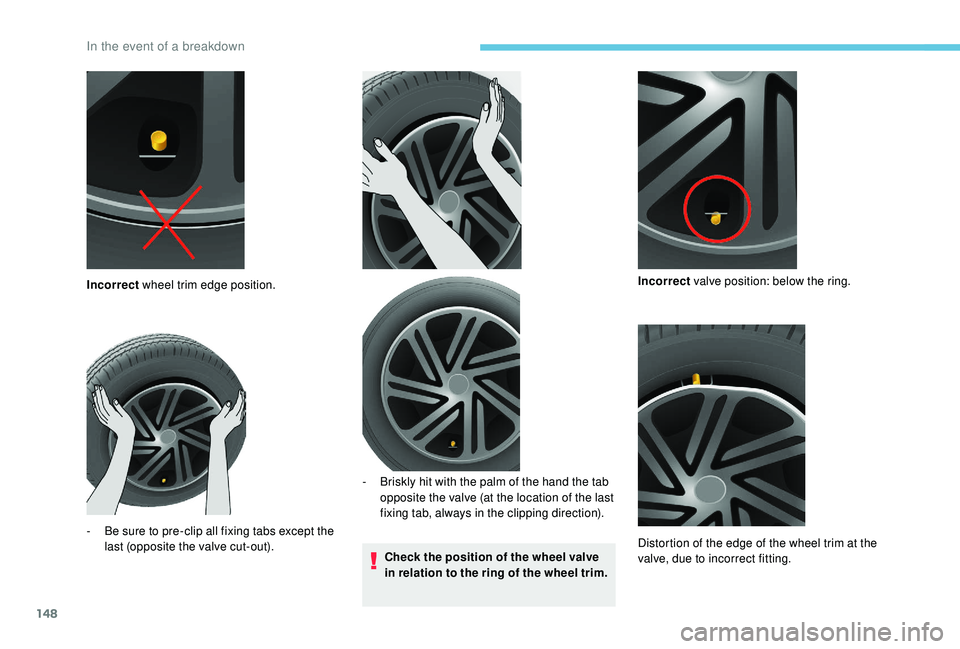
Check the position of the wheel valve
in relation to the ring of the wheel trim.
Incorrect
wheel trim edge position.
-
B
e sure to pre-clip all fixing tabs except the
last (opposite the valve cut-out). -
B
riskly hit with the palm of the hand the tab
opposite the valve (at the location of the last
fixing tab, always in the clipping direction). Incorrect
valve position: below the ring.
Distortion of the edge of the wheel trim at the
valve, due to incorrect fitting.
In the event of a breakdown