PONTIAC FIERO 1988 Service Repair Manual
Manufacturer: PONTIAC, Model Year: 1988, Model line: FIERO, Model: PONTIAC FIERO 1988Pages: 1825, PDF Size: 99.44 MB
Page 771 of 1825
6E3-C6-2 2.8L (WIN 5) DRIVEABILITY AND EMISSIONS
When the solenoid is de-energized, the pressurized
air from the air pump is allowed to enter the decel
timing chamber. This places sufficient pressure on
the metering valve diaphragm to overcome spring
tension, closing the
valve,causing air to divert to the
silencer.
At higher engine speeds, excess air is exhausted to
the silencer through the pressure relief valve. (Figure
C6-1)
Deceleration Valve
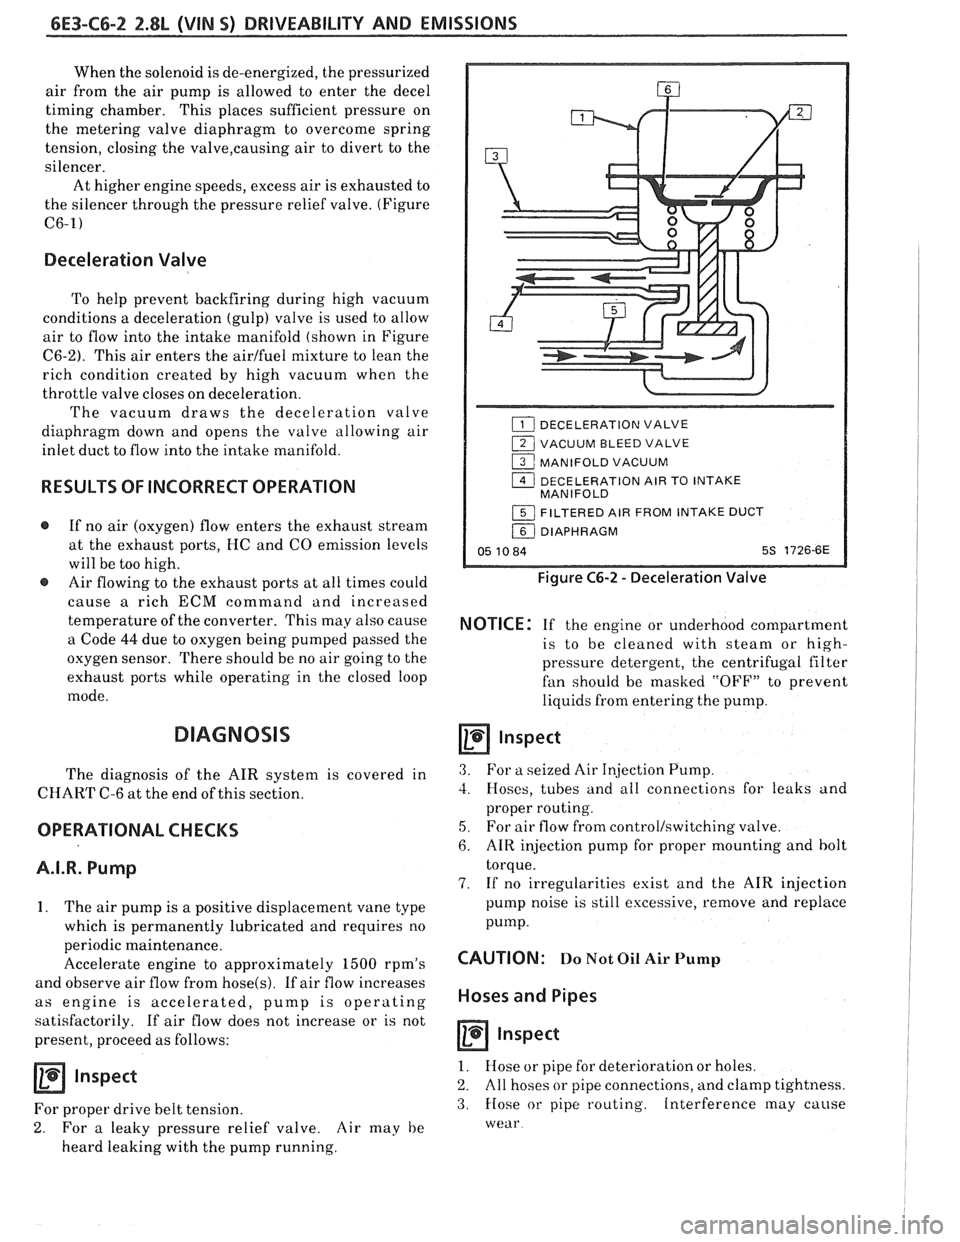
To help prevent backfiring during high vacuum
conditions a deceleration (gulp) valve is used to allow
air to flow into the intake manifold (shown in Figure
C6-2). This air enters the airlfuel mixture to lean the
rich condition created by high vacuum when the
throttle valve closes on deceleration.
The vacuum draws the deceleration valve
diaphragm down and opens the valve allowing air
inlet duct to flow into the intake manifold.
RESULTS OF INCORRECT OPERATION
@ If no air (oxygen) flow enters the exhaust stream
at the exhaust ports, HC and
CO emission levels
will be too high.
@ Air flowing to the exhaust ports at all times could
cause
a rich ECM command and increased
temperature of the converter. This may also cause
a Code
44 due to oxygen being pumped passed the
oxygen sensor. There should be no air going to the
exhaust ports while operating in the closed loop
mode.
DIAGNOSIS
The diagnosis of the AIR system is covered in
CHART C-6 at the end of this section.
OPERATIONAL CHECKS
A.I.R. Pump
1. The air pump is a positive displacement vane type
which is permanently lubricated and requires no
periodic maintenance.
Accelerate engine to approximately
1500 rpm's
and observe air flow from
hose(s). If air flow increases
as engine is accelerated, pump is operating
satisfactorily. If air flow does not increase or is not
present, proceed as follows:
Inspect
For proper drive belt tension.
2. For a leaky pressure relief valve. Air may he
heard leaking with the pump running.
DECELERATION VALVE
1 VACUUM BLEED VALVE
1 MANIFOLD VACUUM
1 DECELERATION AIR TO INTAKE
MANIFOLD
1 FILTERED AIR FROM INTAKE DUCT
/ DIAPHRAGM
05 10 84 5s 1726-6E
Figure C6-2 - Deceleration Valve
NOTICE: If the engine or underhood compartment
is to he cleaned with
steam or high-
pressure detergent, the centrifugal filter
fan should be masked "OFF7' to prevent
liquids from entering the pump.
Inspect
3. For a seized Air Injection Pump.
3. Hoses, tubes and all connections for leaks and
proper routing.
5, For air flow from controllswitching valve.
6. AIR injection pump for proper mounting and bolt
torque.
7. If no irregularities exist and the AIR injection
pump noise is still excessive, remove and replace
pump.
CAUTION: Do Not Oil Air Pump
Hoses and Pipes
Inspect
1. Hose or pipe for deterioration or holes.
2. All hoses or pipe connections, and clamp tightness.
3. Hose or pipe routing. Interference may cause
wear
Page 772 of 1825
DRIVEABILITY AND EMISSIONS 2.8L (WIN 5) 6E3-C6-3
4. If a leak is suspected on the pressure side of the
system or if
a hose or pipe has been disconnected
on the pressure side, the connections should be
checked for leaks with a soapy water solution.
With the pump running, bubbles will form if
a
leak exists.
Deceleration Valve
1. Connect tachometer, start engine and allow idle to
stabilize.
2. With the engine running at specified idle speed,
remove the small deceleration valve signal hose
from the manifold vacuum source.
3. Reconnect the signal hose and listen for air flow
through the ventilation pipe and into the
deceleration valve. There should also be a
noticeable speed drop when the signal hose is
reconnected.
4. If the air flow does not continue for at least one
second or the engine speed does not drop
noticeably, check the deceleration valve hoses for
restrictions or leaks.
5. If no restrictions or leaks are found, replace the
deceleration valve.
Check Valve
Inspect
1. A check valve should be inspected whenever the
hose is disconnected form
a check valve or
whenever check valve failure is suspected.
(A
pump that had become inoperative and had shown
indications of having exhaust gases in the pump
would indicate check valve failure).
2. Blow through the check valve (toward the exhaust
manifold) then attempt to suck back through the
check valve. Flow should only be in one
direction(towax-d the exhaust manifold). Replace
valve which does not operate properly.
ON-CAR SERVICE
DRIVE BELT
Remove or Disconnect
1. Inspect drive belt for ware, cracks or deterioration
and replace if required. When installing new belt,
it must be seated and fully secured in grooves of
A/C compressor, AIR pump, generator, and
crankshaft pulleys.
A.I.R. PUMP
Remove or Disconnect
1. Hold pump pulley from turning by compressing
drive belt, then loosen pump pulley bolts.
2. Loosen bolt, holding pump to mounting brackets,
release tension on drive belts.
3. Move belts out of the way, then remove pump
hoses, vacuum and electrical connections, and
control valve.
4. Pulley, then pump.
5. If required, insert needle nose pliers and pull filter
fan from hub.
Install or Connect
1. Air pump assembly, and tighten mounting bolts.
2. I-loses, vacuum and electrical connections, and
control valve
3. New
filter
fan on pump hub.
4. Spacer and pump pulley against centrifugal filter
fan.
5. Pump pulley bolts and tighten equally to 13 N m
(10 lb.
ft.). This will compress the centrifugal
filter fan onto the pump hole. Do not drive filter
fan on with a hammer. A slight amount of
interference with the housing bore is normal.
After a new filter fan has been installed, it
ma?;
squeal upon initial operation or until 0.11, sealing
lip has worn in. This
may require a short period of
purnp operation at various engine speeds.
6. Pump drive belt and adjust.
a Lon 7. Check air injection system for proper oper t'
(see CHART C-6)
AIR CONTROL VALVE
Remove or Disconnect
1. Battery ground cable.
2. Adapter bolts (See Figure C6-3).
3. Air outlet hoses from valve.
4. Adapter.
5. Electrical connectors and vacuum hoses from
valve. ve.
6. Control
va 1
Install or Connect
1. Control valve.
2. Electrical connectors and vacuum hoses.
3. Adapter.
4. Air hoses to valve.
5. Adapter bolts to pump.
6 Batterv ground crtble.
7. Check system operation (see CHART C-6)
Page 773 of 1825
6E3-C6-4 2.8L (WIN S) DRIVEABILITY AND EMlSDlONS
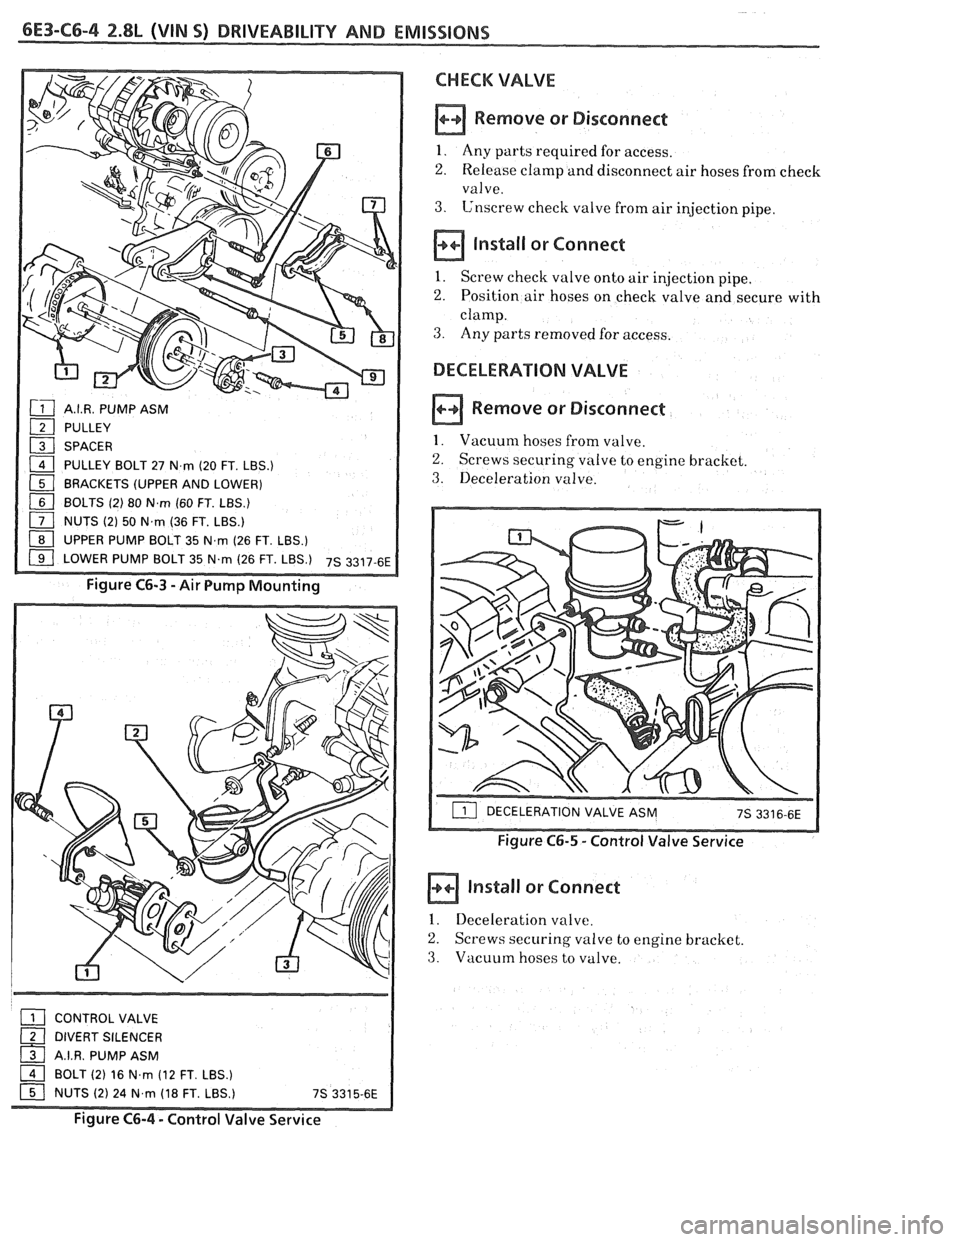
A.I.R. PUMP ASM
PULLEY
SPACER
PULLEY BOLT 27 N
rn (20 FT. LBS.)
BRACKETS (UPPER AND LOWER)
[ BOLTS (2) 80 Nm (60 FT. LBS.)
NUTS (2) 50 N.rn (36 FT. LBS.)
( UPPER PUMP BOLT 35 N,rn (26 FT. LBS.)
( LOWER PUMP BOLT 35 N.rn (26 FT. LBS.) 7s 3317-6E
Figure C6-3 -Air Pump Mounting
CONTROL VALVE
( DIVERT SILENCER
1 A.I.R. PUMP ASM
CHECK VALVE
Remove or Disconnect
1. Any parts required for access.
2. Release clamp and disconnect air hoses from check
valve.
3. Unscrew check valve from air injection pipe.
install or Connect
1. Screw check valve onto air injection pipe.
2. Position air hoses on check valve and secure with
clamp.
3. Any parts removed for access.
DECELERATION VALVE
Remove or Disconnect
1. Vacuum hoses from valve.
2. Screws securing valve to engine bracket.
3. Deceleration valve.
Figure C6-5 - Control Valve Service
Install or Connect
1. Deceleration valve.
2. Screws securing valve to engine bracket.
3. Vacuum hoses to valve.
1 BOLT (2) 16 N.rn (12 FT. LBS.)
1 NUTS (2) 24 N.rn (18 FT. LBS.) 7s 3315-6E
Figure C6-4 - Control Valve Service
Page 774 of 1825
DRIVEABILITY AND EMISSIONS 2.8L (VIN 0) 6E3-C6-5
PART NAME CROUP
Bracket. AIR Inj Pump Supt (RR) .........
Bracket. AIR Inj Pump (Frt) .............
Bracket. Dclr Vlv ....................
Gasket. AIR Cont Vlv ..................
IIose. AIR 111j Cont Vlv .................
........ Ilose. Clcase Vent Pipe to Dclr Vlv
Pipe . AIR 1n.j Ctltc Conv Chk Vlv .........
Pipe . AIR Inj Cont Vlv .................
Pulley. AIR tnj Pump .................
Punlp. AIR Ini .......................
Silencer. AIR Inj Corit Vlv ..............
Valve. AIR Inj Cont ...................
Valve. AIR I11j Eng Ckik ................
Valve. Ilclr ..........................
Page 775 of 1825
6E3-C6-6 2.8L (VIN S) DRlVEABlLlTY AND EMISSIONS
AIR SOLENOID
CHART C-6
ELECTRIC CONTROL (DIVERT)
(MANUAL TRANSMISSION)
2.8L (VIN S) "'F" SERIES (PORT)
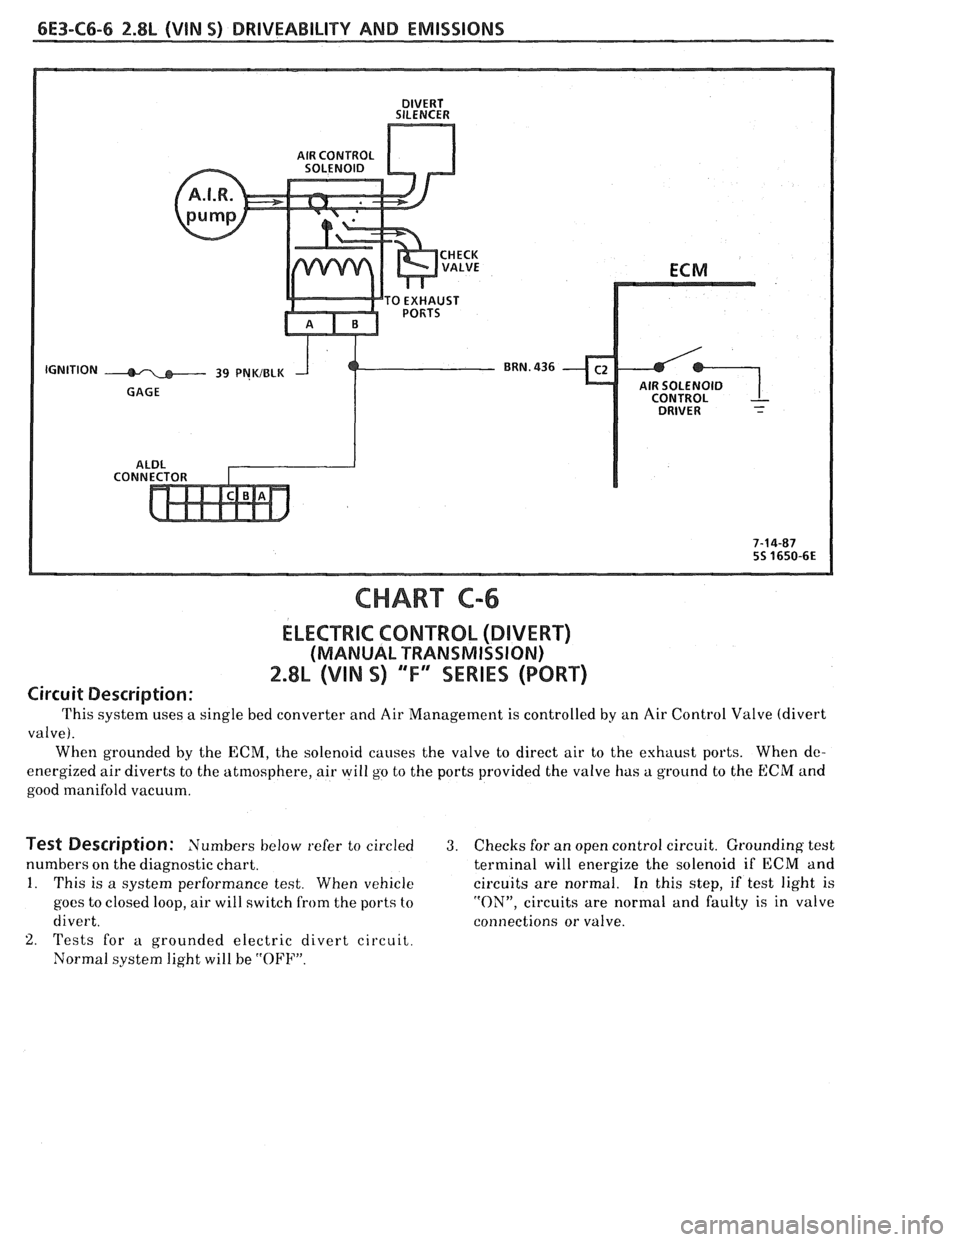
Circuit Description:
This system uses a single bed converter and Air Management is controlled by an Air Control Valve (divert
valve).
When grounded by the ECM, the solenoid causes the valve to direct air to the exhaust ports. When
dc-
energized air diverts to the atmosphere, air will go to the ports provided the valve has a ground to the ECM and
good manifold vacuum.
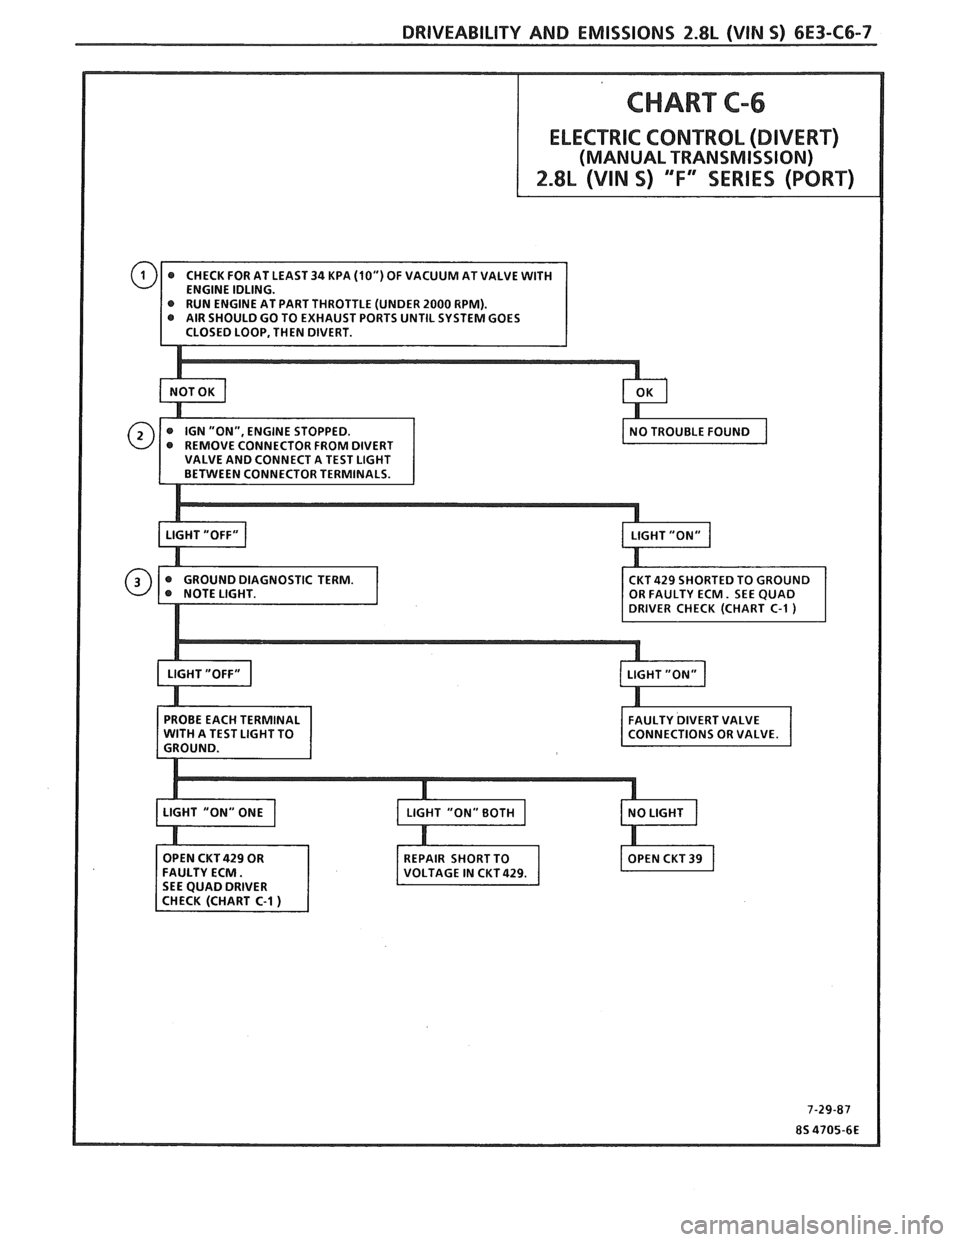
Test Description: Numbers below refer to circled 3. Checks for an open control circuit. Grounding test
numbers on the diagnostic chart. terminal will energize the solenoid if ECM and
1. This is a system performance test. When vehicle circuits are normal. In this step, if test light is
goes to closed loop, air will switch from the ports to "ON", circuits are normal and faulty is in valve
divert. connections or valve.
2. 'rests for a grounded electric divert circuit.
Normal system light will be
"OFF".
Page 776 of 1825
DRIVEABILITY AND EMISSIONS 2.8L (VIM 5) 6E3-C6-7
LE (UNDER 2000 RPM).
PORTS UNTIL SYSTEM GOES
Page 777 of 1825

6E3-C6-8 2.8L (WIN S) DRIVEABILITY AND EMISSIONS
BLANK
Page 778 of 1825
DRIVEABILITY AND EMISSIONS 2.8L (VIN 5) 6E3-C7-1
SECTION C7
EXHAUST GAS RECIRCULATION (EGR) SYSTEM
CONTENTS
GENERAL DESCRIPTION ................ C7-1
PURPOSE
......................... C7-1
OPERATION
....................... C7-1
ELECTRONIC VACUUM REGULATOR
VALVE
........................... C7-1
PORT EGR VALVE
................... C7-2
EGR VALVE IDENTIFICATION..
......... C7-2
RESULTS OF INCORRECT OPERATION
... C7-2
DIAGNOSIS
......................... C7-3
GENERAL DESCRIPTION
PURPOSE
The EGR system is used to lower NO, (oxides of
nitrogen) emission levels caused by high combustion
temperature. It does this
by decreasing combustion
temperature.
The main element of the system is the
EGR valve
operated by vacuum and mounted
"ON" the intake
manifold.
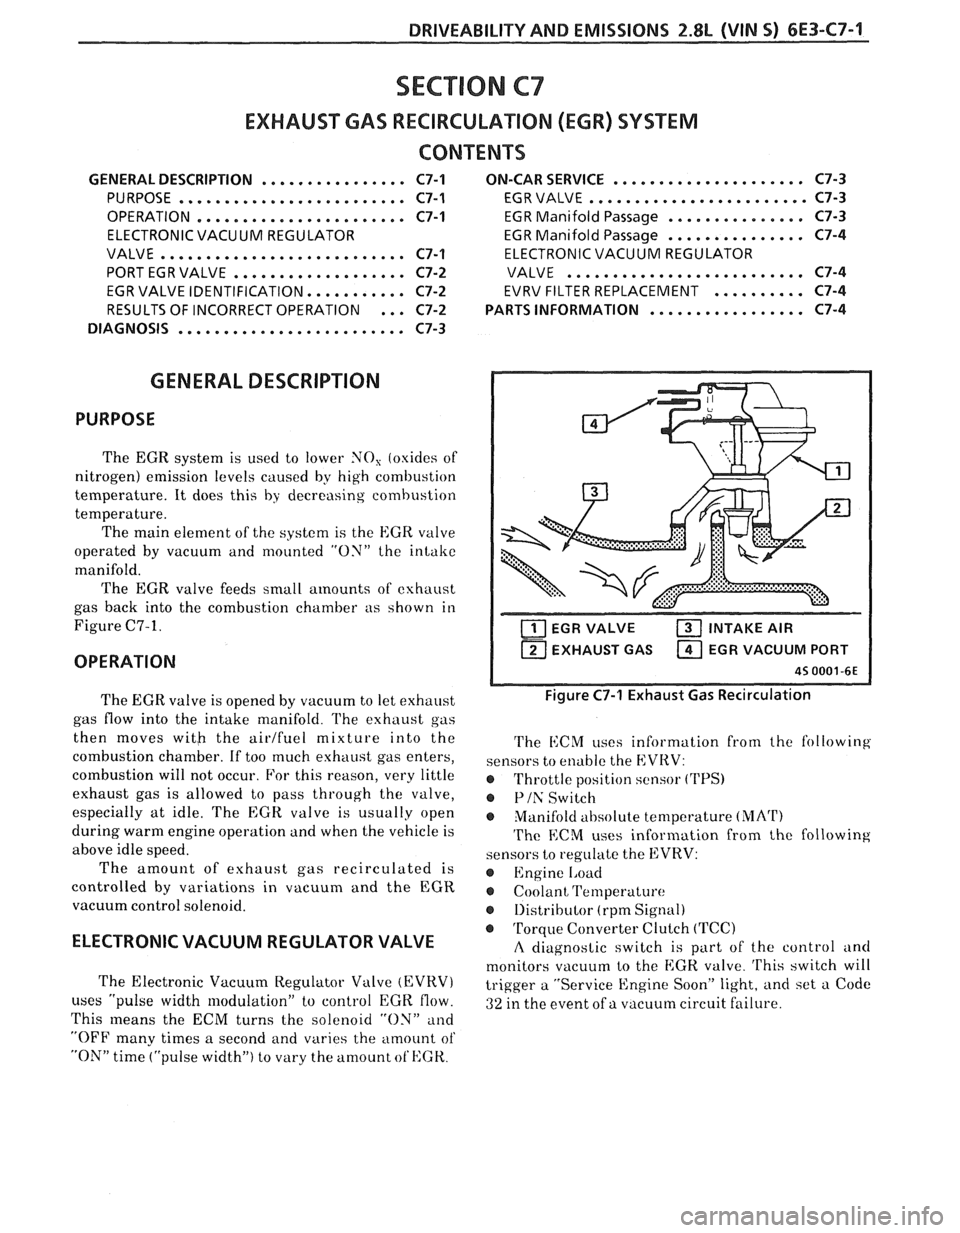
The EGR valve feeds small
amounts of exhaust
gas back into the combustion chamber as shown in
Figure C7-1.
OPERATION
..................... ON-CAR SERVICE C7-3
EGR VALVE
........................ C7-3
EGR Manifold Passage
............... C7-3
EGR Manifold Passage
............... C7-4
ELECTRONIC VACUUM REGULATOR
VALVE
.......................... C7-4
EVRV FILTER REPLACEMENT
.......... C7-4
................. PARTS INFORMATION C7-4
EGR VALVE INTAKE AIR
1 EXHAUST GAS EGR VACUUM PORT I
The EGR valve is opened by vacuum to let exhaust
gas flow into the intake manifold.
l'he exhaust gas
then moves
witb the airlfuel mixture into the
combustion chamber. If too much exhaust gas enters,
combustion will not occur. For this reason, very little
exhaust gas is allowed to pass through the valve,
especially at idle. The
EGR valve is usually open
during warm engine operation and when the vehicle is
above idle speed.
The amount of exhaust gas recirculated is
controlled by variations in vacuum and the EGR
vacuum control solenoid.
ELECTRONIC VACUUM REGULATOR VALVE
The Electronic Vacuum Regulator Valve (EVRV)
uses "pulse width modulation" to control EGK flow.
This
means the ECM turns the solenoid "ON" and
"OFF many times a second and varies the amount of
"ON" time ("pulse width") to vary the amount ot'HGK.
Figure C7-1 Exhaust Gas Recirculation
The i1:CM uses information from the following
sensors to enable the EVRV:
@ Throttle position sensor ('I'PS)
@ Plh' Switch
Manifold
ahsolute temperature (MArI')
The ECM uses information from the following
sensors to regulate the EVRV:
@ Engine 1,oad
Coolant Temperature
@ 1)istributor (rpm Signal)
@ Torque Converter Clutch (TCC)
A diagnostic switch is part of the control and
monitors vacuum to the
EGK. valve. 'I'his switch will
trigger a "Service Engine Soon" light, and set a Code
ai ure. 32 in the event of a vacuum circuit f 'I
Page 779 of 1825
EXHAUST GAS VALVE OPEN
INTAKE AIR
171 VALVE CLOSED
VACUUM PORT
/ SPRING 4s 05366E
Figure C7-2 - Port EGR Valve
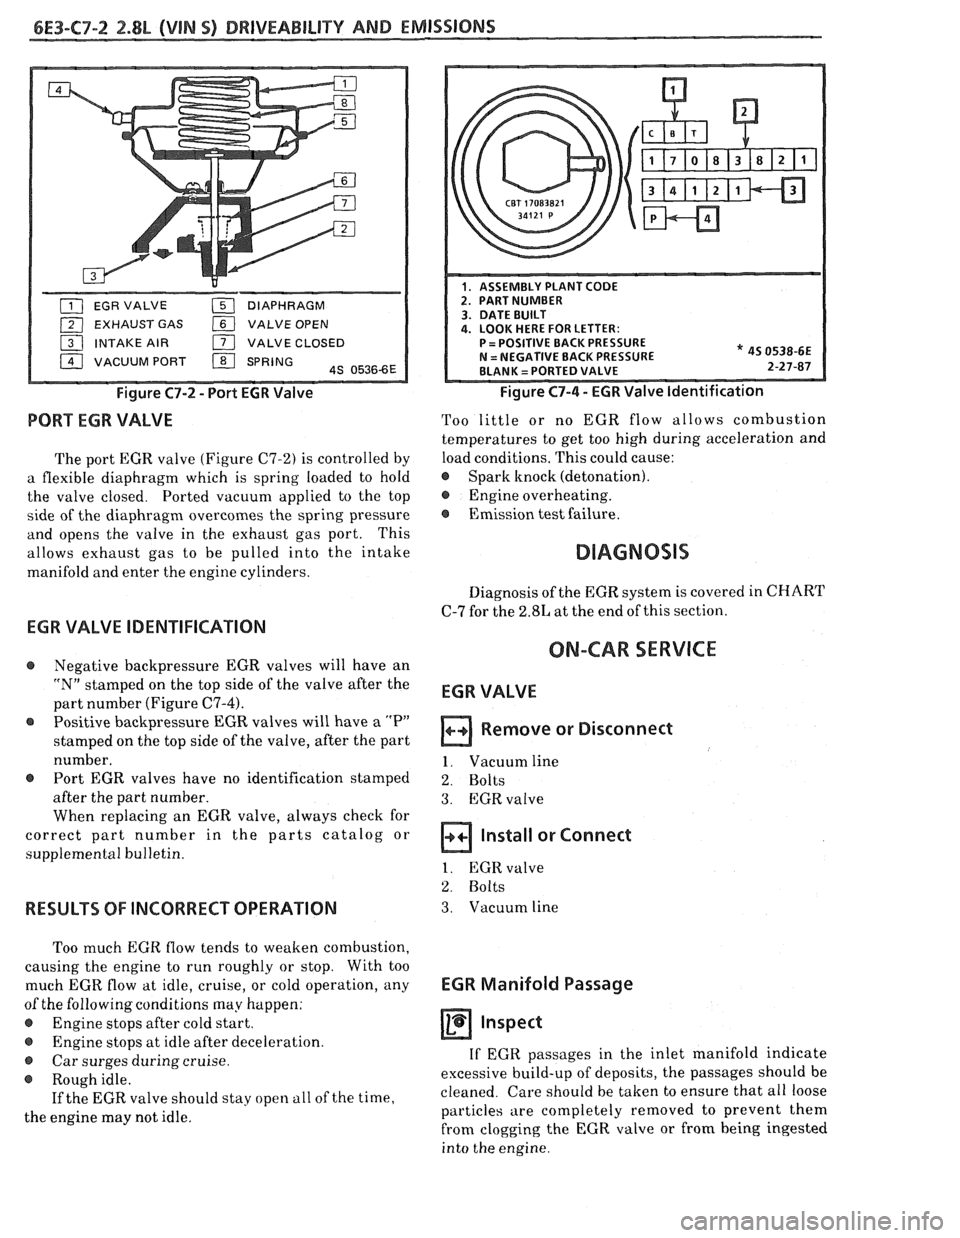
PORT EGR VALVE
The port EGR valve (Figure C7-2) is controlled by
a flexible diaphragm which is spring loaded to hold
the valve closed. Ported vacuum applied to the top
side of the diaphragm overcomes the spring pressure
and opens the valve in the exhaust gas port. This
allows exhaust gas to be pulled into the intake
manifold and enter the engine cylinders.
* 45 0538-6E 2-27-87
Figure C7-4 - EGR Valve Identification
Too little or no EGR flow allows combustion
temperatures to get too high during acceleration and
load conditions. This could cause:
@ Spark knock (detonation).
@ Engine overheating.
@ Emission test failure.
Diagnosis of the EGR system is covered in CHART
C-7 for the 2.8L at the end of this section.
EGR VALVE IDENTIFICATION
ON-CAR SERVICE @ Negative backpressure EGR valves will have an
"N" stamped on the top side of the valve after the
part number (Figure
C7-4).
Positive backpressure EGR valves will have a "P"
stamped on the top side of the valve, after the part
number.
@ Port EGR valves have no identification stamped
after the part number.
When replacing an EGR valve, always check for
correct part number in the parts catalog or
supplemental bulletin.
RESULTS OF INCORRECT OPERATION
Too much EGR flow tends to weaken combustion,
causing the engine to run roughly or stop. With too
much EGR flow at idle, cruise, or cold operation, any
of the following conditions may happen:
@ Engine stops after cold start.
e Engine stops at idle after deceleration.
@ Car surges during cruise.
@ Rough idle.
If the EGR valve should stay open
a11 of the time,
the engine may not idle.
EGR VALVE
Remove or Disconnect
1. Vacuum line
2. Bolts
3. EGRvalve
Install or Connect
1. EGR valve
2. Bolts
3. Vacuum line
EGR Manifold Passage
Inspect
If EGR passages in the inlet manifold indicate
excessive build-up of deposits, the passages should be
cleaned. Care should be taken to ensure that all loose
particles are completely removed to prevent them
from clogging the EGR valve or from being ingested
into the engine.
Page 780 of 1825
DRIVEABILITY AND EMISSIONS 2.8L (VIM 5) 6E3-C7-3
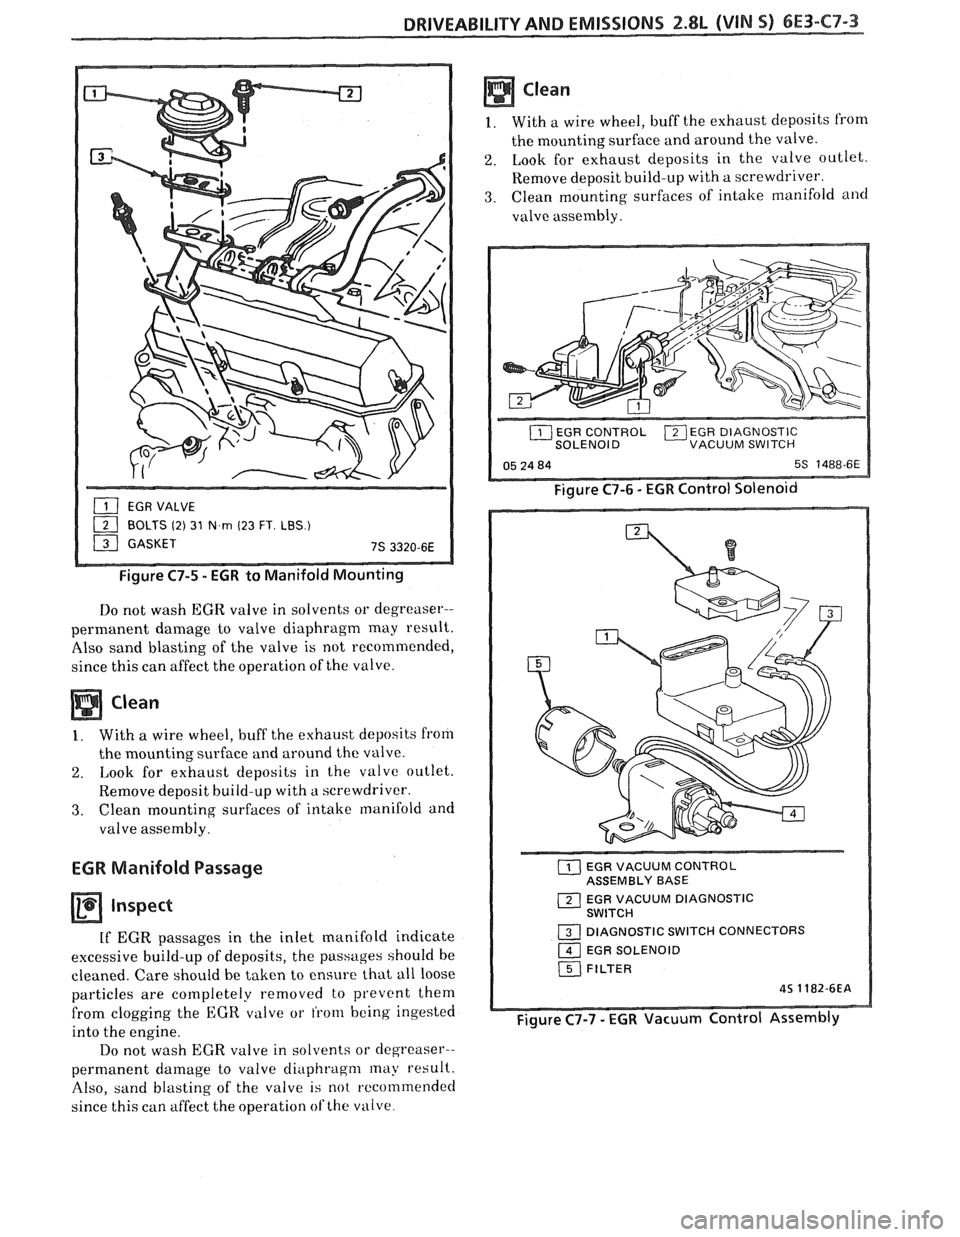
- Figure C7-5 - EGR to Manifold Mounting
Do not wash EGR valve in solvents or degreaser--
permanent damage to valve diaphragm
may result.
Also sand blasting of the valve is not recommended,
since this can affect the operation of the valve.
1. With a wire wheel, buff the exhaust deposits fro111
the mounting surface and around the valve.
2. Look for exhaust deposits in the valve outlet.
Remove deposit build-up with a screwdriver.
3. Clean mounting surfaces of intake manifold and
valve assembly.
EGR Manifold Passage
a Inspect
If EGR passages in the inlet manifold indicate
excessive build-up of deposits, the passages should be
cleaned. Care should be taken to ensure that
a11 loose
particles are completely removed to prevent them
from clogging the
EGR valve or from being ingested
into the engine.
Do not wash
EGR valve in solvents or clegrcaser--
permanent damage to valve diaphragm may result.
Also, sand blasting of the valve is
not 1.ccomrnendec1
since this can affect the operation of the villve
Clean
1. With a wire wheel, buff the exhaust deposits from
the mounting surface and around the valve.
2. Look for exhaust deposits in the valve outlet.
Remove deposit build-up with a screwdriver.
3. Clean mounting surfaces of intake manifold and
valve assembly.
EGR CONTROL ~EGR DIAGNOSTIC SOLENOID VACUUM SWITCH
Figure C7-6 - EGR Control Solenoid
( EGR VACUUM CONTROL
ASSEMBLY BASE
( EGR VACUUM DIAGNOSTIC SWITCH
1 DIAGNOSTIC SWITCH CONNECTORS
1 EGR SOLENOID
FILTER
45 1182-6EA
Figure C7-7 - EGR Vacuum Control Assembly