Ram 3500 2020 User Guide
Manufacturer: RAM, Model Year: 2020, Model line: 3500, Model: Ram 3500 2020Pages: 568
Page 11 of 568

9
Windshield Wiper Blades ..........................414
Exhaust System ........................................416
Cooling System .........................................417
Charge Air Cooler — Inter-Cooler ..............421
Brake System ............................................421
Automatic Transmission ............................422
Rear Axle And 4x4 Front Driving Axle
Fluid Level .................................................. 424 Transfer Case ............................................425
Noise Control System Required
Maintenance & Warranty .........................425
HOISTING ........................................................... 429
TIRES ................................................................... 429
Tire Safety Information .............................429Tires — General Information .....................435Tire Types ...................................................440
Spare Tires — If Equipped .........................441
Wheel And Wheel Trim Care ....................442
Tire Chains And Traction Devices ............443
Tire Rotation Recommendations .............444 DEPARTMENT OF TRANSPORTATION
UNIFORM TIRE QUALITY GRADES .................. 446
Treadwear .................................................. 446
Traction Grades ......................................... 446
Temperature Grades ................................. 446
STORING THE VEHICLE .....................................447
BODYWORK ........................................................ 447
Protection From Atmospheric Agents....... 447
Body And Underbody Maintenance .......... 447Preserving The Bodywork .......................... 448
INTERIORS ......................................................... 450
Seats And Fabric Parts .............................. 450
Plastic And Coated Parts ........................... 450
Leather Parts ............................................. 451
Glass Surfaces .......................................... 451
TECHNICAL SPECIFICATIONS
IDENTIFICATION DATA .......................................452Vehicle Identification Number ................. 452
BRAKE SYSTEM ................................................. 452
Hydraulic Brake Assist — If Equipped ....... 452
WHEEL AND TIRE TORQUE SPECIFICATIONS ... 452
Torque Specifications ............................... 452 FUEL REQUIREMENTS — GAS ENGINE ............ 454
6.4L Engine ................................................ 454
Reformulated Gasoline ............................ 454Materials Added To Fuel ........................... 454
Gasoline/Oxygenate Blends ..................... 454
Do Not Use E-85 In Non-Flex Fuel
Vehicles ...................................................... 455 CNG And LP Fuel System Modifications .. 455MMT In Gasoline........................................ 455
Fuel System Cautions................................ 455
Carbon Monoxide Warnings ..................... 456
FUEL REQUIREMENTS – DIESEL ENGINE ....... 456
Fuel Specifications ................................... 457
Biodiesel Fuel Requirements.................... 457
FLUID CAPACITIES — GAS ENGINE ................. 459
FLUID CAPACITIES — DIESEL ENGINE............. 460
FLUIDS AND LUBRICANTS — GAS ENGINE..... 461 Engine ....................................................... 461
Chassis ...................................................... 463
FLUIDS AND LUBRICANTS — DIESEL ENGINE ...464
Engine ....................................................... 464
Chassis ....................................................... 466
20_DJD2_OM_EN_USC_t.book Page 9
Page 12 of 568

10
MULTIMEDIA
UCONNECT SYSTEMS ....................................... 467
CYBERSECURITY ............................................... 467
UCONNECT SETTINGS ....................................... 468
Uconnect 3 Settings ..................................468Uconnect 4/4C/4C NAV Settings .............484
Uconnect 4C NAV With 12-inch
Display Settings .........................................505
SAFETY AND GENERAL INFORMATION .......... 524
Safety Guidelines .......................................524
UCONNECT 3 WITH 5-INCH DISPLAY .............. 525
Introduction ................................................525
Radio Mode ................................................526
Media Mode ...............................................529Phone Mode ...............................................531
STEERING WHEEL AUDIO CONTROLS —
IF EQUIPPED ...................................................... 537
Radio Operation .........................................538
Media Mode ...............................................538
IPOD®/USB/MP3 CONTROL — IF EQUIPPED .. 538
RADIO OPERATION AND MOBILE PHONES ...540
Regulatory And Safety Information........... 540
VOICE RECOGNITION QUICK TIPS ................... 541
Introducing Uconnect ................................ 541
Get Started ................................................. 541
Basic Voice Commands............................. 542Radio .......................................................... 543
Media.......................................................... 543
Phone ......................................................... 543Voice Text Reply — If Equipped ................. 543
Climate (4C/4C NAV) ................................. 544
Navigation (4C NAV) .................................. 544Siri® Eyes Free — If Equipped ................. 545
Using Do Not Disturb ................................ 545
Android Auto™ — If Equipped ................... 545
Apple CarPlay® — If Equipped ................. 546
General Information .................................. 546Additional Information ............................... 547
CUSTOMER ASSISTANCE
SUGGESTIONS FOR OBTAINING SERVICE
FOR YOUR VEHICLE .......................................... 548
Prepare For The Appointment .................. 548Prepare A List............................................. 548
Be Reasonable With Requests ................. 548
IF YOU NEED ASSISTANCE .............................. 548
FCA US LLC Customer Center ................... 549
FCA Canada Inc. Customer Center ........... 549
In Mexico Contact ...................................... 549
Puerto Rico And US Virgin Islands ............ 549
Customer Assistance For The Hearing
Or Speech Impaired (TDD/TTY) ................ 549 Service Contract ....................................... 549
WARRANTY INFORMATION .............................. 550
MOPAR PARTS................................................... 550
REPORTING SAFETY DEFECTS ........................ 550
In The 50 United States And
Washington, D.C. ....................................... 550 In Canada ................................................... 550
PUBLICATION ORDER FORMS ........................ 551
20_DJD2_OM_EN_USC_t.book Page 10
Page 13 of 568

11
INTRODUCTION
Dear Customer, congratulations on selecting your new vehicle. Be assured that it represents precision workmanship, distinctive styling, and high quality.
This is a specialized utility vehicle. It can go places and perform tasks that are not intended for conventional passenger vehicles. It handles and
maneuvers differently from many passenger vehicles both on-road and off-road, so take time to become familiar with your vehicle. If equipped, the
two-wheel drive version of this vehicle was designed for on-road use only. It is not intended for off-road driving or use in other severe conditions suited
for a four-wheel drive vehicle. Before you start to drive this vehicle, read the Owner’s Manual. Be sure you are familiar with all vehicle controls,
particularly those used for braking, steering, transmission, and transfer case shifting. Learn how your vehicle handles on different road surfaces. Your
driving skills will improve with experience. When driving off-road, or working the vehicle, don’t overload the vehicle or expect the vehicle to overcome
the natural laws of physics. Always observe federal, state, provincial and local laws wherever you drive. As with other vehicles of this type, failure to
operate this vehicle correctly may result in loss of control or a collision. Refer to the “Driving Tips” in “Starting and Operating” for further information.
This Owner's Manual has been prepared with the assistance of service and engineering specialists to acquaint you with the operation and maintenance
of your vehicle. It is supplemented by Warranty Information, and customer-oriented documents. Within this information, you will find a description of
the services that FCA US LLC offers to its customers, the vehicle's warranty coverage, and the details of the terms and conditions for maintaining its
validity. Please take the time to read all of these publications carefully before driving your vehicle for the first time. Following the instructions,
recommendations, tips, and important warnings in this manual will help assure safe and enjoyable operation of your vehicle.
This Owner's Manual describes all versions of this vehicle. Options and equipment dedicated to specific markets or versions are not expressly indicated
in the text. Therefore, you should only consider the information which is related to the trim level, engine, and version that you have purchased. Any
content introduced throughout the Owner's Information, that may or may not be applicable to your vehicle, will be identified with the wording “If
Equipped”. All data contained in this publication are intended to help you use your vehicle in the best possible way. FCA US LLC aims at a constant
improvement of the vehicles produced. For this reason, it reserves the right to make changes to the model described for technical and/or commercial
reasons. For further information, contact an authorized dealer.
When it comes to service, remember that an authorized dealer knows your vehicle best, has factory-trained technicians and genuine MOPAR® parts,
and cares about your satisfaction.1
20_DJD2_OM_EN_USC_t.book Page 11
Page 14 of 568

12
HOW TO USE THIS MANUAL
ESSENTIAL INFORMATION
Consult the Table of Contents to determine which section contains the
information you desire.
Since the specification of your vehicle depends on the items of equipment
ordered, certain descriptions and illustrations may differ from your
vehicle's equipment.
The detailed Index at the back of this Owner's Manual contains a
complete listing of all subjects.
SYMBOLS
Some vehicle components have colored labels whose symbols indicate
precautions to be observed when using this component. Refer to
“Warning Lights and Messages” in “Getting To Know Your Instrument
Panel” for further information on the symbols used in your vehicle.
WARNINGS AND CAUTIONS
This Owner’s Manual contains WARNINGS against operating procedures
that could result in a collision, bodily injury and/or death. It also contains
CAUTIONS against procedures that could result in damage to your vehicle.
If you do not read this entire Owner’s Manual, you may miss important
information. Observe all Warnings and Cautions.
VAN CONVERSIONS/CAMPERS
The New Vehicle Limited Warranty does not apply to body modifications or
special equipment installed by van conversion/camper manufacturers/
body builders. US residents refer to the Warranty Information, Section
2.1.C. Canadian residents refer to the “What Is Not Covered” section of
the Warranty Information. Such equipment includes video monitors,
VCRs, heaters, stoves, refrigerators, etc. For warranty coverage and
service on these items, contact the applicable manufacturer.
Operating instructions for the special equipment installed by the
conversion/camper manufacturer should also be supplied with your
vehicle. If these instructions are missing, please contact an authorized
dealer for assistance in obtaining replacement documents from the
applicable manufacturer.
For information on the Body Builder’s Guide refer to www.ramtrucks.com.
This website contains dimensional and technical specifications for your
vehicle. It is intended for Second Stage Manufacturer's technical support.
For service issues, contact an authorized dealer.
VEHICLE MODIFICATIONS/ALTERATIONS
WARNING!
Any modifications or alterations to this vehicle could seriously affect its
roadworthiness and safety and may lead to a collision resulting in
serious injury or death.
20_DJD2_OM_EN_USC_t.book Page 12
Page 15 of 568

13
GETTING TO KNOW YOUR VEHICLE
VEHICLE USER GUIDE — IF EQUIPPED
Access your Owner’s Information right through
your Uconnect 4C or 4C NAV touchscreen
system (if equipped).
To access the Vehicle User Guide on your
Uconnect Touchscreen: Press the Uconnect
Apps button. From there, press the Vehicle User
Guide icon on your touchscreen. No Uconnect
registration is required.
Uconnect 4C NAV With 8.4–inch Display Vehicle User Guide Touchscreen Icon
NOTE:
Vehicle User Guide features are not available
while the vehicle is moving. If you try to access while the vehicle is in motion, the system will
display the message “Feature not available
while the vehicle is in motion”.
Pre-Installed Features
Your User Guide — Updated in real-time
Touchscreen convenience
Maintenance schedules and information
Comprehensive icon and symbol glossary
Available when and where you need it
Customizable interface
Multilingual
Once you launch your Vehicle User Guide, you
will be able to explore your warranty information
and radio manual when and where you need
them. Your Uconnect system displays the
Vehicle User Guide on your touchscreen radio to
assist in better understanding your vehicle.
There’s no app to download, no phone to
connect and no external device needed for
playback. Plus, it’s updated throughout the
year, in real-time, so it never goes out of date. Features/Benefits
Pre-installed on your Uconnect touchscreen
radio
Enhanced search and browsing capability
Robust NAV application (if equipped)
Add selected topics to a fast-access Favor
-
ites category
Icon and symbol glossary
Warranty information
Crucial driver information and assistance:
Operating Instructions
Warranty Information
Fluid Level Standards
Maintenance Schedules
Emergency Procedures
911 Contact and More
2
20_DJD2_OM_EN_USC_t.book Page 13
Page 16 of 568

14GETTING TO KNOW YOUR VEHICLE
TIP:
When viewing a topic, tap the star icon to add it
to your Favorites, for easy access in the future.
KEYS
KEY FOB
Your vehicle uses a keyless ignition system. The
ignition system consists of a key fob and a
START/STOP push button ignition system. The
Remote Keyless Entry (RKE) system consists of
a key fob and Keyless Enter-N-Go feature.
NOTE:
The key fob may not be found if it is located next
to a mobile phone, laptop or other electronic
device; these devices may block the key fob’s
wireless signal.
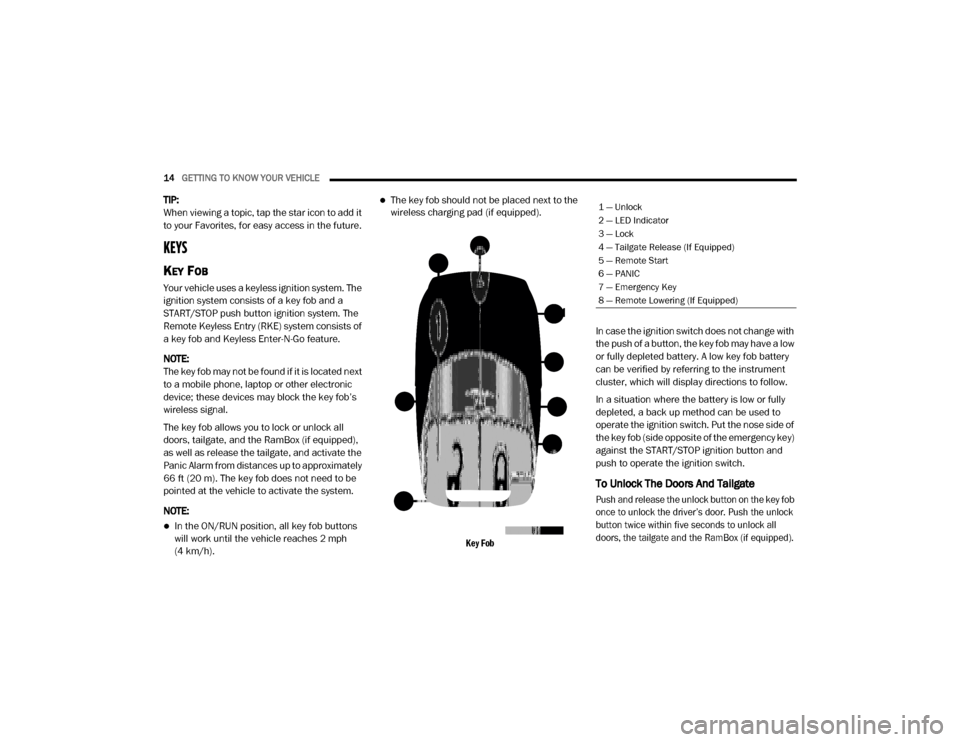
The key fob allows you to lock or unlock all
doors, tailgate, and the RamBox (if equipped),
as well as release the tailgate, and activate the
Panic Alarm from distances up to approximately
66 ft (20 m). The key fob does not need to be
pointed at the vehicle to activate the system.
NOTE:
In the ON/RUN position, all key fob buttons
will work until the vehicle reaches 2 mph
(4 km/h).
The key fob should not be placed next to the
wireless charging pad (if equipped).
Key Fob
In case the ignition switch does not change with
the push of a button, the key fob may have a low
or fully depleted battery. A low key fob battery
can be verified by referring to the instrument
cluster, which will display directions to follow.
In a situation where the battery is low or fully
depleted, a back up method can be used to
operate the ignition switch. Put the nose side of
the key fob (side opposite of the emergency key)
against the START/STOP ignition button and
push to operate the ignition switch.
To Unlock The Doors And Tailgate
Push and release the unlock button on the key fob
once to unlock the driver’s door. Push the unlock
button twice within five seconds to unlock all
doors, the tailgate and the RamBox (if equipped).
1 — Unlock
2 — LED Indicator
3 — Lock
4 — Tailgate Release (If Equipped)
5 — Remote Start
6 — PANIC
7 — Emergency Key
8 — Remote Lowering (If Equipped)
20_DJD2_OM_EN_USC_t.book Page 14
Page 17 of 568

GETTING TO KNOW YOUR VEHICLE15
The turn signal lights will flash to acknowledge the
unlock signal. The illuminated entry system will
also turn on.
NOTE:
All doors can be programmed to unlock on the
first push of the unlock button. Refer to “Ucon -
nect Settings” in “Multimedia” for further infor -
mation.
To Lock The Doors And Tailgate
Push and release the lock button on the key fob
to lock all doors, the tailgate, and the RamBox
(if equipped). The turn signal lights will flash and
the horn will chirp to acknowledge the signal.
Sound Horn With Remote Key Lock — If
Equipped
This feature will cause the horn to chirp when
the doors are locked with the key fob. This
feature can be turned on or turned off through
the Uconnect Settings. NOTE:
Pushing the lock button on the key fob while you
are in the vehicle will activate the vehicle secu
-
rity alarm system. Opening a door with the
vehicle security alarm system activated will
cause the alarm to sound. Push the unlock
button to deactivate the vehicle security alarm
system.
Refer to “Vehicle Security Alarm” in this chapter
for further information.
Using The Panic Alarm
To turn the Panic Alarm feature on or off, push
the Panic button on the key fob. When the Panic
Alarm is activated, the turn signals will flash, the
horn will pulse on and off, and the interior lights
will turn on.
The Panic Alarm will stay on for three minutes
unless you turn it off by either pushing the Panic
button a second time or drive the vehicle at a
speed of 15 mph (24 km/h) or greater. NOTE:
The interior lights will turn off if you place the
ignition in the ACC or ON/RUN position while
the Panic Alarm is activated. However, the
exterior lights and horn will remain on.
You may need to be less than 35 ft (11 m)
from the vehicle when using the key fob to
turn off the Panic Alarm due to the radio
frequency noises emitted by the system.
Replacing The Battery In The Key Fob With
Remote Control
The replacement battery model is one CR2450
battery.
NOTE:
Perchlorate Material — special handling may
apply. See www.dtsc.ca.gov/hazard
-
ouswaste/perchlorate for further informa -
tion.
Do not touch the battery terminals that are
on the back housing or the printed circuit
board.
2
20_DJD2_OM_EN_USC_t.book Page 15
Page 18 of 568

16GETTING TO KNOW YOUR VEHICLE
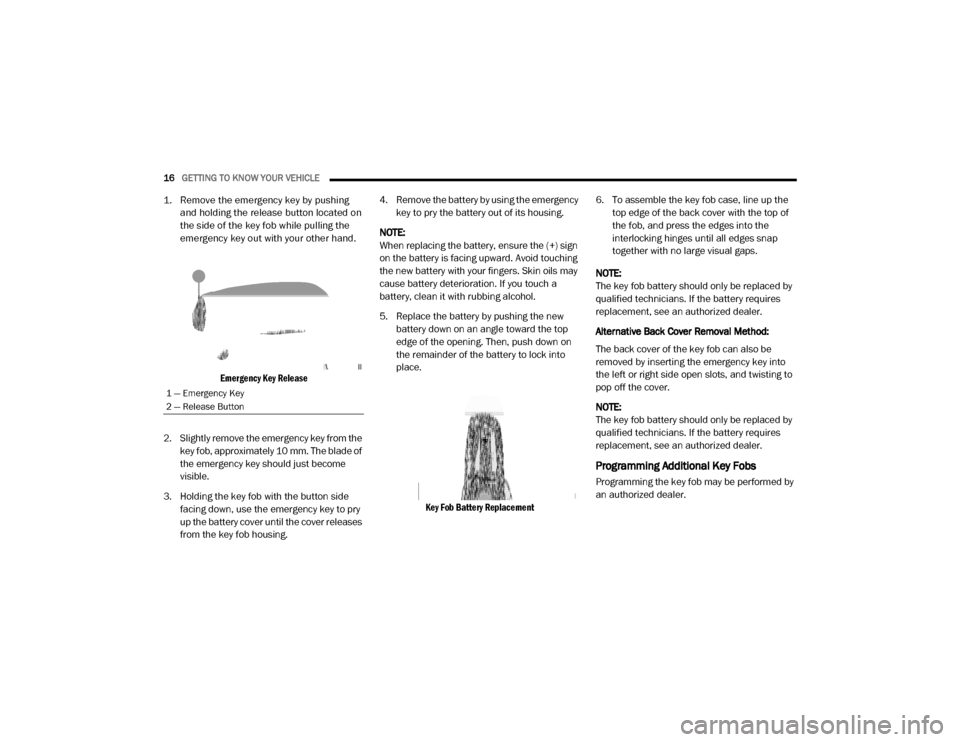
1. Remove the emergency key by pushing
and holding the release button located on
the side of the key fob while pulling the
emergency key out with your other hand.
Emergency Key Release
2. Slightly remove the emergency key from the key fob, approximately 10 mm. The blade of
the emergency key should just become
visible.
3. Holding the key fob with the button side facing down, use the emergency key to pry
up the battery cover until the cover releases
from the key fob housing. 4. Remove the battery by using the emergency
key to pry the battery out of its housing.
NOTE:
When replacing the battery, ensure the (+) sign
on the battery is facing upward. Avoid touching
the new battery with your fingers. Skin oils may
cause battery deterioration. If you touch a
battery, clean it with rubbing alcohol.
5. Replace the battery by pushing the new battery down on an angle toward the top
edge of the opening. Then, push down on
the remainder of the battery to lock into
place.
Key Fob Battery Replacement
6. To assemble the key fob case, line up the
top edge of the back cover with the top of
the fob, and press the edges into the
interlocking hinges until all edges snap
together with no large visual gaps.
NOTE:
The key fob battery should only be replaced by
qualified technicians. If the battery requires
replacement, see an authorized dealer.
Alternative Back Cover Removal Method:
The back cover of the key fob can also be
removed by inserting the emergency key into
the left or right side open slots, and twisting to
pop off the cover.
NOTE:
The key fob battery should only be replaced by
qualified technicians. If the battery requires
replacement, see an authorized dealer.
Programming Additional Key Fobs
Programming the key fob may be performed by
an authorized dealer.
1 — Emergency Key
2 — Release Button
20_DJD2_OM_EN_USC_t.book Page 16
Page 19 of 568

GETTING TO KNOW YOUR VEHICLE17
NOTE:
Once a key fob is programmed to a vehicle, it
cannot be repurposed and reprogrammed to
another vehicle.
General Information
The following regulatory statement applies to all
Radio Frequency (RF) devices equipped in this
vehicle:
This device complies with Part 15 of the FCC
Rules and with Innovation, Science and
Economic Development Canada license-exempt
RSS standard(s). Operation is subject to the
following two conditions:
1. This device may not cause harmful
interference, and
2. This device must accept any interference received, including interference that may
cause undesired operation.
Le présent appareil est conforme aux CNR
d`Innovation, Science and Economic
Development applicables aux appareils radio
exempts de licence. L'exploitation est autorisée
aux deux conditions suivantes:
1. l'appareil ne doit pas produire de
brouillage, et
2. l'utilisateur de l'appareil doit accepter tout brouillage radioélectrique subi, même si le
brouillage est susceptible d'en compro -
mettre le fonctionnement.
La operación de este equipo está sujeta a las
siguientes dos condiciones:
1. es posible que este equipo o dispositivo no cause interferencia perjudicial y
2. este equipo o dispositivo debe aceptar cualquier interferencia, incluyendo la que
pueda causar su operación no deseada.
NOTE:
Changes or modifications not expressly
approved by the party responsible for compli -
ance could void the user’s authority to operate
the equipment.
IGNITION SWITCH
KEYLESS PUSH BUTTON IGNITION
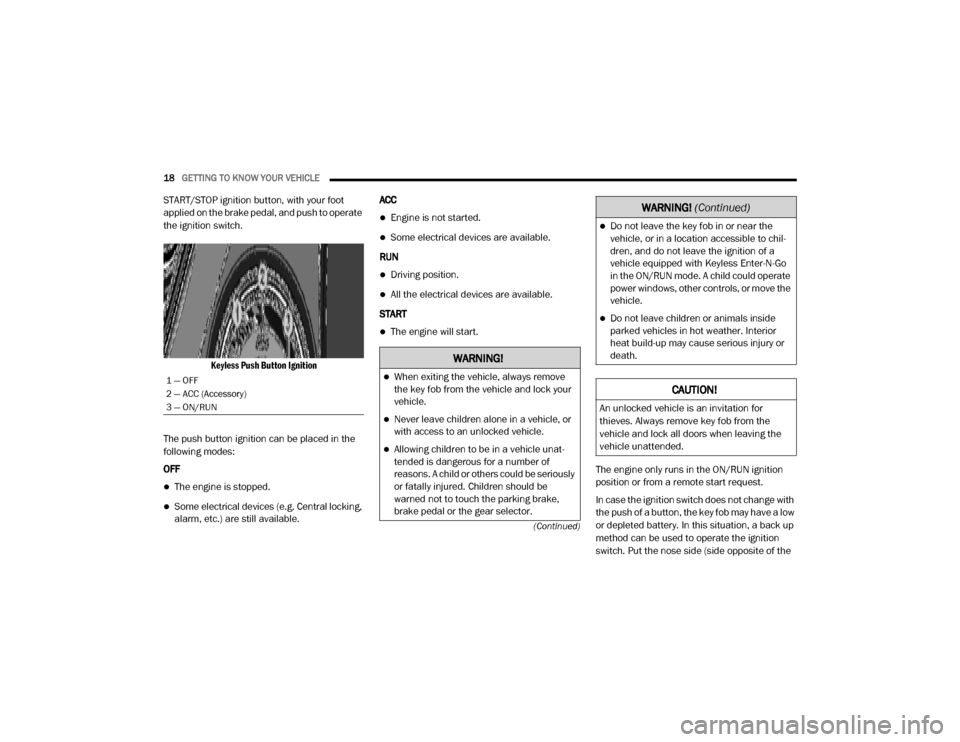
This feature allows the driver to operate the
ignition switch with the push of a button as long
as the Remote Keyless Entry key fob is in the
passenger compartment.
The Keyless Push Button Ignition has four
operating positions; three of which are labeled
and will illuminate when in position. The three
positions are OFF, ACC, and ON/RUN. The
fourth position is START. During START, RUN will
illuminate.
NOTE:
In case the ignition switch does not change with
the push of a button, the key fob may have a low
or depleted battery. In this situation, a back up
method can be used to operate the ignition
switch. Put the nose side (side opposite of the
emergency key) of the key fob against the
2
20_DJD2_OM_EN_USC_t.book Page 17
Page 20 of 568

18GETTING TO KNOW YOUR VEHICLE
(Continued)
START/STOP ignition button, with your foot
applied on the brake pedal, and push to operate
the ignition switch.
Keyless Push Button Ignition
The push button ignition can be placed in the
following modes:
OFF
The engine is stopped.
Some electrical devices (e.g. Central locking,
alarm, etc.) are still available. ACC
Engine is not started.
Some electrical devices are available.
RUN
Driving position.
All the electrical devices are available.
START
The engine will start.
The engine only runs in the ON/RUN ignition
position or from a remote start request.
In case the ignition switch does not change with
the push of a button, the key fob may have a low
or depleted battery. In this situation, a back up
method can be used to operate the ignition
switch. Put the nose side (side opposite of the
1 — OFF
2 — ACC (Accessory)
3 — ON/RUN
WARNING!
When exiting the vehicle, always remove
the key fob from the vehicle and lock your
vehicle.
Never leave children alone in a vehicle, or
with access to an unlocked vehicle.
Allowing children to be in a vehicle unat-
tended is dangerous for a number of
reasons. A child or others could be seriously
or fatally injured. Children should be
warned not to touch the parking brake,
brake pedal or the gear selector.
Do not leave the key fob in or near the
vehicle, or in a location accessible to chil -
dren, and do not leave the ignition of a
vehicle equipped with Keyless Enter-N-Go
in the ON/RUN mode. A child could operate
power windows, other controls, or move the
vehicle.
Do not leave children or animals inside
parked vehicles in hot weather. Interior
heat build-up may cause serious injury or
death.
CAUTION!
An unlocked vehicle is an invitation for
thieves. Always remove key fob from the
vehicle and lock all doors when leaving the
vehicle unattended.
WARNING! (Continued)
20_DJD2_OM_EN_USC_t.book Page 18