service SSANGYONG MUSSO 1998 Workshop Owner's Manual
[x] Cancel search | Manufacturer: SSANGYONG, Model Year: 1998, Model line: MUSSO, Model: SSANGYONG MUSSO 1998Pages: 1463, PDF Size: 19.88 MB
Page 74 of 1463

SECTION 1B1
M162 ENGINE MECHANICAL
CAUTION: Disconnect the negative battery cable before removing or installing any electrical unit or when a
tool or equipment could easily come in contact with exposed electrical terminals. Disconnecting this cable
will help prevent personal injury and damage to the vehicle. The ignition must also be in LOCK unless otherwise
noted.
Specifications . . . . . . . . . . . . . . . . . . . . . . . 1B1-2
Fastener Tightening Specifications . . . . . . . . 1B1-2
Special Tools . . . . . . . . . . . . . . . . . . . . . . . 1B1-4
Special Tools Table . . . . . . . . . . . . . . . . . . . . 1B1-4
Maintenance and Repair . . . . . . . . . . . . . . 1B1-8
On-Vehicle Service . . . . . . . . . . . . . . . . . . . . . 1B1-8
Engine Assembly . . . . . . . . . . . . . . . . . . . . . 1B1-8
Crankcase Ventilation System . . . . . . . . . . 1B1-16
Alternator . . . . . . . . . . . . . . . . . . . . . . . . . . 1B1-18
Power Steering Pump and A/C Bracket . . . 1B1-19
Hydraulic Engine Mounting Insulator . . . . . . 1B1-22
Poly V-Belt . . . . . . . . . . . . . . . . . . . . . . . . . 1B1-25
Tensioning Device . . . . . . . . . . . . . . . . . . . . 1B1-27
Poly V-Belt Inspection . . . . . . . . . . . . . . . . . 1B1-29
Cylinder Head Cover . . . . . . . . . . . . . . . . . 1B1-31
Cylinder Head Front Cover . . . . . . . . . . . . . 1B1-33
Cylinder Head . . . . . . . . . . . . . . . . . . . . . . . 1B1-35
Timing Gear Case Cover . . . . . . . . . . . . . . 1B1-38
Crankshaft Sealing Rear Cover . . . . . . . . . 1B1-40
Belt Pulley and Vibration Damper . . . . . . . . 1B1-42
Crankshaft Front Radial Seal . . . . . . . . . . . 1B1-45
Crankshaft Rear Radial Seal . . . . . . . . . . . 1B1-46
Crankshaft . . . . . . . . . . . . . . . . . . . . . . . . . 1B1-47
Flywheel / Driven Plate . . . . . . . . . . . . . . . . 1B1-53
Camshaft Adjuster . . . . . . . . . . . . . . . . . . . 1B1-55
Camshaft Sprocket Bolt . . . . . . . . . . . . . . . 1B1-58
Camshaft . . . . . . . . . . . . . . . . . . . . . . . . . . 1B1-59
TABLE OF CONTENTS
Camshaft Timing Position . . . . . . . . . . . . . . 1B1-64
Valve Spring . . . . . . . . . . . . . . . . . . . . . . . . 1B1-67
Valve Stem Seal . . . . . . . . . . . . . . . . . . . . . 1B1-71
Chain Tensioner . . . . . . . . . . . . . . . . . . . . . 1B1-72
Timing Chain . . . . . . . . . . . . . . . . . . . . . . . . 1B1-75
Tensioning Rail . . . . . . . . . . . . . . . . . . . . . . 1B1-80
Cylinder Head Guide Rail . . . . . . . . . . . . . . 1B1-81
Crankcase Guide Rail . . . . . . . . . . . . . . . . . 1B1-82
Crankshaft Sprocket . . . . . . . . . . . . . . . . . . 1B1-83
Piston . . . . . . . . . . . . . . . . . . . . . . . . . . . . . 1B1-85
Connecting Rod . . . . . . . . . . . . . . . . . . . . . 1B1-88
Piston Ring . . . . . . . . . . . . . . . . . . . . . . . . . 1B1-90
Engine Oil Specification . . . . . . . . . . . . . . . 1B1-92
Oil Pan . . . . . . . . . . . . . . . . . . . . . . . . . . . . 1B1-93
Engine Oil and Oil Filter Element . . . . . . . . 1B1-95
Oil Filter . . . . . . . . . . . . . . . . . . . . . . . . . . . 1B1-97
Oil Pump . . . . . . . . . . . . . . . . . . . . . . . . . . . 1B1-99
Oil Pressure Relief Valve . . . . . . . . . . . . . 1B1-101
Oil Non-Return Valve . . . . . . . . . . . . . . . . 1B1-102
Oil Dipstick Guide Tube . . . . . . . . . . . . . . 1B1-103
Unit Repair . . . . . . . . . . . . . . . . . . . . . . . 1B1-104
Oil Gallery in Crankcase . . . . . . . . . . . . . . 1B1-104
Oil Gallery in Cylinder Head . . . . . . . . . . . 1B1-106
Core Plugs in Crankcase . . . . . . . . . . . . . 1B1-109
Cylinder Bore . . . . . . . . . . . . . . . . . . . . . . 1B1-111
Crankcase Mating Surface . . . . . . . . . . . . 1B1-113
Cylinder Head Mating Surface . . . . . . . . . 1B1-115
Page 81 of 1463

1B1-8 M162 ENGINE MECHANICAL
MAINTENANCE AND REPAIR
ON-VEHICLE SERVICE
ENGINE ASSEMBLY
Tools Required
000 589 10 99 01 Torque Wrench
000 589 40 37 00 Hose Clamp
112 589 00 72 00 Oil Extractor
Page 95 of 1463
1B1-22 M162 ENGINE MECHANICAL
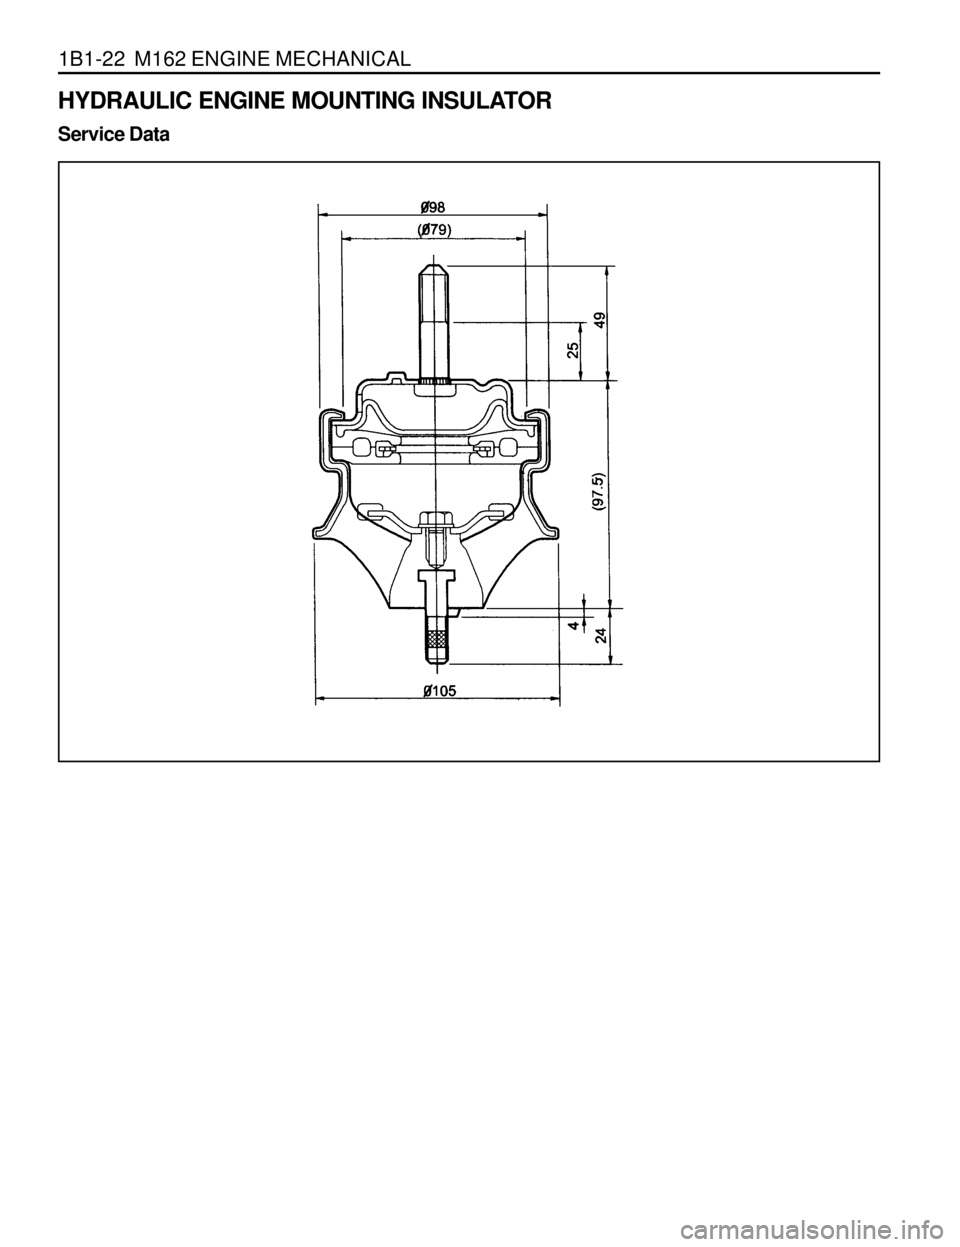
HYDRAULIC ENGINE MOUNTING INSULATOR
Service Data
Page 116 of 1463
M162 ENGINE MECHANICAL 1B1-43
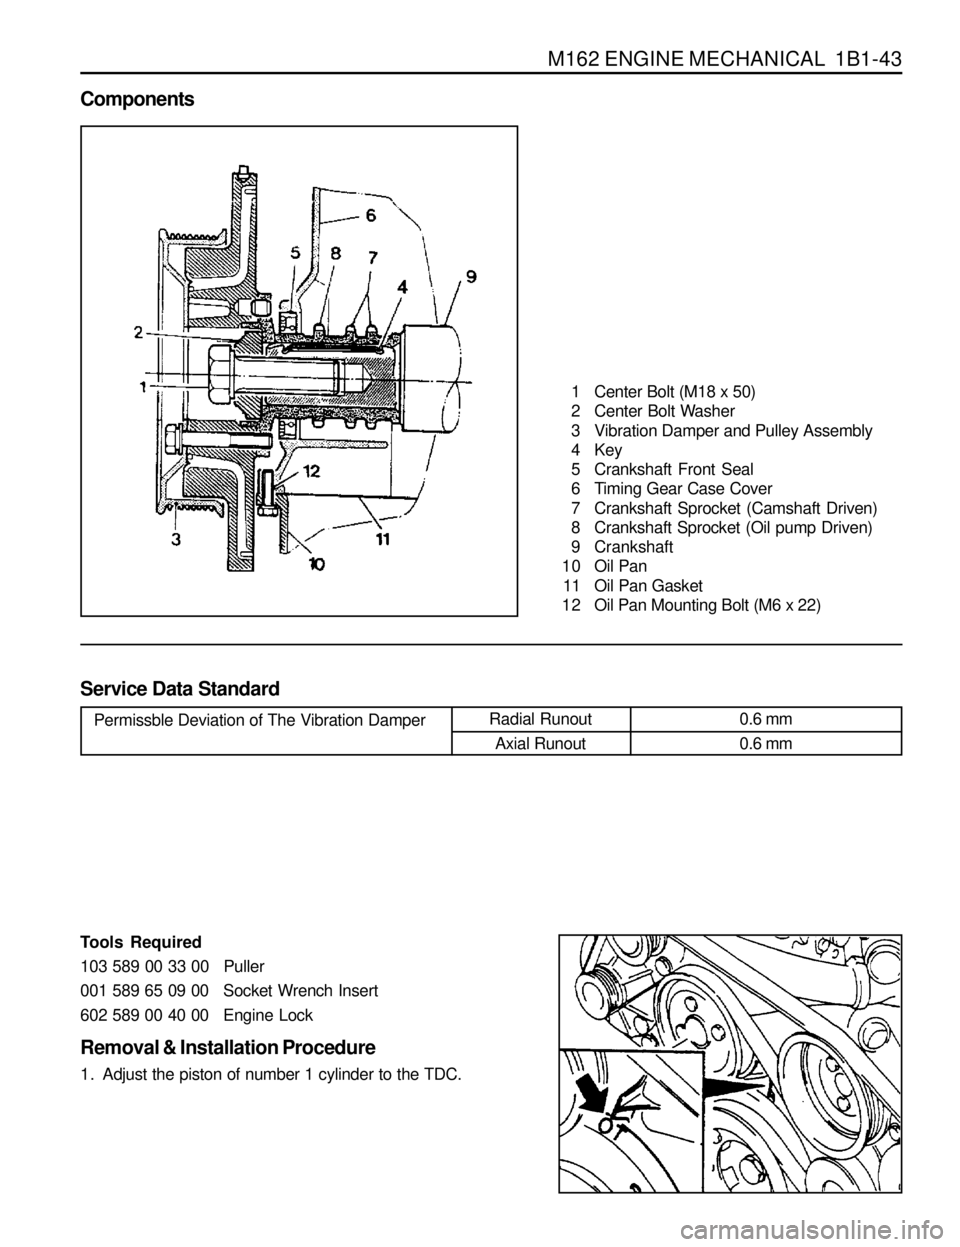
Components
1 Center Bolt (M18 x 50)
2 Center Bolt Washer
3 Vibration Damper and Pulley Assembly
4 Key
5 Crankshaft Front Seal
6 Timing Gear Case Cover
7 Crankshaft Sprocket (Camshaft Driven)
8 Crankshaft Sprocket (Oil pump Driven)
9 Crankshaft
10 Oil Pan
11 Oil Pan Gasket
12 Oil Pan Mounting Bolt (M6 x 22)
Service Data Standard
Permissble Deviation of The Vibration DamperRadial Runout
Axial Runout0.6 mm
0.6 mm
Tools Required
103 589 00 33 00 Puller
001 589 65 09 00 Socket Wrench Insert
602 589 00 40 00 Engine Lock
Removal & Installation Procedure
1. Adjust the piston of number 1 cylinder to the TDC.
Page 122 of 1463
M162 ENGINE MECHANICAL 1B1-49
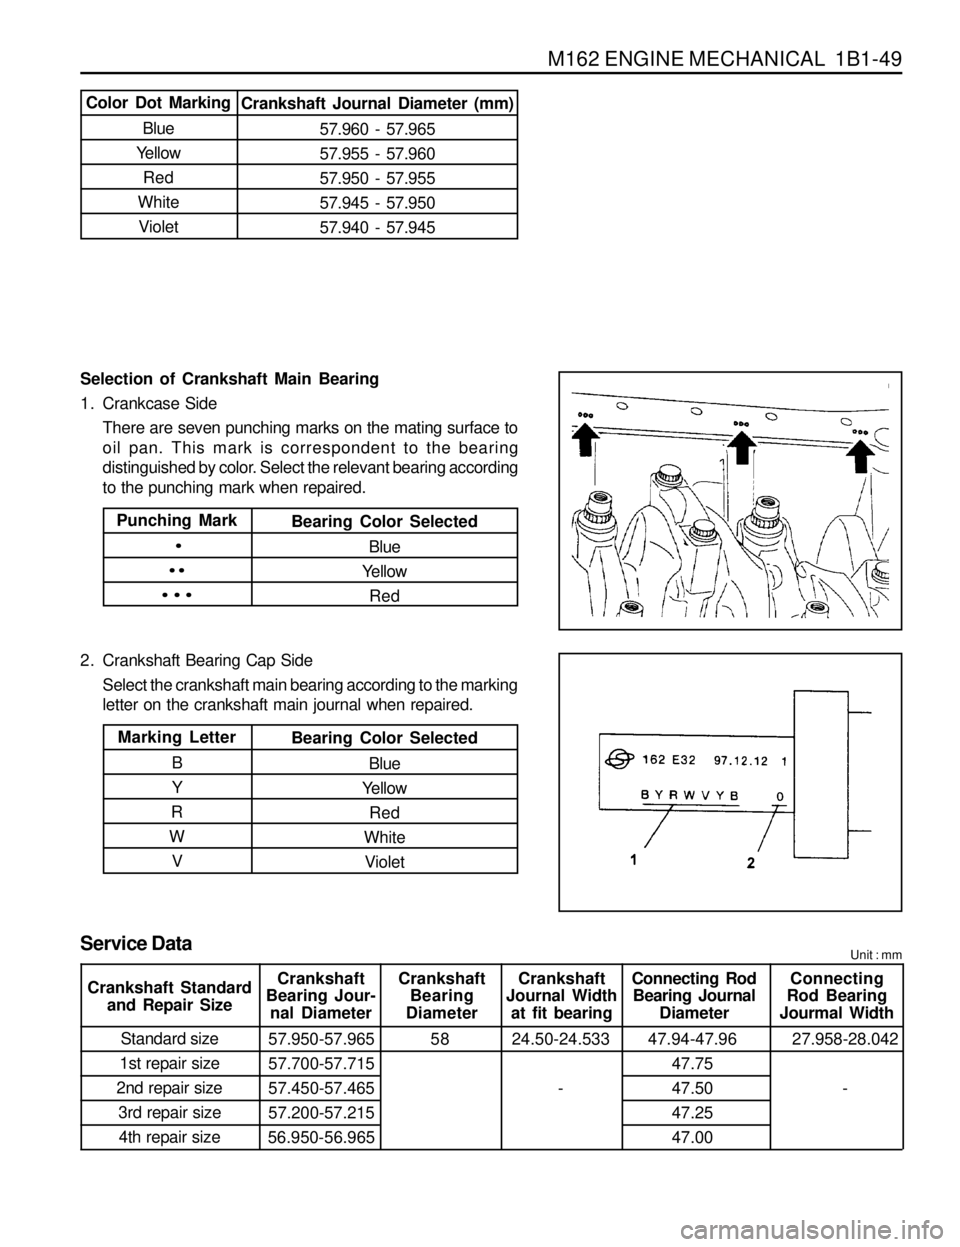
Selection of Crankshaft Main Bearing
1. Crankcase Side
There are seven punching marks on the mating surface to
oil pan. This mark is correspondent to the bearing
distinguished by color. Select the relevant bearing according
to the punching mark when repaired.
2. Crankshaft Bearing Cap Side
Select the crankshaft main bearing according to the marking
letter on the crankshaft main journal when repaired.
Color Dot Marking
Blue
Yellow
Red
White
VioletCrankshaft Journal Diameter (mm)
57.960 - 57.965
57.955 - 57.960
57.950 - 57.955
57.945 - 57.950
57.940 - 57.945
Punching Mark
·
··
···
Bearing Color Selected
Blue
Yellow
Red
Marking Letter
B
Y
R
W
VBearing Color Selected
Blue
Yellow
Red
White
Violet
Service DataUnit : mm
Crankshaft
Bearing Jour-
nal DiameterCrankshaft
Bearing
DiameterCrankshaft
Journal Width
at fit bearingConnecting Rod
Bearing Journal
DiameterConnecting
Rod Bearing
Jourmal Width
Standard size
1st repair size
2nd repair size
3rd repair size
4th repair size57.950-57.965
57.700-57.715
57.450-57.465
57.200-57.215
56.950-56.96558 24.50-24.533
-47.94-47.96
47.75
47.50
47.25
47.0027.958-28.042
- Crankshaft Standard
and Repair Size
Page 125 of 1463
1B1-52 M162 ENGINE MECHANICAL
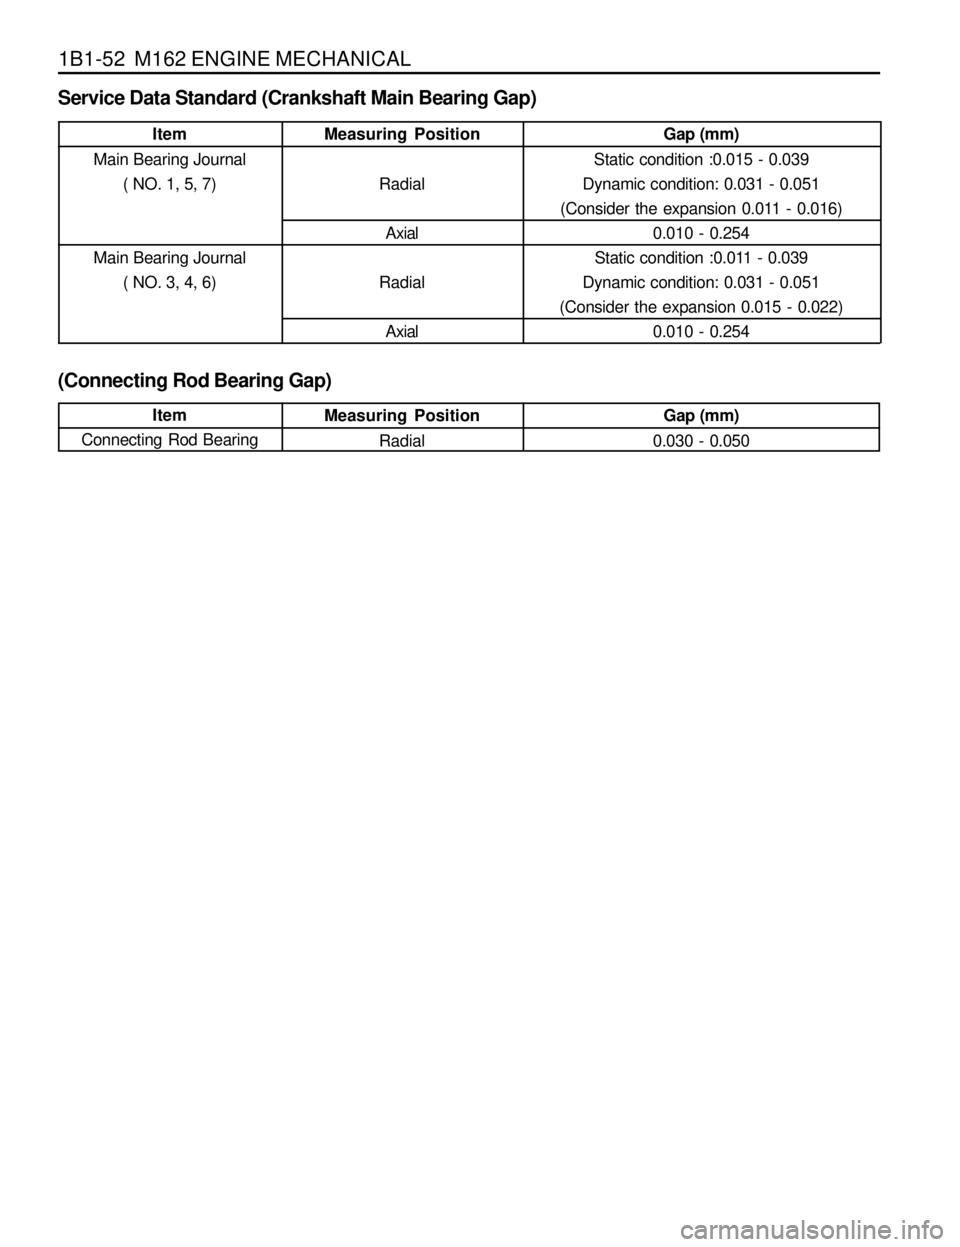
Service Data Standard (Crankshaft Main Bearing Gap)
(Connecting Rod Bearing Gap)
Item
Main Bearing Journal
( NO. 1, 5, 7)
Main Bearing Journal
( NO. 3, 4, 6)Measuring Position
Radial
Axial
Radial
AxialGap (mm)
Static condition :0.015 - 0.039
Dynamic condition: 0.031 - 0.051
(Consider the expansion 0.011 - 0.016)
0.010 - 0.254
Static condition :0.011 - 0.039
Dynamic condition: 0.031 - 0.051
(Consider the expansion 0.015 - 0.022)
0.010 - 0.254
Item
Connecting Rod BearingMeasuring Position
RadialGap (mm)
0.030 - 0.050
Page 126 of 1463
M162 ENGINE MECHANICAL 1B1-53
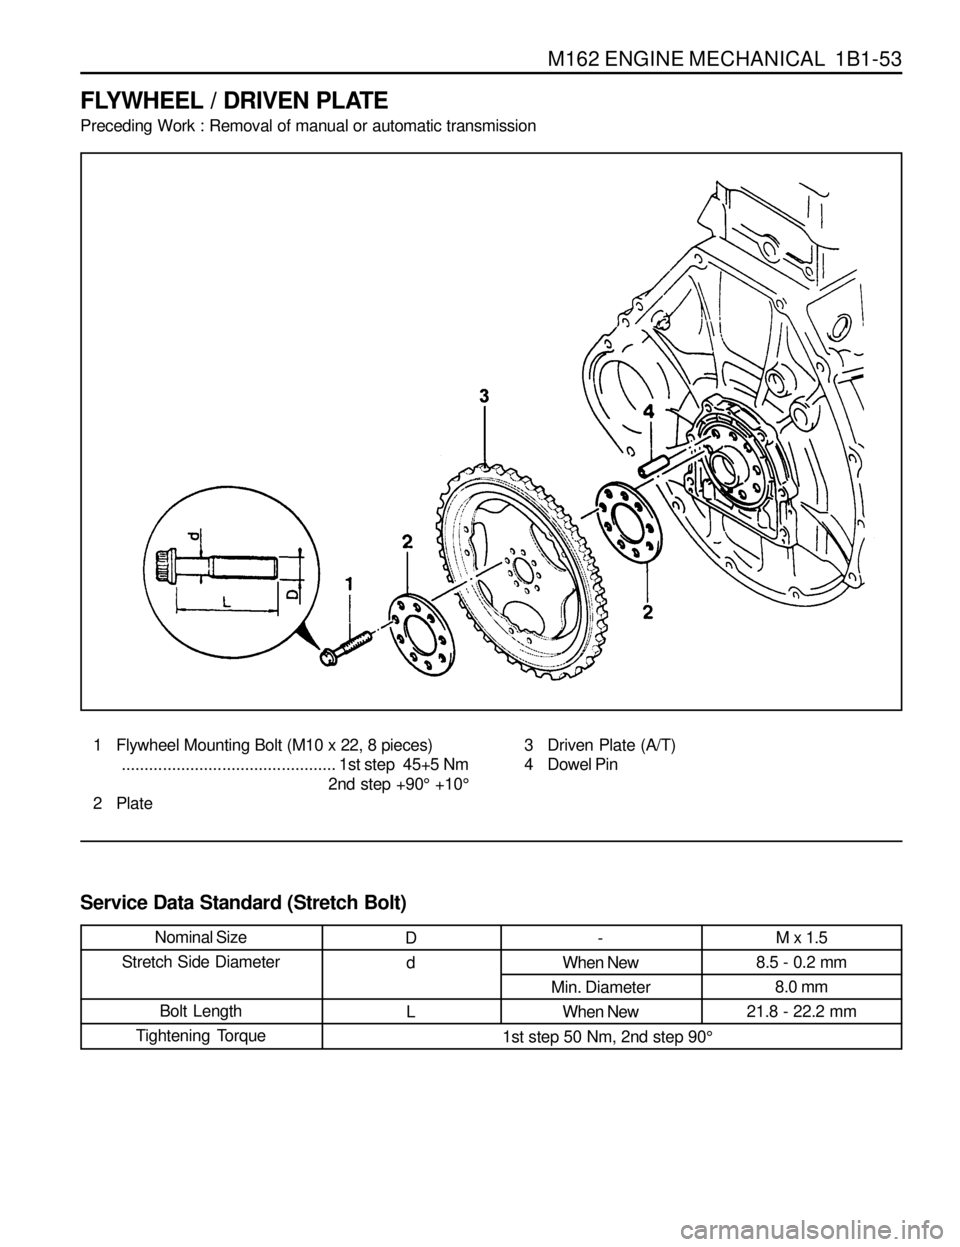
FLYWHEEL / DRIVEN PLATE
Preceding Work : Removal of manual or automatic transmission
1 Flywheel Mounting Bolt (M10 x 22, 8 pieces)
...............................................1st step 45+5 Nm
2nd step +90° +10°
2 Plate3 Driven Plate (A/T)
4 Dowel Pin
Service Data Standard (Stretch Bolt)
Nominal Size
Stretch Side Diameter
Bolt Length
Tightening TorqueM x 1.5
8.5 - 0.2 mm
8.0 mm
21.8 - 22.2 mm-
When New
Min. Diameter
When NewD
d
L
1st step 50 Nm, 2nd step 90°
Page 161 of 1463

1B1-88 M162 ENGINE MECHANICAL
CONNECTING ROD
Preceding Work : Removal of piston
1 Connecting Rod Bushing
2 Oil Gallery
3 Balance Weight
4 Connecting Rod Bolt
(M9 x 52, 12 m pieces) .. 1st step 40+5 Nm
2nd step 90°+10°
5 Fit Sleeve
6 Upper Connecting Rod Bearing
7 Lower Connecting Rod Bearing
8 BearingShell Lug
9 Marking [Indication(//) or Numbers]
Service Data Standard
Distance (L) from The Connecting Rod Bearing Bore Center to The Bushing Bore Center
Width of The Connecting Rod (B) at Bearing Bore
Width of The Connecting Rod (b) at Bushing Bore
Basic Bore at The Bearing Shell (D1)
Basic Bore at The Bushing (d1)
Bushing Inner Diameter (d)
Clearance Between The Piston Pin and The Bushing
Peak-to-valley Height of Connecting Rod Bushing on Inside
Permissible Wwist of Connecting Rod Bearing Bore to Connecting Rod Bushing Bore
Permissible Deviation of Axial Paralleism of Connecting Rod Bearing Bore to Connecting
Rod Bushing Core
Permissible Deviation of Connecting Rod Bearing Bore from Concentricity
Permissible Difference of Each Connecting Rod in Weight145 ± 0.05 mm
21.940 - 22.000 mm
21.940 - 22.000 mm
51.600 - 51.614 mm
24.500 - 24.571 mm
22.007 - 22.013 mm
0.007 - 0.018 mm
0.005 mm
0.15 mm
0.07 mm
0.01 mm
0.4 g
Page 185 of 1463

1B1-112 M162 ENGINE MECHANICAL
Service Data Standard
Measurement of Cylinder Bore
1. Clean the cylinder wall.
2. Using a internal diameter gauge, measure the bore size in
axial and transverse direction at three points (1,2,3).
1,2,3. Measuring Points
A . Axial Direction
B. Transverse Direction
a. Location of the No.1 Piston Ring at TDC
b. Location of the Piston BDC
c. Location of the Oil Ring at BDC
Chamfer Angle
Wear Limit in Longitudinal and Transverse Direction
Permissible Deviation of Cylinder Out-of-round
Permissible Deviation of Rectangular Cylinder Height (Except Chamfered Area)
Basic Peak-to-valley Height After Final Honing and Brushing
Chamfer Angle
Honing AngleWhen new
Wear limit0.1 mm
0.007 mm
0.05 mm
0.05 mm
0.003 - 0.006 mm
60°
50° ± 10°
Page 186 of 1463

M162 ENGINE MECHANICAL 1B1-113
CRANKCASE MATING SURFACE
Service Data Standard
Height of The Crankcase “H” (When new)
Minimum Height After Milling
Flatness
Permissible Deviation of Parallelism of The
Upper to Lower Mating Surface
Peak-to-valley HeightCrankcase Upper Mating Surface
Crankcase Lower Mating Surface
Axial Direction
Transverse Direction
Crankcase Upper Mating Surface
Crankcase Lower Mating Surface282.25 - 282.35mm
281.95mm
0.03mm
0.04mm
0.1mm
0.05mm
0.005 - 0.020mm
0.025mm