SSANGYONG MUSSO 2003 Service Manual
MUSSO 2003
SSANGYONG
SSANGYONG
https://www.carmanualsonline.info/img/67/57511/w960_57511-0.png
SSANGYONG MUSSO 2003 Service Manual
Trending: engine, fuel fill door release, Hight, spare tire location, tcm, engine oil capacity, remove seats
Page 141 of 1574
M162 ENGINE MECHANICAL 1B1-105
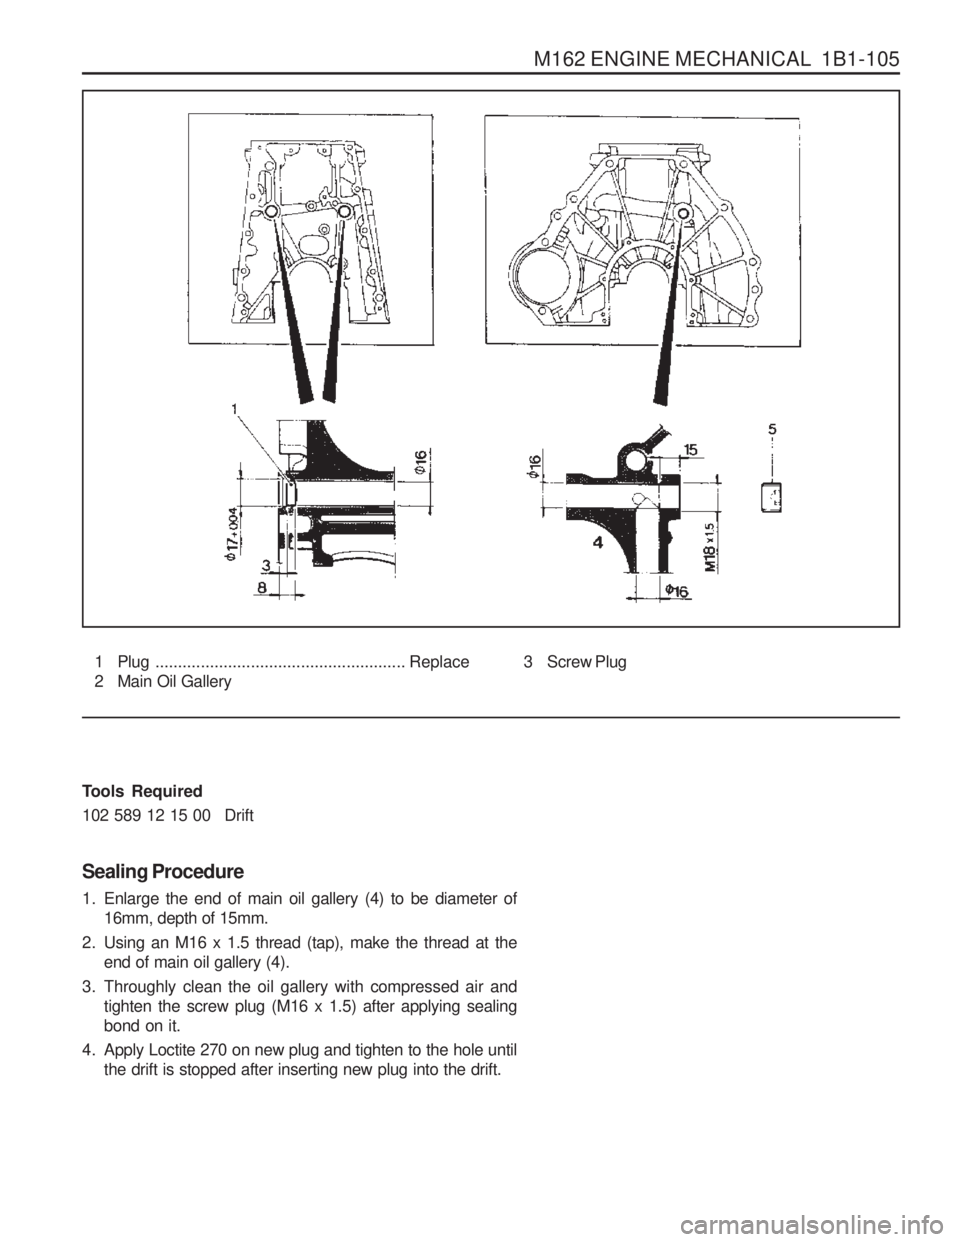
1 Plug....................................................... Replace
2 Main Oil Gallery
Tools Required
102 589 12 15 00 Drift Sealing Procedure
1. Enlarge the end of main oil gallery (4) to be diameter of 16mm, depth of 15mm.
2. Using an M16 x 1.5 thread (tap), make the thread at the end of main oil gallery (4).
3. Throughly clean the oil gallery with compressed air and tighten the screw plug (M16 x 1.5) after applying sealing bond on it.
4. Apply Loctite 270 on new plug and tighten to the hole until the drift is stopped after inserting new plug into the drift. 3 Screw Plug
Page 142 of 1574
1B1-106 M162 ENGINE MECHANICAL
OIL GALLERY IN CYLINDER HEAD Preceding Work : Removal of cylinder headRemoval of camshaft
Removal of tappet
1 Screw Plug................................................ 15 Nm
2 Seal
Cleaning Procedure
1. Remove the screw plug (1) and the seal (2). Installation Notice Replace the seal with new one.
2. Clean the oil gallery using the compressed air.3 Steel Ball (�8mm)
Tightening Torque 15 Nm
Page 143 of 1574
M162 ENGINE MECHANICAL 1B1-107
Sealing Procedure
1. Remove the screw plug (1) and the seal.Installation Notice
2. Remove the steel ball from the oil gallery (4), (5), (6) and (7) using the round bar (12,
�6 x 700 mm).
4. Enlarge the oil gallery at the rear of the cylinder head to be diameter 9mm, depth 8mm.
5. Tap in the steel ball (3) from the side to the oil gallery using the punch (13).
6. Pull out the steel ball (3) using the round bar (12).
7. Enlarge the oil gallery to be diameter 9mm, depth 8mm.
Tightening Torque 15 Nm
3. Remove the plug (8) using the screw driver.
Page 144 of 1574
1B1-108 M162 ENGINE MECHANICAL
11. Tighten the screw plug with the seal (arrow).Screw Plug (Part No. 000 908 01 00 02)Seal (Part No. 007 603 01 01 03)
8. Make a screw hole at the oil gallery using M10 x 1 thread.
9. All the oil gallery should be cleaned with the compressed
air.
10. Apply the Loctite 270 to new plug and press in using a suitable drift (arrow).
Page 145 of 1574
M162 ENGINE MECHANICAL 1B1-109
CORE PLUGS IN CRANKCASE Preceding Work : Draining of the coolant
1 Core Plug............................................... Replace
Page 146 of 1574
1B1-110 M162 ENGINE MECHANICAL
Tools Required
102 589 00 15 00 Drift Replacement Procedure
1. Remove the intake and exhaust manifolds.
2. Pull back the core plug until the end of one side comes outusing the screw driver.
3. Pull out the plug carefully using a pliers.
5. Press in new plug using a drift. Notice
Wait for about 45minutes before filling the coolant so that the Loctite 240 hardens.
6. Warm up the engine and check the coolant for leaks.
4. Clean the sealing surface and apply Loctite 241.
Page 147 of 1574
M162 ENGINE MECHANICAL 1B1-111
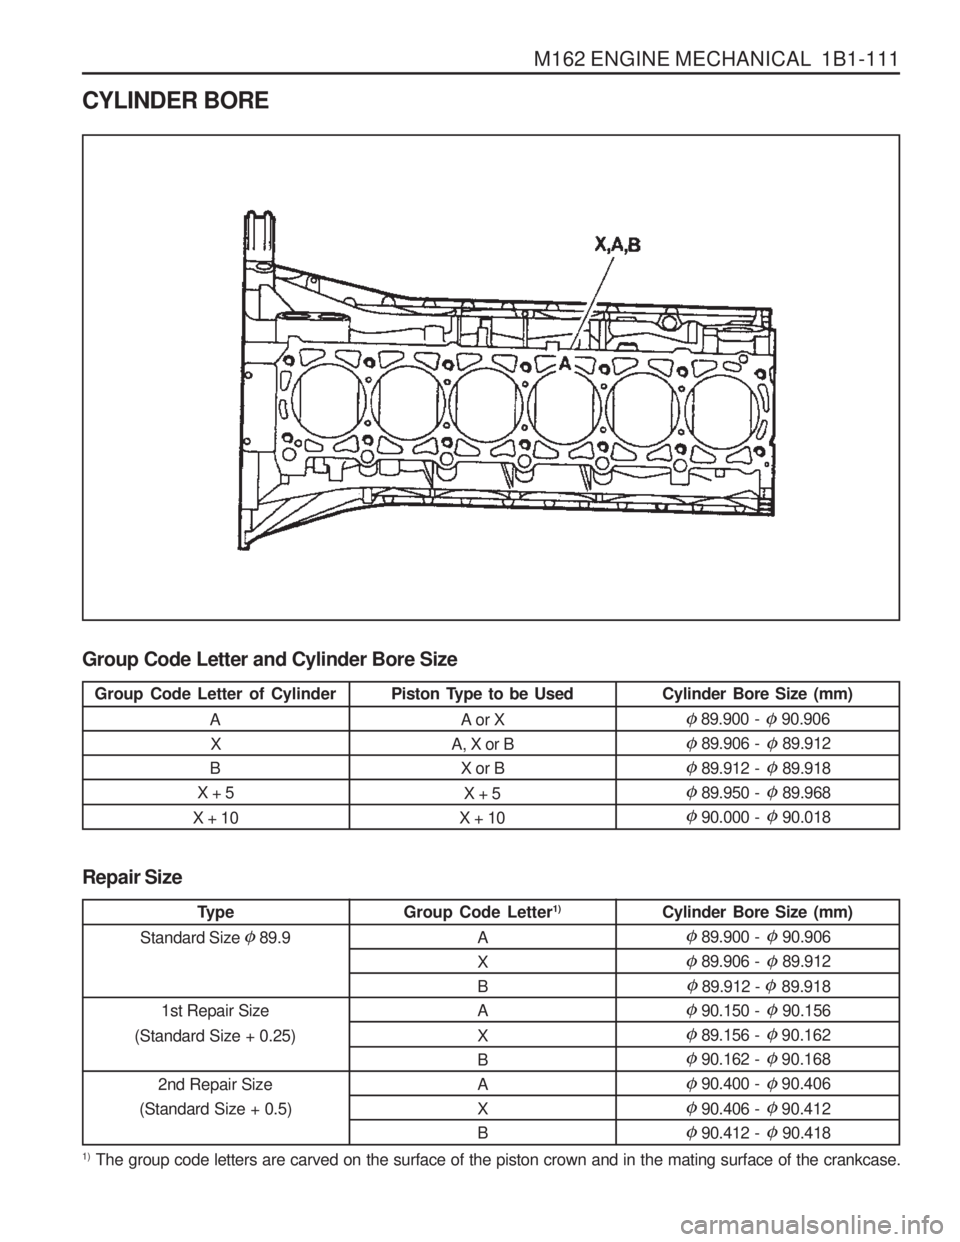
Group Code Letter and Cylinder Bore Size Repair Size 1) The group code letters are carved on the surface of the piston crown and in the mating surface of the crankcase.
CYLINDER BORE
Group Code Letter of Cylinder
AX
B
X + 5
X + 10 Piston Type to be Used
A or X
A, X or B
X or B
X + 5
X + 10 Cylinder Bore Size (mm)
�
89.900 - � 90.906
� 89.906 - � 89.912
� 89.912 - � 89.918
� 89.950 - � 89.968
� 90.000 - � 90.018
Type
Standard Size
� 89.9
1st Repair Size
(Standard Size + 0.25)
2nd Repair Size
(Standard Size + 0.5) Group Code Letter
1)
A XBA X BAXB Cylinder Bore Size (mm)� 89.900 - � 90.906
� 89.906 - � 89.912
� 89.912 - � 89.918
� 90.150 - � 90.156
� 89.156 - �
90.162
� 90.162 - � 90.168
� 90.400 - � 90.406
� 90.406 - � 90.412
� 90.412 - � 90.418
Page 148 of 1574
1B1-112 M162 ENGINE MECHANICAL Service Data Standard Measurement of Cylinder Bore
1. Clean the cylinder wall.
2. Using a internal diameter gauge, measure the bore size inaxial and transverse direction at three points (1,2,3).
1,2,3. Measuring PointsA . Axial Direction
B. Transverse Direction
a. Location of the No.1 Piston Ring at TDC
b. Location of the Piston BDC
c . Location of the Oil Ring at BDC
Chamfer Angle
Wear Limit in Longitudinal and Transverse Direction Permissible Deviation of Cylinder Out-of-round Permissible Deviation of Rectangular Cylinder Height (Except Chamfered Area) Basic Peak-to-valley Height After Final Honing and Brushing Chamfer AngleHoning Angle When new
Wear limit 0.1 mm
0.007 mm 0.05 mm0.05 mm
0.003 - 0.006 mm 60°
50 ° ± 10 °
Page 149 of 1574
M162 ENGINE MECHANICAL 1B1-113
CRANKCASE MATING SURFACE
Service Data StandardHeight of The Crankcase “H” (When new)
Minimum Height After Milling Flatness Permissible Deviation of Parallelism of The Upper to Lower Mating SurfacePeak-to-valley Height Crankcase Upper Mating SurfaceCrankcase Lower Mating SurfaceAxial Direction
Transverse Direction Crankcase Upper Mating SurfaceCrankcase Lower Mating Surface282.25 - 282.35mm
281.95mm0.03mm0.04mm0.1mm
0.05mm
0.005 - 0.020mm
0.025mm
Page 150 of 1574
1B1-114 M162 ENGINE MECHANICAL Chamfering Procedure
1. Chamfer angle : 60°
2. Polish the lower chamfered area evenly with a grinder after finishing the chamfering with a suitable tool (e.g., hand milling cutter).
Trending: trunk release, ESP inoperative, steering wheel adjustment, traction control, check transmission fluid, flat tire, alternator belt


