SUBARU FORESTER 2004 Service Repair Manual
Manufacturer: SUBARU, Model Year: 2004, Model line: FORESTER, Model: SUBARU FORESTER 2004Pages: 2870, PDF Size: 38.67 MB
Page 1791 of 2870

EN(H4DOTC)-158
ENGINE (DIAGNOSTIC)
Diagnostic Procedure with Diagnostic Trouble Code (DTC)
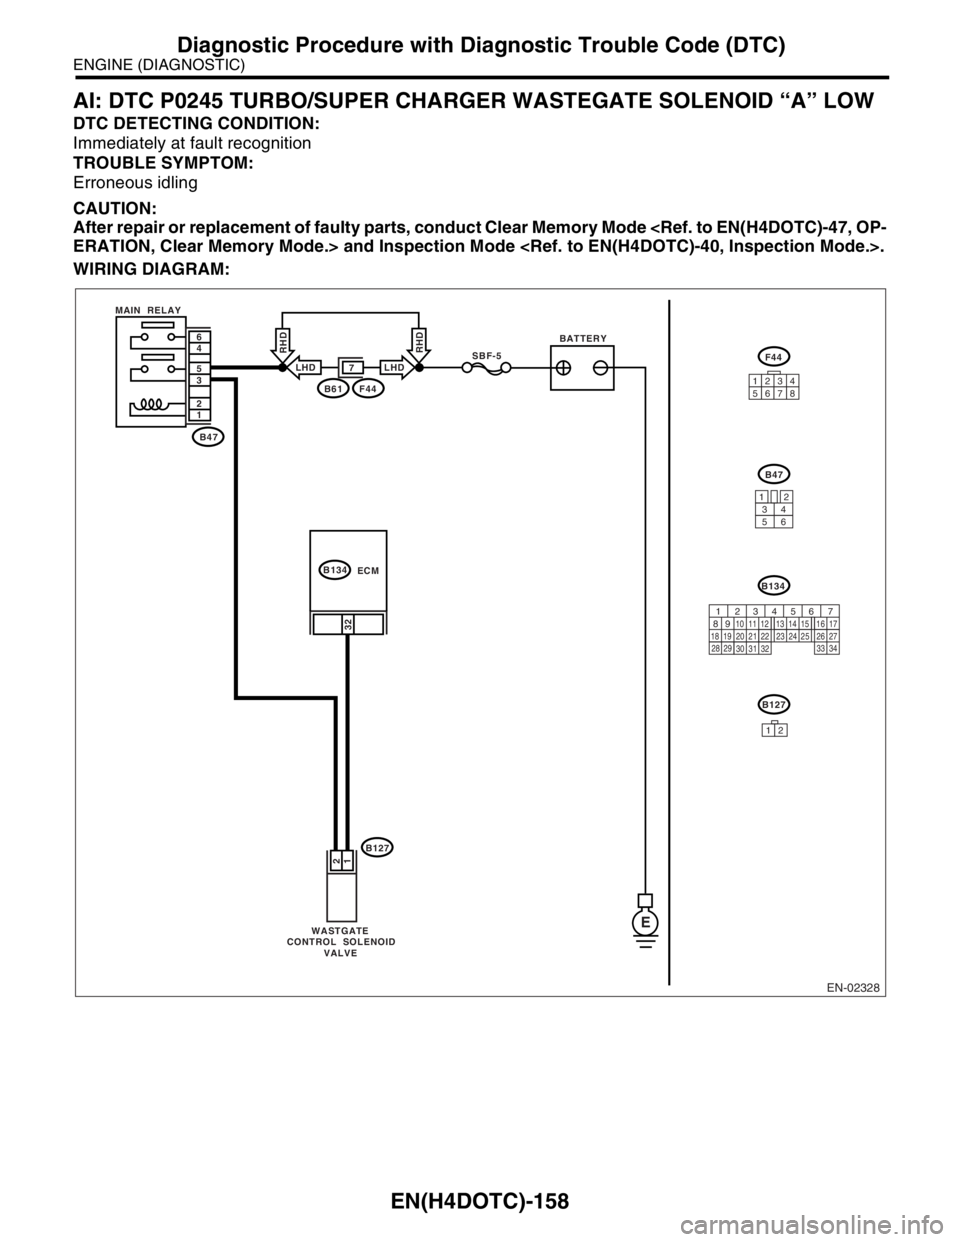
AI: DTC P0245 TURBO/SUPER CHARGER WASTEGATE SOLENOID “A” LOW
DTC DETECTING CONDITION:
Immediately at fault recognition
TROUBLE SYMPTOM:
Erroneous idling
CAUTION:
After repair or replacement of faulty parts, conduct Clear Memory Mode
WIRING DIAGRAM:
EN-02328
MAIN RELAY
B47 1 2 3 5 4 6
BATTERY
E
B61F44
F44
B47
B134
B127
B134
B127
WASTGATE
CONTROL SOLENOID
VALVEECM
32 1 2
7LHD
RHD
LHD
RHDSBF-5
12345678
3412
56
12
56 7
82 1
94 310
24 22 23 25 11 12 13 14 15
26 27
2816 17
18 19 20 21
33 34 29
32 30 31
Page 1792 of 2870

EN(H4DOTC)-159
ENGINE (DIAGNOSTIC)
Diagnostic Procedure with Diagnostic Trouble Code (DTC)
Step Check Yes No
1 CHECK OUTPUT SIGNAL FROM ECM.
1) Turn the ignition switch to ON.
2) Measure the voltage between ECM and
chassis ground.
Connector & terminal
(B134) No. 32 (+) — Chassis ground (
−):Is the voltage more than 10 V? Even if the mal-
function indicator
light illuminates,
the circuit has
returned to a nor-
mal condition at
this time.Go to step 2.
2 CHECK HARNESS BETWEEN WASTEGATE
CONTROL SOLENOID VALVE AND ECM
CONNECTOR.
1) Turn the ignition switch to OFF.
2) Disconnect the connectors from wastegate
control solenoid valve and ECM.
3) Measure the resistance in harness
between wastegate control solenoid valve con-
nector and engine ground.
Connector & terminal
(B127) No. 1 — Engine ground:Is the resistance less than 10
Ω?Repair ground
short circuit in har-
ness between
ECM and waste-
gate control sole-
noid valve
connector.Go to step 3.
3 CHECK HARNESS BETWEEN WASTEGATE
CONTROL SOLENOID VALVE AND ECM
CONNECTOR.
Measure the resistance of harness between
wastegate control solenoid valve and ECM.
Connector & terminal
(B134) No. 32 — (B127) No. 1:Is the resistance less than 1
Ω?Go to step 4.Repair open circuit
in harness
between ECM and
wastegate control
solenoid valve
connector.
N
OTE:
In this case repair
the following:
Open circuit in
harness between
ECM and waste-
gate control sole-
noid valve
connector
4 CHECK WASTEGATE CONTROL SOLE-
NOID VALVE.
1) Remove the wastegate control solenoid
valve.
2) Measure the resistance between wastegate
control solenoid valve terminals.
Te r m i n a l s
No. 1 — No. 2:Is the resistance 30 — 34 Ω? Go to step 5.Replace the
wastegate control
solenoid valve.
Wastegate Con-
trol Solenoid Valve
Assembly.>
5 CHECK POWER SUPPLY TO WASTEGATE
CONTROL SOLENOID VALVE.
1) Turn the ignition switch to ON.
2) Measure the voltage between wastegate
control solenoid valve and engine ground.
Connector & terminal
(B127) No. 2 (+) — Engine ground (
−):Is the voltage more than 10 V? Go to step 6.Repair open circuit
in harness
between main
relay and waste-
gate control sole-
noid valve
connector.
6 CHECK POOR CONTACT.
Check poor contact in wastegate control sole-
noid valve connector.Is there poor contact in waste-
gate control solenoid valve
connector?Repair poor con-
tact in wastegate
control solenoid
valve connector.Contact the SUB-
ARU dealer.
N
OTE:
Inspection by DTM
is required, because
probable cause is
deterioration of mul-
tiple parts.
Page 1793 of 2870

EN(H4DOTC)-160
ENGINE (DIAGNOSTIC)
Diagnostic Procedure with Diagnostic Trouble Code (DTC)
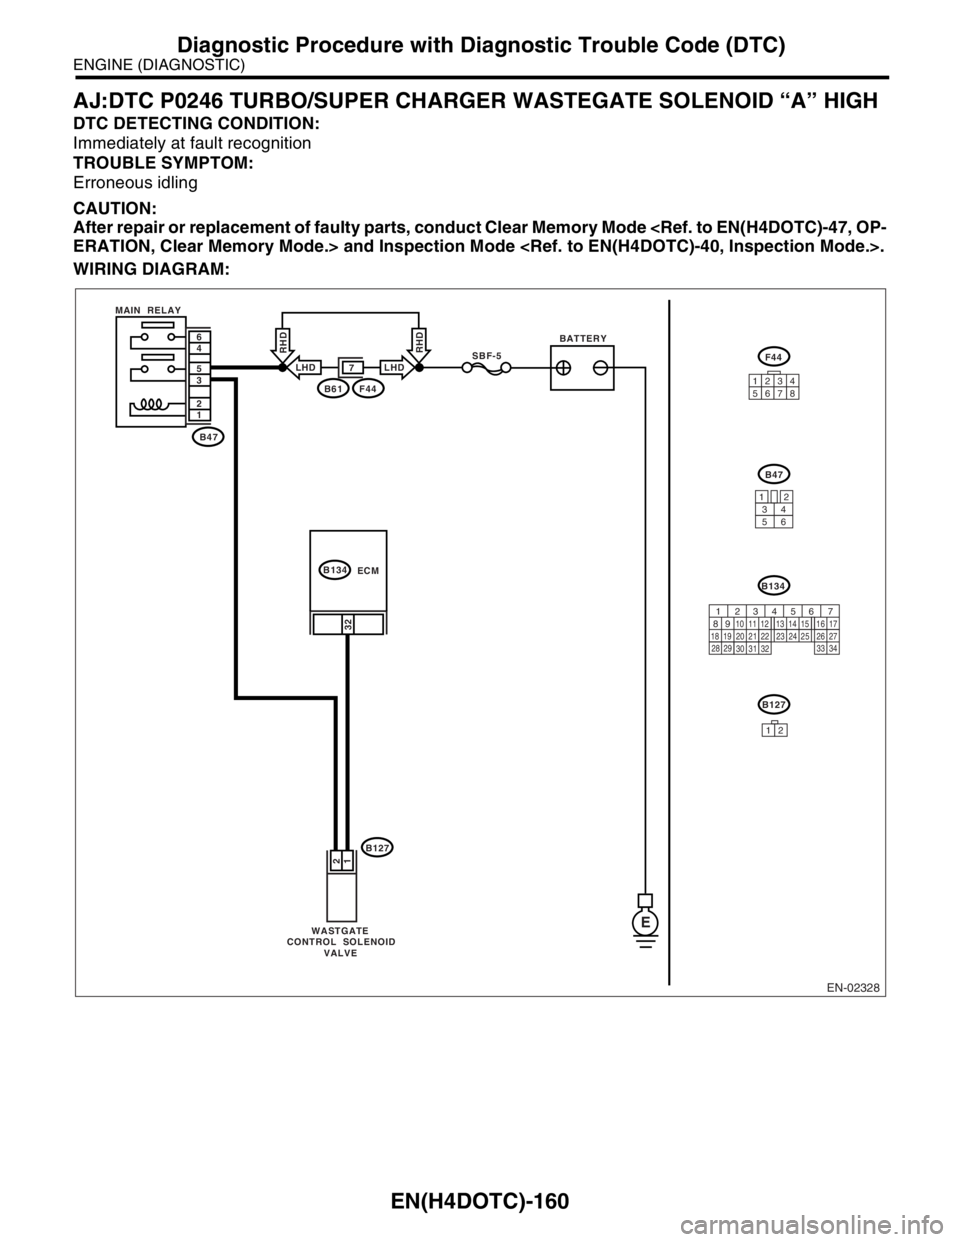
AJ:DTC P0246 TURBO/SUPER CHARGER WASTEGATE SOLENOID “A” HIGH
DTC DETECTING CONDITION:
Immediately at fault recognition
TROUBLE SYMPTOM:
Erroneous idling
CAUTION:
After repair or replacement of faulty parts, conduct Clear Memory Mode
WIRING DIAGRAM:
EN-02328
MAIN RELAY
B47 1 2 3 5 4 6
BATTERY
E
B61F44
F44
B47
B134
B127
B134
B127
WASTGATE
CONTROL SOLENOID
VALVEECM
32 1 2
7LHD
RHD
LHD
RHDSBF-5
12345678
3412
56
12
56 7
82 1
94 310
24 22 23 25 11 12 13 14 15
26 27
2816 17
18 19 20 21
33 34 29
32 30 31
Page 1794 of 2870

EN(H4DOTC)-161
ENGINE (DIAGNOSTIC)
Diagnostic Procedure with Diagnostic Trouble Code (DTC)
Step Check Yes No
1 CHECK OUTPUT SIGNAL FROM ECM.
1) Turn the ignition switch to ON.
2) Measure the voltage between ECM and
chassis ground.
Connector & terminal
(B134) No. 32 (+) — Chassis ground (
−):Is the voltage more than 10 V? Go to step 3.Go to step 2.
2 CHECK POOR CONTACT.
Check poor contact in ECM connector. Is there poor contact in ECM
connector?Repair the poor
contact in ECM
connector.Replace the ECM.
Engine Control
Module (ECM).>
3 CHECK HARNESS BETWEEN WASTEGATE
CONTROL SOLENOID VALVE AND ECM
CONNECTOR.
1) Turn the ignition switch to OFF.
2) Disconnect the connector from wastegate
control solenoid valve.
3) Turn the ignition switch to ON.
4) Measure the voltage between ECM and
chassis ground.
Connector & terminal
(B134) No. 32 (+) — Chassis ground (
−):Is the voltage more than 10 V? Repair battery
short circuit in har-
ness between
ECM and waste-
gate control sole-
noid valve
connector.After
repair, replace the
ECM.
Engine Control
Module (ECM).>Go to step 4.
4 CHECK WASTEGATE CONTROL SOLE-
NOID VALVE.
1) Turn the ignition switch to OFF.
2) Measure the resistance between wastegate
control solenoid valve terminals.
Te r m i n a l s
No. 1 — No. 2:Is the resistance less than 1
Ω?Replace the
wastegate control
solenoid valve and
ECM.
Wastegate Con-
trol Solenoid Valve
Assembly.>
50, Engine Con-
trol Module
(ECM).>Go to step 5.
5 CHECK POOR CONTACT.
Check poor contact in ECM connector.Is there poor contact in ECM
connector?Repair the poor
contact in ECM
connector.Replace the ECM.
Engine Control
Module (ECM).>
Page 1795 of 2870

EN(H4DOTC)-162
ENGINE (DIAGNOSTIC)
Diagnostic Procedure with Diagnostic Trouble Code (DTC)
AK:DTC P0301 CYLINDER 1 MISFIRE DETECTED
NOTE:
For the diagnostic procedure, refer to DTC P0304.
AL:DTC P0302 CYLINDER 2 MISFIRE DETECTED
NOTE:
For the diagnostic procedure, refer to DTC P0304.
AM:DTC P0303 CYLINDER 3 MISFIRE DETECTED
NOTE:
For the diagnostic procedure, refer to DTC P0304.
Page 1796 of 2870

EN(H4DOTC)-163
ENGINE (DIAGNOSTIC)
Diagnostic Procedure with Diagnostic Trouble Code (DTC)
AN:DTC P0304 CYLINDER 4 MISFIRE DETECTED
DTC DETECTING CONDITION:
Two consecutive driving cycles with fault
Immediately at fault recognition (A misfire which could damage catalyst occurs.)
TROUBLE SYMPTOM:
Engine stalls.
Erroneous idling
Rough driving
CAUTION:
After repair or replacement of faulty parts, conduct Clear Memory Mode
Page 1797 of 2870

EN(H4DOTC)-164
ENGINE (DIAGNOSTIC)
Diagnostic Procedure with Diagnostic Trouble Code (DTC)
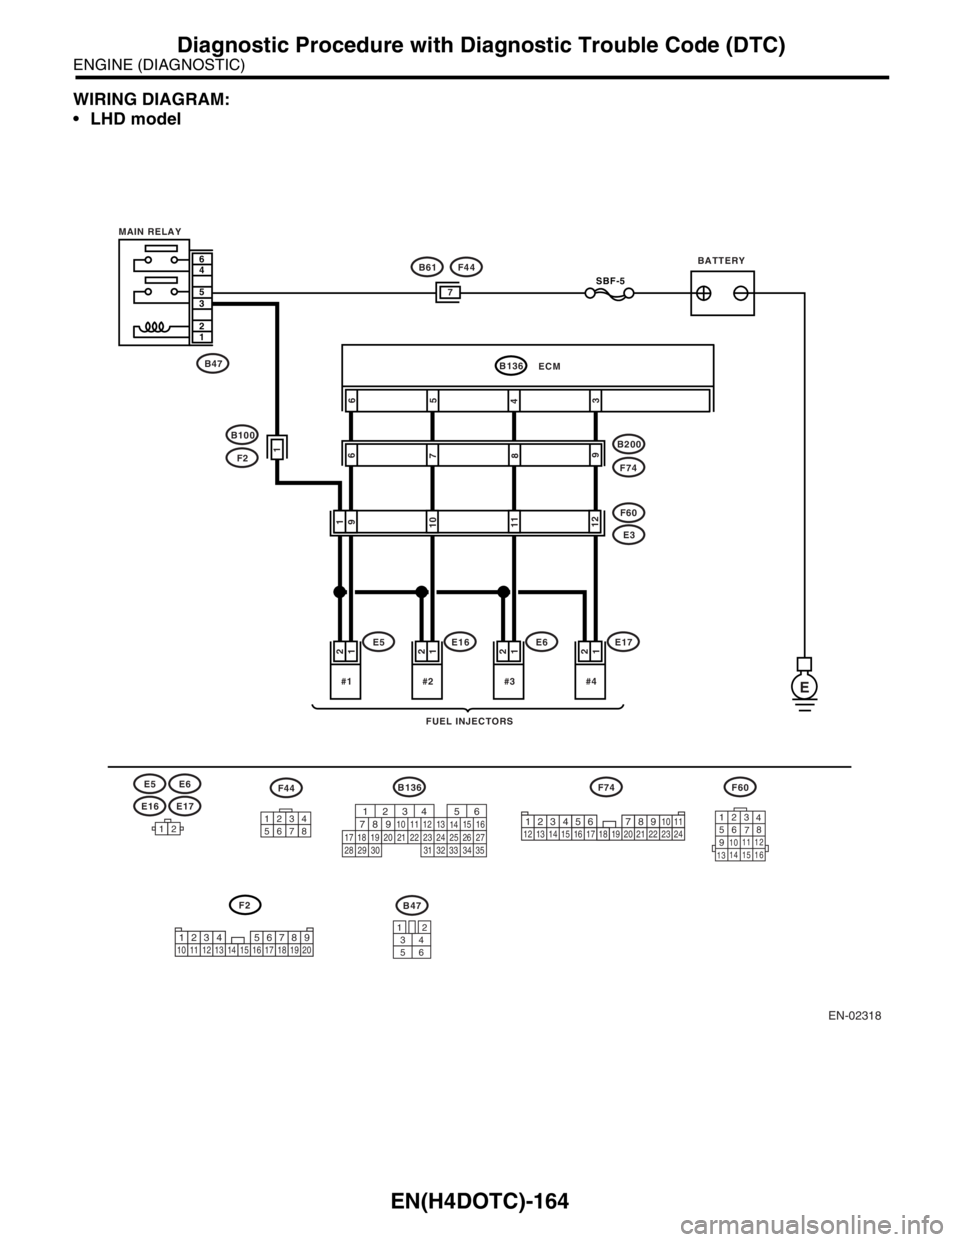
WIRING DIAGRAM:
LHD model
EN-02318
BATTERY
FUEL INJECTORS MAIN RELAY
E#4
1 2
SBF-5
#3
1
2
#2
1
2
F60
#1
1 2
1
9
10
11
12
6
7
8
9
6
5
4
3
1
7
12123
4
56
78
9
1011 12
1314 15 16
6
4
5
3
2
1
F60
F74
B136F74
B200
E5
E5
E3
E6
E6
E16
E16
E17
F44
F2
B100
B47
B61F44
E17
12345678
F2B47
34
12
56
56
782 1
94 310
24 22 23 2511 12 13
1415
26 27
2816
17 18 19 20 21
33 34 29
32 30
31 3534 12 8910 11
12 13 14 15 16 17 18 19 20 21 22 23 2456 7
1234 5678910 11 12 13 14 15 16 17 18 19 20
B136
ECM
Page 1798 of 2870

EN(H4DOTC)-165
ENGINE (DIAGNOSTIC)
Diagnostic Procedure with Diagnostic Trouble Code (DTC)
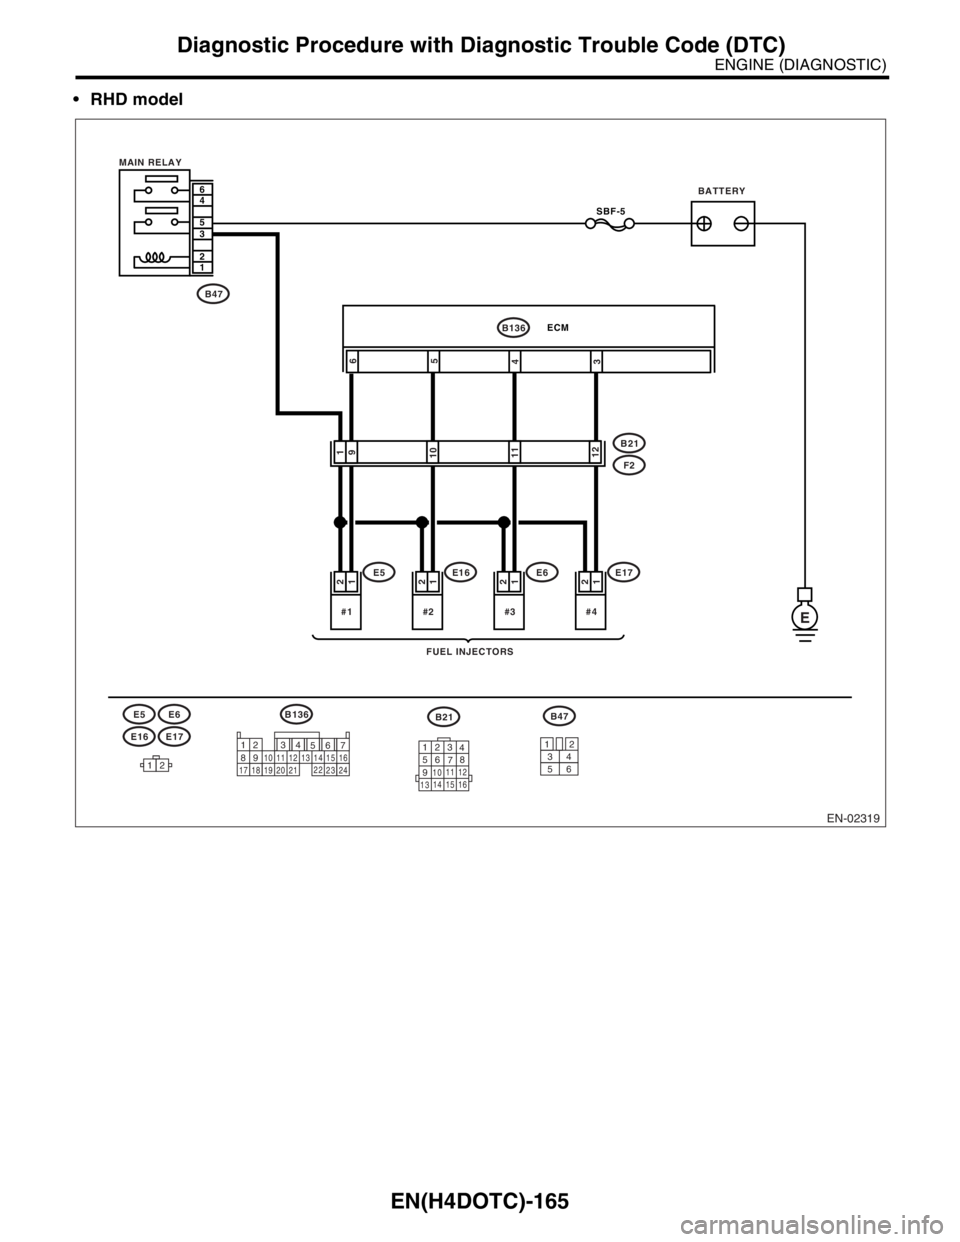
RHD model
EN-02319
BATTERY
FUEL INJECTORS MAIN RELAY
E#4
1 2
SBF-5
#3
1
2
#2
1 2
#1
1
2
1
9
10
11
12
12
12
7
8956 3410 11 12
19 20 2113 14 1516
17 1822
23
24123
4
56
78
9
1011 12
1314 15 16
6
4
5
3
2
1
B21
B21B136E5
E5
F2
E6
E6
E16
E16
E17
B47
E17
6
5
4
3
B136ECM
B47
34
12
56
Page 1799 of 2870

EN(H4DOTC)-166
ENGINE (DIAGNOSTIC)
Diagnostic Procedure with Diagnostic Trouble Code (DTC)
Step Check Yes No
1 CHECK ANY OTHER DTC ON DISPLAY.Is any other DTC displayed? Inspect the rele-
vant DTC using
“List of Diagnostic
Trouble Code
(DTC)”.
List of Diagnostic
Trouble Code
(DTC).>Go to step 2.
2 CHECK OUTPUT SIGNAL FROM ECM.
1) Turn the ignition switch to ON.
2) Measure the voltage between ECM con-
nector and chassis ground on faulty cylinders.
Connector & terminal
#1 (B136) No. 6 (+) — Chassis ground (
−):
#2 (B136 No. 5 (+) — Chassis ground (
−):
#3 (B136 No. 4 (+) — Chassis ground (
−):
#4 (B136 No. 3 (+) — Chassis ground (
−):Is the voltage more than 10 V? Go to step 7.Go to step 3.
3 CHECK HARNESS BETWEEN FUEL INJEC-
TOR AND ECM CONNECTOR.
1) Turn the ignition switch to OFF.
2) Disconnect the connector from fuel injector
on faulty cylinder.
3) Disconnect the connector from ECM.
4) Measure the voltage between ECM con-
nector and engine ground on faulty cylinders.
Connector & terminal
#1 (E5) No. 1 — Engine ground:
#2 (E16) No. 1 — Engine ground:
#3 (E6) No. 1 — Engine ground:
#4 (E17) No. 1 — Engine ground:Is the resistance more than 1
MΩ?Go to step 4.Repair ground
short circuit in har-
ness between fuel
injector and ECM
connector.
4 CHECK HARNESS BETWEEN FUEL INJEC-
TOR AND ECM CONNECTOR.
Measure the resistance of harness connector
between ECM connector and fuel injector on
faulty cylinders.
Connector & terminal
#1 (B136) No. 6 — (E5) No. 1:
#2 (B136) No. 5 — (E16) No. 1:
#3 (B136) No. 4 — (E6) No. 1:
#4 (B136) No. 3 — (E17) No. 1:Is the resistance less than 1
Ω?Go to step 5.Repair the har-
ness and connec-
tor.
N
OTE:
In this case repair
the following:
Open circuit in
harness between
ECM and fuel
injector connector
Poor contact in
coupling connector
5 CHECK FUEL INJECTOR.
Measure the resistance between fuel injector
terminals on faulty cylinder.
Te r m i n a l s
No. 1 — No. 2:Is the resistance 5 — 20 Ω? Go to step 6.Replace the faulty
fuel injector.
38, Fuel Injector.>
Page 1800 of 2870

EN(H4DOTC)-167
ENGINE (DIAGNOSTIC)
Diagnostic Procedure with Diagnostic Trouble Code (DTC)
6 CHECK POWER SUPPLY LINE.
1) Turn the ignition switch to ON.
2) Measure the voltage between fuel injector
and engine ground on faulty cylinders.
Connector & terminal
#1 (E5) No. 2 (+) — Engine ground (
−):
#2 (E16) No. 2 (+) — Engine ground (
−):
#3 (E6) No. 2 (+) — Engine ground (
−):
#4 (E17) No. 2 (+) — Engine ground (
−):Is the voltage more than 10 V? Repair poor con-
tact in all connec-
tors in fuel injector
circuit.Repair the har-
ness and connec-
tor.
N
OTE:
In this case repair
the following:
Open circuit in
harness between
main relay and fuel
injector connector
on faulty cylinders
Poor contact in
coupling connector
Poor contact in
main relay connec-
tor
Poor contact in
fuel injector con-
nector on faulty
cylinders
7 CHECK HARNESS BETWEEN FUEL INJEC-
TOR AND ECM CONNECTOR.
1) Turn the ignition switch to OFF.
2) Disconnect the connector from fuel injector
on faulty cylinder.
3) Turn the ignition switch to ON.
4) Measure the voltage between ECM con-
nector and chassis ground on faulty cylinders.
Connector & terminal
#1 (B136) No. 6 (+) — Chassis ground (
−):
#2 (B136 No. 5 (+) — Chassis ground (
−):
#3 (B136 No. 4 (+) — Chassis ground (
−):
#4 (B136 No. 3 (+) — Chassis ground (
−):Is the voltage more than 10 V? Repair battery
short circuit in har-
ness between
ECM and fuel
injector.After
repair, replace the
ECM.
Engine Control
Module (ECM).>Go to step 8.
8 CHECK FUEL INJECTOR.
1) Turn the ignition switch to OFF.
2) Measure the resistance between fuel injec-
tor terminals on faulty cylinder.
Te r m i n a l s
No. 1 — No. 2:Is the resistance less than 1
Ω?Replace the faulty
fuel injector and
ECM.
Fuel Injector.>
Engine Control
Module (ECM).>Go to step 9.
9 CHECK INSTALLATION OF CAMSHAFT PO-
SITION SENSOR/CRANKSHAFT POSITION
SENSOR.Is the installation of camshaft
position sensor or crankshaft
position sensor loosened?Tighten camshaft
position sensor or
crankshaft posi-
tion sensor.Go to step 10.
10 CHECK CRANK SPROCKET.
Remove the timing belt cover.Is the crank sprocket rusted or
does it have broken teeth?Replace the crank
sprocket.
Crank Sprocket.>Go to step 11.
11 CHECK INSTALLATION CONDITION OF
TIMING BELT.
Turn the crankshaft, and align alignment mark
on crank sprocket with alignment mark on cyl-
inder block.Is the timing belt dislocated
from its proper position?Repair installation
condition of timing
belt.
Timing Belt
Assembly.>Go to step 12. Step Check Yes No