SUBARU LEGACY 1999 Service Repair Manual
Manufacturer: SUBARU, Model Year: 1999, Model line: LEGACY, Model: SUBARU LEGACY 1999Pages: 1456, PDF Size: 59.93 MB
Page 211 of 1456
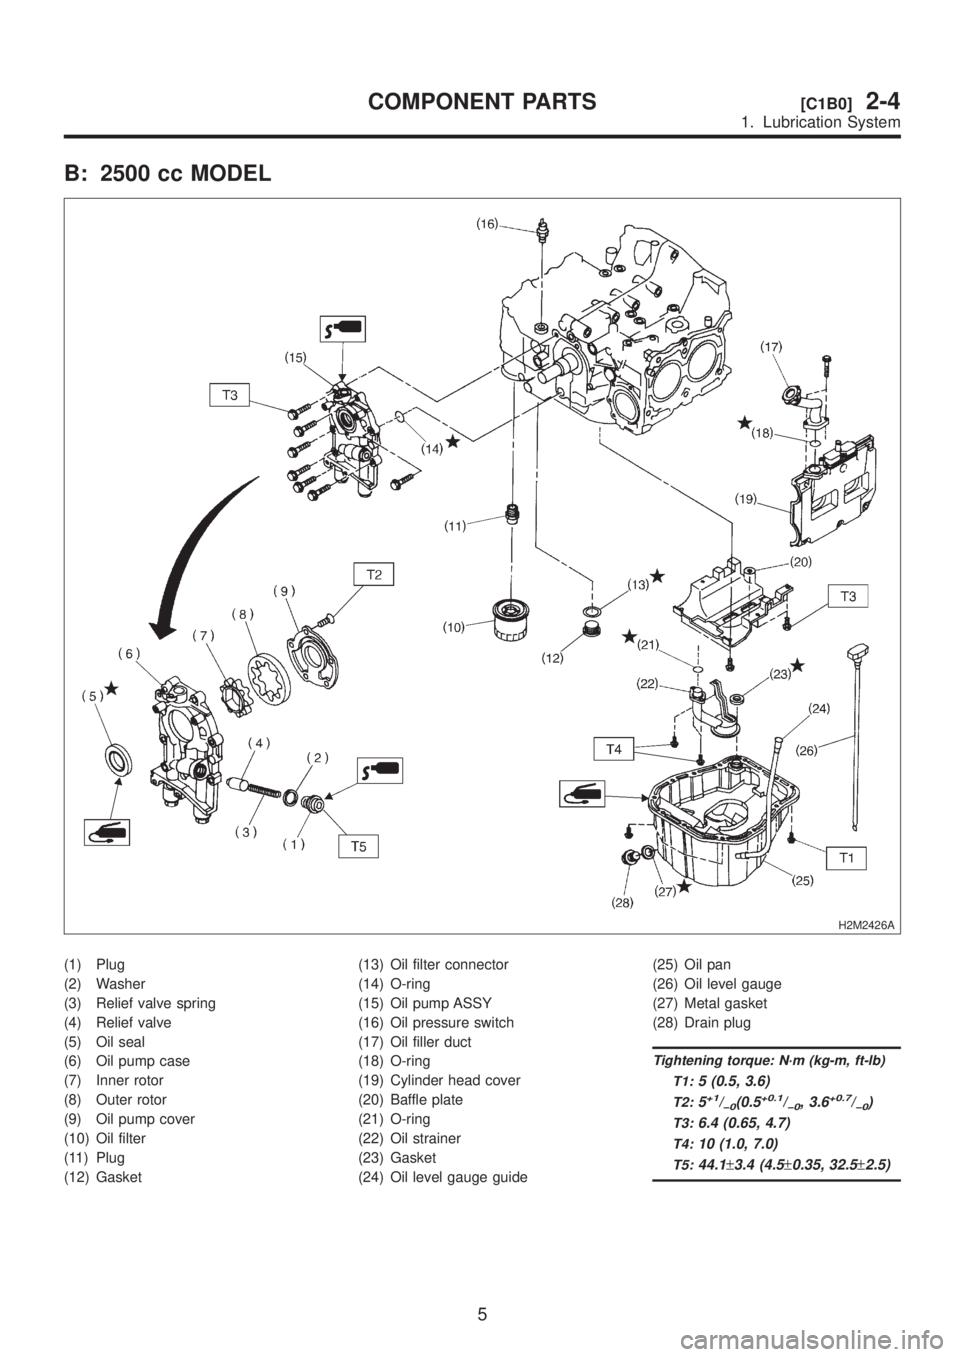
B: 2500 cc MODEL
H2M2426A
(1) Plug
(2) Washer
(3) Relief valve spring
(4) Relief valve
(5) Oil seal
(6) Oil pump case
(7) Inner rotor
(8) Outer rotor
(9) Oil pump cover
(10) Oil filter
(11) Plug
(12) Gasket(13) Oil filter connector
(14) O-ring
(15) Oil pump ASSY
(16) Oil pressure switch
(17) Oil filler duct
(18) O-ring
(19) Cylinder head cover
(20) Baffle plate
(21) O-ring
(22) Oil strainer
(23) Gasket
(24) Oil level gauge guide(25) Oil pan
(26) Oil level gauge
(27) Metal gasket
(28) Drain plug
Tightening torque: N´m (kg-m, ft-lb)
T1:
5 (0.5, 3.6)
T2:5+1/þ0(0.5+0.1/þ0, 3.6+0.7/þ0)
T3:6.4 (0.65, 4.7)
T4:10 (1.0, 7.0)
T5:44.1±3.4 (4.5±0.35, 32.5±2.5)
5
[C1B0]2-4COMPONENT PARTS
1. Lubrication System
Page 212 of 1456
![SUBARU LEGACY 1999 Service Repair Manual 1. Oil Pump
A: REMOVAL
1) Disconnect battery ground cable.
G6M0095
2) Lift-up the vehicle.
3) Remove under cover.
B2M0014
4) Drain coolant. <Ref. to 2-5 [W1A0].>
B2M0015A
5) Remove radiator. <Ref. to SUBARU LEGACY 1999 Service Repair Manual 1. Oil Pump
A: REMOVAL
1) Disconnect battery ground cable.
G6M0095
2) Lift-up the vehicle.
3) Remove under cover.
B2M0014
4) Drain coolant. <Ref. to 2-5 [W1A0].>
B2M0015A
5) Remove radiator. <Ref. to](/img/17/57435/w960_57435-211.png)
1. Oil Pump
A: REMOVAL
1) Disconnect battery ground cable.
G6M0095
2) Lift-up the vehicle.
3) Remove under cover.
B2M0014
4) Drain coolant.
B2M0015A
5) Remove radiator.
S2M0033
6) Lower the vehicle.
7) Remove crankshaft position sensor.
B2M1252A
8) Remove camshaft position sensor.
G2M0417
9) Remove V-belts.
G2M0286
10) Remove rear side V-belt tensioner.
S2M0113
6
2-4[W1A0]SERVICE PROCEDURE
1. Oil Pump
Page 213 of 1456
![SUBARU LEGACY 1999 Service Repair Manual 11) Remove crankshaft pulley by using ST.
ST 49997700 CRANKSHAFT PULLEY
WRENCH
S2M0114
12) Remove water pump. <Ref. to 2-5 [W2A0].>
S2M0022
13) Remove timing belt guide. (MT vehicles only)
S2M0115
14) SUBARU LEGACY 1999 Service Repair Manual 11) Remove crankshaft pulley by using ST.
ST 49997700 CRANKSHAFT PULLEY
WRENCH
S2M0114
12) Remove water pump. <Ref. to 2-5 [W2A0].>
S2M0022
13) Remove timing belt guide. (MT vehicles only)
S2M0115
14)](/img/17/57435/w960_57435-212.png)
11) Remove crankshaft pulley by using ST.
ST 49997700 CRANKSHAFT PULLEY
WRENCH
S2M0114
12) Remove water pump.
S2M0022
13) Remove timing belt guide. (MT vehicles only)
S2M0115
14) Remove crankshaft sprocket.
S2M0116
15) Remove bolts which install oil pump onto cyl-
inder block.
S2M0117
16) Remove oil pump by using flat bladed screw-
driver.
CAUTION:
Be careful not to scratch mating surfaces of
cylinder block and oil pump.
S2M0722A
7
[W1A0]2-4SERVICE PROCEDURE
1. Oil Pump
Page 214 of 1456
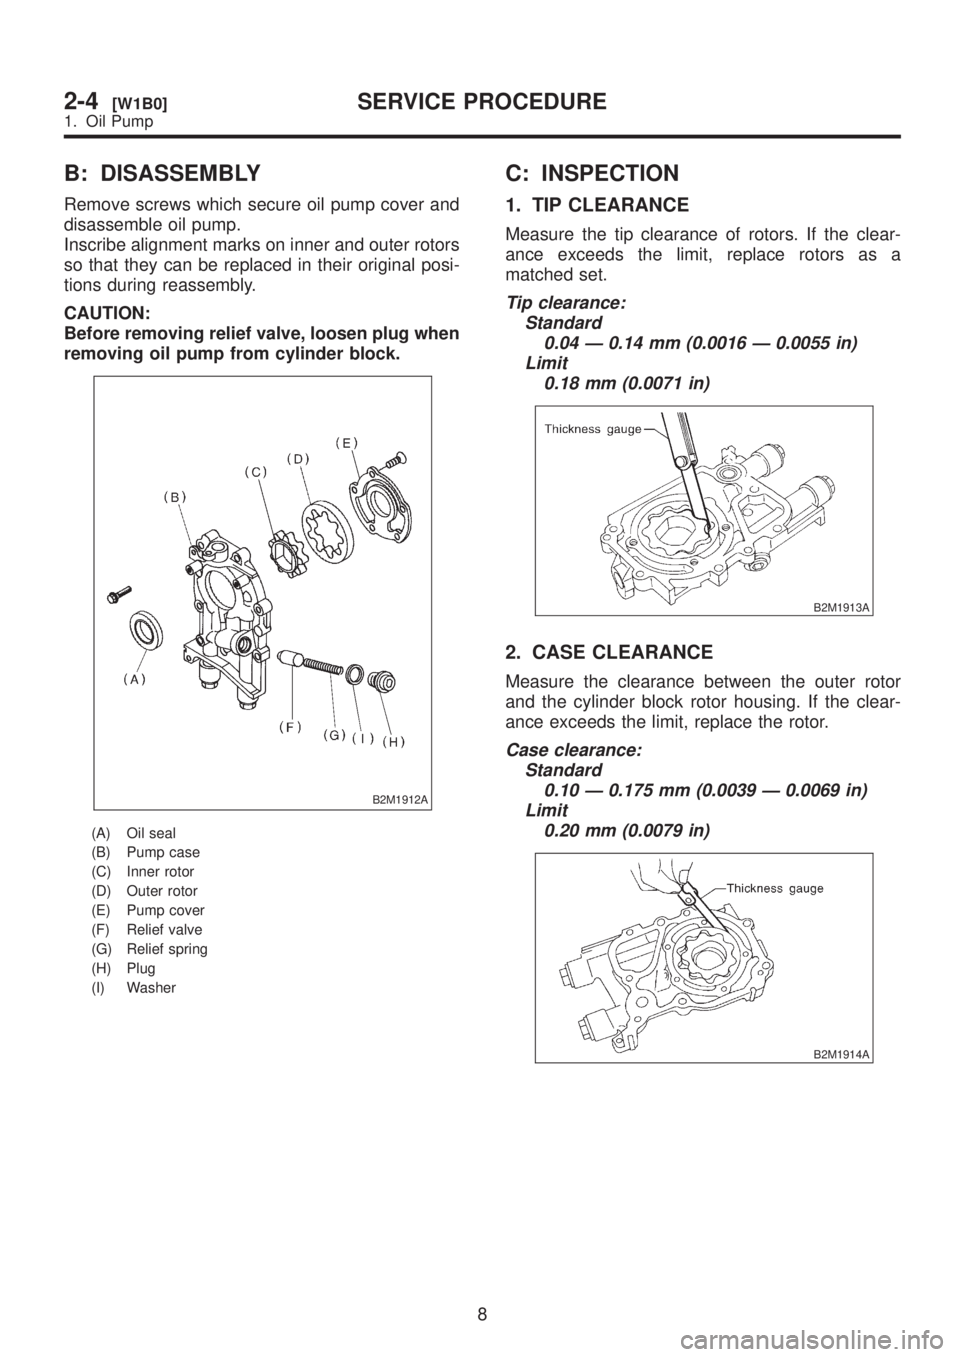
B: DISASSEMBLY
Remove screws which secure oil pump cover and
disassemble oil pump.
Inscribe alignment marks on inner and outer rotors
so that they can be replaced in their original posi-
tions during reassembly.
CAUTION:
Before removing relief valve, loosen plug when
removing oil pump from cylinder block.
B2M1912A
(A) Oil seal
(B) Pump case
(C) Inner rotor
(D) Outer rotor
(E) Pump cover
(F) Relief valve
(G) Relief spring
(H) Plug
(I) Washer
C: INSPECTION
1. TIP CLEARANCE
Measure the tip clearance of rotors. If the clear-
ance exceeds the limit, replace rotors as a
matched set.
Tip clearance:
Standard
0.04 Ð 0.14 mm (0.0016 Ð 0.0055 in)
Limit
0.18 mm (0.0071 in)
B2M1913A
2. CASE CLEARANCE
Measure the clearance between the outer rotor
and the cylinder block rotor housing. If the clear-
ance exceeds the limit, replace the rotor.
Case clearance:
Standard
0.10 Ð 0.175 mm (0.0039 Ð 0.0069 in)
Limit
0.20 mm (0.0079 in)
B2M1914A
8
2-4[W1B0]SERVICE PROCEDURE
1. Oil Pump
Page 215 of 1456
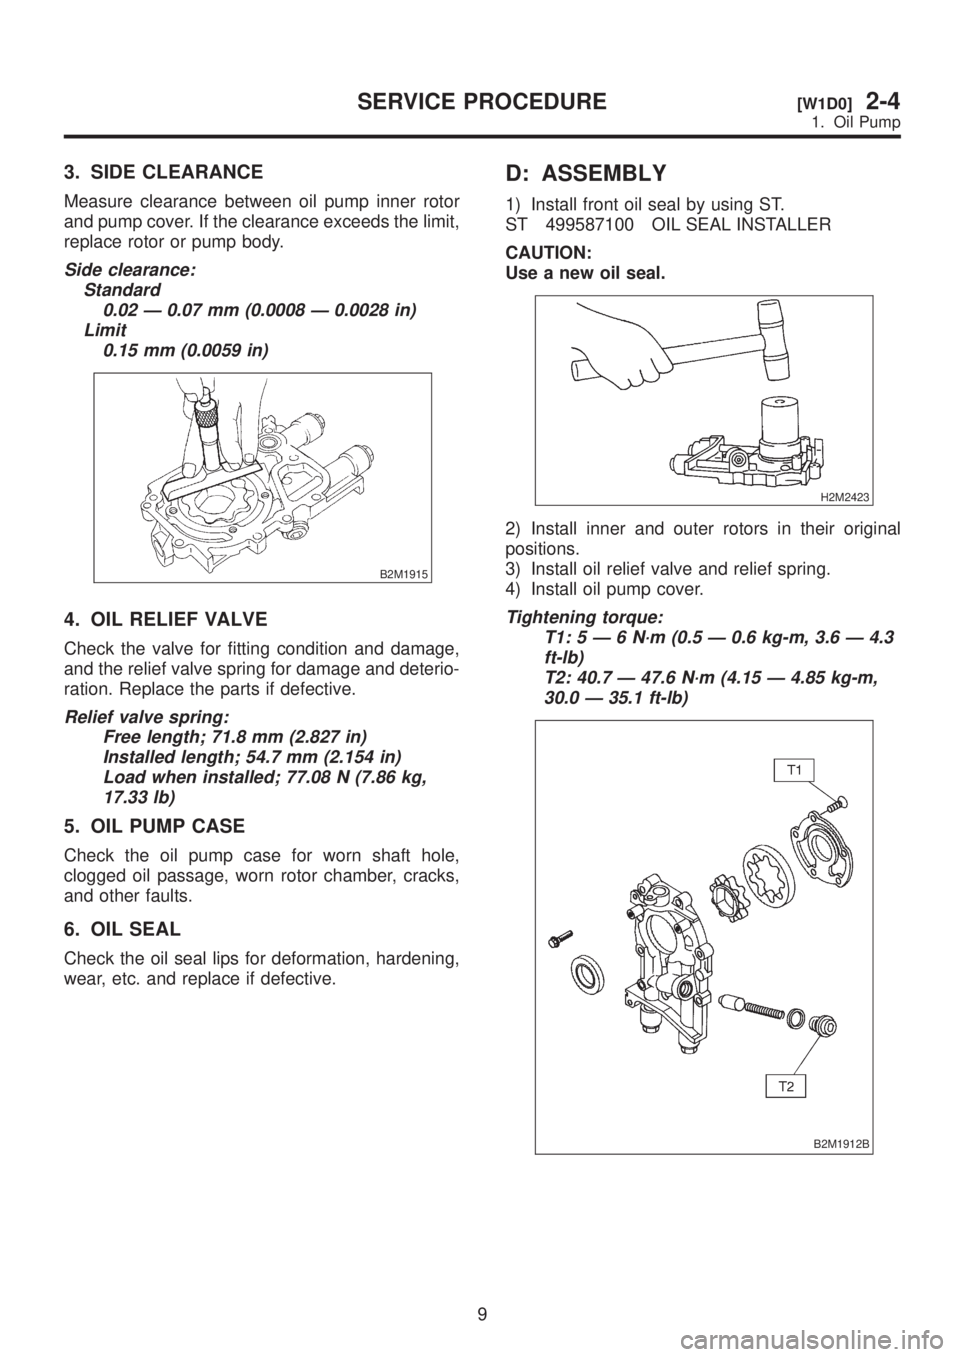
3. SIDE CLEARANCE
Measure clearance between oil pump inner rotor
and pump cover. If the clearance exceeds the limit,
replace rotor or pump body.
Side clearance:
Standard
0.02 Ð 0.07 mm (0.0008 Ð 0.0028 in)
Limit
0.15 mm (0.0059 in)
B2M1915
4. OIL RELIEF VALVE
Check the valve for fitting condition and damage,
and the relief valve spring for damage and deterio-
ration. Replace the parts if defective.
Relief valve spring:
Free length; 71.8 mm (2.827 in)
Installed length; 54.7 mm (2.154 in)
Load when installed; 77.08 N (7.86 kg,
17.33 lb)
5. OIL PUMP CASE
Check the oil pump case for worn shaft hole,
clogged oil passage, worn rotor chamber, cracks,
and other faults.
6. OIL SEAL
Check the oil seal lips for deformation, hardening,
wear, etc. and replace if defective.
D: ASSEMBLY
1) Install front oil seal by using ST.
ST 499587100 OIL SEAL INSTALLER
CAUTION:
Use a new oil seal.
H2M2423
2) Install inner and outer rotors in their original
positions.
3) Install oil relief valve and relief spring.
4) Install oil pump cover.
Tightening torque:
T1:5Ð6N´m(0.5 Ð 0.6 kg-m, 3.6 Ð 4.3
ft-lb)
T2: 40.7 Ð 47.6 N´m (4.15 Ð 4.85 kg-m,
30.0 Ð 35.1 ft-lb)
B2M1912B
9
[W1D0]2-4SERVICE PROCEDURE
1. Oil Pump
Page 216 of 1456
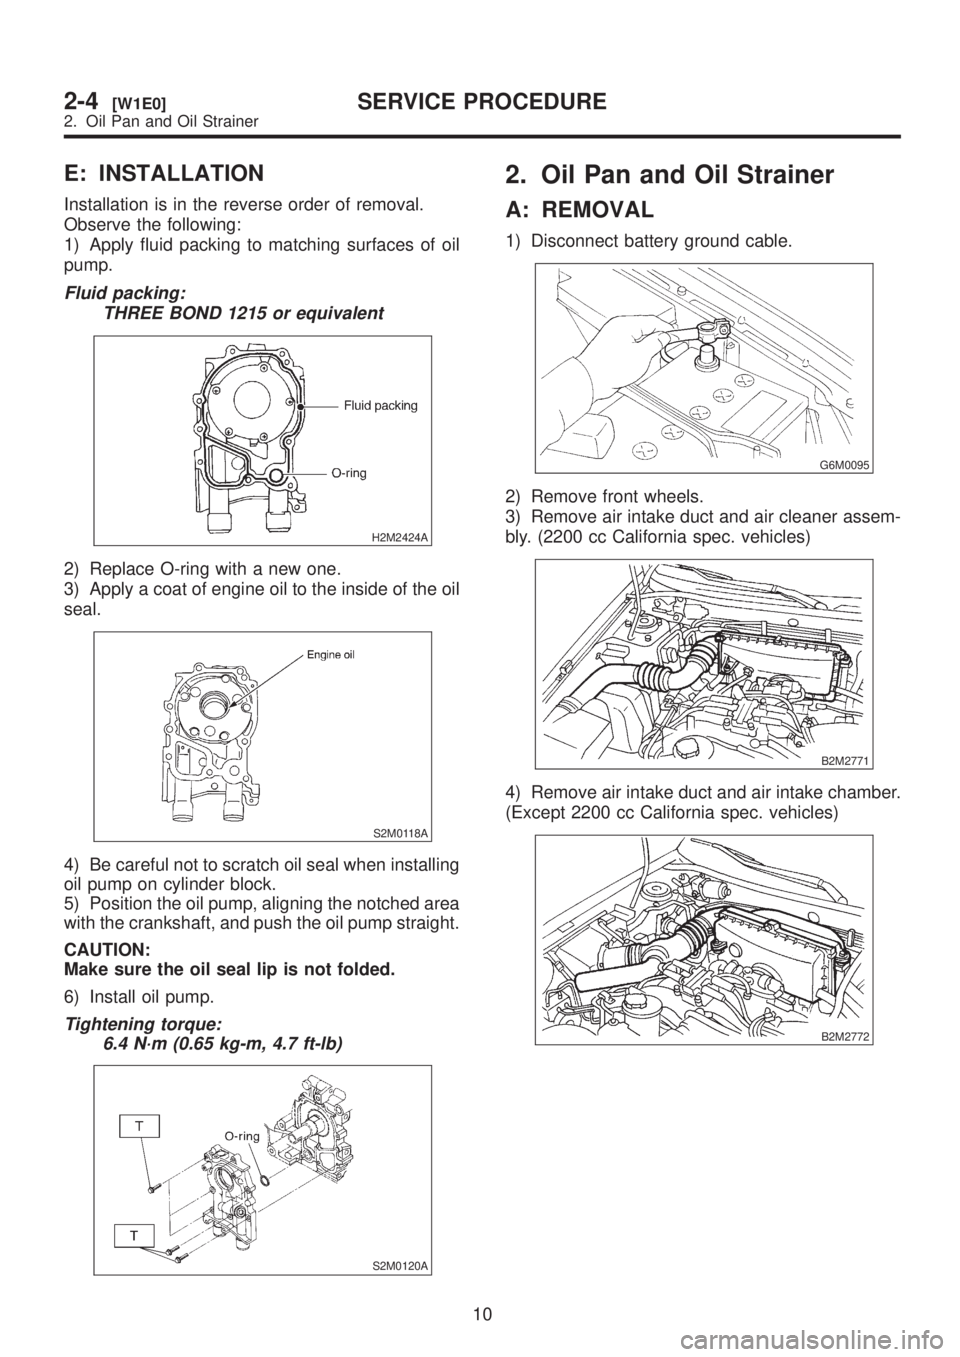
E: INSTALLATION
Installation is in the reverse order of removal.
Observe the following:
1) Apply fluid packing to matching surfaces of oil
pump.
Fluid packing:
THREE BOND 1215 or equivalent
H2M2424A
2) Replace O-ring with a new one.
3) Apply a coat of engine oil to the inside of the oil
seal.
S2M0118A
4) Be careful not to scratch oil seal when installing
oil pump on cylinder block.
5) Position the oil pump, aligning the notched area
with the crankshaft, and push the oil pump straight.
CAUTION:
Make sure the oil seal lip is not folded.
6) Install oil pump.
Tightening torque:
6.4 N´m (0.65 kg-m, 4.7 ft-lb)
S2M0120A
2. Oil Pan and Oil Strainer
A: REMOVAL
1) Disconnect battery ground cable.
G6M0095
2) Remove front wheels.
3) Remove air intake duct and air cleaner assem-
bly. (2200 cc California spec. vehicles)
B2M2771
4) Remove air intake duct and air intake chamber.
(Except 2200 cc California spec. vehicles)
B2M2772
10
2-4[W1E0]SERVICE PROCEDURE
2. Oil Pan and Oil Strainer
Page 217 of 1456
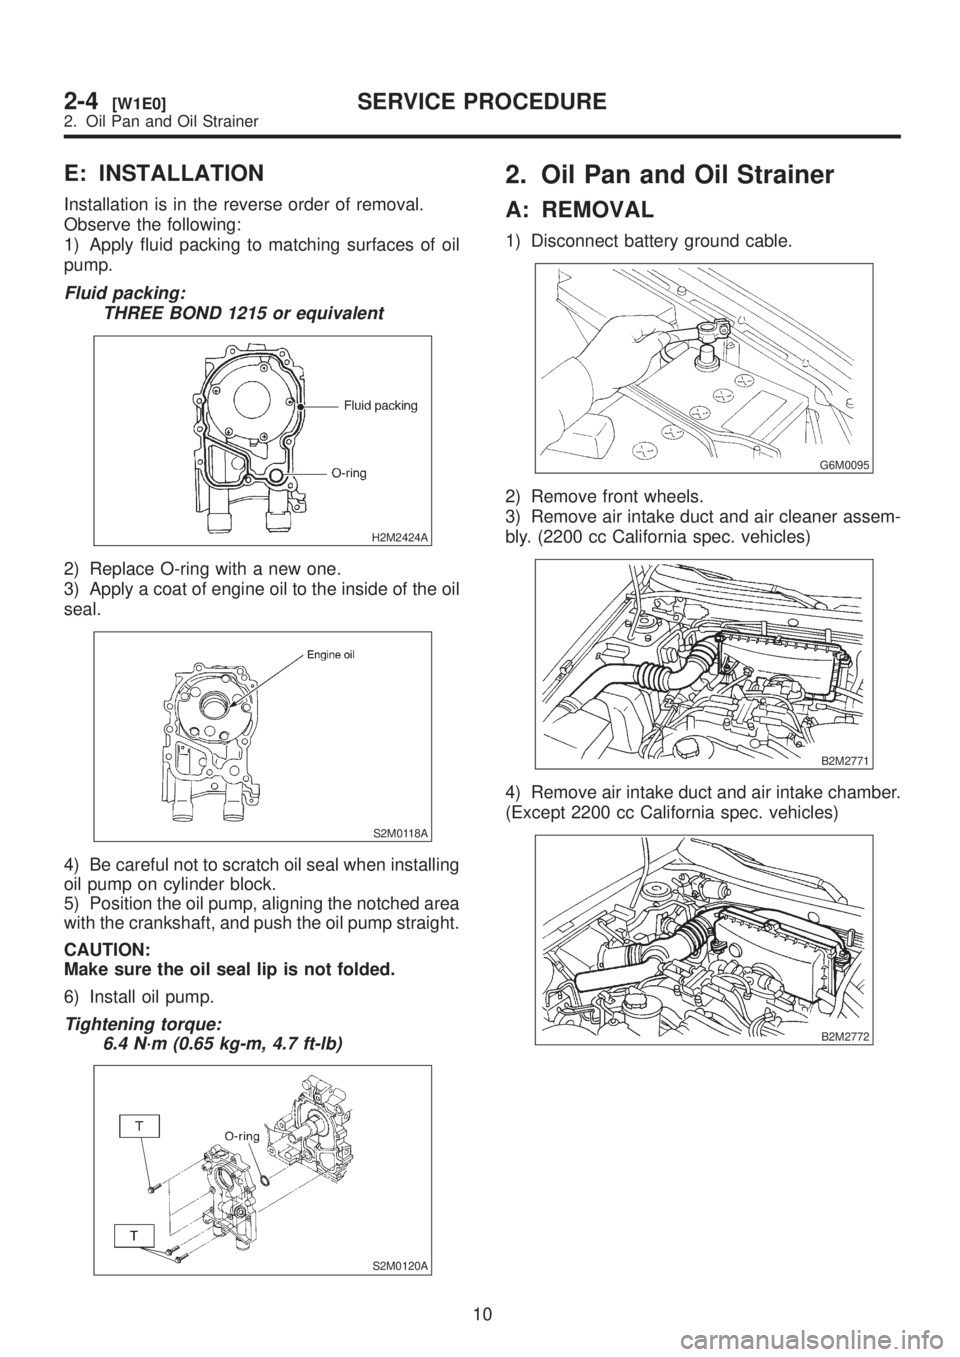
E: INSTALLATION
Installation is in the reverse order of removal.
Observe the following:
1) Apply fluid packing to matching surfaces of oil
pump.
Fluid packing:
THREE BOND 1215 or equivalent
H2M2424A
2) Replace O-ring with a new one.
3) Apply a coat of engine oil to the inside of the oil
seal.
S2M0118A
4) Be careful not to scratch oil seal when installing
oil pump on cylinder block.
5) Position the oil pump, aligning the notched area
with the crankshaft, and push the oil pump straight.
CAUTION:
Make sure the oil seal lip is not folded.
6) Install oil pump.
Tightening torque:
6.4 N´m (0.65 kg-m, 4.7 ft-lb)
S2M0120A
2. Oil Pan and Oil Strainer
A: REMOVAL
1) Disconnect battery ground cable.
G6M0095
2) Remove front wheels.
3) Remove air intake duct and air cleaner assem-
bly. (2200 cc California spec. vehicles)
B2M2771
4) Remove air intake duct and air intake chamber.
(Except 2200 cc California spec. vehicles)
B2M2772
10
2-4[W1E0]SERVICE PROCEDURE
2. Oil Pan and Oil Strainer
Page 218 of 1456
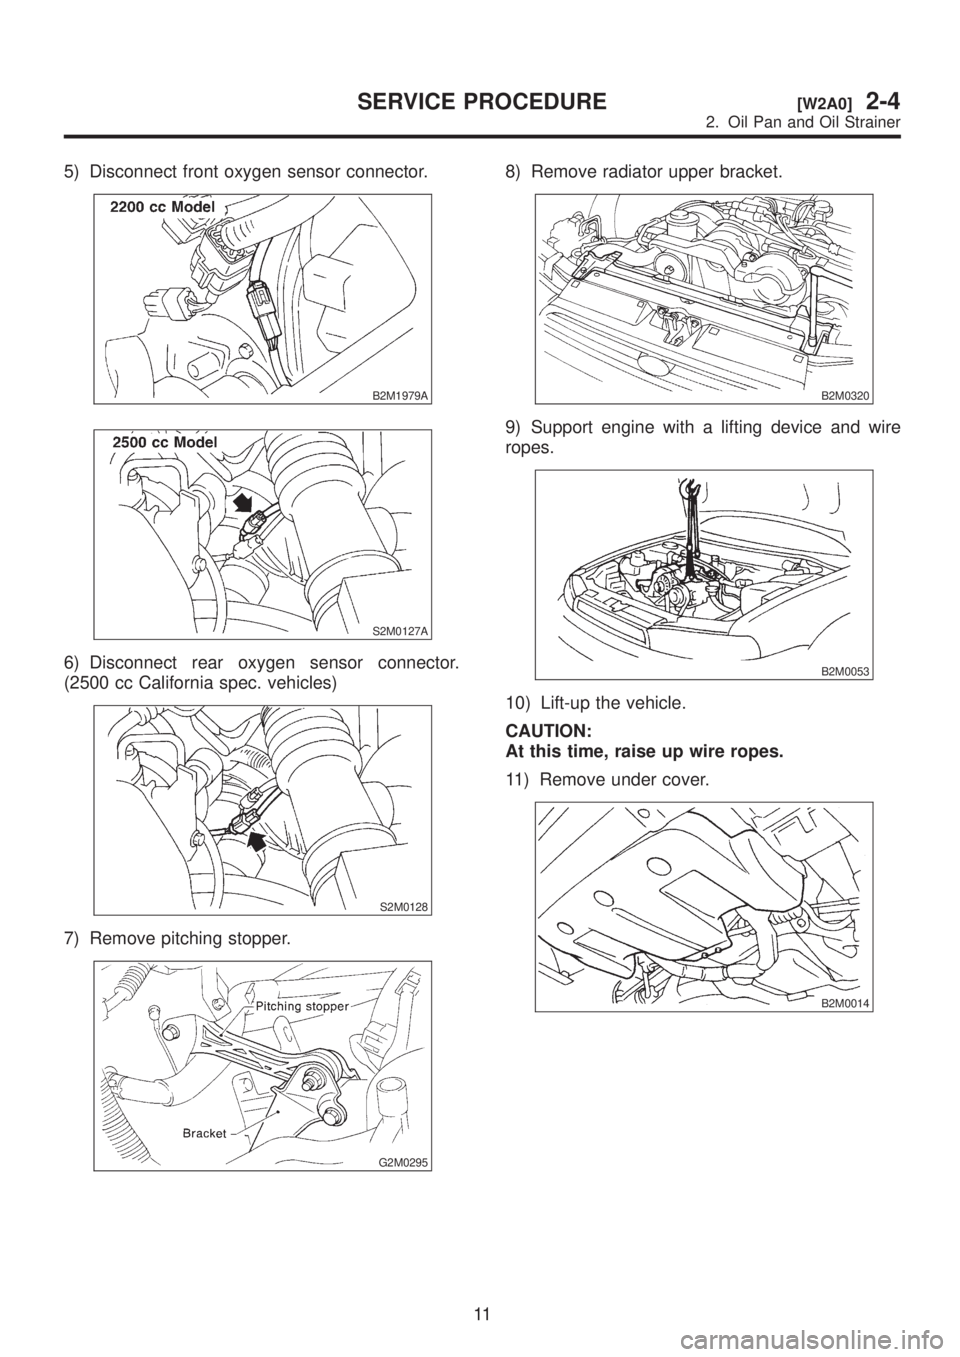
5) Disconnect front oxygen sensor connector.
B2M1979A
S2M0127A
6) Disconnect rear oxygen sensor connector.
(2500 cc California spec. vehicles)
S2M0128
7) Remove pitching stopper.
G2M0295
8) Remove radiator upper bracket.
B2M0320
9) Support engine with a lifting device and wire
ropes.
B2M0053
10) Lift-up the vehicle.
CAUTION:
At this time, raise up wire ropes.
11) Remove under cover.
B2M0014
11
[W2A0]2-4SERVICE PROCEDURE
2. Oil Pan and Oil Strainer
Page 219 of 1456
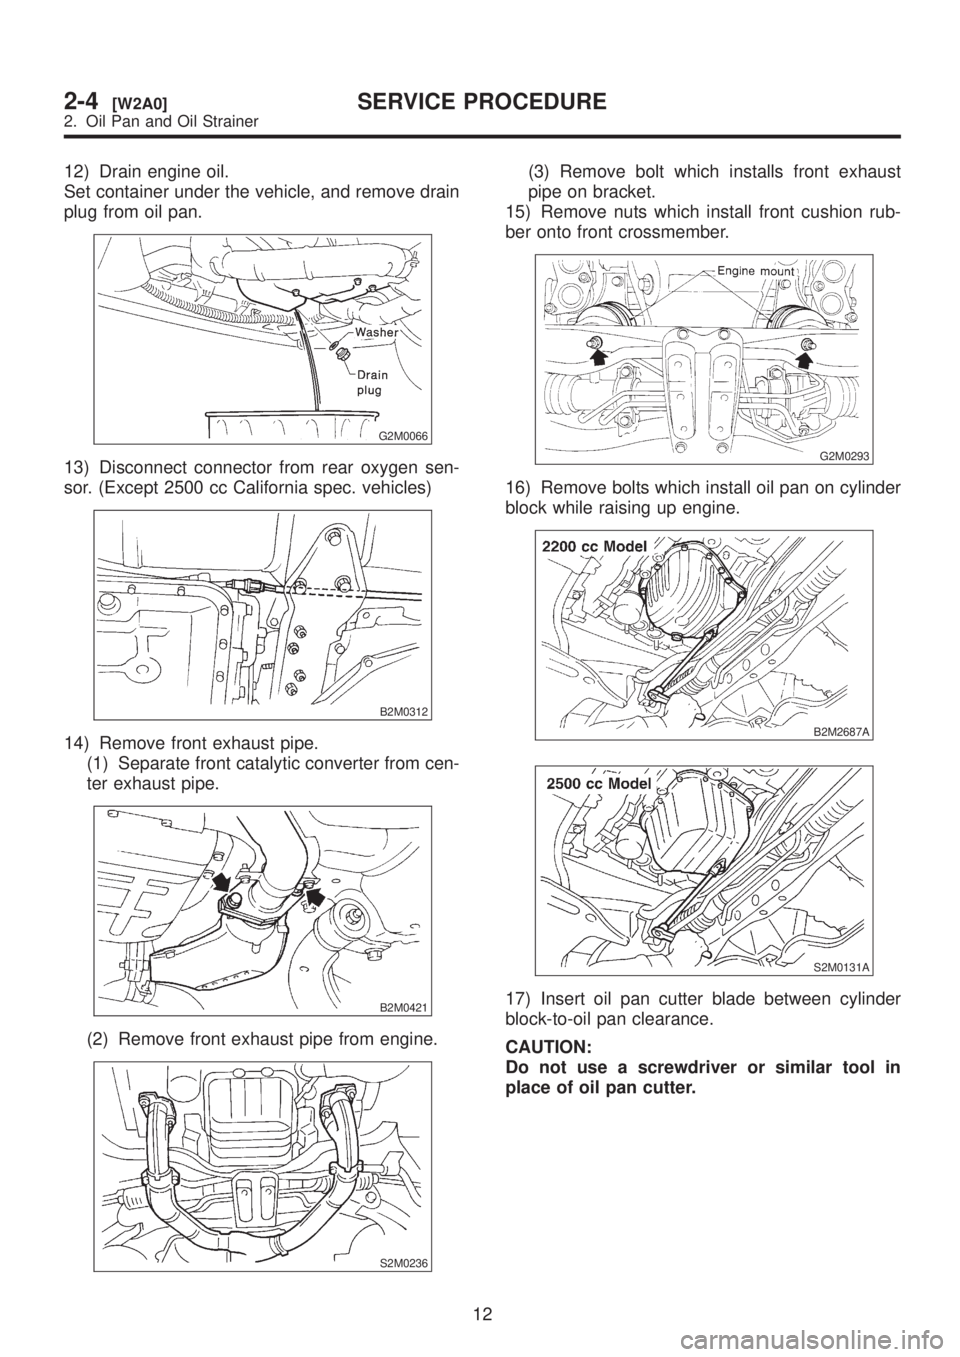
12) Drain engine oil.
Set container under the vehicle, and remove drain
plug from oil pan.
G2M0066
13) Disconnect connector from rear oxygen sen-
sor. (Except 2500 cc California spec. vehicles)
B2M0312
14) Remove front exhaust pipe.
(1) Separate front catalytic converter from cen-
ter exhaust pipe.
B2M0421
(2) Remove front exhaust pipe from engine.
S2M0236
(3) Remove bolt which installs front exhaust
pipe on bracket.
15) Remove nuts which install front cushion rub-
ber onto front crossmember.
G2M0293
16) Remove bolts which install oil pan on cylinder
block while raising up engine.
B2M2687A
S2M0131A
17) Insert oil pan cutter blade between cylinder
block-to-oil pan clearance.
CAUTION:
Do not use a screwdriver or similar tool in
place of oil pan cutter.
12
2-4[W2A0]SERVICE PROCEDURE
2. Oil Pan and Oil Strainer
Page 220 of 1456
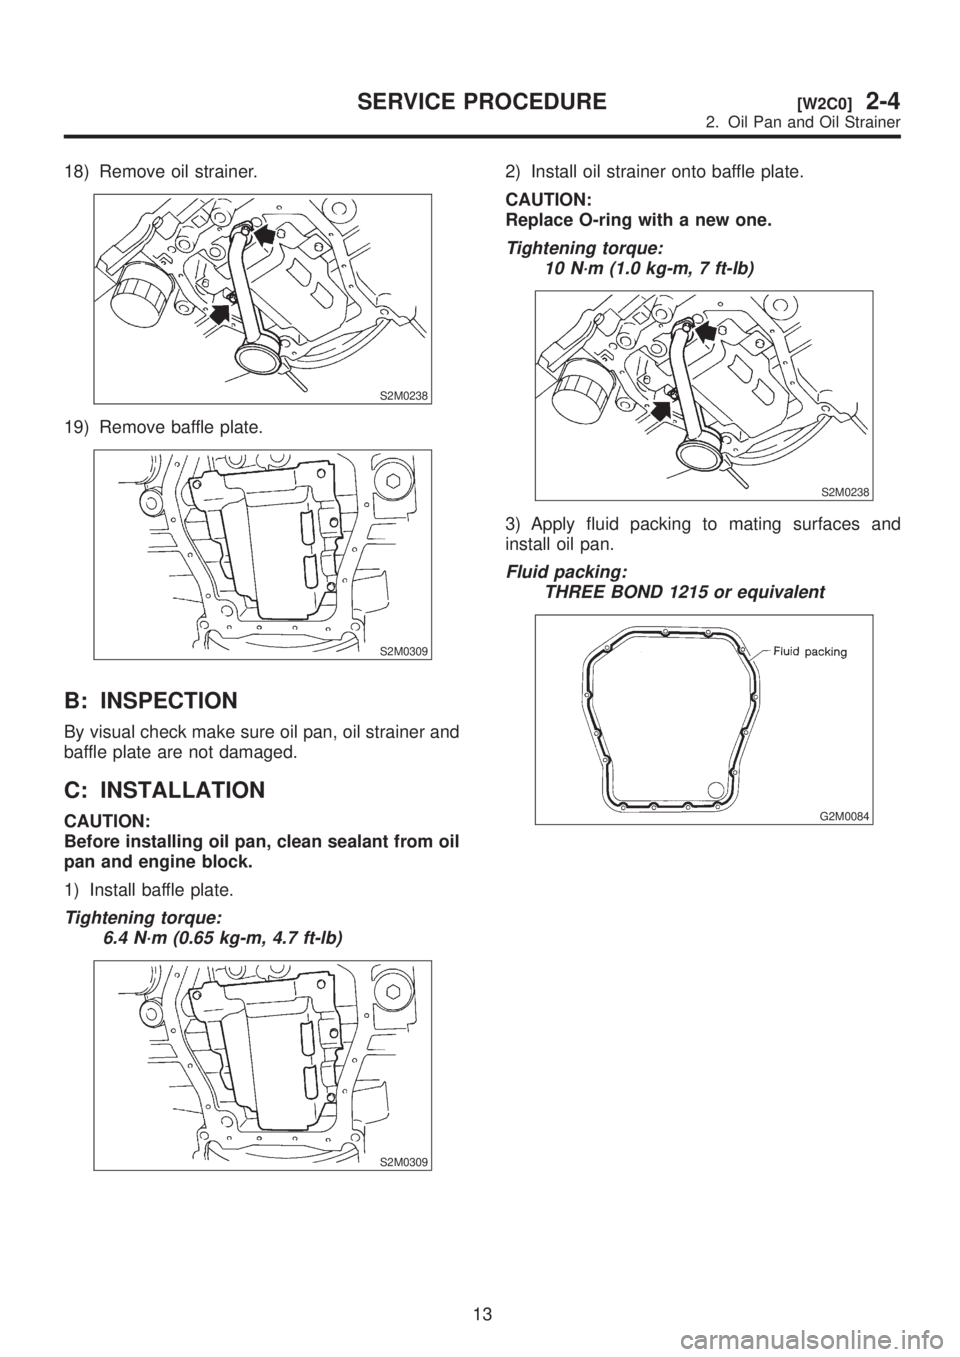
18) Remove oil strainer.
S2M0238
19) Remove baffle plate.
S2M0309
B: INSPECTION
By visual check make sure oil pan, oil strainer and
baffle plate are not damaged.
C: INSTALLATION
CAUTION:
Before installing oil pan, clean sealant from oil
pan and engine block.
1) Install baffle plate.
Tightening torque:
6.4 N´m (0.65 kg-m, 4.7 ft-lb)
S2M0309
2) Install oil strainer onto baffle plate.
CAUTION:
Replace O-ring with a new one.
Tightening torque:
10 N´m (1.0 kg-m, 7 ft-lb)
S2M0238
3) Apply fluid packing to mating surfaces and
install oil pan.
Fluid packing:
THREE BOND 1215 or equivalent
G2M0084
13
[W2C0]2-4SERVICE PROCEDURE
2. Oil Pan and Oil Strainer