SUBARU LEGACY 1999 Service Repair Manual
Manufacturer: SUBARU, Model Year: 1999, Model line: LEGACY, Model: SUBARU LEGACY 1999Pages: 1456, PDF Size: 59.93 MB
Page 411 of 1456
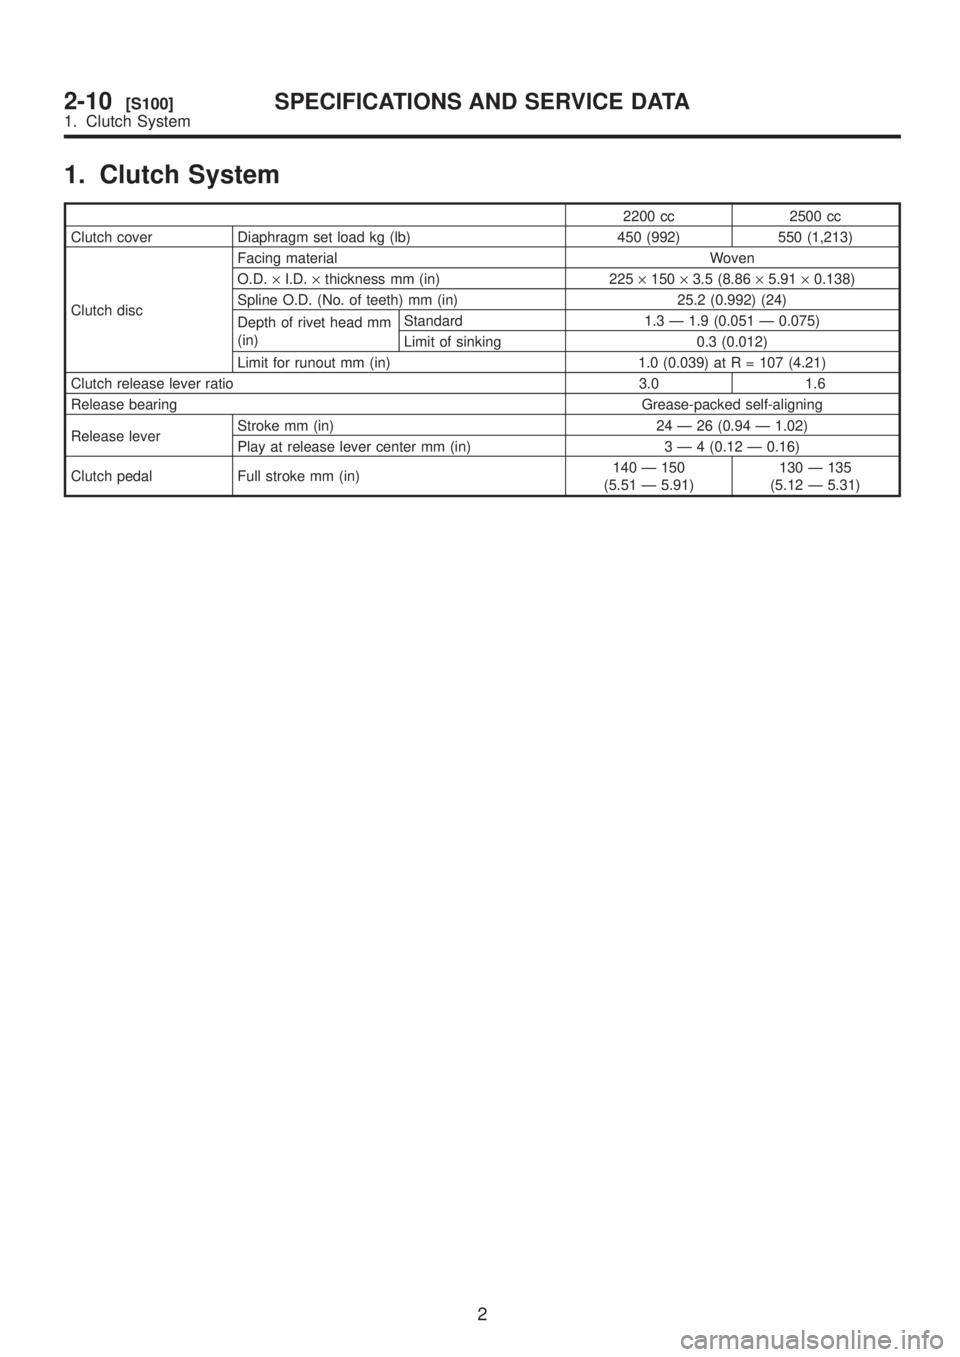
1. Clutch System
2200 cc 2500 cc
Clutch cover Diaphragm set load kg (lb) 450 (992) 550 (1,213)
Clutch discFacing material Woven
O.D.´I.D.´thickness mm (in) 225´150´3.5 (8.86´5.91´0.138)
Spline O.D. (No. of teeth) mm (in) 25.2 (0.992) (24)
Depth of rivet head mm
(in)Standard 1.3 Ð 1.9 (0.051 Ð 0.075)
Limit of sinking 0.3 (0.012)
Limit for runout mm (in) 1.0 (0.039) at R = 107 (4.21)
Clutch release lever ratio 3.0 1.6
Release bearingGrease-packed self-aligning
Release leverStroke mm (in) 24 Ð 26 (0.94 Ð 1.02)
Play at release lever center mm (in)3 Ð 4 (0.12 Ð 0.16)
Clutch pedal Full stroke mm (in)140 Ð 150
(5.51 Ð 5.91)130 Ð 135
(5.12 Ð 5.31)
2
2-10[S100]SPECIFICATIONS AND SERVICE DATA
1. Clutch System
Page 412 of 1456
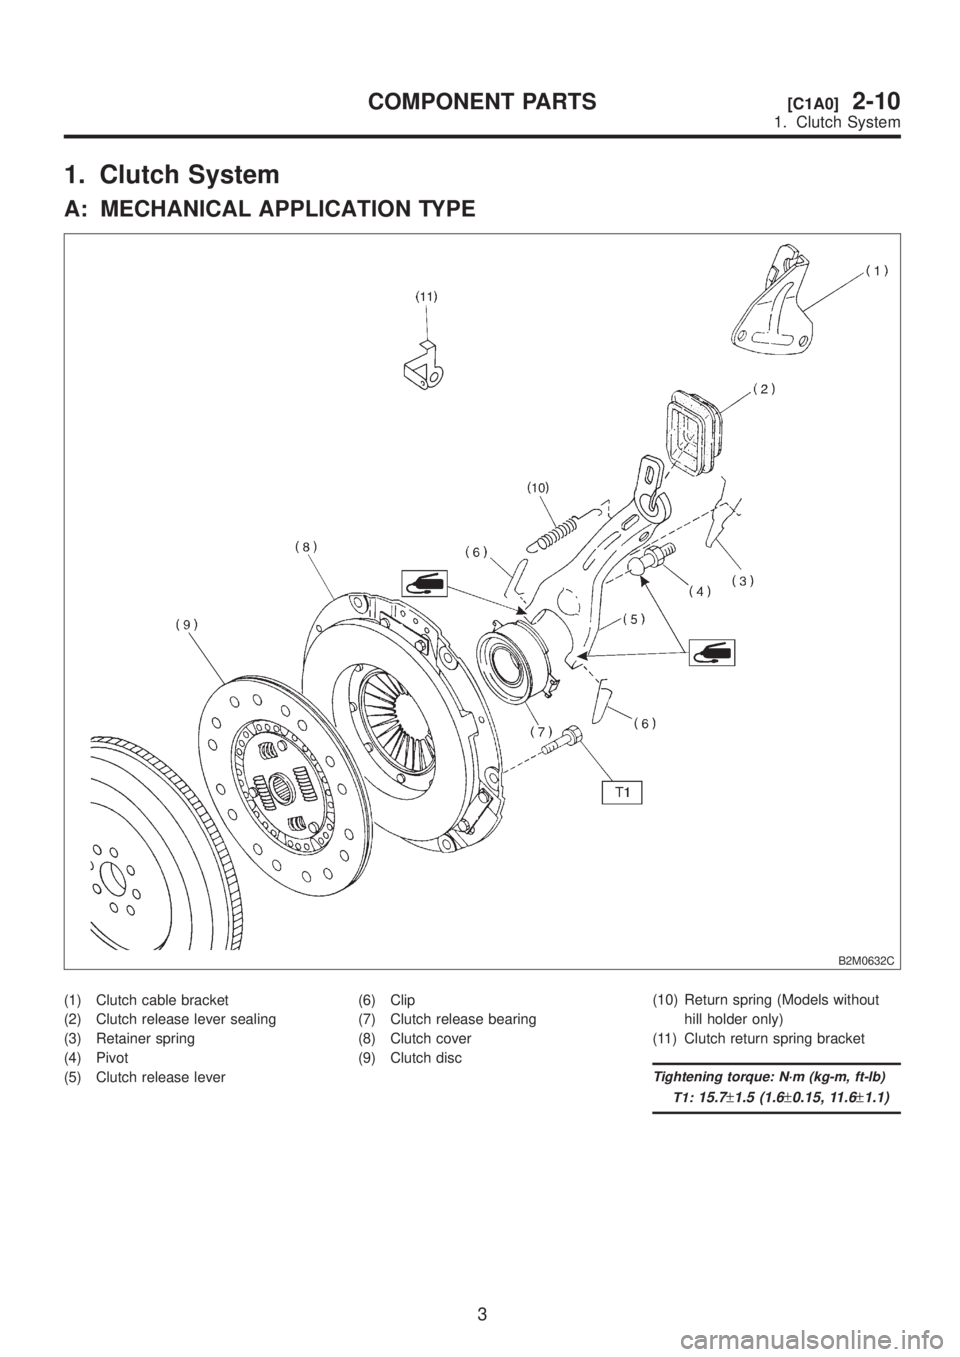
1. Clutch System
A: MECHANICAL APPLICATION TYPE
B2M0632C
(1) Clutch cable bracket
(2) Clutch release lever sealing
(3) Retainer spring
(4) Pivot
(5) Clutch release lever(6) Clip
(7) Clutch release bearing
(8) Clutch cover
(9) Clutch disc(10) Return spring (Models without
hill holder only)
(11) Clutch return spring bracket
Tightening torque: N´m (kg-m, ft-lb)
T1:
15.7±1.5 (1.6±0.15, 11.6±1.1)
3
[C1A0]2-10COMPONENT PARTS
1. Clutch System
Page 413 of 1456
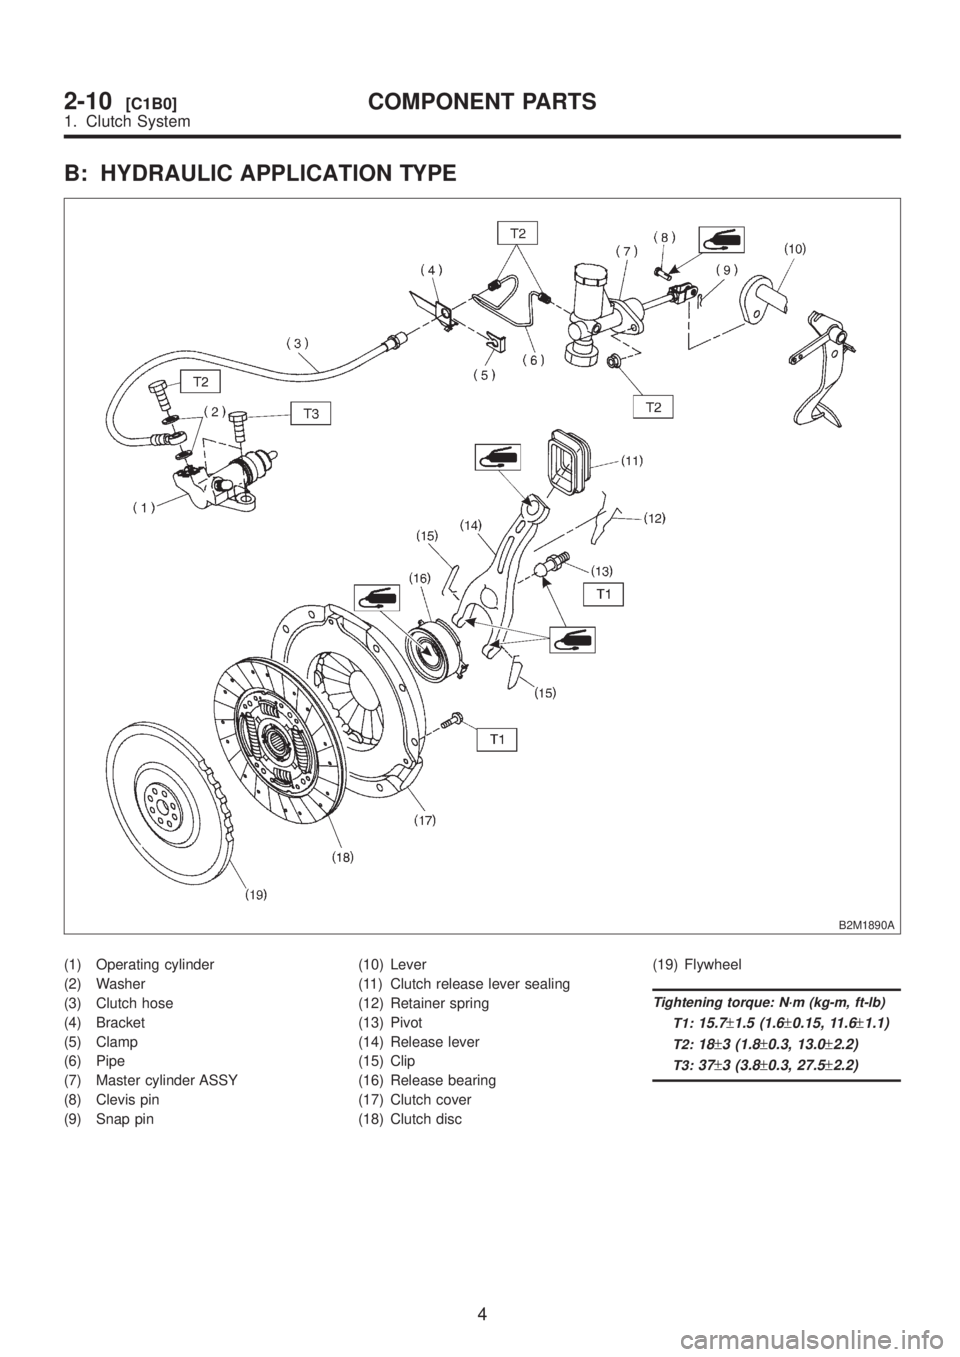
B: HYDRAULIC APPLICATION TYPE
B2M1890A
(1) Operating cylinder
(2) Washer
(3) Clutch hose
(4) Bracket
(5) Clamp
(6) Pipe
(7) Master cylinder ASSY
(8) Clevis pin
(9) Snap pin(10) Lever
(11) Clutch release lever sealing
(12) Retainer spring
(13) Pivot
(14) Release lever
(15) Clip
(16) Release bearing
(17) Clutch cover
(18) Clutch disc(19) Flywheel
Tightening torque: N´m (kg-m, ft-lb)
T1:
15.7±1.5 (1.6±0.15, 11.6±1.1)
T2:18±3 (1.8±0.3, 13.0±2.2)
T3:37±3 (3.8±0.3, 27.5±2.2)
4
2-10[C1B0]COMPONENT PARTS
1. Clutch System
Page 414 of 1456
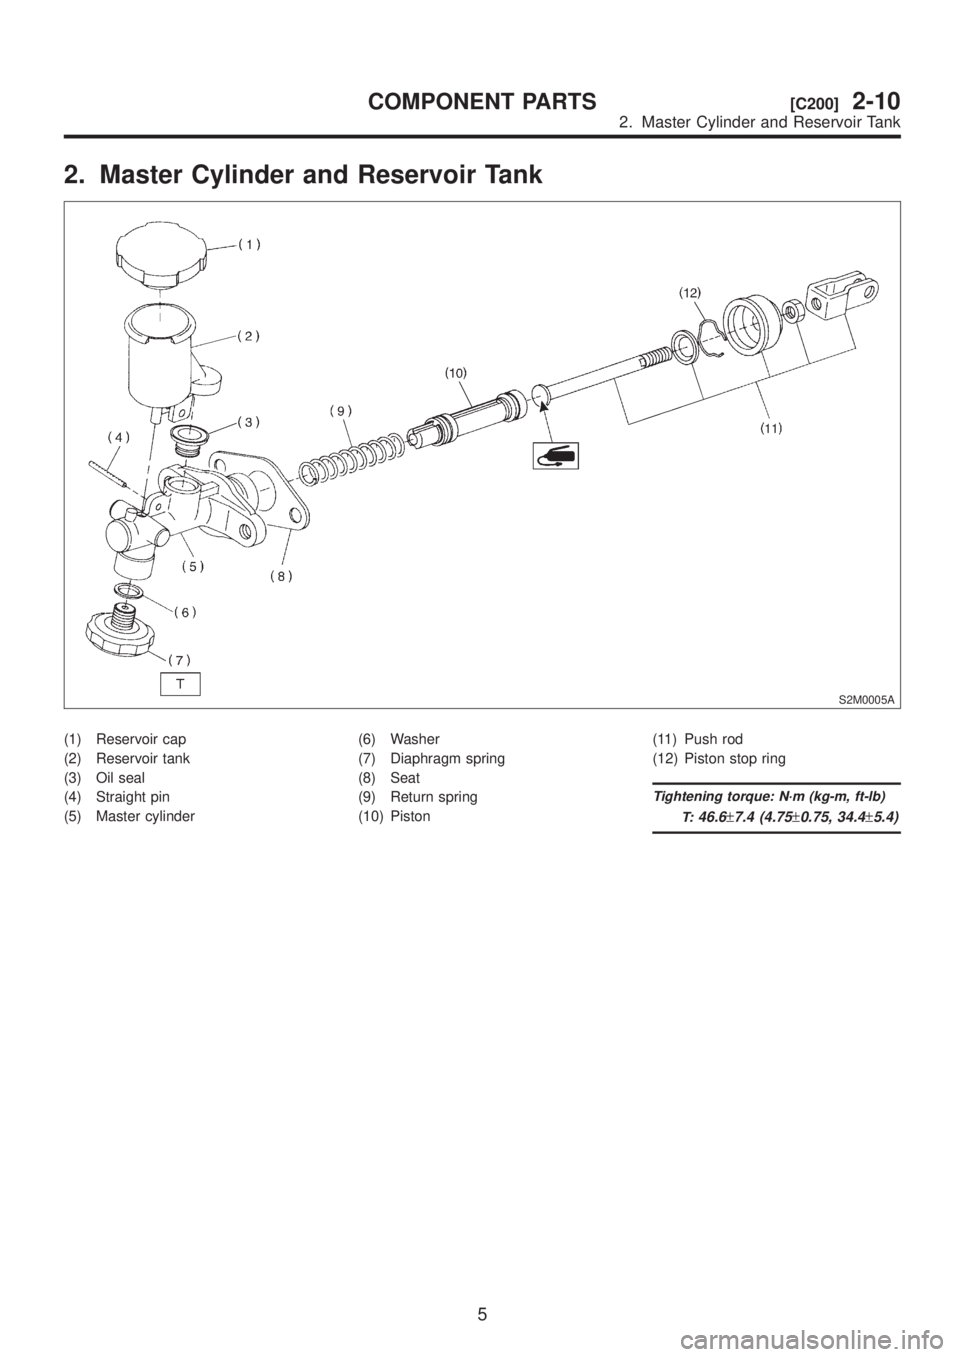
2. Master Cylinder and Reservoir Tank
S2M0005A
(1) Reservoir cap
(2) Reservoir tank
(3) Oil seal
(4) Straight pin
(5) Master cylinder(6) Washer
(7) Diaphragm spring
(8) Seat
(9) Return spring
(10) Piston(11) Push rod
(12) Piston stop ring
Tightening torque: N´m (kg-m, ft-lb)
T:
46.6±7.4 (4.75±0.75, 34.4±5.4)
5
[C200]2-10COMPONENT PARTS
2. Master Cylinder and Reservoir Tank
Page 415 of 1456
1. General
A: PRECAUTION
When servicing clutch system, pay attention to the
following items.
1. MECHANICAL APPLICATION TYPE
1) Check the routing of clutch cable for smooth-
ness.
2) Excessive tightness or looseness of clutch
cable have a bad influence upon the cable durabil-
ity.
3) Apply grease sufficiently to the connecting por-
tion of clutch pedal.
4) Apply grease sufficiently to the release lever
portion.
5) Position clutch cable through the center of toe
board hole and route it smoothly. Adjustment is
done by moving the outer cable.
6) Make sure not to let the clutch chatter when
starting forward or rearward. If clutch chattering
occurs, readjust so that the bend of clutch outer
cable becomes flatter.
2. HYDRAULIC APPLICATION TYPE
1) Check fluid level using a scale on outside of
reservoir tank. If the level is below ªMINº, add
clutch fluid to bring it up to ªMAXº.
Recommended clutch fluid:
FMVSS No. 116, fresh DOT3 or DOT4
brake fluid
CAUTION:
IAvoid mixing different brakes of brake fluid
to prevent degradation of the fluid.
IBe careful not to allow dirt or dust to get into
the reservoir tank.
IUse fresh DOT3 or DOT4 brake fluid when
refilling fluid.
S2M0351A
2) Make sure that brake fluid does not leak from
master cylinder, operating cylinder and piping.
3) Apply grease sufficiently to the release lever
pinion.
4) Check for proper clutch disengagement and
clutch pedal return ability.
2. On-car Service
A: ADJUSTMENT
1. MECHANICAL APPLICATION TYPE
1) Remove release lever return spring from lever
(Models without hill holder only).
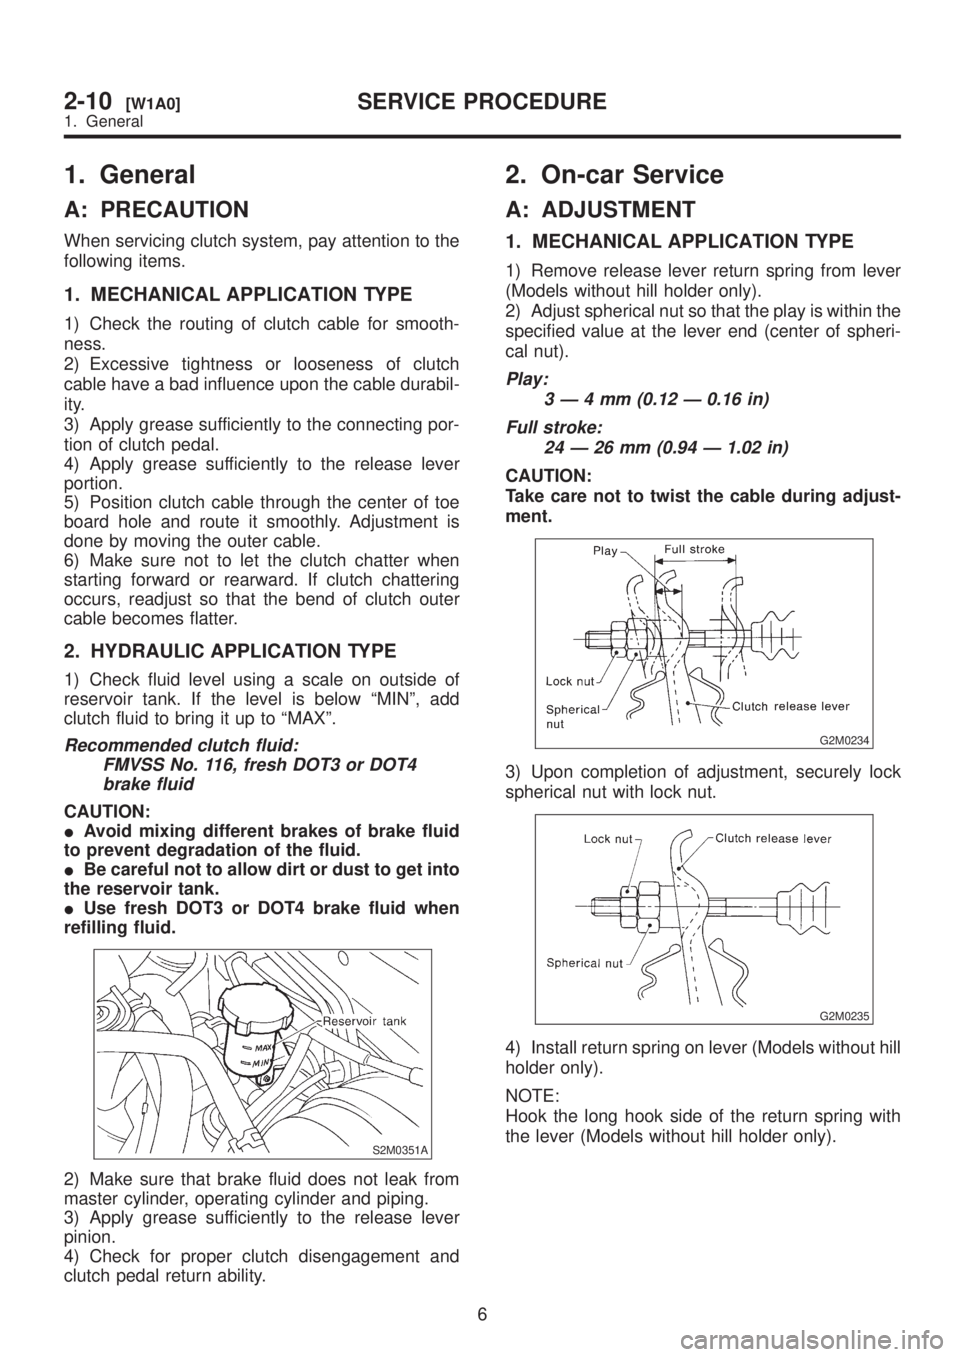
2) Adjust spherical nut so that the play is within the
specified value at the lever end (center of spheri-
cal nut).
Play:
3Ð4mm(0.12 Ð 0.16 in)
Full stroke:
24 Ð 26 mm (0.94 Ð 1.02 in)
CAUTION:
Take care not to twist the cable during adjust-
ment.
G2M0234
3) Upon completion of adjustment, securely lock
spherical nut with lock nut.
G2M0235
4) Install return spring on lever (Models without hill
holder only).
NOTE:
Hook the long hook side of the return spring with
the lever (Models without hill holder only).
6
2-10[W1A0]SERVICE PROCEDURE
1. General
Page 416 of 1456
1. General
A: PRECAUTION
When servicing clutch system, pay attention to the
following items.
1. MECHANICAL APPLICATION TYPE
1) Check the routing of clutch cable for smooth-
ness.
2) Excessive tightness or looseness of clutch
cable have a bad influence upon the cable durabil-
ity.
3) Apply grease sufficiently to the connecting por-
tion of clutch pedal.
4) Apply grease sufficiently to the release lever
portion.
5) Position clutch cable through the center of toe
board hole and route it smoothly. Adjustment is
done by moving the outer cable.
6) Make sure not to let the clutch chatter when
starting forward or rearward. If clutch chattering
occurs, readjust so that the bend of clutch outer
cable becomes flatter.
2. HYDRAULIC APPLICATION TYPE
1) Check fluid level using a scale on outside of
reservoir tank. If the level is below ªMINº, add
clutch fluid to bring it up to ªMAXº.
Recommended clutch fluid:
FMVSS No. 116, fresh DOT3 or DOT4
brake fluid
CAUTION:
IAvoid mixing different brakes of brake fluid
to prevent degradation of the fluid.
IBe careful not to allow dirt or dust to get into
the reservoir tank.
IUse fresh DOT3 or DOT4 brake fluid when
refilling fluid.
S2M0351A
2) Make sure that brake fluid does not leak from
master cylinder, operating cylinder and piping.
3) Apply grease sufficiently to the release lever
pinion.
4) Check for proper clutch disengagement and
clutch pedal return ability.
2. On-car Service
A: ADJUSTMENT
1. MECHANICAL APPLICATION TYPE
1) Remove release lever return spring from lever
(Models without hill holder only).
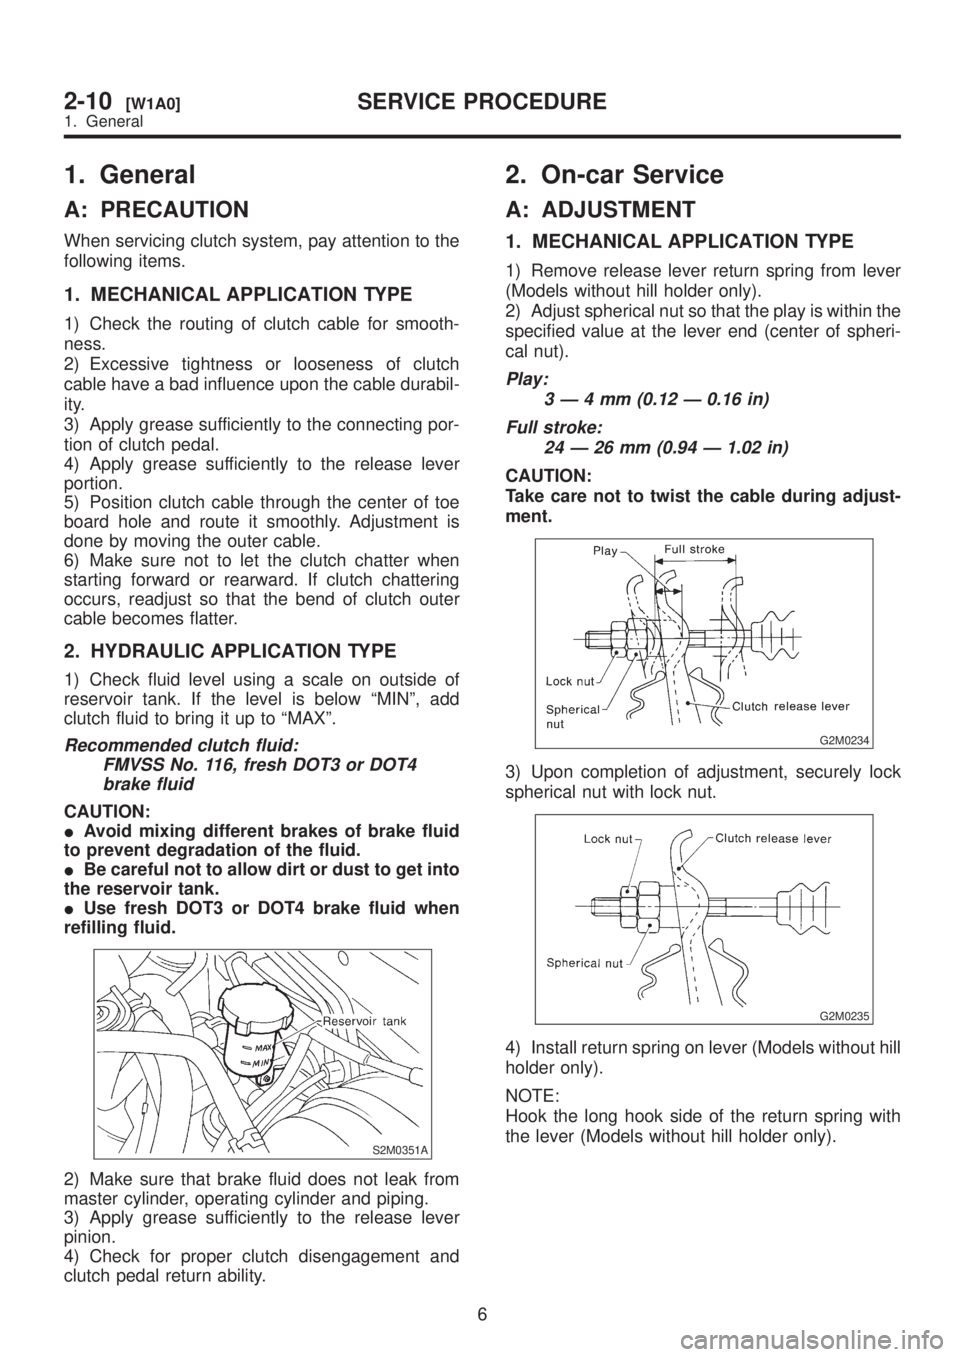
2) Adjust spherical nut so that the play is within the
specified value at the lever end (center of spheri-
cal nut).
Play:
3Ð4mm(0.12 Ð 0.16 in)
Full stroke:
24 Ð 26 mm (0.94 Ð 1.02 in)
CAUTION:
Take care not to twist the cable during adjust-
ment.
G2M0234
3) Upon completion of adjustment, securely lock
spherical nut with lock nut.
G2M0235
4) Install return spring on lever (Models without hill
holder only).
NOTE:
Hook the long hook side of the return spring with
the lever (Models without hill holder only).
6
2-10[W1A0]SERVICE PROCEDURE
1. General
Page 417 of 1456
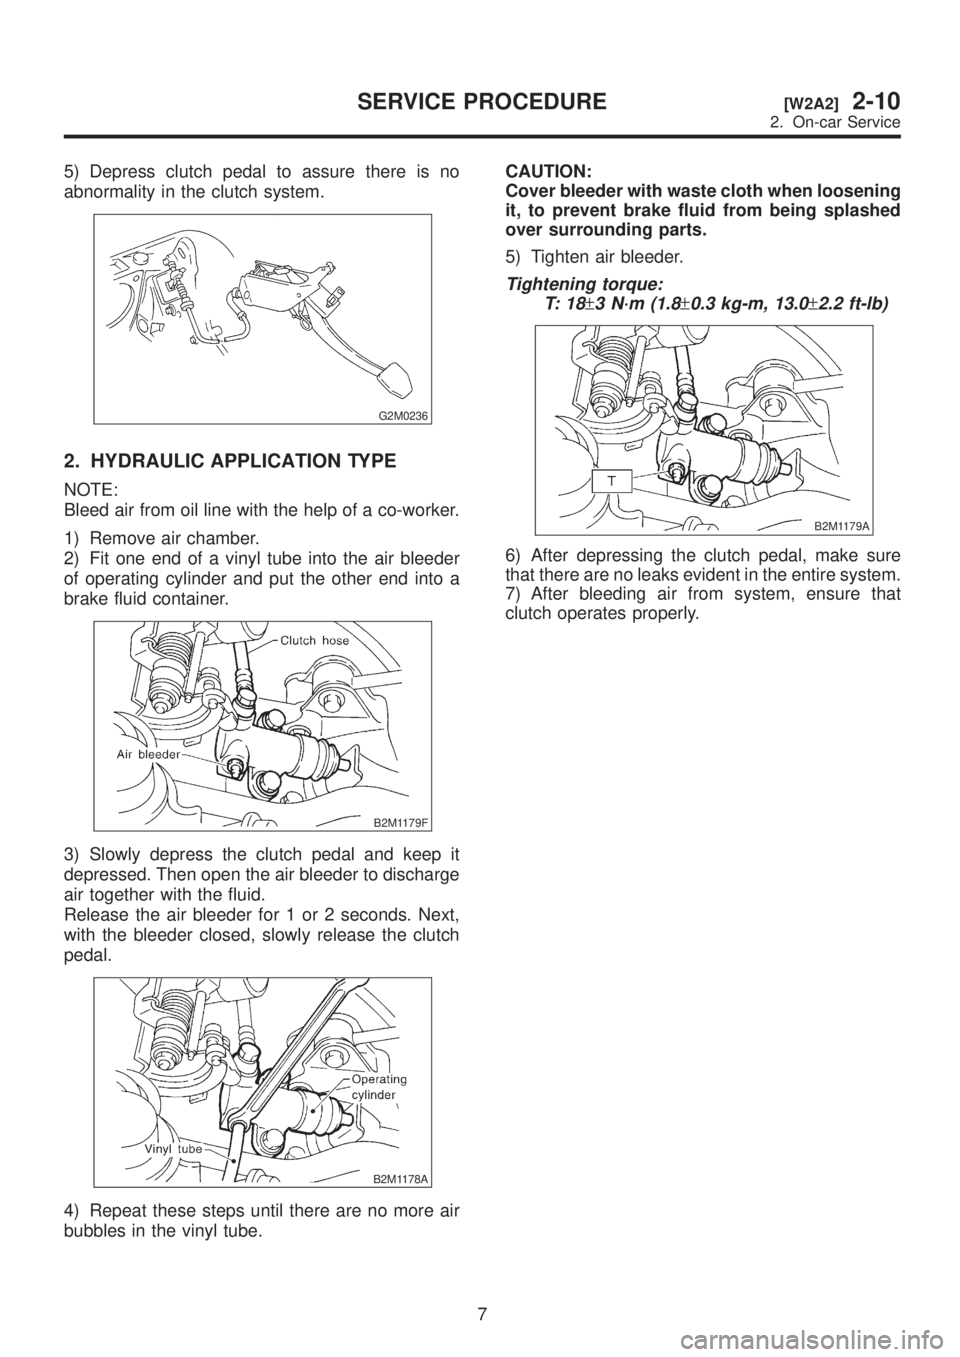
5) Depress clutch pedal to assure there is no
abnormality in the clutch system.
G2M0236
2. HYDRAULIC APPLICATION TYPE
NOTE:
Bleed air from oil line with the help of a co-worker.
1) Remove air chamber.
2) Fit one end of a vinyl tube into the air bleeder
of operating cylinder and put the other end into a
brake fluid container.
B2M1179F
3) Slowly depress the clutch pedal and keep it
depressed. Then open the air bleeder to discharge
air together with the fluid.
Release the air bleeder for 1 or 2 seconds. Next,
with the bleeder closed, slowly release the clutch
pedal.
B2M1178A
4) Repeat these steps until there are no more air
bubbles in the vinyl tube.CAUTION:
Cover bleeder with waste cloth when loosening
it, to prevent brake fluid from being splashed
over surrounding parts.
5) Tighten air bleeder.
Tightening torque:
T: 1 8
±3 N´m (1.8±0.3 kg-m, 13.0±2.2 ft-lb)
B2M1179A
6) After depressing the clutch pedal, make sure
that there are no leaks evident in the entire system.
7) After bleeding air from system, ensure that
clutch operates properly.
7
[W2A2]2-10SERVICE PROCEDURE
2. On-car Service
Page 418 of 1456
![SUBARU LEGACY 1999 Service Repair Manual 3. Release Bearing and Lever
A: REMOVAL
1. MECHANICAL APPLICATION TYPE
1) Remove transmission assembly from vehicle
body.
<Ref. to 2-11 [W2B0].>
2) Remove release lever return spring (Models
without h SUBARU LEGACY 1999 Service Repair Manual 3. Release Bearing and Lever
A: REMOVAL
1. MECHANICAL APPLICATION TYPE
1) Remove transmission assembly from vehicle
body.
<Ref. to 2-11 [W2B0].>
2) Remove release lever return spring (Models
without h](/img/17/57435/w960_57435-417.png)
3. Release Bearing and Lever
A: REMOVAL
1. MECHANICAL APPLICATION TYPE
1) Remove transmission assembly from vehicle
body.
2) Remove release lever return spring (Models
without hill holder only).
3) Remove the two clips from clutch release lever
and remove release bearing.
CAUTION:
Be careful not to deform clips.
4) Remove release lever seal.
B2M0633D
(A) Release lever return spring
(B) Clip
(C) Release lever
(D) Release lever seal
(E) Retainer spring
(F) Clutch release lever
5) Remove release lever retainer spring from
release lever pivot with a screwdriver by accessing
it through clutch housing release lever hole. Then
remove release lever.
B2M0174A
2. HYDRAULIC APPLICATION TYPE
1) Remove transmission assembly from vehicle
body.
2) Remove operating cylinder.
3) Remove the two clips from clutch release lever
and remove release bearing.
CAUTION:
Be careful not to deform clips.
4) Remove release lever seal.
B2M1257G
(A) Operating cylinder
(B) Clip
(C) Clutch release lever
(D) Release bearing
(E) Release lever seal
8
2-10[W3A1]SERVICE PROCEDURE
3. Release Bearing and Lever
Page 419 of 1456
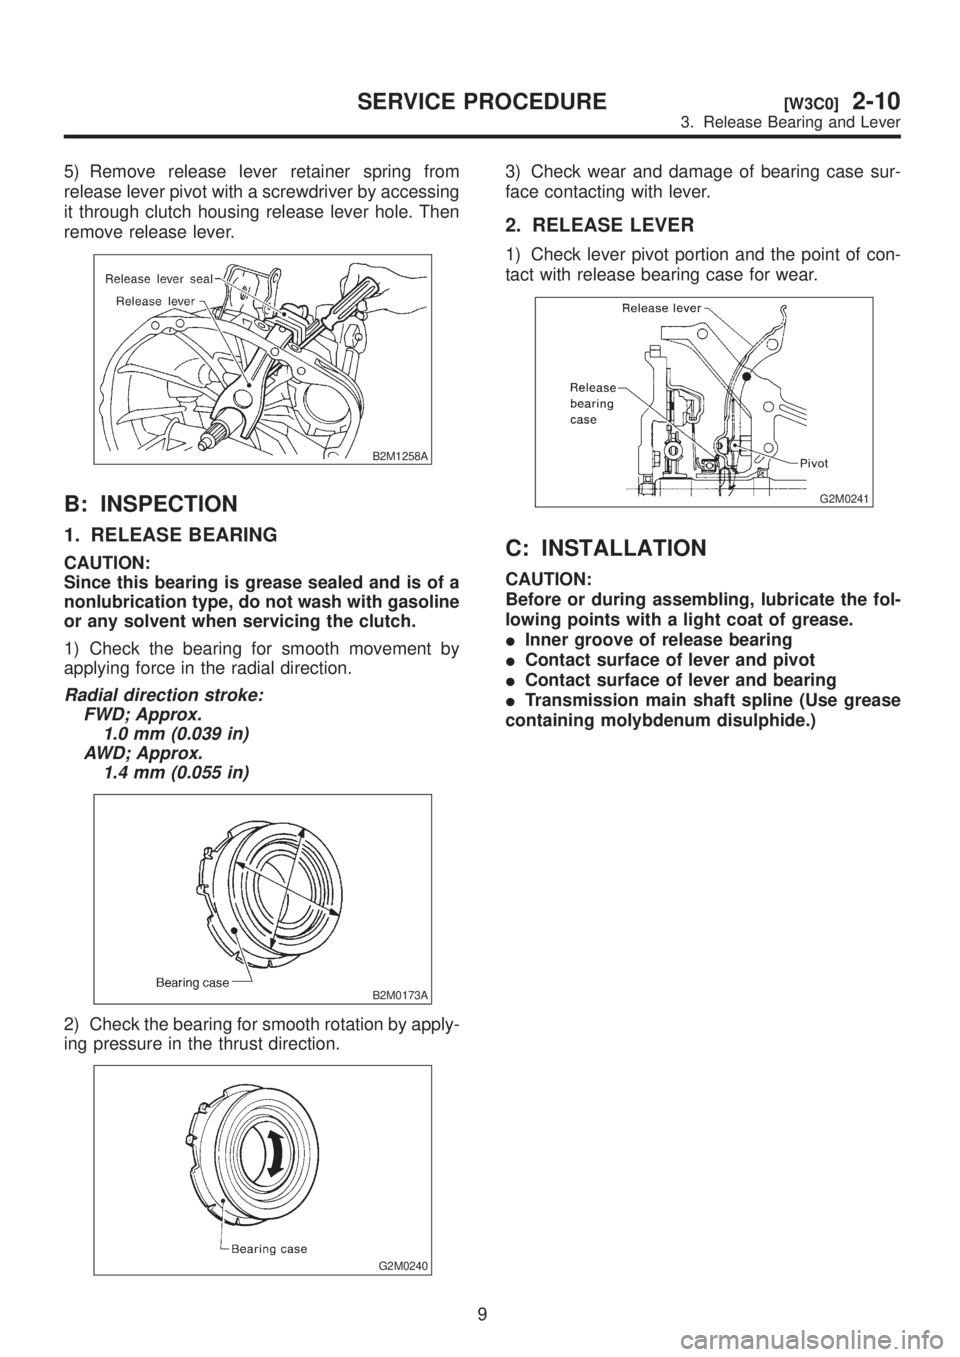
5) Remove release lever retainer spring from
release lever pivot with a screwdriver by accessing
it through clutch housing release lever hole. Then
remove release lever.
B2M1258A
B: INSPECTION
1. RELEASE BEARING
CAUTION:
Since this bearing is grease sealed and is of a
nonlubrication type, do not wash with gasoline
or any solvent when servicing the clutch.
1) Check the bearing for smooth movement by
applying force in the radial direction.
Radial direction stroke:
FWD; Approx.
1.0 mm (0.039 in)
AWD; Approx.
1.4 mm (0.055 in)
B2M0173A
2) Check the bearing for smooth rotation by apply-
ing pressure in the thrust direction.
G2M0240
3) Check wear and damage of bearing case sur-
face contacting with lever.
2. RELEASE LEVER
1) Check lever pivot portion and the point of con-
tact with release bearing case for wear.
G2M0241
C: INSTALLATION
CAUTION:
Before or during assembling, lubricate the fol-
lowing points with a light coat of grease.
IInner groove of release bearing
IContact surface of lever and pivot
IContact surface of lever and bearing
ITransmission main shaft spline (Use grease
containing molybdenum disulphide.)
9
[W3C0]2-10SERVICE PROCEDURE
3. Release Bearing and Lever
Page 420 of 1456
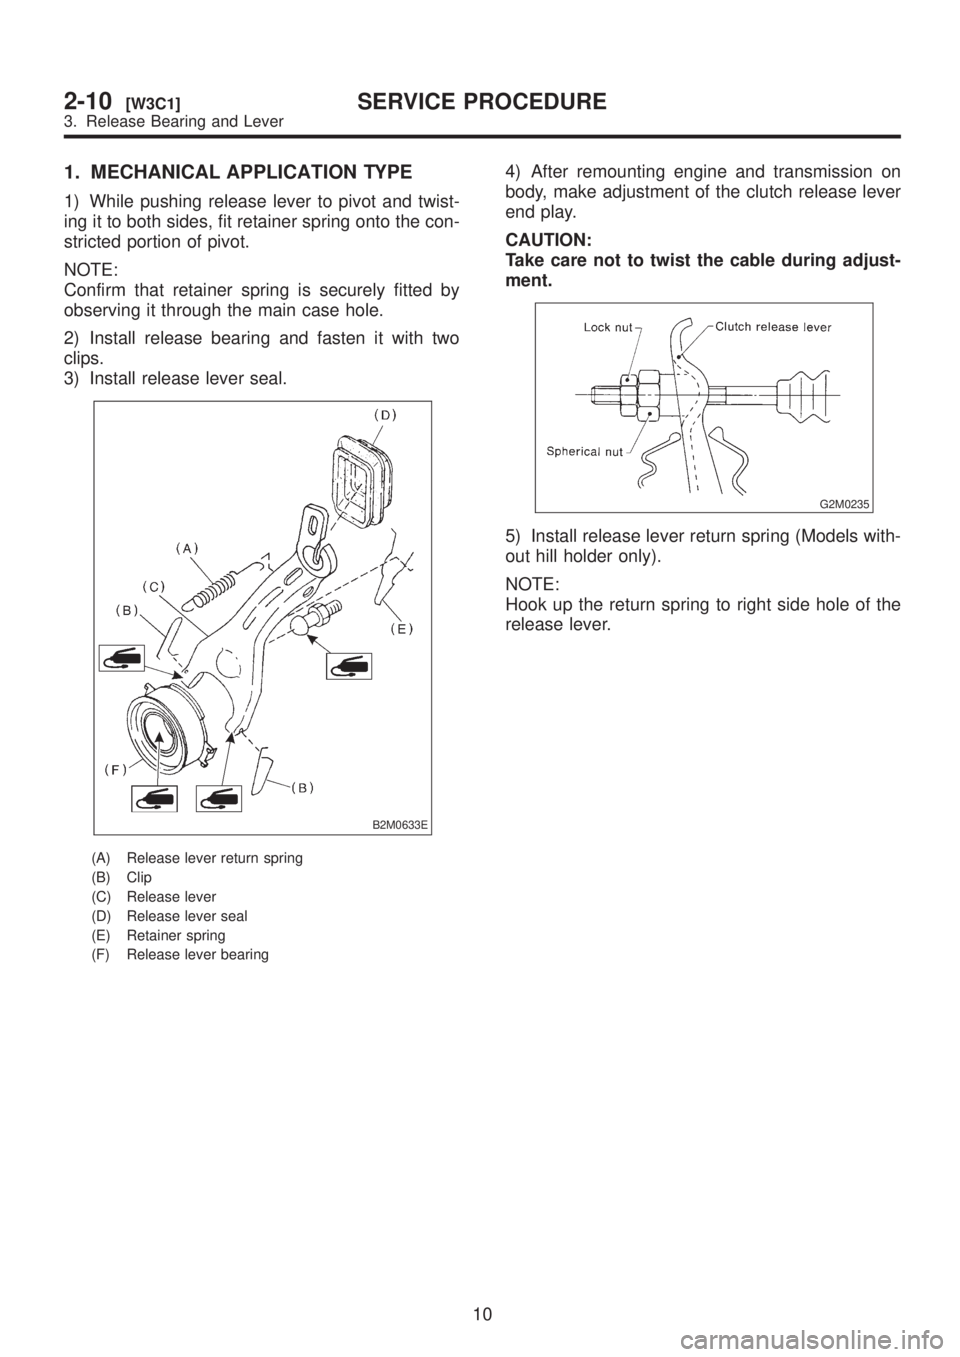
1. MECHANICAL APPLICATION TYPE
1) While pushing release lever to pivot and twist-
ing it to both sides, fit retainer spring onto the con-
stricted portion of pivot.
NOTE:
Confirm that retainer spring is securely fitted by
observing it through the main case hole.
2) Install release bearing and fasten it with two
clips.
3) Install release lever seal.
B2M0633E
(A) Release lever return spring
(B) Clip
(C) Release lever
(D) Release lever seal
(E) Retainer spring
(F) Release lever bearing
4) After remounting engine and transmission on
body, make adjustment of the clutch release lever
end play.
CAUTION:
Take care not to twist the cable during adjust-
ment.
G2M0235
5) Install release lever return spring (Models with-
out hill holder only).
NOTE:
Hook up the return spring to right side hole of the
release lever.
10
2-10[W3C1]SERVICE PROCEDURE
3. Release Bearing and Lever