SUBARU TRIBECA 2009 1.G Service Workshop Manual
Manufacturer: SUBARU, Model Year: 2009, Model line: TRIBECA, Model: SUBARU TRIBECA 2009 1.GPages: 2453, PDF Size: 46.32 MB
Page 531 of 2453
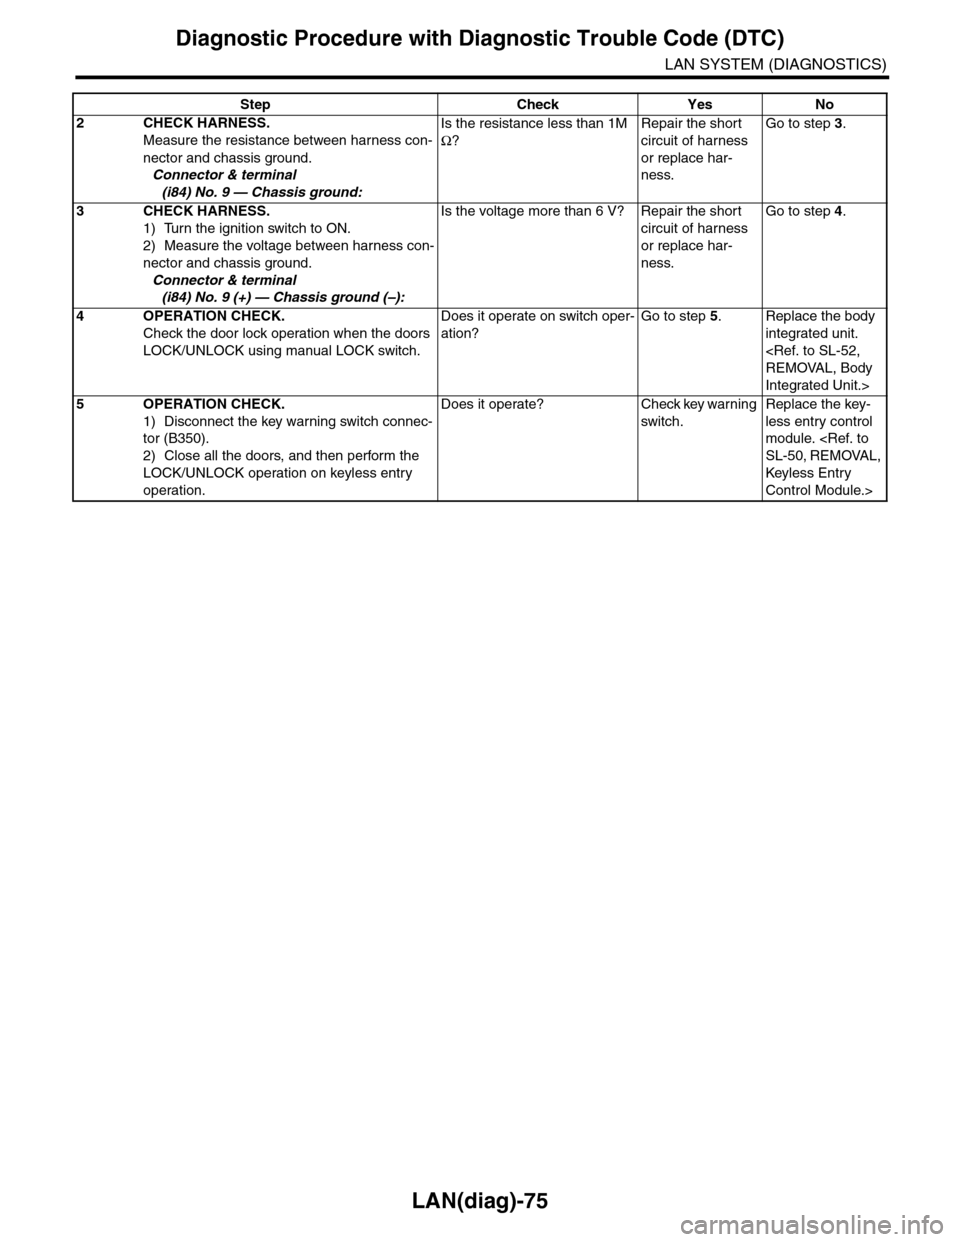
LAN(diag)-75
Diagnostic Procedure with Diagnostic Trouble Code (DTC)
LAN SYSTEM (DIAGNOSTICS)
2CHECK HARNESS.
Measure the resistance between harness con-
nector and chassis ground.
Connector & terminal
(i84) No. 9 — Chassis ground:
Is the resistance less than 1M
Ω?
Repair the short
circuit of harness
or replace har-
ness.
Go to step 3.
3CHECK HARNESS.
1) Turn the ignition switch to ON.
2) Measure the voltage between harness con-
nector and chassis ground.
Connector & terminal
(i84) No. 9 (+) — Chassis ground (–):
Is the voltage more than 6 V? Repair the short
circuit of harness
or replace har-
ness.
Go to step 4.
4OPERATION CHECK.
Check the door lock operation when the doors
LOCK/UNLOCK using manual LOCK switch.
Does it operate on switch oper-
ation?
Go to step 5.Replace the body
integrated unit.
Integrated Unit.>
5OPERATION CHECK.
1) Disconnect the key warning switch connec-
tor (B350).
2) Close all the doors, and then perform the
LOCK/UNLOCK operation on keyless entry
operation.
Does it operate? Check key warning
switch.
Replace the key-
less entry control
module.
Keyless Entr y
Control Module.>
Step Check Yes No
Page 532 of 2453
LAN(diag)-76
General Diagnostic Table
LAN SYSTEM (DIAGNOSTICS)
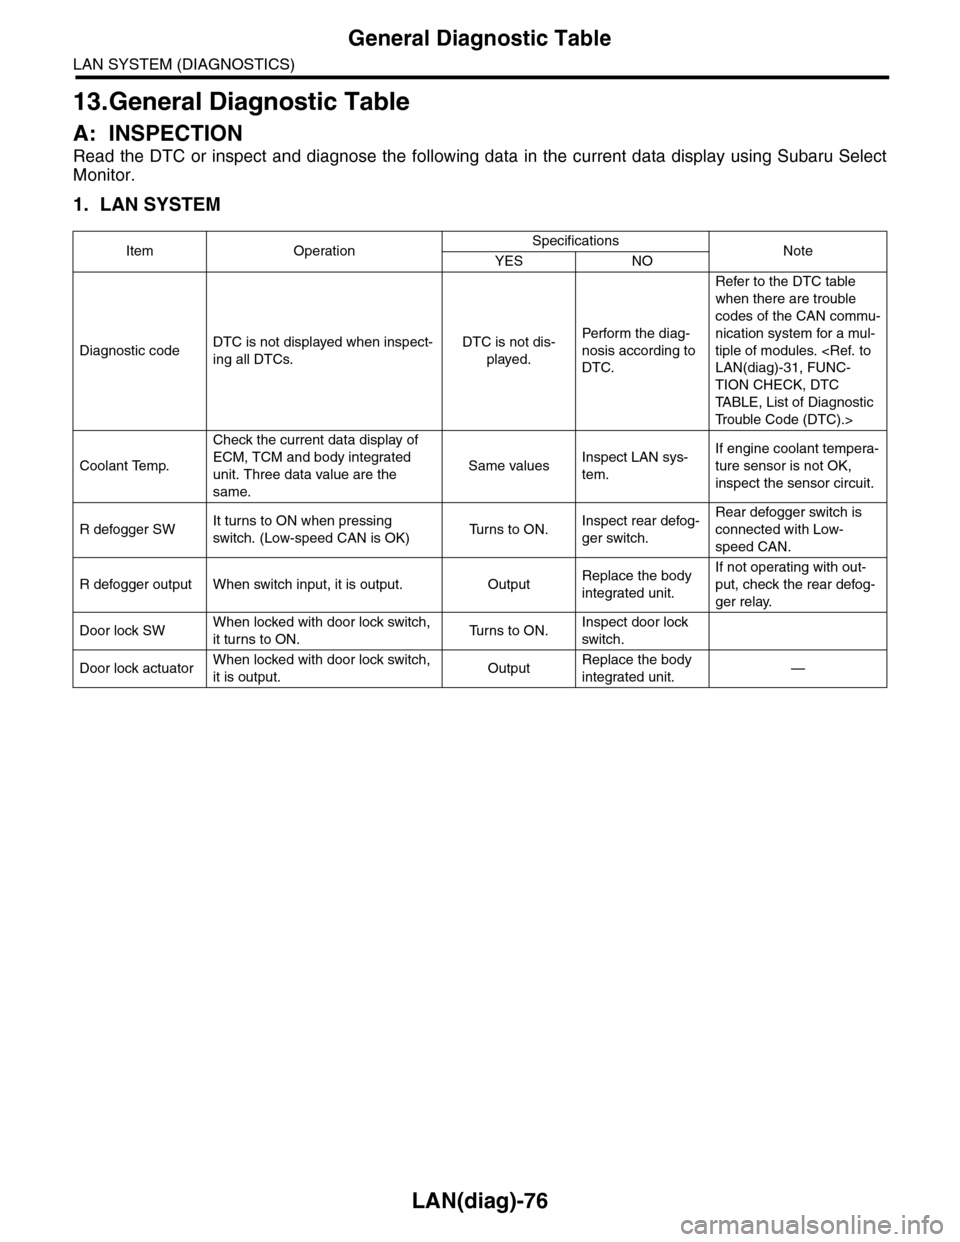
13.General Diagnostic Table
A: INSPECTION
Read the DTC or inspect and diagnose the following data in the current data display using Subaru Select
Monitor.
1. LAN SYSTEM
Item OperationSpecificationsNoteYES NO
Diagnostic codeDTC is not displayed when inspect-
ing all DTCs.
DTC is not dis-
played.
Perfor m the diag-
nosis according to
DTC.
Refer to the DTC table
when there are trouble
codes of the CAN commu-
nication system for a mul-
tiple of modules.
TION CHECK, DTC
TA B L E , L i s t o f D i a g n o s t i c
Tr o u b l e C o d e ( D T C ) . >
Coolant Temp.
Check the current data display of
ECM, TCM and body integrated
unit. Three data value are the
same.
Same valuesInspect LAN sys-
tem.
If engine coolant tempera-
ture sensor is not OK,
inspect the sensor circuit.
R defogger SWIt turns to ON when pressing
switch. (Low-speed CAN is OK)Tu r n s t o O N .Inspect rear defog-
ger switch.
Rear defogger switch is
connected with Low-
speed CAN.
R defogger output When switch input, it is output. OutputReplace the body
integrated unit.
If not operating with out-
put, check the rear defog-
ger relay.
Door lock SWWhen locked with door lock switch,
it turns to ON.Tu r n s t o O N .Inspect door lock
switch.
Door lock actuatorWhen locked with door lock switch,
it is output.OutputReplace the body
integrated unit.—
Page 533 of 2453
LAN(diag)-77
General Diagnostic Table
LAN SYSTEM (DIAGNOSTICS)
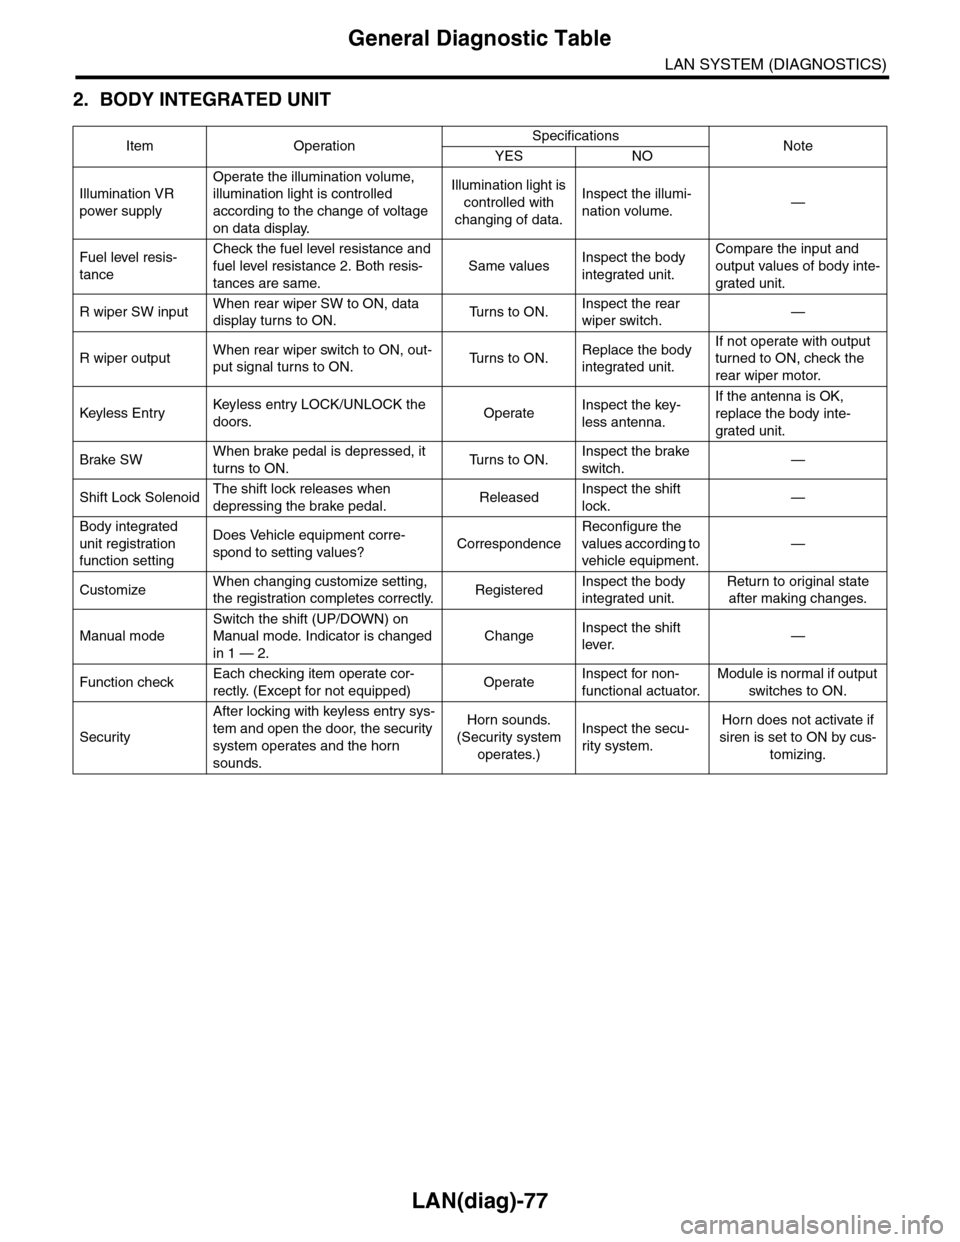
2. BODY INTEGRATED UNIT
Item OperationSpecificationsNoteYES NO
Illumination VR
power supply
Operate the illumination volume,
illumination light is controlled
according to the change of voltage
on data display.
Illumination light is
controlled with
changing of data.
Inspect the illumi-
nation volume.—
Fuel level resis-
tance
Check the fuel level resistance and
fuel level resistance 2. Both resis-
tances are same.
Same valuesInspect the body
integrated unit.
Compare the input and
output values of body inte-
grated unit.
R wiper SW inputWhen rear wiper SW to ON, data
display turns to ON.Tu r n s t o O N .Inspect the rear
wiper switch.—
R wiper outputWhen rear wiper switch to ON, out-
put signal turns to ON.Tu r n s t o O N .Replace the body
integrated unit.
If not operate with output
turned to ON, check the
rear wiper motor.
Keyless Entr yKeyless entr y LOCK/UNLOCK the
doors.OperateInspect the key-
less antenna.
If the antenna is OK,
replace the body inte-
grated unit.
Brake SWWhen brake pedal is depressed, it
turns to ON.Tu r n s t o O N .Inspect the brake
switch.—
Shift Lock SolenoidThe shift lock releases when
depressing the brake pedal.ReleasedInspect the shift
lock.—
Body integrated
unit registration
function setting
Does Vehicle equipment corre-
spond to setting values?Correspondence
Reconfigure the
values according to
vehicle equipment.
—
CustomizeWhen changing customize setting,
the registration completes correctly.RegisteredInspect the body
integrated unit.
Return to original state
after making changes.
Manual mode
Switch the shift (UP/DOWN) on
Manual mode. Indicator is changed
in 1 — 2.
ChangeInspect the shift
lever.—
Function checkEach checking item operate cor-
rectly. (Except for not equipped)OperateInspect for non-
functional actuator.
Module is normal if output
switches to ON.
Security
After locking with keyless entry sys-
tem and open the door, the security
system operates and the horn
sounds.
Horn sounds.
(Security system
operates.)
Inspect the secu-
rity system.
Horn does not activate if
siren is set to ON by cus-
tomizing.
Page 534 of 2453
LAN(diag)-78
General Diagnostic Table
LAN SYSTEM (DIAGNOSTICS)
Page 535 of 2453
LI-2
General Description
LIGHTING SYSTEM
1. General Description
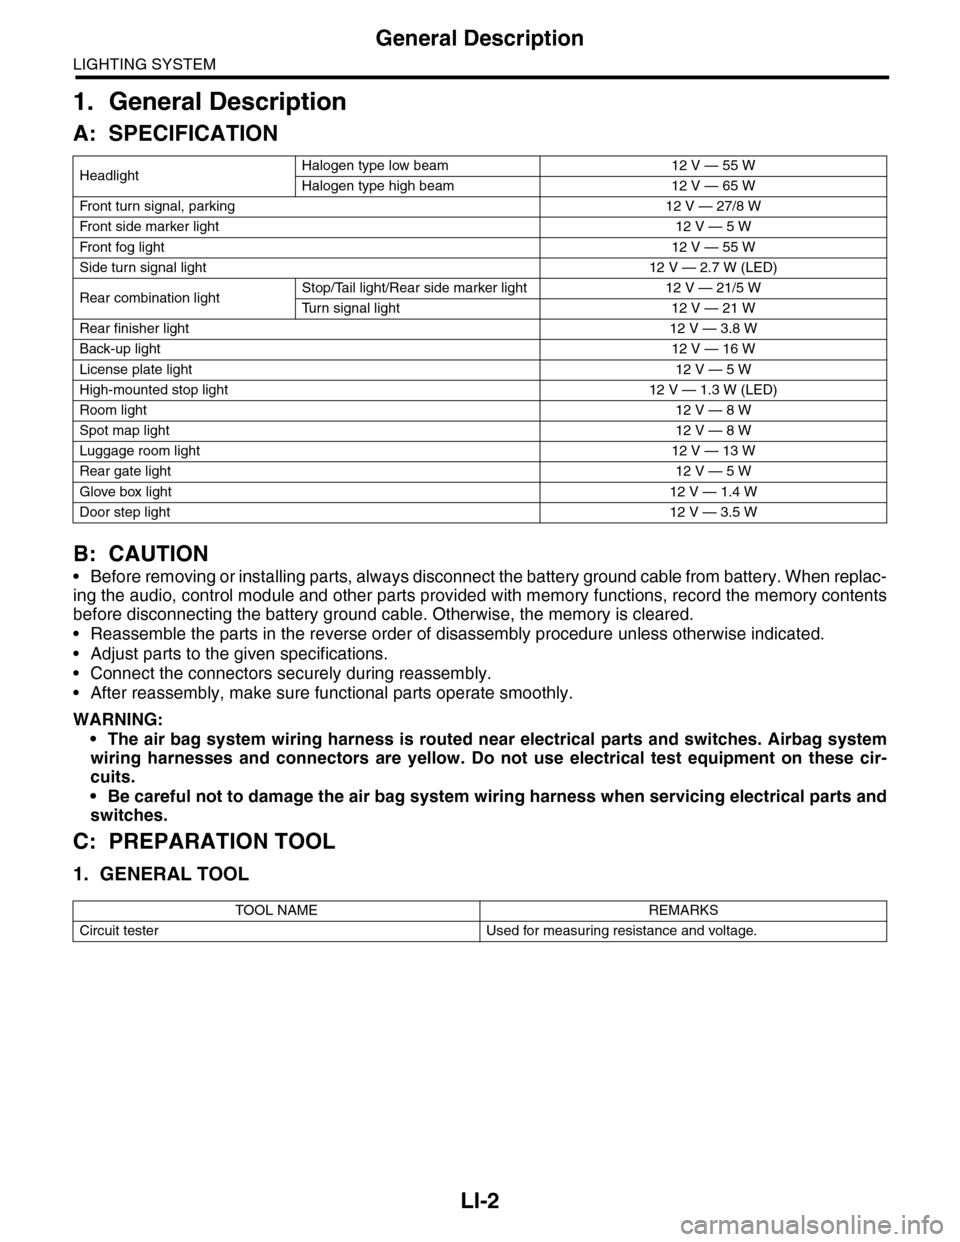
A: SPECIFICATION
B: CAUTION
•Before removing or installing parts, always disconnect the battery ground cable from battery. When replac-
ing the audio, control module and other parts provided with memory functions, record the memory contents
before disconnecting the battery ground cable. Otherwise, the memory is cleared.
•Reassemble the parts in the reverse order of disassembly procedure unless otherwise indicated.
•Adjust parts to the given specifications.
•Connect the connectors securely during reassembly.
•After reassembly, make sure functional parts operate smoothly.
WARNING:
•The air bag system wiring harness is routed near electrical parts and switches. Airbag system
wiring harnesses and connectors are yellow. Do not use electrical test equipment on these cir-
cuits.
•Be careful not to damage the air bag system wiring harness when servicing electrical parts and
switches.
C: PREPARATION TOOL
1. GENERAL TOOL
HeadlightHalogen type low beam 12 V — 55 W
Halogen type high beam 12 V — 65 W
Fr o nt t ur n si gn a l, p ar k in g 1 2 V — 27 / 8 W
Fr o nt si d e m ar ke r li gh t12 V — 5 W
Fr o nt fog li g ht12 V — 55 W
Side turn signal light 12 V — 2.7 W (LED)
Rear combination lightStop/Tail light/Rear side marker light 12 V — 21/5 W
Tu r n s i g n a l l i g h t 1 2 V — 2 1 W
Rear finisher light12 V — 3.8 W
Back-up light12 V — 16 W
License plate light12 V — 5 W
High-mounted stop light 12 V — 1.3 W (LED)
Room light12 V — 8 W
Spot map light12 V — 8 W
Luggage room light12 V — 13 W
Rear gate light12 V — 5 W
Glove box light12 V — 1.4 W
Door step light12 V — 3.5 W
TOOL NAME REMARKS
Circuit tester Used for measuring resistance and voltage.
Page 536 of 2453
LI-3
Headlight and Tail Light System
LIGHTING SYSTEM
2. Headlight and Tail Light Sys-
tem
A: WIRING DIAGRAM
1. HALOGEN TYPE HEADLIGHT
2. CLEARANCE LIGHT AND ILLUMINA-
TION LIGHT
B: INSPECTION
1. HEADLIGHT SWITCH
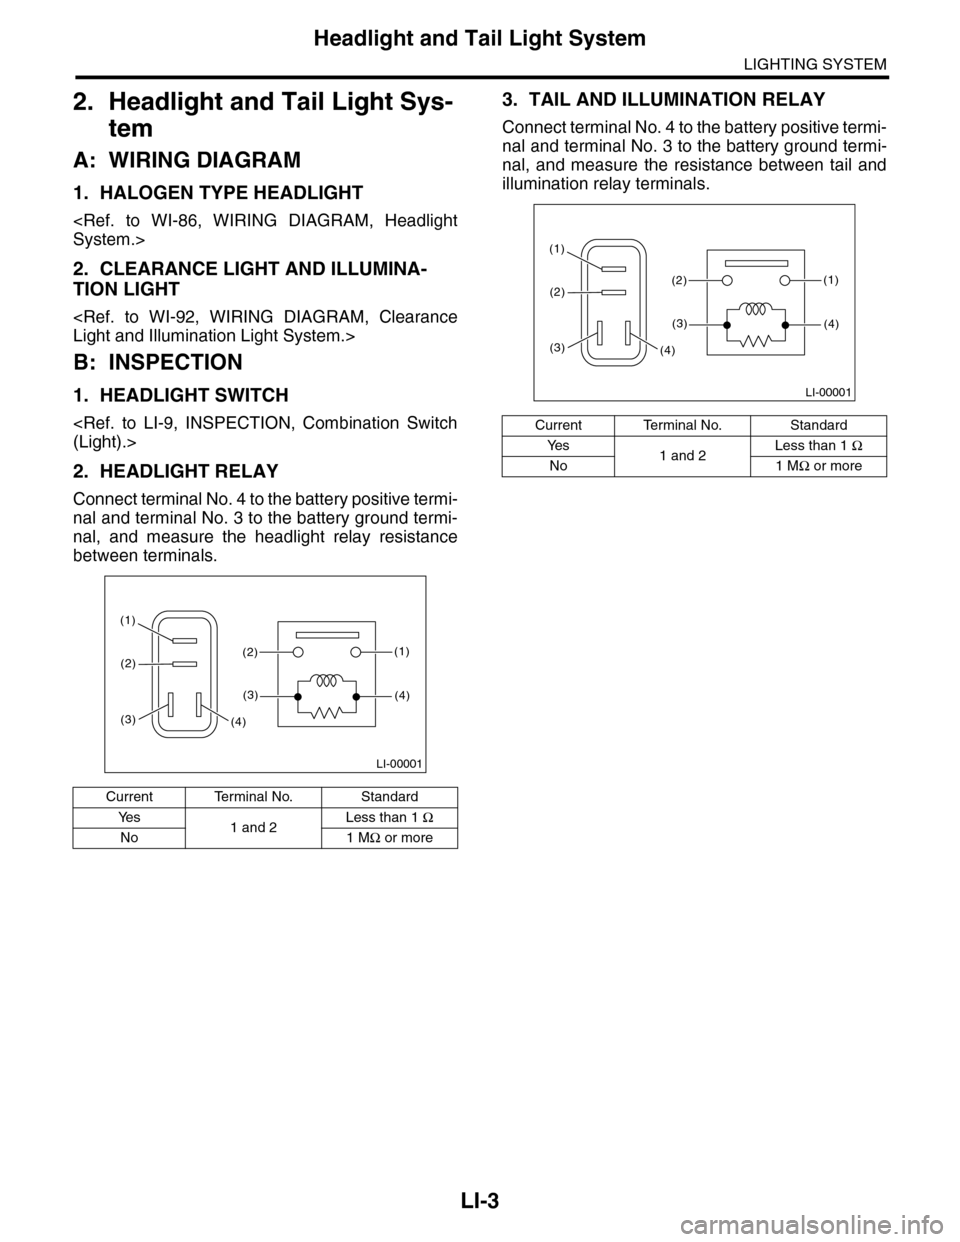
2. HEADLIGHT RELAY
Connect terminal No. 4 to the battery positive termi-
nal and terminal No. 3 to the battery ground termi-
nal, and measure the headlight relay resistance
between terminals.
3. TAIL AND ILLUMINATION RELAY
Connect terminal No. 4 to the battery positive termi-
nal and terminal No. 3 to the battery ground termi-
nal, and measure the resistance between tail and
illumination relay terminals.
Current Terminal No. Standard
Ye s1 and 2Less than 1 Ω
No 1 MΩ or more
LI-00001
(1)(2)
(1)
(4)
(2)
(3)
(3)(4)
Current Terminal No. Standard
Ye s1 and 2Less than 1 Ω
No 1 MΩ or more
LI-00001
(1)(2)
(1)
(4)
(2)
(3)
(3)(4)
Page 537 of 2453
LI-4
Front Fog Light System
LIGHTING SYSTEM
3. Front Fog Light System
A: WIRING DIAGRAM
1. FRONT FOG LIGHT
B: INSPECTION
1. FRONT FOG LIGHT SWITCH
Measure the resistance between front fog light
switch terminals.
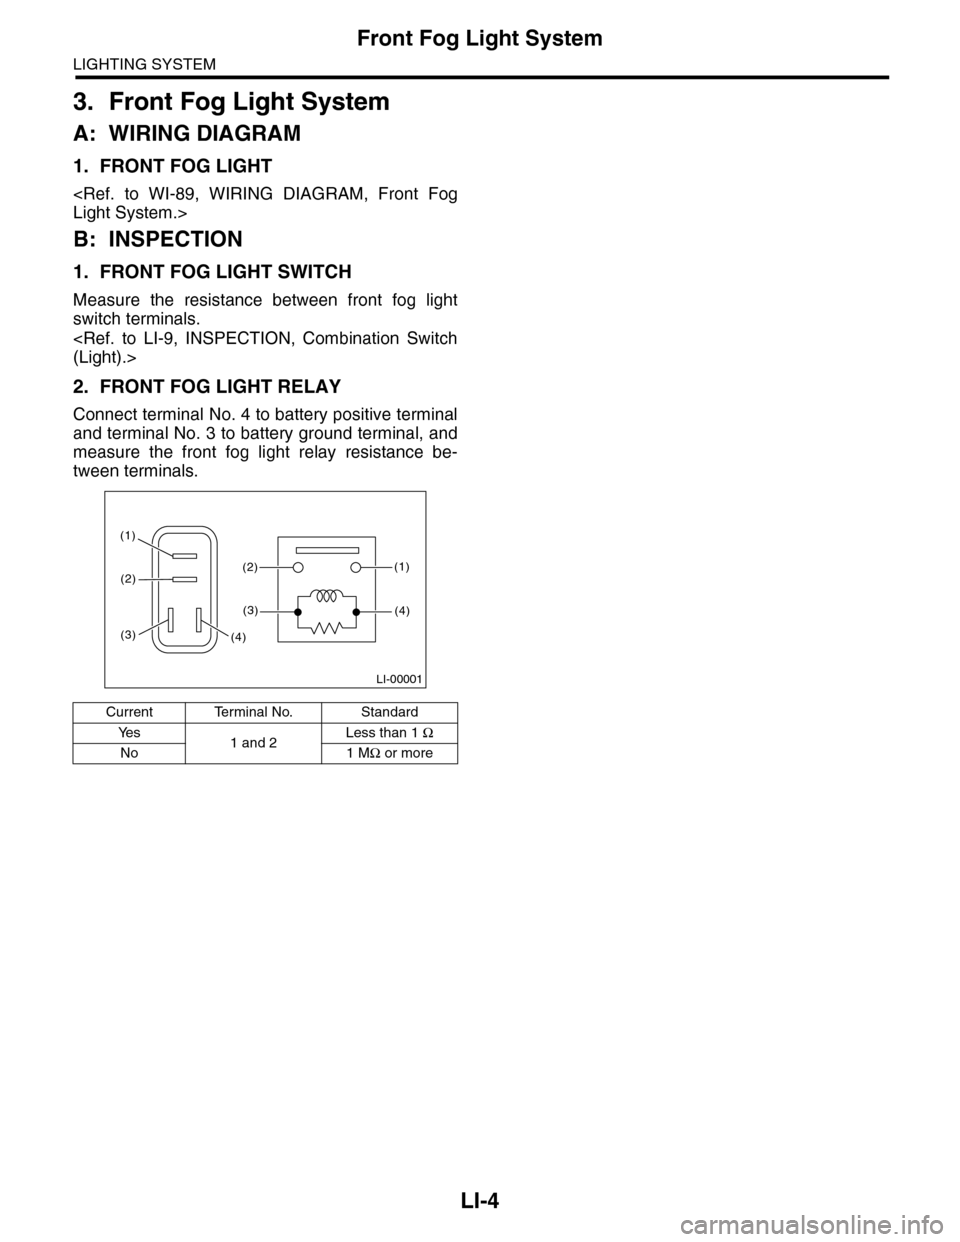
2. FRONT FOG LIGHT RELAY
Connect terminal No. 4 to battery positive terminal
and terminal No. 3 to battery ground terminal, and
measure the front fog light relay resistance be-
tween terminals.
Current Terminal No. Standard
Ye s1 and 2Less than 1 Ω
No 1 MΩ or more
LI-00001
(1)(2)
(1)
(4)
(2)
(3)
(3)(4)
Page 538 of 2453
LI-5
Turn Signal Light and Hazard Light System
LIGHTING SYSTEM
4. Turn Signal Light and Hazard
Light System
A: WIRING DIAGRAM
1. TURN SIGNAL LIGHT AND HAZARD
LIGHT
B: INSPECTION
1. TURN SIGNAL SWITCH
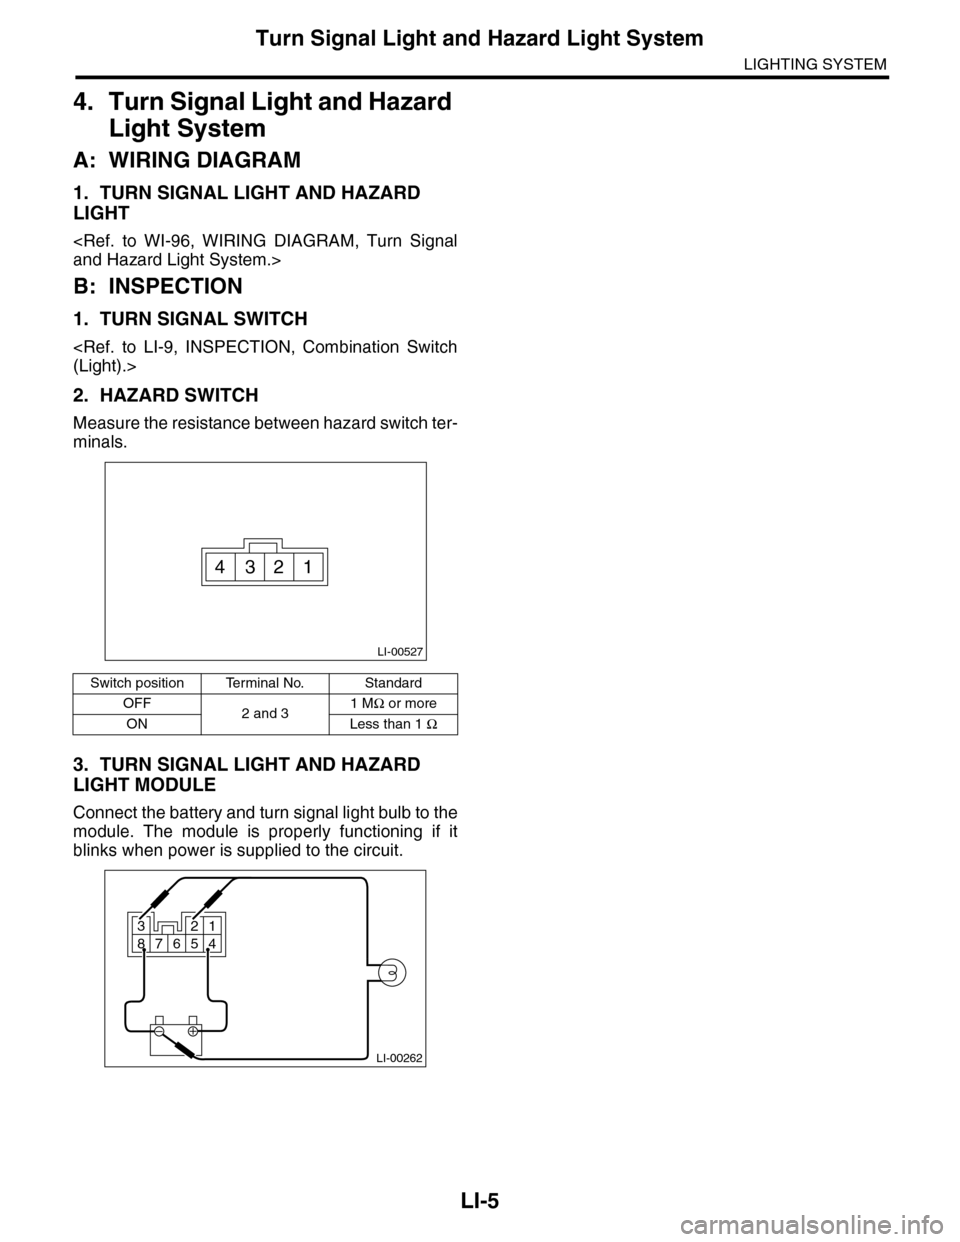
2. HAZARD SWITCH
Measure the resistance between hazard switch ter-
minals.
3. TURN SIGNAL LIGHT AND HAZARD
LIGHT MODULE
Connect the battery and turn signal light bulb to the
module. The module is properly functioning if it
blinks when power is supplied to the circuit.
Switch position Terminal No. Standard
OFF2 and 31 MΩ or more
ON Less than 1 Ω
LI-00527
4321
LI-00262
321
87654
Page 539 of 2453
LI-6
Back-up Light System
LIGHTING SYSTEM
5. Back-up Light System
A: WIRING DIAGRAM
1. BACK-UP LIGHT
B: INSPECTION
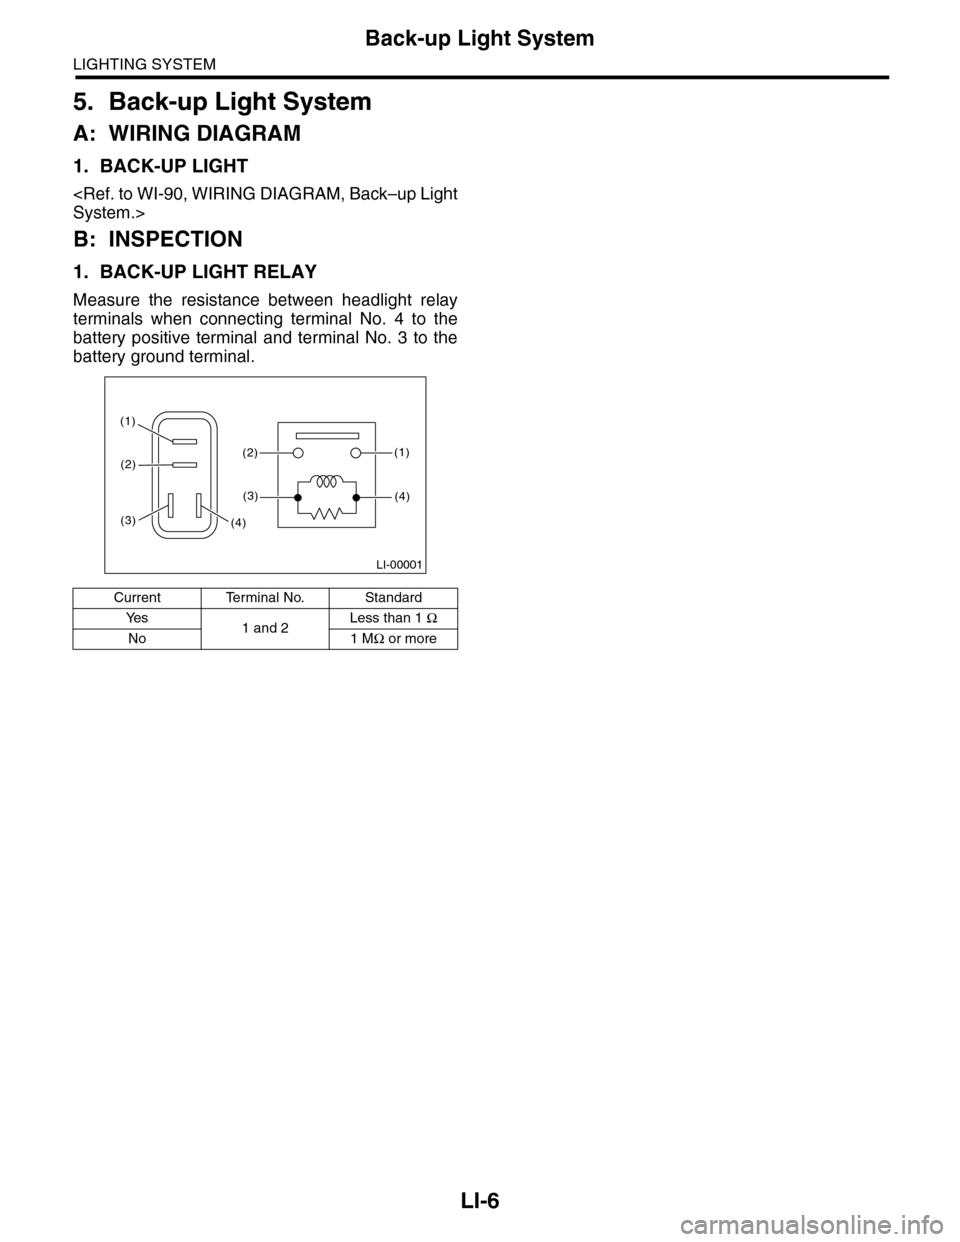
1. BACK-UP LIGHT RELAY
Measure the resistance between headlight relay
terminals when connecting terminal No. 4 to the
battery positive terminal and terminal No. 3 to the
battery ground terminal.
Current Terminal No. Standard
Ye s1 and 2Less than 1 Ω
No 1 MΩ or more
LI-00001
(1)(2)
(1)
(4)
(2)
(3)
(3)(4)
Page 540 of 2453
LI-7
Stop Light System
LIGHTING SYSTEM
6. Stop Light System
A: WIRING DIAGRAM
1. STOP LIGHT
B: INSPECTION
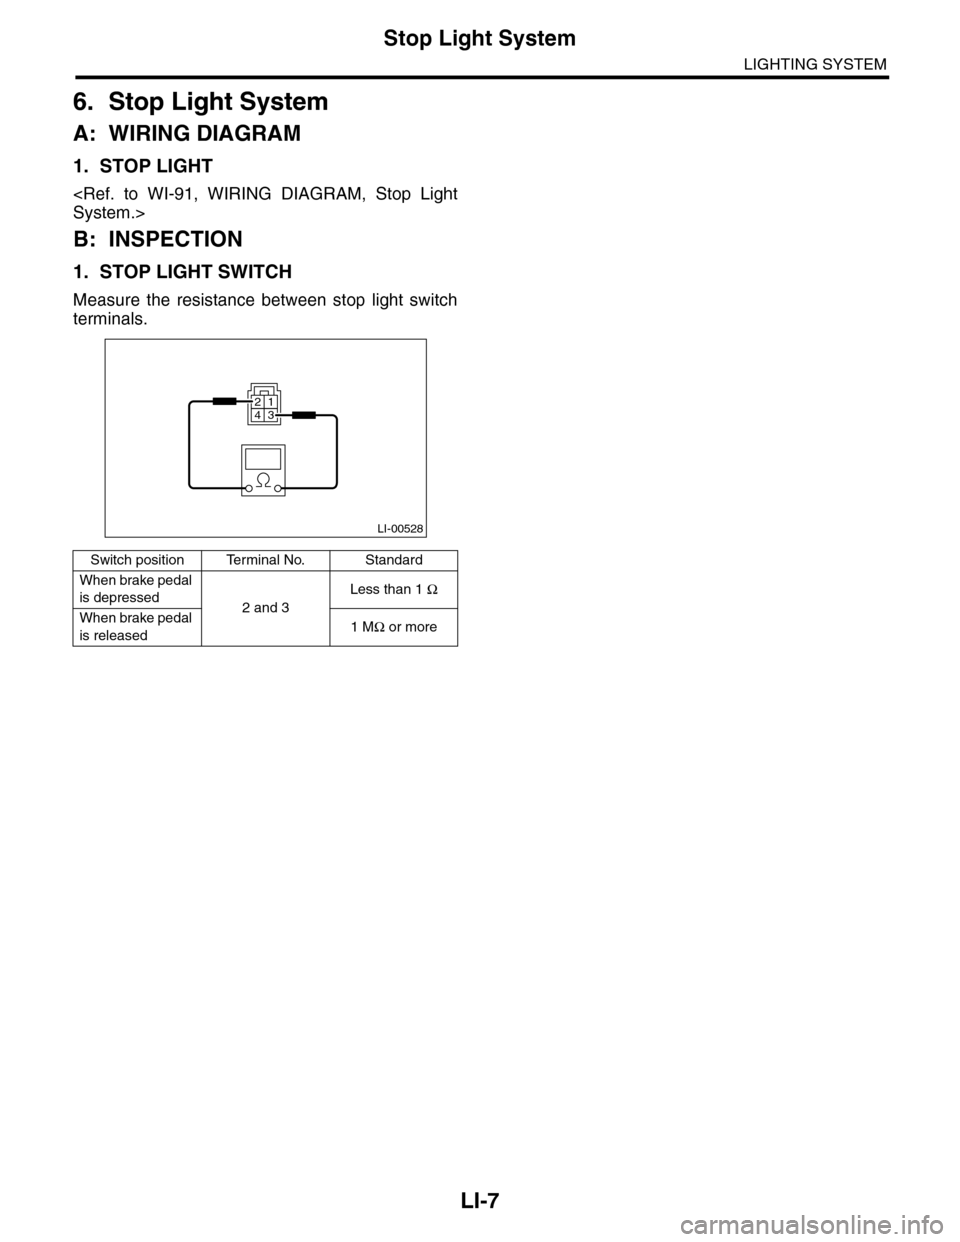
1. STOP LIGHT SWITCH
Measure the resistance between stop light switch
terminals.
Switch position Terminal No. Standard
When brake pedal
is depressed2 and 3
Less than 1 Ω
When brake pedal
is released1 MΩ or more
LI-00528
3412