sensor SUBARU TRIBECA 2009 1.G Service Repair Manual
[x] Cancel search | Manufacturer: SUBARU, Model Year: 2009, Model line: TRIBECA, Model: SUBARU TRIBECA 2009 1.GPages: 2453, PDF Size: 46.32 MB
Page 157 of 2453
AB(diag)-133
Diagnostic Chart with Trouble Code
AIRBAG SYSTEM (DIAGNOSTICS)
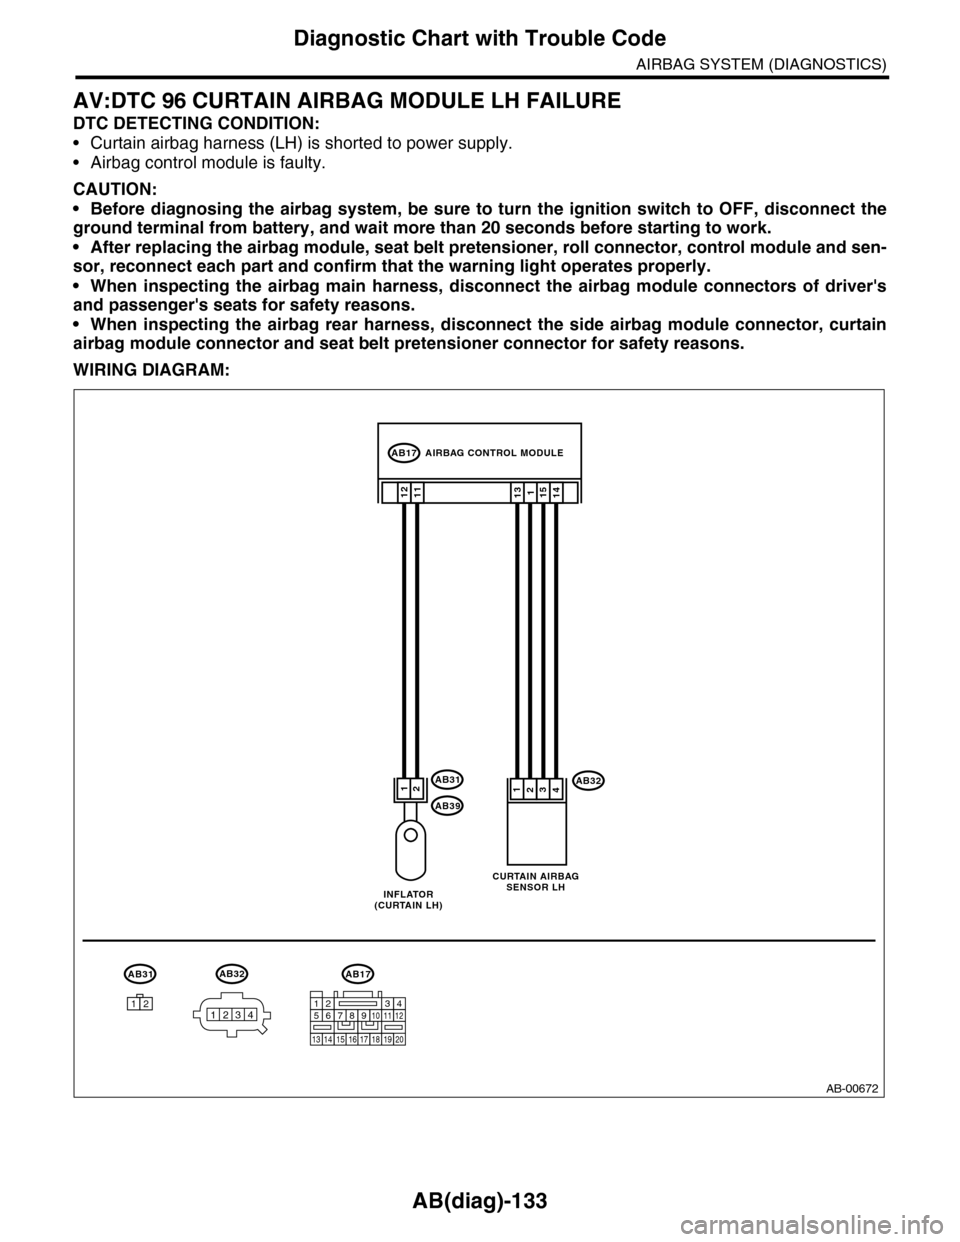
AV:DTC 96 CURTAIN AIRBAG MODULE LH FAILURE
DTC DETECTING CONDITION:
•Curtain airbag harness (LH) is shorted to power supply.
•Airbag control module is faulty.
CAUTION:
•Before diagnosing the airbag system, be sure to turn the ignition switch to OFF, disconnect the
ground terminal from battery, and wait more than 20 seconds before starting to work.
•After replacing the airbag module, seat belt pretensioner, roll connector, control module and sen-
sor, reconnect each part and confirm that the warning light operates properly.
•When inspecting the airbag main harness, disconnect the airbag module connectors of driver's
and passenger's seats for safety reasons.
•When inspecting the airbag rear harness, disconnect the side airbag module connector, curtain
airbag module connector and seat belt pretensioner connector for safety reasons.
WIRING DIAGRAM:
AB-00672
AB3212
1112
AB31
AB39
1511413
3412
AB31
12
AB17
AB17
789101112
13141516171819
56
20
1234
AIRBAG CONTROL MODULE
INFLATOR(CURTAIN LH)
CURTAIN AIRBAGSENSOR LH
AB32
1234
Page 158 of 2453
AB(diag)-134
Diagnostic Chart with Trouble Code
AIRBAG SYSTEM (DIAGNOSTICS)
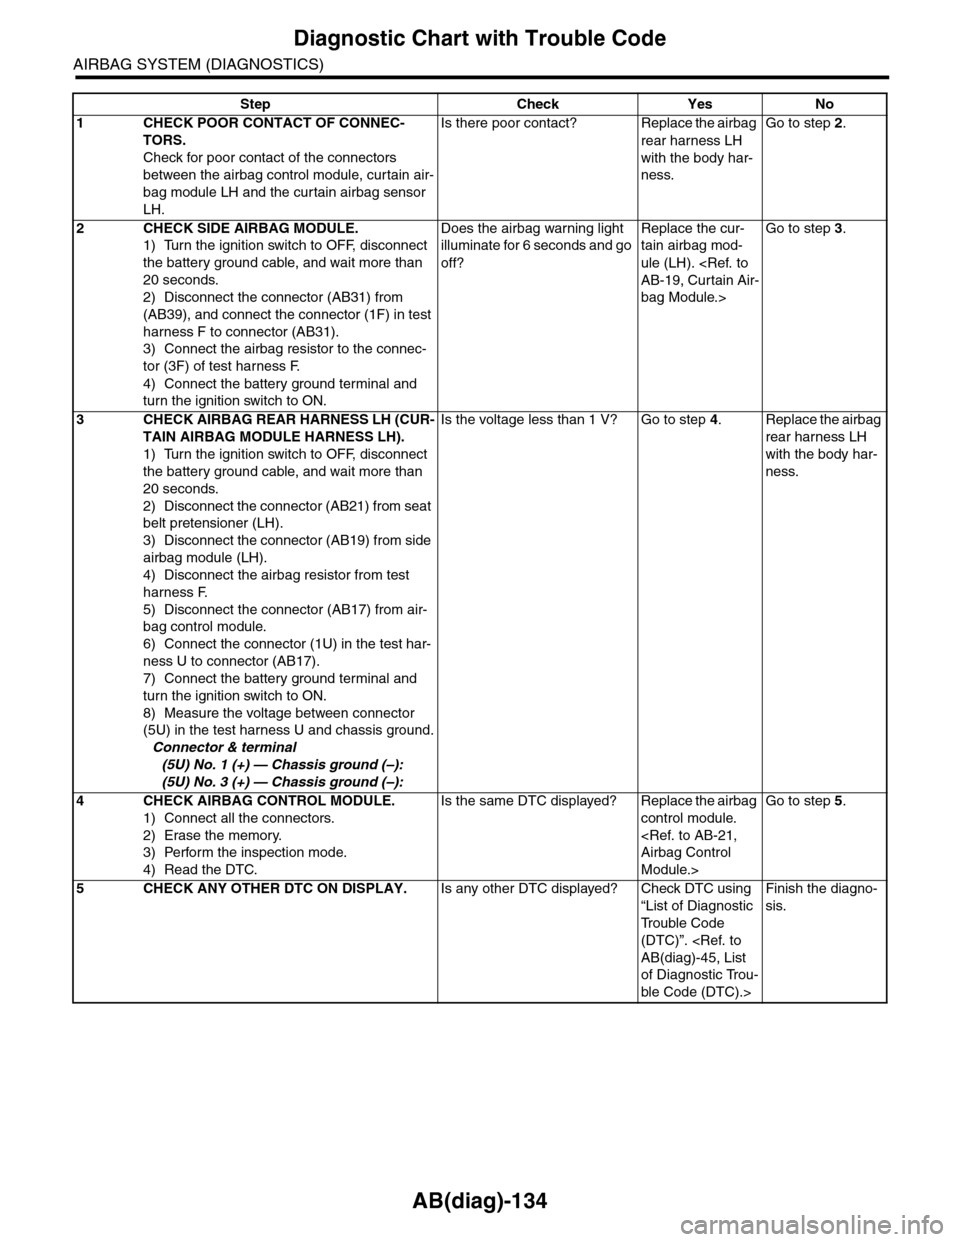
Step Check Yes No
1CHECK POOR CONTACT OF CONNEC-
TORS.
Check for poor contact of the connectors
between the airbag control module, curtain air-
bag module LH and the curtain airbag sensor
LH.
Is there poor contact? Replace the airbag
rear harness LH
with the body har-
ness.
Go to step 2.
2CHECK SIDE AIRBAG MODULE.
1) Turn the ignition switch to OFF, disconnect
the battery ground cable, and wait more than
20 seconds.
2) Disconnect the connector (AB31) from
(AB39), and connect the connector (1F) in test
harness F to connector (AB31).
3) Connect the airbag resistor to the connec-
tor (3F) of test harness F.
4) Connect the battery ground terminal and
turn the ignition switch to ON.
Does the airbag warning light
illuminate for 6 seconds and go
off?
Replace the cur-
tain airbag mod-
ule (LH).
bag Module.>
Go to step 3.
3CHECK AIRBAG REAR HARNESS LH (CUR-
TAIN AIRBAG MODULE HARNESS LH).
1) Turn the ignition switch to OFF, disconnect
the battery ground cable, and wait more than
20 seconds.
2) Disconnect the connector (AB21) from seat
belt pretensioner (LH).
3) Disconnect the connector (AB19) from side
airbag module (LH).
4) Disconnect the airbag resistor from test
harness F.
5) Disconnect the connector (AB17) from air-
bag control module.
6) Connect the connector (1U) in the test har-
ness U to connector (AB17).
7) Connect the battery ground terminal and
turn the ignition switch to ON.
8) Measure the voltage between connector
(5U) in the test harness U and chassis ground.
Connector & terminal
(5U) No. 1 (+) — Chassis ground (–):
(5U) No. 3 (+) — Chassis ground (–):
Is the voltage less than 1 V? Go to step 4.Replace the airbag
rear harness LH
with the body har-
ness.
4CHECK AIRBAG CONTROL MODULE.
1) Connect all the connectors.
2) Erase the memory.
3) Perform the inspection mode.
4) Read the DTC.
Is the same DTC displayed? Replace the airbag
control module.
Module.>
Go to step 5.
5CHECK ANY OTHER DTC ON DISPLAY.Is any other DTC displayed? Check DTC using
“List of Diagnostic
Tr o u b l e C o d e
(DTC)”.
of Diagnostic Trou-
ble Code (DTC).>
Finish the diagno-
sis.
Page 174 of 2453
CC(ETC)(diag)-7
Subaru Select Monitor
CRUISE CONTROL SYSTEM (DIAGNOSTICS)
5. Subaru Select Monitor
A: OPERATION
1. GENERAL DESCRIPTION
The on-board diagnosis function of the cruise con-
trol system uses Subaru Select Monitor.
The on-board diagnosis function operates in two
categories, which are used depending on the type
of problems;
1) Cruise Control Cancel Conditions Diagnosis:
(1) This category of diagnosis requires actual
vehicle driving in order to determine the cause,
as when cruise speed is cancelled during driv-
ing although cruise cancel condition is not en-
tered.
(2) Cruise control memory in ECM stores the
cancel condition (Code No.) which occurred
during driving. When there are multiple cancel
conditions (Code No.), they are shown on the
Subaru Select Monitor.
CAUTION:
•The cruise control memory stores not only
the cruise “cancel” which occurred (although
“cancel” operation is not entered by the driver),
but also the “cancel” condition input by the
driver.
•The content of memory is cleared when igni-
tion switch or cruise control main switch is
turned OFF.
2) Real-time Diagnosis:
Real-time diagnosis function is used to determine
whether or not the input signal system is in good or-
der, according to signal emitted from switches, sen-
sors, etc.
(1) Vehicle cannot be driven at cruise speed
when the problem occurs in the cruise control
system or relevant circuits.
(2) Monitor the signal conditions from switches
and sensors.
2. CRUISE CONTROL CANCEL CONDI-
TIONS DIAGNOSIS
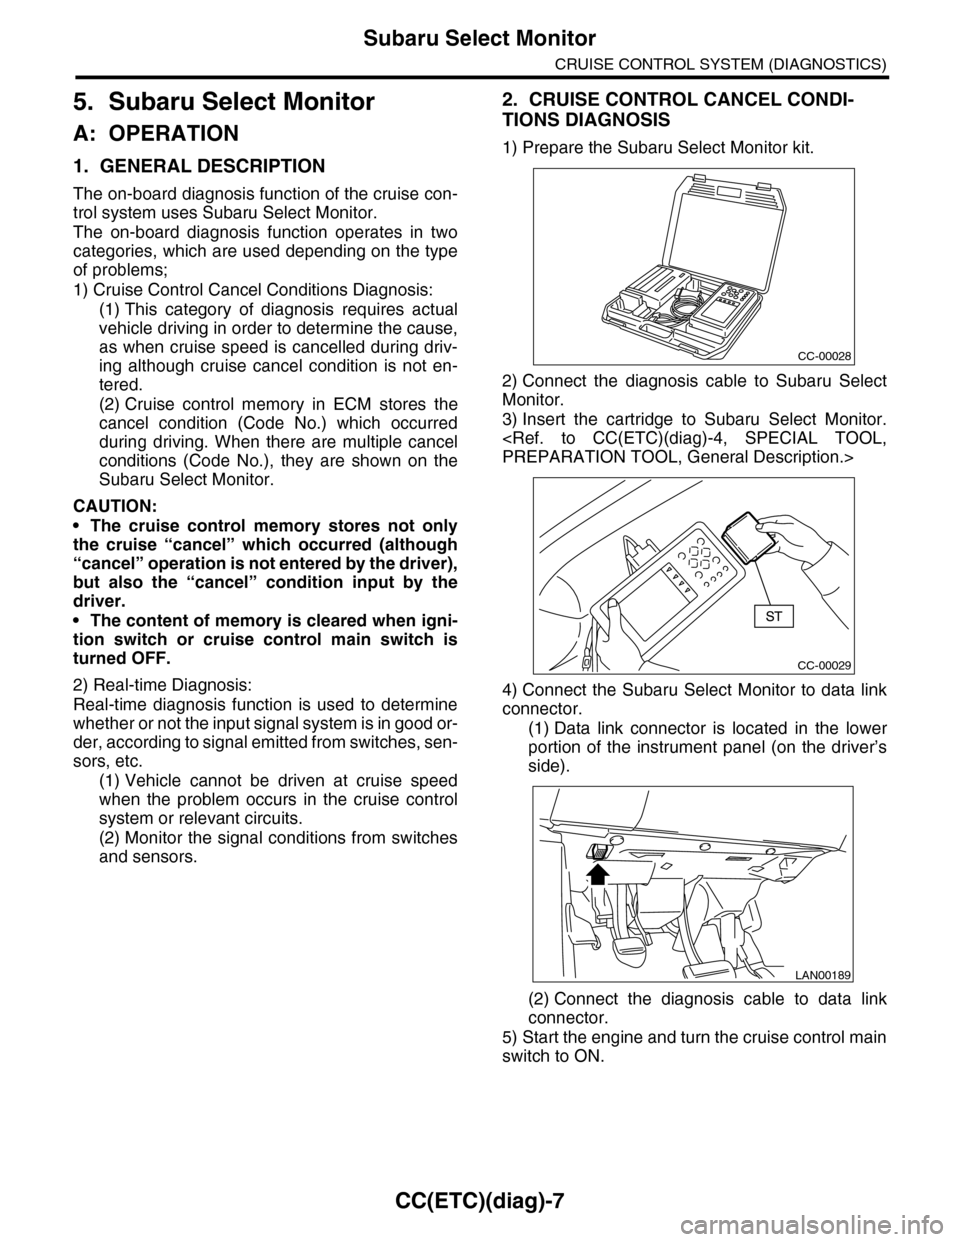
1) Prepare the Subaru Select Monitor kit.
2) Connect the diagnosis cable to Subaru Select
Monitor.
3) Insert the cartridge to Subaru Select Monitor.
4) Connect the Subaru Select Monitor to data link
connector.
(1) Data link connector is located in the lower
portion of the instrument panel (on the driver’s
side).
(2) Connect the diagnosis cable to data link
connector.
5) Start the engine and turn the cruise control main
switch to ON.
CC-00028
CC-00029
LAN00189
Page 176 of 2453
CC(ETC)(diag)-9
Diagnostics with Phenomenon
CRUISE CONTROL SYSTEM (DIAGNOSTICS)
6. Diagnostics with Phenomenon
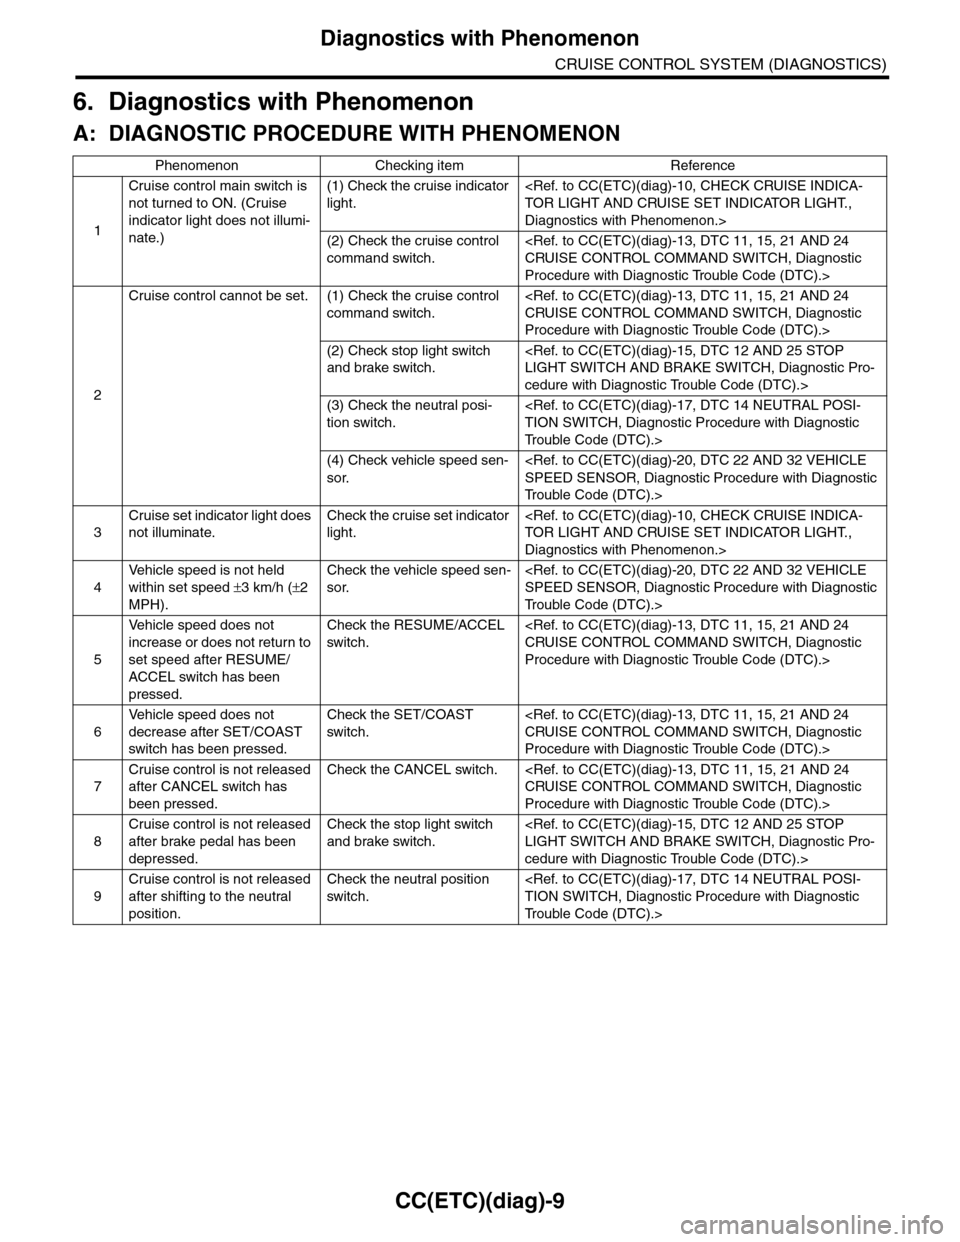
A: DIAGNOSTIC PROCEDURE WITH PHENOMENON
Phenomenon Checking item Reference
1
Cruise control main switch is
not turned to ON. (Cruise
indicator light does not illumi-
nate.)
(1) Check the cruise indicator
light.
Diagnostics with Phenomenon.>
(2) Check the cruise control
command switch.
Procedure with Diagnostic Trouble Code (DTC).>
2
Cruise control cannot be set. (1) Check the cruise control
command switch.
Procedure with Diagnostic Trouble Code (DTC).>
(2) Check stop light switch
and brake switch.
cedure with Diagnostic Trouble Code (DTC).>
(3) Check the neutral posi-
tion switch.
Tr o u b l e C o d e ( D T C ) . >
(4) Check vehicle speed sen-
sor.
Tr o u b l e C o d e ( D T C ) . >
3
Cruise set indicator light does
not illuminate.
Check the cruise set indicator
light.
Diagnostics with Phenomenon.>
4
Ve h i c l e s p e e d i s n o t h e l d
within set speed ±3 km/h (±2
MPH).
Check the vehicle speed sen-
sor.
Tr o u b l e C o d e ( D T C ) . >
5
Ve h i c l e s p e e d d o e s n o t
increase or does not return to
set speed after RESUME/
ACCEL switch has been
pressed.
Check the RESUME/ACCEL
switch.
Procedure with Diagnostic Trouble Code (DTC).>
6
Ve h i c l e s p e e d d o e s n o t
decrease after SET/COAST
switch has been pressed.
Check the SET/COAST
switch.
Procedure with Diagnostic Trouble Code (DTC).>
7
Cruise control is not released
after CANCEL switch has
been pressed.
Check the CANCEL switch.
Procedure with Diagnostic Trouble Code (DTC).>
8
Cruise control is not released
after brake pedal has been
depressed.
Check the stop light switch
and brake switch.
cedure with Diagnostic Trouble Code (DTC).>
9
Cruise control is not released
after shifting to the neutral
position.
Check the neutral position
switch.
Tr o u b l e C o d e ( D T C ) . >
Page 178 of 2453
CC(ETC)(diag)-11
List of Diagnostic Trouble Code (DTC)
CRUISE CONTROL SYSTEM (DIAGNOSTICS)
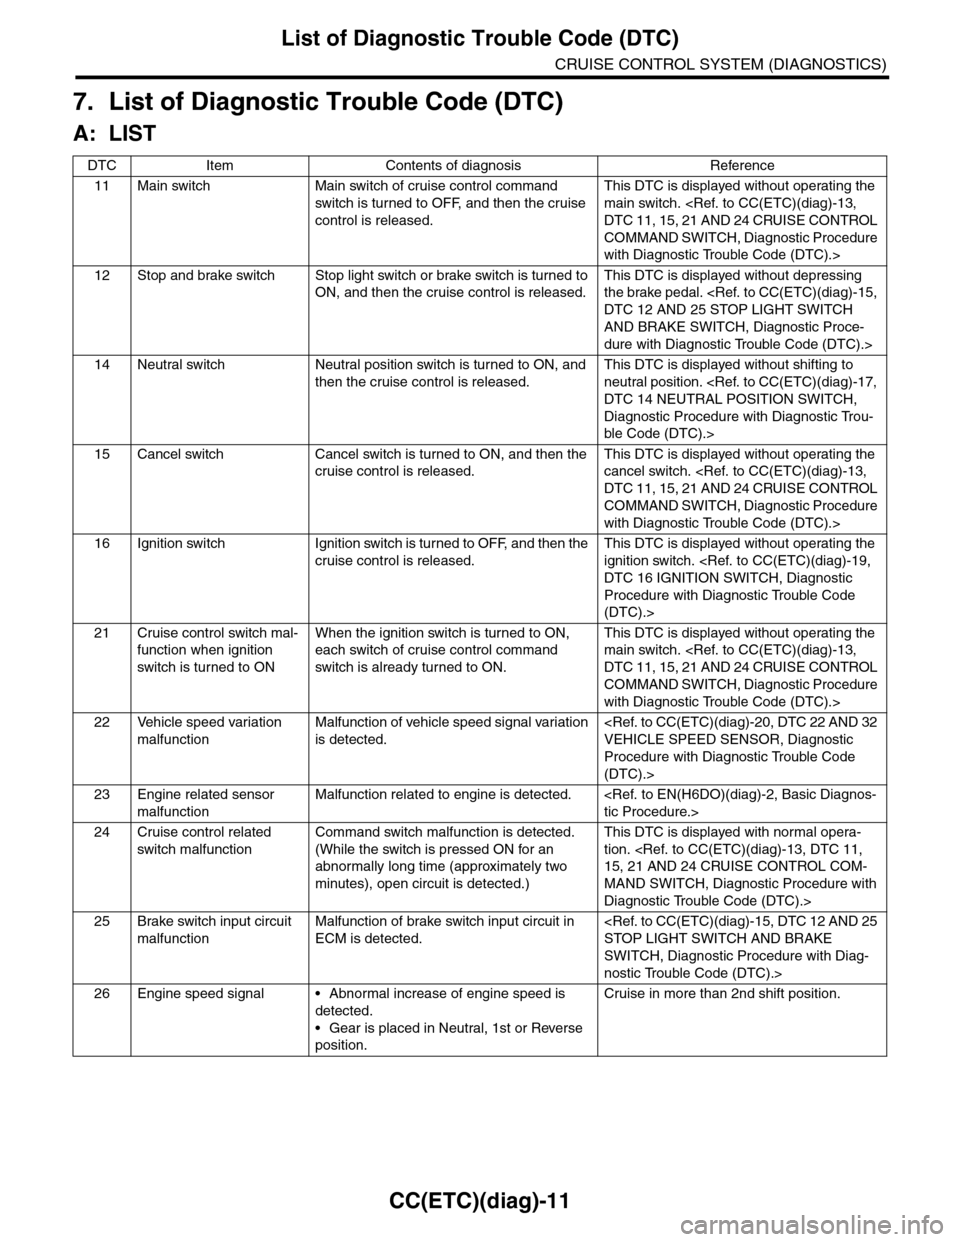
7. List of Diagnostic Trouble Code (DTC)
A: LIST
DTC Item Contents of diagnosis Reference
11 Main switch Main switch of cruise control command
switch is tur ned to OFF, and then the cr uise
control is released.
This DTC is displayed without operating the
main switch.
COMMAND SWITCH, Diagnostic Procedure
with Diagnostic Trouble Code (DTC).>
12 Stop and brake switch Stop light switch or brake switch is turned to
ON, and then the cruise control is released.
This DTC is displayed without depressing
the brake pedal.
AND BRAKE SWITCH, Diagnostic Proce-
dure with Diagnostic Trouble Code (DTC).>
14 Neutral switch Neutral position switch is turned to ON, and
then the cruise control is released.
This DTC is displayed without shifting to
neutral position.
Diagnostic Procedure with Diagnostic Trou-
ble Code (DTC).>
15 Cancel switch Cancel switch is turned to ON, and then the
cruise control is released.
This DTC is displayed without operating the
cancel switch.
COMMAND SWITCH, Diagnostic Procedure
with Diagnostic Trouble Code (DTC).>
16 Ignition switch Ignition switch is turned to OFF, and then the
cruise control is released.
This DTC is displayed without operating the
ignition switch.
Procedure with Diagnostic Trouble Code
(DTC).>
21 Cruise control switch mal-
function when ignition
switch is tur ned to ON
When the ignition switch is turned to ON,
each switch of cruise control command
switch is already tur ned to ON.
This DTC is displayed without operating the
main switch.
COMMAND SWITCH, Diagnostic Procedure
with Diagnostic Trouble Code (DTC).>
22 Vehicle speed variation
malfunction
Malfunction of vehicle speed signal variation
is detected.
Procedure with Diagnostic Trouble Code
(DTC).>
23 Engine related sensor
malfunction
Malfunction related to engine is detected.
24 Cruise control related
switch malfunction
Command switch malfunction is detected.
(While the switch is pressed ON for an
abnormally long time (approximately two
minutes), open circuit is detected.)
This DTC is displayed with normal opera-
tion.
MAND SWITCH, Diagnostic Procedure with
Diagnostic Trouble Code (DTC).>
25 Brake switch input circuit
malfunction
Malfunction of brake switch input circuit in
ECM is detected.
SWITCH, Diagnostic Procedure with Diag-
nostic Trouble Code (DTC).>
26 Engine speed signal • Abnormal increase of engine speed is
detected.
•Gear is placed in Neutral, 1st or Reverse
position.
Cruise in more than 2nd shift position.
Page 179 of 2453
CC(ETC)(diag)-12
List of Diagnostic Trouble Code (DTC)
CRUISE CONTROL SYSTEM (DIAGNOSTICS)
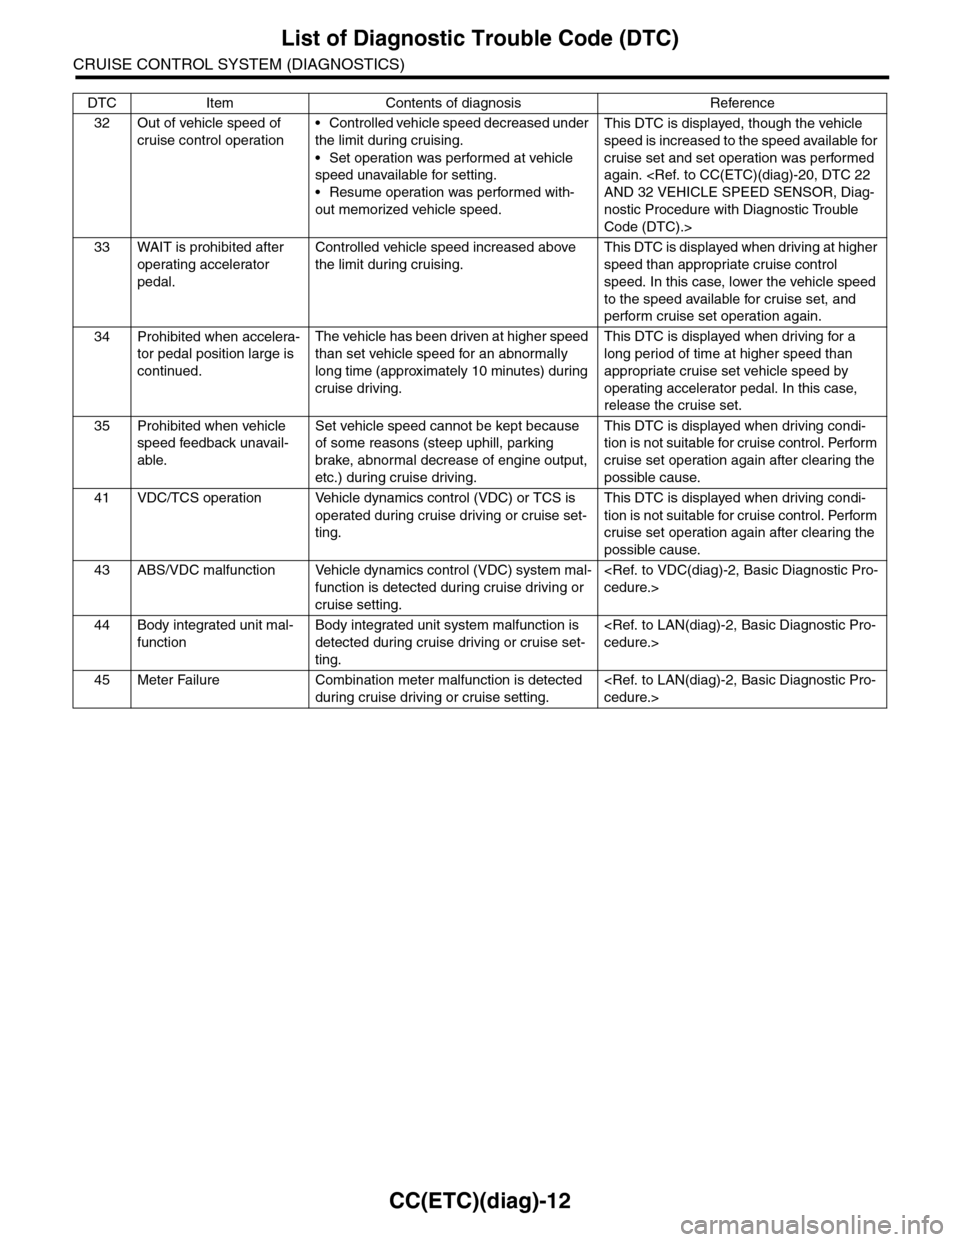
32 Out of vehicle speed of
cruise control operation
•Controlled vehicle speed decreased under
the limit during cruising.
•Set operation was performed at vehicle
speed unavailable for setting.
•Resume operation was performed with-
out memorized vehicle speed.
This DTC is displayed, though the vehicle
speed is increased to the speed available for
cruise set and set operation was performed
again.
nostic Procedure with Diagnostic Trouble
Code (DTC).>
33 WAIT is prohibited after
operating accelerator
pedal.
Controlled vehicle speed increased above
the limit during cruising.
This DTC is displayed when driving at higher
speed than appropriate cruise control
speed. In this case, lower the vehicle speed
to the speed available for cruise set, and
perform cruise set operation again.
34 Prohibited when accelera-
tor pedal position large is
continued.
The vehicle has been driven at higher speed
than set vehicle speed for an abnormally
long time (approximately 10 minutes) during
cruise driving.
This DTC is displayed when driving for a
long period of time at higher speed than
appropriate cruise set vehicle speed by
operating accelerator pedal. In this case,
release the cruise set.
35 Prohibited when vehicle
speed feedback unavail-
able.
Set vehicle speed cannot be kept because
of some reasons (steep uphill, parking
brake, abnormal decrease of engine output,
etc.) during cruise driving.
This DTC is displayed when driving condi-
tion is not suitable for cruise control. Perform
cruise set operation again after clearing the
possible cause.
41 VDC/TCS operation Vehicle dynamics control (VDC) or TCS is
operated during cruise driving or cruise set-
ting.
This DTC is displayed when driving condi-
tion is not suitable for cruise control. Perform
cruise set operation again after clearing the
possible cause.
43 ABS/VDC malfunction Vehicle dynamics control (VDC) system mal-
function is detected during cruise driving or
cruise setting.
44 Body integrated unit mal-
function
Body integrated unit system malfunction is
detected during cruise driving or cruise set-
ting.
45 Meter Failure Combination meter malfunction is detected
during cruise driving or cruise setting.
DTC Item Contents of diagnosis Reference
Page 187 of 2453
CC(ETC)(diag)-20
Diagnostic Procedure with Diagnostic Trouble Code (DTC)
CRUISE CONTROL SYSTEM (DIAGNOSTICS)
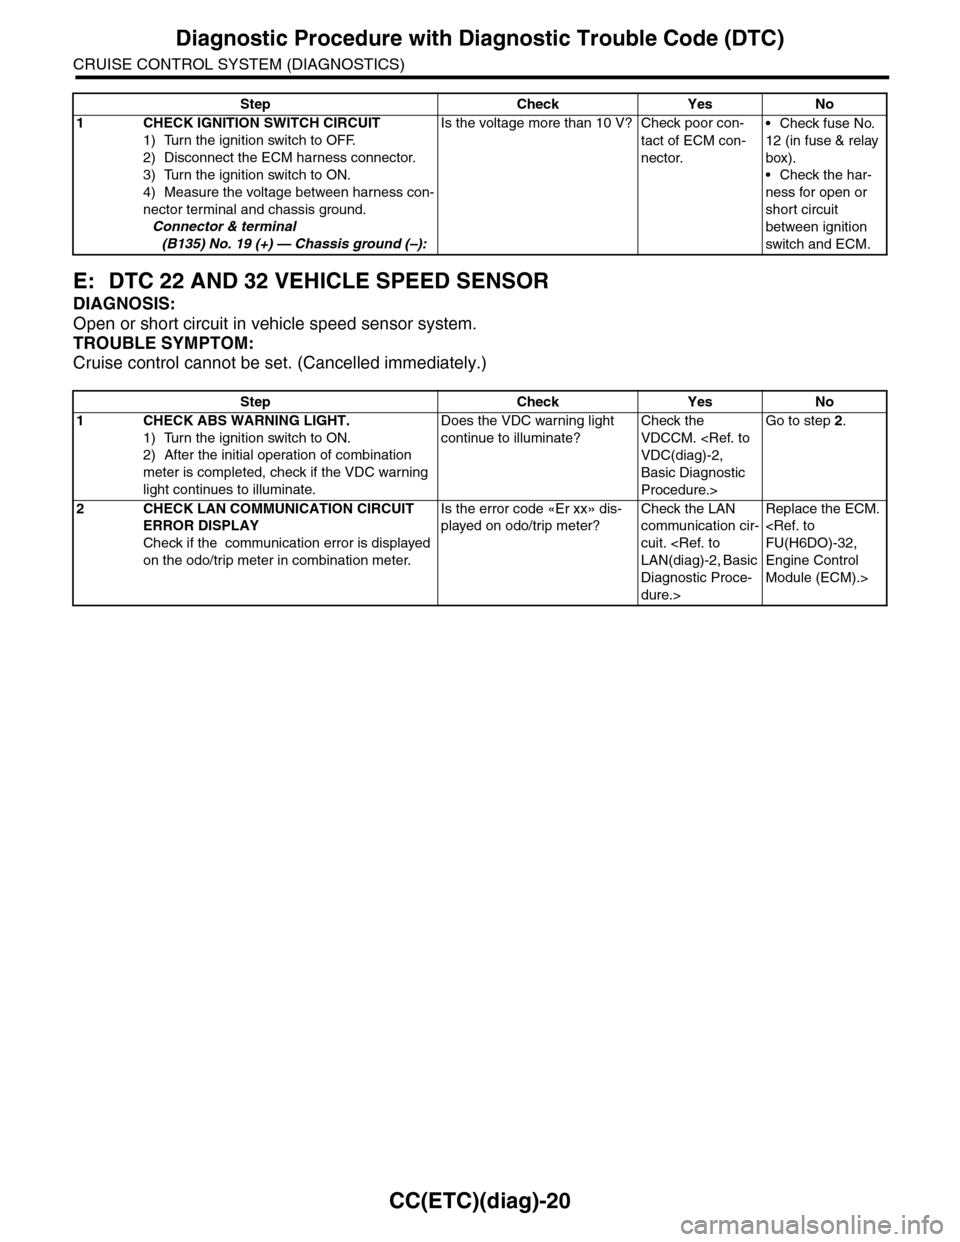
E: DTC 22 AND 32 VEHICLE SPEED SENSOR
DIAGNOSIS:
Open or short circuit in vehicle speed sensor system.
TROUBLE SYMPTOM:
Cruise control cannot be set. (Cancelled immediately.)
Step Check Yes No
1 CHECK IGNITION SWITCH CIRCUIT
1) Turn the ignition switch to OFF.
2) Disconnect the ECM harness connector.
3) Turn the ignition switch to ON.
4) Measure the voltage between harness con-
nector terminal and chassis ground.
Connector & terminal
(B135) No. 19 (+) — Chassis ground (–):
Is the voltage more than 10 V? Check poor con-
tact of ECM con-
nector.
•Check fuse No.
12 (in fuse & relay
box).
•Check the har-
ness for open or
short circuit
between ignition
switch and ECM.
Step Check Yes No
1CHECK ABS WARNING LIGHT.
1) Turn the ignition switch to ON.
2) After the initial operation of combination
meter is completed, check if the VDC warning
light continues to illuminate.
Does the VDC warning light
continue to illuminate?
Check the
VDCCM.
Basic Diagnostic
Procedure.>
Go to step 2.
2CHECK LAN COMMUNICATION CIRCUIT
ERROR DISPLAY
Check if the communication error is displayed
on the odo/trip meter in combination meter.
Is the error code «Er xx» dis-
played on odo/trip meter?
Check the LAN
communication cir-
cuit.
Diagnostic Proce-
dure.>
Replace the ECM.
Engine Control
Module (ECM).>
Page 192 of 2453
ET-6
Navigation System
ENTERTAINMENT
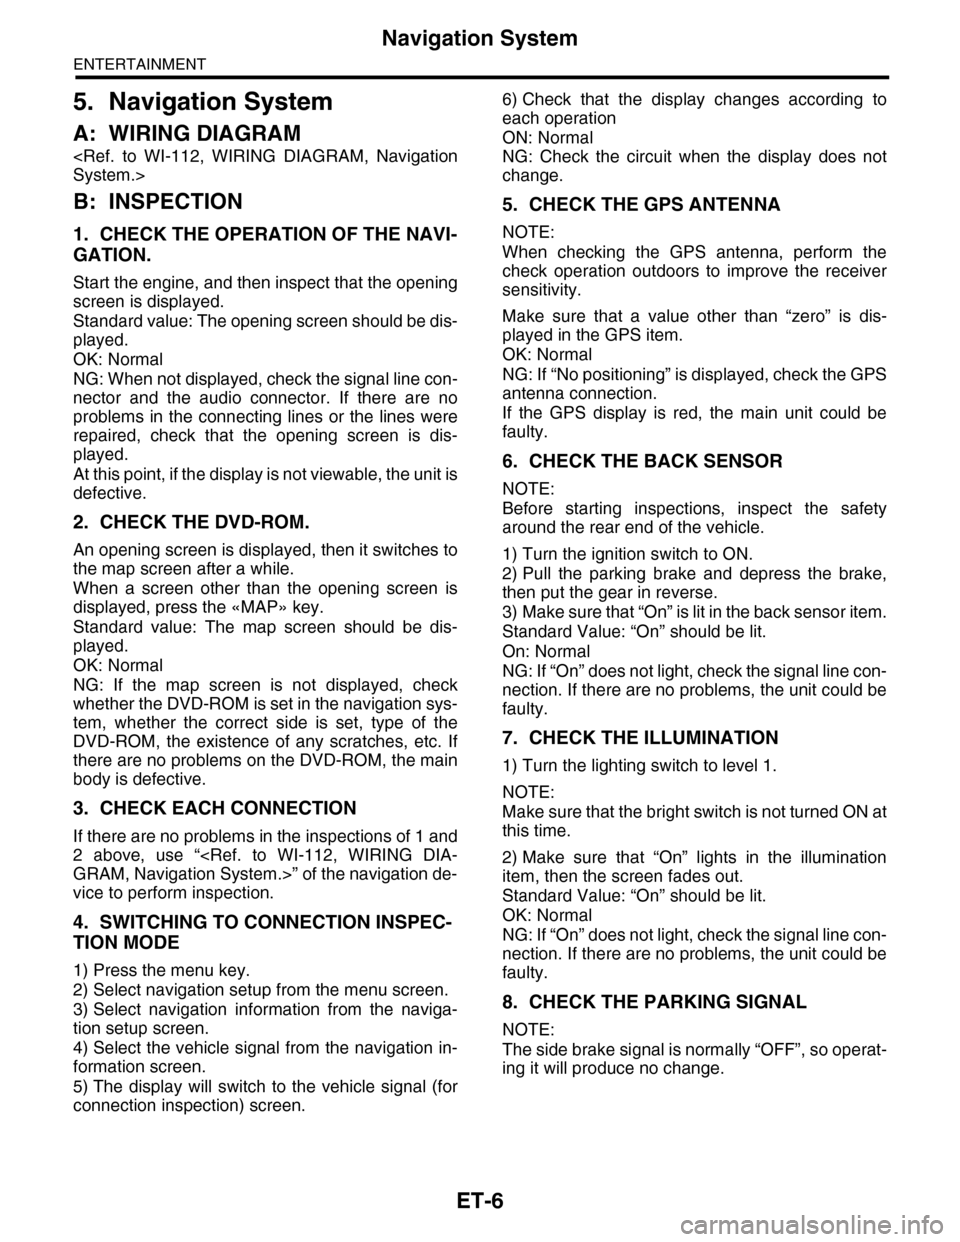
5. Navigation System
A: WIRING DIAGRAM
B: INSPECTION
1. CHECK THE OPERATION OF THE NAVI-
GATION.
Start the engine, and then inspect that the opening
screen is displayed.
Standard value: The opening screen should be dis-
played.
OK: Normal
NG: When not displayed, check the signal line con-
nector and the audio connector. If there are no
problems in the connecting lines or the lines were
repaired, check that the opening screen is dis-
played.
At this point, if the display is not viewable, the unit is
defective.
2. CHECK THE DVD-ROM.
An opening screen is displayed, then it switches to
the map screen after a while.
When a screen other than the opening screen is
displayed, press the «MAP» key.
Standard value: The map screen should be dis-
played.
OK: Normal
NG: If the map screen is not displayed, check
whether the DVD-ROM is set in the navigation sys-
tem, whether the correct side is set, type of the
DVD-ROM, the existence of any scratches, etc. If
there are no problems on the DVD-ROM, the main
body is defective.
3. CHECK EACH CONNECTION
If there are no problems in the inspections of 1 and
2 above, use “
vice to perform inspection.
4. SWITCHING TO CONNECTION INSPEC-
TION MODE
1) Press the menu key.
2) Select navigation setup from the menu screen.
3) Select navigation information from the naviga-
tion setup screen.
4) Select the vehicle signal from the navigation in-
formation screen.
5) The display will switch to the vehicle signal (for
connection inspection) screen.
6) Check that the display changes according to
each operation
ON: Normal
NG: Check the circuit when the display does not
change.
5. CHECK THE GPS ANTENNA
NOTE:
When checking the GPS antenna, perform the
check operation outdoors to improve the receiver
sensitivity.
Make sure that a value other than “zero” is dis-
played in the GPS item.
OK: Normal
NG: If “No positioning” is displayed, check the GPS
antenna connection.
If the GPS display is red, the main unit could be
faulty.
6. CHECK THE BACK SENSOR
NOTE:
Before starting inspections, inspect the safety
around the rear end of the vehicle.
1) Turn the ignition switch to ON.
2) Pull the parking brake and depress the brake,
then put the gear in reverse.
3) Make sure that “On” is lit in the back sensor item.
Standard Value: “On” should be lit.
On: Normal
NG: If “On” does not light, check the signal line con-
nection. If there are no problems, the unit could be
faulty.
7. CHECK THE ILLUMINATION
1) Turn the lighting switch to level 1.
NOTE:
Make sure that the bright switch is not turned ON at
this time.
2) Make sure that “On” lights in the illumination
item, then the screen fades out.
Standard Value: “On” should be lit.
OK: Normal
NG: If “On” does not light, check the signal line con-
nection. If there are no problems, the unit could be
faulty.
8. CHECK THE PARKING SIGNAL
NOTE:
The side brake signal is normally “OFF”, so operat-
ing it will produce no change.
Page 193 of 2453
ET-7
Navigation System
ENTERTAINMENT
9. CHECK SPEED SENSOR
NOTE:
•Before starting inspections, inspect the safety
around the vehicle.
•Lift-up the vehicle as necessary.
•When the diagnostic trouble code is input in the
VDC CM, clear the memory.
1) Move the vehicle 2 to 3 meters (6.6 to 9.8 ft).
2) Check that the numbers from the speed sensor
are displayed.
Standard value: Vehicle speed is to be shown in
numbers.
OK: Normal
NG: If vehicle speed is not displayed, check the sig-
nal line connection. If there are no problems, the
unit could be faulty.
Page 286 of 2453
EI-44
Side Trim
EXTERIOR/INTERIOR TRIM
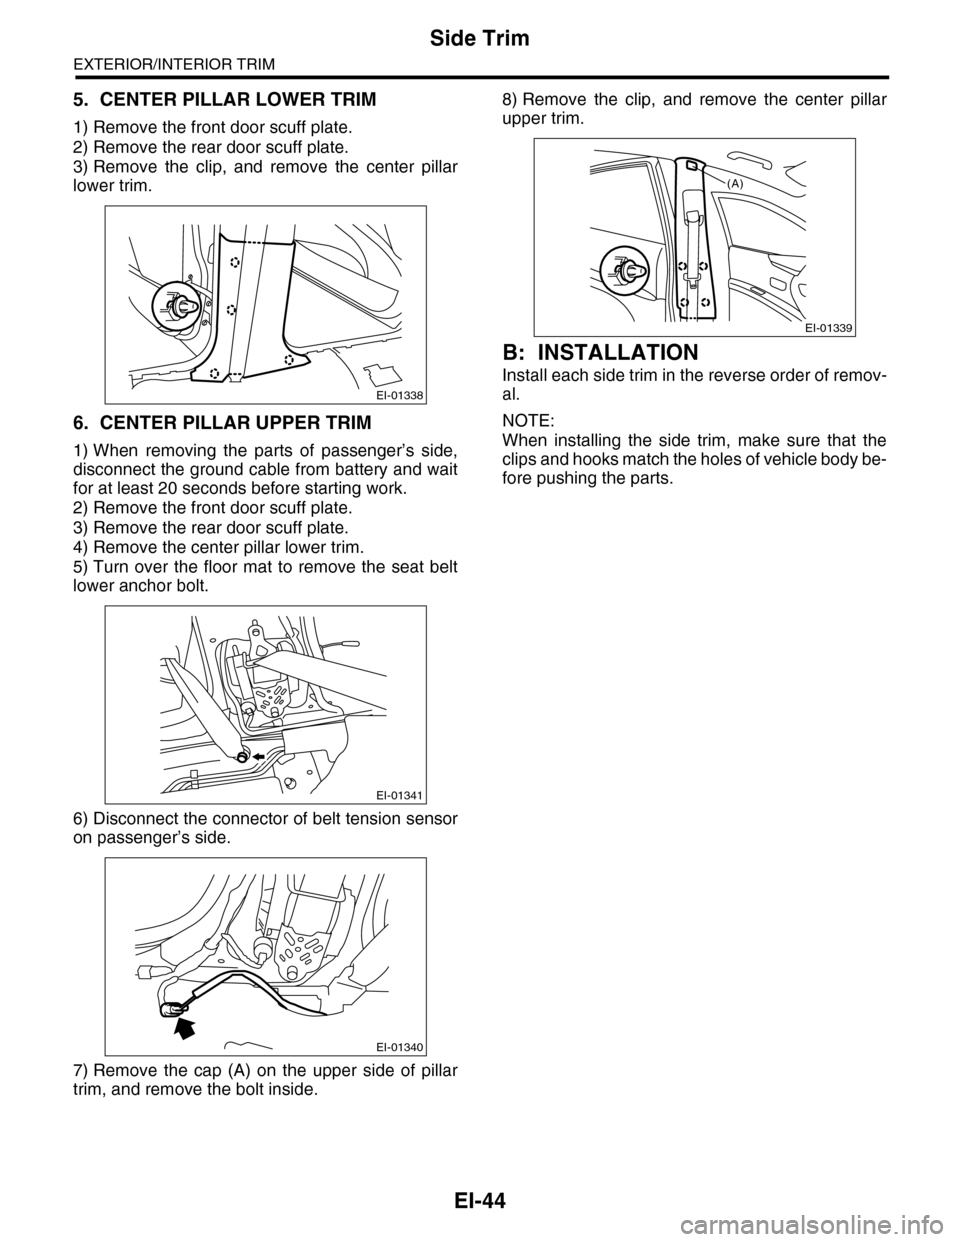
5. CENTER PILLAR LOWER TRIM
1) Remove the front door scuff plate.
2) Remove the rear door scuff plate.
3) Remove the clip, and remove the center pillar
lower trim.
6. CENTER PILLAR UPPER TRIM
1) When removing the parts of passenger’s side,
disconnect the ground cable from battery and wait
for at least 20 seconds before starting work.
2) Remove the front door scuff plate.
3) Remove the rear door scuff plate.
4) Remove the center pillar lower trim.
5) Turn over the floor mat to remove the seat belt
lower anchor bolt.
6) Disconnect the connector of belt tension sensor
on passenger’s side.
7) Remove the cap (A) on the upper side of pillar
trim, and remove the bolt inside.
8) Remove the clip, and remove the center pillar
upper trim.
B: INSTALLATION
Install each side trim in the reverse order of remov-
al.
NOTE:
When installing the side trim, make sure that the
clips and hooks match the holes of vehicle body be-
fore pushing the parts.
EI-01338
EI-01341
EI-01340
EI-01339
(A)