SUZUKI KIZASHI 2010 1.G Owners Manual
Manufacturer: SUZUKI, Model Year: 2010, Model line: KIZASHI, Model: SUZUKI KIZASHI 2010 1.GPages: 388, PDF Size: 4.94 MB
Page 191 of 388
5-12
OTHER CONTROLS AND EQUIPMENT
57L20-03E
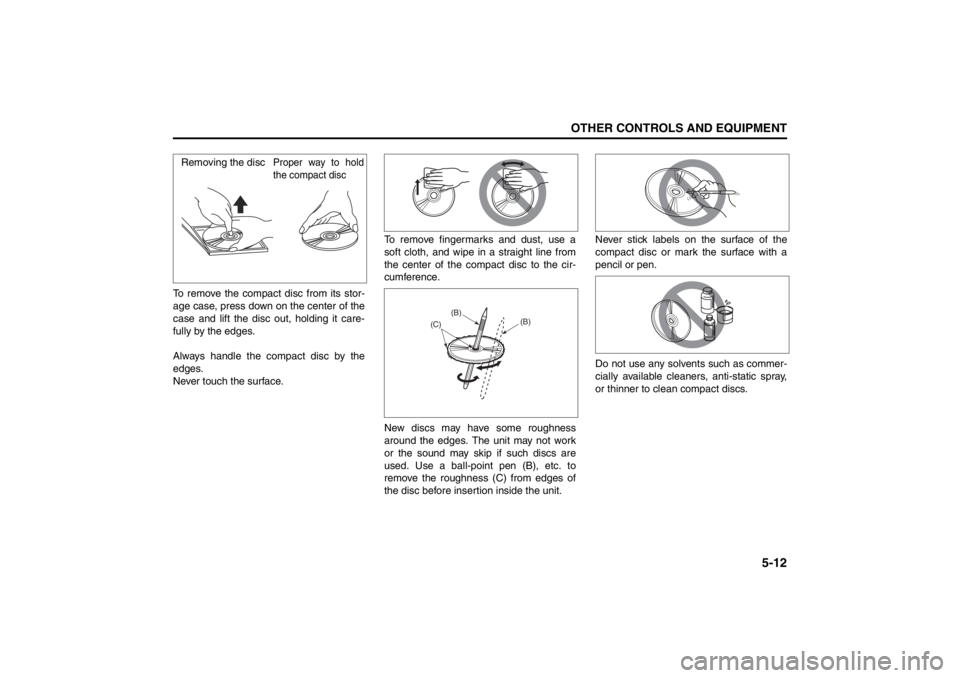
To remove the compact disc from its stor-
age case, press down on the center of the
case and lift the disc out, holding it care-
fully by the edges.
Always handle the compact disc by the
edges.
Never touch the surface.To remove fingermarks and dust, use a
soft cloth, and wipe in a straight line from
the center of the compact disc to the cir-
cumference.
New discs may have some roughness
around the edges. The unit may not work
or the sound may skip if such discs are
used. Use a ball-point pen (B), etc. to
remove the roughness (C) from edges of
the disc before insertion inside the unit.Never stick labels on the surface of the
compact disc or mark the surface with a
pencil or pen.
Do not use any solvents such as commer-
cially available cleaners, anti-static spray,
or thinner to clean compact discs.Removing the disc
Proper way to hold
the compact disc
(B)
(B)
(C)
Page 192 of 388
5-13OTHER CONTROLS AND EQUIPMENT
57L20-03E
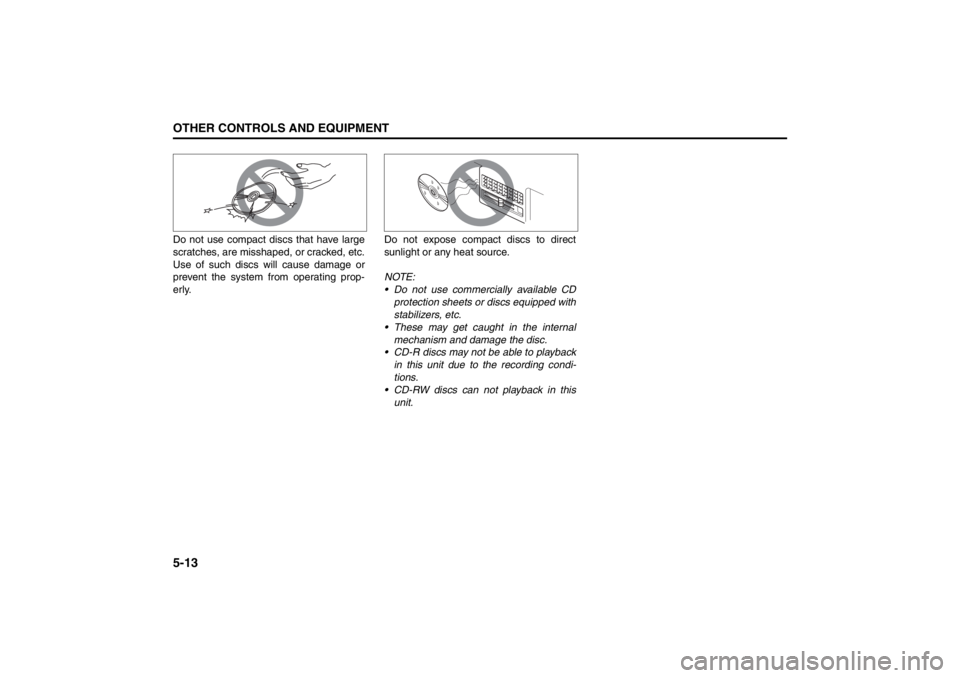
Do not use compact discs that have large
scratches, are misshaped, or cracked, etc.
Use of such discs will cause damage or
prevent the system from operating prop-
erly.Do not expose compact discs to direct
sunlight or any heat source.
NOTE:
Do not use commercially available CD
protection sheets or discs equipped with
stabilizers, etc.
These may get caught in the internal
mechanism and damage the disc.
CD-R discs may not be able to playback
in this unit due to the recording condi-
tions.
CD-RW discs can not playback in this
unit.
Page 193 of 388
5-14
OTHER CONTROLS AND EQUIPMENT
57L20-03E
Part 15 of the FCC Rules
FCC Warning:
Any unauthorized changes or modifica-
tions to this equipment would void the
user’s authority to operate this device.Bluetooth
®: Bluetooth
® is a registered
trademark of Bluetooth SIG, Ink.
Stop using this unit and a Bluetooth
®-
ready device whenever requested.
This unit shares the communication fre-
quency with other private or public wire-
less communication equipment such as a
wireless LAN and other wireless commu-
nication radios.
You should stop using this unit whenever
you are notified that your unit disturbs
other wireless communication immedi-
ately.
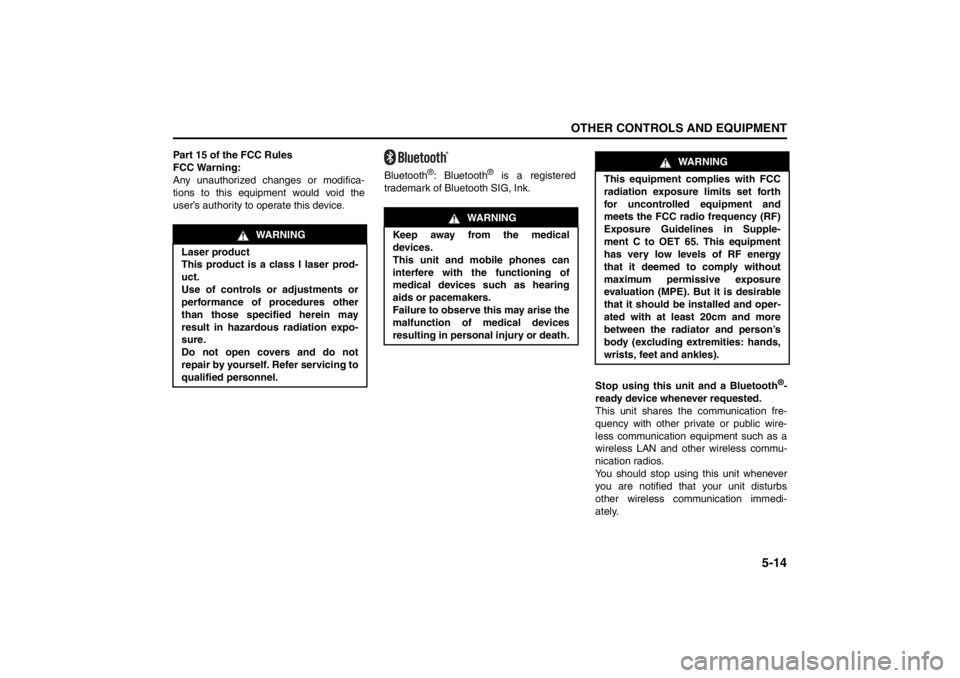
WARNING
Laser product
This product is a class I laser prod-
uct.
Use of controls or adjustments or
performance of procedures other
than those specified herein may
result in hazardous radiation expo-
sure.
Do not open covers and do not
repair by yourself. Refer servicing to
qualified personnel.
WARNING
Keep away from the medical
devices.
This unit and mobile phones can
interfere with the functioning of
medical devices such as hearing
aids or pacemakers.
Failure to observe this may arise the
malfunction of medical devices
resulting in personal injury or death.
WA R N I N G
This equipment complies with FCC
radiation exposure limits set forth
for uncontrolled equipment and
meets the FCC radio frequency (RF)
Exposure Guidelines in Supple-
ment C to OET 65. This equipment
has very low levels of RF energy
that it deemed to comply without
maximum permissive exposure
evaluation (MPE). But it is desirable
that it should be installed and oper-
ated with at least 20cm and more
between the radiator and person’s
body (excluding extremities: hands,
wrists, feet and ankles).
Page 194 of 388

5-15OTHER CONTROLS AND EQUIPMENT
57L20-03E
(This device complies with Part 15 of FCC
Rules and RSS-Gen of IC Rules.) Opera-
tion is subject to the following two condi-
tions: (1) this device may not cause
interference, and (2) this device must
accept any interference, including interfer-
ence that may cause undesired operation
of this device.
FCC Warning:
Changes or modifications not expressly
approved by the party responsible for
compliance could void the user’s authority
to operate the equipment.NOTE:
This equipment generates, uses and can
radiate radio frequency energy and, if not
installed and used in accordance with the
instructions, may cause harmful interfer-
ence to radio communications. However,
there is no guarantee that interference will
not occur in a particular installation. If this
equipment does cause harmful interfer-
ence to radio or television reception, which
can be determined by turning the equip-
ment off and on, the user is encouraged to
try to correct the interference by one or
more of the following measures:
Reorient or relocate the receiving
antenna
Increase the separation between the
equipment and receiver.
Connect the equipment into an outlet on
a circuit different from that to which the
receiver is connected.
Consult the dealer or an experienced
radio/TV technician for help. This trans-
mitter must not be co-located or oper-
ated in conjunction with any other
antenna or transmitter. FCC ID: ACJ932C5ZZZ035
IC ID: 216J - C5ZZZ038
MADE IN JAPAN
Page 195 of 388
5-16
OTHER CONTROLS AND EQUIPMENT
57L20-03E
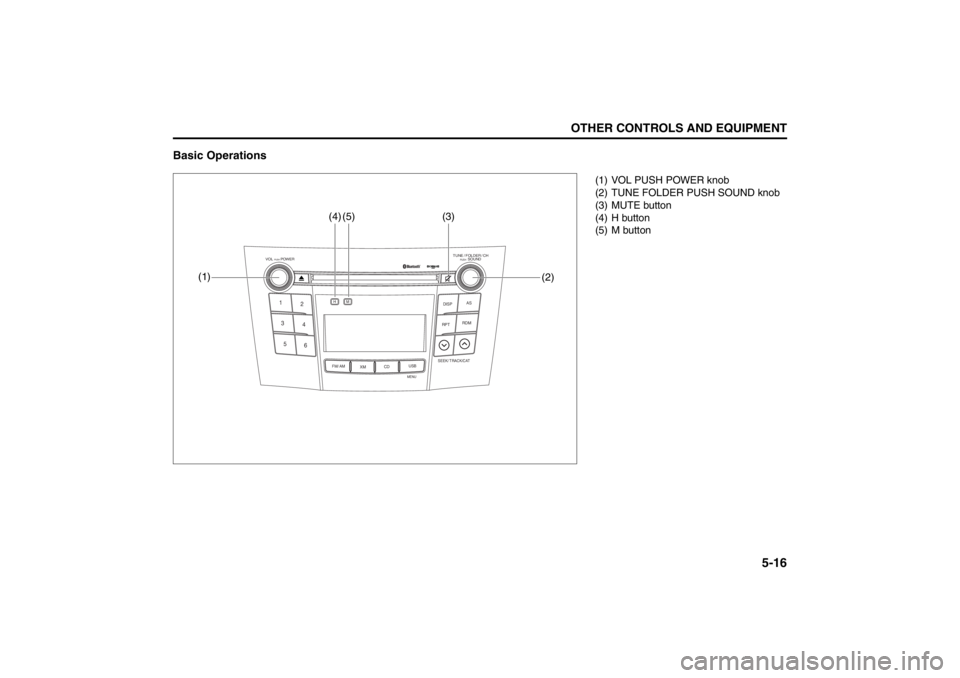
Basic Operations
TUNE / FOLDER / CHDISPAS
RPT
XM
USBMENU
RDM
SEEK/ TRACK/CAT
SOUNDPUSH
1
2
3
4
5
6
VOL PUSH POWER
CD
FM/ AMH
M
(1)(3)
(2)
(4)
(5)
(1) VOL PUSH POWER knob
(2) TUNE FOLDER PUSH SOUND knob
(3) MUTE button
(4) H button
(5) M button
Page 196 of 388

5-17OTHER CONTROLS AND EQUIPMENT
57L20-03E
Turning power on/off
Press the VOL PUSH POWER knob (1).
The unit starts in the function mode it was
in when the power was turned off last.
Adjusting the clock
1) Press and hold the H button (4) for 1
second or longer.
2) Press the H button (4) to adjust the
hours. Press and hold H button (4) to
successive change.
3) Press the M button (5).
4) Press the M button (5) to adjust the
minutes. Press and hold M button (5)
to successive change.
NOTE:
If no operation takes place for more than
3 seconds, the displayed time is fixed.
Pressing the H button (4) and M button
(5) simultaneously allows users to set
the clock on the hour. If “the minute” of
the clock is between 31 and 59, “the
hour” of the clock advances 1 hour.Adjusting the volume
Turn the VOL PUSH POWER knob (1).
Turning it clockwise increases the volume;
turning it counterclockwise decreases the
volume.
NOTE:
While driving, adjust the volume to an
extent that sound and/or noise coming
from outside the car can be heard.
Mute
Press the MUTE button (3).
Press the MUTE button (3) again, it
returns to the original volume.Adjusting bass/middle/treble/balance/
fader
1) Press the TUNE FOLDER PUSH
SOUND knob (2).
Each time it is pressed, sound adjust-
ment is changed as follows:
For standard specifications
Bass adjustment (BASS 0)
Treble adjustment (TRE 0)
Balance adjustment (BAL 0)
Fader adjustment (FADE 0)
AVC adjustment (LEVEL 2)
Page 197 of 388

5-18
OTHER CONTROLS AND EQUIPMENT
57L20-03E
For Rockford
® specifications
* The PUNCH® Bass adjustment enables
greater control of the Rockford Fosgate
®
sonic signature by increasing/decreasing
the system’s low-frequency and sub-
woofer levels to tailor the dynamics of
the sound system without the muddied
bass and vocals typical of bass controls.
2) Turn the TUNE FOLDER PUSH
SOUND knob (2) to adjust the sound.Adjusting the AVC (Auto volume con-
trol)
The Auto Volume Control (AVC) function
automatically adjusts (increases/
decreases) the sound volume in accor-
dance with vehicle speed. The AVC control
is provided with three selectable levels
(LEVEL OFF, 1, 2, 3). The range of volume
adjustment increases together with the
LEVEL number.
1) Press the TUNE FOLDER PUSH
SOUND knob (2) until the AVC adjust-
ment mode is selected.
2) Turn the TUNE FOLDER PUSH
SOUND knob (2) to select the desired
AVC adjustment level. (Initial setting:
LEVEL 2) Bass adjustment (PUNCH BASS* 0)
Middle adjustment (MID 0)
Treble adjustment (TRE 0)
Balance adjustment (BAL 0)
Fader adjustment (FADE 0)
AVC adjustment (LEVEL 2)
Page 198 of 388
5-19OTHER CONTROLS AND EQUIPMENT
57L20-03E
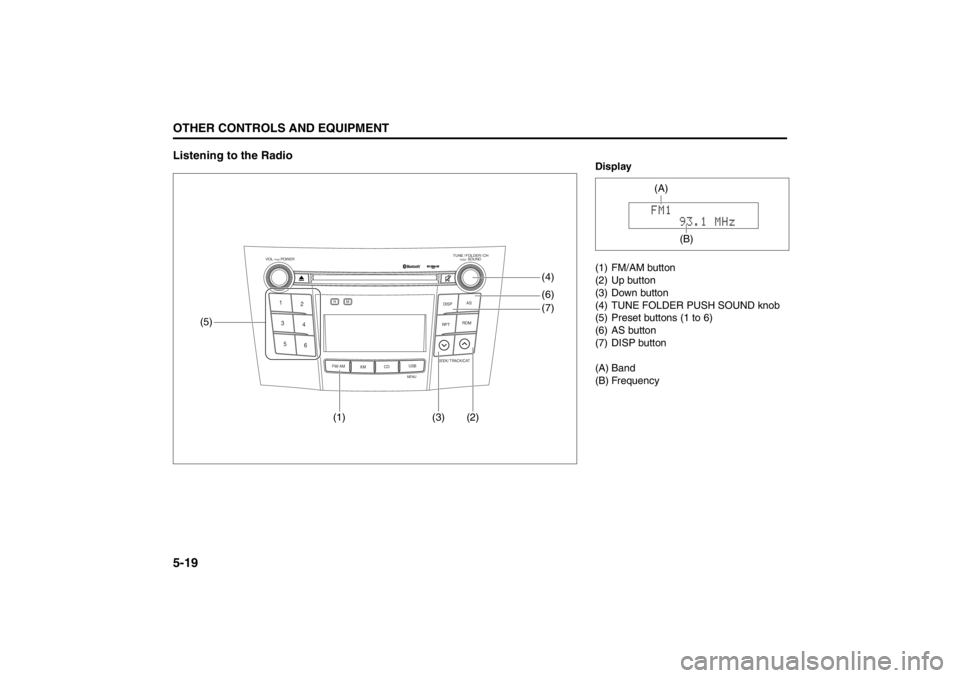
Listening to the Radio
TUNE / FOLDER / CHDISPAS
RPT
XM
USBMENU
RDM
SEEK/ TRACK/CAT
SOUNDPUSH
1
2
3
4
5
6
VOL PUSH POWER
CD
FM/ AMH
M
(5)(4)
(1) (3) (2)(6)
(7)
Display
(1) FM/AM button
(2) Up button
(3) Down button
(4) TUNE FOLDER PUSH SOUND knob
(5) Preset buttons (1 to 6)
(6) AS button
(7) DISP button
(A) Band
(B) Frequency
(A)
(B)
Page 199 of 388

5-20
OTHER CONTROLS AND EQUIPMENT
57L20-03E
Selecting the reception band
Press the FM/AM button (1).
Each time the button is pressed, the
reception band is switched as follows:
Seek tuning
Press the seek Up button (2) or the seek
Down button (3).
The unit stops searching for a station at a
frequency where a broadcast station is
available.
Manual tuning
Turn the TUNE FOLDER PUSH SOUND
knob (4).
The frequency being received is dis-
played.Preset memory
1) Select the desired station.
2) Select the Preset button (5) to which
you want to store the station and press
and hold the button for 2 seconds or
longer.
Auto store
Press and hold the AS button (6) for 2 sec-
onds or longer.
Six stations in good reception are auto-
matically stored to the Preset buttons (5)
in sequential order, starting from the lower
frequencies.
NOTE:
Auto store can be released by pressing
AS button (6) while auto store is under
way.
When the auto store is performed, the
station previously stored in the memory
at the position is overwritten.
When there are fewer than 6 stations
that can be stored even if 1 round of
auto store operation is performed, no
station will be stored at the remaining
Preset buttons (5).
6 stations can be preset for FM1 and
FM2 in common, and 6 stations for AM
in auto store mode.Auto store mode on/off
Press the AS button (6).
Each time the button is pressed, the mode
is switched as follows:
Preset station calling
Press the Preset button (5).
The corresponding station preset can be
received.
NOTE:
If the button for a station not preset is
pressed, the unit displays “- - - ”. FM1 FM2 AM
AS mode on AS mode off
Page 200 of 388

5-21OTHER CONTROLS AND EQUIPMENT
57L20-03E
Display change
Press the DISP button (7).
Each time it is pressed, display is changed
as follows:
NOTE:
Station name display is not selectable
when no station name data is received.
“NO MESSAGE” is displayed when no
radio text data is received.
If all the text data cannot be displayed,
the “>” mark appears at the right end.
Holding down the DISP button (7) for 1
sec. or more calls the next page.
The display will return to the frequency
display after 6 seconds.Radio Reception
Radio reception can be affected by envi-
ronment, atmospheric conditions, or radio
signal's power and distance from the sta-
tion. Nearby mountains and buildings may
interfere or deflect radio reception, caus-
ing poor reception. Poor reception or radio
static can also be caused by electric cur-
rent from overhead wires or high voltage
power lines.
Station name display/Radio text display
Station name display and radio text dis-
play are not available when no data is
received, or may not be displayed properly
when the data is incorrectly transmitted or
received. Frequency display
Station name display
Radio text display