TOYOTA CAMRY 2019 Accessories, Audio & Navigation (in English)
Manufacturer: TOYOTA, Model Year: 2019, Model line: CAMRY, Model: TOYOTA CAMRY 2019Pages: 354, PDF Size: 8.08 MB
Page 81 of 354
81
1. BASIC OPERATION
AUDIO/VISUAL SYSTEM
3
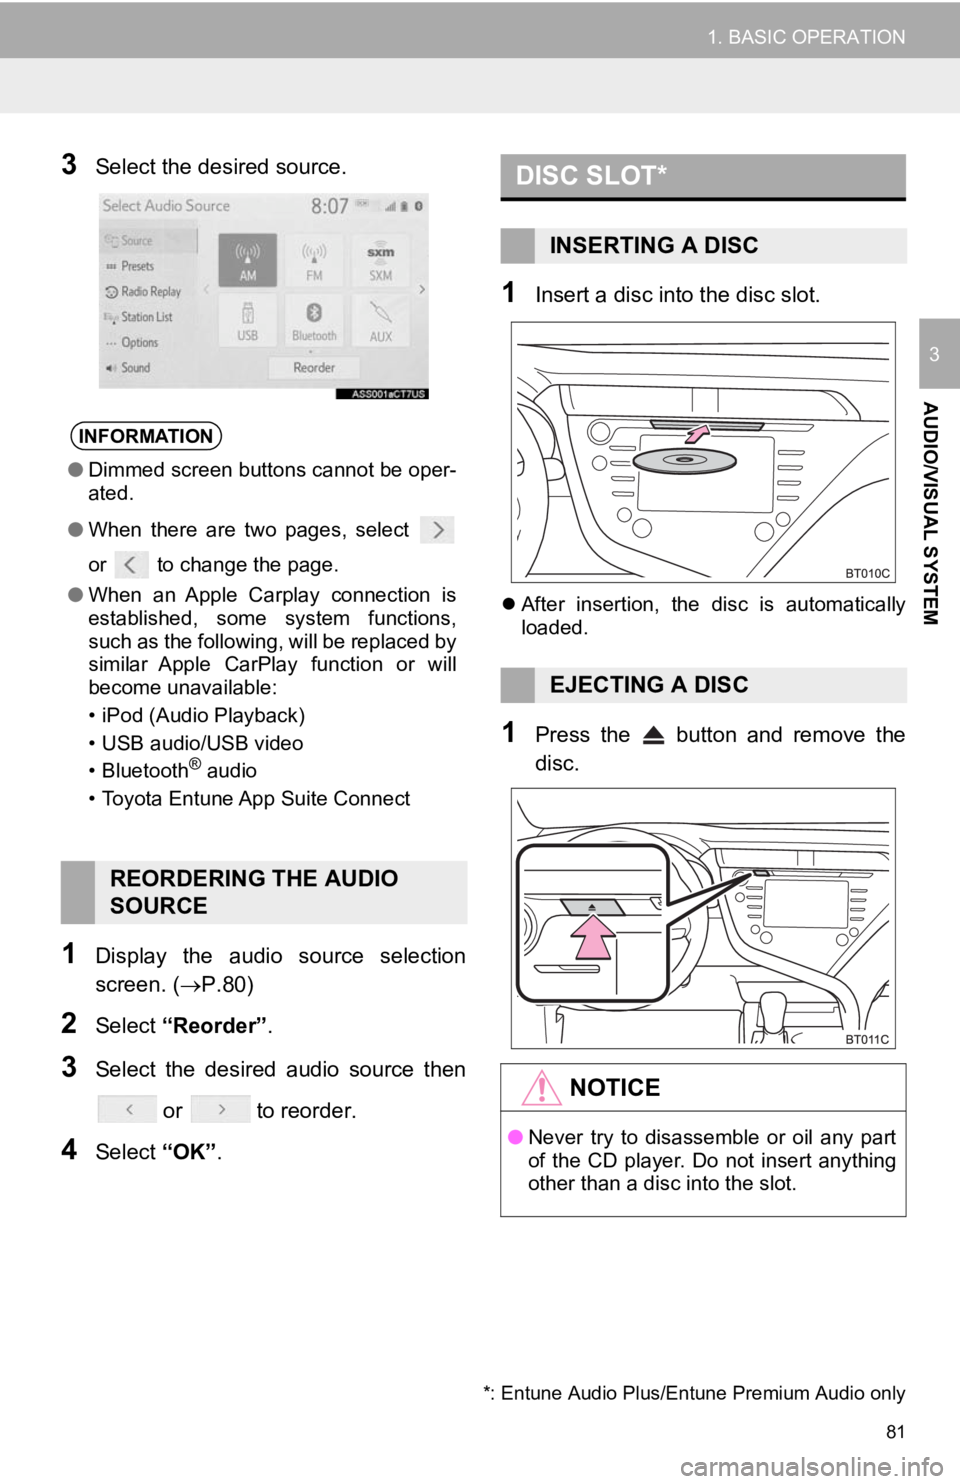
3Select the desired source.
1Display the audio source selection
screen. (P.80)
2Select “Reorder” .
3Select the desired audio source then
or to reorder.
4Select “OK”.
1Insert a disc into the disc slot.
After insertion, the disc is automatically
loaded.
1Press the button and remove the
disc.
INFORMATION
● Dimmed screen buttons cannot be oper-
ated.
● When there are two pages, select
or to change the page.
● When an Apple Carplay connection is
established, some system functions,
such as the following, will be replaced by
similar Apple CarPlay function or will
become unavailable:
• iPod (Audio Playback)
• USB audio/USB video
• Bluetooth
® audio
• Toyota Entune App Suite Connect
REORDERING THE AUDIO
SOURCE
DISC SLOT*
INSERTING A DISC
EJECTING A DISC
NOTICE
● Never try to disassemble or oil any part
of the CD player. Do not insert anything
other than a disc into the slot.
*: Entune Audio Plus/Entune Premium Audio only
Page 82 of 354
82
1. BASIC OPERATION
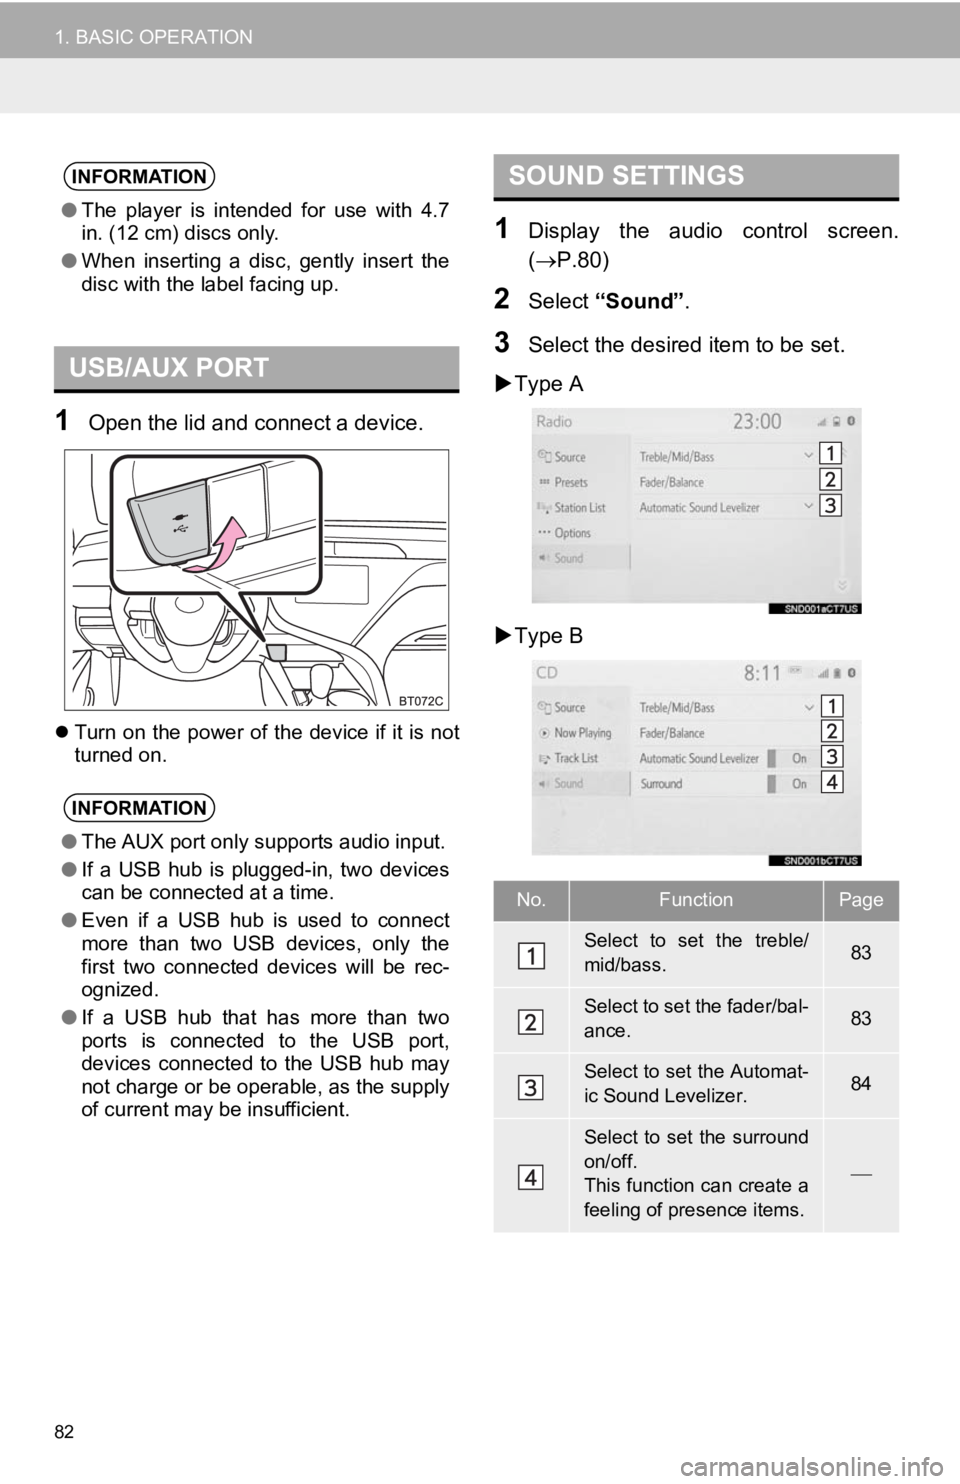
1Open the lid and connect a device.
Turn on the power of the device if it is not
turned on.
1Display the audio control screen.
( P.80)
2Select “Sound” .
3Select the desired item to be set.
Type A
Type B
INFORMATION
● The player is intended for use with 4.7
in. (12 cm) discs only.
● When inserting a disc, gently insert the
disc with the label facing up.
USB/AUX PORT
INFORMATION
●The AUX port only supports audio input.
● If a USB hub is plugged-in, two devices
can be connected at a time.
● Even if a USB hub is used to connect
more than two USB devices, only the
first two connected devices will be rec-
ognized.
● If a USB hub that has more than two
ports is connected to the USB port,
devices connected to the USB hub may
not charge or be operable, as the supply
of current may be insufficient.
SOUND SETTINGS
No.FunctionPage
Select to set the treble/
mid/bass.83
Select to set the fader/bal-
ance.83
Select to set the Automat-
ic Sound Levelizer.84
Select to set the surround
on/off.
This function can create a
feeling of presence items.
Page 83 of 354
83
1. BASIC OPERATION
AUDIO/VISUAL SYSTEM
3
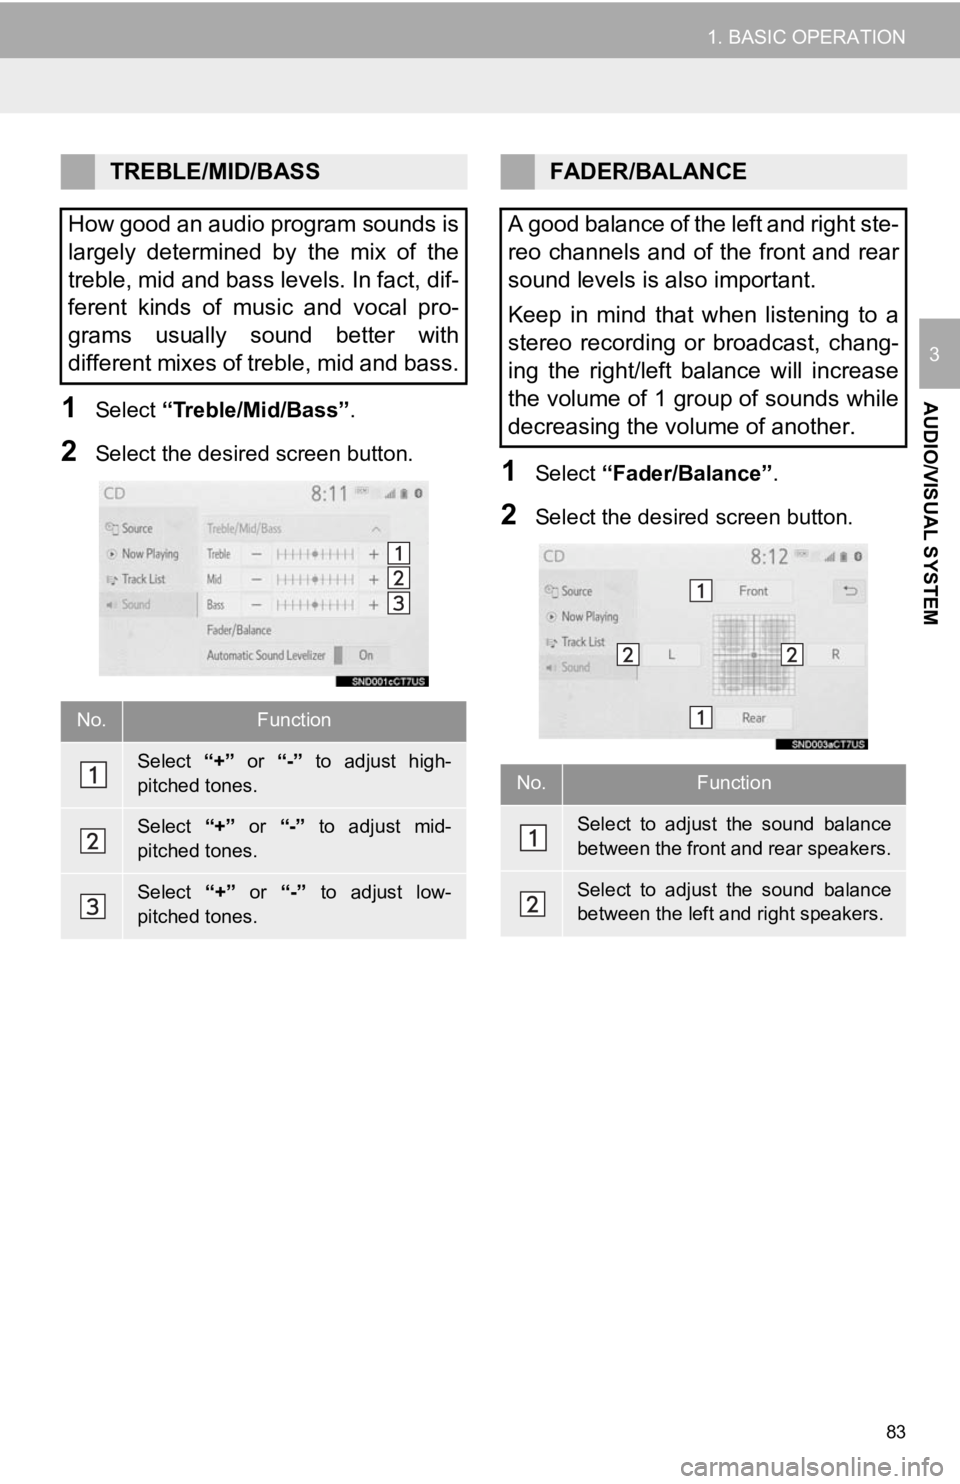
1Select “Treble/Mid/Bass” .
2Select the desired screen button.1Select “Fader/Balance” .
2Select the desired screen button.
TREBLE/MID/BASS
How good an audio program sounds is
largely determined by the mix of the
treble, mid and bass levels. In fact, dif-
ferent kinds of music and vocal pro-
grams usually sound better with
different mixes of treble, mid and bass.
No.Function
Select “+” or “-” to adjust high-
pitched tones.
Select “+” or “-” to adjust mid-
pitched tones.
Select “+” or “-” to adjust low-
pitched tones.
FADER/BALANCE
A good balance of the left and right ste-
reo channels and of the front and rear
sound levels is also important.
Keep in mind that when listening to a
stereo recording or broadcast, chang-
ing the right/left balance will increase
the volume of 1 group of sounds while
decreasing the volume of another.
No.Function
Select to adjust the sound balance
between the front and rear speakers.
Select to adjust the sound balance
between the left and right speakers.
Page 84 of 354
84
1. BASIC OPERATION
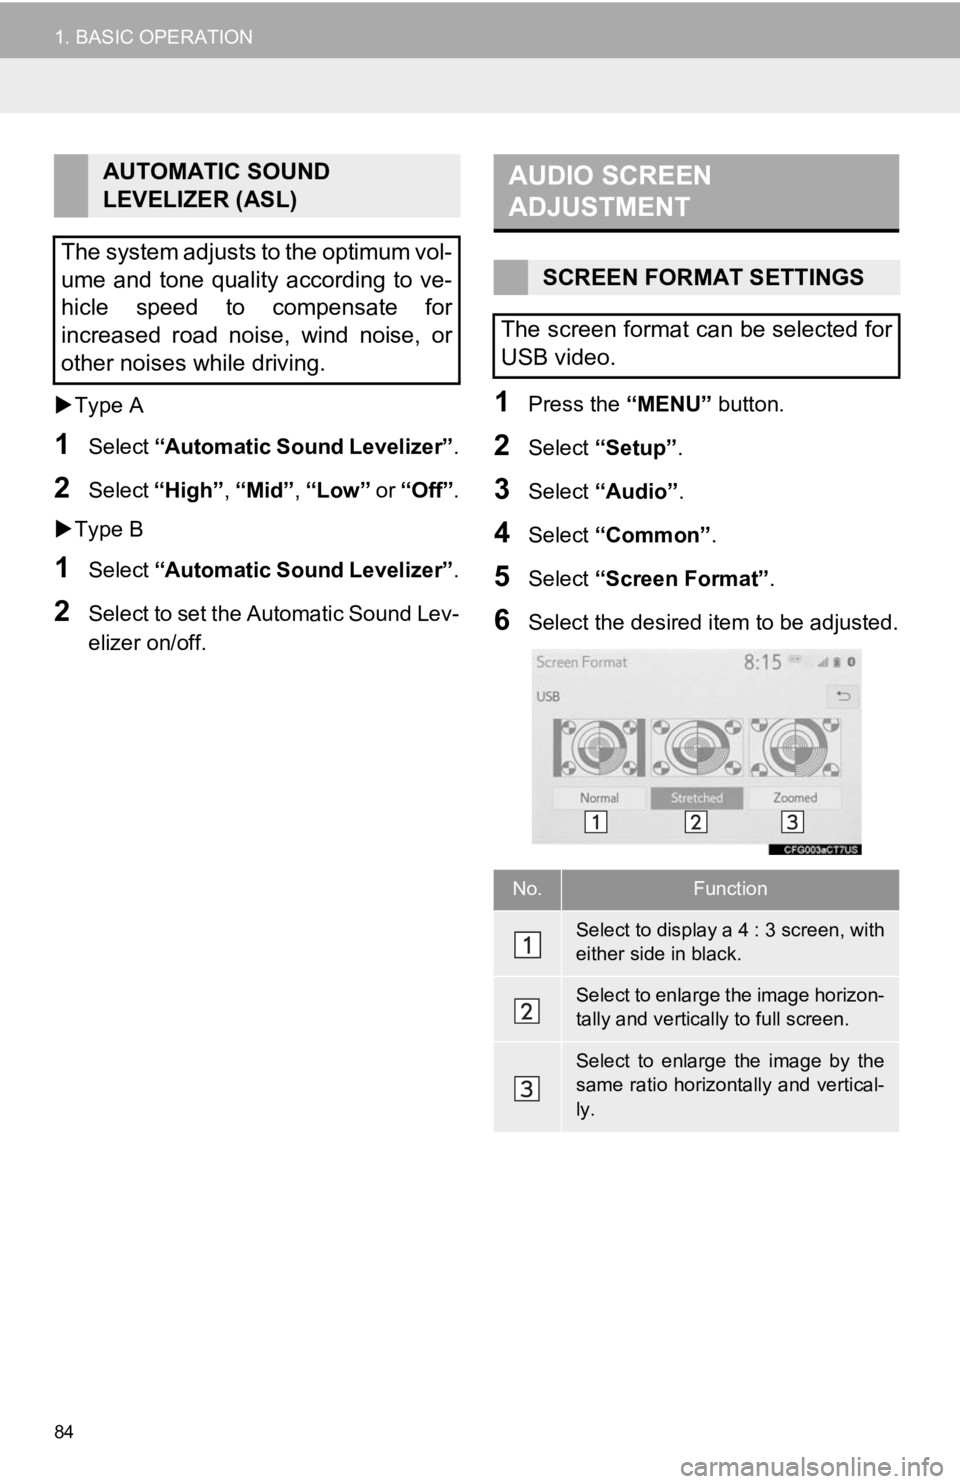
Type A
1Select “Automatic Sound Levelizer” .
2Select “High” , “Mid”, “Low” or “Off” .
Type B
1Select “Automatic Sound Levelizer” .
2Select to set the Automatic Sound Lev-
elizer on/off.
1Press the “MENU” button.
2Select “Setup”.
3Select “Audio” .
4Select “Common” .
5Select “Screen Format” .
6Select the desired item to be adjusted.
AUTOMATIC SOUND
LEVELIZER (ASL)
The system adjusts to the optimum vol-
ume and tone quality according to ve-
hicle speed to compensate for
increased road noise, wind noise, or
other noises while driving.AUDIO SCREEN
ADJUSTMENT
SCREEN FORMAT SETTINGS
The screen format can be selected for
USB video.
No.Function
Select to display a 4 : 3 screen, with
either side in black.
Select to enlarge the image horizon-
tally and vertica lly to full screen.
Select to enlarge the image by the
same ratio horizontally and vertical-
ly.
Page 85 of 354
85
1. BASIC OPERATION
AUDIO/VISUAL SYSTEM
3
1Press the “MENU” button.
2Select “Setup” .
3Select “Audio” .
4Select “Common” .
5Select “Display”.
6Select the desired item to be adjusted.
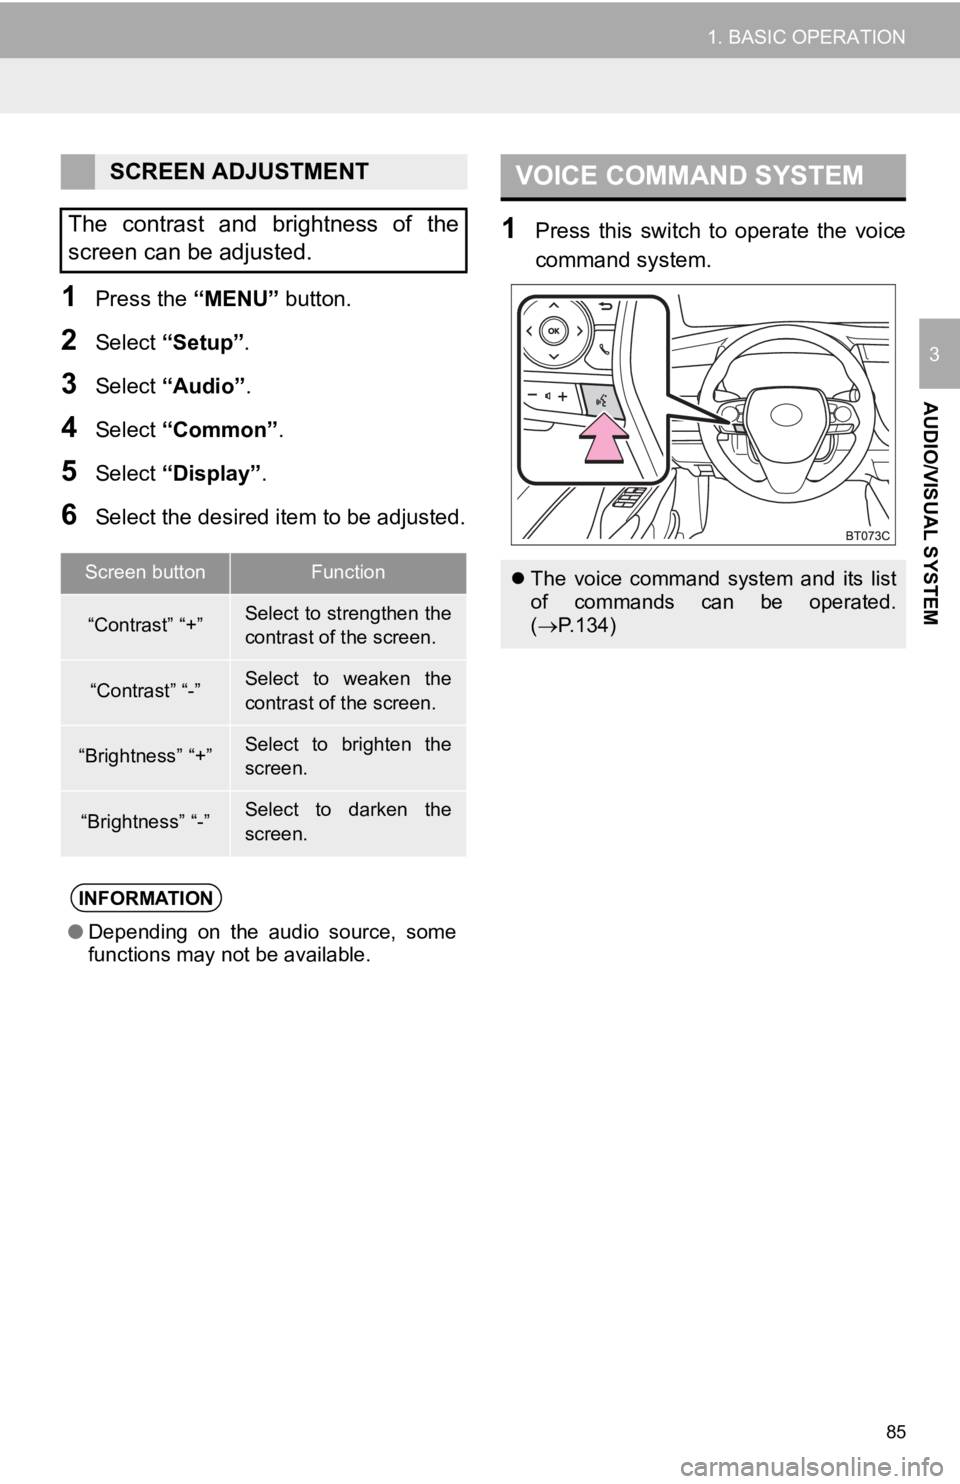
1Press this switch to operate the voice
command system.
SCREEN ADJUSTMENT
The contrast and brightness of the
screen can be adjusted.
Screen buttonFunction
“Contrast” “+”Select to strengthen the
contrast of the screen.
“Contrast” “-”Select to weaken the
contrast of the screen.
“Brightness” “+”Select to brighten the
screen.
“Brightness” “-”Select to darken the
screen.
INFORMATION
● Depending on the audio source, some
functions may not be available.
VOICE COMMAND SYSTEM
The voice command system and its list
of commands can be operated.
( P.134)
Page 86 of 354
86
2. RADIO OPERATION
1. AM/FM/SiriusXM (SXM)* RADIO
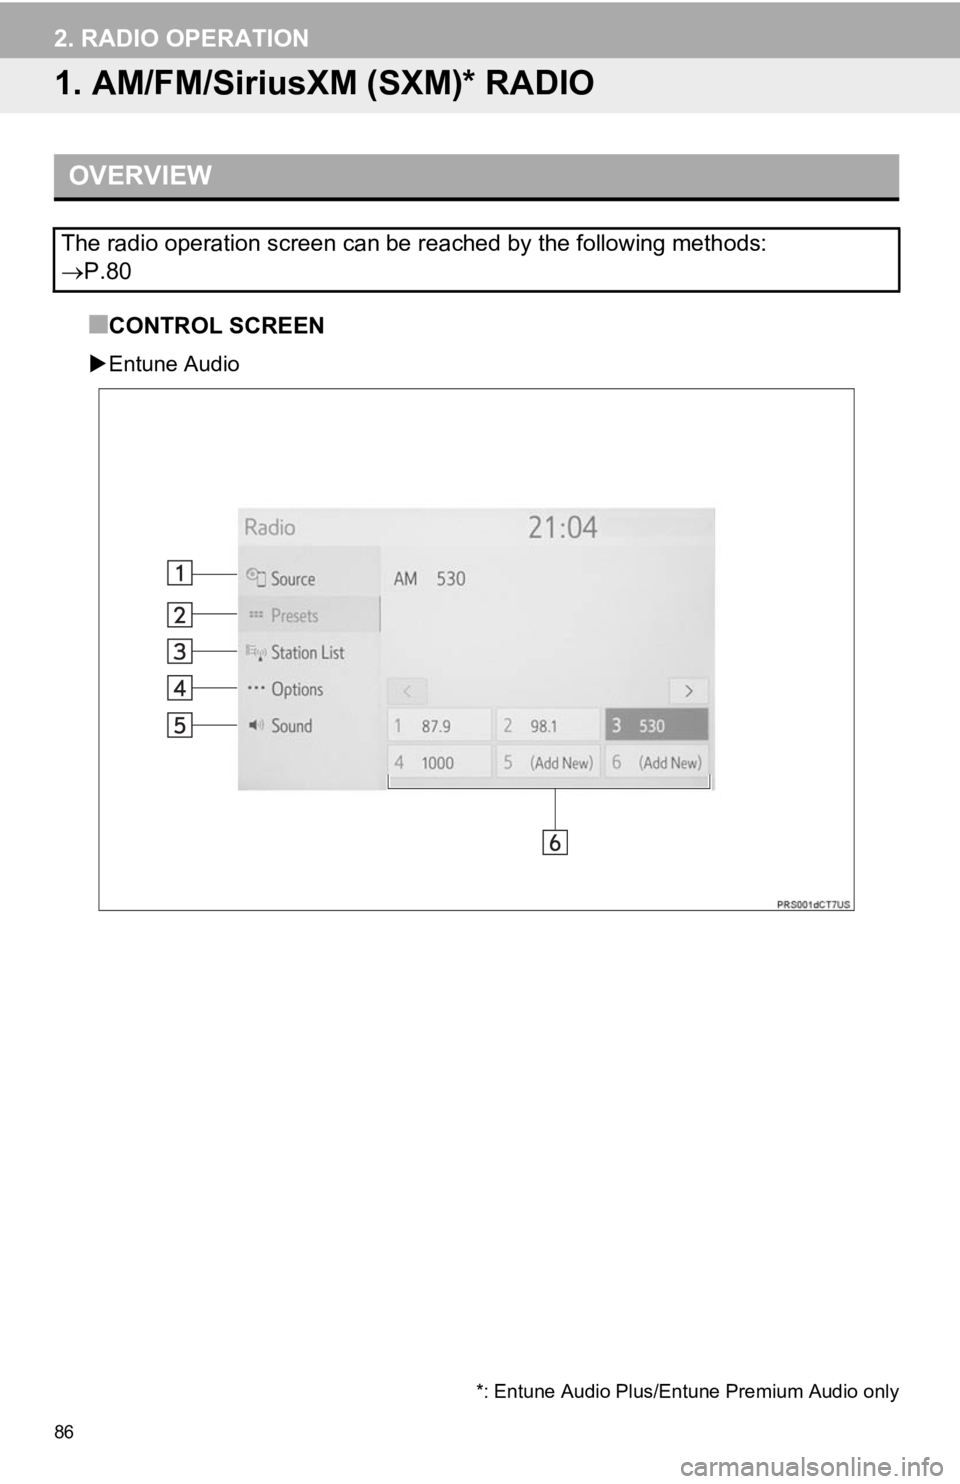
■CONTROL SCREEN
Entune Audio
OVERVIEW
The radio operation screen can be reached by the following meth ods:
P.80
*: Entune Audio Plus/Entune Premium Audio only
Page 87 of 354
87
2. RADIO OPERATION
AUDIO/VISUAL SYSTEM
3
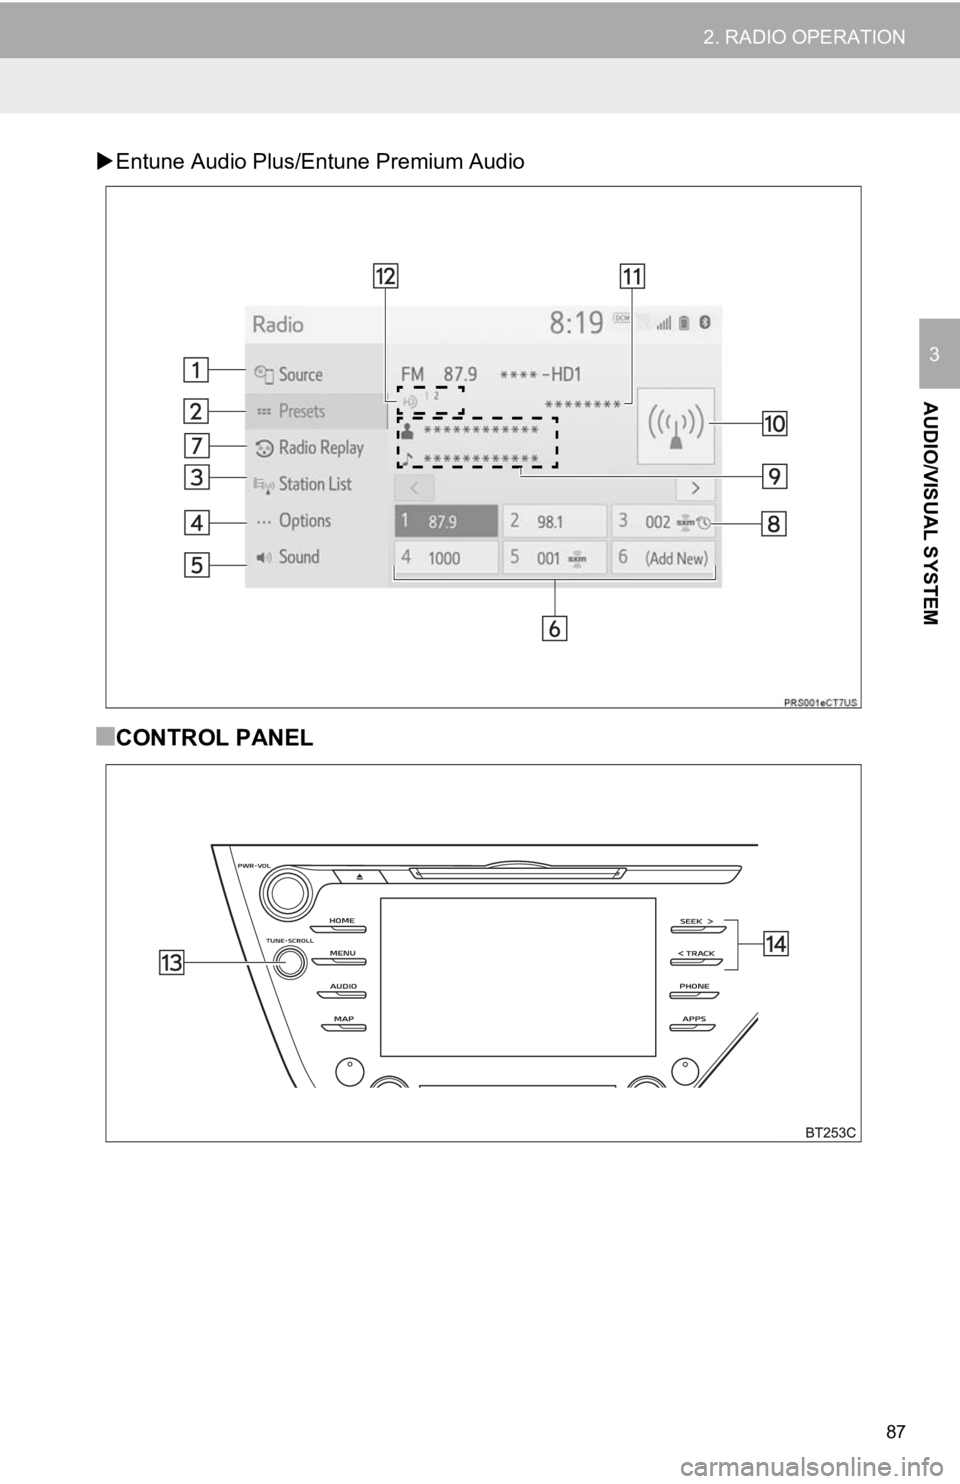
Entune Audio Plus/Entune Premium Audio
■CONTROL PANEL
Page 88 of 354
88
2. RADIO OPERATION
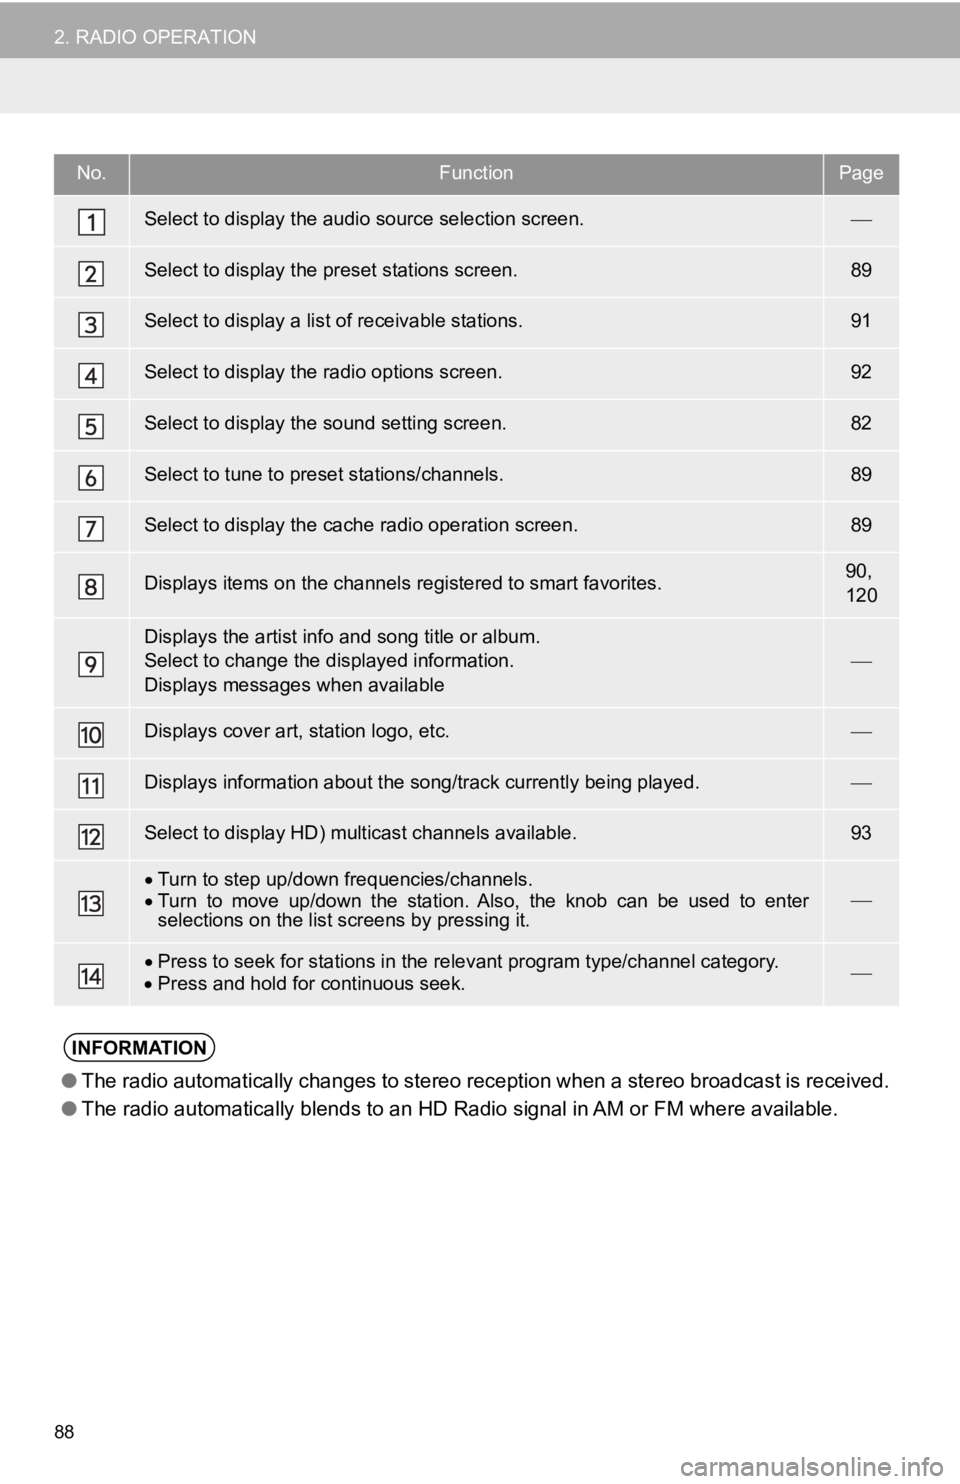
No.FunctionPage
Select to display the audio source selection screen.
Select to display the preset stations screen.89
Select to display a list o f receivable stations.91
Select to display the radio options screen.92
Select to display the sound setting screen.82
Select to tune to preset stations/channels.89
Select to display the cach e radio operation screen.89
Displays items on the channels registered to smart favorites.90,
120
Displays the artist info and song title or album.
Select to change the displayed information.
Displays messages when available
Displays cover ar t, station logo, etc.
Displays information about the song/track currently being playe d.
Select to display HD) multicast channels available.93
Turn to step up/down frequencies/channels.
Turn to move up/down the station. Also, the knob can be used to enter
selections on the list screens by pressing it.
Press to seek for stations in the relevant program type/channel category.
Press and hold for continuous seek.
INFORMATION
● The radio automatically changes to stereo reception when a ster eo broadcast is received.
● The radio automatically blends to an HD Radio signal in AM or FM where available.
Page 89 of 354
89
2. RADIO OPERATION
AUDIO/VISUAL SYSTEM
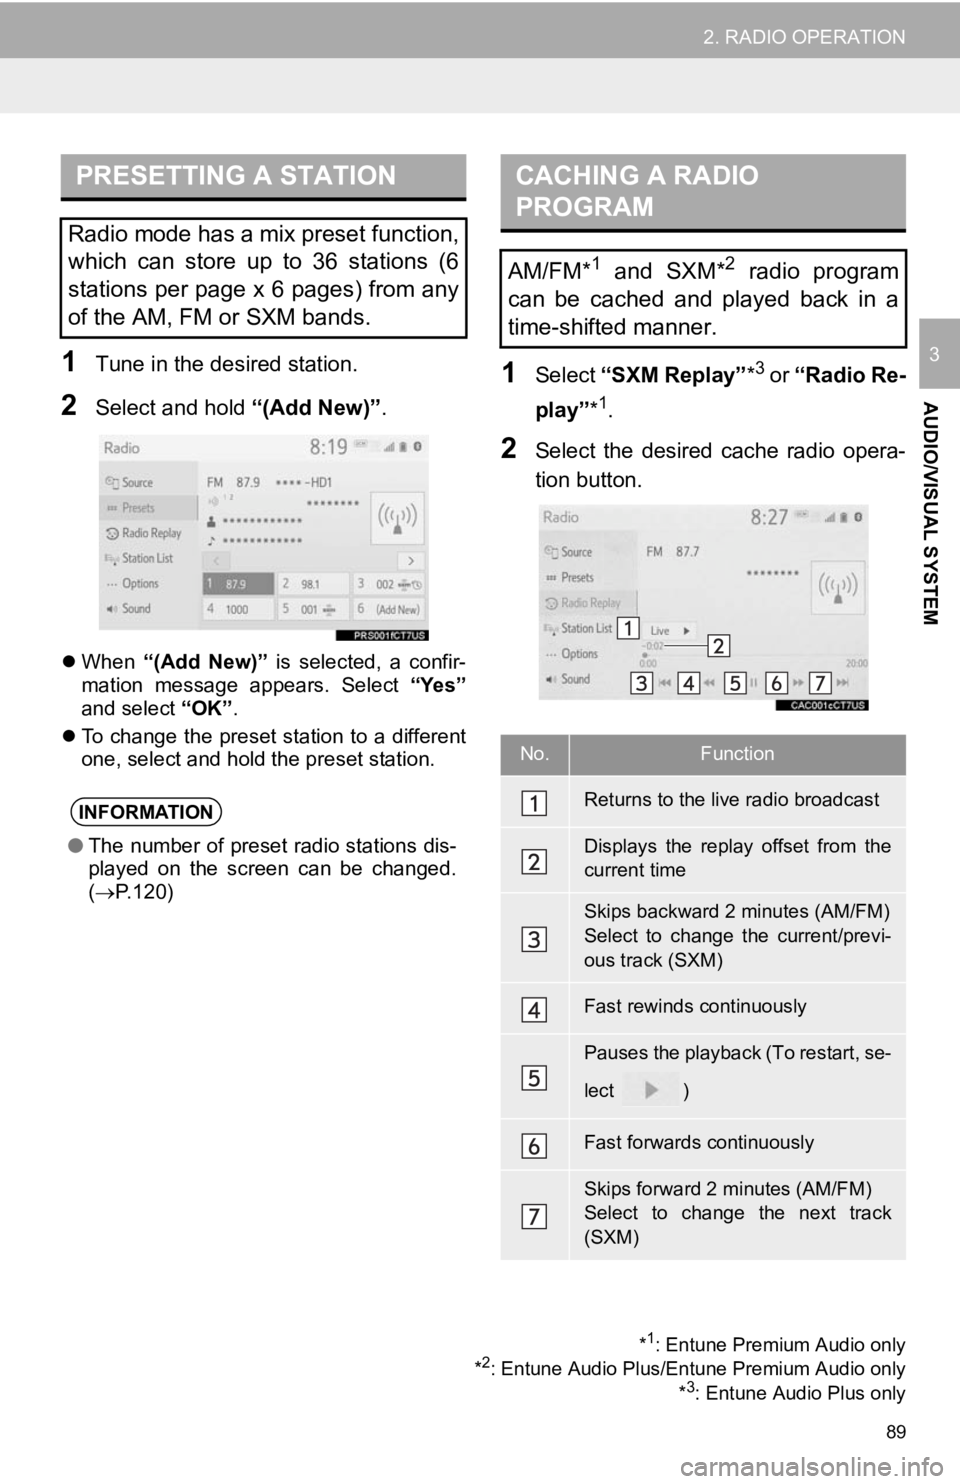
31Tune in the desired station.
2Select and hold “(Add New)”.
When “(Add New)” is selected, a confir-
mation message appears. Select “Yes”
and select “OK”.
To change the preset station to a different
one, select and hold the preset station.
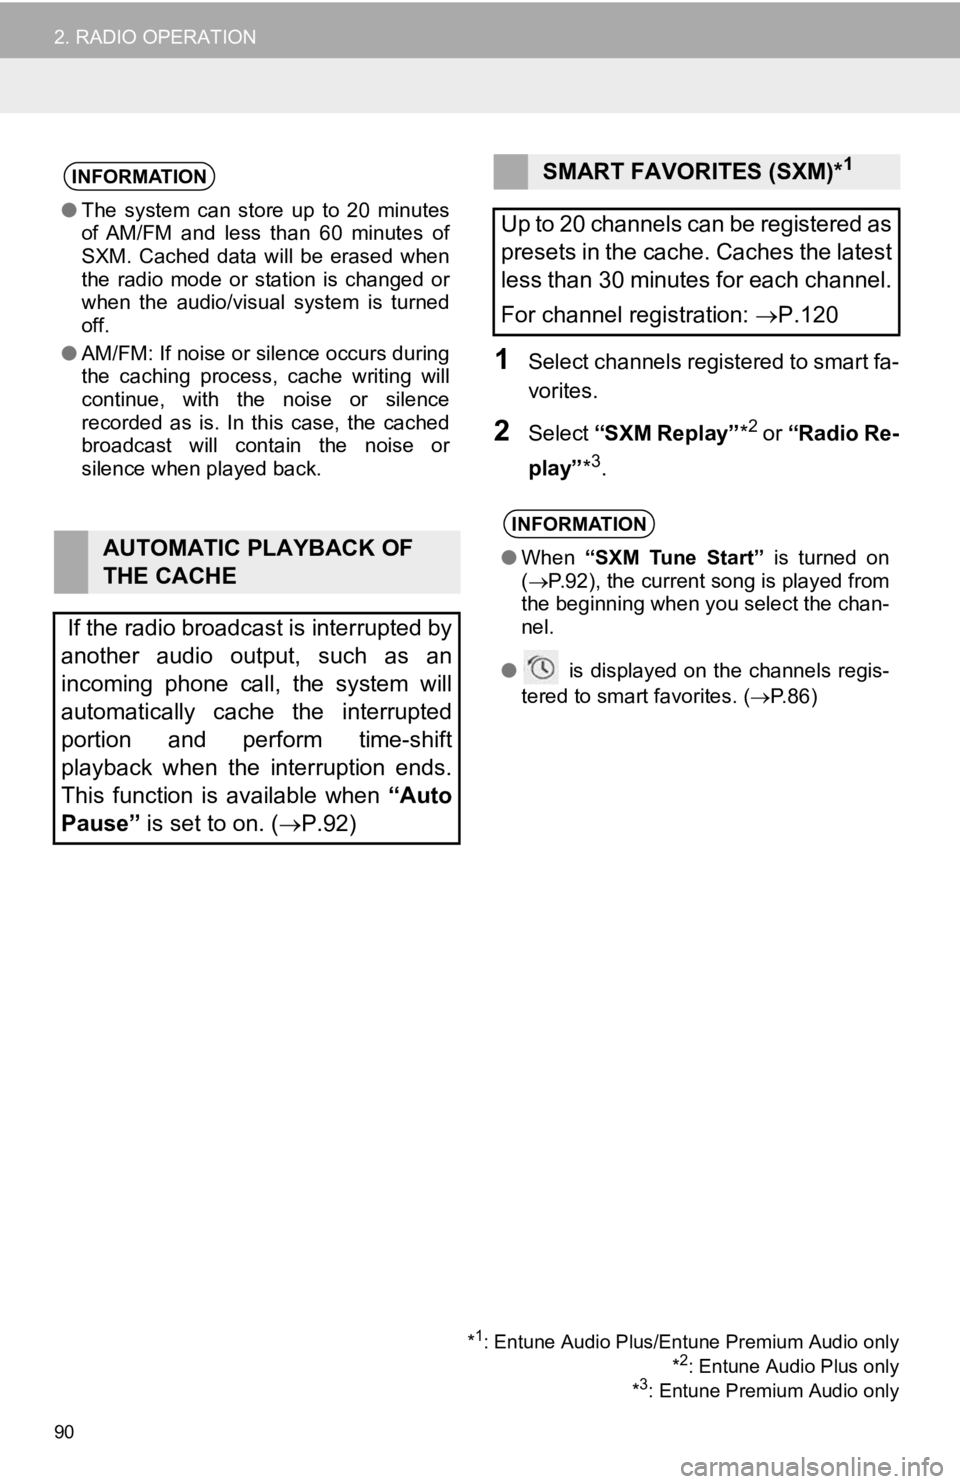
1Select “SXM Replay” *3 or “Radio Re-
play” *
1.
2Select the desired cache radio opera-
tion button.
PRESETTING A STATION
Radio mode has a mix preset function,
which can store up to 36 stations (6
stations per page x 6 pages) from any
of the AM, FM or SXM bands.
INFORMATION
●The number of preset radio stations dis-
played on the screen can be changed.
( P.120)
*1: Entune Premium Audio only
*2: Entune Audio Plus/Entune Premium Audio only *3: Entune Audio Plus only
CACHING A RADIO
PROGRAM
AM/FM*1 and SXM*2 radio program
can be cached and played back in a
time-shifted manner.
No.Function
Returns to the live radio broadcast
Displays the replay offset from the
current time
Skips backward 2 minutes (AM/FM)
Select to change the current/previ-
ous track (SXM)
Fast rewinds continuously
Pauses the playback (To restart, se-
lect
)
Fast forwards continuously
Skips forward 2 minutes (AM/FM)
Select to change the next track
(SXM)
Page 90 of 354
90
2. RADIO OPERATION
1Select channels registered to smart fa-
vorites.
2Select “SXM Replay” *2 or “Radio Re-
play” *
3.
INFORMATION
●The system can stor e up to 20 minutes
of AM/FM and less than 60 minutes of
SXM. Cached data will be erased when
the radio mode or station is changed or
when the audio/visual system is turned
off.
● AM/FM: If noise or silence occurs during
the caching process, cache writing will
continue, with the noise or silence
recorded as is. In this case, the cached
broadcast will contain the noise or
silence when played back.
AUTOMATIC PLAYBACK OF
THE CACHE
If the radio broadcast is interrupted by
another audio output, such as an
incoming phone call, the system will
automatically cache the interrupted
portion and perform time-shift
playback when the interruption ends.
This function is available when “Auto
Pause” is set to on. ( P.92)
SMART FAVORITES (SXM)*1
Up to 20 channels can be registered as
presets in the cache. Caches the latest
less than 30 minutes for each channel.
For channel registration: P.120
INFORMATION
● When “SXM Tune Start” is turned on
( P.92), the current song is played from
the beginning when you select the chan-
nel.
● is displayed on the channels regis-
tered to smart favorites. ( P.86)
*1: Entune Audio Plus/Entune Premium Audio only
*2: Entune Audio Plus only
*3: Entune Premium Audio only