TOYOTA CAMRY V20 1986 Service Information
CAMRY V20 1986
TOYOTA
TOYOTA
https://www.carmanualsonline.info/img/14/57449/w960_57449-0.png
TOYOTA CAMRY V20 1986 Service Information
Trending: check engine light, adding oil, fuse chart, differential, maintenance, radio antenna, high beam
Page 691 of 2389
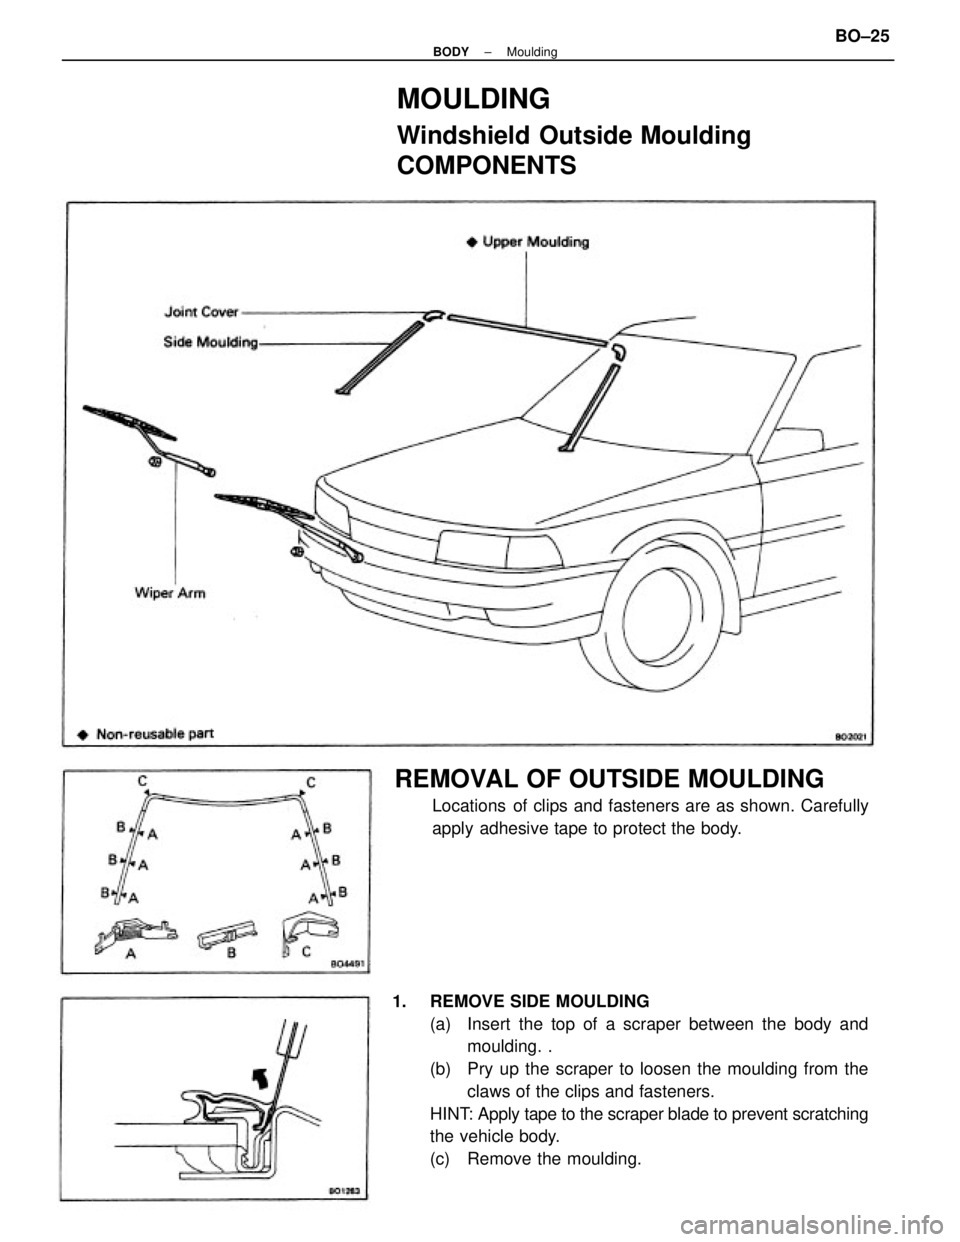
1. REMOVE SIDE MOULDING
(a) Insert the top of a scraper between the body and
moulding. .
(b) Pry up the scraper to loosen the moulding from the
claws of the clips and fasteners.
HINT: Apply tape to the scraper blade to prevent scratching
the vehicle body.
(c) Remove the moulding.
MOULDING
Windshield Outside Moulding
COMPONENTS
REMOVAL OF OUTSIDE MOULDING
Locations of clips and fasteners are as shown. Carefully
apply adhesive tape to protect the body.
± BODYMouldingBO±25
Page 692 of 2389
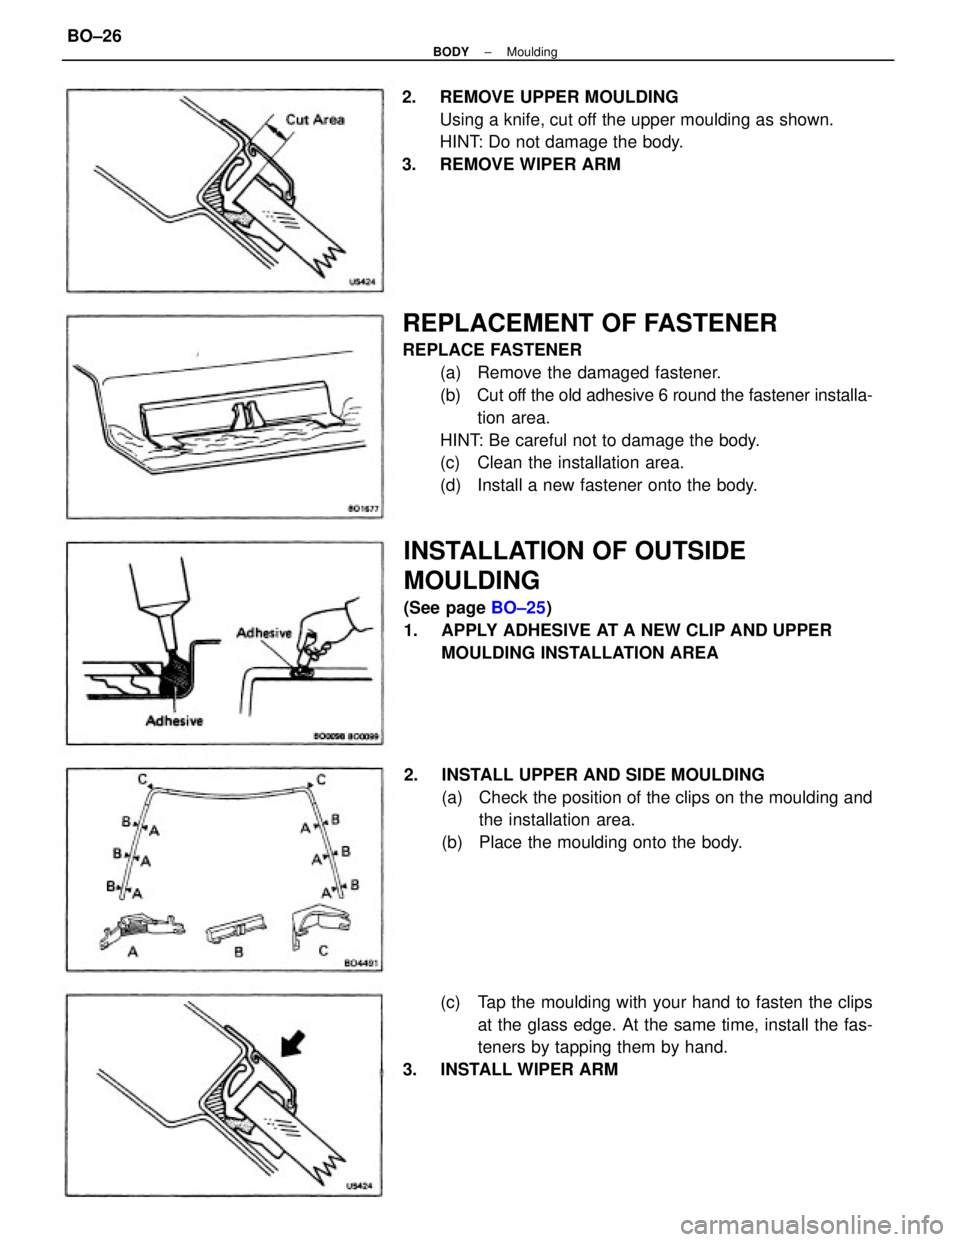
REPLACEMENT OF FASTENER
REPLACE FASTENER
(a) Remove the damaged fastener.
(b) Cut off the old adhesive 6 round the fastener installa-
tion area.
HINT: Be careful not to damage the body.
(c) Clean the installation area.
(d) Install a new fastener onto the body.
(c) Tap the moulding with your hand to fasten the clips
at the glass edge. At the same time, install the fas-
teners by tapping them by hand.
3. INSTALL WIPER ARM 2. REMOVE UPPER MOULDING
Using a knife, cut off the upper moulding as shown.
HINT: Do not damage the body.
3. REMOVE WIPER ARM
2. INSTALL UPPER AND SIDE MOULDING
(a) Check the position of the clips on the moulding and
the installation area.
(b) Place the moulding onto the body.
INSTALLATION OF OUTSIDE
MOULDING
(See page BO±25)
1. APPLY ADHESIVE AT A NEW CLIP AND UPPER
MOULDING INSTALLATION AREA
± BODYMouldingBO±26
Page 693 of 2389
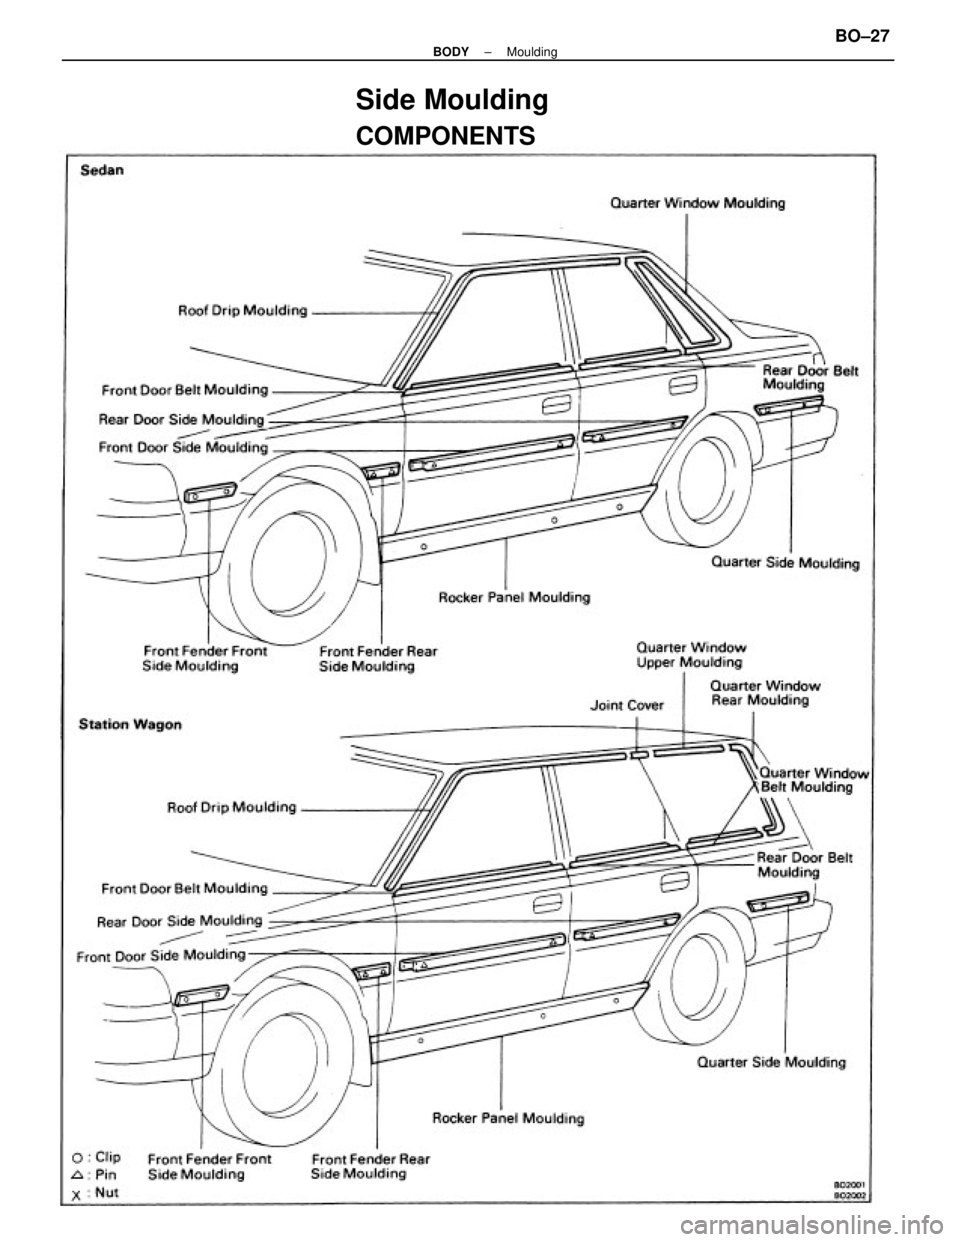
Side Moulding
COMPONENTS
± BODYMouldingBO±27
Page 694 of 2389
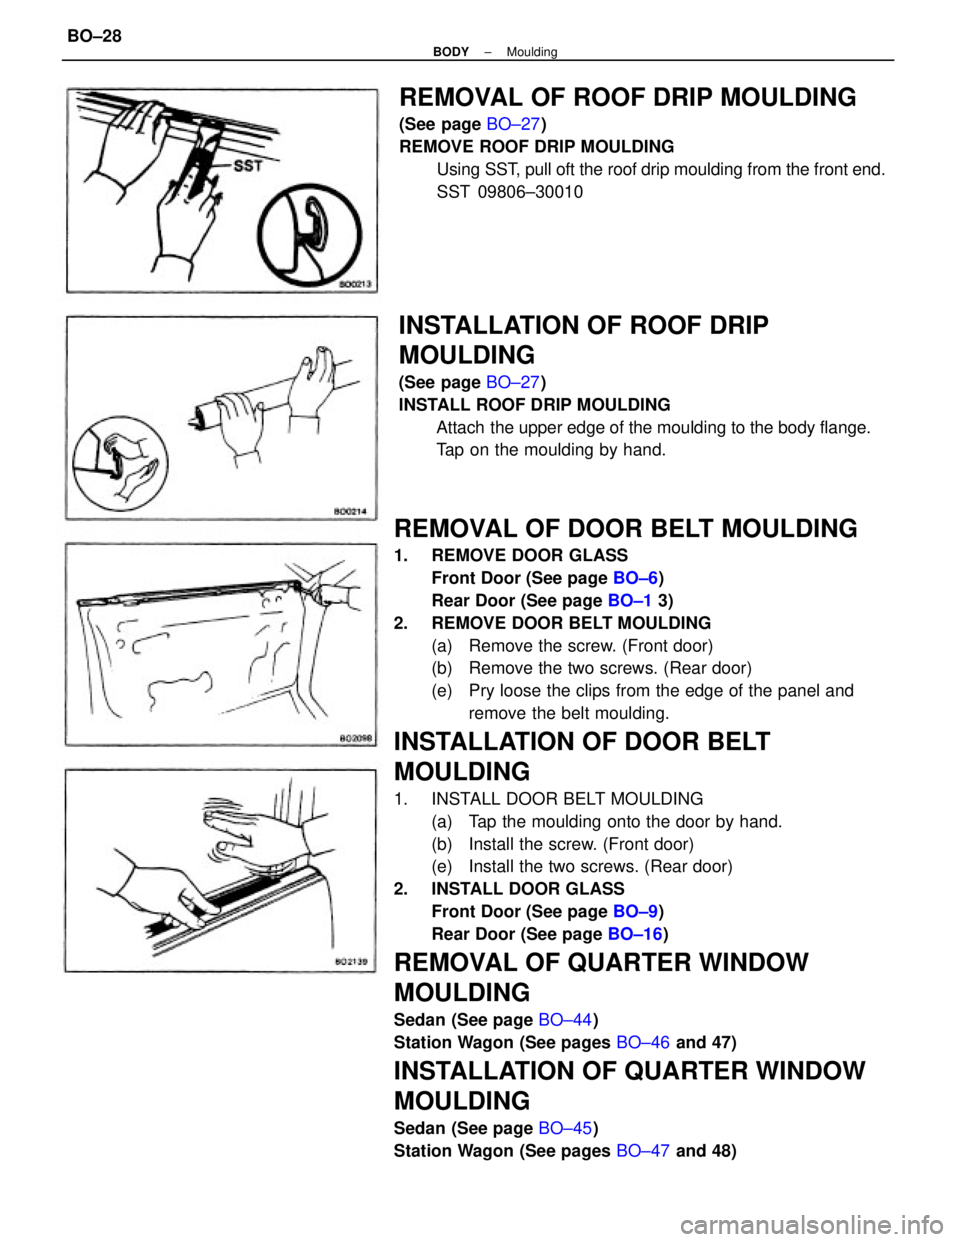
REMOVAL OF DOOR BELT MOULDING
1. REMOVE DOOR GLASS
Front Door (See page BO±6)
Rear Door (See page BO±1 3)
2. REMOVE DOOR BELT MOULDING
(a) Remove the screw. (Front door)
(b) Remove the two screws. (Rear door)
(e) Pry loose the clips from the edge of the panel and
remove the belt moulding.
INSTALLATION OF DOOR BELT
MOULDING
1. INSTALL DOOR BELT MOULDING
(a) Tap the moulding onto the door by hand.
(b) Install the screw. (Front door)
(e) Install the two screws. (Rear door)
2. INSTALL DOOR GLASS
Front Door (See page BO±9)
Rear Door (See page BO±16)
REMOVAL OF QUARTER WINDOW
MOULDING
Sedan (See page BO±44)
Station Wagon (See pages BO±46 and 47)
INSTALLATION OF QUARTER WINDOW
MOULDING
Sedan (See page BO±45)
Station Wagon (See pages BO±47 and 48)
REMOVAL OF ROOF DRIP MOULDING
(See page BO±27)
REMOVE ROOF DRIP MOULDING
Using SST, pull oft the roof drip moulding from the front end.
SST 09806±30010
INSTALLATION OF ROOF DRIP
MOULDING
(See page BO±27)
INSTALL ROOF DRIP MOULDING
Attach the upper edge of the moulding to the body flange.
Tap on the moulding by hand.
± BODYMouldingBO±28
Page 695 of 2389
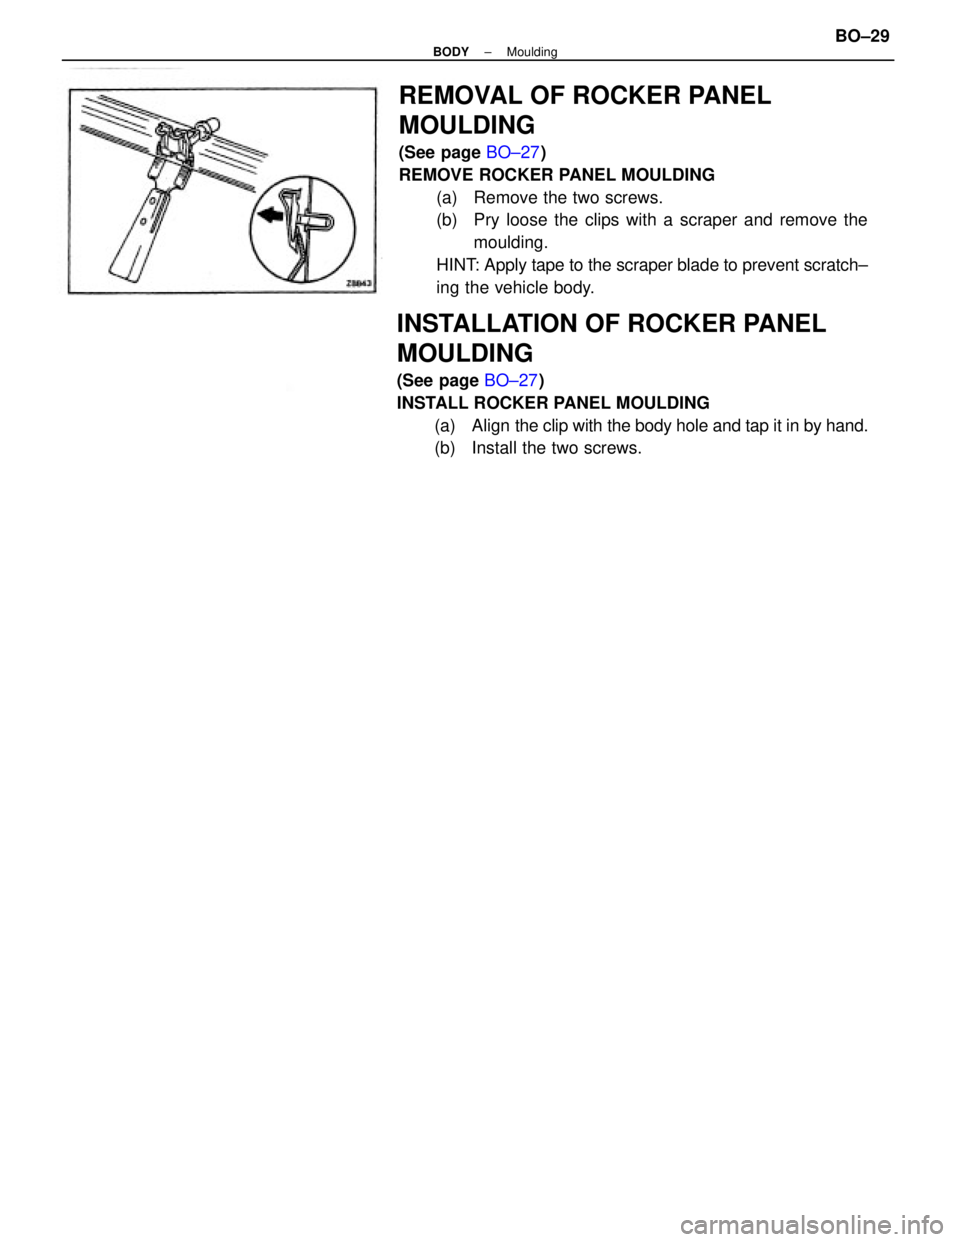
REMOVAL OF ROCKER PANEL
MOULDING
(See page BO±27)
REMOVE ROCKER PANEL MOULDING
(a) Remove the two screws.
(b) Pry loose the clips with a scraper and remove the
moulding.
HINT: Apply tape to the scraper blade to prevent scratch±
ing the vehicle body.
INSTALLATION OF ROCKER PANEL
MOULDING
(See page BO±27)
INSTALL ROCKER PANEL MOULDING
(a) Align the clip with the body hole and tap it in by hand.
(b) Install the two screws.
± BODYMouldingBO±29
Page 696 of 2389
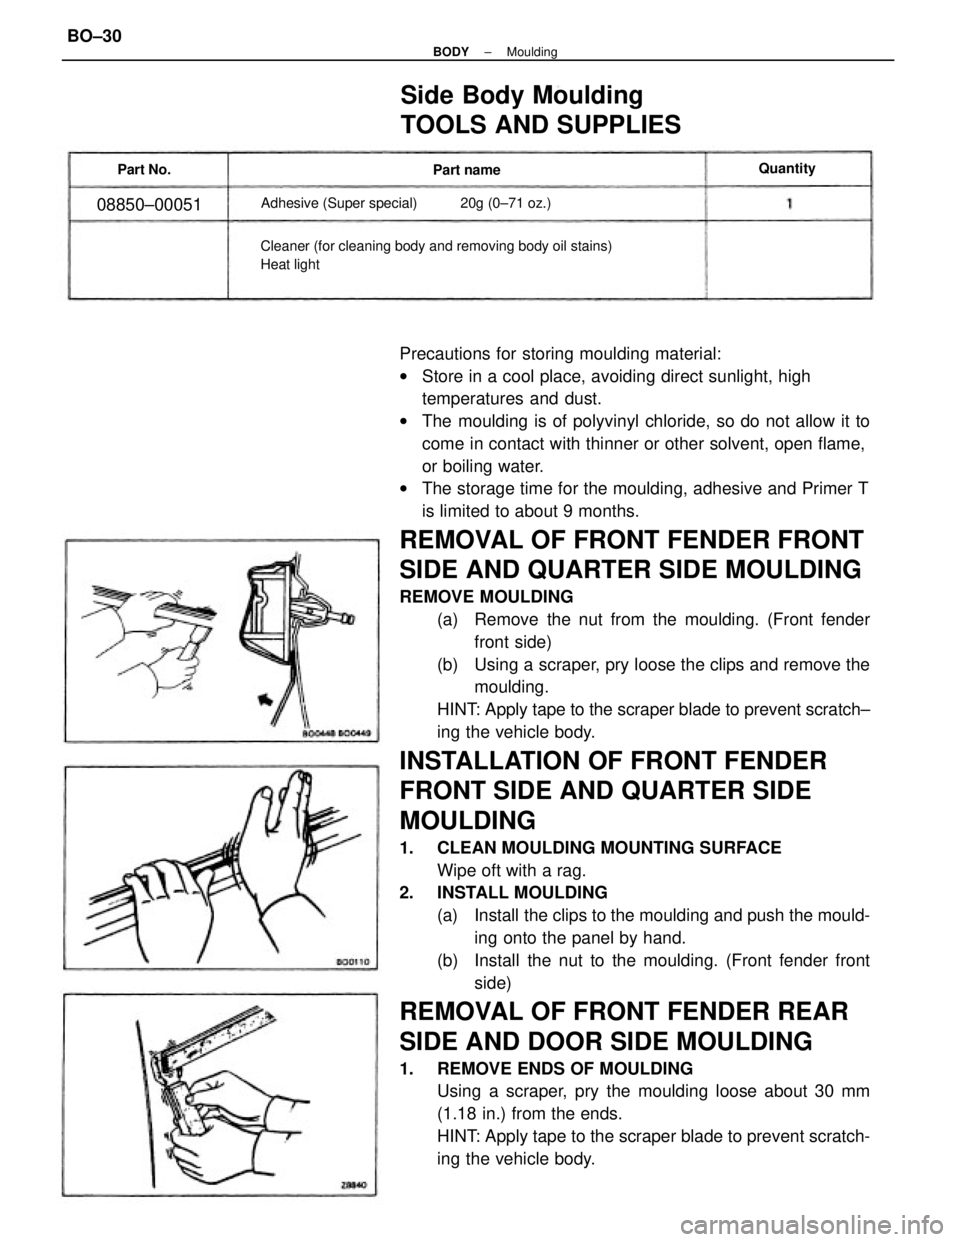
Precautions for storing moulding material:
wStore in a cool place, avoiding direct sunlight, high
temperatures and dust.
wThe moulding is of polyvinyl chloride, so do not allow it to
come in contact with thinner or other solvent, open flame,
or boiling water.
wThe storage time for the moulding, adhesive and Primer T
is limited to about 9 months.
REMOVAL OF FRONT FENDER FRONT
SIDE AND QUARTER SIDE MOULDING
REMOVE MOULDING
(a) Remove the nut from the moulding. (Front fender
front side)
(b) Using a scraper, pry loose the clips and remove the
moulding.
HINT: Apply tape to the scraper blade to prevent scratch±
ing the vehicle body.
INSTALLATION OF FRONT FENDER
FRONT SIDE AND QUARTER SIDE
MOULDING
1. CLEAN MOULDING MOUNTING SURFACE
Wipe oft with a rag.
2. INSTALL MOULDING
(a) Install the clips to the moulding and push the mould-
ing onto the panel by hand.
(b) Install the nut to the moulding. (Front fender front
side)
REMOVAL OF FRONT FENDER REAR
SIDE AND DOOR SIDE MOULDING
1. REMOVE ENDS OF MOULDING
Using a scraper, pry the moulding loose about 30 mm
(1.18 in.) from the ends.
HINT: Apply tape to the scraper blade to prevent scratch-
ing the vehicle body.
Side Body Moulding
TOOLS AND SUPPLIES
Cleaner (for cleaning body and removing body oil stains)
Heat lightAdhesive (Super special) 20g (0±71 oz.)
08850±00051
Quantity
Part name Part No.
± BODYMouldingBO±30
Page 697 of 2389
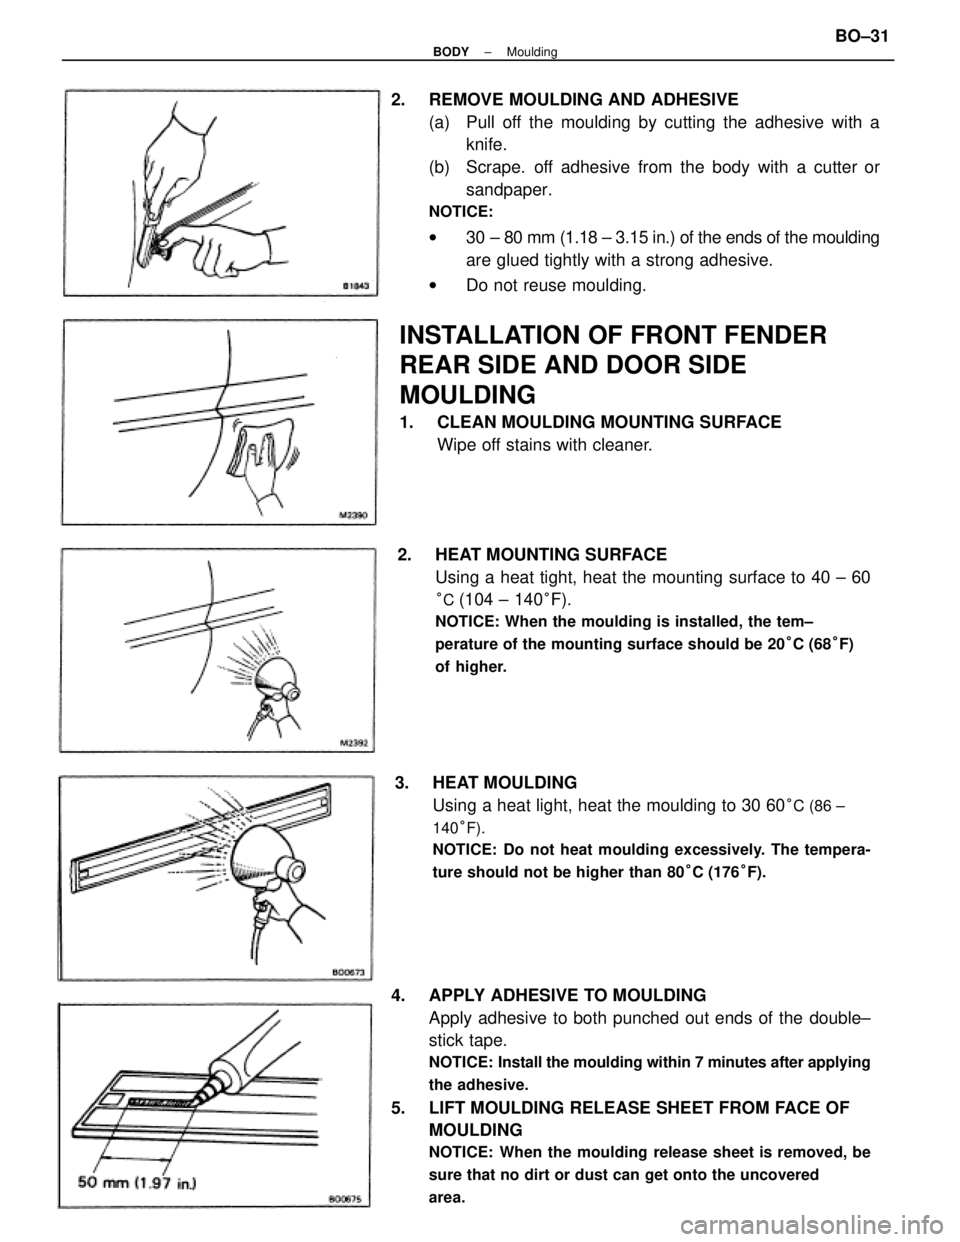
4. APPLY ADHESIVE TO MOULDING
Apply adhesive to both punched out ends of the double±
stick tape.
NOTICE: Install the moulding within 7 minutes after applying
the adhesive.
5. LIFT MOULDING RELEASE SHEET FROM FACE OF
MOULDING
NOTICE: When the moulding release sheet is removed, be
sure that no dirt or dust can get onto the uncovered
area.
2. REMOVE MOULDING AND ADHESIVE
(a) Pull off the moulding by cutting the adhesive with a
knife.
(b) Scrape. off adhesive from the body with a cutter or
sandpaper.
NOTICE:
w30 ± 80 mm (1.18 ± 3.15 in.) of the ends of the moulding
are glued tightly with a strong adhesive.
wDo not reuse moulding.
2. HEAT MOUNTING SURFACE
Using a heat tight, heat the mounting surface to 40 ± 60
°C (104 ± 140°F).
NOTICE: When the moulding is installed, the tem±
perature of the mounting surface should be 20°C (68°F)
of higher.
3. HEAT MOULDING
Using a heat light, heat the moulding to 30 60
°C (86 ±
140°F).
NOTICE: Do not heat moulding excessively. The tempera-
ture should not be higher than 80°C (176°F).
INSTALLATION OF FRONT FENDER
REAR SIDE AND DOOR SIDE
MOULDING
1. CLEAN MOULDING MOUNTING SURFACE
Wipe off stains with cleaner.
± BODYMouldingBO±31
Page 698 of 2389
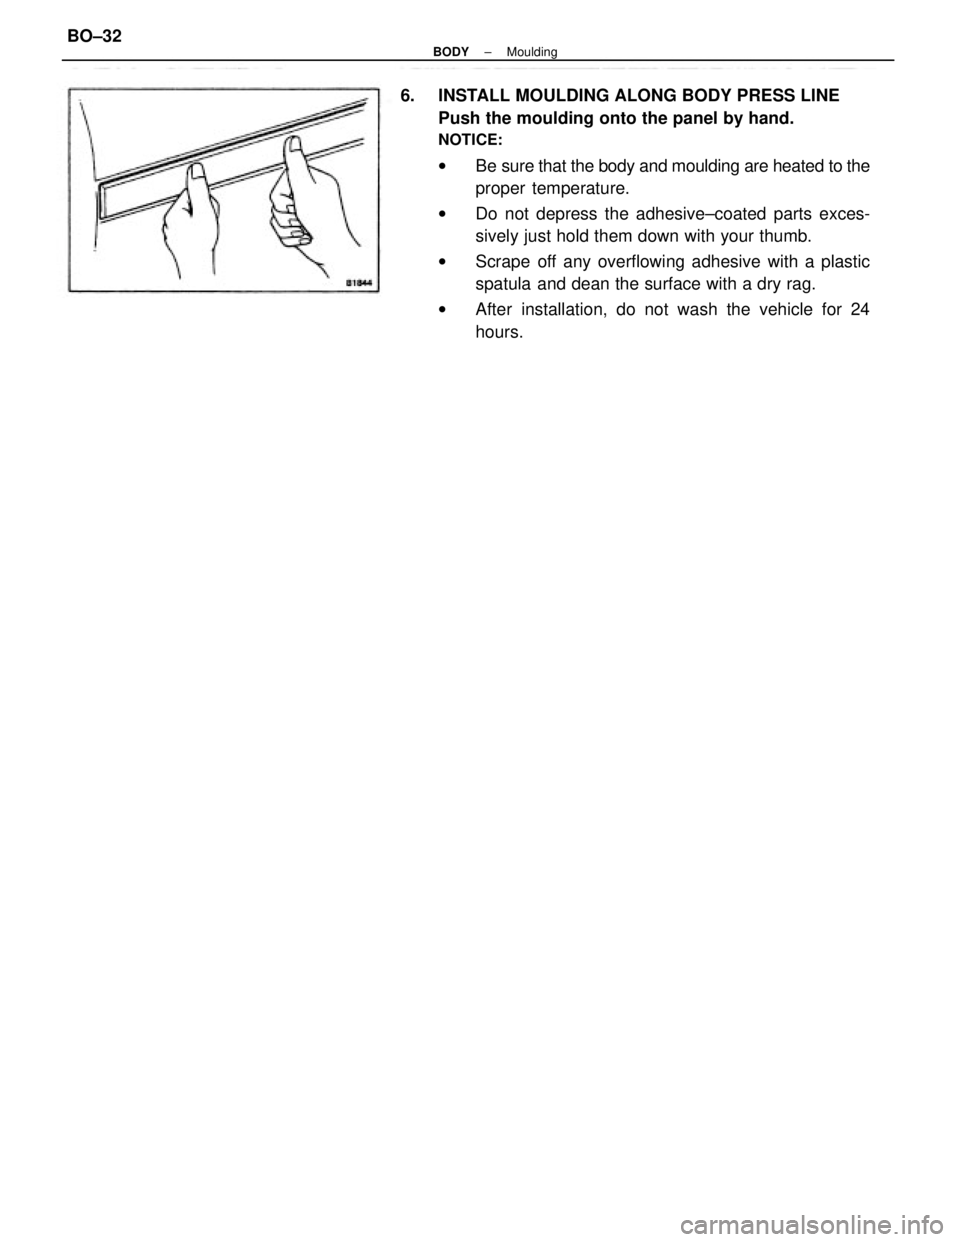
6. INSTALL MOULDING ALONG BODY PRESS LINE
Push the moulding onto the panel by hand.
NOTICE:
wBe sure that the body and moulding are heated to the
proper temperature.
wDo not depress the adhesive±coated parts exces-
sively just hold them down with your thumb.
wScrape off any overflowing adhesive with a plastic
spatula and dean the surface with a dry rag.
wAfter installation, do not wash the vehicle for 24
hours.
± BODYMouldingBO±32
Page 699 of 2389
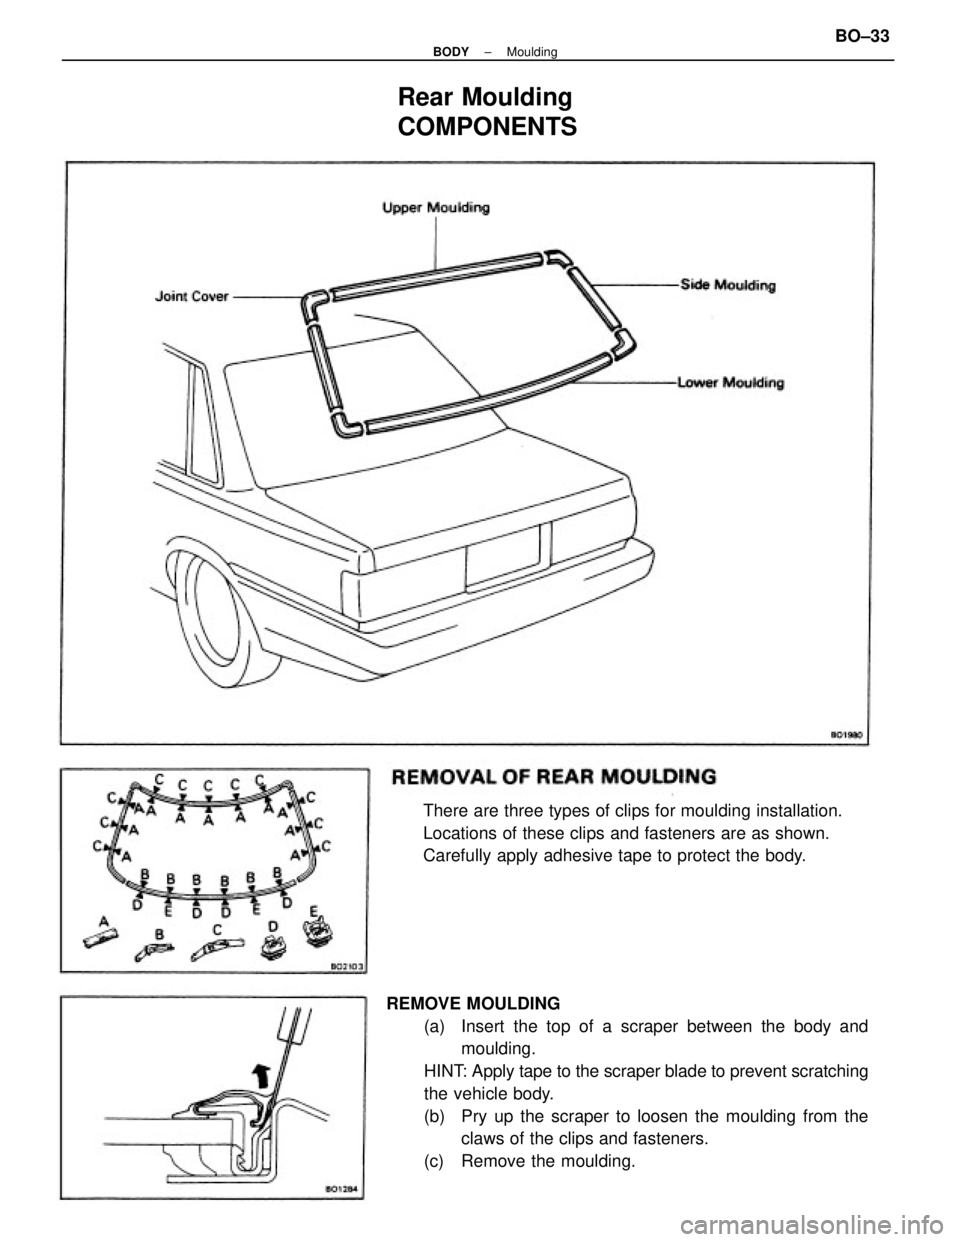
REMOVE MOULDING
(a) Insert the top of a scraper between the body and
moulding.
HINT: Apply tape to the scraper blade to prevent scratching
the vehicle body.
(b) Pry up the scraper to loosen the moulding from the
claws of the clips and fasteners.
(c) Remove the moulding. There are three types of clips for moulding installation.
Locations of these clips and fasteners are as shown.
Carefully apply adhesive tape to protect the body.
Rear Moulding
COMPONENTS
± BODYMouldingBO±33
Page 700 of 2389
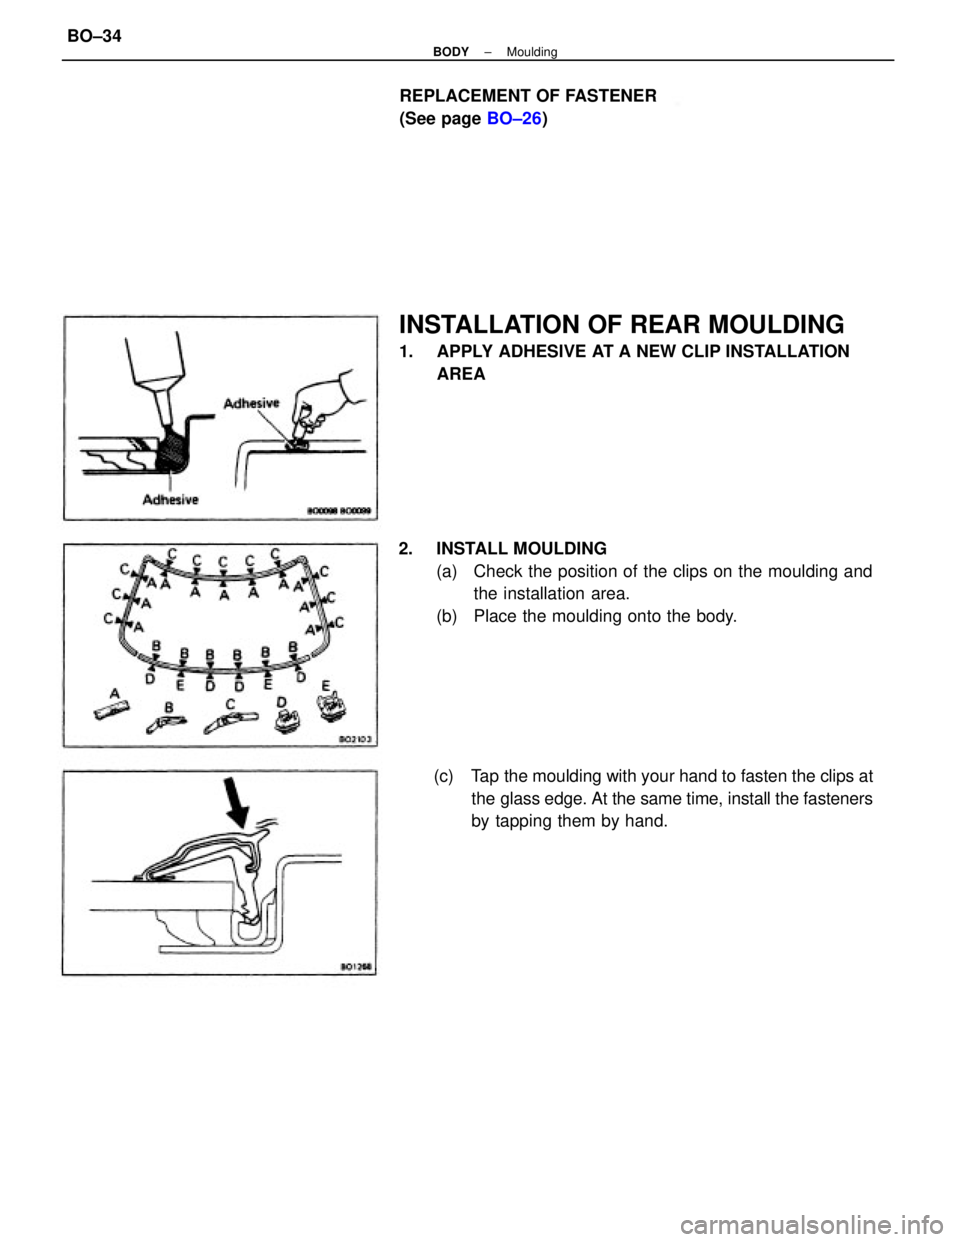
2. INSTALL MOULDING
(a) Check the position of the clips on the moulding and
the installation area.
(b) Place the moulding onto the body.
INSTALLATION OF REAR MOULDING
1. APPLY ADHESIVE AT A NEW CLIP INSTALLATION
AREA
(c) Tap the moulding with your hand to fasten the clips at
the glass edge. At the same time, install the fasteners
by tapping them by hand. REPLACEMENT OF FASTENER
(See page BO±26)
± BODYMouldingBO±34
Trending: clutch, brake sensor, power steering fluid, air conditioning, boot, bulb, engine oil capacity
