TOYOTA CAMRY V20 1986 Service Information
Manufacturer: TOYOTA, Model Year: 1986, Model line: CAMRY V20, Model: TOYOTA CAMRY V20 1986Pages: 2389, PDF Size: 84.44 MB
Page 701 of 2389
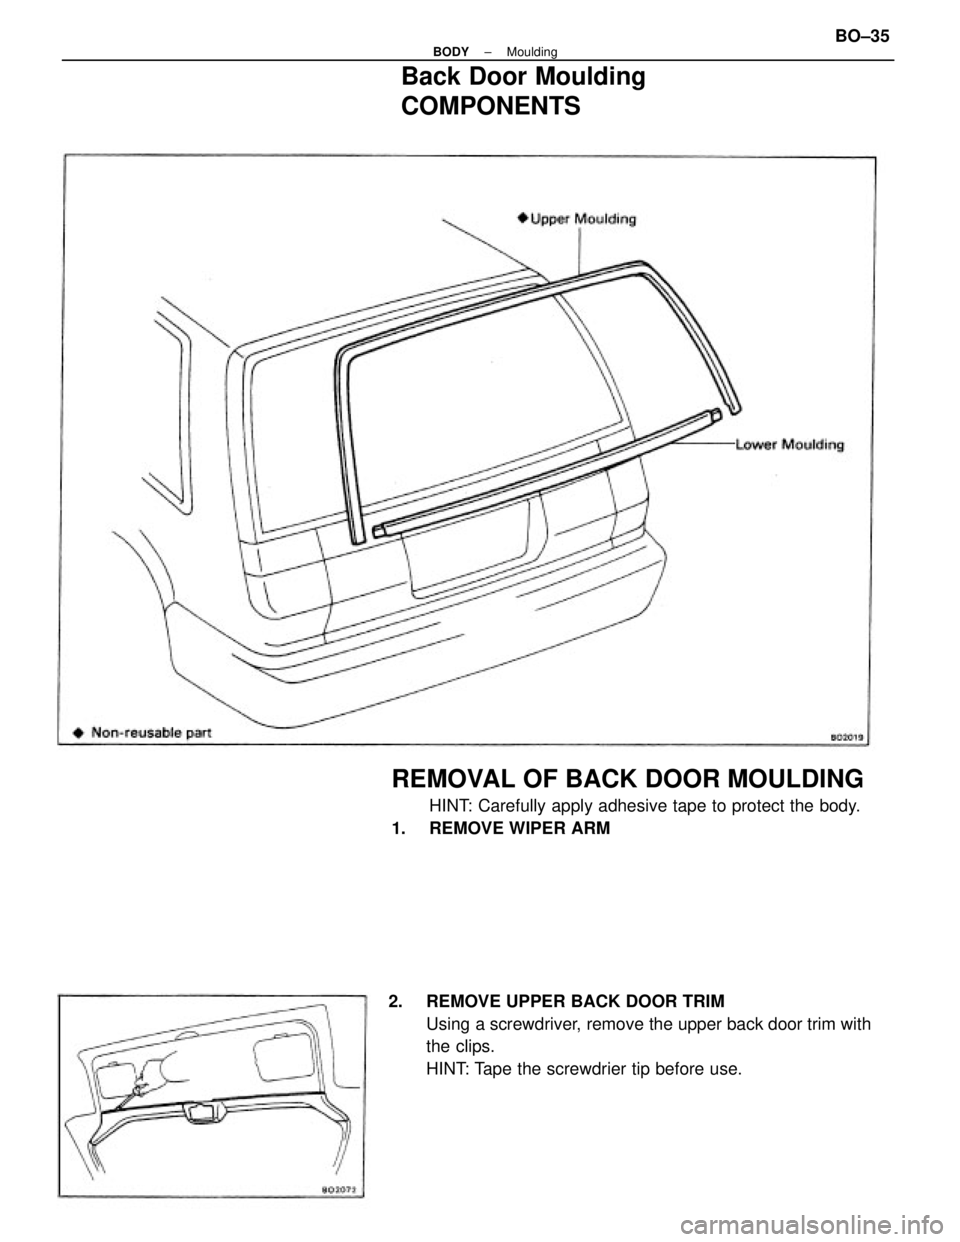
2. REMOVE UPPER BACK DOOR TRIM
Using a screwdriver, remove the upper back door trim with
the clips.
HINT: Tape the screwdrier tip before use.
REMOVAL OF BACK DOOR MOULDING
HINT: Carefully apply adhesive tape to protect the body.
1. REMOVE WIPER ARM
Back Door Moulding
COMPONENTS
± BODYMouldingBO±35
Page 702 of 2389
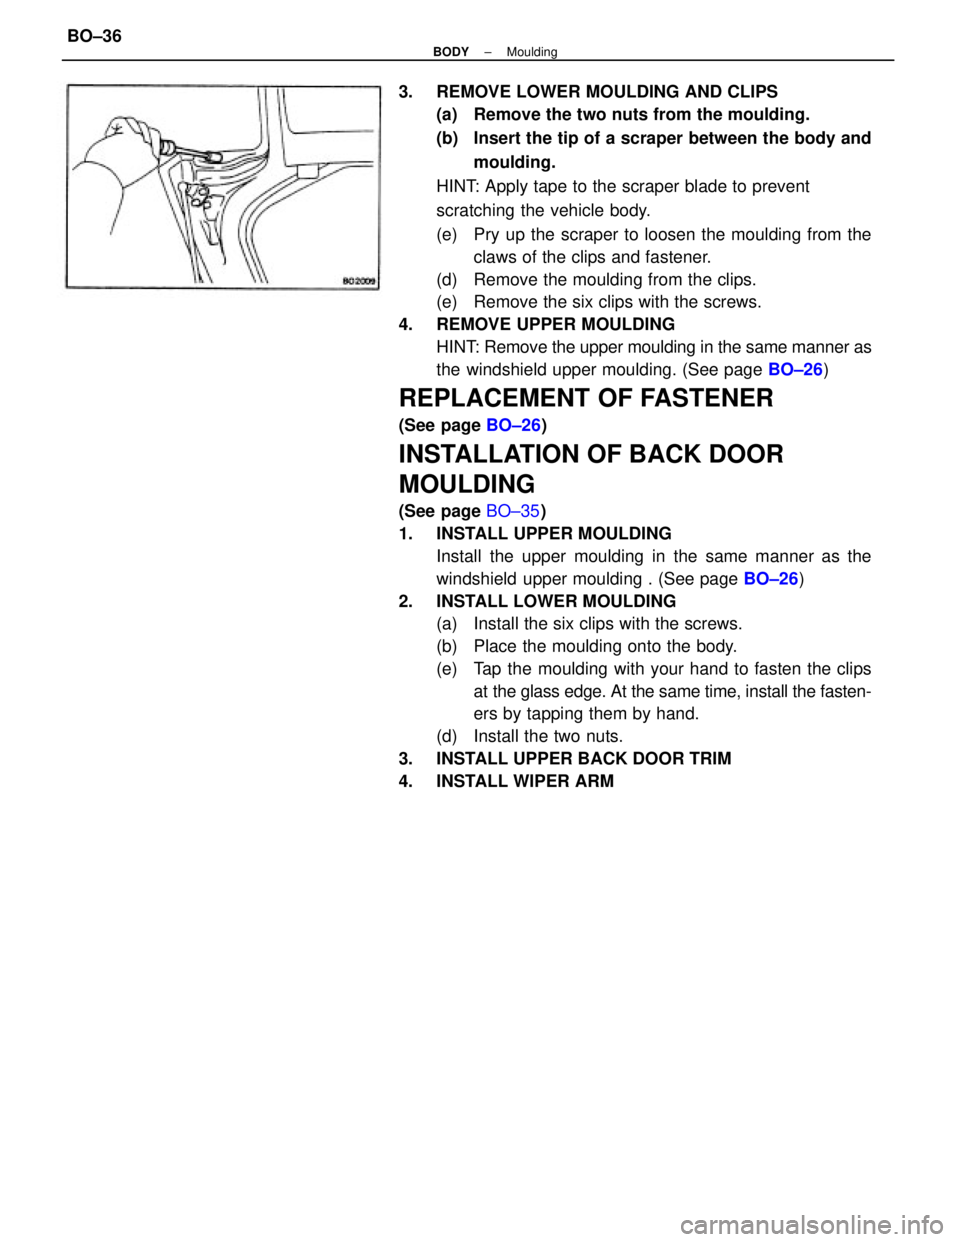
3. REMOVE LOWER MOULDING AND CLIPS
(a) Remove the two nuts from the moulding.
(b) Insert the tip of a scraper between the body and
moulding.
HINT: Apply tape to the scraper blade to prevent
scratching the vehicle body.
(e) Pry up the scraper to loosen the moulding from the
claws of the clips and fastener.
(d) Remove the moulding from the clips.
(e) Remove the six clips with the screws.
4. REMOVE UPPER MOULDING
HINT: Remove the upper moulding in the same manner as
the windshield upper moulding. (See page BO±26)
REPLACEMENT OF FASTENER
(See page BO±26)
INSTALLATION OF BACK DOOR
MOULDING
(See page BO±35)
1. INSTALL UPPER MOULDING
Install the upper moulding in the same manner as the
windshield upper moulding . (See page BO±26)
2. INSTALL LOWER MOULDING
(a) Install the six clips with the screws.
(b) Place the moulding onto the body.
(e) Tap the moulding with your hand to fasten the clips
at the glass edge. At the same time, install the fasten-
ers by tapping them by hand.
(d) Install the two nuts.
3. INSTALL UPPER BACK DOOR TRIM
4. INSTALL WIPER ARM
± BODYMouldingBO±36
Page 703 of 2389
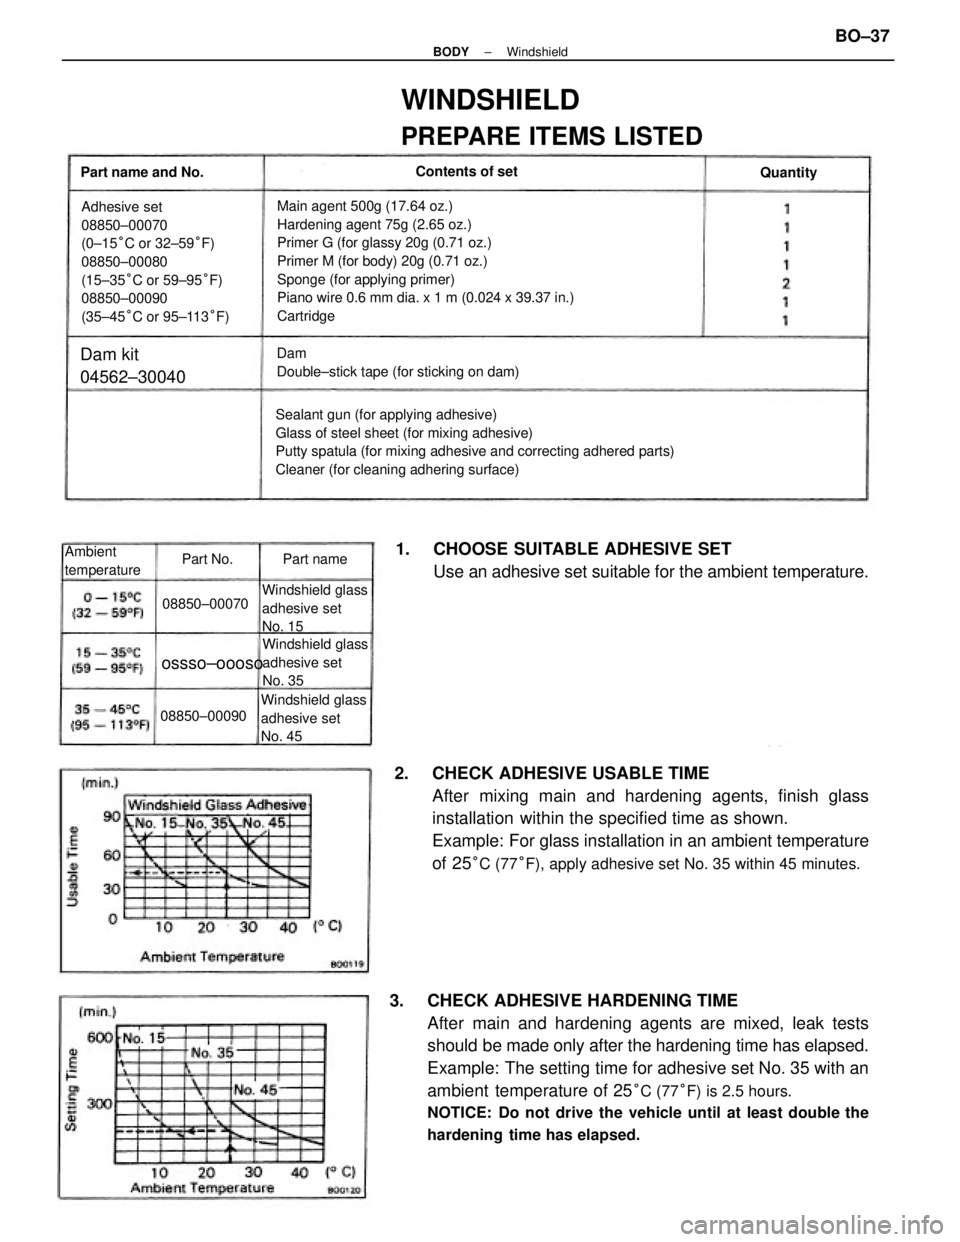
3. CHECK ADHESIVE HARDENING TIME
After main and hardening agents are mixed, leak tests
should be made only after the hardening time has elapsed.
Example: The setting time for adhesive set No. 35 with an
ambient temperature of 25
°C (77°F) is 2.5 hours.
NOTICE: Do not drive the vehicle until at least double the
hardening time has elapsed.
2. CHECK ADHESIVE USABLE TIME
After mixing main and hardening agents, finish glass
installation within the specified time as shown.
Example: For glass installation in an ambient temperature
of 25
°C (77°F), apply adhesive set No. 35 within 45 minutes.
Main agent 500g (17.64 oz.)
Hardening agent 75g (2.65 oz.)
Primer G (for glassy 20g (0.71 oz.)
Primer M (for body) 20g (0.71 oz.)
Sponge (for applying primer)
Piano wire 0.6 mm dia. x 1 m (0.024 x 39.37 in.)
Cartridge
Sealant gun (for applying adhesive)
Glass of steel sheet (for mixing adhesive)
Putty spatula (for mixing adhesive and correcting adhered parts)
Cleaner (for cleaning adhering surface)
1. CHOOSE SUITABLE ADHESIVE SET
Use an adhesive set suitable for the ambient temperature.
Adhesive set
08850±00070
(0±15°C or 32±59°F)
08850±00080
(15±35°C or 59±95°F)
08850±00090
(35±45°C or 95±113°F)
WINDSHIELD
PREPARE ITEMS LISTED
Dam
Double±stick tape (for sticking on dam)
Windshield glass
adhesive set
No. 15
Windshield glass
adhesive set
No. 45Windshield glass
adhesive set
No. 35Dam kit
04562±30040
Ambient
temperaturePart name and No.Contents of set
08850±00070
ossso±oooso
08850±00090Quantity
Part name Part No.
± BODYWindshieldBO±37
Page 704 of 2389
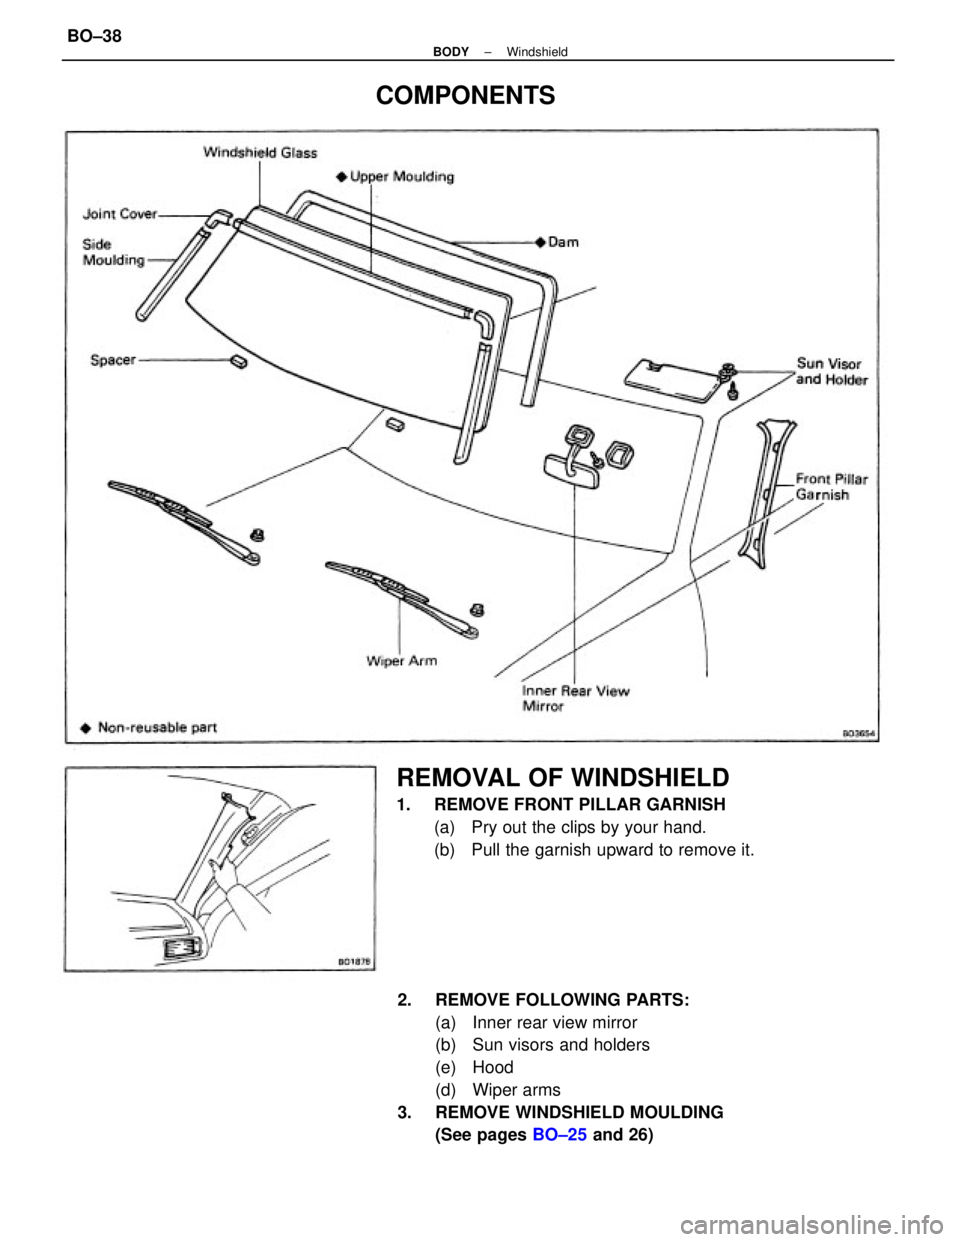
2. REMOVE FOLLOWING PARTS:
(a) Inner rear view mirror
(b) Sun visors and holders
(e) Hood
(d) Wiper arms
3. REMOVE WINDSHIELD MOULDING
(See pages BO±25 and 26)
REMOVAL OF WINDSHIELD
1. REMOVE FRONT PILLAR GARNISH
(a) Pry out the clips by your hand.
(b) Pull the garnish upward to remove it.
COMPONENTS
± BODYWindshieldBO±38
Page 705 of 2389
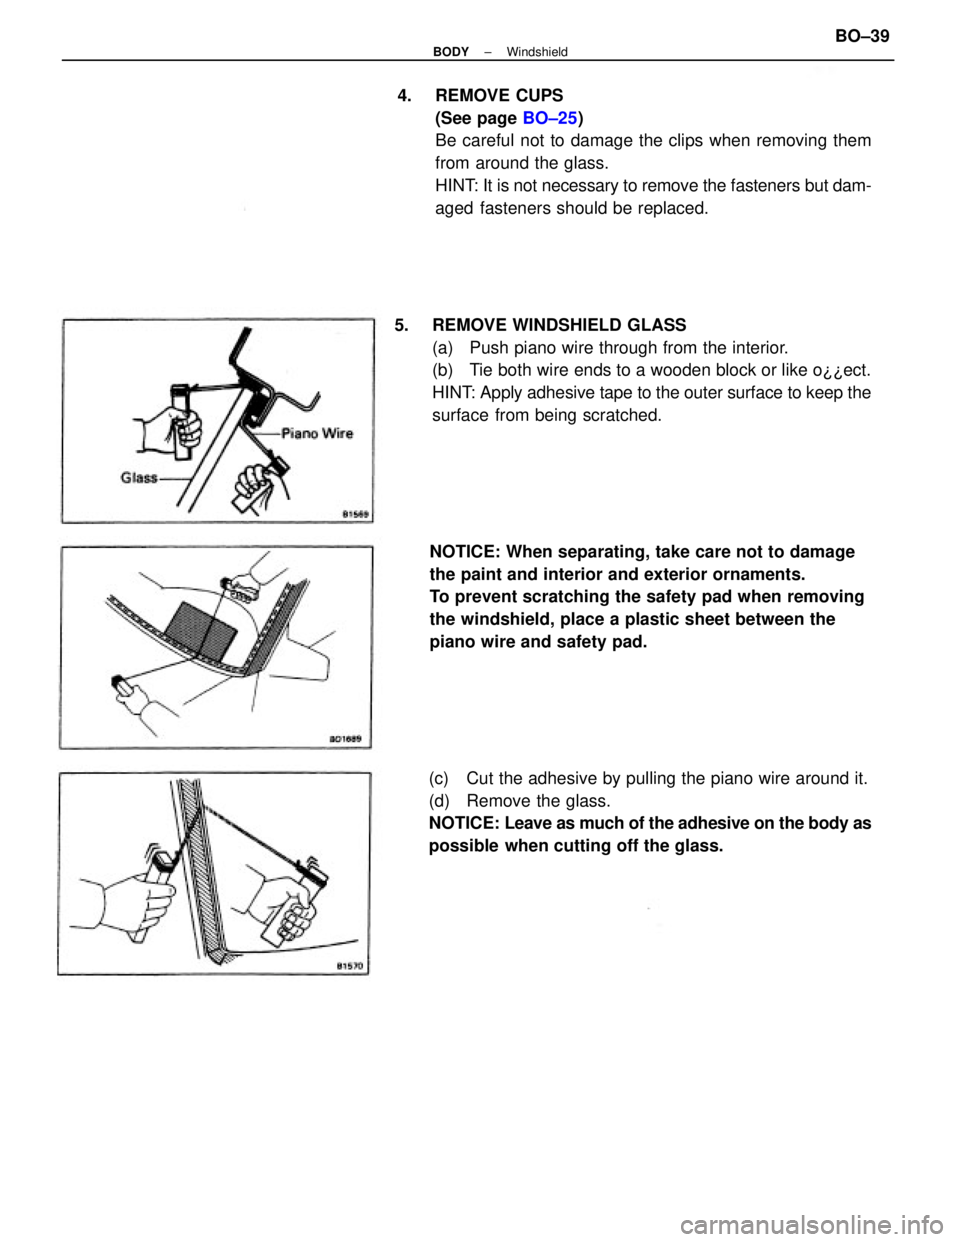
4. REMOVE CUPS
(See page BO±25)
Be careful not to damage the clips when removing them
from around the glass.
HINT: It is not necessary to remove the fasteners but dam-
aged fasteners should be replaced.
5. REMOVE WINDSHIELD GLASS
(a) Push piano wire through from the interior.
(b) Tie both wire ends to a wooden block or like o¿¿ect.
HINT: Apply adhesive tape to the outer surface to keep the
surface from being scratched.
NOTICE: When separating, take care not to damage
the paint and interior and exterior ornaments.
To prevent scratching the safety pad when removing
the windshield, place a plastic sheet between the
piano wire and safety pad.
(c) Cut the adhesive by pulling the piano wire around it.
(d) Remove the glass.
NOTICE: Leave as much of the adhesive on the body as
possible when cutting off the glass.
± BODYWindshieldBO±39
Page 706 of 2389
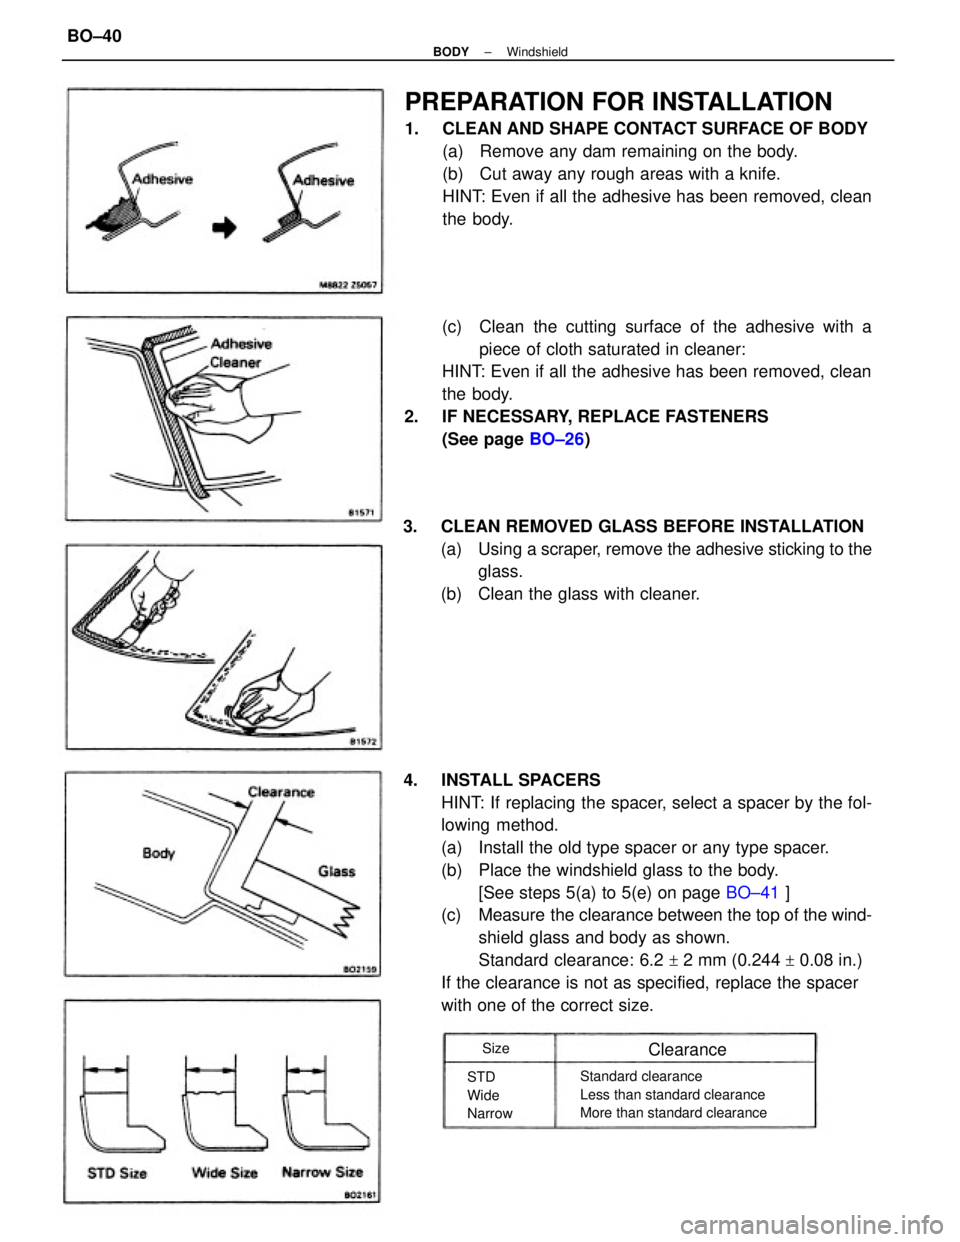
4. INSTALL SPACERS
HINT: If replacing the spacer, select a spacer by the fol-
lowing method.
(a) Install the old type spacer or any type spacer.
(b) Place the windshield glass to the body.
[See steps 5(a) to 5(e) on page BO±41 ]
(c) Measure the clearance between the top of the wind-
shield glass and body as shown.
Standard clearance: 6.2
+ 2 mm (0.244 + 0.08 in.)
If the clearance is not as specified, replace the spacer
with one of the correct size.
PREPARATION FOR INSTALLATION
1. CLEAN AND SHAPE CONTACT SURFACE OF BODY
(a) Remove any dam remaining on the body.
(b) Cut away any rough areas with a knife.
HINT: Even if all the adhesive has been removed, clean
the body.
(c) Clean the cutting surface of the adhesive with a
piece of cloth saturated in cleaner:
HINT: Even if all the adhesive has been removed, clean
the body.
2. IF NECESSARY, REPLACE FASTENERS
(See page BO±26)
3. CLEAN REMOVED GLASS BEFORE INSTALLATION
(a) Using a scraper, remove the adhesive sticking to the
glass.
(b) Clean the glass with cleaner.
Standard clearance
Less than standard clearance
More than standard clearance STD
Wide
Narrow
ClearanceSize
± BODYWindshieldBO±40
Page 707 of 2389
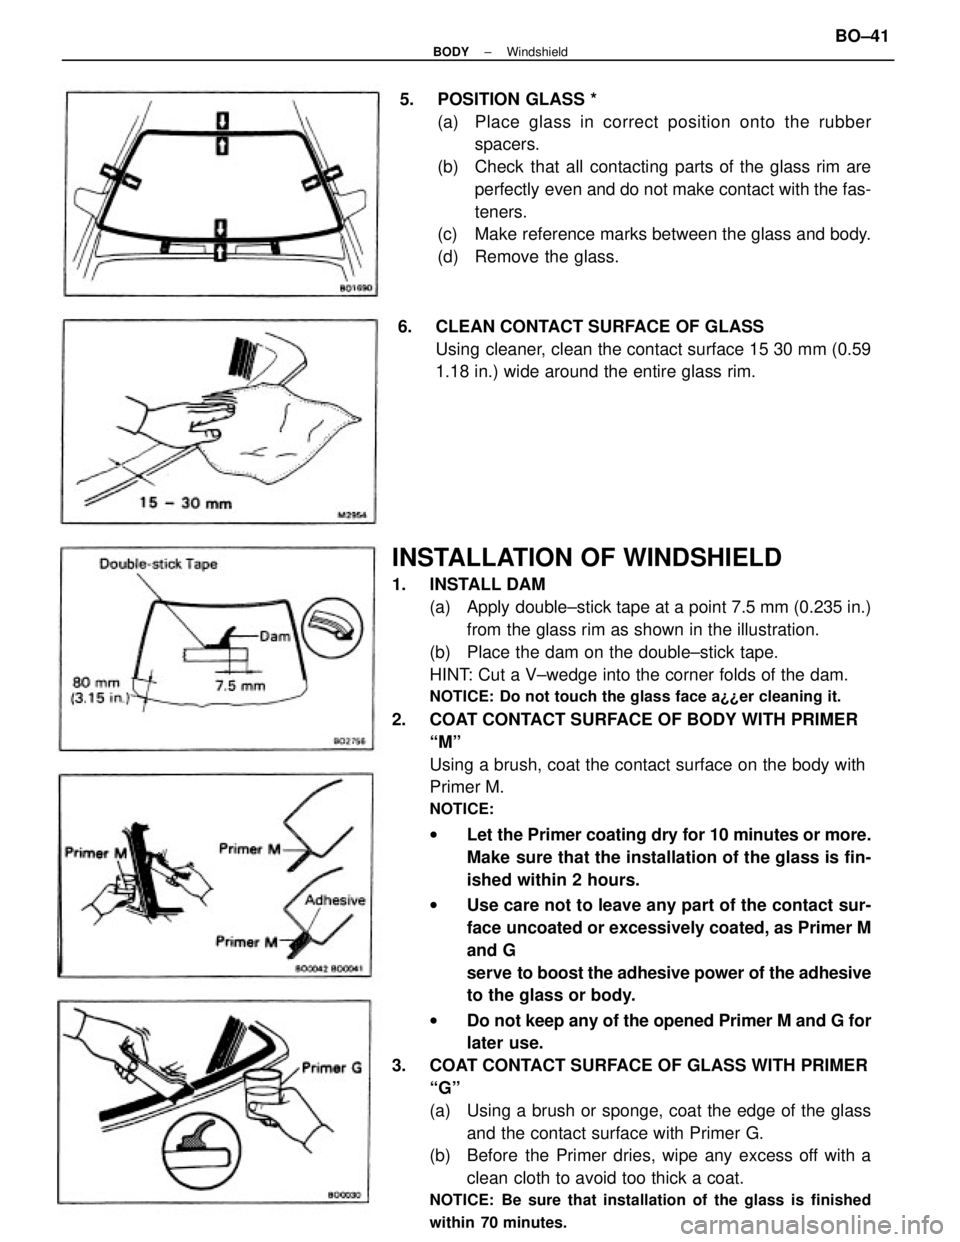
INSTALLATION OF WINDSHIELD
1. INSTALL DAM
(a) Apply double±stick tape at a point 7.5 mm (0.235 in.)
from the glass rim as shown in the illustration.
(b) Place the dam on the double±stick tape.
HINT: Cut a V±wedge into the corner folds of the dam.
NOTICE: Do not touch the glass face a¿¿er cleaning it.
2. COAT CONTACT SURFACE OF BODY WITH PRIMER
ªMº
Using a brush, coat the contact surface on the body with
Primer M.
NOTICE:
wLet the Primer coating dry for 10 minutes or more.
Make sure that the installation of the glass is fin-
ished within 2 hours.
wUse care not to leave any part of the contact sur-
face uncoated or excessively coated, as Primer M
and G
serve to boost the adhesive power of the adhesive
to the glass or body.
wDo not keep any of the opened Primer M and G for
later use.
3. COAT CONTACT SURFACE OF GLASS WITH PRIMER
ªGº
(a) Using a brush or sponge, coat the edge of the glass
and the contact surface with Primer G.
(b) Before the Primer dries, wipe any excess off with a
clean cloth to avoid too thick a coat.
NOTICE: Be sure that installation of the glass is finished
within 70 minutes.
5. POSITION GLASS *
(a) Place glass in correct position onto the rubber
spacers.
(b) Check that all contacting parts of the glass rim are
perfectly even and do not make contact with the fas-
teners.
(c) Make reference marks between the glass and body.
(d) Remove the glass.
6. CLEAN CONTACT SURFACE OF GLASS
Using cleaner, clean the contact surface 15 30 mm (0.59
1.18 in.) wide around the entire glass rim.
± BODYWindshieldBO±41
Page 708 of 2389
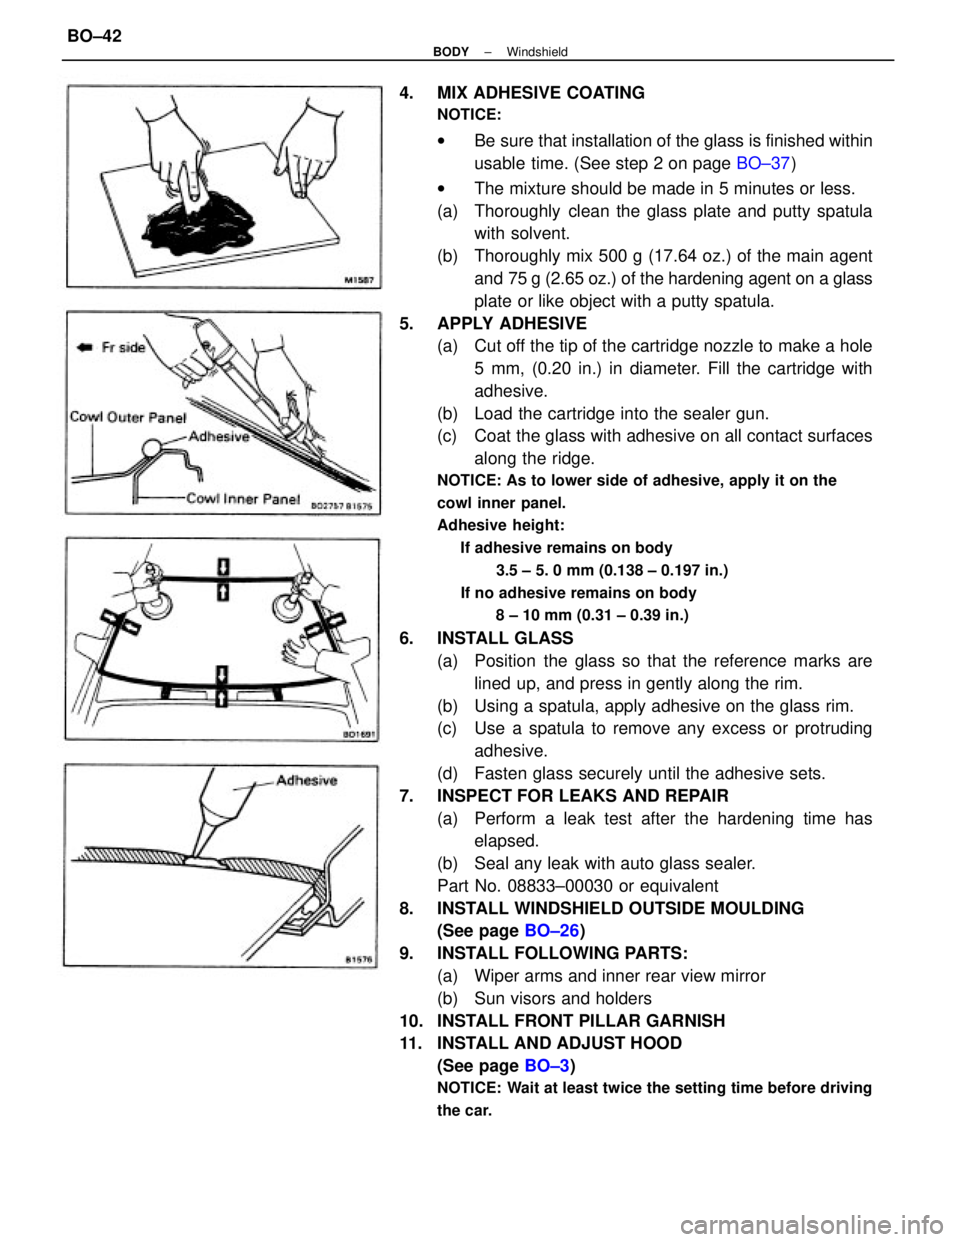
4. MIX ADHESIVE COATING
NOTICE:
wBe sure that installation of the glass is finished within
usable time. (See step 2 on page BO±37)
wThe mixture should be made in 5 minutes or less.
(a) Thoroughly clean the glass plate and putty spatula
with solvent.
(b) Thoroughly mix 500 g (17.64 oz.) of the main agent
and 75 g (2.65 oz.) of the hardening agent on a glass
plate or like object with a putty spatula.
5. APPLY ADHESIVE
(a) Cut off the tip of the cartridge nozzle to make a hole
5 mm, (0.20 in.) in diameter. Fill the cartridge with
adhesive.
(b) Load the cartridge into the sealer gun.
(c) Coat the glass with adhesive on all contact surfaces
along the ridge.
NOTICE: As to lower side of adhesive, apply it on the
cowl inner panel.
Adhesive height:
If adhesive remains on body
3.5 ± 5. 0 mm (0.138 ± 0.197 in.)
If no adhesive remains on body
8 ± 10 mm (0.31 ± 0.39 in.)
6. INSTALL GLASS
(a) Position the glass so that the reference marks are
lined up, and press in gently along the rim.
(b) Using a spatula, apply adhesive on the glass rim.
(c) Use a spatula to remove any excess or protruding
adhesive.
(d) Fasten glass securely until the adhesive sets.
7. INSPECT FOR LEAKS AND REPAIR
(a) Perform a leak test after the hardening time has
elapsed.
(b) Seal any leak with auto glass sealer.
Part No. 08833±00030 or equivalent
8. INSTALL WINDSHIELD OUTSIDE MOULDING
(See page BO±26)
9. INSTALL FOLLOWING PARTS:
(a) Wiper arms and inner rear view mirror
(b) Sun visors and holders
10. INSTALL FRONT PILLAR GARNISH
11. INSTALL AND ADJUST HOOD
(See page BO±3)
NOTICE: Wait at least twice the setting time before driving
the car.
± BODYWindshieldBO±42
Page 709 of 2389
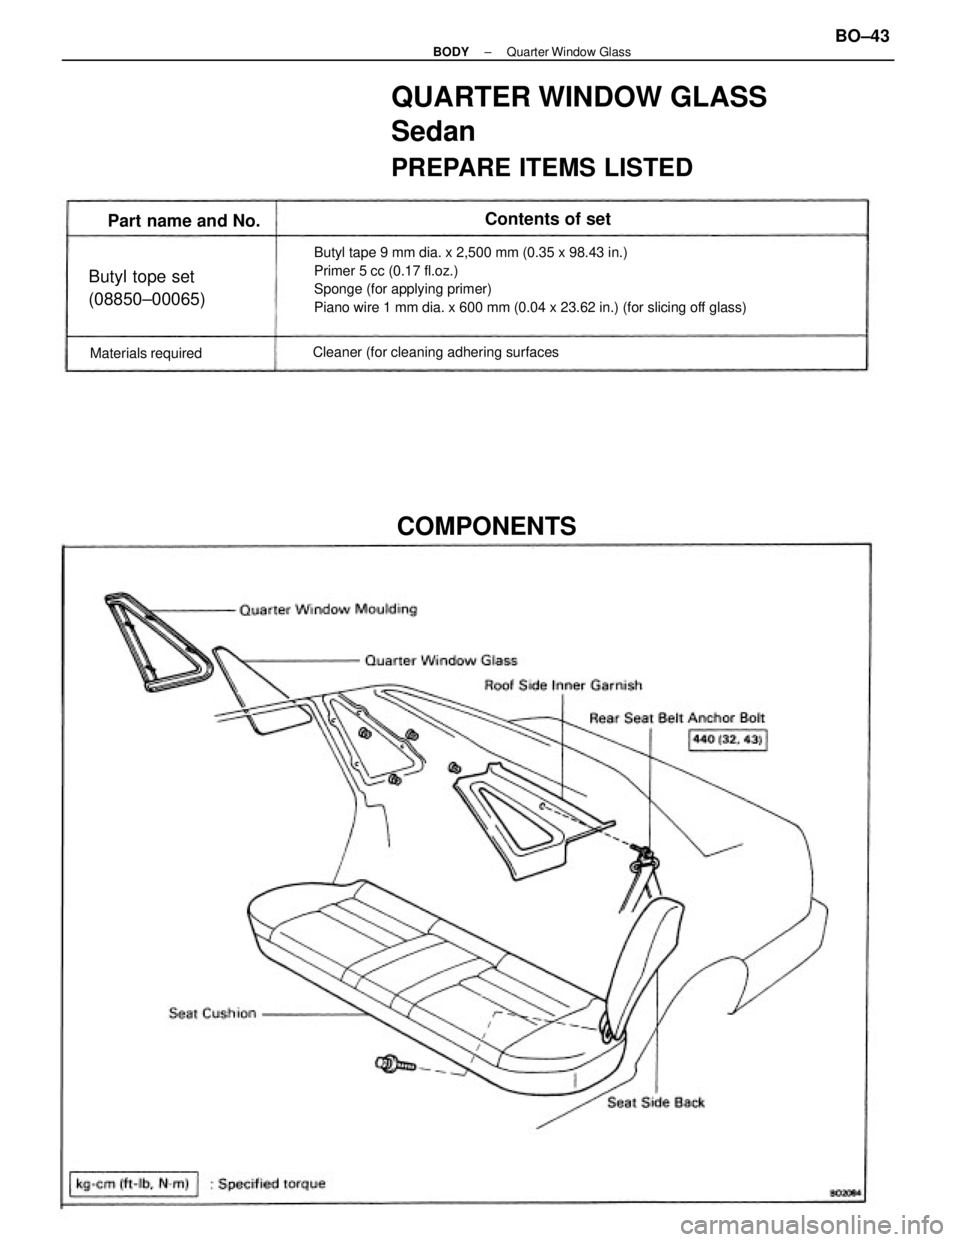
Butyl tape 9 mm dia. x 2,500 mm (0.35 x 98.43 in.)
Primer 5 cc (0.17 fl.oz.)
Sponge (for applying primer)
Piano wire 1 mm dia. x 600 mm (0.04 x 23.62 in.) (for slicing off glass)
QUARTER WINDOW GLASS
Sedan
PREPARE ITEMS LISTED
Cleaner (for cleaning adhering surfaces
Butyl tope set
(08850±00065)
COMPONENTS
Materials required
Part name and No.Contents of set
± BODYQuarter Window GlassBO±43
Page 710 of 2389
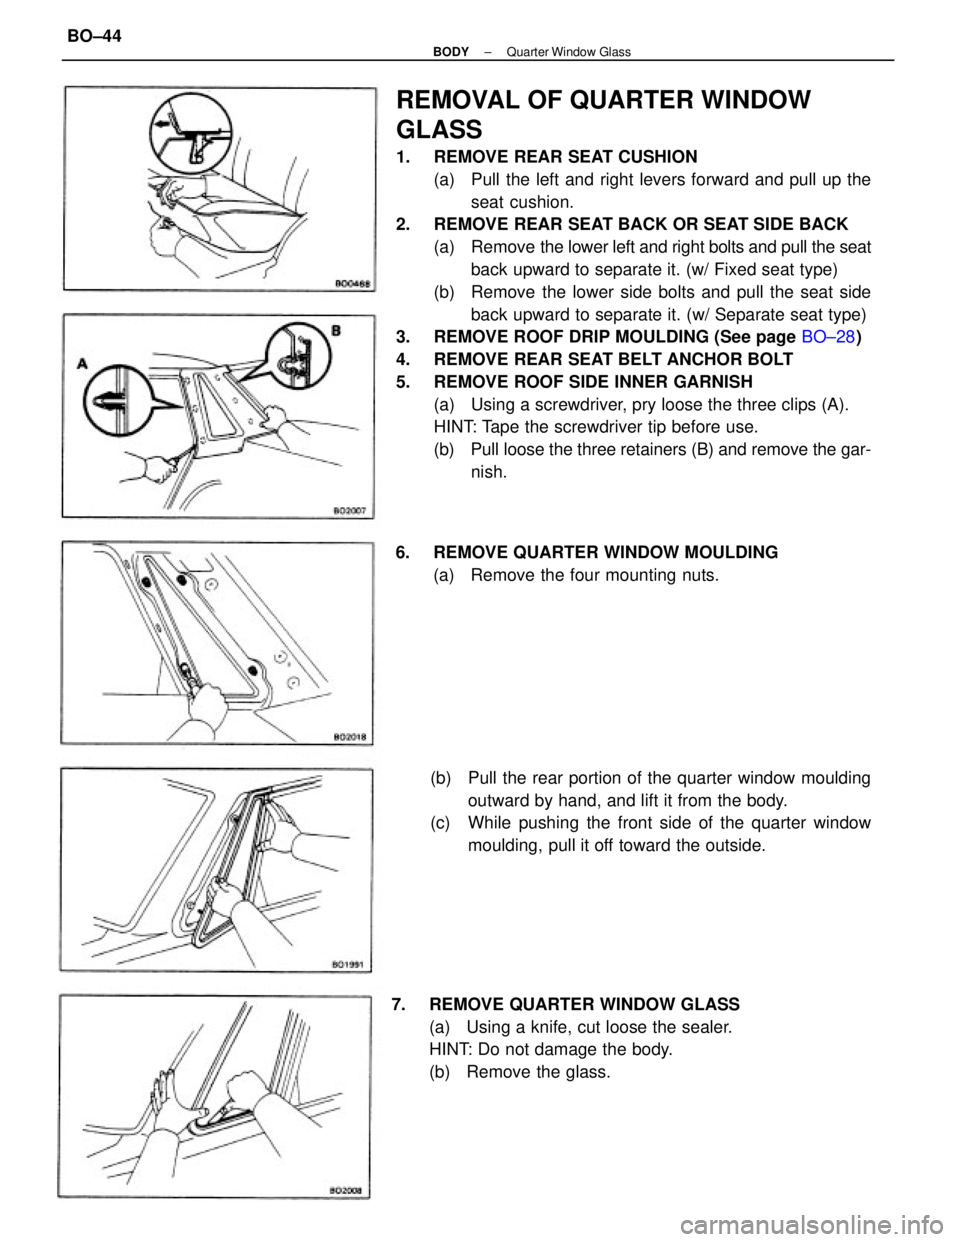
REMOVAL OF QUARTER WINDOW
GLASS
1. REMOVE REAR SEAT CUSHION
(a) Pull the left and right levers forward and pull up the
seat cushion.
2. REMOVE REAR SEAT BACK OR SEAT SIDE BACK
(a) Remove the lower left and right bolts and pull the seat
back upward to separate it. (w/ Fixed seat type)
(b) Remove the lower side bolts and pull the seat side
back upward to separate it. (w/ Separate seat type)
3. REMOVE ROOF DRIP MOULDING (See page BO±28)
4. REMOVE REAR SEAT BELT ANCHOR BOLT
5. REMOVE ROOF SIDE INNER GARNISH
(a) Using a screwdriver, pry loose the three clips (A).
HINT: Tape the screwdriver tip before use.
(b) Pull loose the three retainers (B) and remove the gar-
nish.
(b) Pull the rear portion of the quarter window moulding
outward by hand, and lift it from the body.
(c) While pushing the front side of the quarter window
moulding, pull it off toward the outside.
7. REMOVE QUARTER WINDOW GLASS
(a) Using a knife, cut loose the sealer.
HINT: Do not damage the body.
(b) Remove the glass. 6. REMOVE QUARTER WINDOW MOULDING
(a) Remove the four mounting nuts.
± BODYQuarter Window GlassBO±44