TOYOTA COROLLA HATCHBACK 2022 Owners Manual (in English)
Manufacturer: TOYOTA, Model Year: 2022, Model line: COROLLA HATCHBACK, Model: TOYOTA COROLLA HATCHBACK 2022Pages: 758, PDF Size: 155.26 MB
Page 141 of 758
139
3
3-2. Opening, closing and locking the doors
Before driving
• The electronic key is on the instru-
ment panel, luggage cover or floor, or in the door pockets or glove box when
the engine is started or engine switch
modes are changed.
●Do not leave the electronic key on top
of the instrument panel or near the door pockets when exiting the vehicle.
Depending on the radio wave recep-
tion conditions, it may be detected by the antenna outside the cabin and the
door will become lockable from the
outside, possibly trapping the elec- tronic key inside the vehicle.
●As long as the electronic key is within the effective range, the doors may be
locked or unlocked by anyone. How-
ever, only the doors detecting the electronic key can be used to unlock
the vehicle.
●Even if the electronic key is not inside
the vehicle, it may be possible to start
the engine if the electronic key is near the window.
●The doors may unlock or lock if a large amount of water splashes on the
door handle, such as in the rain or in a
car wash when the electronic key is within the effective range. (The doors
will automatically be locked after
approximately 30 seconds if the doors are not opened and closed.)
●If the wireless remote control is used to lock the doors when the electronic
key is near the vehicle, there is a pos-
sibility that the door may not be unlocked by the entry function. (Use
the wireless remote control to unlock
the doors.)
●Touching the door lock or unlock sen-
sor while wearing gloves may prevent
lock or unlock operation.
●Some models: When the lock opera-
tion is performed using the lock sen- sor, recognition signals will be shown
up to two consecutive times. After
this, no recognition signals will be given.
●If the door handle becomes wet while
the electronic key is within the effec-
tive range, the door may lock and unlock repeatedly. In that case, follow
the following correction procedures to
wash the vehicle: • Place the electronic key in a location 2
m (6 ft.) or more away from the vehi-
cle. (Take care to ensure that the key is not stolen.)
• Set the electronic key to battery-sav-
ing mode to disable the smart entry & start system. ( P.138)
●If the electronic key is inside the vehi- cle and a door handle becomes wet
during a car wash, a message may be
shown on the multi-information dis- play and a buzzer will sound outside
the vehicle. To turn off the alarm, lock
all the doors.
●The lock sensor may not work prop-
erly if it comes into contact with ice, snow, mud, etc. Clean the lock sensor
and attempt to operate it again.
●A sudden handle operation or a han-
dle operation immediately after enter-
ing the effective range may prevent the doors from being unlocked. Touch
the door unlock sensor and check that
the doors are unlocked before pulling the door handle again.
●If there is another electronic key in the detection area, it may take slightly
longer to unlock the doors after the
door handle is gripped.
■When the vehicle is not driven for extended periods
●To prevent theft of the vehicle, do not leave the electronic key within 2 m (6
ft.) of the vehicle.
●The smart entry & start system can be
deactivated in advance. ( P.577)
●Setting the electronic key to bat- tery-saving mode helps to reduce key
battery depletion. ( P.138)
■To operate the system properly
Make sure to carry the electronic key when operating the system. Do not get
the electronic key too close to the vehi-
cle when operating the system from the
Page 142 of 758

1403-2. Opening, closing and locking the doors
outside of the vehicle.
Depending on the position and holding condition of the electronic key, the key
may not be detected correctly and the
system may not operat e properly. (The alarm may go off accidentally, or the
door lock prevention function may not
operate.)
■If the smart entry & start system does not operate properly
●Locking and unlocking the doors: P. 5 5 5
●Starting the engine: P. 5 5 5
■Customization
Some functions can be customized.
( P.577)
■If the smart entry & start system
has been deactivated in a custom- ized setting
●Locking and unlocking the doors: Use the wireless remote control or
mechanical key. ( P.119, 555)
●Starting the engine and changing
engine switch modes: P. 5 5 5
●Stopping the engine: P. 1 8 0
WA R N I N G
■Caution regarding interference
with electronic devices
●People with implantable cardiac pacemakers, cardiac
resynchronization therapy-pace-
makers or implantable cardioverter defibrillators should maintain a rea-
sonable distance between them-
selves and the smart entry & start
system antennas. ( P.136) The radio waves may affect the
operation of such devices. If neces-
sary, the entry function can be disa- bled. Ask any authorized Toyota
retailer or Toyota authorized
repairer, or any reliable repairer for details, such as the frequency of
radio waves and timing of the emit-
ted radio waves. Then, consult your doctor to see if you should disable
the entry function.
●Users of any electrical medical
device other than implantable car-
diac pacemakers, cardiac resynchronization therapy-pace-
makers or implantable cardioverter
defibrillators should consult the manufacturer of the device for infor-
mation about its operation under
the influence of radio waves. Radio waves could have unex-
pected effects on the operation of
such medical devices.
Ask any authorized Toyota retailer or
Toyota authorized repairer, or any reli- able repairer for details on disabling
the entry function.
Page 143 of 758
141
3
3-3. Adjusting the seats
Before driving
3-3.Adjusting the seats
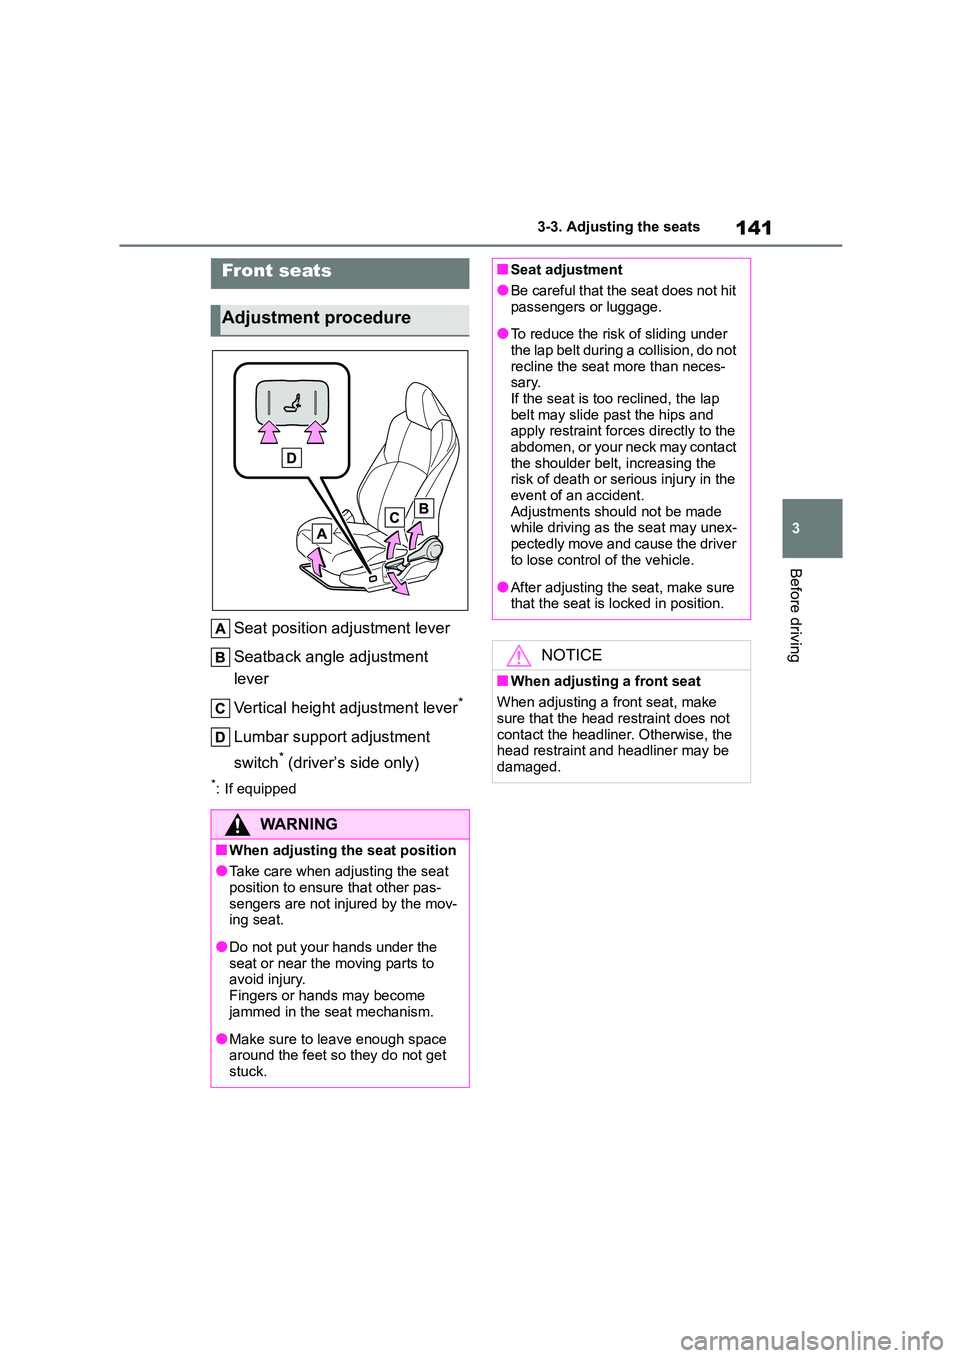
Seat position adjustment lever
Seatback angle adjustment
lever
Vertical height adjustment lever*
Lumbar support adjustment
switch* (driver’s side only)
*: If equipped
Front seats
Adjustment procedure
WA R N I N G
■When adjusting the seat position
●Take care when adjusting the seat position to ensure that other pas-
sengers are not injured by the mov-
ing seat.
●Do not put your hands under the
seat or near the moving parts to avoid injury.
Fingers or hands may become
jammed in the seat mechanism.
●Make sure to leave enough space
around the feet so they do not get
stuck.
■Seat adjustment
●Be careful that the seat does not hit
passengers or luggage.
●To reduce the risk of sliding under
the lap belt during a collision, do not
recline the seat more than neces- sary.
If the seat is too reclined, the lap
belt may slide past the hips and apply restraint forces directly to the
abdomen, or your neck may contact
the shoulder belt, increasing the risk of death or serious injury in the
event of an accident.
Adjustments should not be made while driving as the seat may unex-
pectedly move and cause the driver
to lose control of the vehicle.
●After adjusting the seat, make sure
that the seat is locked in position.
NOTICE
■When adjusting a front seat
When adjusting a front seat, make
sure that the head restraint does not
contact the headliner. Otherwise, the head restraint and headliner may be
damaged.
Page 144 of 758
1423-3. Adjusting the seats
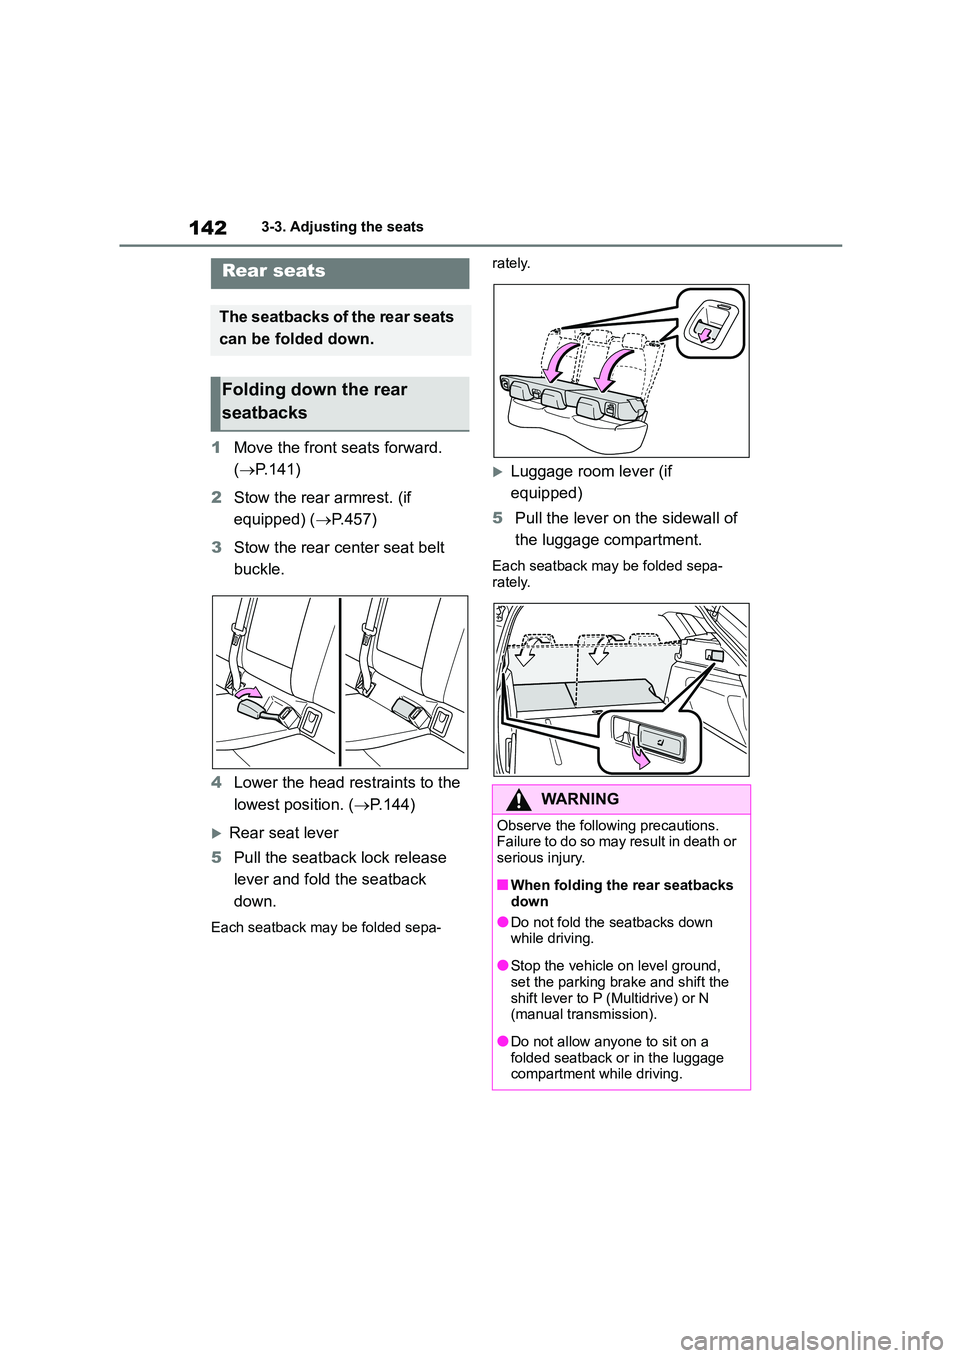
1Move the front seats forward.
( P.141)
2 Stow the rear armrest. (if
equipped) ( P.457)
3 Stow the rear center seat belt
buckle.
4 Lower the head restraints to the
lowest position. ( P.144)
Rear seat lever
5 Pull the seatback lock release
lever and fold the seatback
down.
Each seatback may be folded sepa-
rately.
Luggage room lever (if
equipped)
5 Pull the lever on the sidewall of
the luggage compartment.
Each seatback may be folded sepa- rately.
Rear seats
The seatbacks of the rear seats
can be folded down.
Folding down the rear
seatbacks
WA R N I N G
Observe the following precautions.
Failure to do so may result in death or
serious injury.
■When folding the rear seatbacks
down
●Do not fold the seatbacks down
while driving.
●Stop the vehicle on level ground,
set the parking brake and shift the
shift lever to P (Multidrive) or N (manual transmission).
●Do not allow anyone to sit on a folded seatback or in the luggage
compartment while driving.
Page 145 of 758
143
3
3-3. Adjusting the seats
Before driving
WA R N I N G
●Do not allow children to enter the
luggage compartment.
●Be careful not to get your hand
caught when folding the rear
seatbacks.
●Adjust the position of the front seats
before folding down the rear
seatbacks so that th e front seats do not interfere with the rear seatbacks
when folding down the rear
seatbacks.
●Make sure that the rear seat is free
of passengers before operating the luggage room lever (if equipped).
■After returning the rear seatback to the upright position
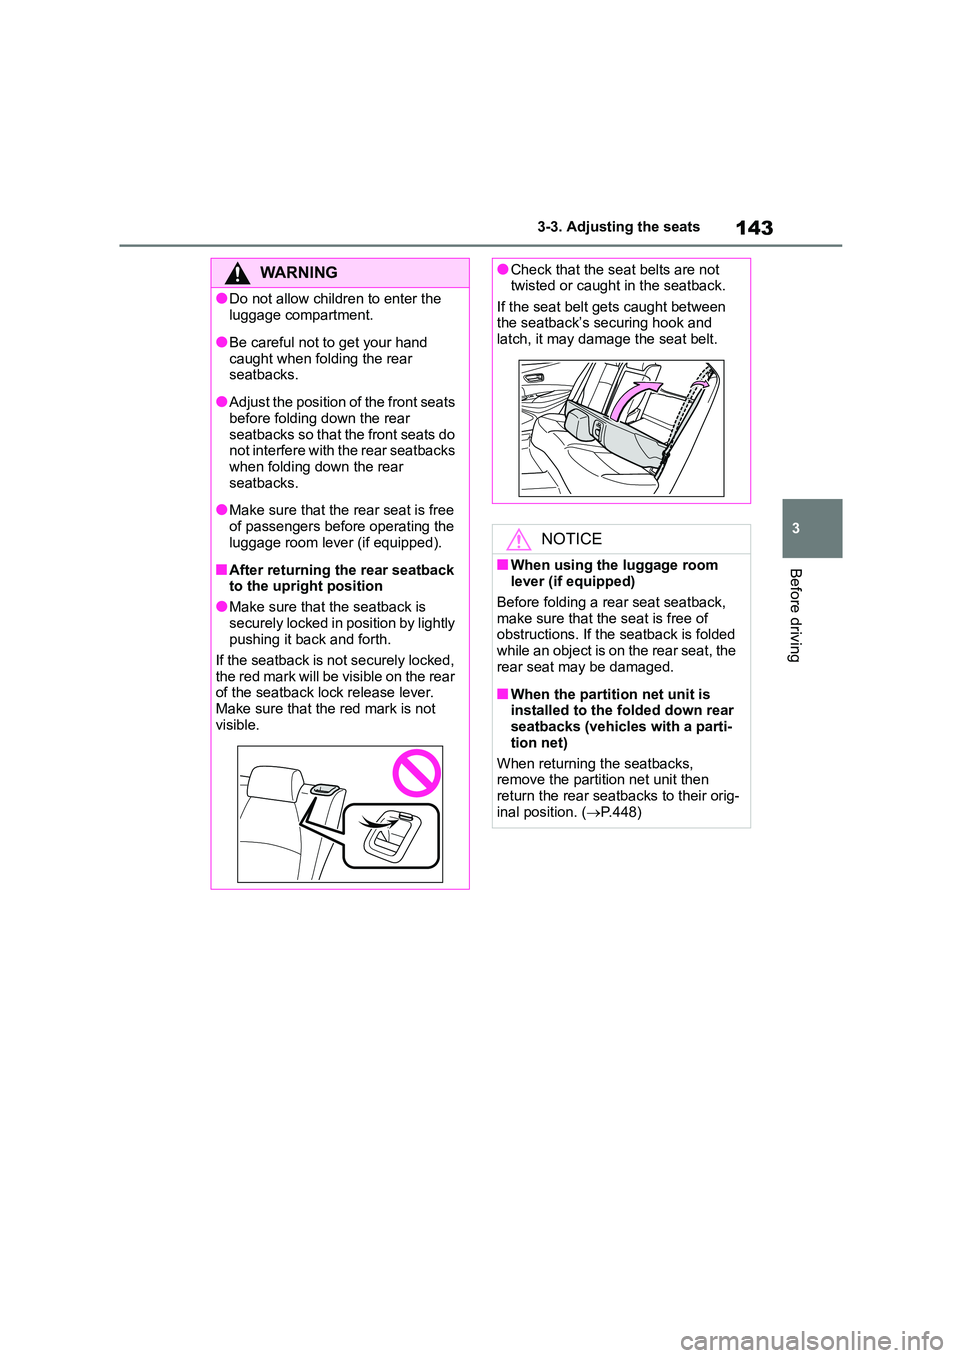
●Make sure that the seatback is
securely locked in position by lightly pushing it back and forth.
If the seatback is not securely locked,
the red mark will be visible on the rear of the seatback lock release lever.
Make sure that the red mark is not
visible.
●Check that the seat belts are not twisted or caught in the seatback.
If the seat belt gets caught between
the seatback’s securing hook and latch, it may damage the seat belt.
NOTICE
■When using the luggage room
lever (if equipped)
Before folding a rear seat seatback, make sure that the seat is free of
obstructions. If the seatback is folded
while an object is on the rear seat, the rear seat may be damaged.
■When the partition net unit is installed to the folded down rear
seatbacks (vehicles with a parti-
tion net)
When returning the seatbacks,
remove the partition net unit then
return the rear seatbacks to their orig- inal position. ( P.448)
Page 146 of 758
1443-3. Adjusting the seats
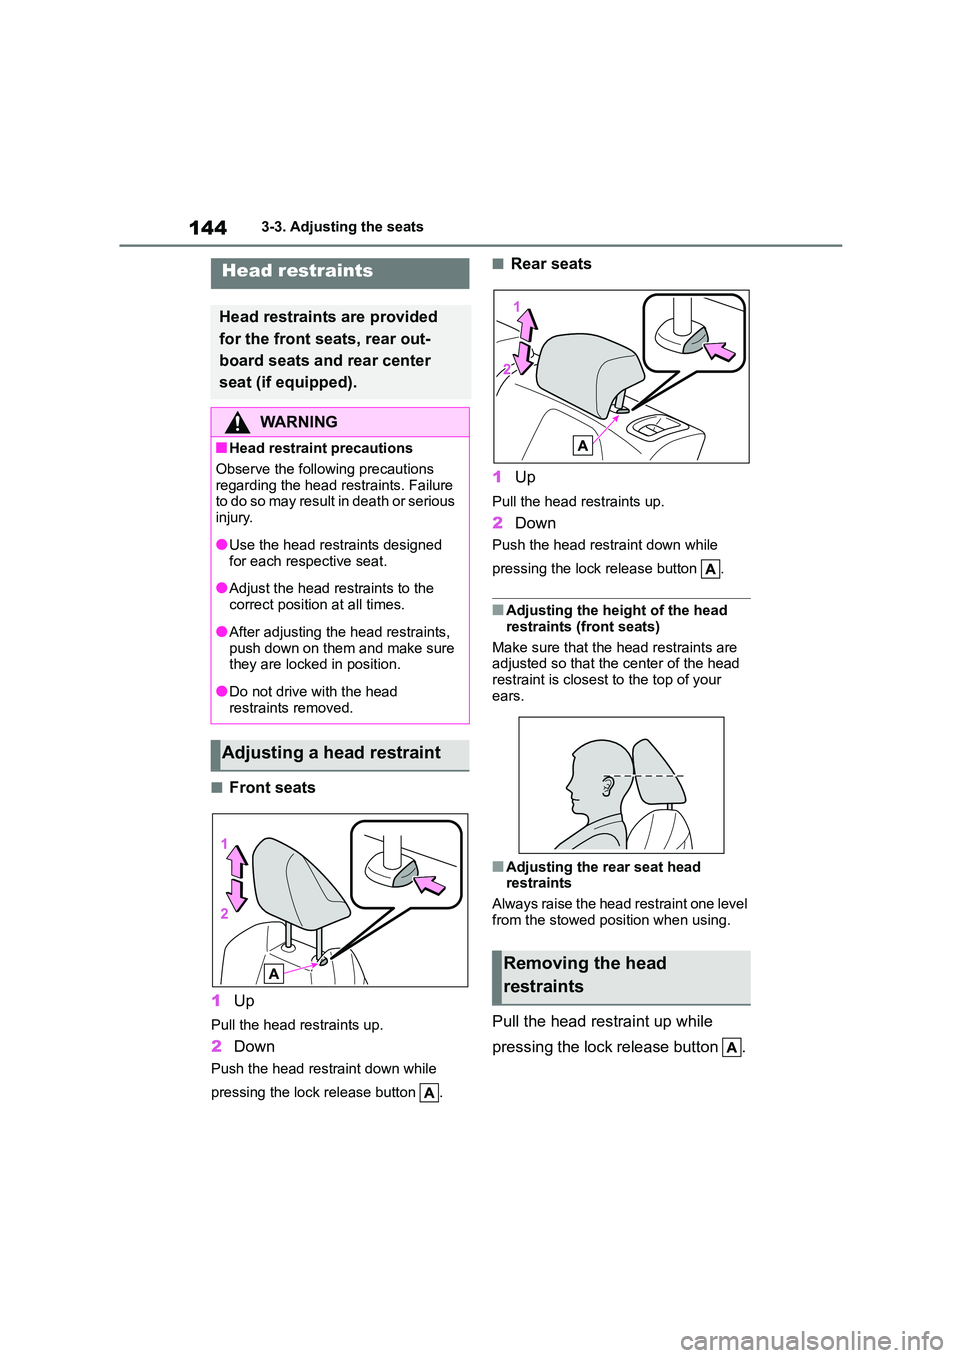
■Front seats
1 Up
Pull the head restraints up.
2Down
Push the head restraint down while
pressing the lock release button .
■Rear seats
1 Up
Pull the head restraints up.
2Down
Push the head restraint down while
pressing the lock release button .
■Adjusting the height of the head
restraints (front seats)
Make sure that the head restraints are
adjusted so that the center of the head
restraint is closest to the top of your ears.
■Adjusting the rear seat head restraints
Always raise the head restraint one level
from the stowed position when using.
Pull the head restraint up while
pressing the lock release button .
Head restraints
Head restraints are provided
for the front seats, rear out-
board seats and rear center
seat (if equipped).
WA R N I N G
■Head restraint precautions
Observe the following precautions
regarding the head restraints. Failure to do so may result in death or serious
injury.
●Use the head restraints designed
for each respective seat.
●Adjust the head restraints to the
correct position at all times.
●After adjusting the head restraints,
push down on them and make sure
they are locked in position.
●Do not drive with the head
restraints removed.
Adjusting a head restraint
Removing the head
restraints
Page 147 of 758
145
3
3-3. Adjusting the seats
Before driving
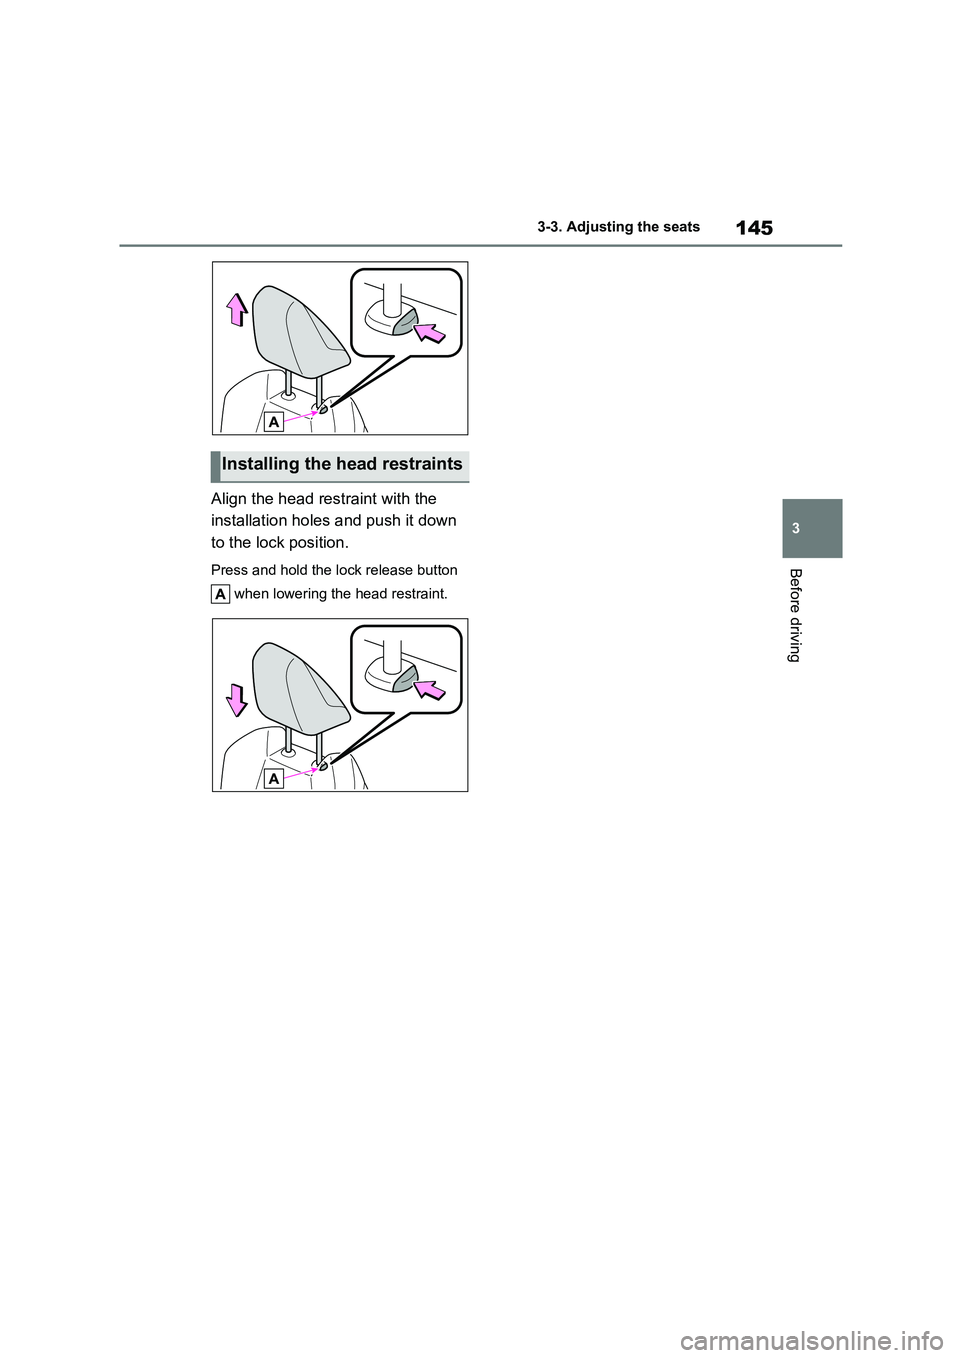
Align the head restraint with the
installation holes and push it down
to the lock position.
Press and hold the lock release button
when lowering the head restraint.
Installing the head restraints
Page 148 of 758
1463-4. Adjusting the steering wheel and mirrors
3-4.Adjusting the steering wheel and mirrors
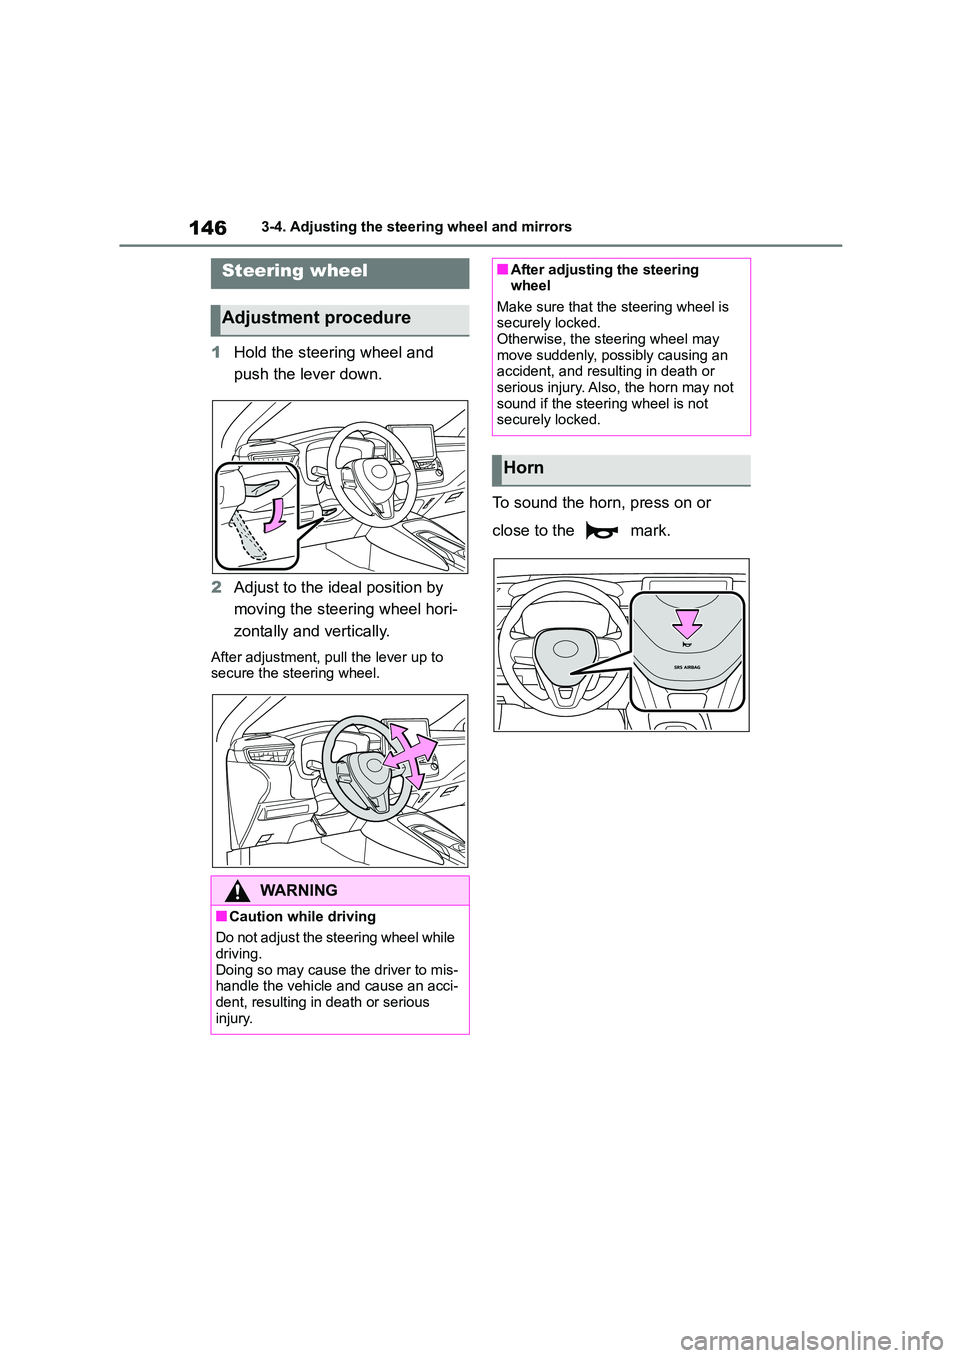
1Hold the steering wheel and
push the lever down.
2 Adjust to the ideal position by
moving the steering wheel hori-
zontally and vertically.
After adjustment, pull the lever up to
secure the steering wheel.
To sound the horn, press on or
close to the mark.
Steering wheel
Adjustment procedure
WA R N I N G
■Caution while driving
Do not adjust the steering wheel while driving.
Doing so may cause the driver to mis-
handle the vehicle and cause an acci- dent, resulting in death or serious
injury.
■After adjusting the steering wheel
Make sure that the steering wheel is
securely locked. Otherwise, the steering wheel may
move suddenly, possibly causing an
accident, and resulting in death or serious injury. Also, the horn may not
sound if the steering wheel is not
securely locked.
Horn
Page 149 of 758

147
3
3-4. Adjusting the steering wheel and mirrors
Before driving
The height of the rear view mirror
can be adjusted to suit your driving
posture.
Adjust the height of the rear view
mirror by moving it up and down.
Manual anti-glare inside rear
view mirror
Reflected light from the headlights
of vehicles behind can be reduced
by operating the lever.
Normal position
Anti-glare position
Auto anti-glare inside rear view
mirror
Responding to the level of bright-
ness of the headlig hts of vehicles
behind, the reflected light is auto-
matically reduced.
Changing automatic anti-glare
function mode
On/off
When the automatic anti-glare function
is in ON mode, the indicator illumi-
nates. The function will set to ON mode
each time the engine switch is turned to
ON.
Pressing the button turns the function
to off mode. (The indicator also
turns off.)
Inside rear view mirror
The rear view mirror’s position
can be adjusted to enable suf-
ficient confirmation of the rear
view.
Adjusting the height of rear
view mirror
WA R N I N G
■Caution while driving
Do not adjust the position of the mir-
ror while driving. Doing so may lead to mishandling of
the vehicle and cause an accident,
resulting in death or serious injury.
Anti-glare function
Page 150 of 758
1483-4. Adjusting the steering wheel and mirrors
■To prevent sensor error (vehicles with an auto anti-glare inside rear
view mirror)
To ensure that the sensors operate properly, do not touch or cover them.
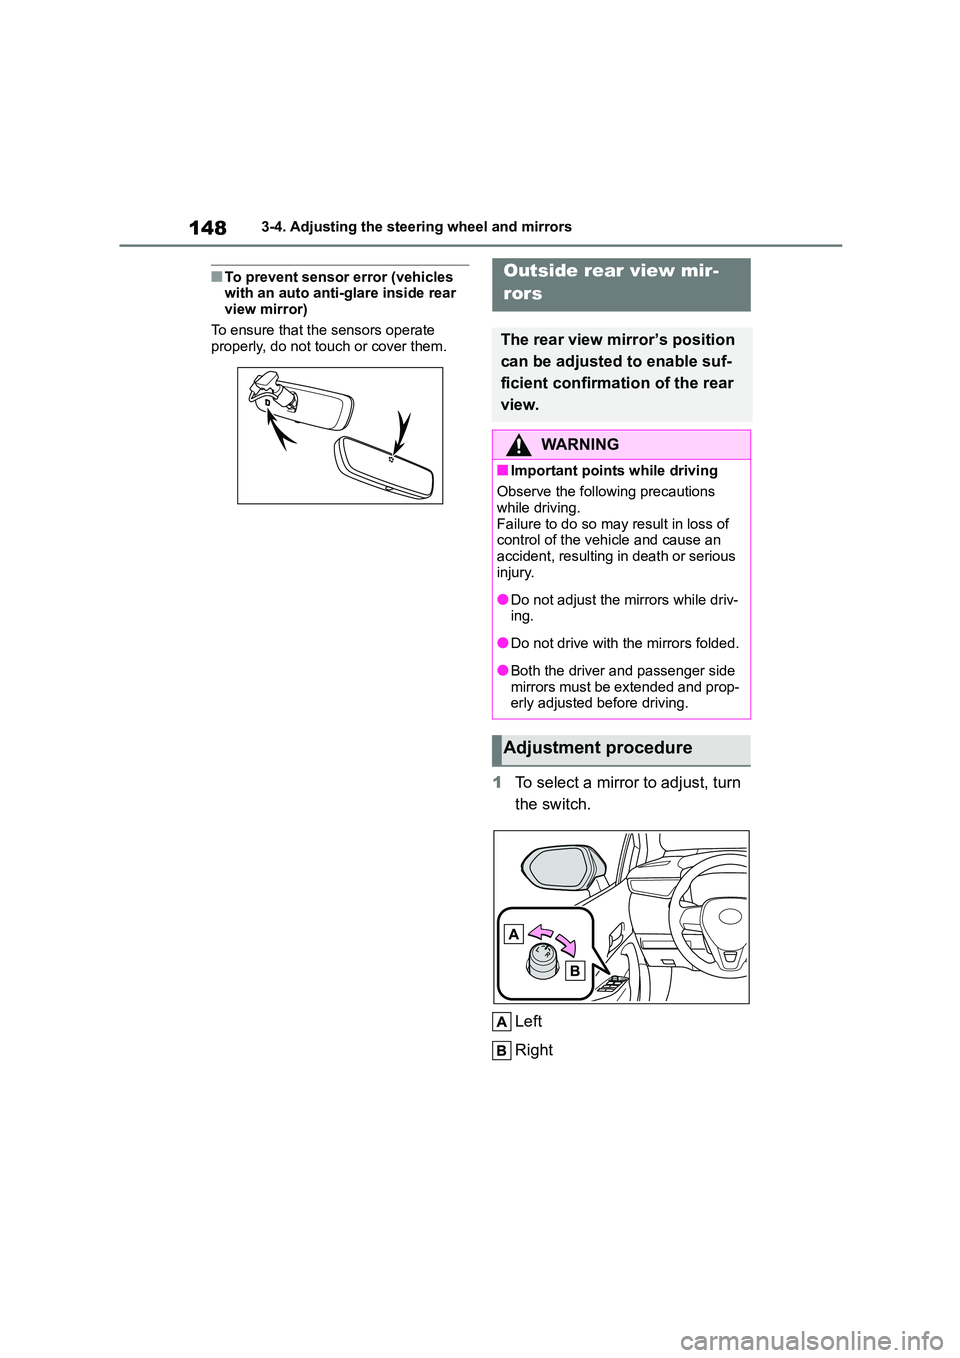
1 To select a mirror to adjust, turn
the switch.
Left
Right
Outside rear view mir-
rors
The rear view mirror’s position
can be adjusted to enable suf-
ficient confirmation of the rear
view.
WA R N I N G
■Important points while driving
Observe the following precautions
while driving.
Failure to do so may result in loss of control of the vehicle and cause an
accident, resulting in death or serious
injury.
●Do not adjust the mirrors while driv-
ing.
●Do not drive with the mirrors folded.
●Both the driver and passenger side
mirrors must be extended and prop-
erly adjusted before driving.
Adjustment procedure