TOYOTA COROLLA iM 2018 Accessories, Audio & Navigation (in English)
Manufacturer: TOYOTA, Model Year: 2018, Model line: COROLLA iM, Model: TOYOTA COROLLA iM 2018Pages: 164, PDF Size: 8.51 MB
Page 141 of 164
4. ROUTE GUIDANCE 4. ROUTE GUIDANCE
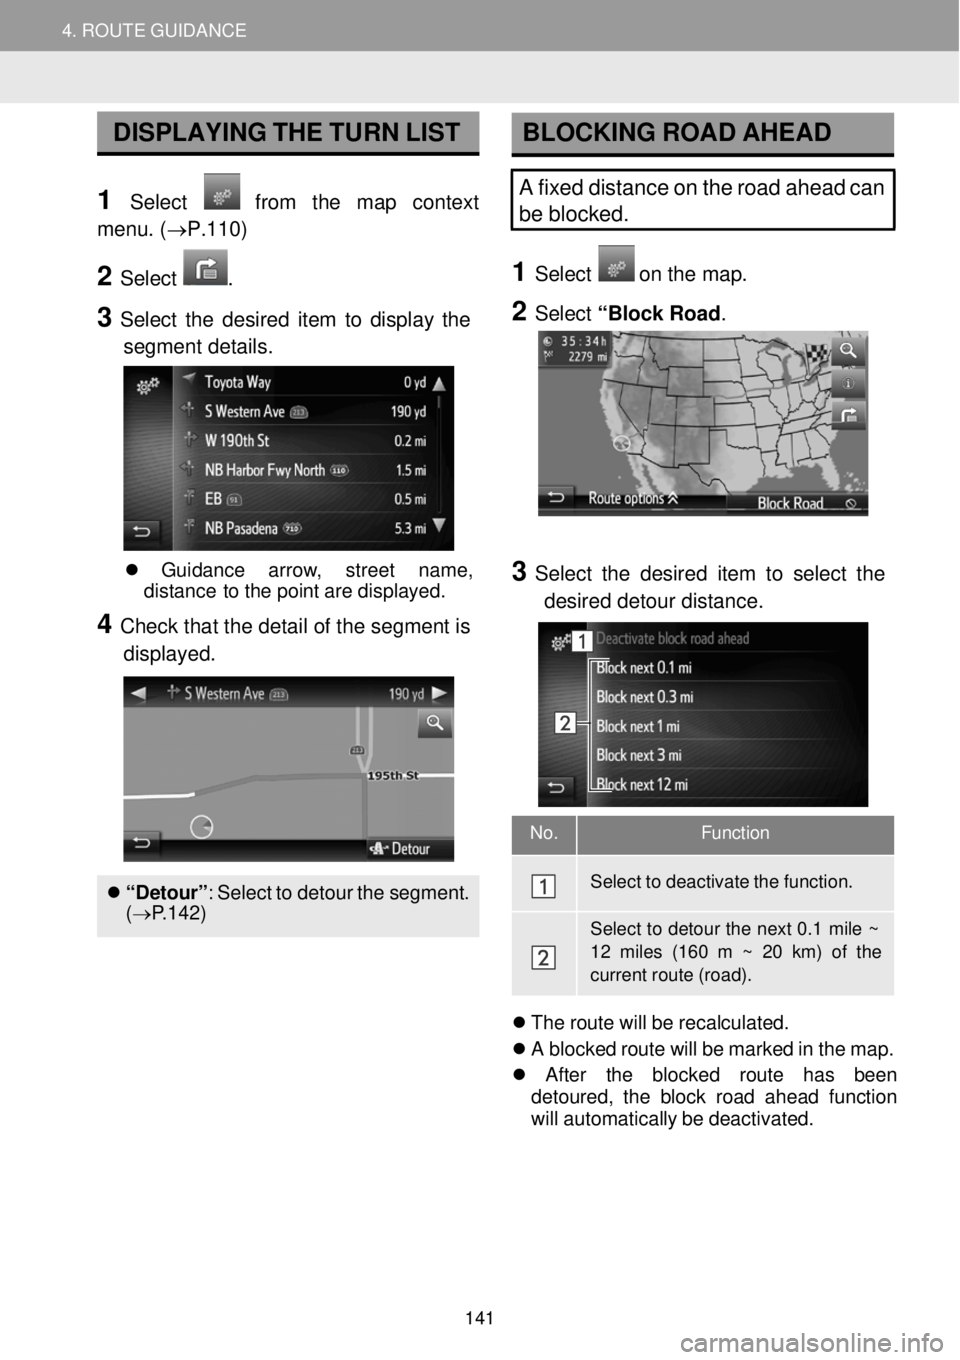
No. Function
Select to deactivate the function.
Select to detour the next 0.1 mile ~
12 miles (160 m ~ 20 km) of the current route (road).
DISPLAYING THE TURN LIST
1 Select from the map context
menu. ( →P.110)
2 Select .
3 Select the desi red item to display th e
segment details .
BLOCKING ROAD AHEAD
A fixed distance on the road ahead can
be blocked.
1 Select o n the ma p.
2 Select “Block Ro ad.
Gui danc e arro w, st reet na me,
dist anc e to the point are displ ayed.
4 Check tha t the detail of t he se gmen t is
displa yed.
“Detour ”: Se lect to det our the s egment.
( → P.142)
3 Se lect the desired item to sel ect the
de sired detour distance.
Th e rou te will be re calculated.
A bl ocked ro ute wi ll be mark ed in th e ma p.
Afte r the blocke d route has b een
de toured , the bl ock road ahead f unction
wi ll au tomatically be de activate d.
141
Page 142 of 164
4. ROUTE GUIDANCE 4. ROUTE GUIDANCE
DETOU RING A SEGMENT ON
THE ROUTE
DETOURI NG A SEGMENT
FROM THE TURN L IST
DETO URING THE SE GM ENT
1 Display the turn list. (→P.141)
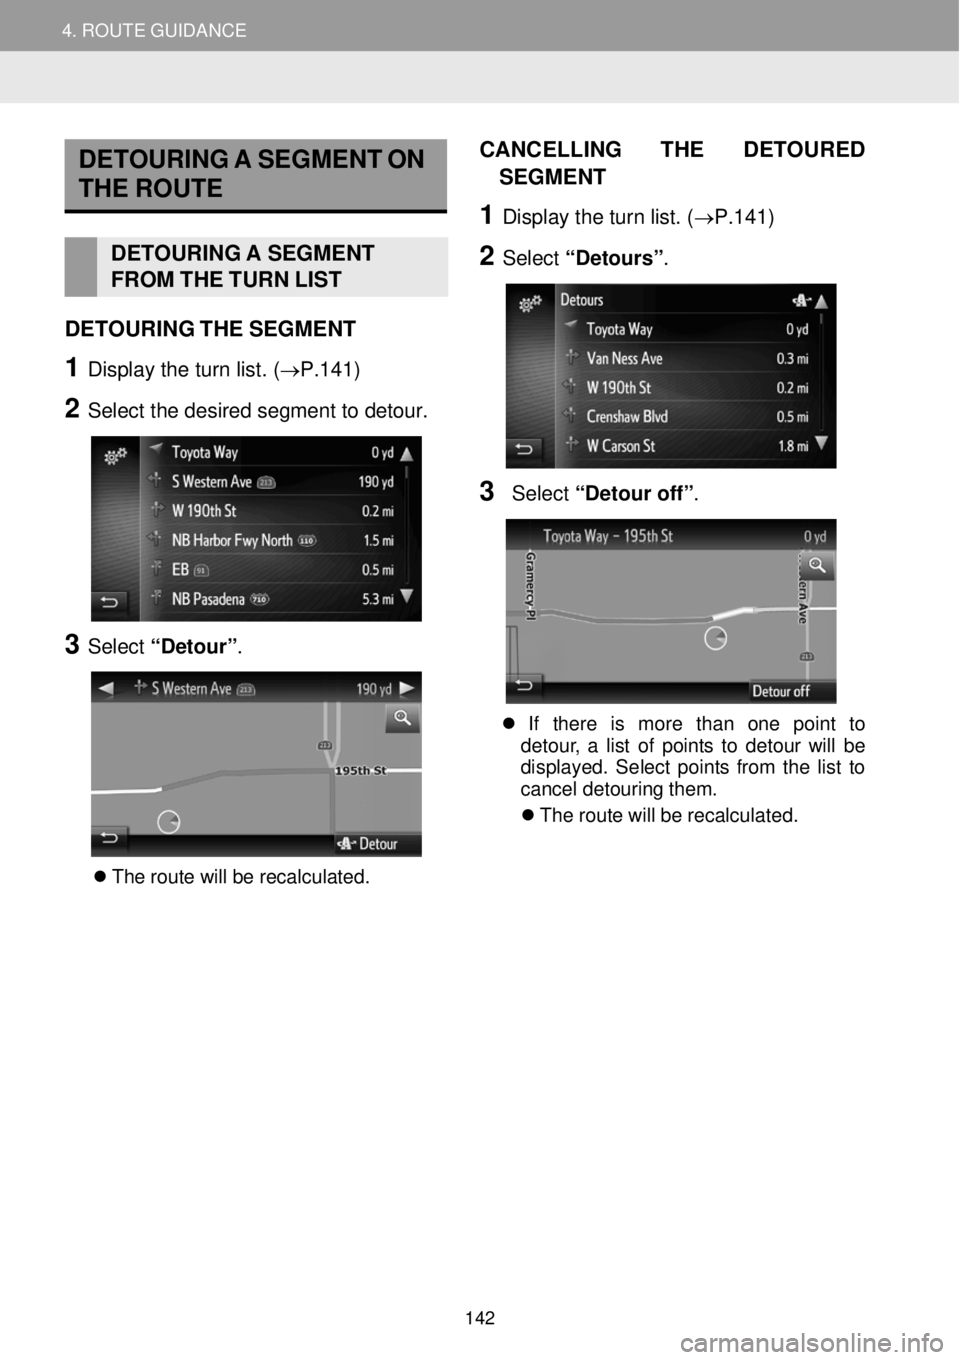
2 Sel ect t he d esir ed s egmen t to detour.
3 Select “Detour” .
The rou te will be re calcul ate d.
CANCEL LING T HE DE TOURED
SE GMENT
1 Display th e turn lis t. (→P.1 41)
2 Select “Detours” .
3 Select “Detour off ”.
If there is more t han one po int to
det our, a list of points to de tour wi ll be
d isp lay ed. Se lect points from the list to
cancel d etouri ng t hem.
Th e rou te will be recalcu lated.
142
Page 143 of 164
4. ROUTE GUIDANCE 5. FAVORITE DESTINATIONS
5. FAVORITE DESTINATIONS
REGISTERING A NEW ENTRY
Up to 200 entries can be registered
with this system.
REGISTERI NG FROM THE
“Favor ite destination” LIST
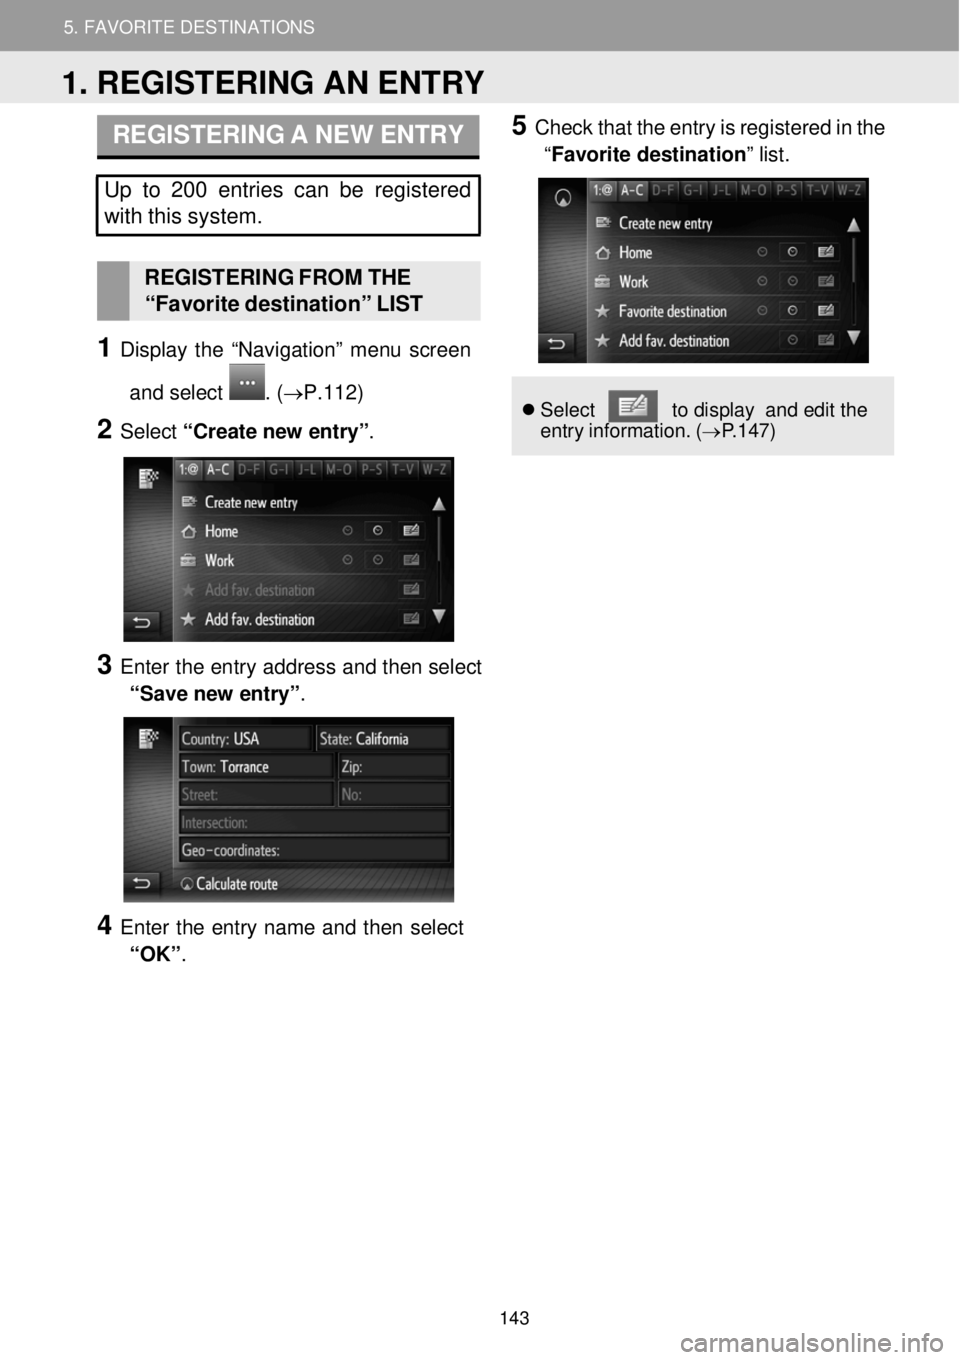
1 Display the “Navigation” me nu screen
and select
. (→ P.1 12)
2 Select “Create n ew e ntry” .
3 Enter the en try ad dress and then sel ect
“Save new entry” .
4 Enter the entry name and then select
“OK” .
5 Check that the en try is reg istered in the
“Favorite destination” list.
Se lect to d ispla y and e dit the
entry inf ormation. (→P.1 47)
1. REGISTERING AN ENTRY
143
Page 144 of 164
5. MY DESTINATIONS 5. FAVORITE DESTINATIONS
REGISTERING “Home”
If “Home” has not been registered,
se lecting “Home” allows a home
address to be regi stered.
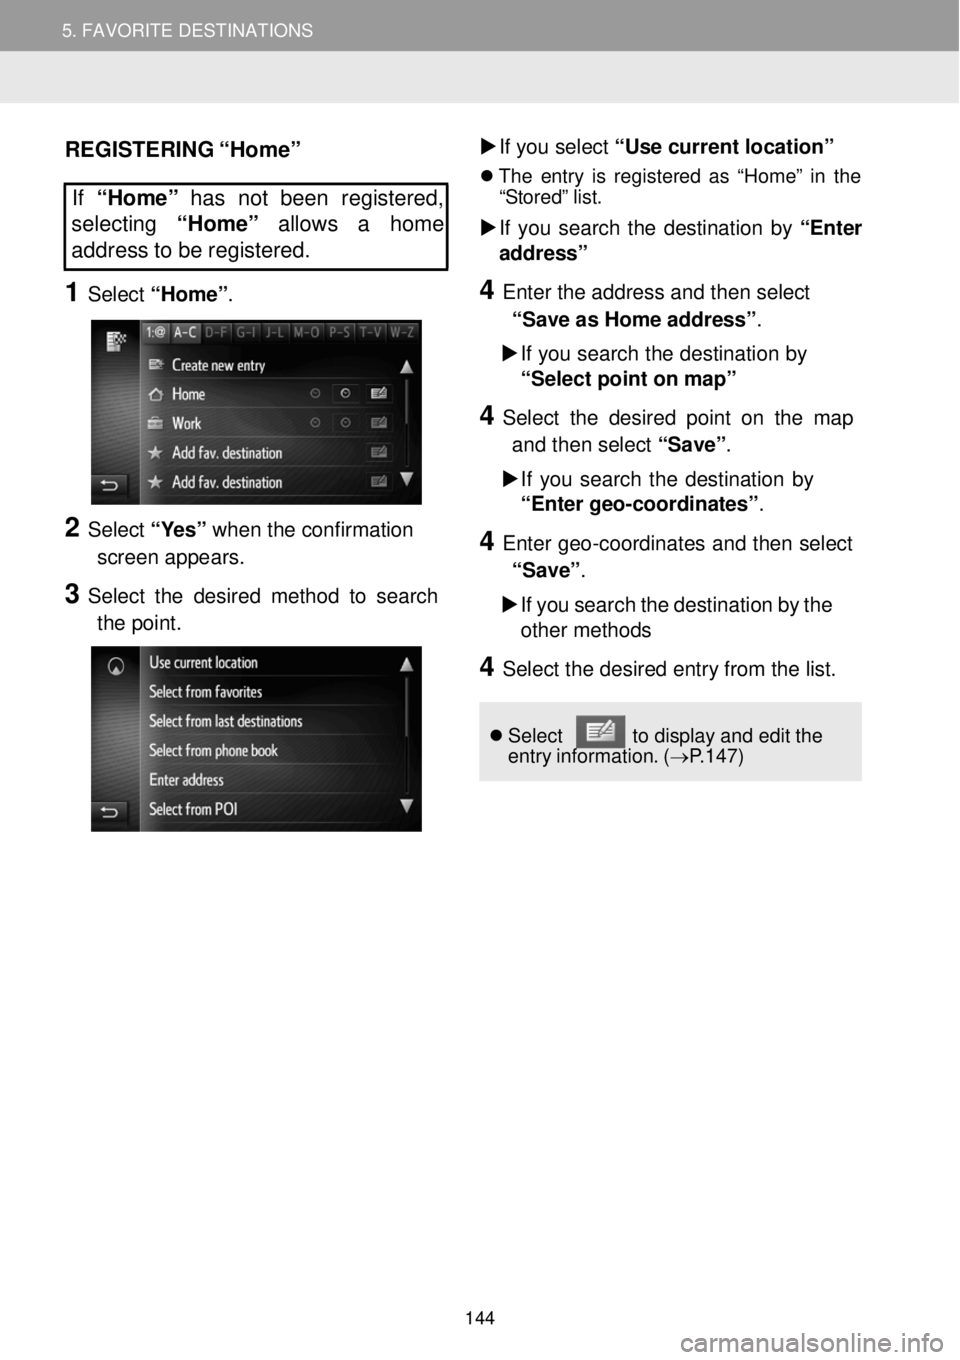
1 Select “Home” .
2 Select “Yes” when the confirmation
scree n appe ars.
3 Select the desired method to search
th e poin t.
If yo u select “Use curr ent l ocation”
Th e e ntry is re gistere d as “Hom e” in the
“Stored” list.
If you sear ch the de stination by “E nter
ad dress”
4 Enter the a ddress and t hen select
“Save a s Home ad dress” .
If you search the destinati on by
“Select point on map”
4 Select the desired po int on the map
an d then sel ect “Save”.
If you sear ch the de stination by
“E nter geo-coordi nates”.
4 Enter geo-coordin ates and then select
“Sav e”.
If you search the desti nation by the
other meth ods
4 Sele ct the d esired entry from the list. Se lect to displ ay and edit the
entry inf ormatio n. ( →P.1 47)
144
Page 145 of 164
5.MYDESTINATIONS5.FAVORITEDESTINATIONS
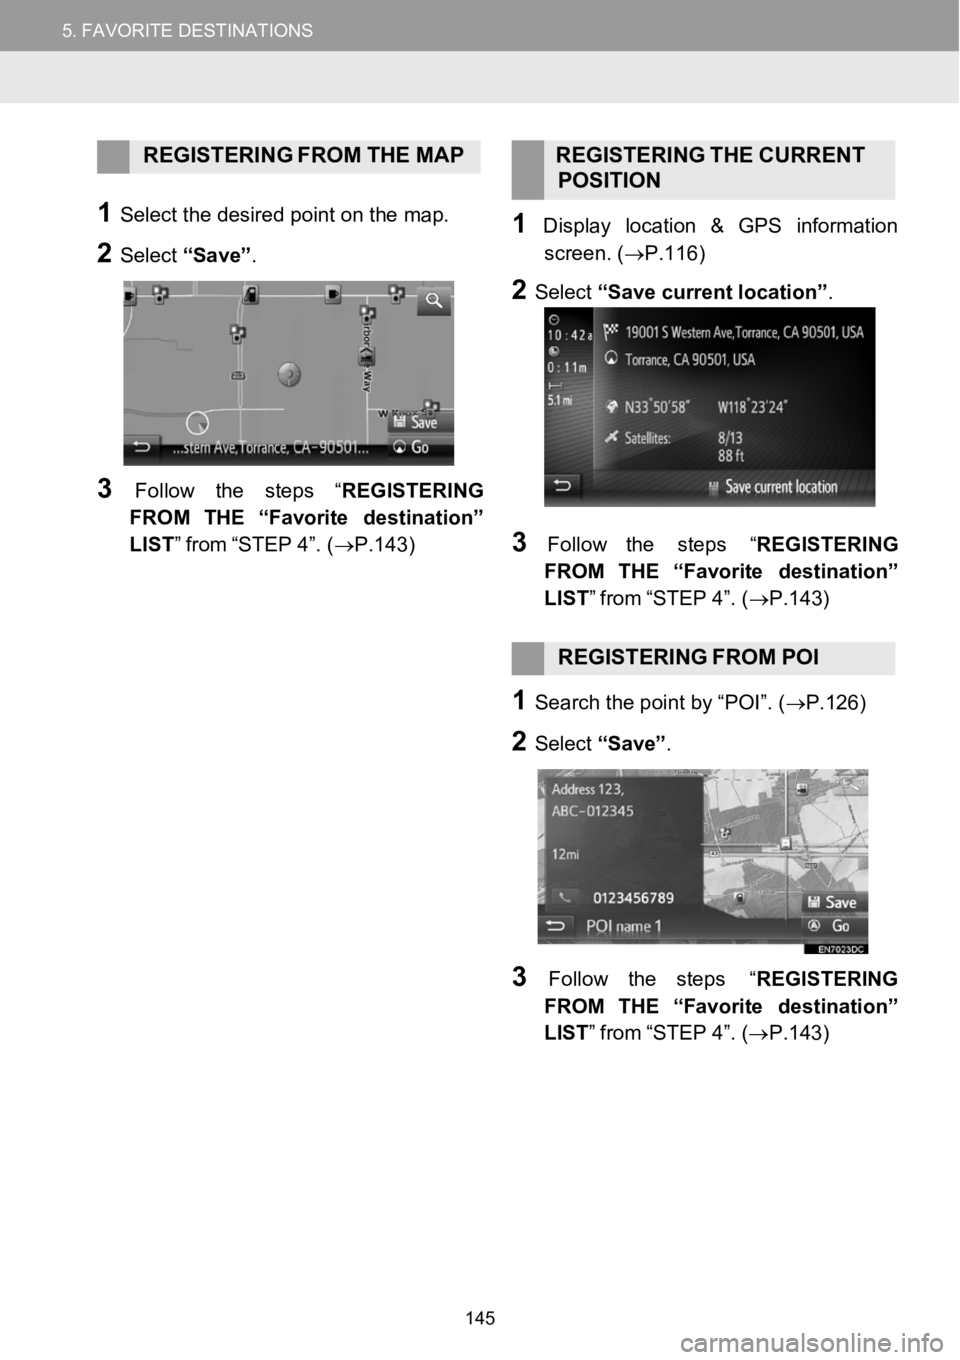
REGISTERINGFROM THE MAP REGISTERING THE CURRENT
POS ITION
1Select t he desired po int on the map.
2Select “Save”.
3Follow the steps “ REGISTERING
FROM THE“Favorite destination”
LIST” from“STEP 4” . (→P.1 43)
1Displa y location & GPS information
scree n.(→P. 116)
2Select “Save current location” .
3Follow the steps “REGIS TERING
FROM THE“Favorite destination ”
LIST” from“STEP 4”. ( →P.143)
REGISTERING FROM POI
1Search t he poin t by “POI”. ( →P.126)
2Select “Save”.
3Fol low the st eps “REGIS TERING
FROM THE“Favorite destination”
LIST” from“STEP 4”. ( →P.143)
145
Page 146 of 164
5.MYDESTINATIONS5.FAVORITEDESTINATIONS
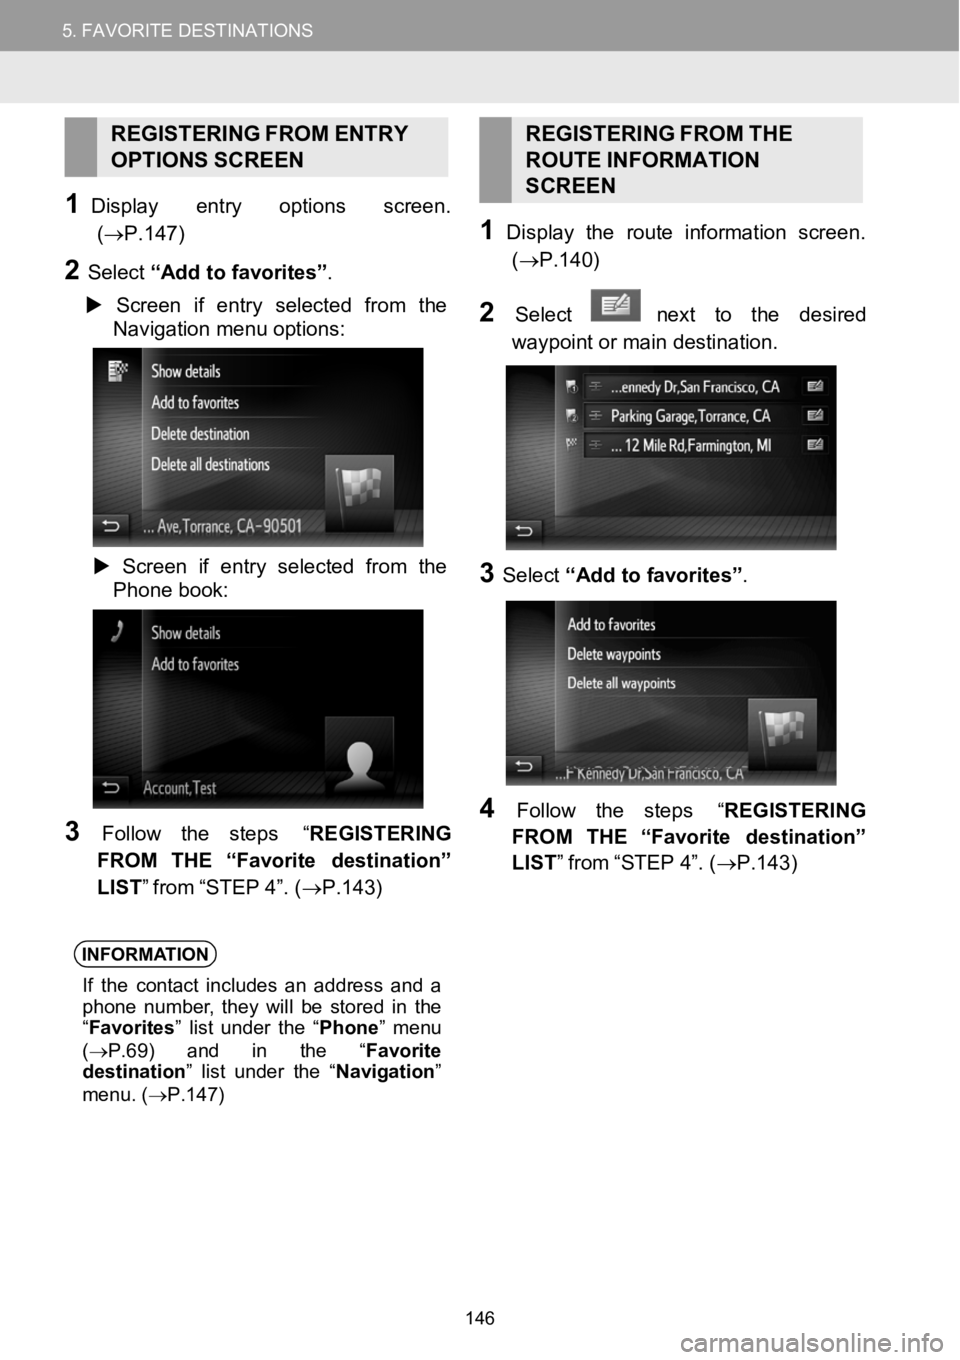
REGISTERING FROMENTRY
OPT IONS SCR EEN
1D ispl ay entry options scre en.
(→P.1 47)
2Select “Add to favorites ”.
Screen i fentry selected from the
Navigation menu options:
Screen if entry selected from the
Phone book :
3Follow the st eps “REGISTERING
FROM THE“Favorite destination”
LIST” from“STEP 4”. ( →P.143)
INFORMA TION
If thecontact includes an ad dressand a
phone number , they will be stored inthe
“ Favorites ” list under the “Phone ” menu
( → P.69 )and in the “Favorite
destination ” list under the “ Navigation”
menu. ( →P.147)
REGISTERING FROMTHE
RO UTE INFORMA TION
SCREEN
1Disp laythe route information screen.
(→P.1 40)
2Select nexttothe desired
waypoint or main desti nation.
3Select “Add to favorites ”.
4Fol low the st eps “REGIS TERING
FROM THE“Favorite destination”
LIST” from“STEP 4”. ( →P.143)
146
Page 147 of 164
5. MY DESTINATIONS 5. FAVORITE DESTINATIONS
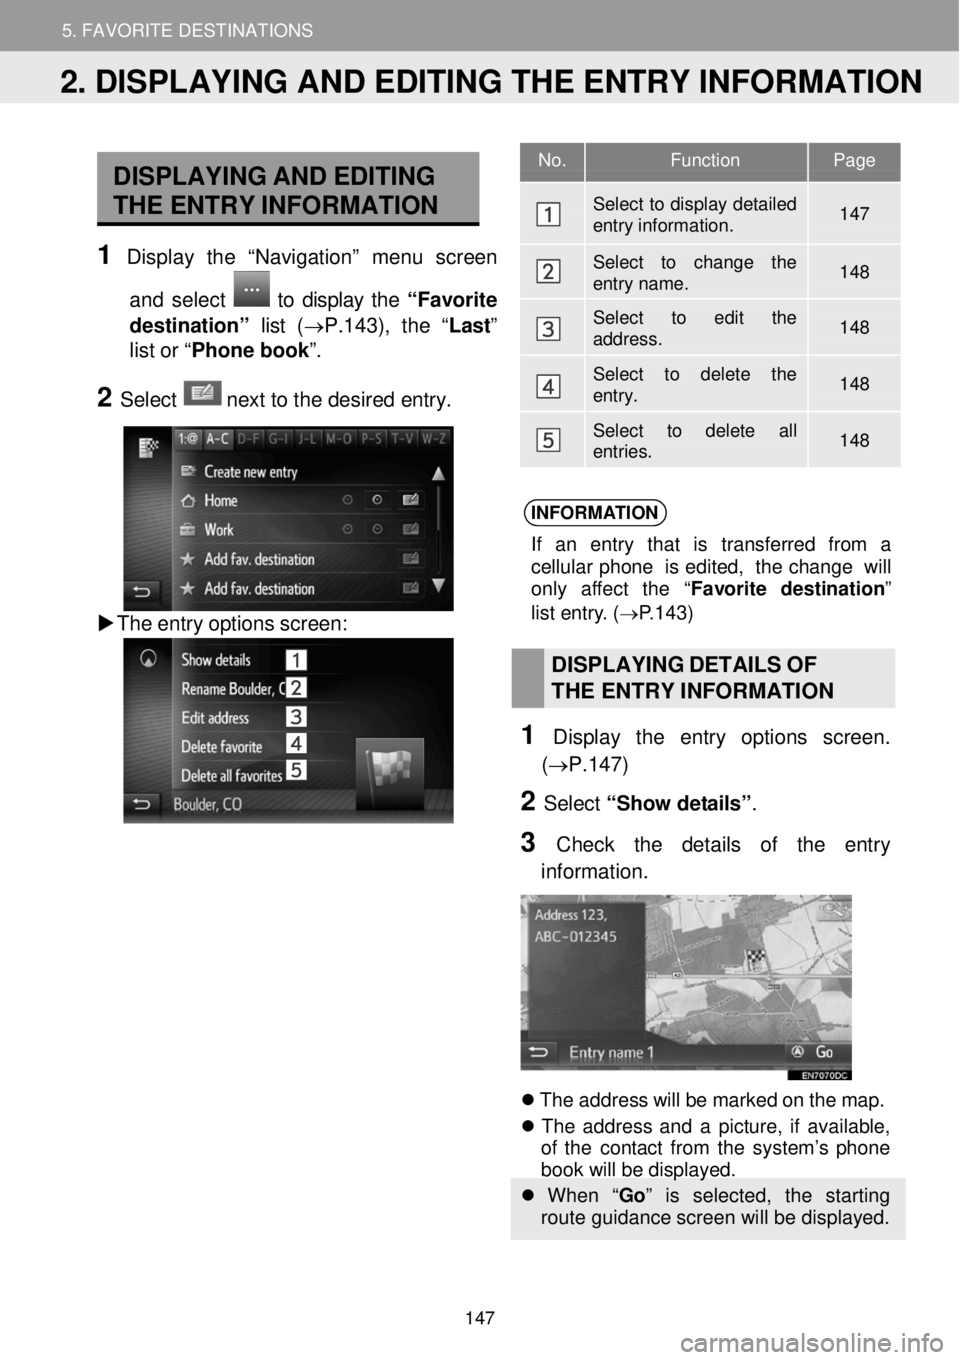
DISPLAYING AND EDITING
THE ENTRY INFORMATION
1 Display t he “Nav igatio n” me nu scree n
and select
to display the “Favorite
destination” list (→P.143), the “ Last”
list or “ Phone book ”.
2 Select ne xt to the de sired entry.
The entry options screen:
INFORMA TION
If an entry t hat is transf erred from a
cellu lar phone is edited, the cha nge will
only affect the “ Favori te desti natio n”
l ist entry. ( →P.143)
DISPLAYING DETAILS OF
TH E ENTR Y IN FORMAT ION
1 Displ ay t he en try options scre en.
(→P. 147)
2 Select “Sho w details” .
3 Check the deta ils of the en try
in formation.
Th e address will be ma rked on the map.
Th e addr ess and a pict ure, if av ailab le,
o f th e conta ct fro m the system ’s phone
b ook wi ll be displ ayed.
When “ Go” is selected, the starting
route guidance screen will be displayed.
No. Function Page
Select to display detailed entry information. 147
Select to change the entry name. 148
Select to edit the address. 148
Select to delete the entry. 148
Select to delete all entries. 148
2. DISPLAYING AND EDITING THE ENTRY INFORMATION
147
Page 148 of 164
5.MYDESTINATIONS5.FAVORITEDESTINATIONS
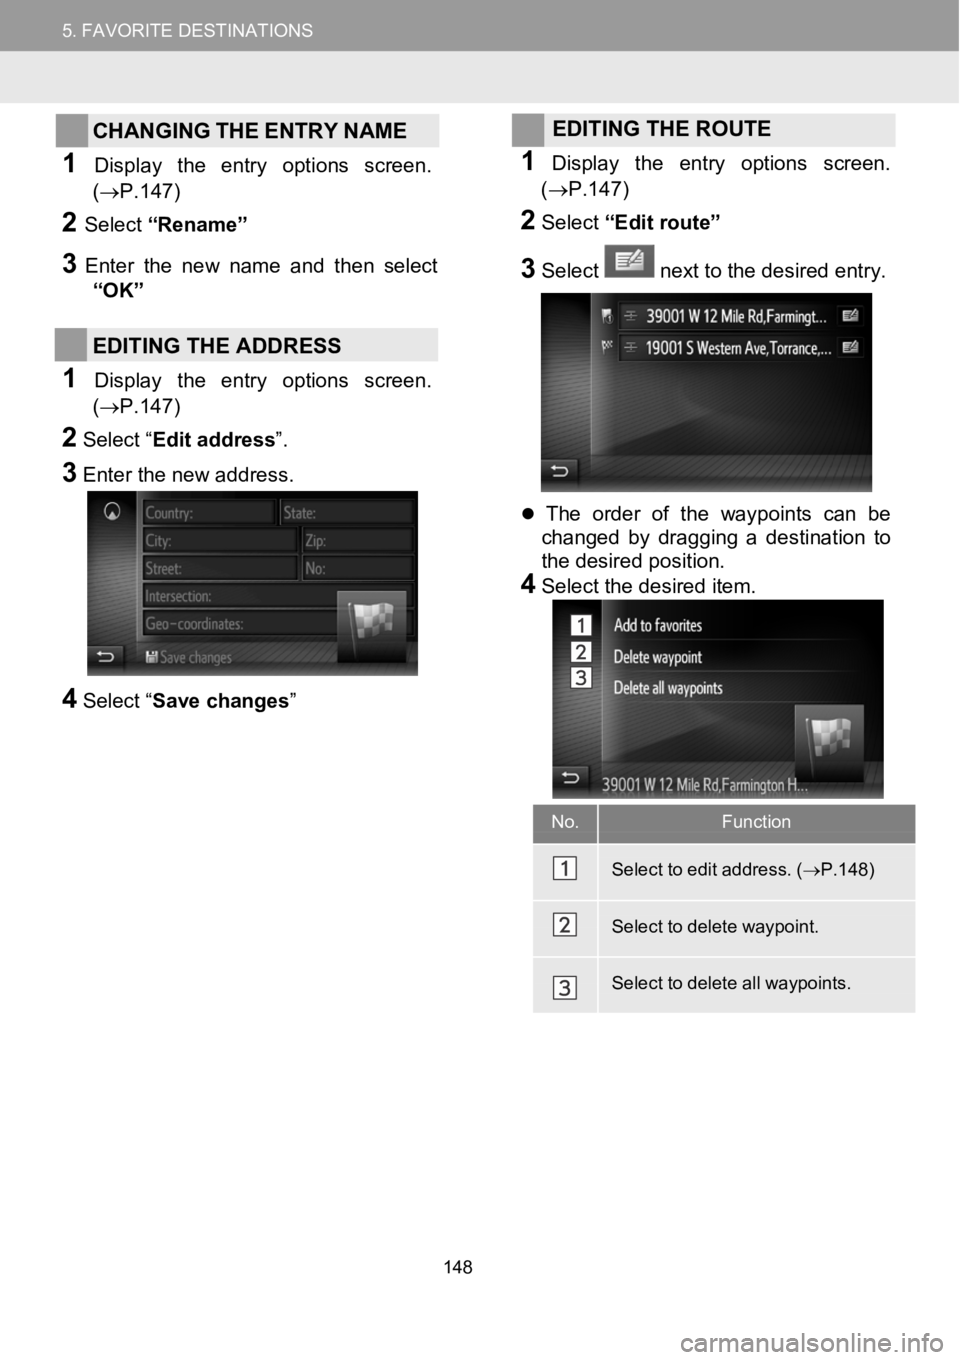
CHANGING THE ENTRY NAME
1Display the entry o ptions scree n.
(→P.1 47)
2Select “Renam e”
3Enterthenew name and then sele ct
“OK”
EDITING THE ADDRESS
1Display the entry options screen.
(→P.1 47)
2Select “ Edit address”.
3Enter the new address.
4Select “Save changes”
EDITING THE ROUTE
1Display the entry opti ons screen.
(→P. 147)
2Select “Edit route”
3Select next to the desired entry.
The order of the waypoints can be
changed by dragging a destination to
the desired position.
4Select the desired item.
No.Fu ncti on
Sele ctto edit address. ( →P.148)
Sele ctto delete waypoint.
Sele ctto delete all waypoints.
148
Page 149 of 164
.5.FAVORITE DESTINATION S
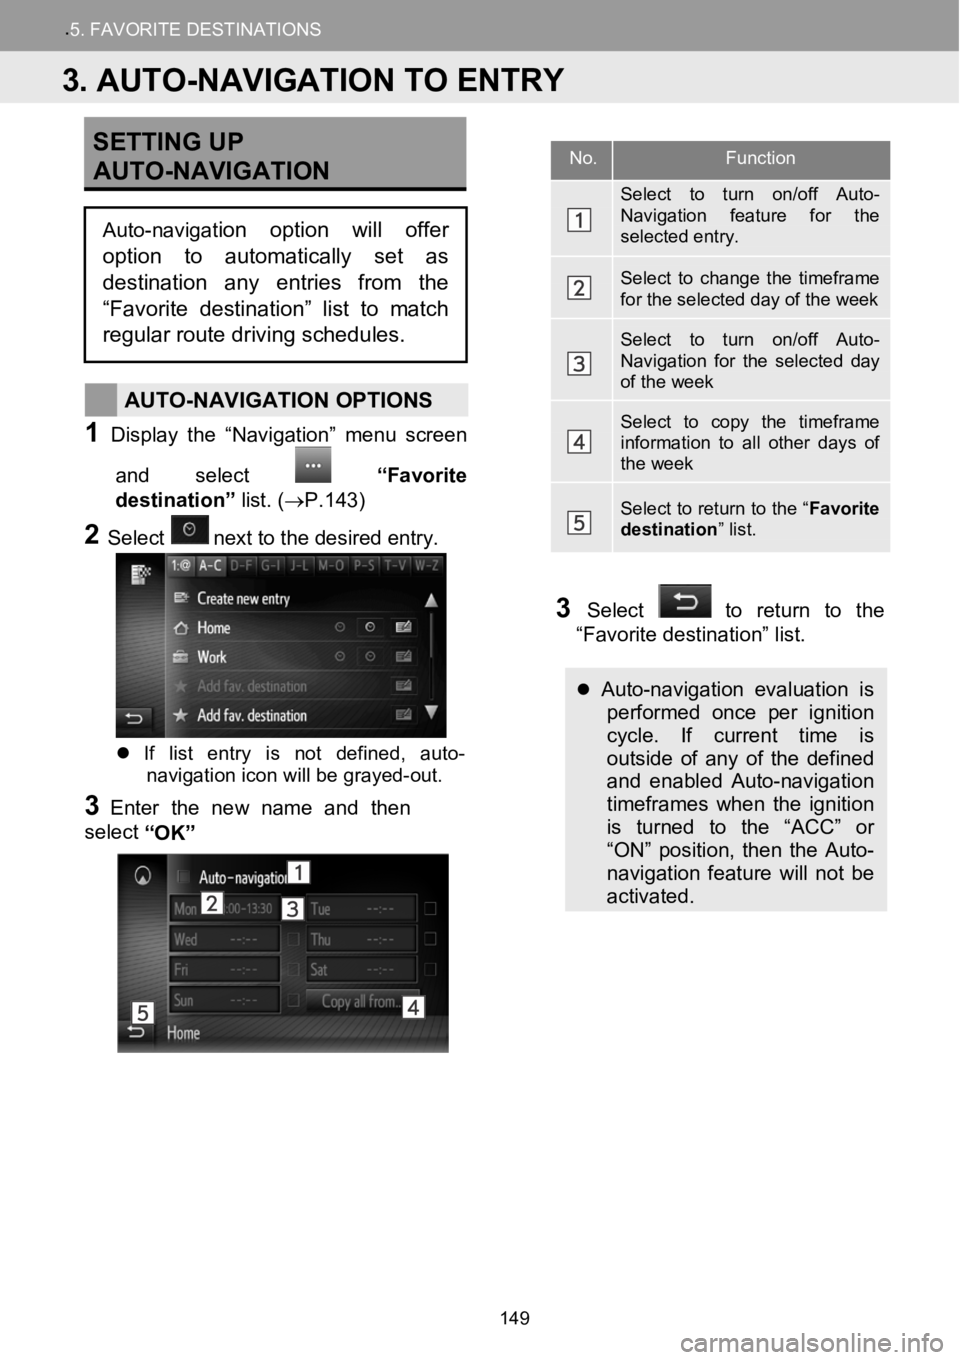
SETTING UP
AUTO- NAVIGATION
AUTO-NAVIGATION OPTIONS
1Disp lay t he “Nav igation ” menu screen
and select
“Favorite
destination” list.(→P.143)
2Selectne xt to the de sired entry.
If list entry is not defined, auto-
navigation icon will be grayed-out.
3Enter the newname and then
select “OK”
3Select to return to the
“Favorite destination” list.
Auto-navigation evaluation is performed once per ignition
cycle. If current time is
outside of any of the defined
and enabled Auto-navigation
timeframes when the ignition
is turned to the “ACC” or
“ON” position, then the Auto-
navigation feature will not be
activated.
No.Function
Select to turn on/off Auto-Navigation feature for the selected entry.
Select to change the timeframe for the selected day of the week
Select to turn on/off Auto-Navigation for the selected day of the week
Select to copy the timeframe information to all other days of the week
Select to return to the “ Favorite destination” list.
3. AUTO-NAVIGATION TO ENTRY
Auto-navigation option will offer
option to automatically set as
destination any entries from the
“Favorite destination” list to match
regular route driving schedules.
149
Page 150 of 164
5. MY DESTINATIONS 5. FAVORITE DESTINATIONS
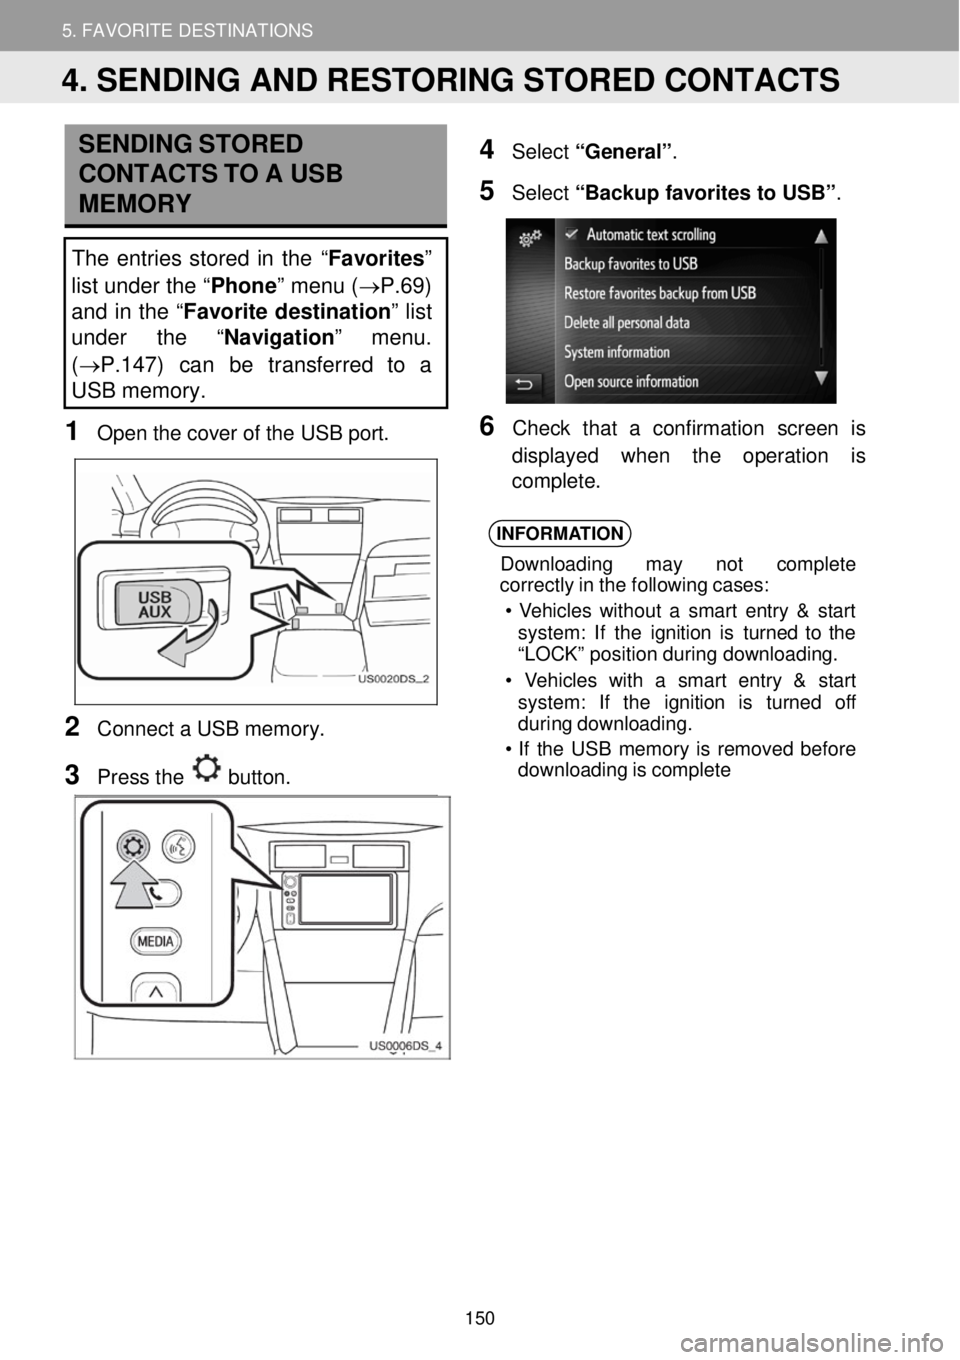
SENDING STORED
CONTACTS TO A USB
ME MO RY
The entries stor ed in th e “Favorites”
list under the “ Phone” menu ( →P.69)
and in the “ Favorite destination ” list
under the “ Navigation” menu.
( →P.147) can be transferred to a
USB memory.
1 Op en th e cove r of the USB port.
2 Conne ct a USB memo ry.
3 Press the button.
4 Select “General” .
5 Select “Backup favorit es to USB ”.
6 Ch eck t hat a confirmation scre en is
di splay ed w hen th e operation is
compl ete.
INFORMA TION
Down loading may not c omplet e
cor rectl y in the following cases:
• Veh icles with out a smart entry & st art
system : If the ignition is turn ed to the
“L OCK ” pos ition duri ng downloa ding.
• V ehicles wit h a smart entry & st art
system : If the ignition is t urned off
duri ng dow nloading.
• If the USB memor y is re moved before
downloading is comple te
4. SENDING AND RESTORING STORED CONTACTS
150