TOYOTA iQ EV 2013 Owners Manual (in English)
Manufacturer: TOYOTA, Model Year: 2013, Model line: iQ EV, Model: TOYOTA iQ EV 2013Pages: 444, PDF Size: 7.34 MB
Page 141 of 444
1414-3. Adjusting the seats
4
Operation of each component
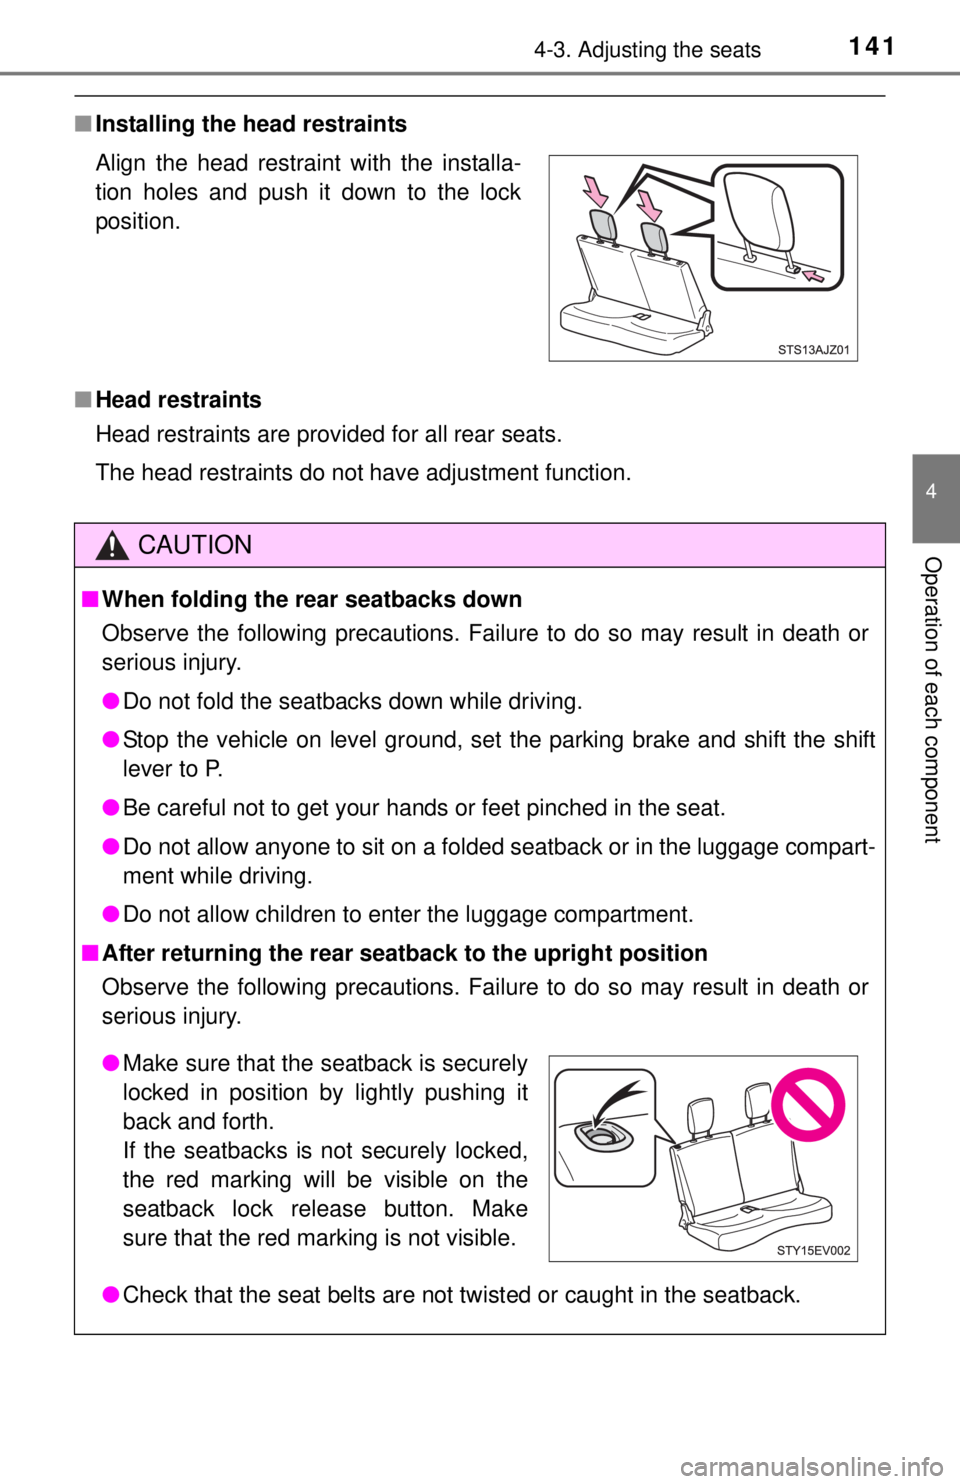
■Installing the head restraints
■ Head restraints
Head restraints are provided for all rear seats.
The head restraints do not have adjustment function. Align the head restraint with the installa-
tion holes and push it down to the lock
position.
CAUTION
■When folding the rear seatbacks down
Observe the following precautions. Failure to do so may result in death or
serious injury.
● Do not fold the seatbacks down while driving.
● Stop the vehicle on level ground, set the parking brake and shift the shift
lever to P.
● Be careful not to get your hands or feet pinched in the seat.
● Do not allow anyone to sit on a folded seatback or in the luggage compart-
ment while driving.
● Do not allow children to enter the luggage compartment.
■ After returning the rear seatback to the upright position
Observe the following precautions. Failure to do so may result in death or
serious injury.
● Check that the seat belts are not twisted or caught in the seatback.
●Make sure that the seatback is securely
locked in position by lightly pushing it
back and forth.
If the seatbacks is not securely locked,
the red marking will be visible on the
seatback lock release button. Make
sure that the red marking is not visible.
Page 142 of 444
1424-3. Adjusting the seats
CAUTION
■Head restraint precautions
Observe the following precautions regarding the head restraints.
Failure to do so may result in death or serious injury.
● Use the head restraints designed for each respective seat.
● After installing the head restraints, push down on them and make sure
they are locked in position.
● Do not drive with the head restraints removed.
NOTICE
■Before folding the seatbacks
● The seat belts buckles must be stowed.
● The head restraints must be removed.
■ When operating the rear seat
Make sure that the rear seat does not come into contact with the front seat.
Do not forcibly operate the rear seat. Otherwise, the seat cover may be
damaged or the seat may be broken.
Page 143 of 444
1434-4. Adjusting the steering wheel and mirrors
4
Operation of each component
Steering wheel
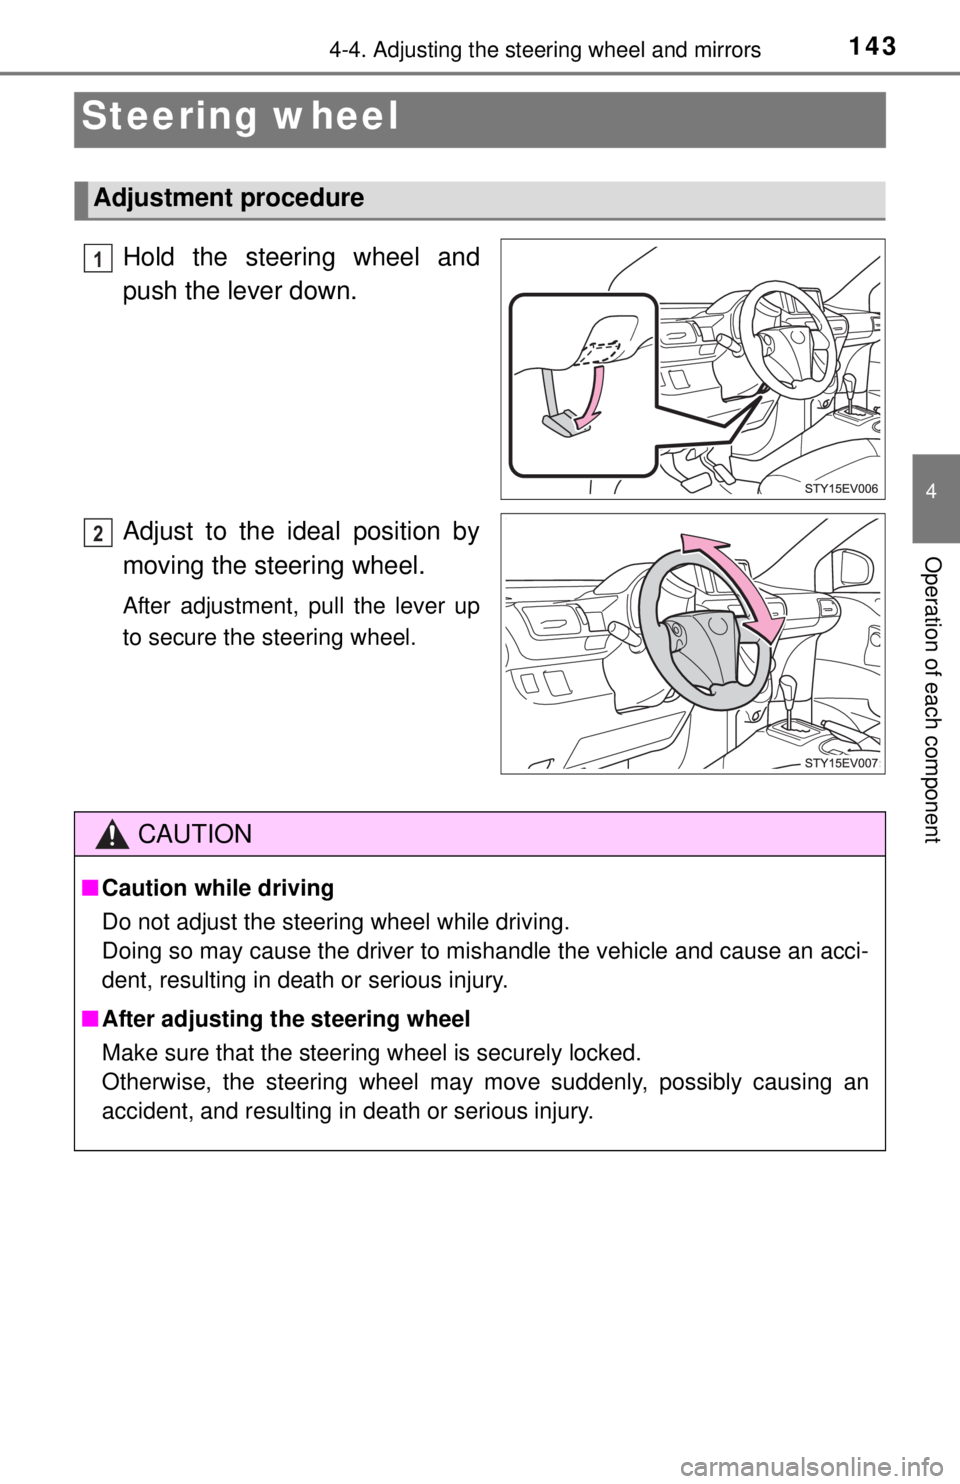
Hold the steering wheel and
push the lever down.
Adjust to the ideal position by
moving the steering wheel.
After adjustment, pull the lever up
to secure the steering wheel.
Adjustment procedure
1
2
CAUTION
■Caution while driving
Do not adjust the steering wheel while driving.
Doing so may cause the driver to mishandle the vehicle and cause an acci-
dent, resulting in death or serious injury.
■ After adjusting the steering wheel
Make sure that the steering wheel is securely locked.
Otherwise, the steering wheel may move suddenly, possibly causing an
accident, and resulting in death or serious injury.
Page 144 of 444
1444-4. Adjusting the steering wheel and mirrors
Inside rear view mirror
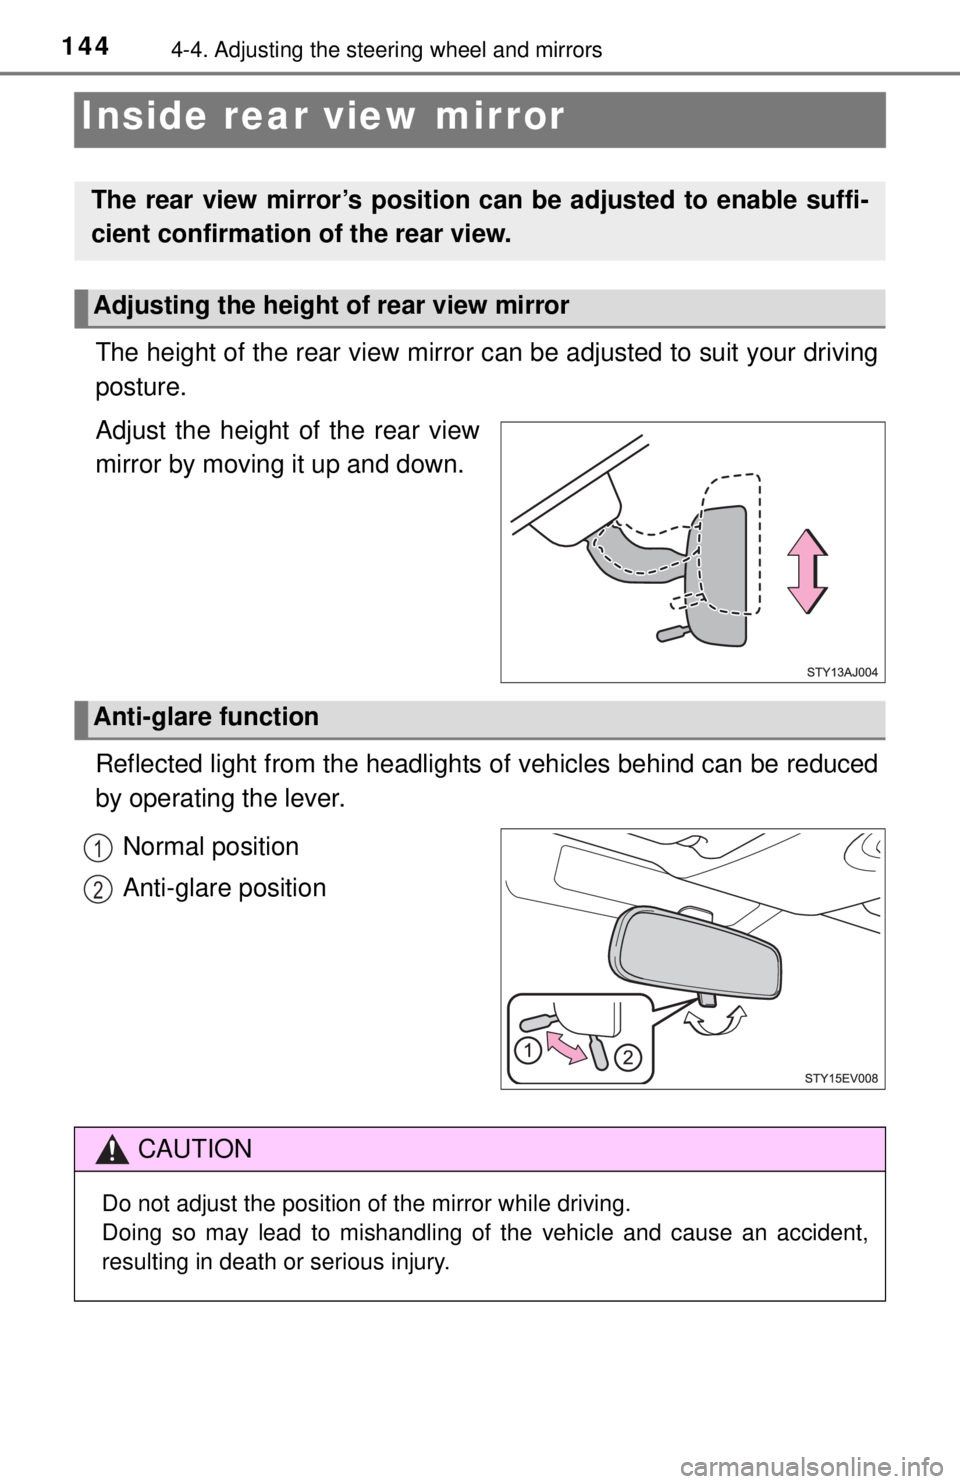
The height of the rear view mirror can be adjusted to suit your driving
posture.
Adjust the height of the rear view
mirror by moving it up and down.
Reflected light from the headlights of vehicles behind can be reduced
by operating the lever.
Normal position
Anti-glare position
The rear view mirror’s position can be adjusted to enable suffi-
cient confirmation of the rear view.
Adjusting the height of rear view mirror
Anti-glare function
1
2
CAUTION
Do not adjust the position of the mirror while driving.
Doing so may lead to mishandling of the vehicle and cause an accident,
resulting in death or serious injury.
Page 145 of 444
1454-4. Adjusting the steering wheel and mirrors
4
Operation of each component
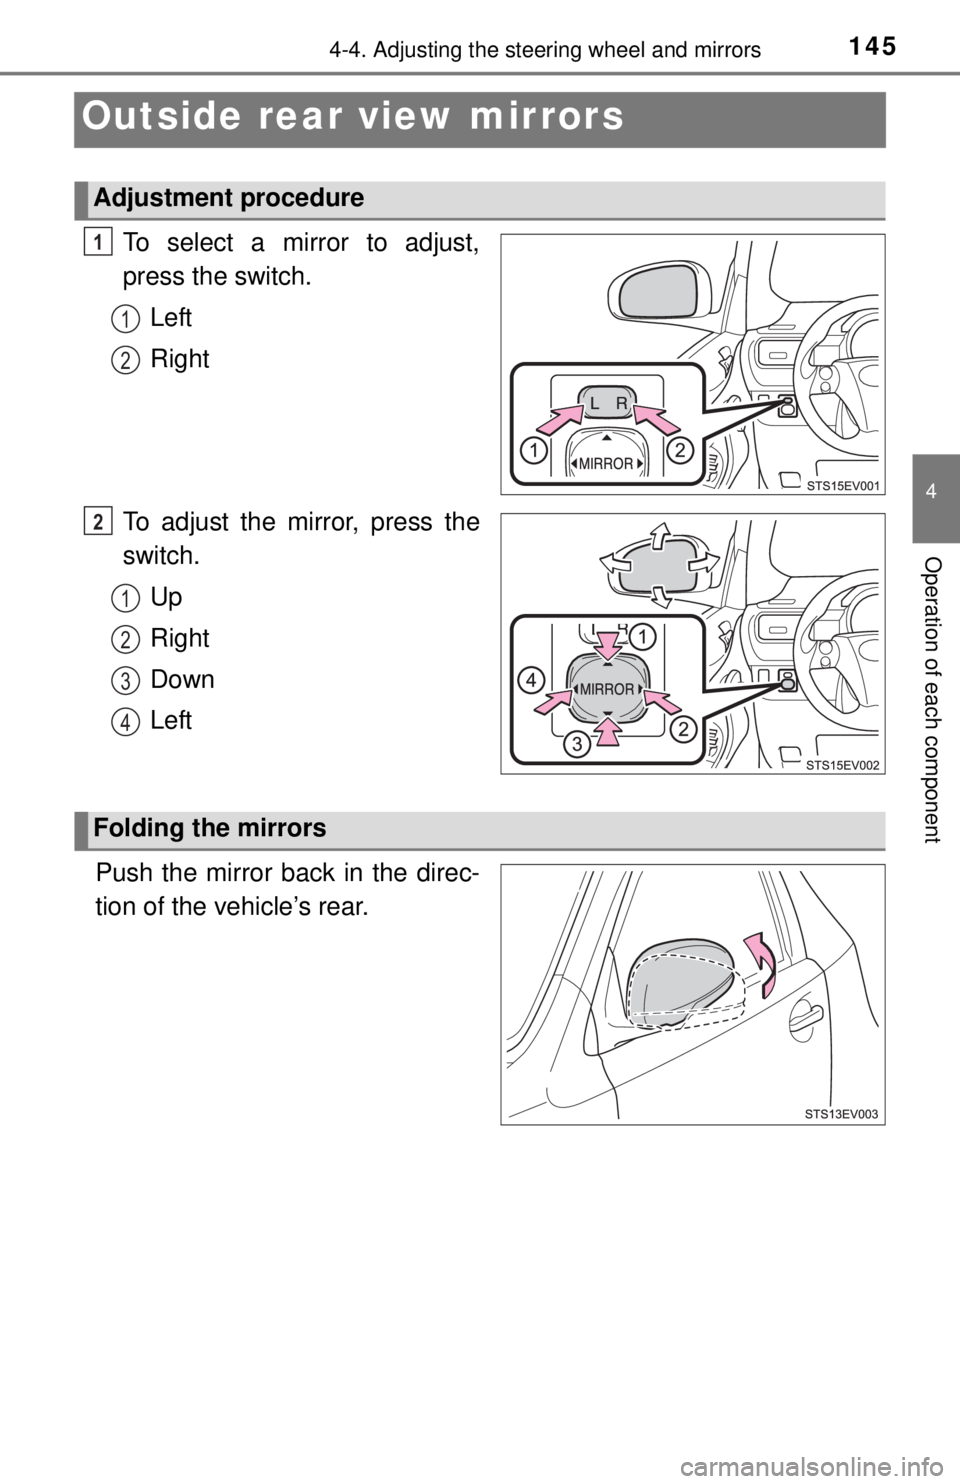
Outside rear view mirrors
To select a mirror to adjust,
press the switch.Left
Right
To adjust the mirror, press the
switch. Up
Right
Down
Left
Push the mirror back in the direc-
tion of the vehicle’s rear.
Adjustment procedure
1
1
2
2
1
2
3
4
Folding the mirrors
Page 146 of 444

1464-4. Adjusting the steering wheel and mirrors
■Mirror angle can be adjusted when
The power switch is in ACCESSORY or ON mode.
CAUTION
■Important points while driving
Observe the following precautions while driving.
Failure to do so may result in loss of control of the vehicle and cause an
accident, resulting in death or serious injury.
● Do not adjust the mirrors while driving.
● Do not drive with the mirrors folded.
● Both the driver and passenger side mirrors must be extended and properly
adjusted before driving.
■ When a mirror is moving
To avoid personal injury and mirror malfunction, be careful not to get your
hand caught by the moving mirror.
Page 147 of 444
1474-5. Opening, closing the windows
4
Operation of each component
Power windows
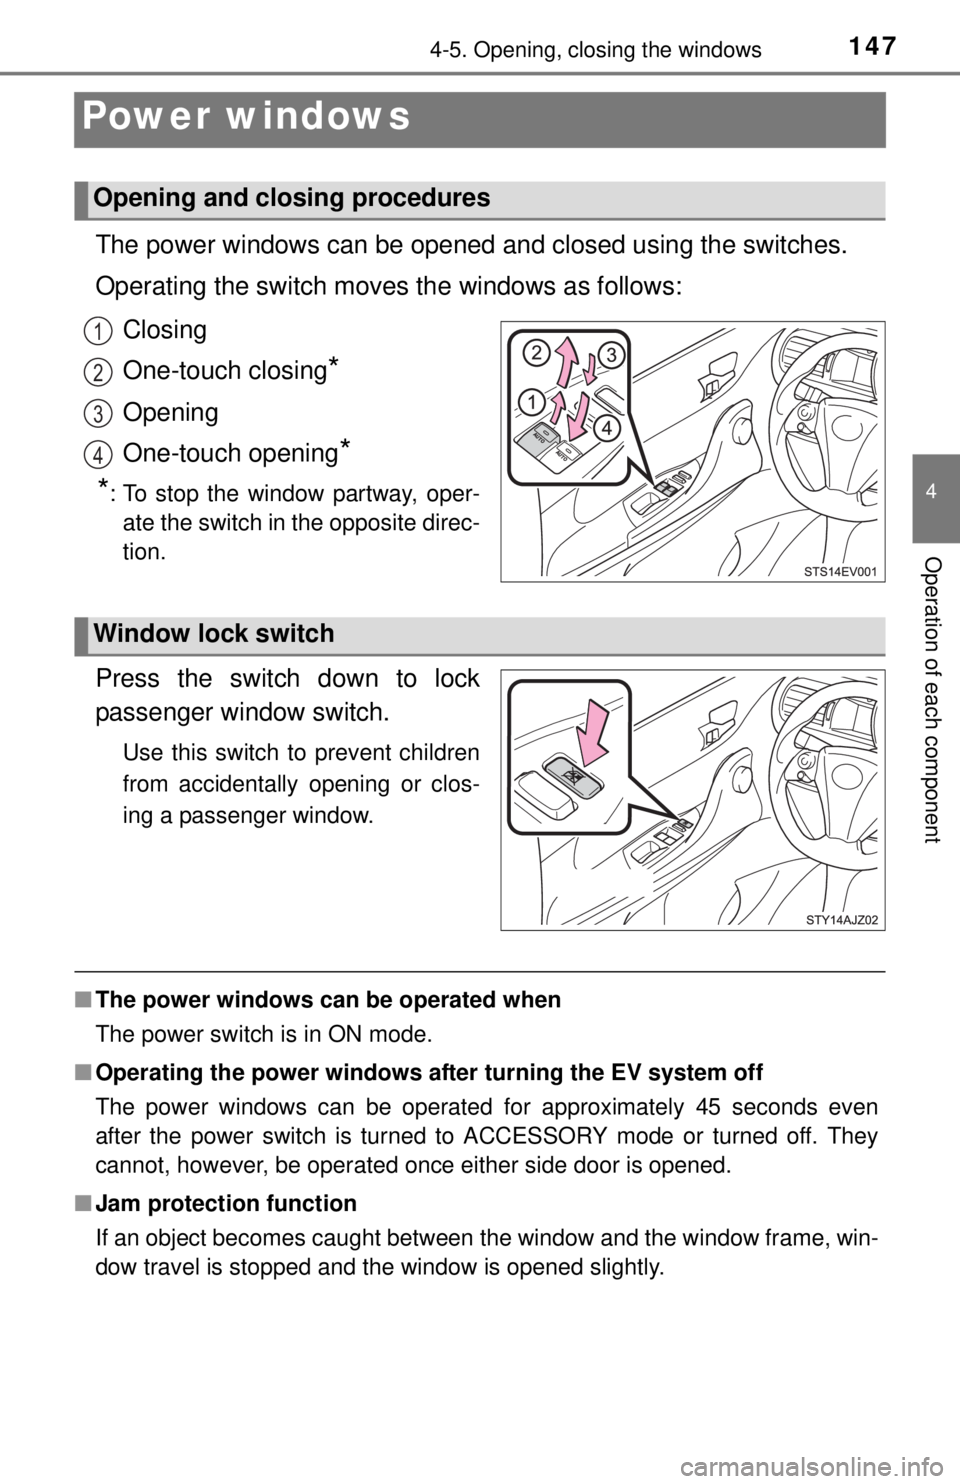
The power windows can be opened and closed using the switches.
Operating the switch moves the windows as follows:
Closing
One-touch closing
*
Opening
One-touch opening
*
*
: To stop the window partway, oper-
ate the switch in the opposite direc-
tion.
Press the switch down to lock
passenger window switch.
Use this switch to prevent children
from accidentally opening or clos-
ing a passenger window.
■ The power windows can be operated when
The power switch is in ON mode.
■ Operating the power windows af ter turning the EV system off
The power windows can be operated for approximately 45 seconds even
after the power switch is turned to ACCESSORY mode or turned off. They
cannot, however, be operated once either side door is opened.
■ Jam protection function
If an object becomes caught between the window and the window frame, win-
dow travel is stopped and the window is opened slightly.
Opening and closing procedures
1
2
3
4
Window lock switch
Page 148 of 444
1484-5. Opening, closing the windows
■When the power window does not close normally
If the jam protection function is operating abnormally and a window cannot be
closed, perform the following operations using the power window switch on
the relevant door.
●After stopping the vehicle, the window can be closed by holding the power
window switch in the one-touch closing position while the power switch is
turned to ON mode.
● If the window still cannot be closed even by carrying out the operation as
explained above, initialize the function by performing the following proce-
dure.
Hold the power window switch in the one-touch closing position. Continue
holding the switch for a further 6 seconds after the window has closed.
Hold the power window switch in the one-touch opening position. Con-
tinue holding the switch for a further 2 seconds after the window has
opened completely.
Hold the power window switch in the one-touch closing position once
again. Continue holding the switch for a further 2 seconds after the win-
dow has closed.
If you release the switch while the window is moving, start again from the
beginning.
If the window continues to close but then re-open slightly even after perform-
ing the above procedure correctly, have the vehicle inspected by your Scion
dealer.
CAUTION
Observe the following precautions.
Failure to do so may result in death or serious injury.
■ Closing the windows
● Check to make sure that all passengers do not have any part of their body
in a position where it could be caught when a window is being operated.
● Do not allow children to operate the power windows.
Closing a power window on someone can cause serious injury, and in
some instances, even death.
■ Jam protection function
● Never use any part of your body to intentionally activate the jam protection
function.
● The jam protection function may not work if something gets caught just
before the window fully closes.
1
2
3
Page 149 of 444

149
5Driving
5-1. Before drivingDriving the vehicle ............. 150
Cargo and luggage ........... 159
Vehicle load limits ............. 162
Trailer towing..................... 163
Dinghy towing ................... 164
5-2. Driving procedures Power (ignition) switch ...... 165
Transmission ..................... 171
Turn signal lever................ 173
Parking brake .................... 174
Horn .................................. 175
5-3. Operating the lights and wipers
Headlight switch ................ 176
Windshield wipers and washer ..................... 178
Rear window wiper and washer ............................ 180
5-4. How to charge Normal charging ................ 181
Quick charging .................. 195
Timer charging (normal charging only) ................. 202 5-5. Using the driving support
systems
Driving assist systems ...... 210
Hill-start assist control ....... 213
5-6. Driving tips Winter driving tips ............. 215
Page 150 of 444
1505-1. Before driving
Driving the vehicle
Check that the charging cable is disconnected. (P. 188)
P. 1 6 5
With the brake pedal depressed, shift the shift lever to D. ( P. 171)
Release the parking brake. ( P. 174)
Gradually release the brake pedal and gently depress the accelera-
tor pedal to accelerate the vehicle.
With the shift lever in D, depress the brake pedal.
If necessary, set the parking brake.
If the vehicle is to be stopped for an extended period of time, shift the shift
lever to P or N. ( P. 171)
With the shift lever in D, depress the brake pedal.
Set the parking brake. ( P. 174)
Shift the shift lever to P. ( P. 171)
Press the power switch to stop the EV system.
Lock the door, making sure that you have the electronic key on your
person.
If parking on a hill, block the wheels as needed.
The following procedures should be observed to ensure safe
driving:
Before starting the EV system
Starting the EV system
Driving
Stopping
Parking the vehicle
1
2
3
1
2
1
2
3
4
5