TOYOTA RAV4 1996 Service Repair Manual
Manufacturer: TOYOTA, Model Year: 1996, Model line: RAV4, Model: TOYOTA RAV4 1996Pages: 1632, PDF Size: 41.64 MB
Page 1071 of 1632
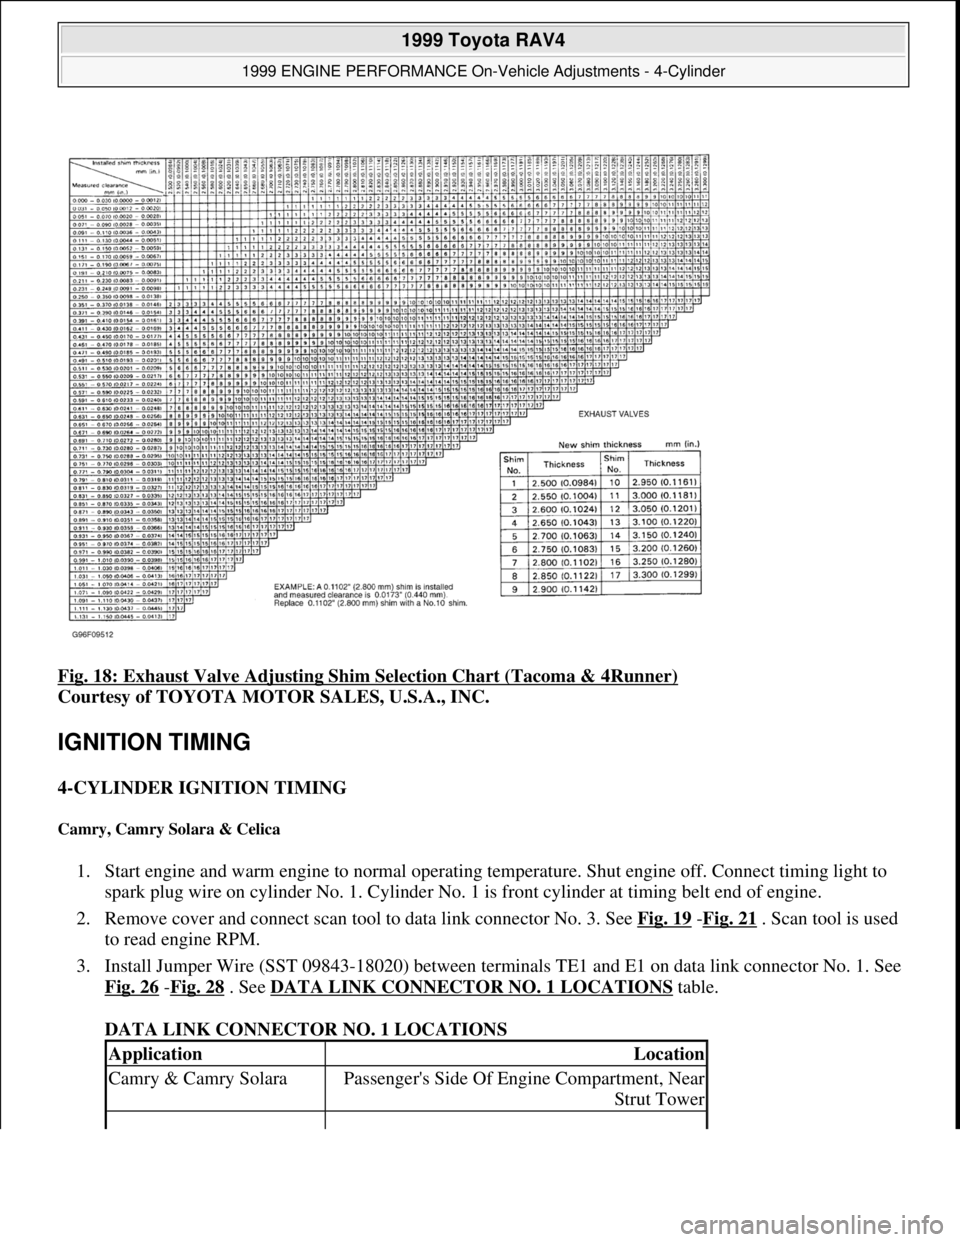
Fig. 18: Exhaust Valve Adjusting Shim Selection Chart (Tacoma & 4Runner)
Courtesy of TOYOTA MOTOR SALES, U.S.A., INC.
IGNITION TIMING
4-CYLINDER IGNITION TIMING
Camry, Camry Solara & Celica
1. Start engine and warm engine to normal operating temperature. Shut engine off. Connect timing light to
spark plug wire on cylinder No. 1. Cylinder No. 1 is front cylinder at timing belt end of engine.
2. Remove cover and connect scan tool to data link connector No. 3. See Fig. 19
-Fig. 21 . Scan tool is used
to read engine RPM.
3. Install Jumper Wire (SST 09843-18020) between terminals TE1 and E1 on data link connector No. 1. See
Fig. 26
-Fig. 28 . See DATA LINK CONNECTOR NO. 1 LOCATIONS table.
DATA LINK CONNECTOR NO. 1 LOCATIONS
ApplicationLocation
Camry & Camry SolaraPassenger's Side Of Engine Compartment, Near
Strut Tower
1999 Toyota RAV4
1999 ENGINE PERFORMANCE On-Vehicle Adjustments - 4-Cylinder
Microsoft
Sunday, November 22, 2009 10:25:31 AMPage 20 © 2005 Mitchell Repair Information Company, LLC.
Page 1072 of 1632
4. Apply parking brake. Place transaxle in Neutral. Start engine and maintain engine at 1000-1300 RPM for
5 seconds and then ensure engine returns to idle.
5. Timing marks are located on timing belt cover, near crankshaft pulley. Ensure base timing is within
specification at idle with transaxle in Neutral, and with A/C and all accessories off. See IGNITION
TIMING SPECIFICATIONS table.
6. Remove jumper wire from data link connector No. 1. Ensure ECM controlled timing is within
specification. See IGNITION TIMING SPECIFICATIONS
table. Shut engine off. Remove timing
light and scan tool.
Corolla
1. Start engine and warm engine to normal operating temperature. Shut engine off. Connect timing light to
spark plug wire on cylinder No. 1. Cylinder No. 1 is front cylinder at timing chain end of engine.
2. Connect scan tool to data link connector No. 3. See Fig. 22
. Scan tool is used to read engine RPM.
3. Install Jumper Wire (SST 09843-18020) between terminals TE1 and E1 on data link connector No. 1. See
Fig. 29
. Data link connector No. 1 is located at driver's side of engine compartment, near strut tower.
4. Apply parking brake. Place transaxle in Neutral. Start engine and maintain engine at 1000-1300 RPM for
5 seconds and then ensure engine returns to idle.
5. Timing marks are located on timing chain cover, near crankshaft pulley. Ensure base timing is within
specification at idle with transaxle in Neutral, and with A/C and all accessories off. See IGNITION
TIMING SPECIFICATIONS table.
6. Remove jumper wire from data link connector No. 1. Ensure ECM controlled timing is within
specification. See IGNITION TIMING SPECIFICATIONS
table. Shut engine off. Remove timing
light and scan tool.
RAV4
1. Start engine and warm engine to normal operating temperature. Shut engine off. Connect timing light to
spark plug wire on cylinder No. 1. Cylinder No. 1 is front cylinder at timing belt end of engine.
2. Remove cover from instrument panel and connect scan tool to data link connector No. 3. See Fig. 23
.
Scan tool is used to read engine RPM.
3. Install Jumper Wire (SST 09843-18020) between terminals TE1 and E1 on data link connector No. 1. See
Fig. 30
. Data link connector No. 1 is located on timing belt end of engine, above generator.
4. Apply parking brake. Place transaxle in Neutral. Start engine and allow engine to idle.
5. Timing marks are located on timing belt cover, near crankshaft pulley. Ensure base timing is within
specification at idle with transaxle in Neutral, and with A/C and all accessories off. See IGNITION
TIMING SPECIFICATIONS table.
6. Remove jumper wire from data link connector No. 1. Ensure ECM controlled timing is within
specification. See IGNITION TIMING SPECIFICATIONS
table. Shut engine off. Remove timing
li
ght and scan tool.
CelicaDriver's Side Rear Corner Of Engine
Compartment, Near Brake Booster
1999 Toyota RAV4
1999 ENGINE PERFORMANCE On-Vehicle Adjustments - 4-Cylinder
Microsoft
Sunday, November 22, 2009 10:25:31 AMPage 21 © 2005 Mitchell Repair Information Company, LLC.
Page 1073 of 1632
Tacoma & 4Runner
1. Start engine and warm engine to normal operating temperature. Shut engine off. Connect timing light to
spark plug wire on cylinder No. 1. Cylinder No. 1 is front cylinder at timing chain end of engine.
2. Connect scan tool to data link connector No. 3. See Fig. 24
and Fig. 25 . Scan tool is used to read engine
RPM.
3. Install Jumper Wire (SST 09843-18020) between terminals TE1 and E1 on data link connector No. 1. See
Fig. 31
. Data link connector No. 1 is located on end of intake manifold at front of engine.
4. Apply parking brake. Place transmission in Neutral. Start engine. Maintain engine at 1000 RPM for 5
seconds and then ensure engine returns to idle.
5. Timing marks are located on timing chain cover, near crankshaft pulley. Ensure base timing is within
specification at idle with transmission in Neutral, and with A/C and all accessories off. See IGNITION
TIMING SPECIFICATIONS table.
6. Remove jumper wire from data link connector No. 1. Ensure ECM controlled timing is within
specification. See IGNITION TIMING SPECIFICATIONS
table. Shut engine off. Remove timing
light and scan tool.
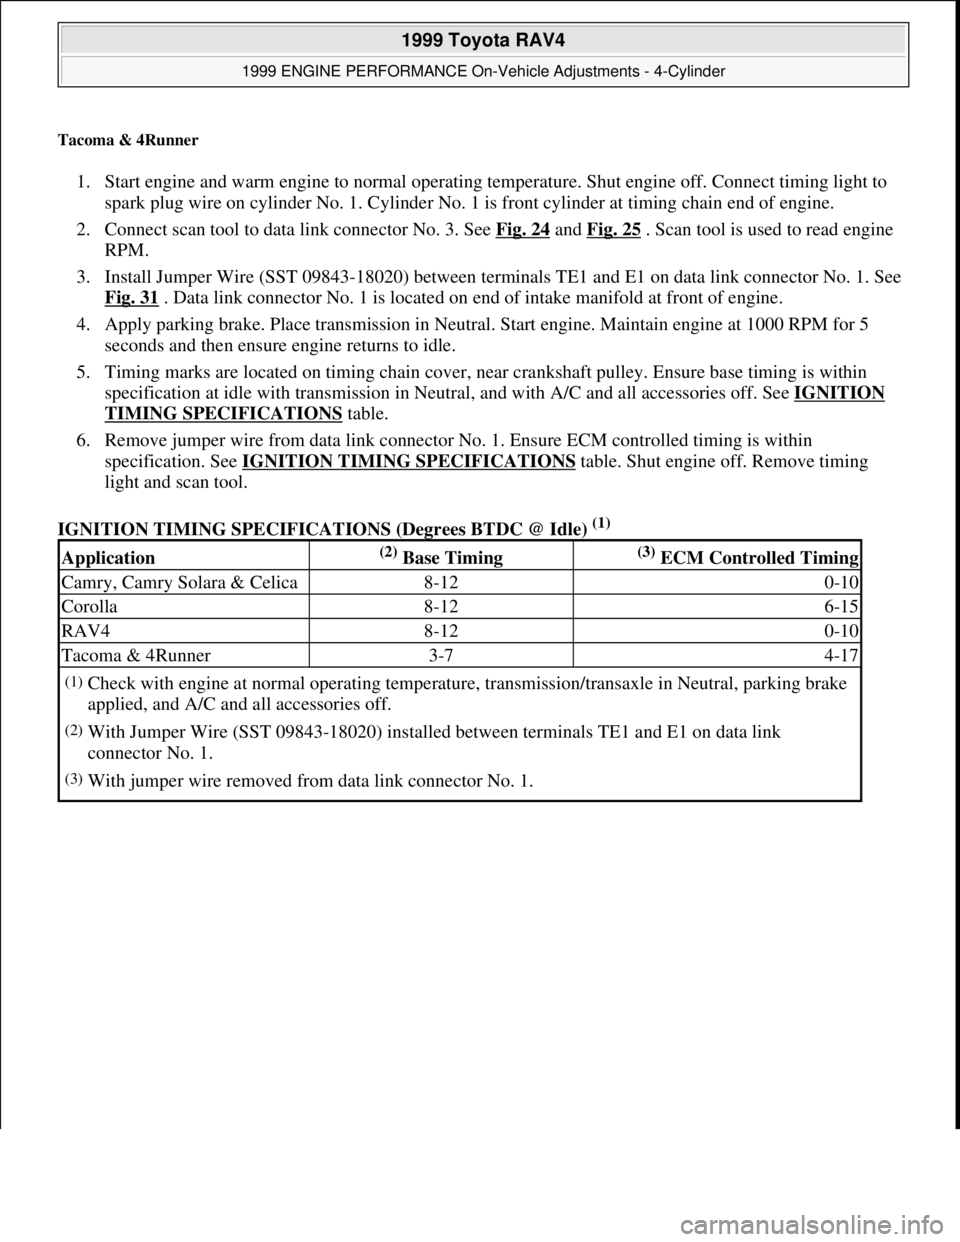
IGNITION TIMING SPECIFICATIONS (Degrees BTDC @ Idle)
(1)
Application(2) Base Timing(3) ECM Controlled Timing
Camry, Camry Solara & Celica8-120-10
Corolla8-126-15
RAV48-120-10
Tacoma & 4Runner3-74-17
(1)Check with engine at normal operating temperature, transmission/transaxle in Neutral, parking brake
applied, and A/C and all accessories off.
(2)With Jumper Wire (SST 09843-18020) installed between terminals TE1 and E1 on data link
connector No. 1.
(3)With jumper wire removed from data link connector No. 1.
1999 Toyota RAV4
1999 ENGINE PERFORMANCE On-Vehicle Adjustments - 4-Cylinder
Microsoft
Sunday, November 22, 2009 10:25:31 AMPage 22 © 2005 Mitchell Repair Information Company, LLC.
Page 1074 of 1632
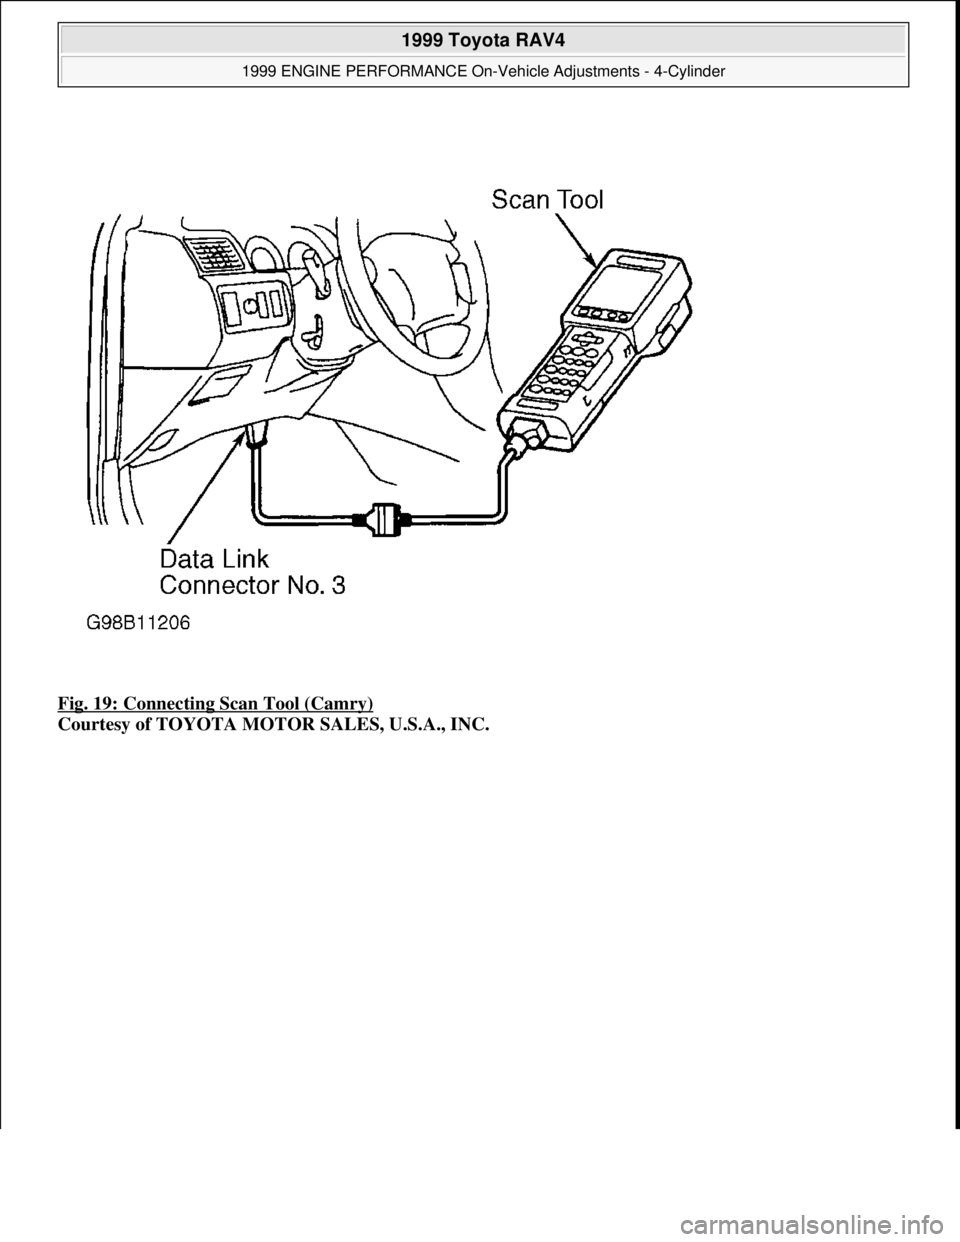
Fig. 19: Connecting Scan Tool (Camry)
Courtesy of TOYOTA MOTOR SALES, U.S.A., INC.
1999 Toyota RAV4
1999 ENGINE PERFORMANCE On-Vehicle Adjustments - 4-Cylinder
Microsoft
Sunday, November 22, 2009 10:25:31 AMPage 23 © 2005 Mitchell Repair Information Company, LLC.
Page 1075 of 1632
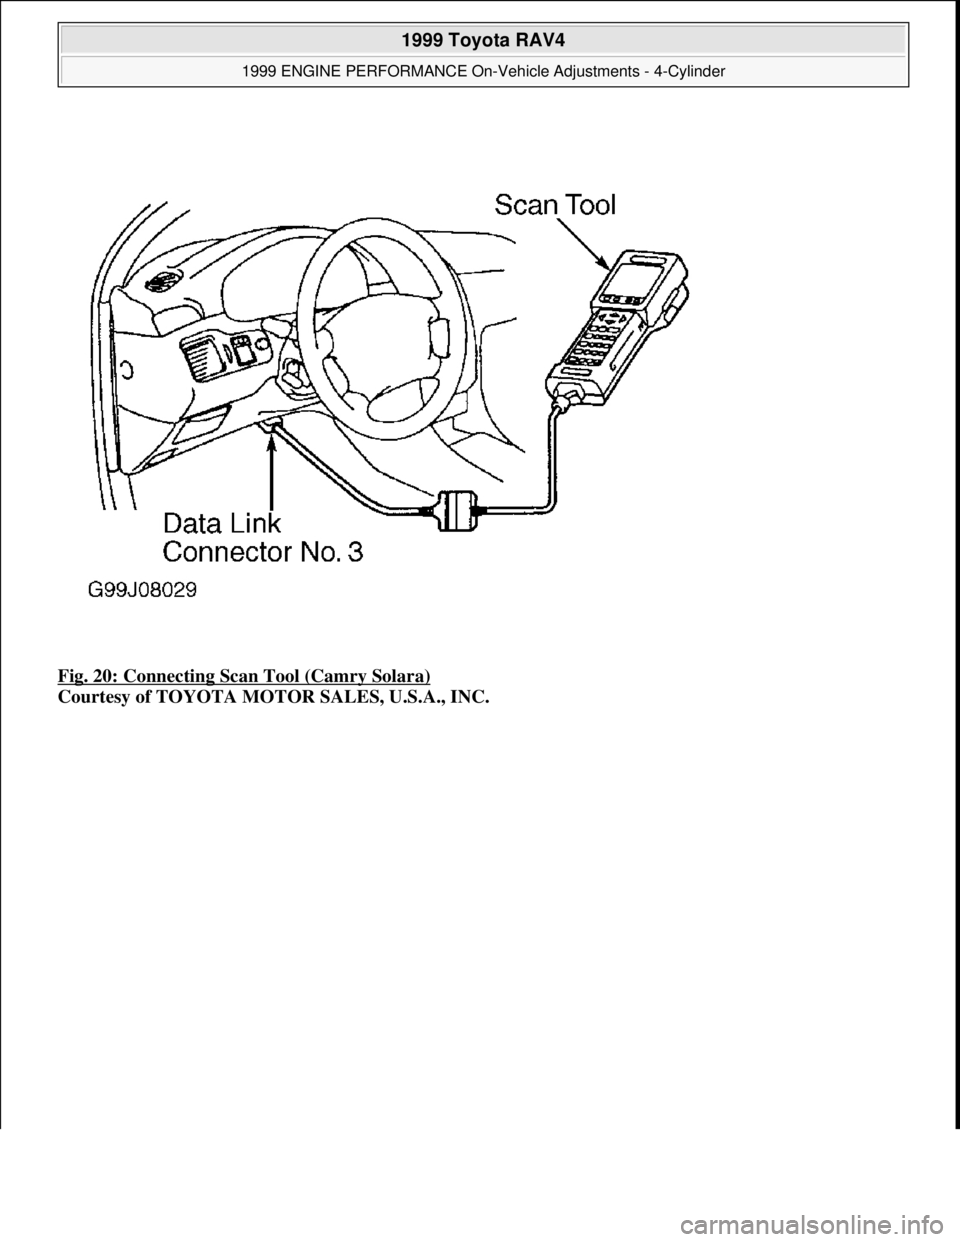
Fig. 20: Connecting Scan Tool (Camry Solara)
Courtesy of TOYOTA MOTOR SALES, U.S.A., INC.
1999 Toyota RAV4
1999 ENGINE PERFORMANCE On-Vehicle Adjustments - 4-Cylinder
Microsoft
Sunday, November 22, 2009 10:25:31 AMPage 24 © 2005 Mitchell Repair Information Company, LLC.
Page 1076 of 1632
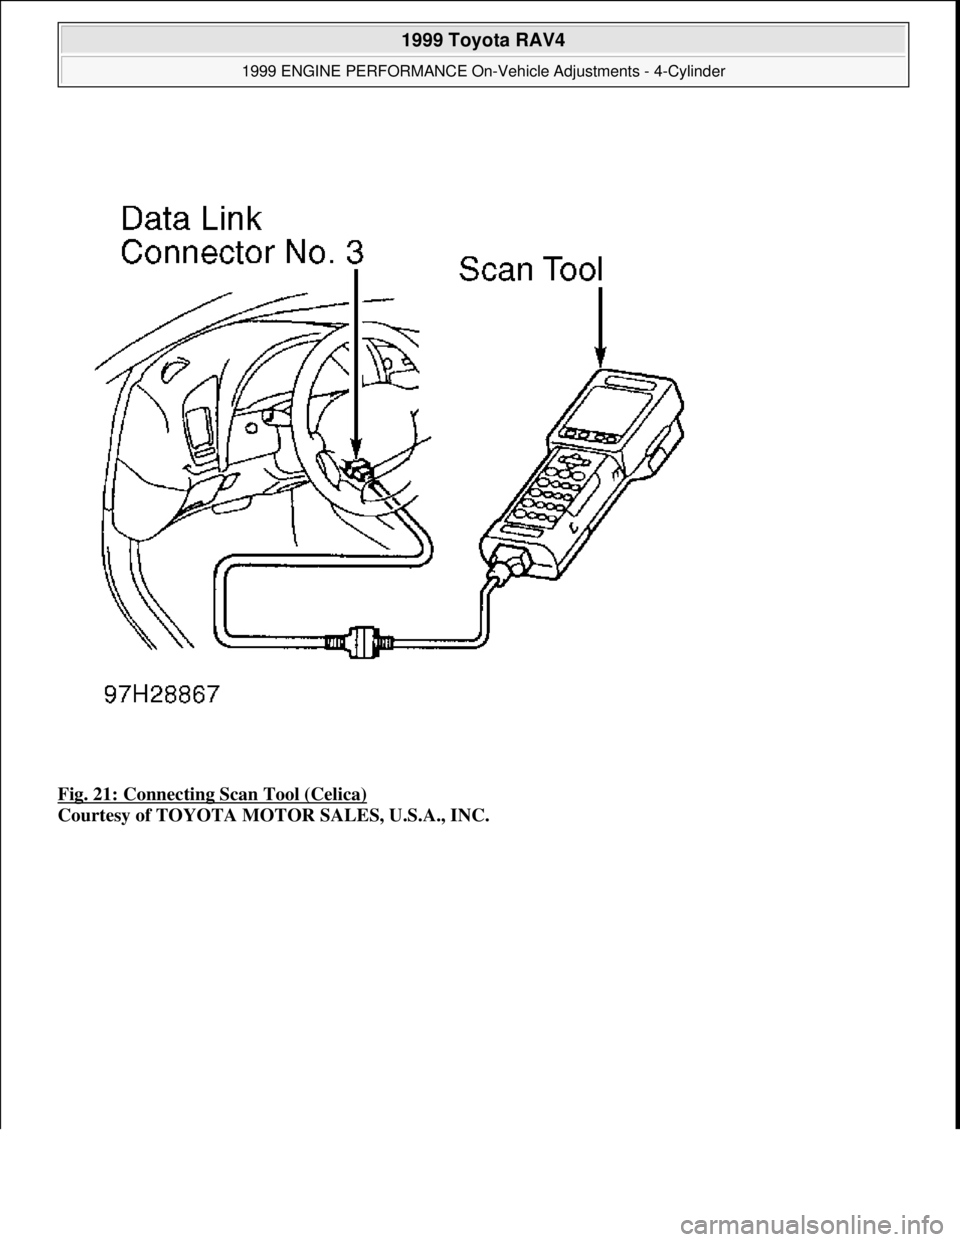
Fig. 21: Connecting Scan Tool (Celica)
Courtesy of TOYOTA MOTOR SALES, U.S.A., INC.
1999 Toyota RAV4
1999 ENGINE PERFORMANCE On-Vehicle Adjustments - 4-Cylinder
Microsoft
Sunday, November 22, 2009 10:25:31 AMPage 25 © 2005 Mitchell Repair Information Company, LLC.
Page 1077 of 1632
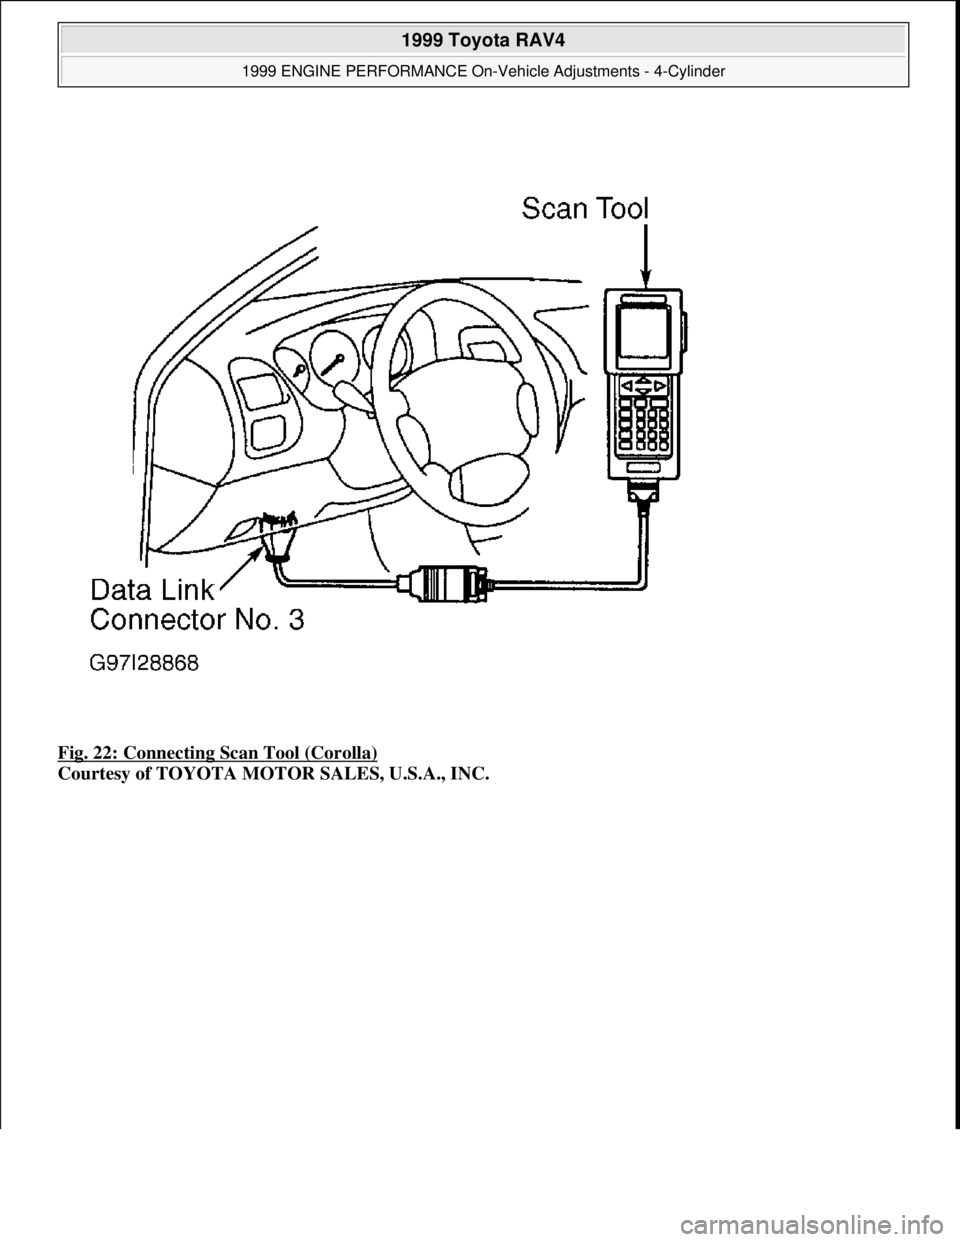
Fig. 22: Connecting Scan Tool (Corolla)
Courtesy of TOYOTA MOTOR SALES, U.S.A., INC.
1999 Toyota RAV4
1999 ENGINE PERFORMANCE On-Vehicle Adjustments - 4-Cylinder
Microsoft
Sunday, November 22, 2009 10:25:31 AMPage 26 © 2005 Mitchell Repair Information Company, LLC.
Page 1078 of 1632
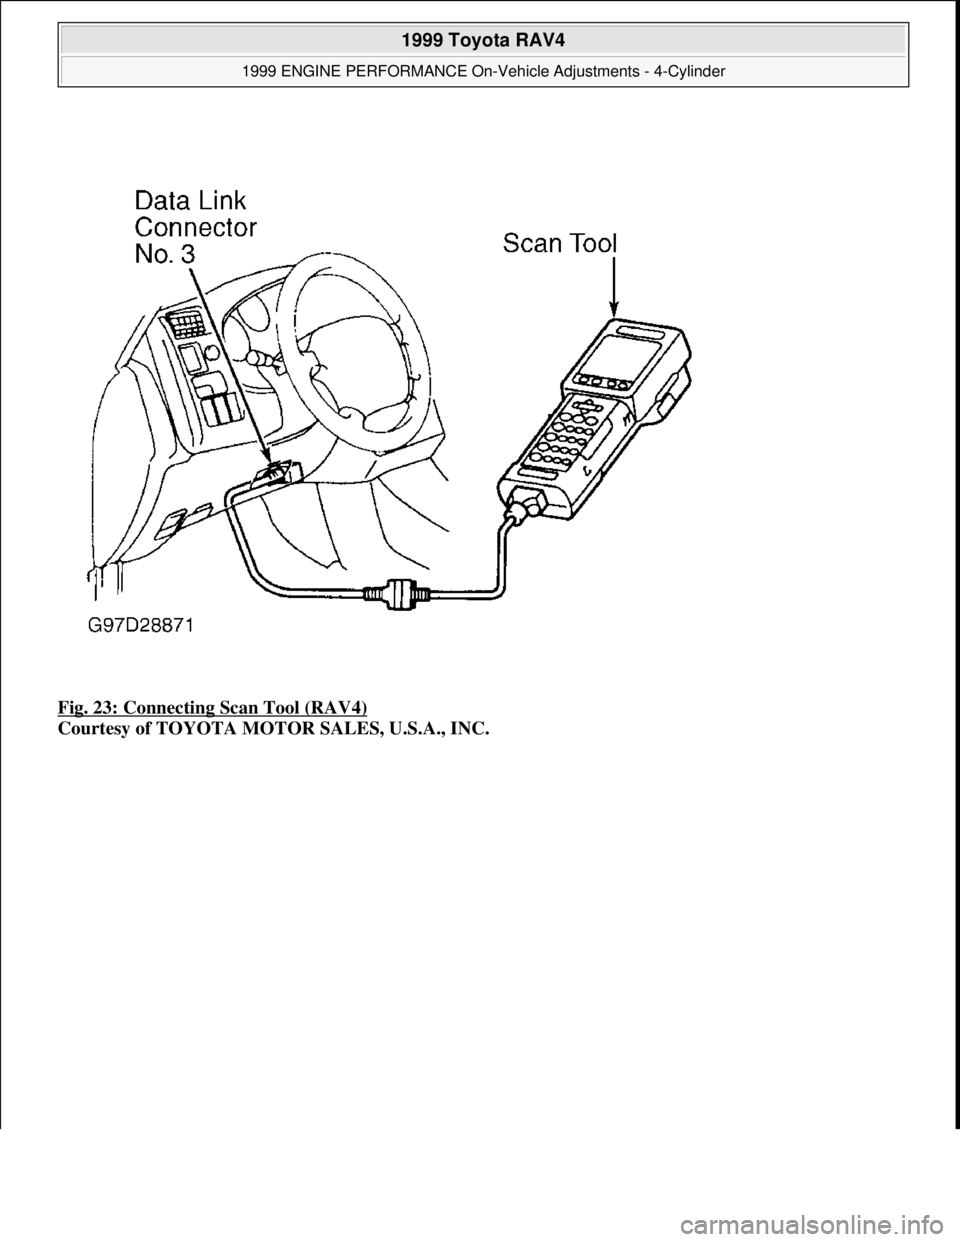
Fig. 23: Connecting Scan Tool (RAV4)
Courtesy of TOYOTA MOTOR SALES, U.S.A., INC.
1999 Toyota RAV4
1999 ENGINE PERFORMANCE On-Vehicle Adjustments - 4-Cylinder
Microsoft
Sunday, November 22, 2009 10:25:31 AMPage 27 © 2005 Mitchell Repair Information Company, LLC.
Page 1079 of 1632
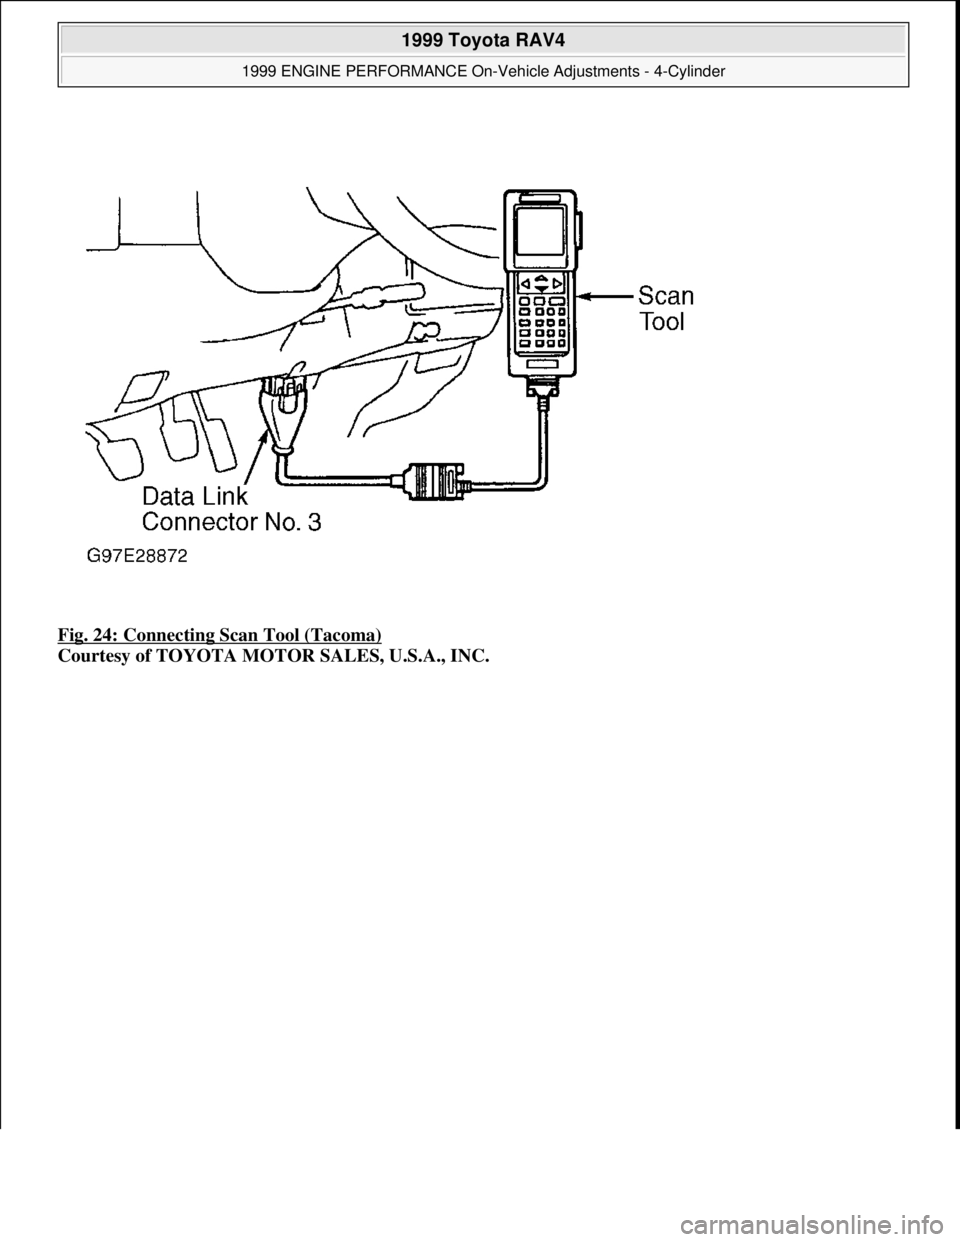
Fig. 24: Connecting Scan Tool (Tacoma)
Courtesy of TOYOTA MOTOR SALES, U.S.A., INC.
1999 Toyota RAV4
1999 ENGINE PERFORMANCE On-Vehicle Adjustments - 4-Cylinder
Microsoft
Sunday, November 22, 2009 10:25:31 AMPage 28 © 2005 Mitchell Repair Information Company, LLC.
Page 1080 of 1632
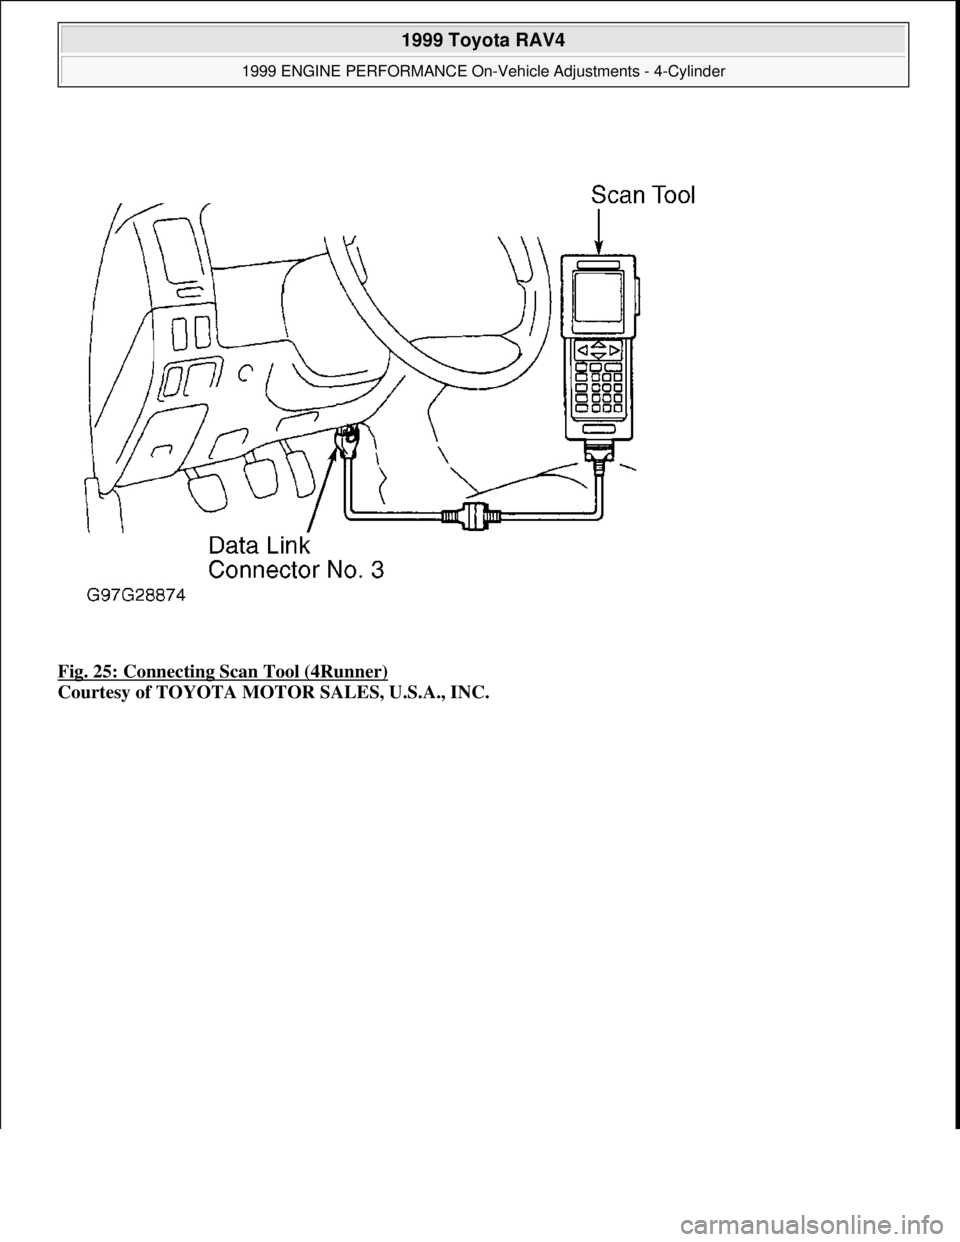
Fig. 25: Connecting Scan Tool (4Runner)
Courtesy of TOYOTA MOTOR SALES, U.S.A., INC.
1999 Toyota RAV4
1999 ENGINE PERFORMANCE On-Vehicle Adjustments - 4-Cylinder
Microsoft
Sunday, November 22, 2009 10:25:31 AMPage 29 © 2005 Mitchell Repair Information Company, LLC.