TOYOTA RAV4 1996 Service Repair Manual
Manufacturer: TOYOTA, Model Year: 1996, Model line: RAV4, Model: TOYOTA RAV4 1996Pages: 1632, PDF Size: 41.64 MB
Page 1461 of 1632
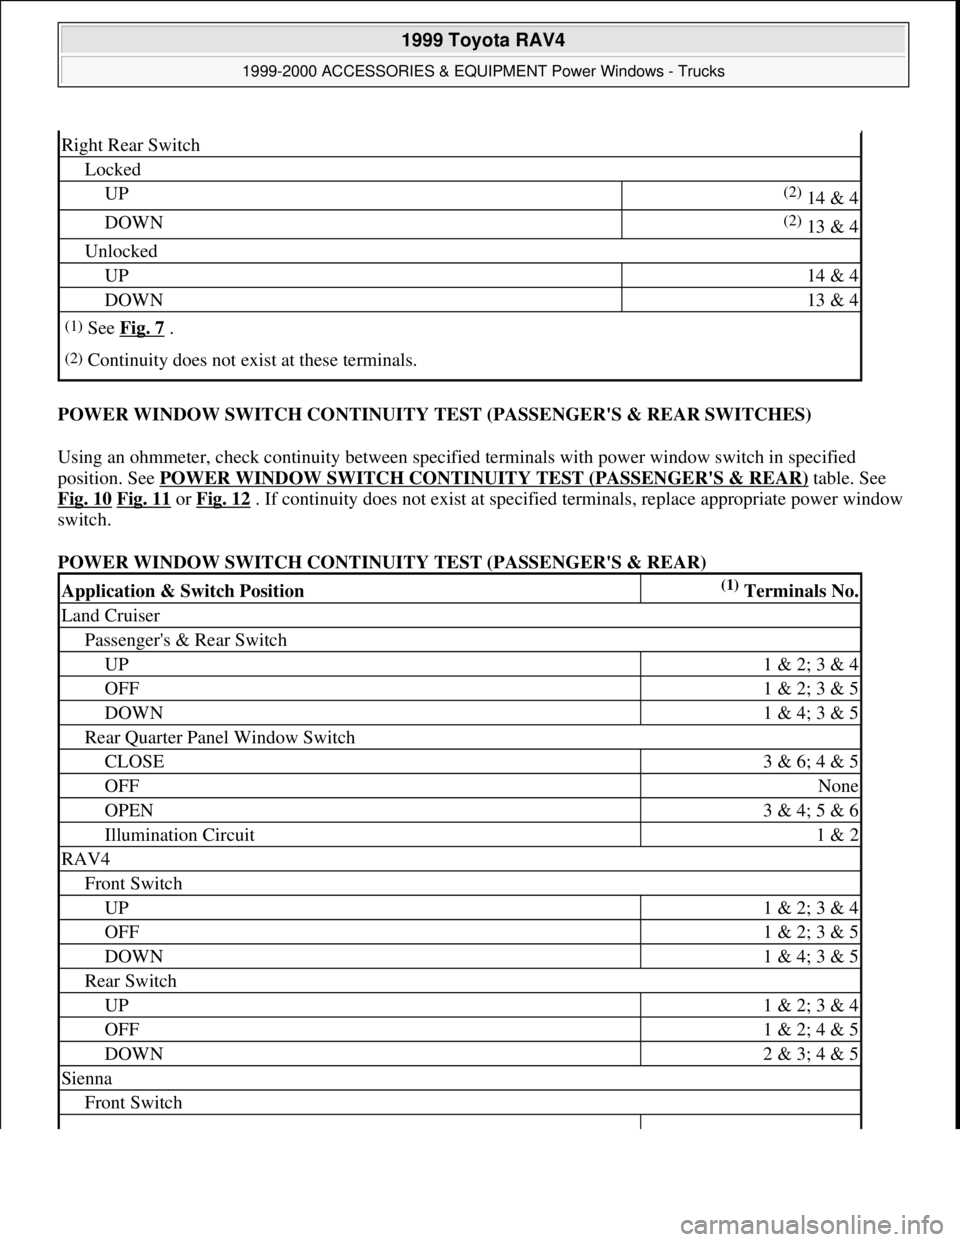
POWER WINDOW SWITCH CONTINUITY TEST (PASSENGER'S & REAR SWITCHES)
Using an ohmmeter, check continuity between specified terminals with power window switch in specified
position. See POWER WINDOW SWITCH CONTINUITY TEST (PASSENGER'S & REAR) table. See
Fig. 10
Fig. 11 or Fig. 12 . If continuity does not exist at specified terminals, replace appropriate power window
switch.
POWER WINDOW SWITCH CONTINUITY TEST (PASSENGER'S & REAR)
Right Rear Switch
Locked
UP(2) 14 & 4
DOWN(2) 13 & 4
Unlocked
UP14 & 4
DOWN13 & 4
(1)See Fig. 7 .
(2)Continuity does not exist at these terminals.
Application & Switch Position(1) Terminals No.
Land Cruiser
Passenger's & Rear Switch
UP1 & 2; 3 & 4
OFF1 & 2; 3 & 5
DOWN1 & 4; 3 & 5
Rear Quarter Panel Window Switch
CLOSE3 & 6; 4 & 5
OFFNone
OPEN3 & 4; 5 & 6
Illumination Circuit1 & 2
RAV4
Front Switch
UP1 & 2; 3 & 4
OFF1 & 2; 3 & 5
DOWN1 & 4; 3 & 5
Rear Switch
UP1 & 2; 3 & 4
OFF1 & 2; 4 & 5
DOWN2 & 3; 4 & 5
Sienna
Front Switch
1999 Toyota RAV4
1999-2000 ACCESSORIES & EQUIPMENT Power Windows - Trucks
Microsoft
Sunday, November 22, 2009 10:59:35 AMPage 9 © 2005 Mitchell Repair Information Company, LLC.
Page 1462 of 1632
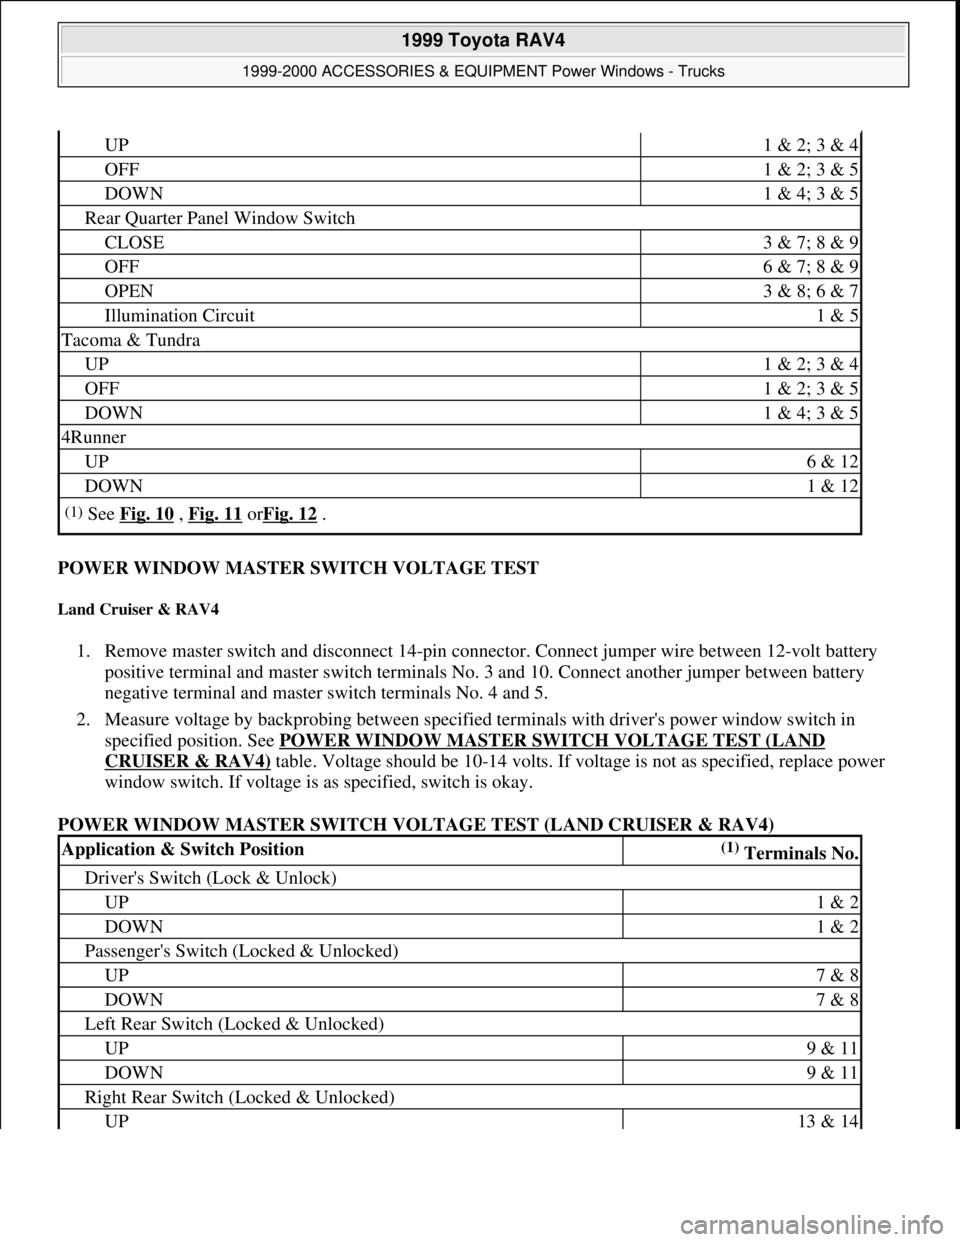
POWER WINDOW MASTER SWITCH VOLTAGE TEST
Land Cruiser & RAV4
1. Remove master switch and disconnect 14-pin connector. Connect jumper wire between 12-volt battery
positive terminal and master switch terminals No. 3 and 10. Connect another jumper between battery
negative terminal and master switch terminals No. 4 and 5.
2. Measure voltage by backprobing between specified terminals with driver's power window switch in
specified position. See POWER WINDOW MASTER SWITCH VOLTAGE TEST (LAND
CRUISER & RAV4) table. Voltage should be 10-14 volts. If voltage is not as specified, replace power
window switch. If voltage is as specified, switch is okay.
POWER WINDOW MASTER SWITCH VOLTAGE TEST (LAND CRUISER & RAV4)
UP1 & 2; 3 & 4
OFF1 & 2; 3 & 5
DOWN1 & 4; 3 & 5
Rear Quarter Panel Window Switch
CLOSE3 & 7; 8 & 9
OFF6 & 7; 8 & 9
OPEN3 & 8; 6 & 7
Illumination Circuit1 & 5
Tacoma & Tundra
UP1 & 2; 3 & 4
OFF1 & 2; 3 & 5
DOWN1 & 4; 3 & 5
4Runner
UP6 & 12
DOWN1 & 12
(1)See Fig. 10 , Fig. 11 orFig. 12 .
Application & Switch Position(1) Terminals No.
Driver's Switch (Lock & Unlock)
UP1 & 2
DOWN1 & 2
Passenger's Switch (Locked & Unlocked)
UP7 & 8
DOWN7 & 8
Left Rear Switch (Locked & Unlocked)
UP9 & 11
DOWN9 & 11
Right Rear Switch (Locked & Unlocked)
UP13 & 14
1999 Toyota RAV4
1999-2000 ACCESSORIES & EQUIPMENT Power Windows - Trucks
Microsoft
Sunday, November 22, 2009 10:59:35 AMPage 10 © 2005 Mitchell Repair Information Company, LLC.
Page 1463 of 1632
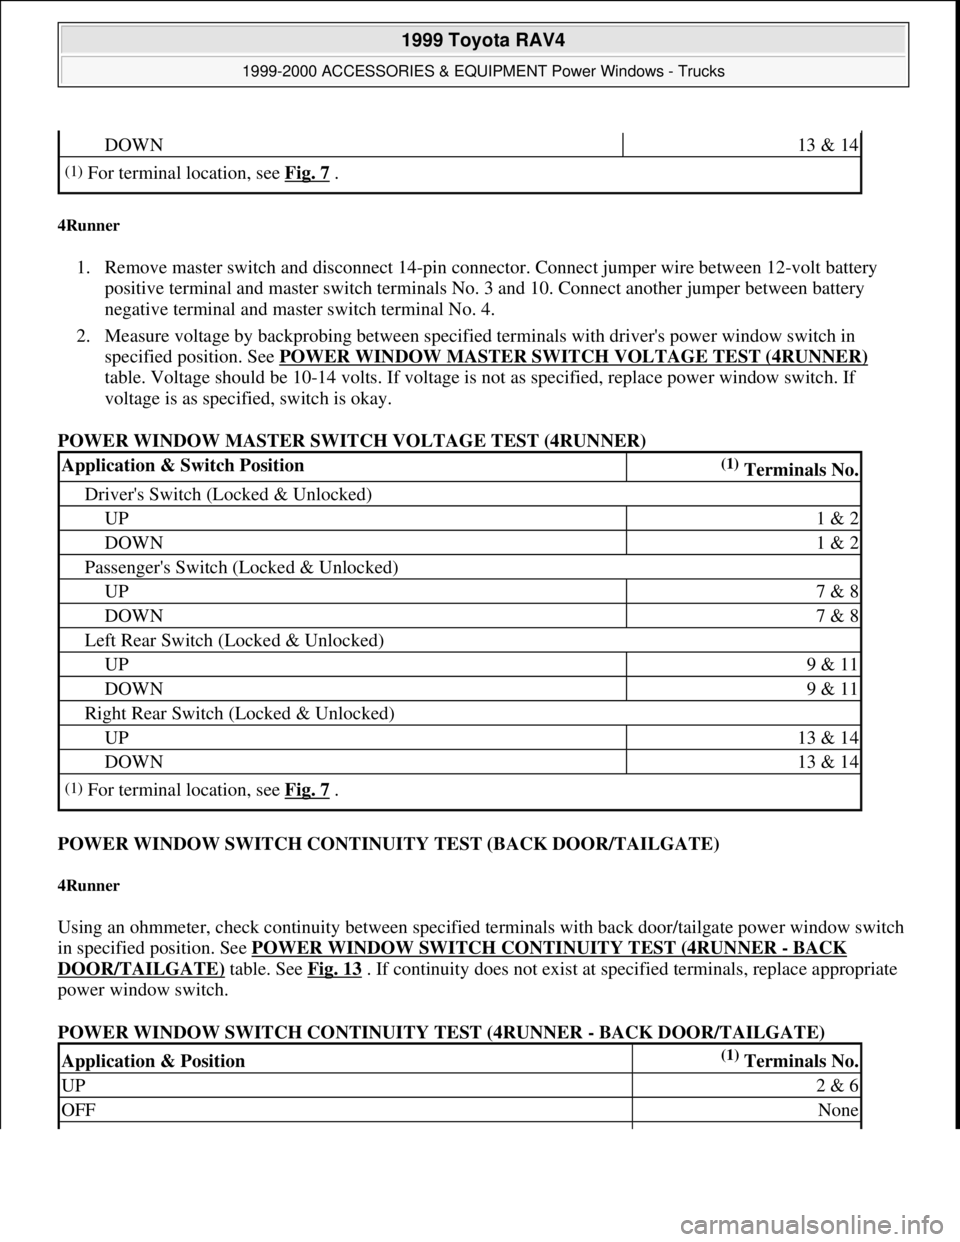
4Runner
1. Remove master switch and disconnect 14-pin connector. Connect jumper wire between 12-volt battery
positive terminal and master switch terminals No. 3 and 10. Connect another jumper between battery
negative terminal and master switch terminal No. 4.
2. Measure voltage by backprobing between specified terminals with driver's power window switch in
specified position. See POWER WINDOW MASTER SWITCH VOLTAGE TEST (4RUNNER)
table. Voltage should be 10-14 volts. If voltage is not as specified, replace power window switch. If
voltage is as specified, switch is okay.
POWER WINDOW MASTER SWITCH VOLTAGE TEST (4RUNNER)
POWER WINDOW SWITCH CONTINUITY TEST (BACK DOOR/TAILGATE)
4Runner
Using an ohmmeter, check continuity between specified terminals with back door/tailgate power window switch
in specified position. See POWER WINDOW SWITCH CONTINUITY TEST (4RUNNER
- BACK
DOOR/TAILGATE) table. See Fig. 13 . If continuity does not exist at specified terminals, replace appropriate
power window switch.
POWER WINDOW SWITCH CONTINUITY TEST (4RUNNER - BACK DOOR/TAILGATE)
DOWN13 & 14
(1)For terminal location, see Fig. 7 .
Application & Switch Position(1) Terminals No.
Driver's Switch (Locked & Unlocked)
UP1 & 2
DOWN1 & 2
Passenger's Switch (Locked & Unlocked)
UP7 & 8
DOWN7 & 8
Left Rear Switch (Locked & Unlocked)
UP9 & 11
DOWN9 & 11
Right Rear Switch (Locked & Unlocked)
UP13 & 14
DOWN13 & 14
(1)For terminal location, see Fig. 7 .
Application & Position(1) Terminals No.
UP2 & 6
OFFNone
1999 Toyota RAV4
1999-2000 ACCESSORIES & EQUIPMENT Power Windows - Trucks
Microsoft
Sunday, November 22, 2009 10:59:35 AMPage 11 © 2005 Mitchell Repair Information Company, LLC.
Page 1464 of 1632
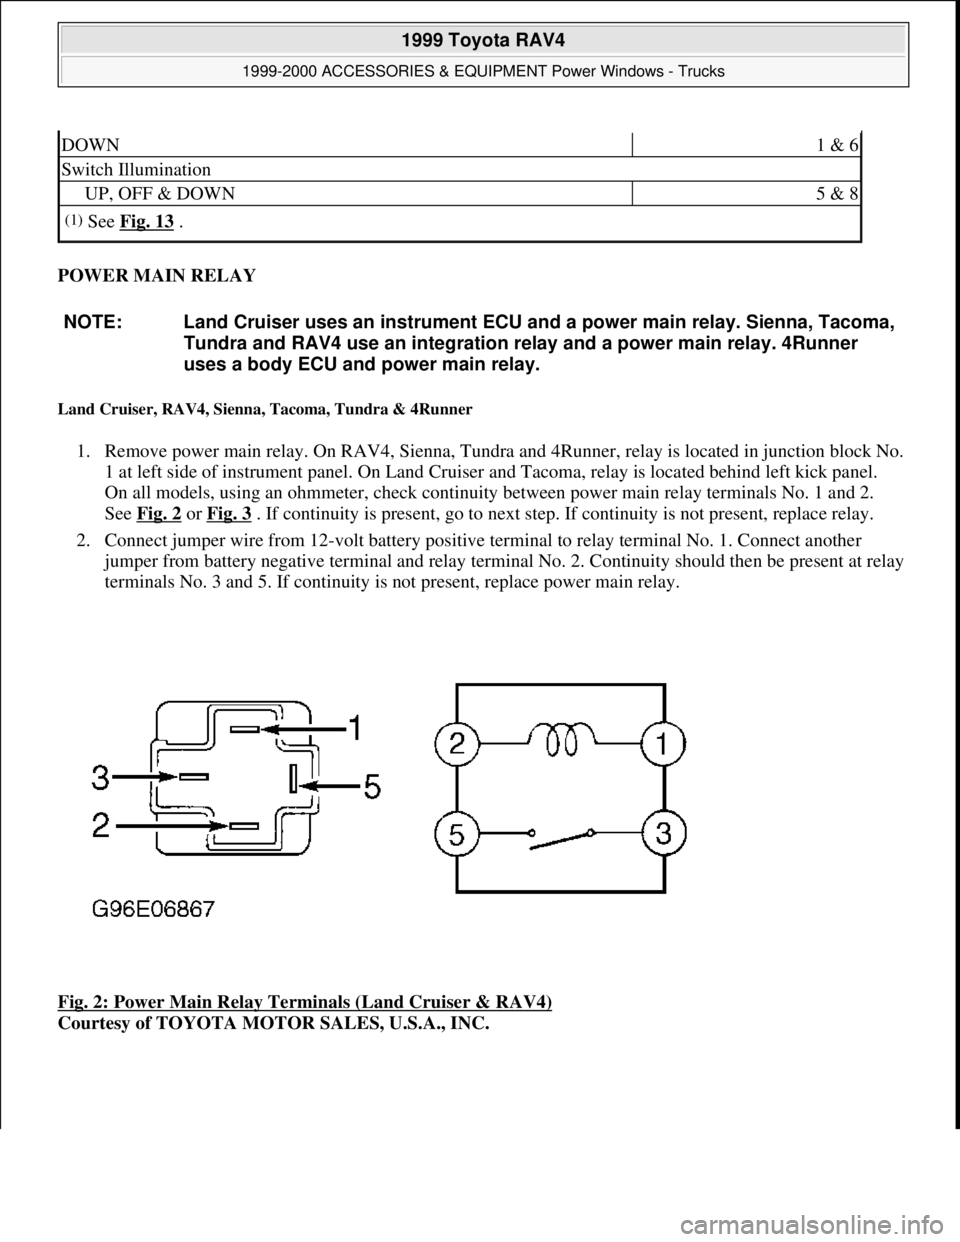
POWER MAIN RELAY
Land Cruiser, RAV4, Sienna, Tacoma, Tundra & 4Runner
1. Remove power main relay. On RAV4, Sienna, Tundra and 4Runner, relay is located in junction block No.
1 at left side of instrument panel. On Land Cruiser and Tacoma, relay is located behind left kick panel.
On all models, using an ohmmeter, check continuity between power main relay terminals No. 1 and 2.
See Fig. 2
or Fig. 3 . If continuity is present, go to next step. If continuity is not present, replace relay.
2. Connect jumper wire from 12-volt battery positive terminal to relay terminal No. 1. Connect another
jumper from battery negative terminal and relay terminal No. 2. Continuity should then be present at relay
terminals No. 3 and 5. If continuity is not present, replace power main relay.
Fig. 2: Power Main Relay Terminals (Land Cruiser & RAV4)
Courtesy of TOYOTA MOTOR SALES, U.S.A., INC.
DOWN1 & 6
Switch Illumination
UP, OFF & DOWN5 & 8
(1)See Fig. 13 .
NOTE: Land Cruiser uses an instrument ECU and a power main relay. Sienna, Tacoma,
Tundra and RAV4 use an integration relay and a power main relay. 4Runner
uses a body ECU and power main relay.
1999 Toyota RAV4
1999-2000 ACCESSORIES & EQUIPMENT Power Windows - Trucks
Microsoft
Sunday, November 22, 2009 10:59:35 AMPage 12 © 2005 Mitchell Repair Information Company, LLC.
Page 1465 of 1632
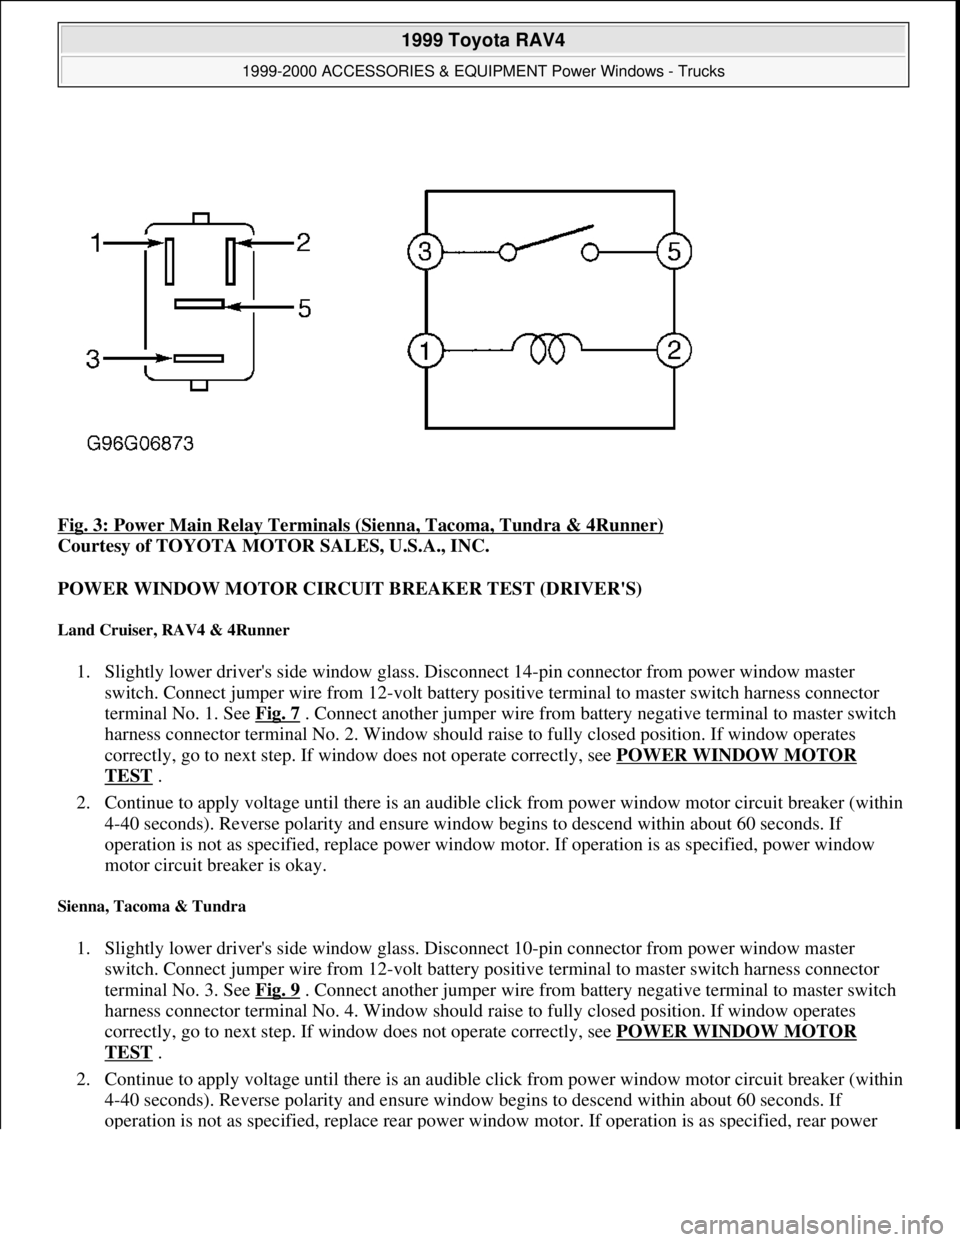
Fig. 3: Power Main Relay Terminals (Sienna, Tacoma, Tundra & 4Runner)
Courtesy of TOYOTA MOTOR SALES, U.S.A., INC.
POWER WINDOW MOTOR CIRCUIT BREAKER TEST (DRIVER'S)
Land Cruiser, RAV4 & 4Runner
1. Slightly lower driver's side window glass. Disconnect 14-pin connector from power window master
switch. Connect jumper wire from 12-volt battery positive terminal to master switch harness connector
terminal No. 1. See Fig. 7
. Connect another jumper wire from battery negative terminal to master switch
harness connector terminal No. 2. Window should raise to fully closed position. If window operates
correctly, go to next step. If window does not operate correctly, see POWER WINDOW MOTOR
TEST .
2. Continue to apply voltage until there is an audible click from power window motor circuit breaker (within
4-40 seconds). Reverse polarity and ensure window begins to descend within about 60 seconds. If
operation is not as specified, replace power window motor. If operation is as specified, power window
motor circuit breaker is okay.
Sienna, Tacoma & Tundra
1. Slightly lower driver's side window glass. Disconnect 10-pin connector from power window master
switch. Connect jumper wire from 12-volt battery positive terminal to master switch harness connector
terminal No. 3. See Fig. 9
. Connect another jumper wire from battery negative terminal to master switch
harness connector terminal No. 4. Window should raise to fully closed position. If window operates
correctly, go to next step. If window does not operate correctly, see POWER WINDOW MOTOR
TEST .
2. Continue to apply voltage until there is an audible click from power window motor circuit breaker (within
4-40 seconds). Reverse polarity and ensure window begins to descend within about 60 seconds. If
operation is not as specified, replace rear power window motor. If operation is as specified, rear power
1999 Toyota RAV4
1999-2000 ACCESSORIES & EQUIPMENT Power Windows - Trucks
Microsoft
Sunday, November 22, 2009 10:59:35 AMPage 13 © 2005 Mitchell Repair Information Company, LLC.
Page 1466 of 1632
window motor circuit breaker is okay.
POWER WINDOW MOTOR CIRCUIT BREAKER TEST (PASSENGER'S & REAR)
Sienna, Tundra, Land Cruiser, RAV4 & 4Runner (Rear Only)
1. Slightly lower window glass. Disconnect 5-pin connector from power window switch. Connect jumper
wire from 12-volt battery positive terminal to power window switch harness connector terminal No. 3.
See Fig. 7
. Connect another jumper wire from battery negative terminal to power window switch harness
connector terminal No. 1. Window should raise to fully closed position. If window operates correctly, go
to next step. If window does not operate correctly, see POWER WINDOW MOTOR TEST
.
2. Continue to apply voltage until there is an audible click from power window motor circuit breaker (within
4-40 seconds). Reverse polarity and ensure window begins to descend within about 60 seconds. If
operation is not as specified, replace power window motor. If operation is as specified, power window
motor circuit breaker is okay.
4Runner (Passenger Only)
1. Slightly lower window glass. Disconnect 12-pin connector from power window switch. Connect jumper
wire from 12-volt battery positive terminal to power window switch harness connector terminal No. 6.
See Fig. 8
. Connect another jumper wire from battery negative terminal to power window switch harness
connector terminal No. 1. Window should raise to fully closed position. If window operates correctly, go
to next step. If window does not operate correctly, see POWER WINDOW MOTOR TEST
.
2. Continue to apply voltage until there is an audible click from power window motor circuit breaker (within
4-40 seconds). Reverse polarity and ensure window begins to descend within about 60 seconds. If
operation is not as specified, replace power window motor. If operation is as specified, power window
motor circuit breaker is okay.
POWER WINDOW MOTOR TEST
Driver's Window Motor (Land Cruiser & RAV4)
Using a 12-volt battery, connect positive battery lead to power window motor terminal No. 1. See Fig. 5 .
Connect negative battery lead to power window motor connector terminal No. 4. Motor should operate. Reverse
battery leads. Motor should operate in opposite direction. If motor does not test as specified, replace motor.
Rear Quarter Window Motors (Land Cruiser)
Connect jumper wire between 12-volt battery positive terminal to power window motor terminal No. 1 (on left
side window), No. 2 (on right side window). See Fig. 4
. Connect negative battery lead to other power window
motor connector terminal. Window link should move to OPEN position. When battery jumper is removed,
window link should move to CLOSED position. If motor does not operate as specified, replace motor.
All Other Window Motors
Using a 12-volt battery, connect positive battery lead to either power window motor terminal. Connect negative
battery lead to other power window motor connector terminal. Motor should operate. Reverse battery leads.
1999 Toyota RAV4
1999-2000 ACCESSORIES & EQUIPMENT Power Windows - Trucks
Microsoft
Sunday, November 22, 2009 10:59:35 AMPage 14 © 2005 Mitchell Repair Information Company, LLC.
Page 1467 of 1632
Motor should operate in opposite direction. If motor does not test as specified, replace motor.
POWER WINDOW LOCK SWITCH
Tailgate Door (4Runner)
Switch Continuity Test
Disconnect power window lock switch Black 10-pin connector, located on left side of instrument panel.
Using an ohmmeter, check continuity between terminals No. 7 (White/Black wire) and No. 10
(Blue/White wire) with lock switch in UNLOCK position. See Fig. 13
. Continuity should be present.
With lock switch in LOCK position, continuity should not be present. If continuity is not as specified,
replace switch.
Switch Illumination Circuit Test
Check continuity between power window lock switch terminals No. 2 (Green wire) and No. 3
(Green/White wire). Continuity should be present with power window lock switch in LOCK or UNLOCK
position. If continuity is not as specified, replace power window lock switch.
POWER WINDOW LIMIT SWITCH
Tailgate Door (4Runner)
Disconnect power window limit switch 2-pin connector, located on left side of tailgate door, behind trim panel.
Using an ohmmeter, check continuity between terminals No. 1 (Red/Blue wire) and No. 2 (White/Black wire)
with switch in ON position. Continuity should exist. With switch in OFF position, continuity should not exist. I
f
continuity is not as specified, replace switch.
CONNECTOR VIEWS
Use the following connector views for diagnostic pin point tests in TROUBLE SHOOTING , COMPONENT
TESTS and CIRCUIT TESTS . See Fig. 4-Fig. 13.
1999 Toyota RAV4
1999-2000 ACCESSORIES & EQUIPMENT Power Windows - Trucks
Microsoft
Sunday, November 22, 2009 10:59:35 AMPage 15 © 2005 Mitchell Repair Information Company, LLC.
Page 1468 of 1632
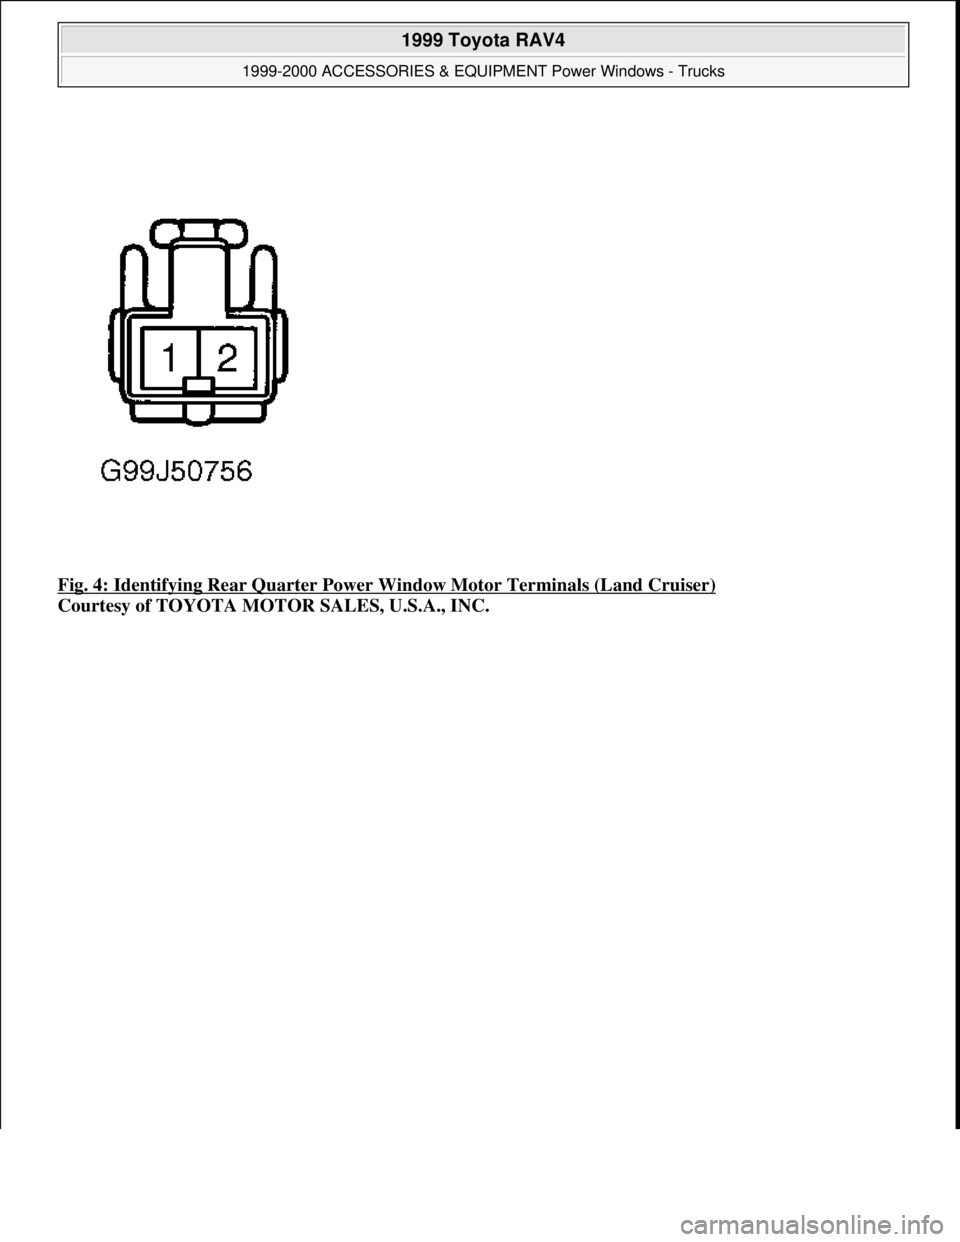
Fig. 4: Identifying Rear Quarter Power Window Motor Terminals (Land Cruiser)
Courtesy of TOYOTA MOTOR SALES, U.S.A., INC.
1999 Toyota RAV4
1999-2000 ACCESSORIES & EQUIPMENT Power Windows - Trucks
Microsoft
Sunday, November 22, 2009 10:59:35 AMPage 16 © 2005 Mitchell Repair Information Company, LLC.
Page 1469 of 1632
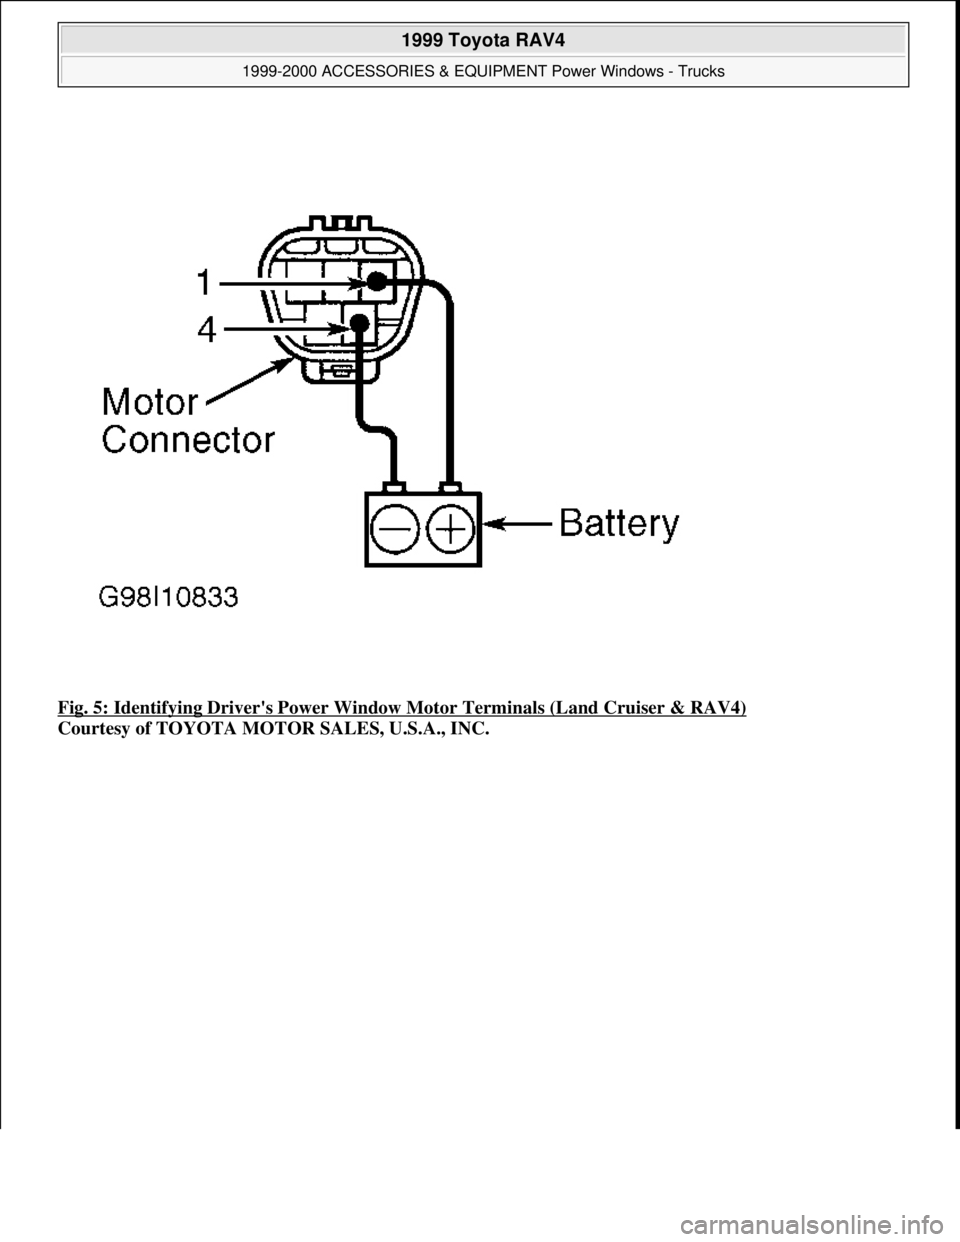
Fig. 5: Identifying Driver's Power Window Motor Terminals (Land Cruiser & RAV4)
Courtesy of TOYOTA MOTOR SALES, U.S.A., INC.
1999 Toyota RAV4
1999-2000 ACCESSORIES & EQUIPMENT Power Windows - Trucks
Microsoft
Sunday, November 22, 2009 10:59:35 AMPage 17 © 2005 Mitchell Repair Information Company, LLC.
Page 1470 of 1632
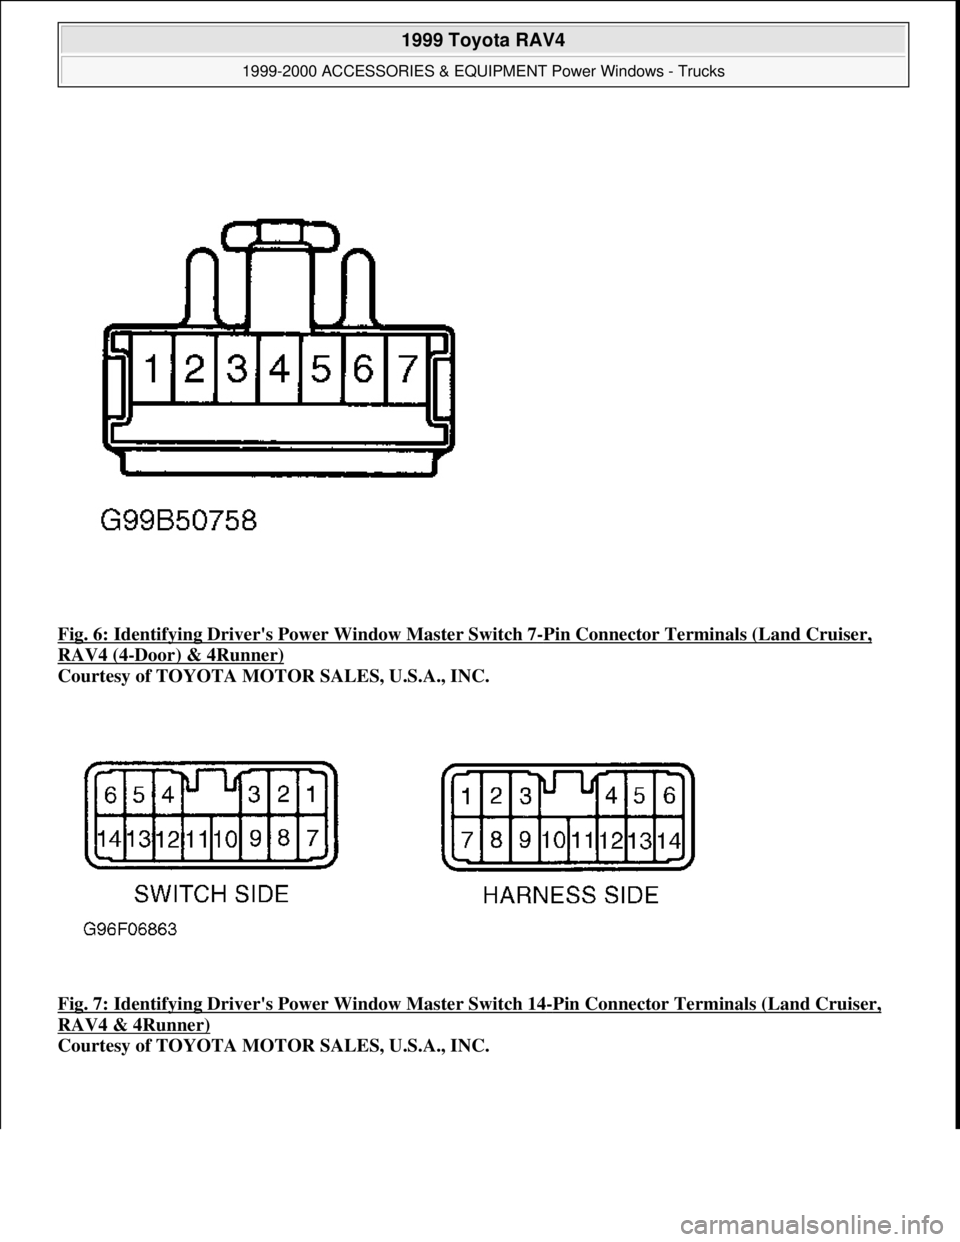
Fig. 6: Identifying Driver's Power Window Master Switch 7-Pin Connector Terminals (Land Cruiser,
RAV4 (4-Door) & 4Runner)
Courtesy of TOYOTA MOTOR SALES, U.S.A., INC.
Fig. 7: Identifying Driver's Power Window Master Switch 14
-Pin Connector Terminals (Land Cruiser,
RAV4 & 4Runner)
Courtesy of TOYOTA MOTOR SALES, U.S.A., INC.
1999 Toyota RAV4
1999-2000 ACCESSORIES & EQUIPMENT Power Windows - Trucks
Microsoft
Sunday, November 22, 2009 10:59:35 AMPage 18 © 2005 Mitchell Repair Information Company, LLC.