TOYOTA RAV4 2006 Service Repair Manual
Manufacturer: TOYOTA, Model Year: 2006, Model line: RAV4, Model: TOYOTA RAV4 2006Pages: 2000, PDF Size: 45.84 MB
Page 401 of 2000
DIFFERENTIAL – REAR DIFFERENTIAL SIDE GEAR SHAFT OIL SEALDF–7
DF
REMOVAL
1. DRAIN DIFFERENTIAL OIL (See page DF-10)
2. REMOVE TAILPIPE ASSEMBLY
(a) Remove the tailpipe (see page EX-2).
3. REMOVE CENTER EXHAUST ASSEMBLY
(a) Remove the center pipe (see page EX-2).
4. REMOVE PROPELLER WITH CENTER BEARING
SHAFT ASSEMBLY (See page PR-3)
5. REMOVE REAR DIFFERENTIAL CARRIER SUB-
ASSEMBLY (See page DF-18)
6. REMOVE REAR DIFFERENTIAL SIDE GEAR SHAFT
OIL SEAL
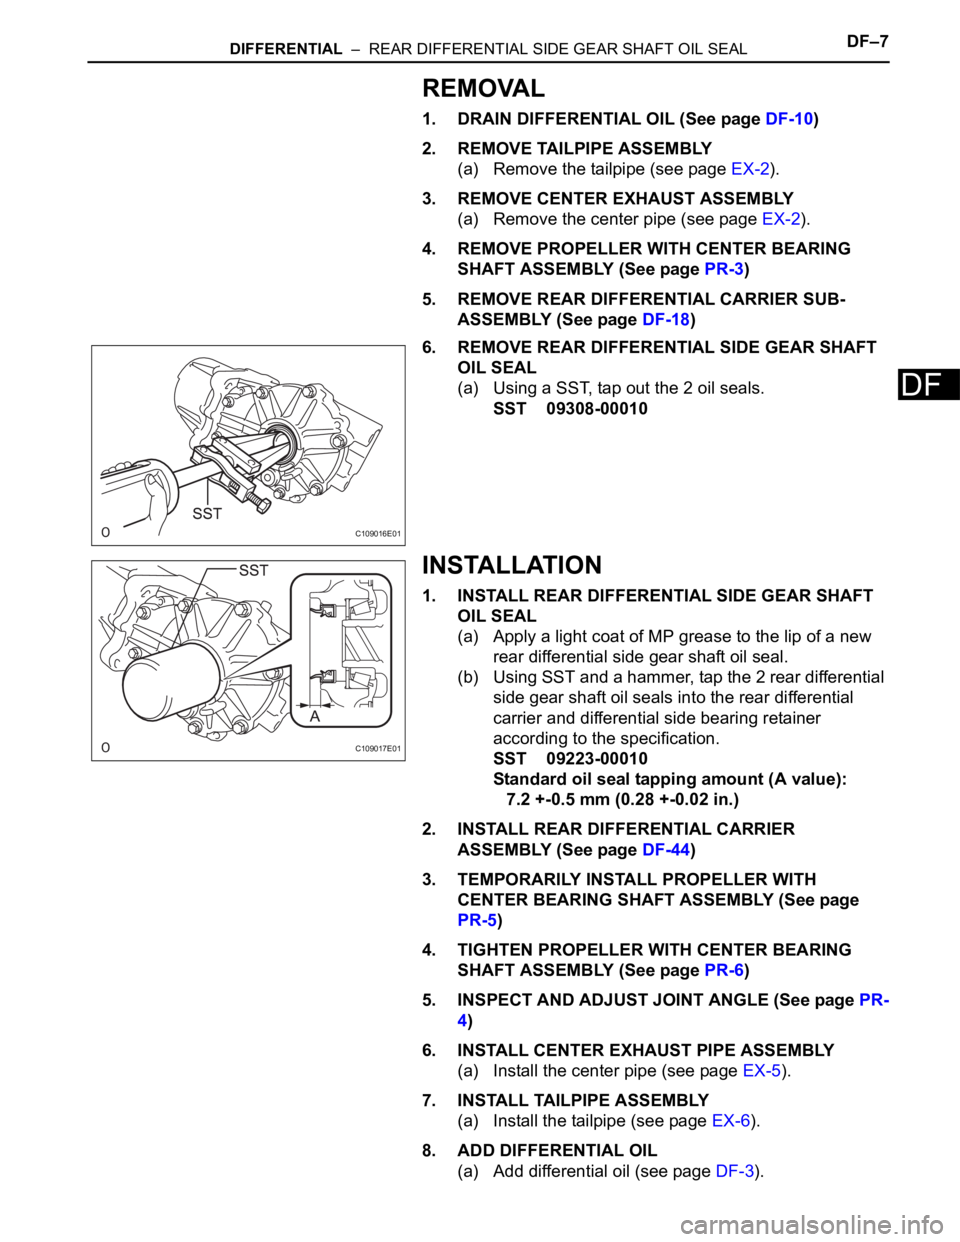
(a) Using a SST, tap out the 2 oil seals.
SST 09308-00010
INSTALLATION
1. INSTALL REAR DIFFERENTIAL SIDE GEAR SHAFT
OIL SEAL
(a) Apply a light coat of MP grease to the lip of a new
rear differential side gear shaft oil seal.
(b) Using SST and a hammer, tap the 2 rear differential
side gear shaft oil seals into the rear differential
carrier and differential side bearing retainer
according to the specification.
SST 09223-00010
Standard oil seal tapping amount (A value):
7.2 +-0.5 mm (0.28 +-0.02 in.)
2. INSTALL REAR DIFFERENTIAL CARRIER
ASSEMBLY (See page DF-44)
3. TEMPORARILY INSTALL PROPELLER WITH
CENTER BEARING SHAFT ASSEMBLY (See page
PR-5)
4. TIGHTEN PROPELLER WITH CENTER BEARING
SHAFT ASSEMBLY (See page PR-6)
5. INSPECT AND ADJUST JOINT ANGLE (See page PR-
4)
6. INSTALL CENTER EXHAUST PIPE ASSEMBLY
(a) Install the center pipe (see page EX-5).
7. INSTALL TAILPIPE ASSEMBLY
(a) Install the tailpipe (see page EX-6).
8. ADD DIFFERENTIAL OIL
(a) Add differential oil (see page DF-3).
C109016E01
C109017E01
Page 402 of 2000
DF–8DIFFERENTIAL – REAR DIFFERENTIAL SIDE GEAR SHAFT OIL SEAL
DF
9. CHECK FOR DIFFERENTIAL OIL LEAKAGE
10. CHECK FOR EXHAUST GAS LEAKAGE
If gas is leaking, tighten the areas necessary to stop the
leak. Replace damaged parts as necessary.
Page 403 of 2000
AH–6AXLE – FRONT AXLE HUB
AH
ON-VEHICLE INSPECTION
1. CHECK FRONT AXLE HUB BEARING
(a) Remove the front wheel.
(b) Disconnect the front disc brake cylinder (see page
BR-40).
(c) Remove the front disc.
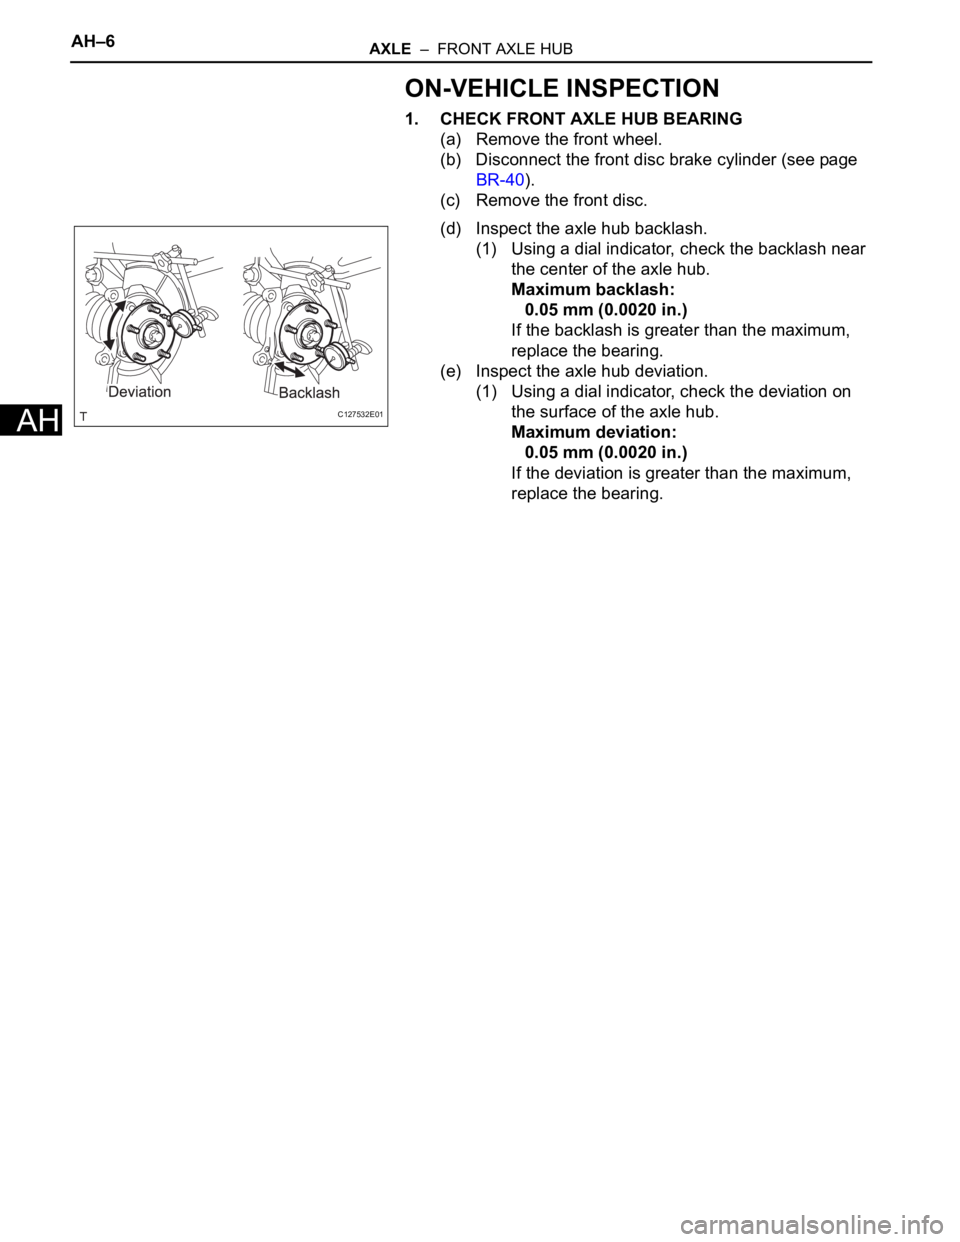
(d) Inspect the axle hub backlash.
(1) Using a dial indicator, check the backlash near
the center of the axle hub.
Maximum backlash:
0.05 mm (0.0020 in.)
If the backlash is greater than the maximum,
replace the bearing.
(e) Inspect the axle hub deviation.
(1) Using a dial indicator, check the deviation on
the surface of the axle hub.
Maximum deviation:
0.05 mm (0.0020 in.)
If the deviation is greater than the maximum,
replace the bearing.
C127532E01
Page 404 of 2000
AXLE – FRONT AXLE HUBAH–7
AH
REMOVAL
(2005/11-2006/01)
HINT:
• Use the same procedures for the RH side and LH side.
• The procedures listed below are for the LH side.
1. REMOVE FRONT WHEEL
2. DRAIN AUTOMATIC TRANSAXLE FLUID
(a) Drain the automatic transaxle fluid for U140F (see
page AX-147).
(b) Drain the automatic transaxle fluid for U241E (see
page AX-146).
3. DISCONNECT CABLE FROM NEGATIVE BATTERY
TERMINAL
CAUTION:
Wait at least 90 seconds after disconnecting the
cable from the negative (-) battery terminal to
prevent airbag and seat belt pretensioner activation.
4. REMOVE FRONT AXLE HUB NUT
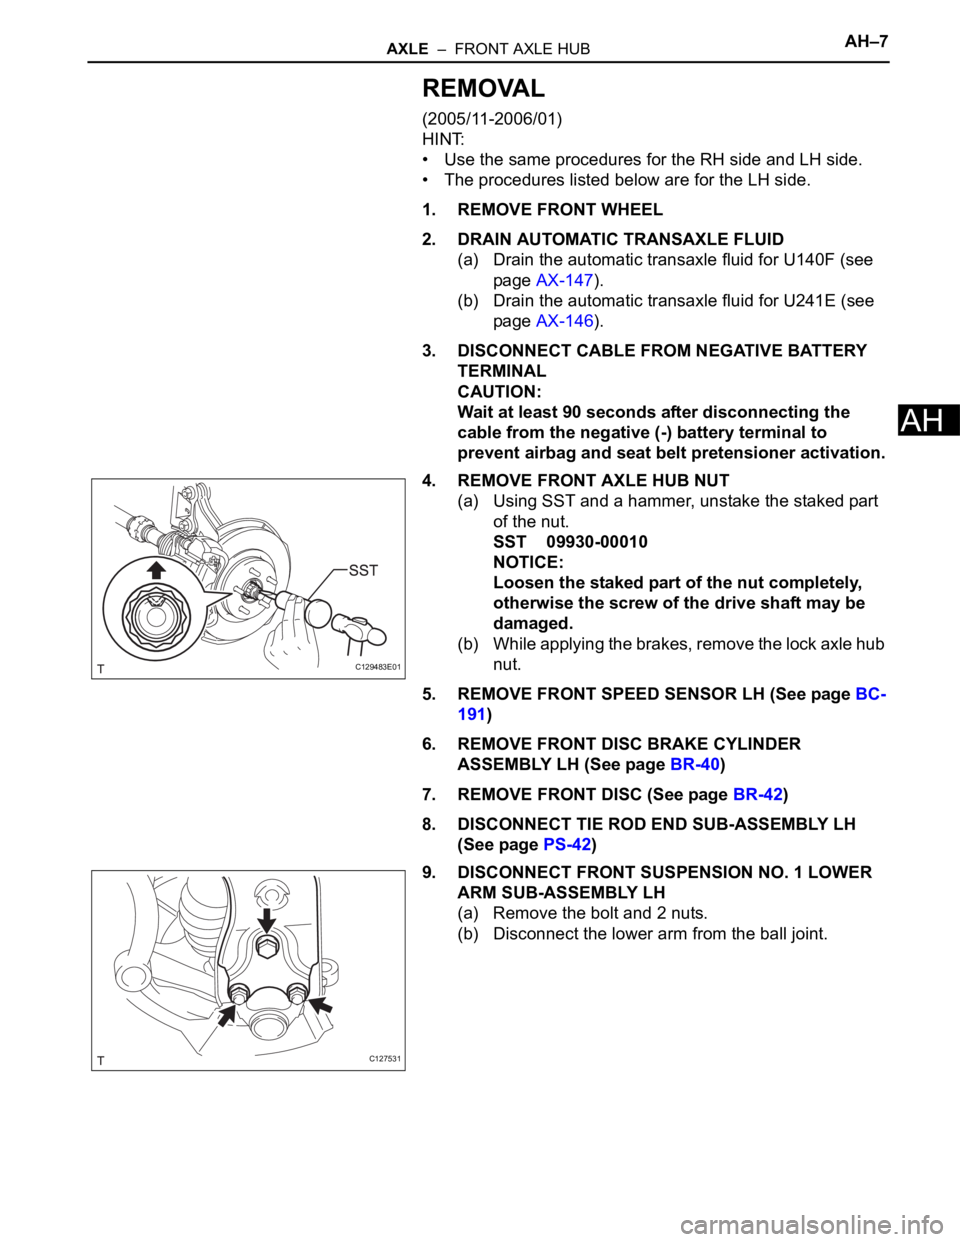
(a) Using SST and a hammer, unstake the staked part
of the nut.
SST 09930-00010
NOTICE:
Loosen the staked part of the nut completely,
otherwise the screw of the drive shaft may be
damaged.
(b) While applying the brakes, remove the lock axle hub
nut.
5. REMOVE FRONT SPEED SENSOR LH (See page BC-
191)
6. REMOVE FRONT DISC BRAKE CYLINDER
ASSEMBLY LH (See page BR-40)
7. REMOVE FRONT DISC (See page BR-42)
8. DISCONNECT TIE ROD END SUB-ASSEMBLY LH
(See page PS-42)
9. DISCONNECT FRONT SUSPENSION NO. 1 LOWER
ARM SUB-ASSEMBLY LH
(a) Remove the bolt and 2 nuts.
(b) Disconnect the lower arm from the ball joint.
C129483E01
C127531
Page 405 of 2000
AH–8AXLE – FRONT AXLE HUB
AH
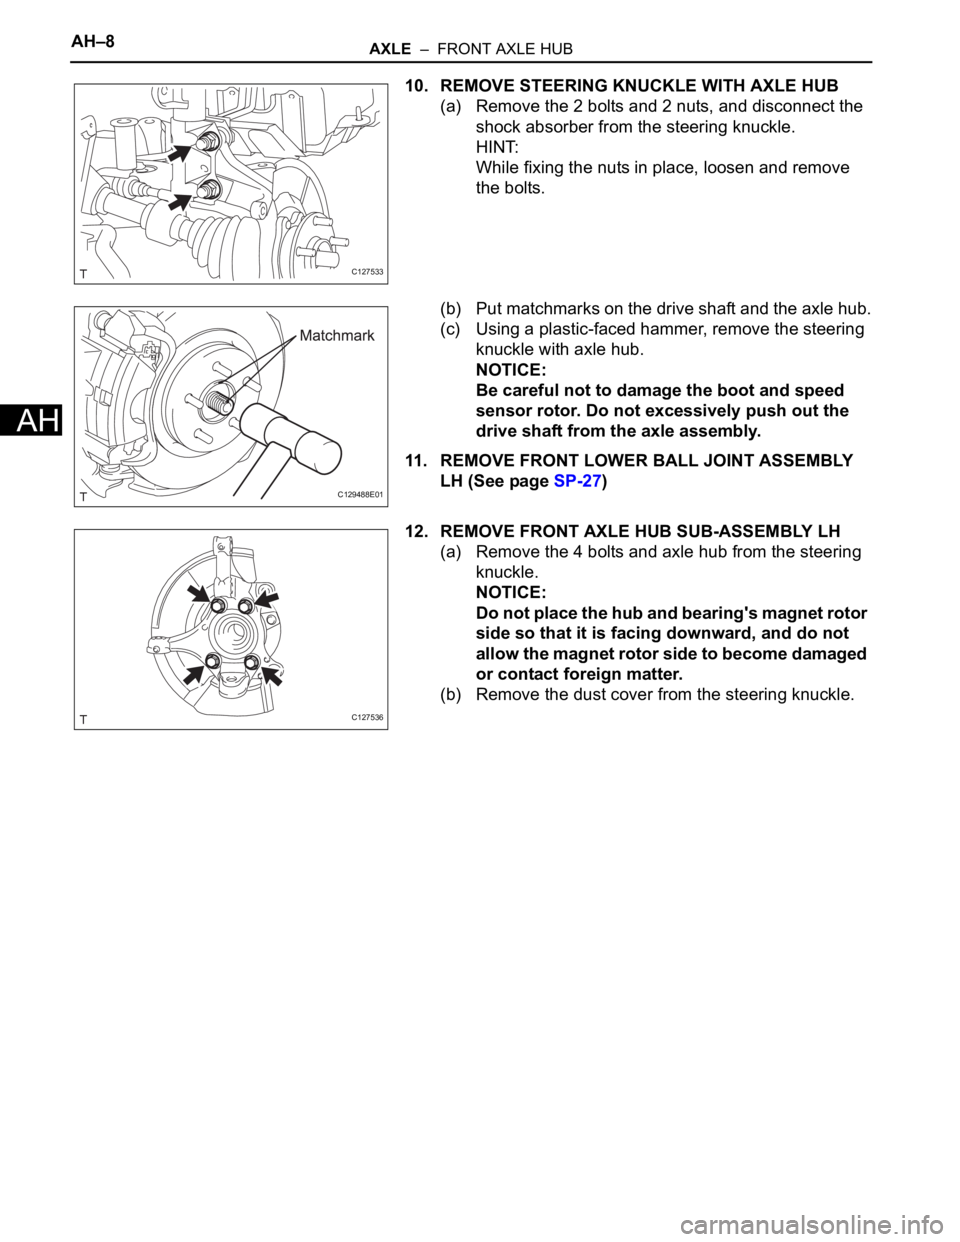
10. REMOVE STEERING KNUCKLE WITH AXLE HUB
(a) Remove the 2 bolts and 2 nuts, and disconnect the
shock absorber from the steering knuckle.
HINT:
While fixing the nuts in place, loosen and remove
the bolts.
(b) Put matchmarks on the drive shaft and the axle hub.
(c) Using a plastic-faced hammer, remove the steering
knuckle with axle hub.
NOTICE:
Be careful not to damage the boot and speed
sensor rotor. Do not excessively push out the
drive shaft from the axle assembly.
11. REMOVE FRONT LOWER BALL JOINT ASSEMBLY
LH (See page SP-27)
12. REMOVE FRONT AXLE HUB SUB-ASSEMBLY LH
(a) Remove the 4 bolts and axle hub from the steering
knuckle.
NOTICE:
Do not place the hub and bearing's magnet rotor
side so that it is facing downward, and do not
allow the magnet rotor side to become damaged
or contact foreign matter.
(b) Remove the dust cover from the steering knuckle.
C127533
C129488E01
C127536
Page 406 of 2000
SP–10SUSPENSION – FRONT SHOCK ABSORBER WITH COIL SPRING
SP
DISASSEMBLY
HINT:
• Use the same procedures for the RH side and LH side.
• The procedures listed below are for the LH side.
1. REMOVE FRONT SUSPENSION SUPPORT PLATE LH
(a) Remove the plate from the shock absorber.
2. REMOVE FRONT SUSPENSION SUPPORT DUST
COVER LH
(a) Using a screwdriver, remove the dust cover from the
suspension support.
HINT:
Tape the screwdriver tip before use.
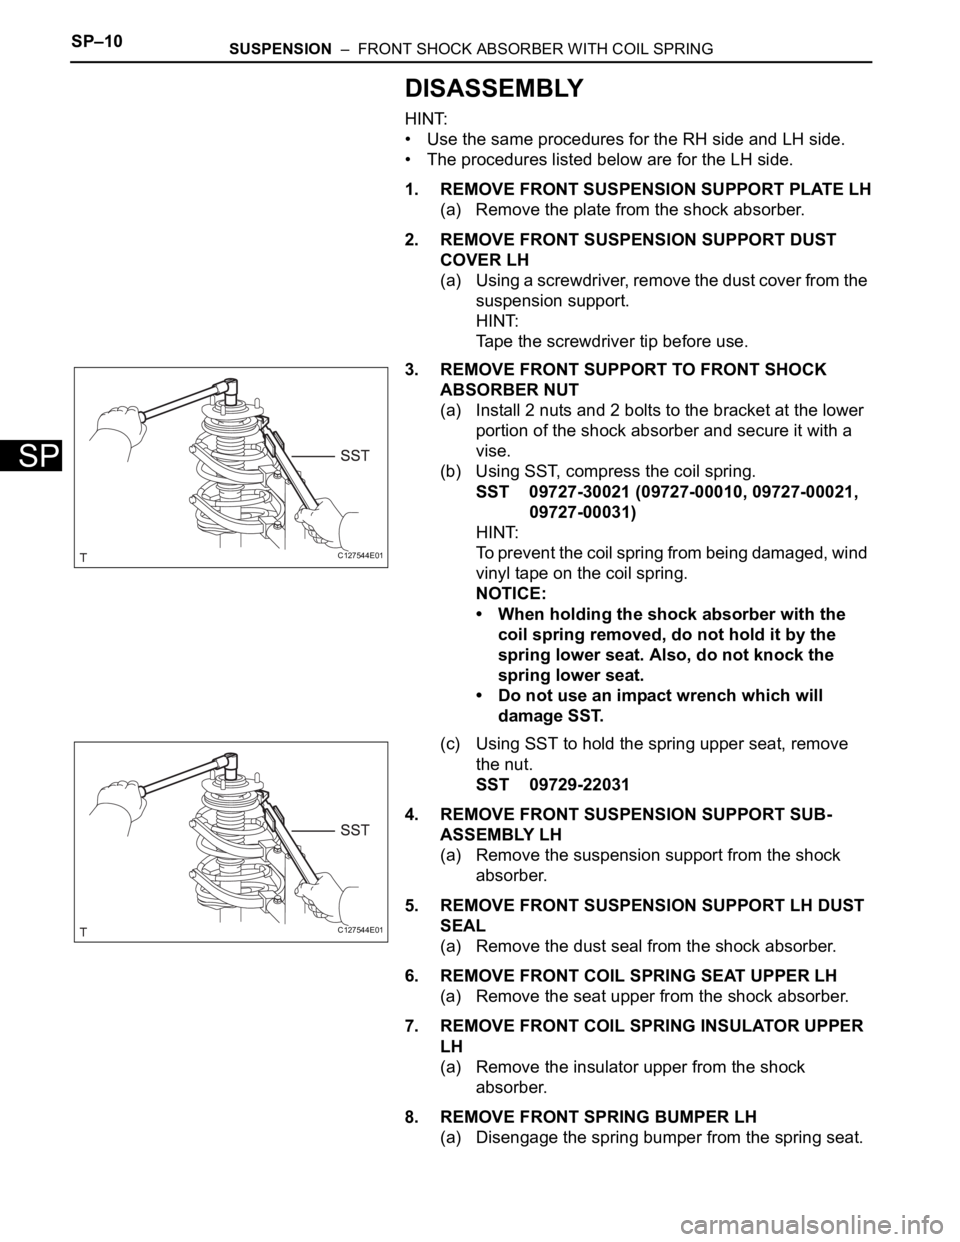
3. REMOVE FRONT SUPPORT TO FRONT SHOCK
ABSORBER NUT
(a) Install 2 nuts and 2 bolts to the bracket at the lower
portion of the shock absorber and secure it with a
vise.
(b) Using SST, compress the coil spring.
SST 09727-30021 (09727-00010, 09727-00021,
09727-00031)
HINT:
To prevent the coil spring from being damaged, wind
vinyl tape on the coil spring.
NOTICE:
• When holding the shock absorber with the
coil spring removed, do not hold it by the
spring lower seat. Also, do not knock the
spring lower seat.
• Do not use an impact wrench which will
damage SST.
(c) Using SST to hold the spring upper seat, remove
the nut.
SST 09729-22031
4. REMOVE FRONT SUSPENSION SUPPORT SUB-
ASSEMBLY LH
(a) Remove the suspension support from the shock
absorber.
5. REMOVE FRONT SUSPENSION SUPPORT LH DUST
SEAL
(a) Remove the dust seal from the shock absorber.
6. REMOVE FRONT COIL SPRING SEAT UPPER LH
(a) Remove the seat upper from the shock absorber.
7. REMOVE FRONT COIL SPRING INSULATOR UPPER
LH
(a) Remove the insulator upper from the shock
absorber.
8. REMOVE FRONT SPRING BUMPER LH
(a) Disengage the spring bumper from the spring seat.
C127544E01
C127544E01
Page 407 of 2000
SUSPENSION – FRONT SHOCK ABSORBER WITH COIL SPRINGSP–11
SP
9. REMOVE FRONT COIL SPRING LH
(a) Remove the coil spring from the shock absorber.
(b) Remove SST from the coil spring.
10. REMOVE FRONT COIL SPRING INSULATOR LOWER
LH
(a) Remove the insulator lower from the shock
absorber.
INSPECTION
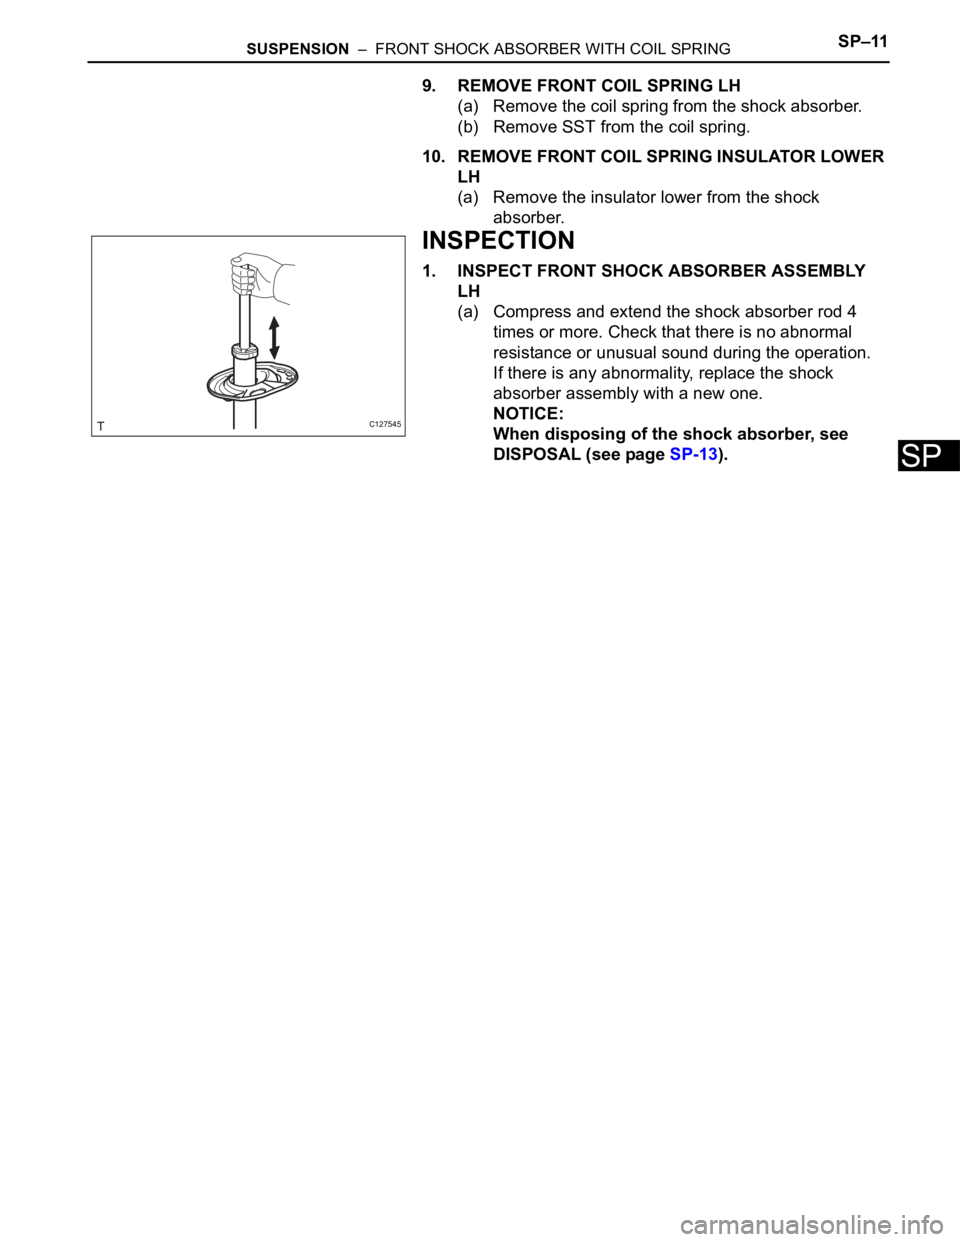
1. INSPECT FRONT SHOCK ABSORBER ASSEMBLY
LH
(a) Compress and extend the shock absorber rod 4
times or more. Check that there is no abnormal
resistance or unusual sound during the operation.
If there is any abnormality, replace the shock
absorber assembly with a new one.
NOTICE:
When disposing of the shock absorber, see
DISPOSAL (see page SP-13).
C127545
Page 408 of 2000
SP–12SUSPENSION – FRONT SHOCK ABSORBER WITH COIL SPRING
SP
REASSEMBLY
HINT:
• Use the same procedures for the RH side and LH side.
• The procedures listed below are for the LH side.
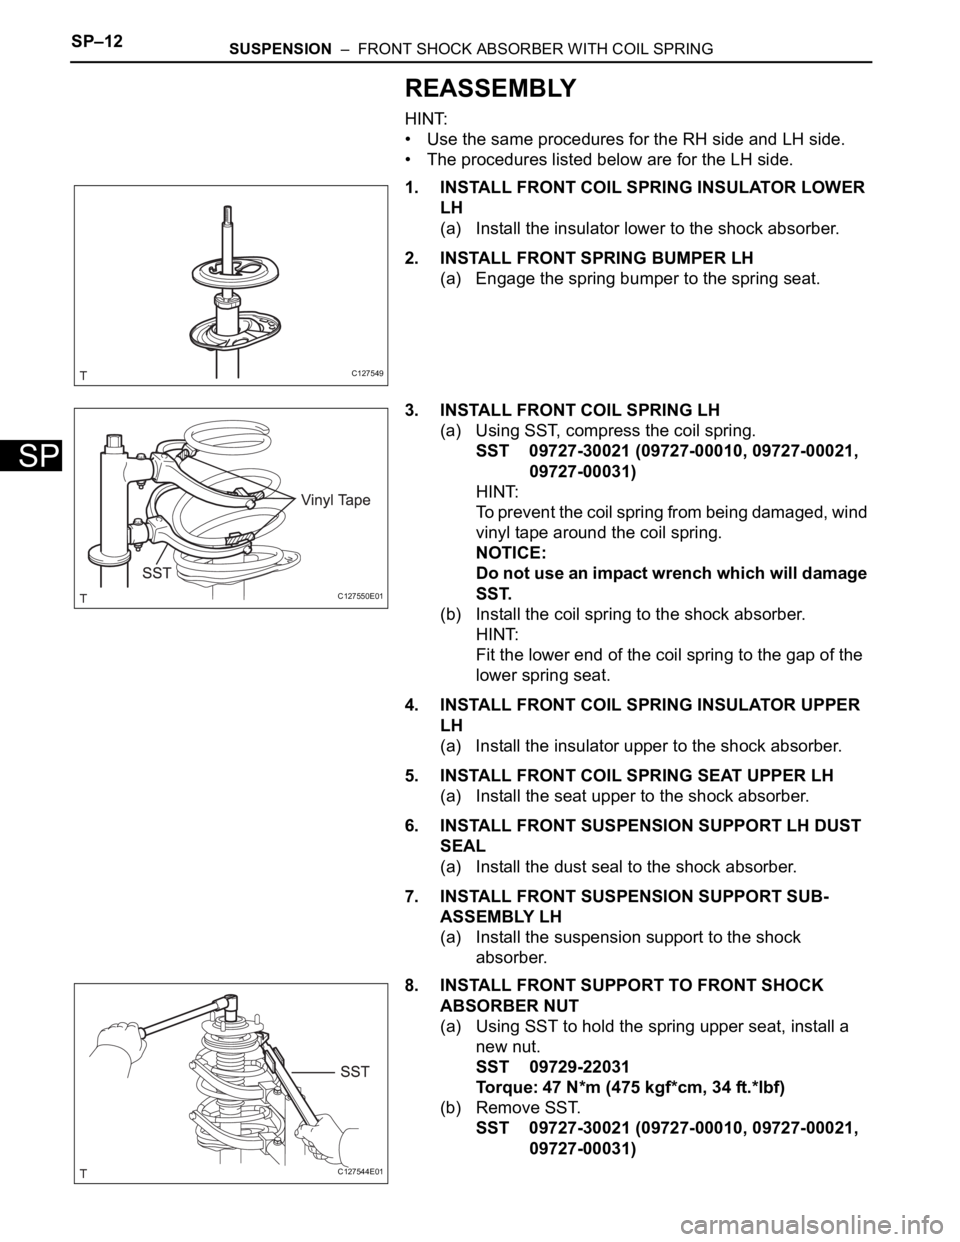
1. INSTALL FRONT COIL SPRING INSULATOR LOWER
LH
(a) Install the insulator lower to the shock absorber.
2. INSTALL FRONT SPRING BUMPER LH
(a) Engage the spring bumper to the spring seat.
3. INSTALL FRONT COIL SPRING LH
(a) Using SST, compress the coil spring.
SST 09727-30021 (09727-00010, 09727-00021,
09727-00031)
HINT:
To prevent the coil spring from being damaged, wind
vinyl tape around the coil spring.
NOTICE:
Do not use an impact wrench which will damage
SST.
(b) Install the coil spring to the shock absorber.
HINT:
Fit the lower end of the coil spring to the gap of the
lower spring seat.
4. INSTALL FRONT COIL SPRING INSULATOR UPPER
LH
(a) Install the insulator upper to the shock absorber.
5. INSTALL FRONT COIL SPRING SEAT UPPER LH
(a) Install the seat upper to the shock absorber.
6. INSTALL FRONT SUSPENSION SUPPORT LH DUST
SEAL
(a) Install the dust seal to the shock absorber.
7. INSTALL FRONT SUSPENSION SUPPORT SUB-
ASSEMBLY LH
(a) Install the suspension support to the shock
absorber.
8. INSTALL FRONT SUPPORT TO FRONT SHOCK
ABSORBER NUT
(a) Using SST to hold the spring upper seat, install a
new nut.
SST 09729-22031
Torque: 47 N*m (475 kgf*cm, 34 ft.*lbf)
(b) Remove SST.
SST 09727-30021 (09727-00010, 09727-00021,
09727-00031)
C127549
C127550E01
C127544E01
Page 409 of 2000
SUSPENSION – FRONT SHOCK ABSORBER WITH COIL SPRINGSP–13
SP
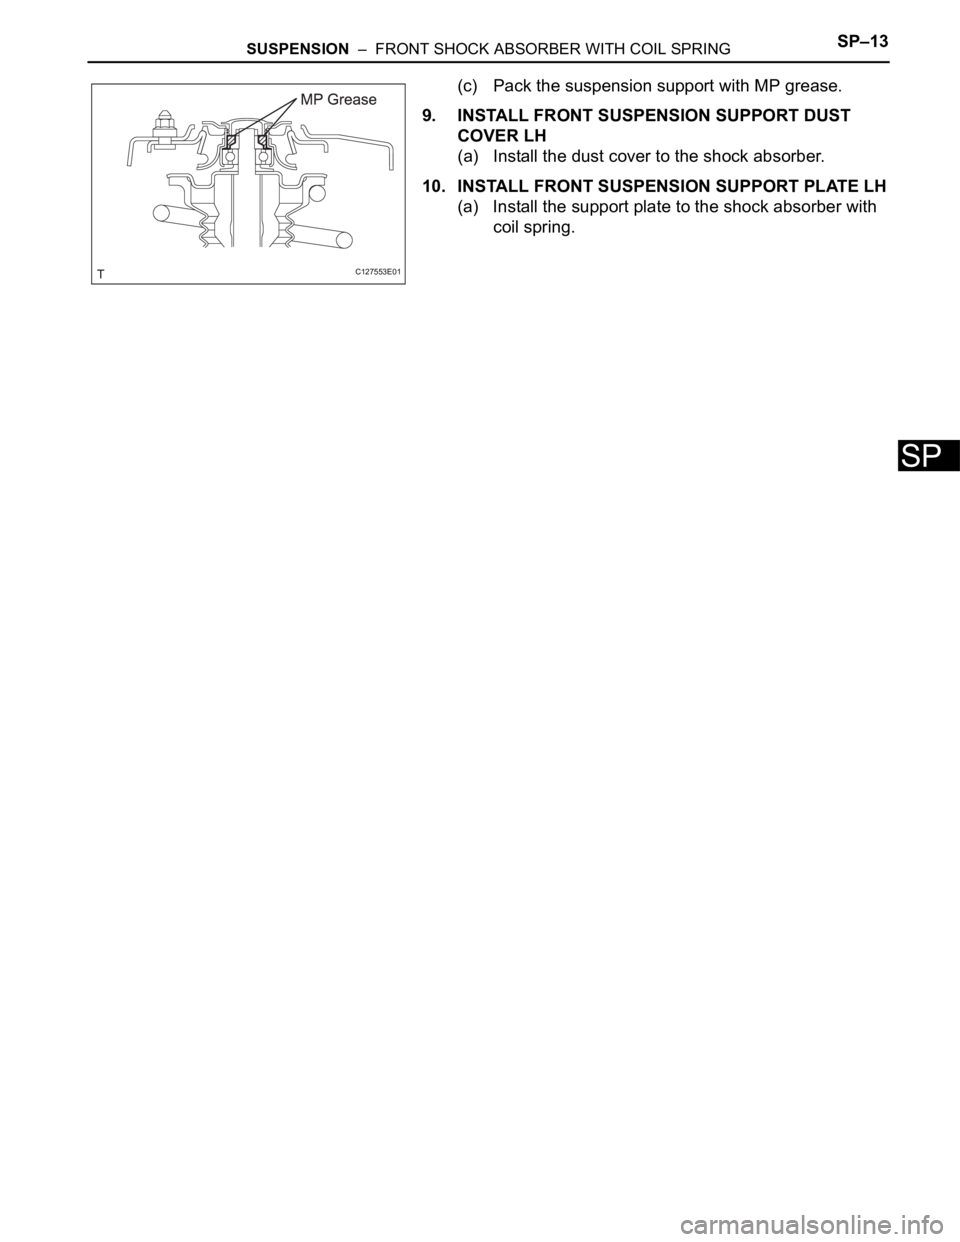
(c) Pack the suspension support with MP grease.
9. INSTALL FRONT SUSPENSION SUPPORT DUST
COVER LH
(a) Install the dust cover to the shock absorber.
10. INSTALL FRONT SUSPENSION SUPPORT PLATE LH
(a) Install the support plate to the shock absorber with
coil spring.
C127553E01
Page 410 of 2000
SP–38SUSPENSION – REAR SHOCK ABSORBER
SP
DISPOSAL
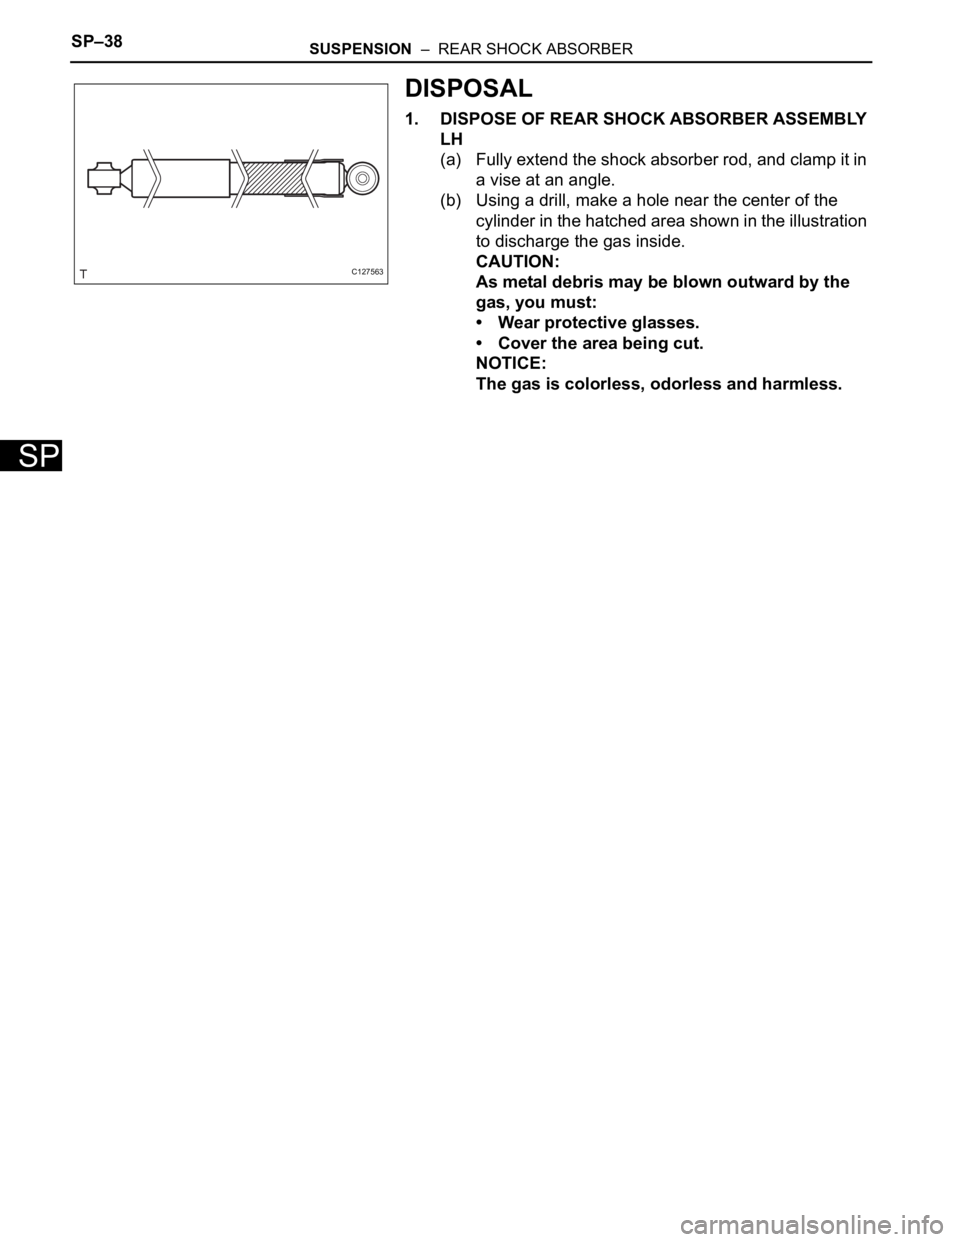
1. DISPOSE OF REAR SHOCK ABSORBER ASSEMBLY
LH
(a) Fully extend the shock absorber rod, and clamp it in
a vise at an angle.
(b) Using a drill, make a hole near the center of the
cylinder in the hatched area shown in the illustration
to discharge the gas inside.
CAUTION:
As metal debris may be blown outward by the
gas, you must:
• Wear protective glasses.
• Cover the area being cut.
NOTICE:
The gas is colorless, odorless and harmless.
C127563