TOYOTA RAV4 2006 Service Repair Manual
Manufacturer: TOYOTA, Model Year: 2006,
Model line: RAV4,
Model: TOYOTA RAV4 2006
Pages: 2000, PDF Size: 45.84 MB
TOYOTA RAV4 2006 Service Repair Manual
RAV4 2006
TOYOTA
TOYOTA
https://www.carmanualsonline.info/img/14/57463/w960_57463-0.png
TOYOTA RAV4 2006 Service Repair Manual
Trending: 2gr, power steering, water drain, park assist, rear entertainment, diagram, wheel bolt torque
Page 511 of 2000
EXTERIOR – FRONT BUMPERET–5
ET
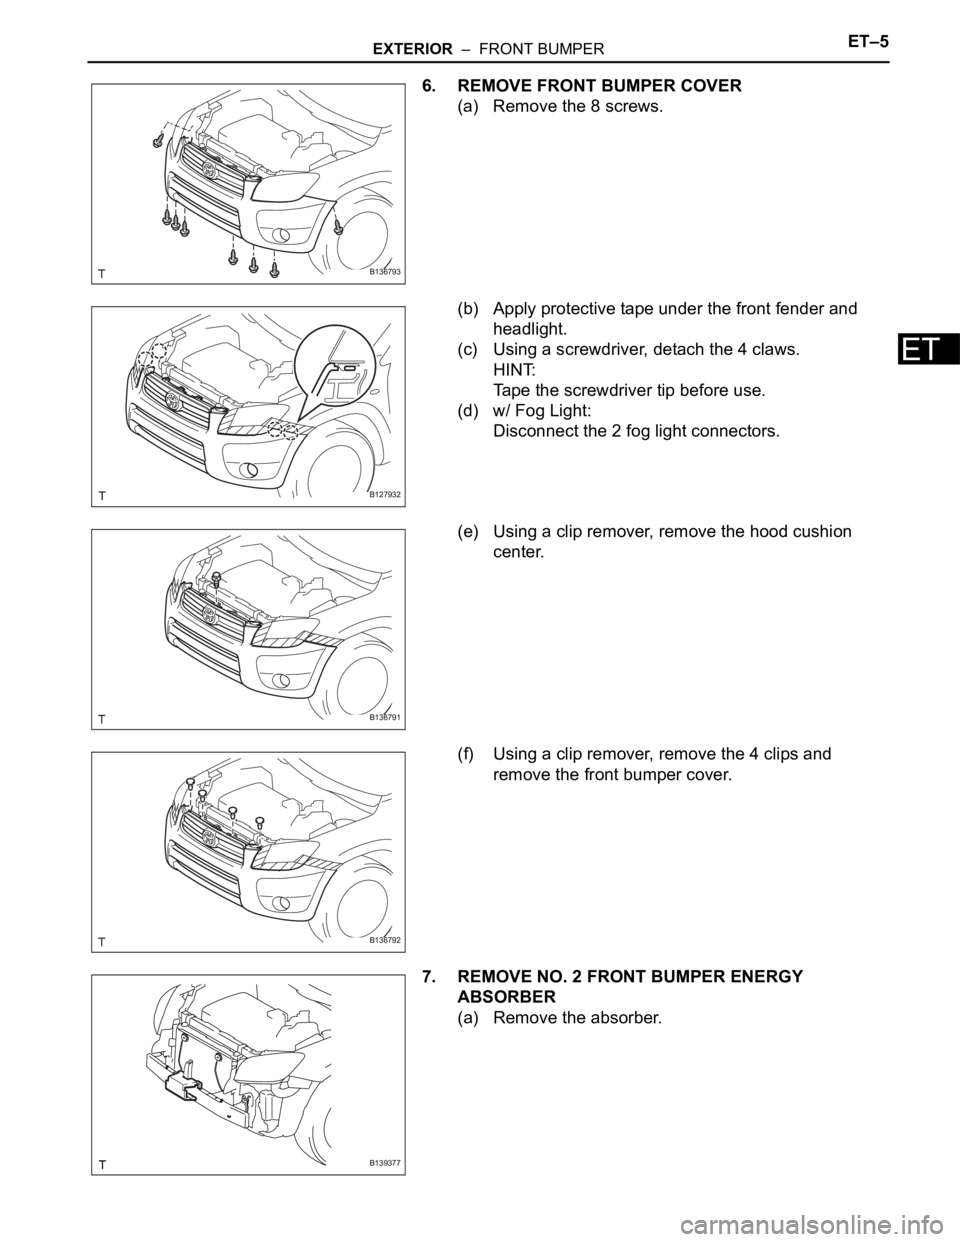
6. REMOVE FRONT BUMPER COVER
(a) Remove the 8 screws.
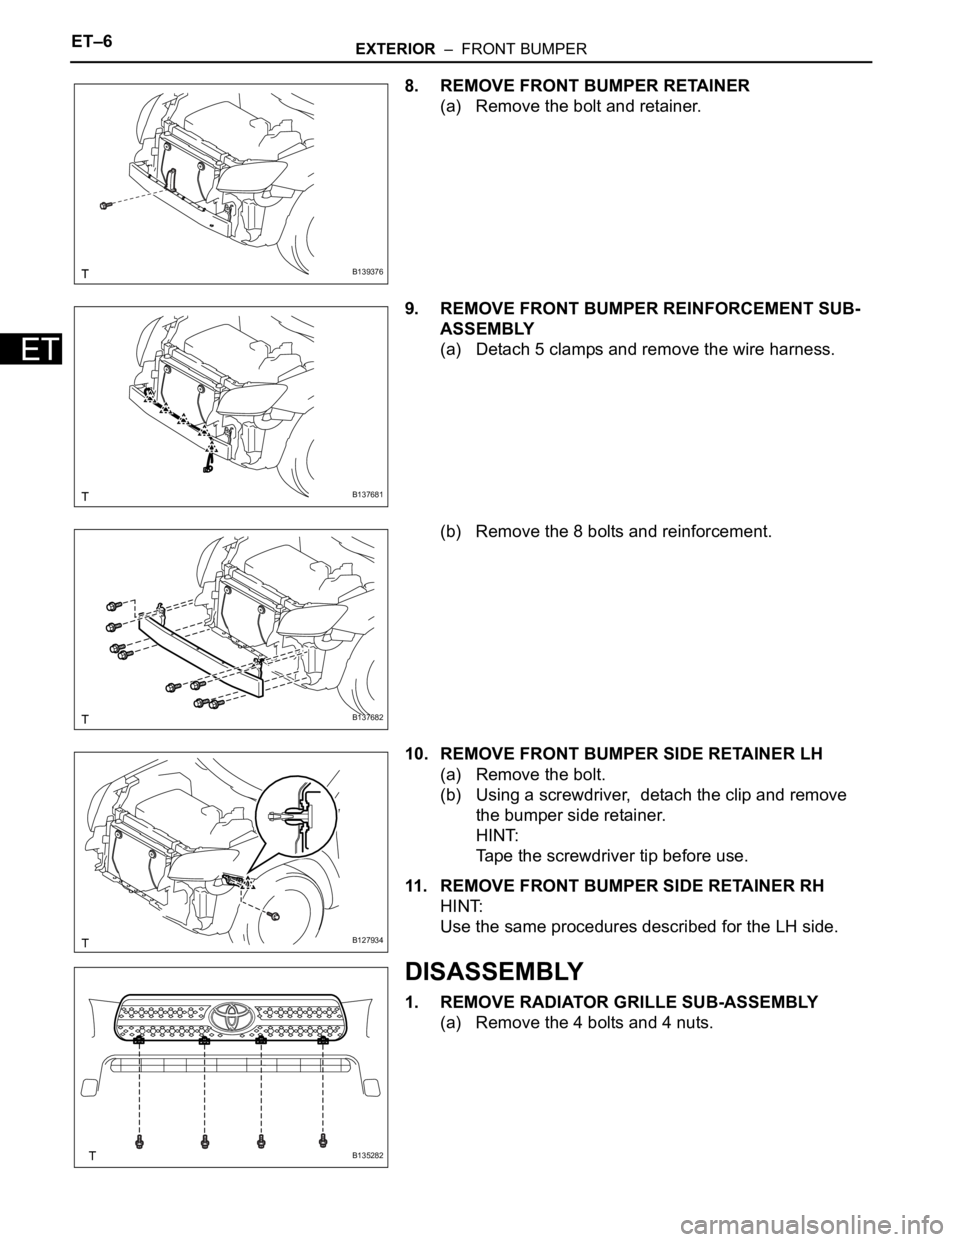
(b) Apply protective tape under the front fender and
headlight.
(c) Using a screwdriver, detach the 4 claws.
HINT:
Tape the screwdriver tip before use.
(d) w/ Fog Light:
Disconnect the 2 fog light connectors.
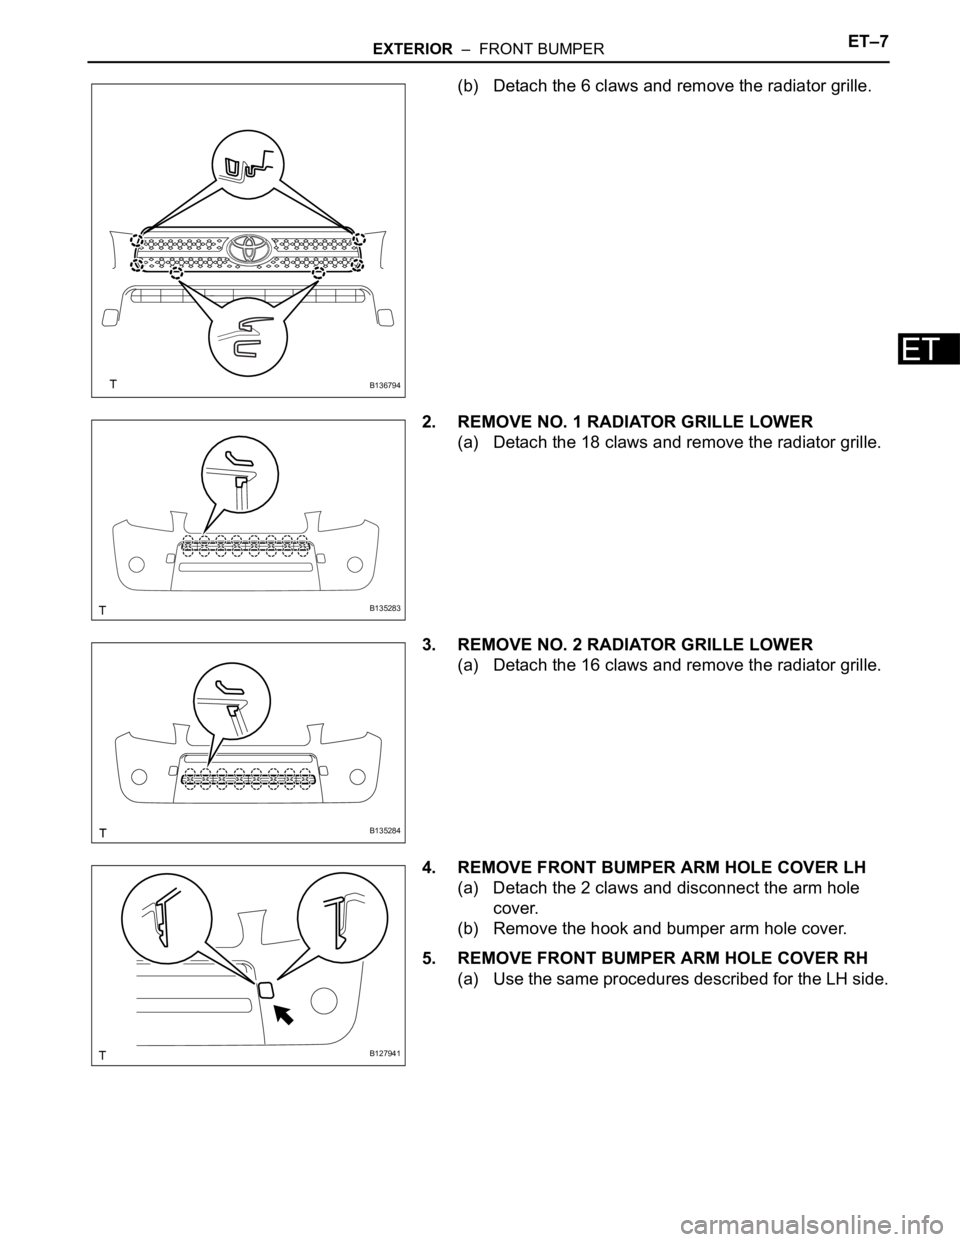
(e) Using a clip remover, remove the hood cushion
center.
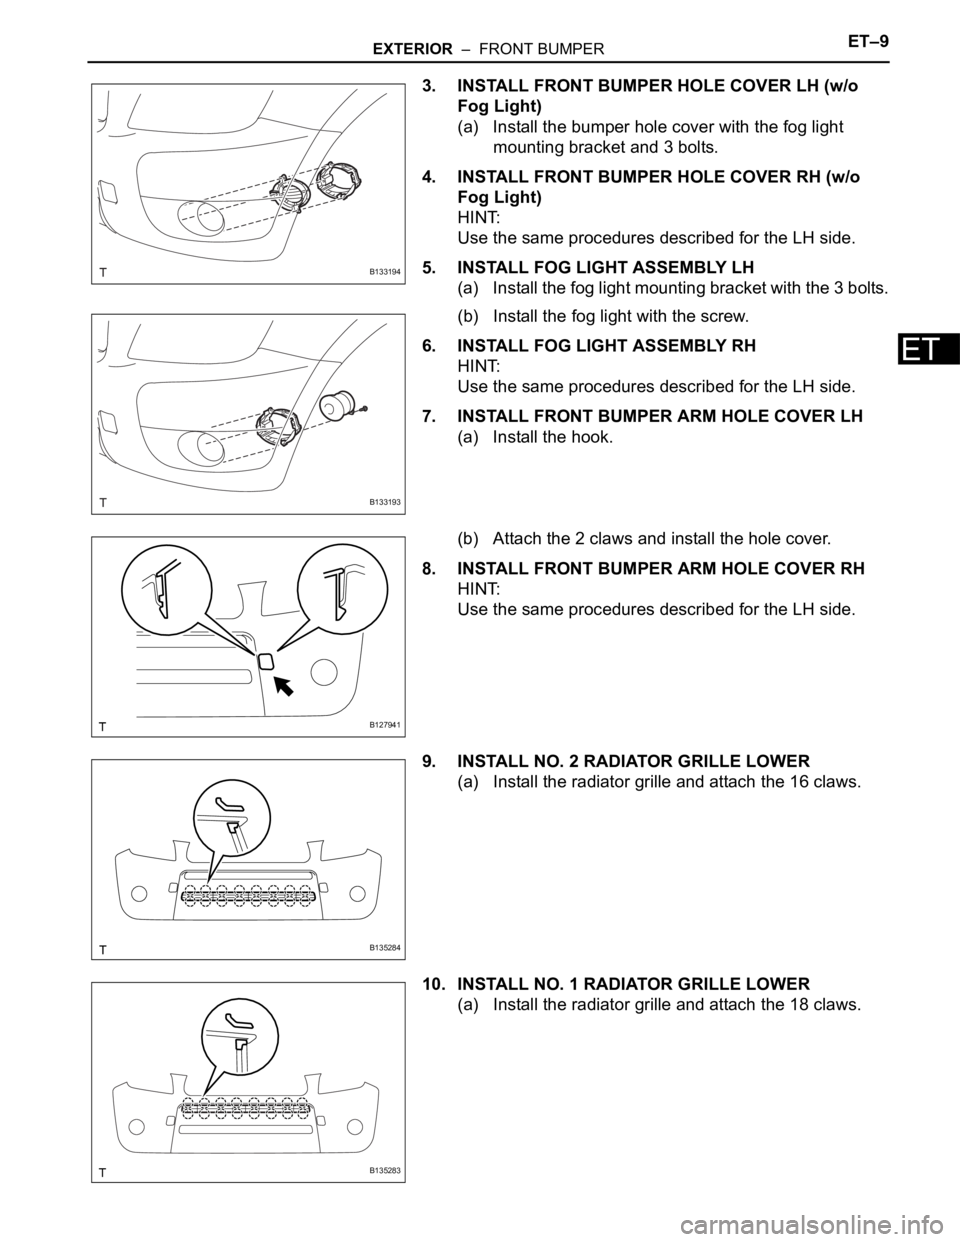
(f) Using a clip remover, remove the 4 clips and
remove the front bumper cover.
7. REMOVE NO. 2 FRONT BUMPER ENERGY
ABSORBER
(a) Remove the absorber.
B136793
B127932
B136791
B136792
B139377
Page 512 of 2000
ET–6EXTERIOR – FRONT BUMPER
ET
8. REMOVE FRONT BUMPER RETAINER
(a) Remove the bolt and retainer.
9. REMOVE FRONT BUMPER REINFORCEMENT SUB-
ASSEMBLY
(a) Detach 5 clamps and remove the wire harness.
(b) Remove the 8 bolts and reinforcement.
10. REMOVE FRONT BUMPER SIDE RETAINER LH
(a) Remove the bolt.
(b) Using a screwdriver, detach the clip and remove
the bumper side retainer.
HINT:
Tape the screwdriver tip before use.
11. REMOVE FRONT BUMPER SIDE RETAINER RH
HINT:
Use the same procedures described for the LH side.
DISASSEMBLY
1. REMOVE RADIATOR GRILLE SUB-ASSEMBLY
(a) Remove the 4 bolts and 4 nuts.
B139376
B137681
B137682
B127934
B135282
Page 513 of 2000
EXTERIOR – FRONT BUMPERET–7
ET
(b) Detach the 6 claws and remove the radiator grille.
2. REMOVE NO. 1 RADIATOR GRILLE LOWER
(a) Detach the 18 claws and remove the radiator grille.
3. REMOVE NO. 2 RADIATOR GRILLE LOWER
(a) Detach the 16 claws and remove the radiator grille.
4. REMOVE FRONT BUMPER ARM HOLE COVER LH
(a) Detach the 2 claws and disconnect the arm hole
cover.
(b) Remove the hook and bumper arm hole cover.
5. REMOVE FRONT BUMPER ARM HOLE COVER RH
(a) Use the same procedures described for the LH side.
B136794
B135283
B135284
B127941
Page 514 of 2000
ET–8EXTERIOR – FRONT BUMPER
ET
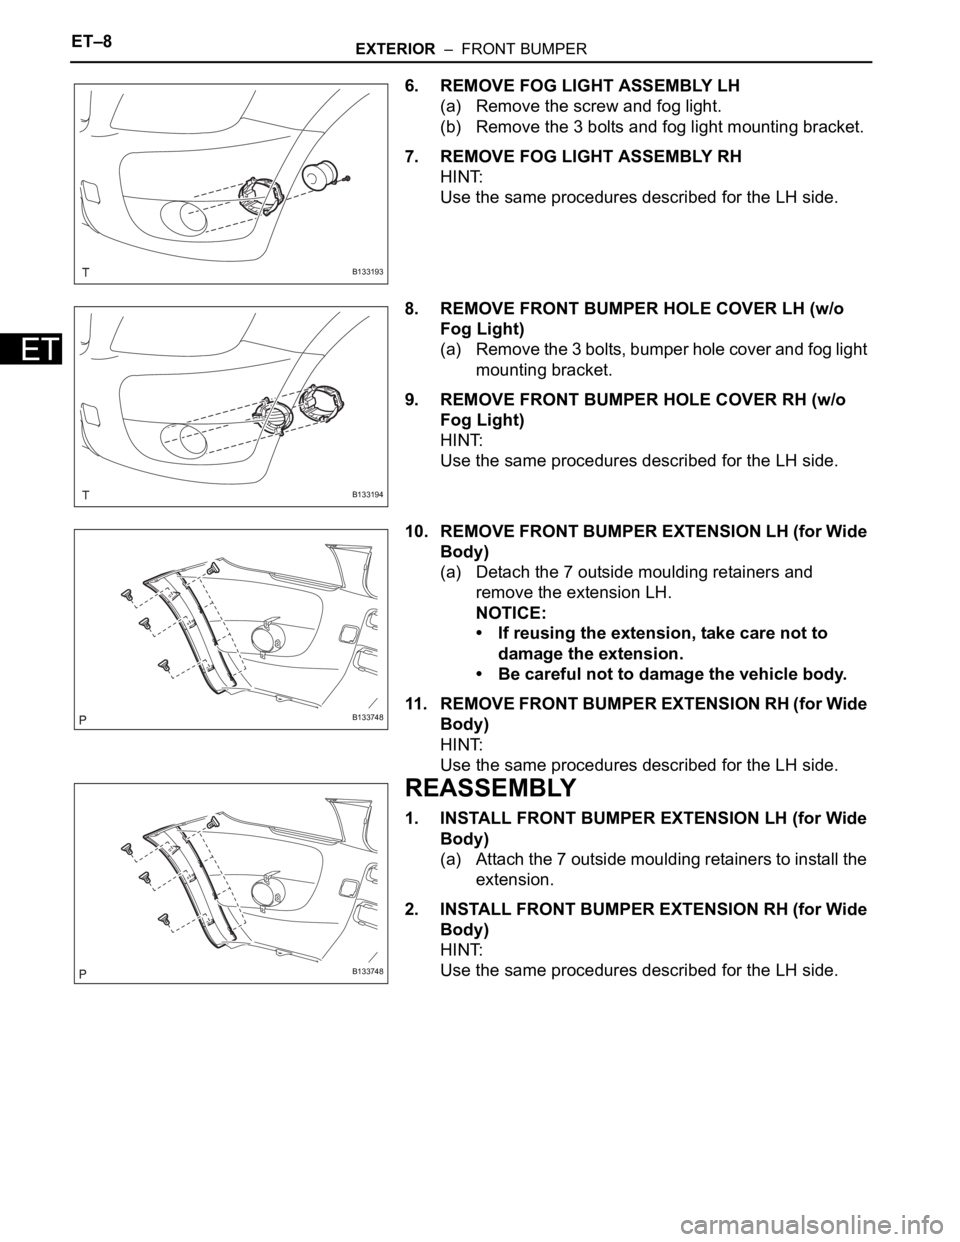
6. REMOVE FOG LIGHT ASSEMBLY LH
(a) Remove the screw and fog light.
(b) Remove the 3 bolts and fog light mounting bracket.
7. REMOVE FOG LIGHT ASSEMBLY RH
HINT:
Use the same procedures described for the LH side.
8. REMOVE FRONT BUMPER HOLE COVER LH (w/o
Fog Light)
(a) Remove the 3 bolts, bumper hole cover and fog light
mounting bracket.
9. REMOVE FRONT BUMPER HOLE COVER RH (w/o
Fog Light)
HINT:
Use the same procedures described for the LH side.
10. REMOVE FRONT BUMPER EXTENSION LH (for Wide
Body)
(a) Detach the 7 outside moulding retainers and
remove the extension LH.
NOTICE:
• If reusing the extension, take care not to
damage the extension.
• Be careful not to damage the vehicle body.
11. REMOVE FRONT BUMPER EXTENSION RH (for Wide
Body)
HINT:
Use the same procedures described for the LH side.
REASSEMBLY
1. INSTALL FRONT BUMPER EXTENSION LH (for Wide
Body)
(a) Attach the 7 outside moulding retainers to install the
extension.
2. INSTALL FRONT BUMPER EXTENSION RH (for Wide
Body)
HINT:
Use the same procedures described for the LH side.
B133193
B133194
B133748
B133748
Page 515 of 2000
EXTERIOR – FRONT BUMPERET–9
ET
3. INSTALL FRONT BUMPER HOLE COVER LH (w/o
Fog Light)
(a) Install the bumper hole cover with the fog light
mounting bracket and 3 bolts.
4. INSTALL FRONT BUMPER HOLE COVER RH (w/o
Fog Light)
HINT:
Use the same procedures described for the LH side.
5. INSTALL FOG LIGHT ASSEMBLY LH
(a) Install the fog light mounting bracket with the 3 bolts.
(b) Install the fog light with the screw.
6. INSTALL FOG LIGHT ASSEMBLY RH
HINT:
Use the same procedures described for the LH side.
7. INSTALL FRONT BUMPER ARM HOLE COVER LH
(a) Install the hook.
(b) Attach the 2 claws and install the hole cover.
8. INSTALL FRONT BUMPER ARM HOLE COVER RH
HINT:
Use the same procedures described for the LH side.
9. INSTALL NO. 2 RADIATOR GRILLE LOWER
(a) Install the radiator grille and attach the 16 claws.
10. INSTALL NO. 1 RADIATOR GRILLE LOWER
(a) Install the radiator grille and attach the 18 claws.
B133194
B133193
B127941
B135284
B135283
Page 516 of 2000
ET–10EXTERIOR – FRONT BUMPER
ET
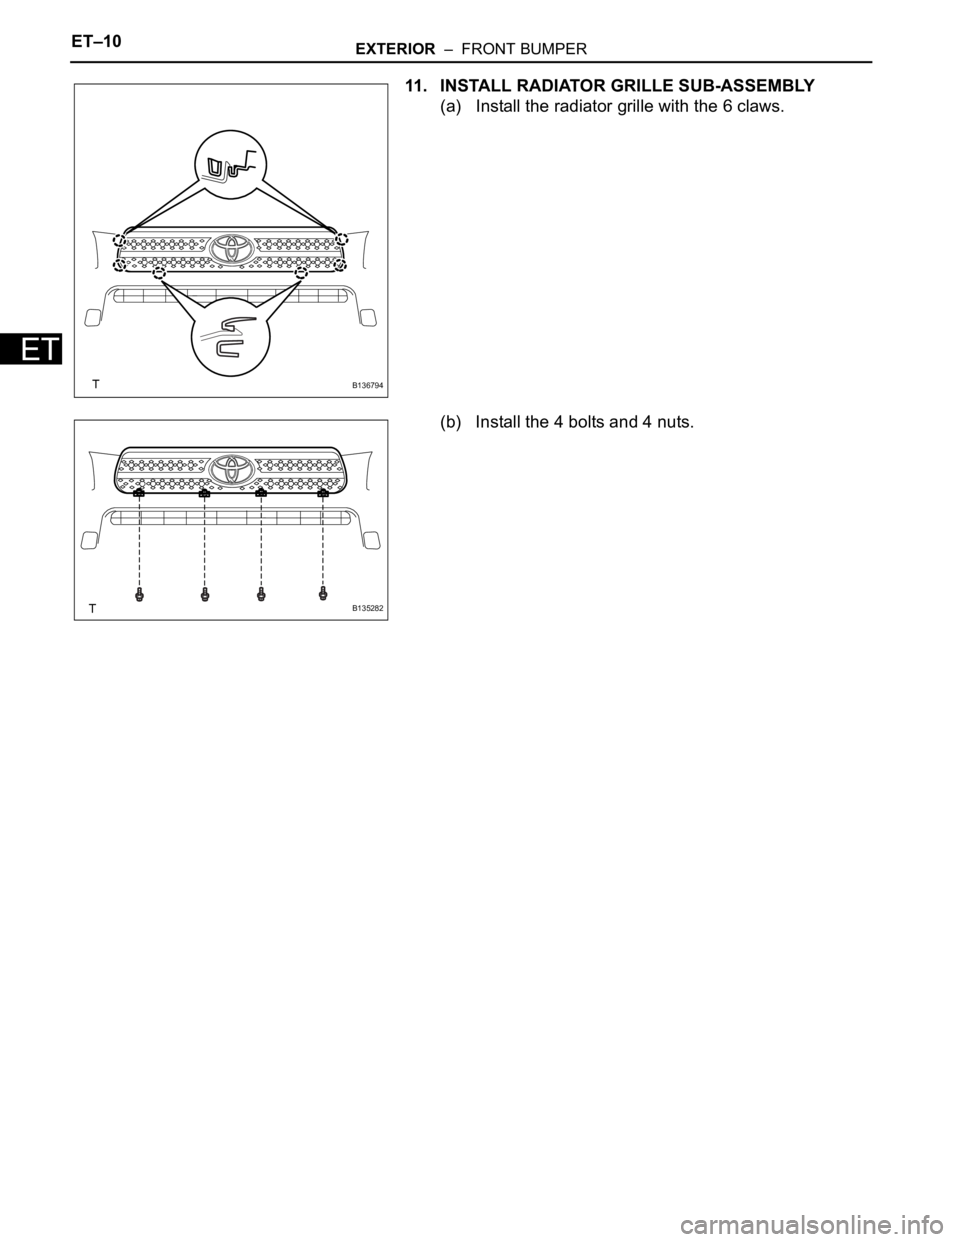
11. INSTALL RADIATOR GRILLE SUB-ASSEMBLY
(a) Install the radiator grille with the 6 claws.
(b) Install the 4 bolts and 4 nuts.
B136794
B135282
Page 517 of 2000
EXTERIOR – FRONT PILLAR UPPER COVERET–49
ET
INSTALLATION
HINT:
• Use the same procedures for the RH side and LH side.
• The procedures listed below are for the LH side.
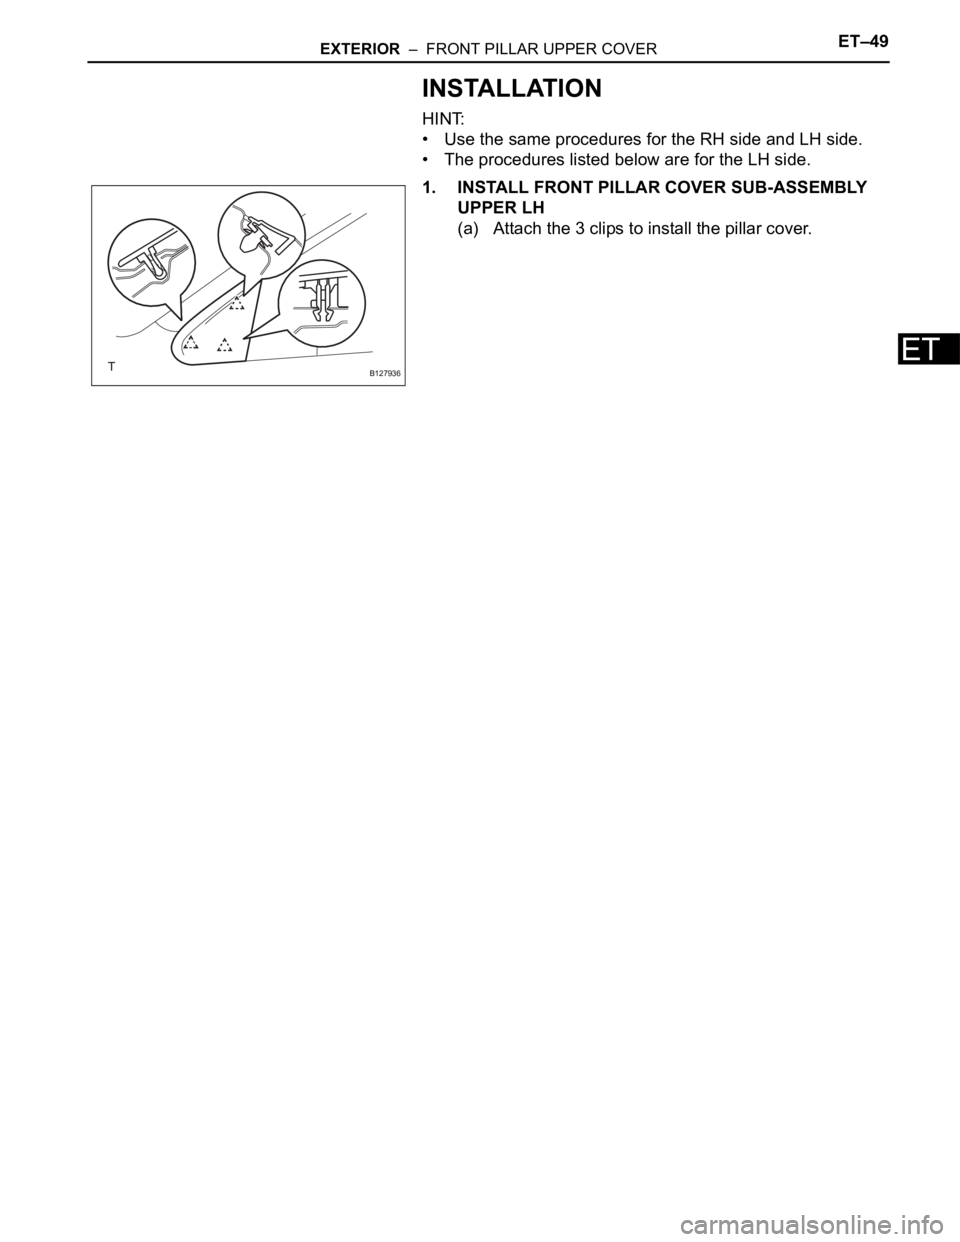
1. INSTALL FRONT PILLAR COVER SUB-ASSEMBLY
UPPER LH
(a) Attach the 3 clips to install the pillar cover.
B127936
Page 518 of 2000
2GR-FE ENGINE CONTROL SYSTEM – SFI SYSTEMES–7
ES
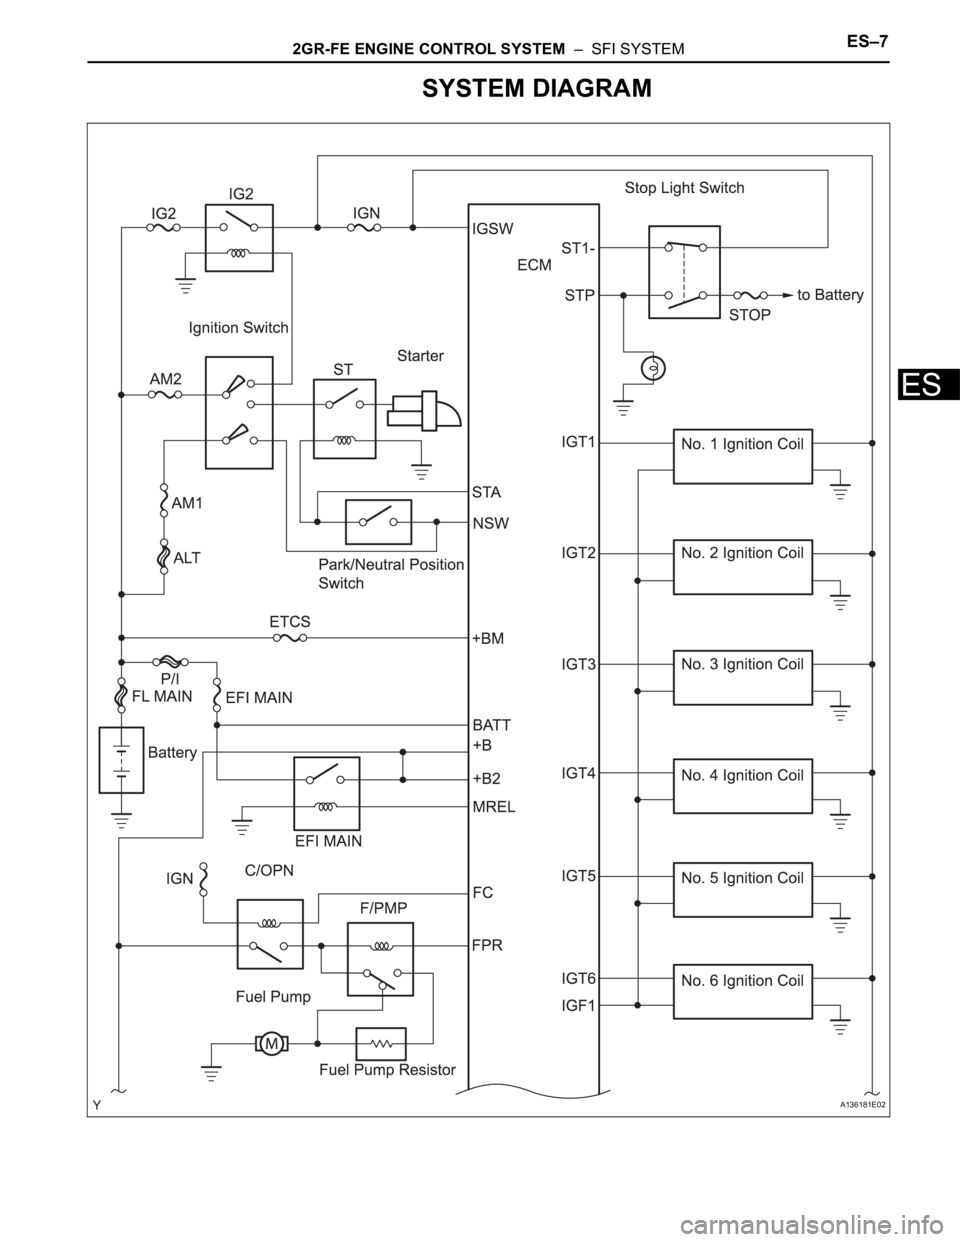
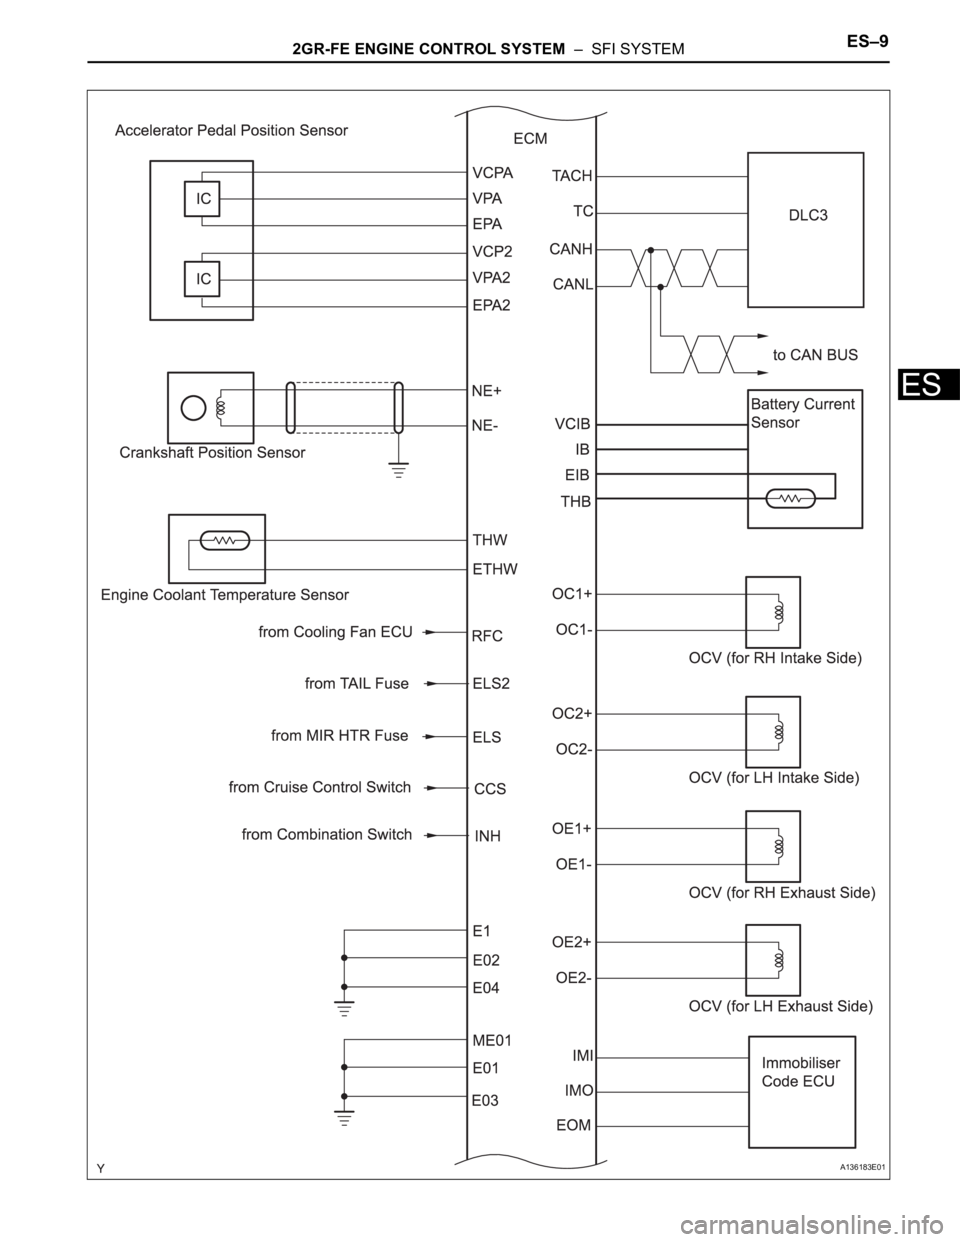
SYSTEM DIAGRAM
A136181E02
Page 519 of 2000
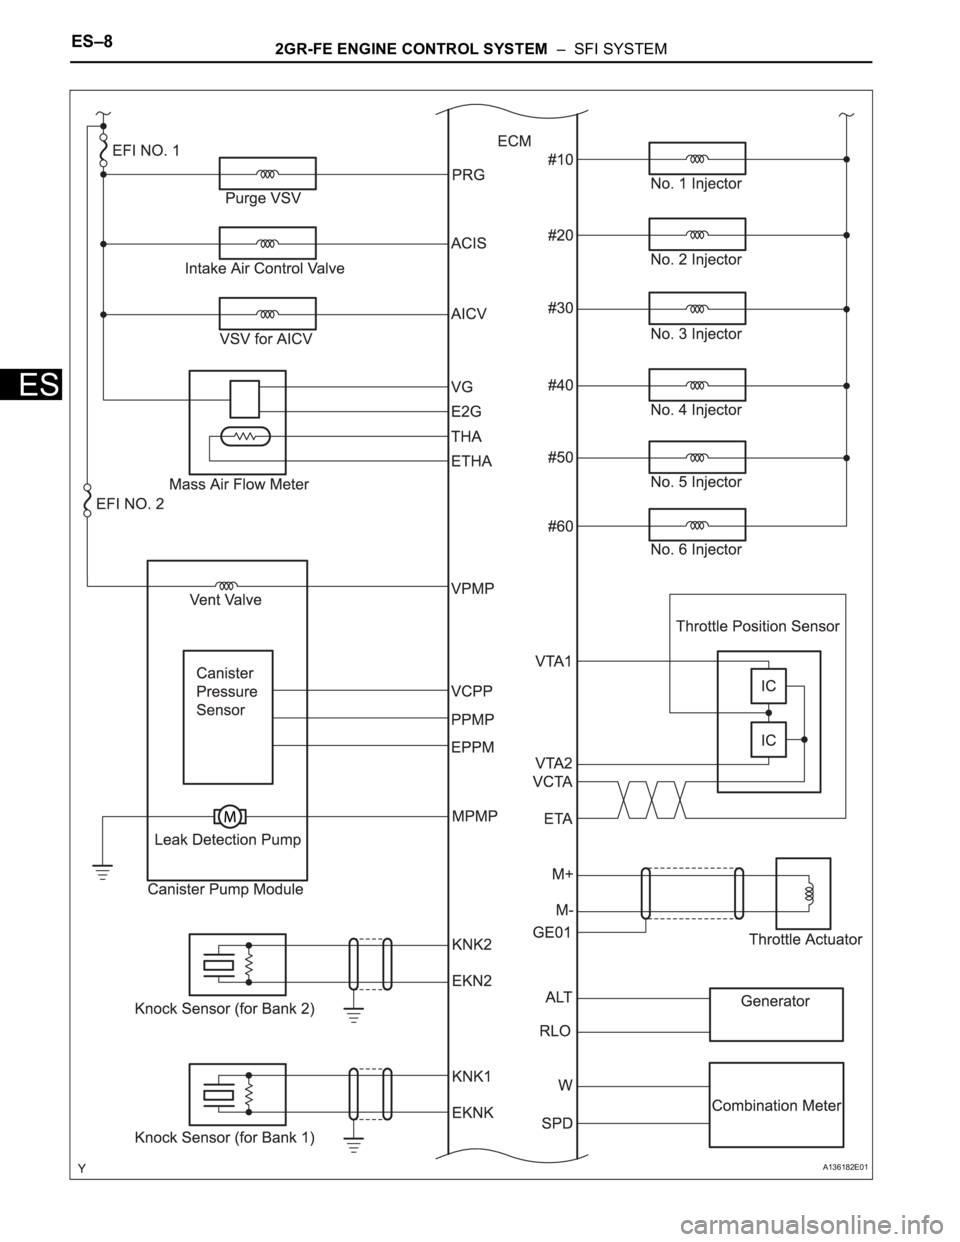
ES–82GR-FE ENGINE CONTROL SYSTEM – SFI SYSTEM
ES
A136182E01
Page 520 of 2000
2GR-FE ENGINE CONTROL SYSTEM – SFI SYSTEMES–9
ES
A136183E01
Trending: low beam, ECO mode, transmission fluid, boot, headlight bulb, rack boots, charging
