display TOYOTA RAV4 PLUG-IN HYBRID 2023 Owner's Manual
[x] Cancel search | Manufacturer: TOYOTA, Model Year: 2023, Model line: RAV4 PLUG-IN HYBRID, Model: TOYOTA RAV4 PLUG-IN HYBRID 2023Pages: 718, PDF Size: 167.55 MB
Page 106 of 718
1042-1. Plug-in hybrid system
■When starting off, depress the
accelerator pedal smoothly to
accelerate
As a guide, accelerate up to
approximately 20 km/h (12mph) in
the first 5 seconds.
Electrical and fuel efficiency can be
improved just by using the ECO
Accelerator Guidance displayed on
the multi-information display and
taking care to start off gently.
(P.202)
When the driving mode is set to Eco
drive mode, depressing the accelerator
pedal generates smooth torque that
makes it easier to operate the accelera-
tor gently.
■Maintain sufficient vehicle-to-
vehicle distance and do not
accelerate or decelerate
unnecessarily
Try to maintain a fixed speed while
driving. Driving at a short vehicle-
to-vehicle distance will result in
repeating wasteful acceleration and
deceleration, which will worsen the
electrical and fuel efficiency.
■Release the accelerator pedal
early before stopping the vehi-
cle, such as at a traffic light
The regenerative brake will operate
to convert the kinetic energy of the
vehicle into electrical energy, which
will charge the hybrid battery (trac-
tion battery).
The regeneration status can be
checked from the Hybrid System
Indicator. (P.190)When the brake pedal is depressed
lightly during deceleration, the
regeneration amount increases,
enabling more electrical energy to
be recovered.
If the brake pedal is depressed too
strongly, the recovered amount indica-
tor will reach the maximum level and
the upper limit of the recoverable
energy will be exceeded. Therefore, be
sure to operate the brake pedal early.
■Use the air conditioning sys-
tem appropriately, and also
utilize the heated steering
wheel (if equipped) and seat
heaters
In EV mode, the vehicle is cooled
and heated by electrical energy.
(Except in extremely cold tempera-
tures of approximately -10°C (14°F)
or less.)
Preventing excessive cooling or
heating of the vehicle will reduce
power consumption and improve
electrical efficiency.
The heated steering wheel (if
equipped) and seat heaters are effi-
cient heating device that directly
warm the body using less electric
power.
When used together with the air condi-
tioning system, a low temperature set-
ting can be used to improve electrical
and fuel efficiency.
■Check the tire pressure
If the tire pressure is lower than the
specified value, it will worsen the
electrical and fuel efficiency.
Page 107 of 718
105
2 2-1. Plug-in hybrid system
Plug-in hybrid system
A pressure level 50 kPa (0.5 kgf/cm2 or
bar, 7 psi) lower than the specified
value will cause a worsening of several
percentage points.
■When driving on highways,
use the EV/HV mode selection
switch to drive in HV mode
The power consumption will
increase significantly if the vehicle
is driven in EV mode on highways.
■Do not load unnecessary
objects in the vehicle
Driving with objects weighing 100
kg (220 lb.) in the vehicle will
worsen the electrical and fuel effi-
ciency by approximately 3%.
Air resistance also greatly affects
electrical and fuel efficiency.
Remove any exterior accessories
such as a roof luggage carrier when
they are not being used.
The running resistance of snow
tires is high and they will worsen
electrical and fuel efficiency.
Replace them with standard tires
as soon as they are no longer
needed.
■Know your vehicle’s electrical
and fuel efficiency
If you know your vehicle’s daily
electrical and fuel efficiency, you
will understand the benefits of Eco
drive.
Use the Power Consumption/Fuel
Economy, ECO Accelerator Guid-
ance/“Eco Score” and other data
displayed on the multi-information display.
The following indicate that charging
has been carried out properly.
The charging indicator of the
charging port turns off
“Charging Complete” is dis-
played on the multi-information
display when a door is opened
with the power switch off
(P.131)
Regardless of the type of power
source or whether the charging
schedule function is used, charging
is completed if the above can be
confirmed.
Charging-related messages: P.172
Display when charging is
completed
Page 110 of 718
1082-2. Charging
*: Flashes for a certain period of time, and then turns off.
■Charging indicator of the charging port
When a system malfunction occurs while charging or using the Remote Air Condi-
tioning System, the charging indicator rapidly flashes for a certain period of time, and
then turns off.
If this occurs, when a door is opened with the power switch off, a message is dis-
played on the multi-information display. When a message is displayed, follow the
instructions displayed on the screen.
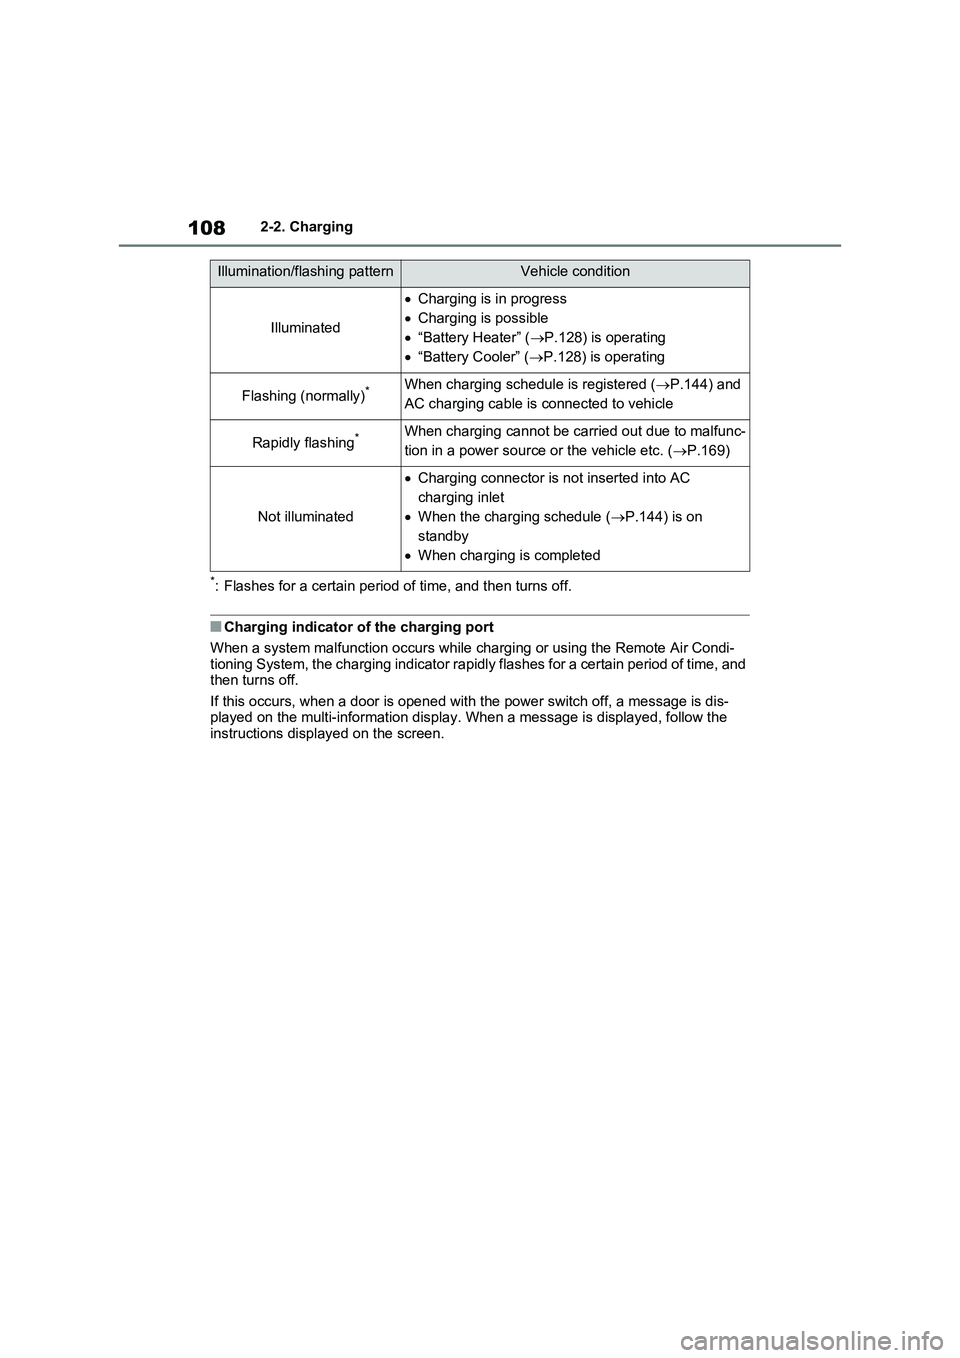
Illumination/flashing patternVehicle condition
Illuminated
Charging is in progress
Charging is possible
“Battery Heater” (P.128) is operating
“Battery Cooler” (P.128) is operating
Flashing (normally)*When charging schedule is registered (P.144) and
AC charging cable is connected to vehicle
Rapidly flashing*When charging cannot be carried out due to malfunc-
tion in a power source or the vehicle etc. (P.169)
Not illuminated
Charging connector is not inserted into AC
charging inlet
When the charging schedule (P.144) is on
standby
When charging is completed
Page 127 of 718
125
2 2-2. Charging
Plug-in hybrid system
Ensure that the junction box is
equipped with a Residual Cur-
rent Circuit-Breaker (RCCB). If it
is not, have one installed by a
duly qualified professional.
When charging outdoors, make
sure to connect to a rain-tight
socket that is certified for outdoor
use. Checking Residual Current
Circuit-Breaker (RCCB) opera-
tion before its use is recom-
mended.
Check whether there are any
local EV-charging regulations in
place, and adhere to them.
*: For detailed information, consult an
electrician.
■The charging environment
For safe charging, the following
charging equipment and settings are
recommended.
●Rain-tight socket
When charging outdoors, connect the
plug to a rain-tight socket, and ensure
that the plug remains waterproof while
the plug is connected.
●Dedicated circuit
• To reduce the risk of fire, connect only
to an at least 13A branch circuit with
an over-current protection.
• To reduce the risk of electric shock
when working with the plug, connect
to a socket that has a Residual Cur-
rent Circuit-Breaker (RCCB) installed.
●Remote switch
Allows the electricity from the socket to
be interrupted by operating a switch,
thus allowing safe removal and insertion
of the plug on rainy days.
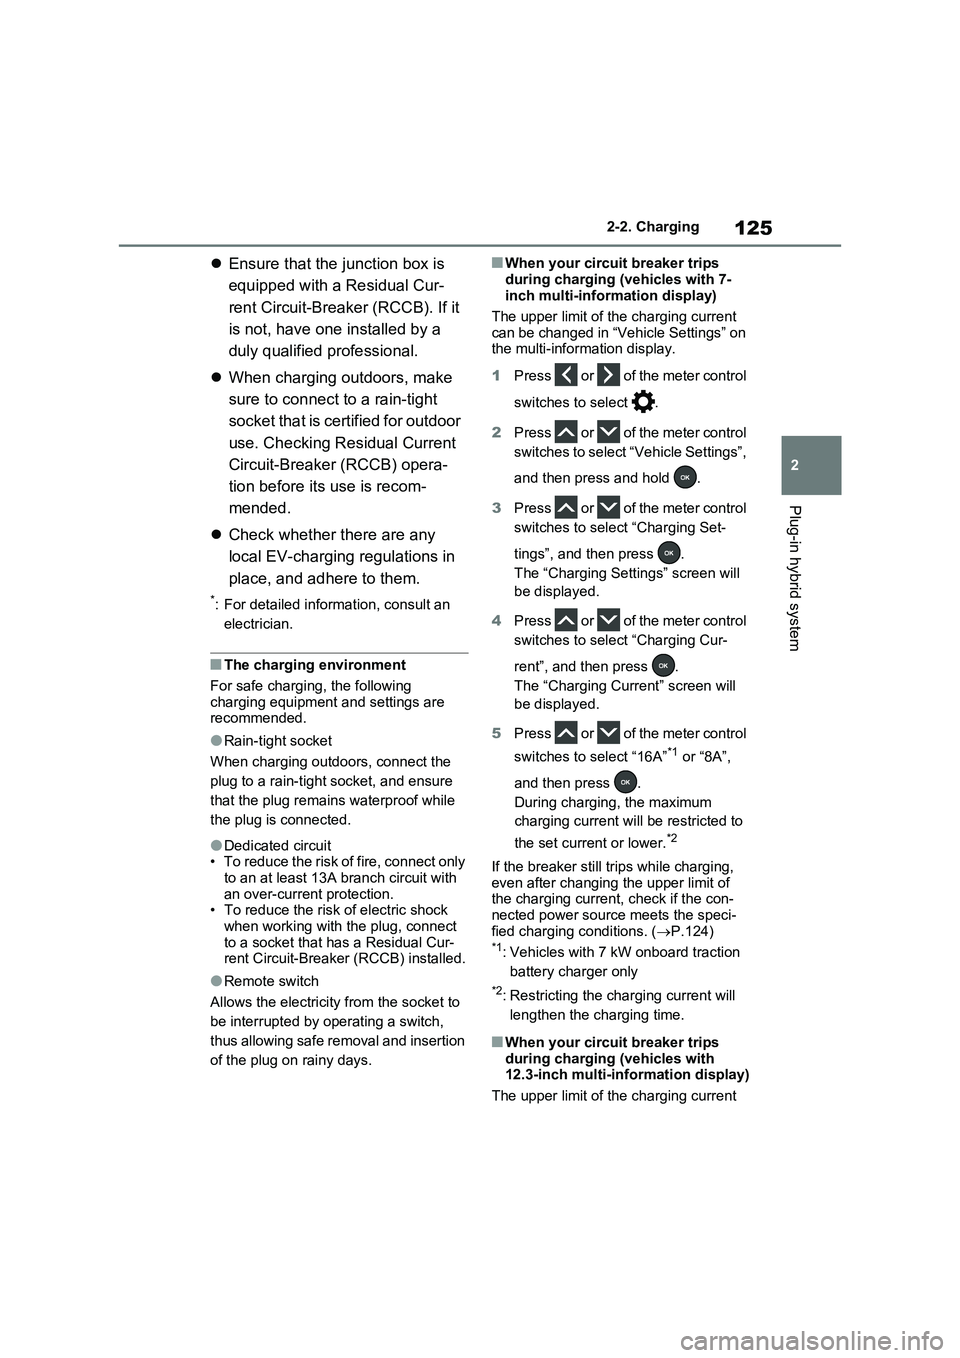
■When your circuit breaker trips
during charging (vehicles with 7-
inch multi-information display)
The upper limit of the charging current
can be changed in “Vehicle Settings” on
the multi-information display.
1Press or of the meter control
switches to select .
2Press or of the meter control
switches to select “Vehicle Settings”,
and then press and hold .
3Press or of the meter control
switches to select “Charging Set-
tings”, and then press .
The “Charging Settings” screen will
be displayed.
4Press or of the meter control
switches to select “Charging Cur-
rent”, and then press .
The “Charging Current” screen will
be displayed.
5Press or of the meter control
switches to select “16A”
*1 or “8A”,
and then press .
During charging, the maximum
charging current will be restricted to
the set current or lower.
*2
If the breaker still trips while charging,
even after changing the upper limit of
the charging current, check if the con-
nected power source meets the speci-
fied charging conditions. (P.124)
*1: Vehicles with 7 kW onboard traction
battery charger only
*2: Restricting the charging current will
lengthen the charging time.
■When your circuit breaker trips
during charging (vehicles with
12.3-inch multi-information display)
The upper limit of the charging current
Page 128 of 718

1262-2. Charging
can be changed in “ Vehicle Set-
tings” on the multi-information display.
1 Press and hold to display the
cursor on the content display area
(center) of the multi-information dis-
play.
2 Press or of the meter control
switches to select and then
press .
3 Press or of the meter control
switches and select “ Vehicle
Settings”. Then press and hold .
4 Press or of the meter control
switches to select “Charging Set-
tings”, and then press .
The “Charging Settings” screen will
be displayed.
5 Press or of the meter control
switches to select “Charging Cur-
rent”, and then press .
The “Charging Current” screen will
be displayed.
6 Press or of the meter control
switches to select “16A”*1 or “8A”,
and then press .
During charging, the maximum
charging current will be restricted to
the set current or lower.*2
If the breaker still trips while charging,
even after changing the upper limit of the charging current, check if the con-nected power source meets the speci-
fied charging conditions. ( P.124)*1: Vehicles with 7 kW onboard traction
battery charger only
*2: Restricting the charging current will
lengthen the charging time.
WARNING
■Power sources precautions
Observe the following precautions.
If you do not follow them, fire, electri- cal shock and/or damages may occur, possibly resulting in death or serious
injury.
●Connect to an AC 220 V - 240 V
socket with a Residual Current Cir- cuit-Breaker (RCCB) and supplied by a circuit breaker in line with local
regulations. Use of an individual cir- cuit provided with at least 13A is strongly recommended.
●Do not connect the AC charging cable to a multi-socket adaptor,
multi-plugs, or conversion plug.
●Connecting the AC charging cable
to an extension cord is strictly pro- hibited. The extension cord may overheat and does not contain a
Residual Current Circuit-Breaker (RCCB).The leakage detection function of
the CCID (Charging Circuit Inter- rupting Device) ( P.113) may not operate correctly.
Page 130 of 718
1282-2. Charging
charging.
■“My Room Mode” (P.164)
When the AC charging cable is
connected to the vehicle, electrical
components such as the air condi-
tioning system or audio system can
be used using the external power
source
*.
*: The power of the hybrid battery (trac-
tion battery) may be used depending
on the situation.
■“Battery Heater”
When the outside temperature is
low and the AC charging cable is
connected to the vehicle, this func-
tion automatically warms the hybrid
battery (traction battery) until it
reaches or exceeds a certain tem-
perature.
“Battery Heater” will operate when
the “Battery Heater” of the
“Charging Settings” on the multi-
information display is on. (P.207)
■Hybrid battery (traction bat-
tery) warming control (Green-
land only)
This control operates after the AC
charging cable remains connected
to the vehicle for 3 days and “Bat-
tery Heater” automatically stops. It
automatically insulates the hybrid
battery (traction battery) in
extremely low temperatures.
This control stops 31 days after
the AC charging cable is con-
nected, even if it is still con-
nected to the vehicle.When this control operates,
charging schedule settings are
ignored and charging starts.
■“Battery Cooler”
When the hybrid battery (traction
battery) is hot and the AC charging
cable is connected to the vehicle,
this function cools the hybrid bat-
tery (traction battery) before
charging is carried out.
“Battery Cooler” will operate when
the “Battery Cooler” of the
“Charging Settings” on the multi-
information display is on. (P.207)
■Traction battery heating and cool-
ing system (“Battery Heater” and
“Battery Cooler”)
●The system operates when the hybrid
battery (traction battery) is below or
above a certain temperature.
●The system may operate when
charging is not being performed.
●When the charging schedule is used
(P.144), this function will operate
according to the charging schedule.
■“Battery Heater”
●When “Battery Heater” is operating,
the charging indicator illuminates.
●When the AC charging cable is
removed from the vehicle or remains
connected to the vehicle for approxi-
mately 3 days, the system automati-
cally stops.
●When “Battery Heater” is operating
during charging, the charging time
may be longer than normal.
●If the outside temperature becomes
high while “Battery Heater” is operat-
ing, charging may complete earlier
than the “Departure” or “Departure
time” time set. (P.144)
●When the following operations are
Page 133 of 718
131
2 2-2. Charging
Plug-in hybrid system
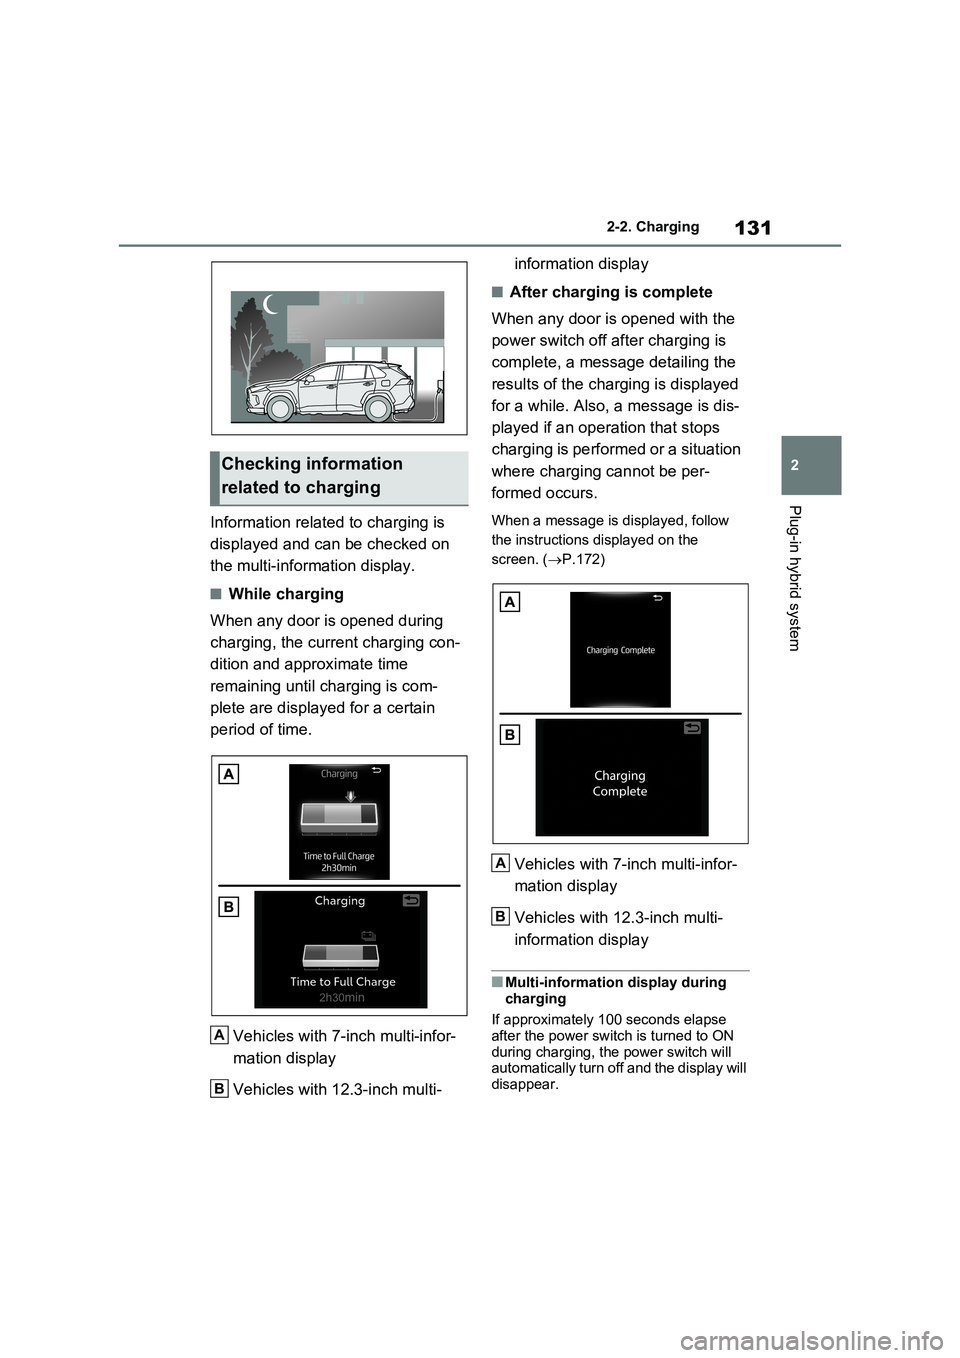
Information related to charging is
displayed and can be checked on
the multi-information display.
■While charging
When any door is opened during
charging, the current charging con-
dition and approximate time
remaining until charging is com-
plete are displayed for a certain
period of time.
Vehicles with 7-inch multi-infor-
mation display
Vehicles with 12.3-inch multi-information display
■After charging is complete
When any door is opened with the
power switch off after charging is
complete, a message detailing the
results of the charging is displayed
for a while. Also, a message is dis-
played if an operation that stops
charging is performed or a situation
where charging cannot be per-
formed occurs.
When a message is displayed, follow
the instructions displayed on the
screen. (P.172)
Vehicles with 7-inch multi-infor-
mation display
Vehicles with 12.3-inch multi-
information display
■Multi-information display during
charging
If approximately 100 seconds elapse
after the power switch is turned to ON
during charging, the power switch will
automatically turn off and the display will
disappear.
Checking information
related to charging
A
B
A
B
Page 135 of 718
133
2 2-2. Charging
Plug-in hybrid system
When charging with a charger,
follow the procedures for using
each charger.
When charging using a public
charging facility, check the set-
ting of the charging schedule
function.
• When the charging schedule is regis-
tered, temporarily turn off the function
or turn “Charge Now” on. (P.150,
156, 162)
• When the charging schedule is set to
on, charging will not start even if the
AC charging cable is connected.
Also, charging fee may occur due to
connection of the AC charging cable.
Before charging, always check the
following items.
The parking brake is applied.
(P.320)
Lights such as the headlights,
emergency flashers and interior
lights etc. are turned off.
If these light switches are turned on,
then these features will consume elec-
tricity, and charging time will increase.
The power switch is turned to
OFF. (P.313)
Before charging, make sure that
each part of the AC charging cable
is in good condition. (P.117)
■During charging
●The charging starting time may differ
depending on the state of the vehicle,
but this does not indicate a malfunc-
tion.
●Cooling fan sounds may be heard
from near the rear seat. (P.99)
●During charging, sounds may be
heard from near the hybrid battery
(traction battery) in accordance with
the operation of the air conditioning
system or “Battery Cooler” (P.128).
●During and after charging, the rear
seat and its surrounding area in which
the onboard traction battery charger is
installed may get warm.
●The surface of the CCID (Charging
Circuit Interrupting Device) may
become hot, but this does not indicate
a malfunction. (When using Mode 2
AC charging cable.)
●Depending on radio wave conditions,
interference may be heard on the
radio.
●The current charging condition and
the estimated time until charging will
complete can be checked on the
multi-information display.
■Capacity reduction of the hybrid
battery (traction battery)
The capacity of the hybrid battery (trac-
tion battery) will decline gradually when
the hybrid battery (traction battery) is in
use. The rate at which it declines will dif-
fer in accordance with environmental
conditions and the way in which the
vehicle is used. Observing the following
can help suppress battery capacity
decline.
●Avoid parking the vehicle in areas with
a high temperature under direct sun-
light when the hybrid battery (traction
battery) is fully charged.
●Avoid accelerating and decelerating
frequently and suddenly when EV
driving.
●Avoid frequent driving near the top
Confirm the following before
charging
Inspecting the AC charging
cable
Page 136 of 718
1342-2. Charging
speed for EV driving. (P.90)
●Leave a low level of charge in the
hybrid battery (traction battery) when
leaving the vehicle undriven for a long
period of time.
After confirming that EV mode or
AUTO EV/HV mode has switched to
HV mode, turn the power switch off.
●Use the charging schedule function as
much as possible in order to fully
charge the hybrid battery (traction bat-
tery) immediately before starting off.
(P.144)
Also, if the hybrid battery (traction bat-
tery) capacity reduces, the distance that
can be driven in EV mode or AUTO
EV/HV mode decreases. However, vehi-
cle performance does not significantly
become worse.
■When the remaining charge of the
hybrid battery (traction battery) is
low after charging
In the following situations, the remaining
charge of the hybrid battery (traction
battery) after charging completes may
be less than normal in order to protect
the system (the EV driving range after
the battery is fully charged may be
shorter).
*
●Charging is carried out when the out-
side temperature is low or high.
●Charging is carried out immediately
after high-load driving or in extreme
heat.
When none of the above situations
apply and there is a drastic drop in the
remaining charge of the hybrid battery
(traction battery) after charging com-
pletes, have the vehicle inspected by
any authorized Toyota retailer or Toyota
authorized repairer, or any reliable
repairer.
*: When this occurs, even if the remain-
ing charge display of the hybrid bat-
tery (traction battery) shows that it is
fully charged, the remaining charge
rapidly decreases faster than normal.
■When the charging amount sent to
the hybrid battery (traction battery)
decreases
When the amount of power supplied by
the charger is low or operation of the
“Battery Heater”, etc., reduces the
charging power sent to the hybrid bat-
tery (traction battery), the charging
amount sent to the hybrid battery (trac-
tion battery) may decrease.
■Charging time may increase
In the following situations, charging time
may become longer than normal:
●In very hot or very cold temperatures.
●When the hybrid battery (traction bat-
tery) becomes hot, such as immedi-
ately after high-load driving.
●The vehicle is consuming a lot of elec-
tricity, for example, when the head-
lights are on etc.
●When using “My Room Mode”.
(P.164)
●There is a power outage during
charging.
●There is an interruption in the electri-
cal supply.
●There is a drop in the voltage of exter-
nal power source.
●The charge in the 12-volt battery is
low, for example due to the vehicle
being left unused for a long period of
time.
●The maximum charging current is set
to 8A or 16A*. (P.125, 126)
●When the “Battery Heater” operates.
(P.128)
●When the “Battery Cooler” is operated
before charging. (P.128)
●When the plug generates heat due to
a loose socket connection etc.
*: Vehicles with 7 kW onboard traction
battery charger only
■Using a DC Charger
DC Chargers cannot be used with this
vehicle.
Page 140 of 718
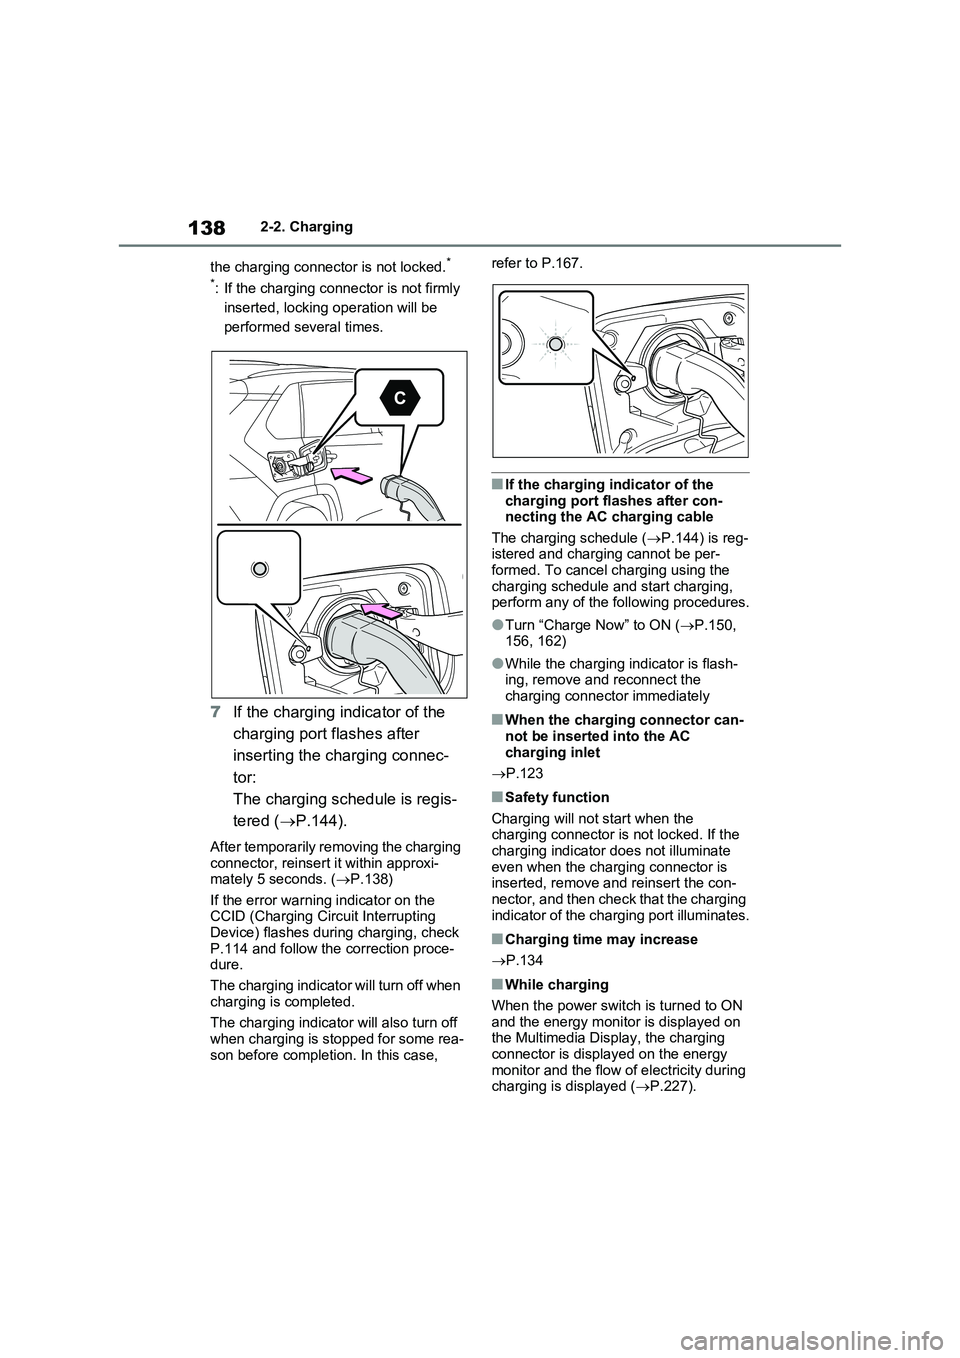
1382-2. Charging
the charging connector is not locked.
*
*
: If the charging connector is not firmly
inserted, locking operation will be
performed several times.
7If the charging indicator of the
charging port flashes after
inserting the charging connec-
tor:
The charging schedule is regis-
tered (P.144).
After temporarily removing the charging
connector, reinsert it within approxi-
mately 5 seconds. (P.138)
If the error warning indicator on the
CCID (Charging Circuit Interrupting
Device) flashes during charging, check
P.114 and follow the correction proce-
dure.
The charging indicator will turn off when
charging is completed.
The charging indicator will also turn off
when charging is stopped for some rea-
son before completion. In this case, refer to P.167.
■If the charging indicator of the
charging port flashes after con-
necting the AC charging cable
The charging schedule (P.144) is reg-
istered and charging cannot be per-
formed. To cancel charging using the
charging schedule and start charging,
perform any of the following procedures.
●Turn “Charge Now” to ON (P.150,
156, 162)
●While the charging indicator is flash-
ing, remove and reconnect the
charging connector immediately
■When the charging connector can-
not be inserted into the AC
charging inlet
P.123
■Safety function
Charging will not start when the
charging connector is not locked. If the
charging indicator does not illuminate
even when the charging connector is
inserted, remove and reinsert the con-
nector, and then check that the charging
indicator of the charging port illuminates.
■Charging time may increase
P.134
■While charging
When the power switch is turned to ON
and the energy monitor is displayed on
the Multimedia Display, the charging
connector is displayed on the energy
monitor and the flow of electricity during
charging is displayed (P.227).