display TOYOTA RAV4 PLUG-IN HYBRID 2023 Workshop Manual
[x] Cancel search | Manufacturer: TOYOTA, Model Year: 2023, Model line: RAV4 PLUG-IN HYBRID, Model: TOYOTA RAV4 PLUG-IN HYBRID 2023Pages: 718, PDF Size: 167.55 MB
Page 166 of 718
1642-2. Charging
1Connect the AC charging cable
to the vehicle and start charging
2Turn the power switch on during
charging
The setting screen of “My Room Mode”
is displayed automatically on the multi-
information display.
3Press or of the meter
control switches, select “Yes”,
and then press .
“My Room Mode” starts and systems
such as the air conditioning system and
audio system can be used inside the
vehicle.
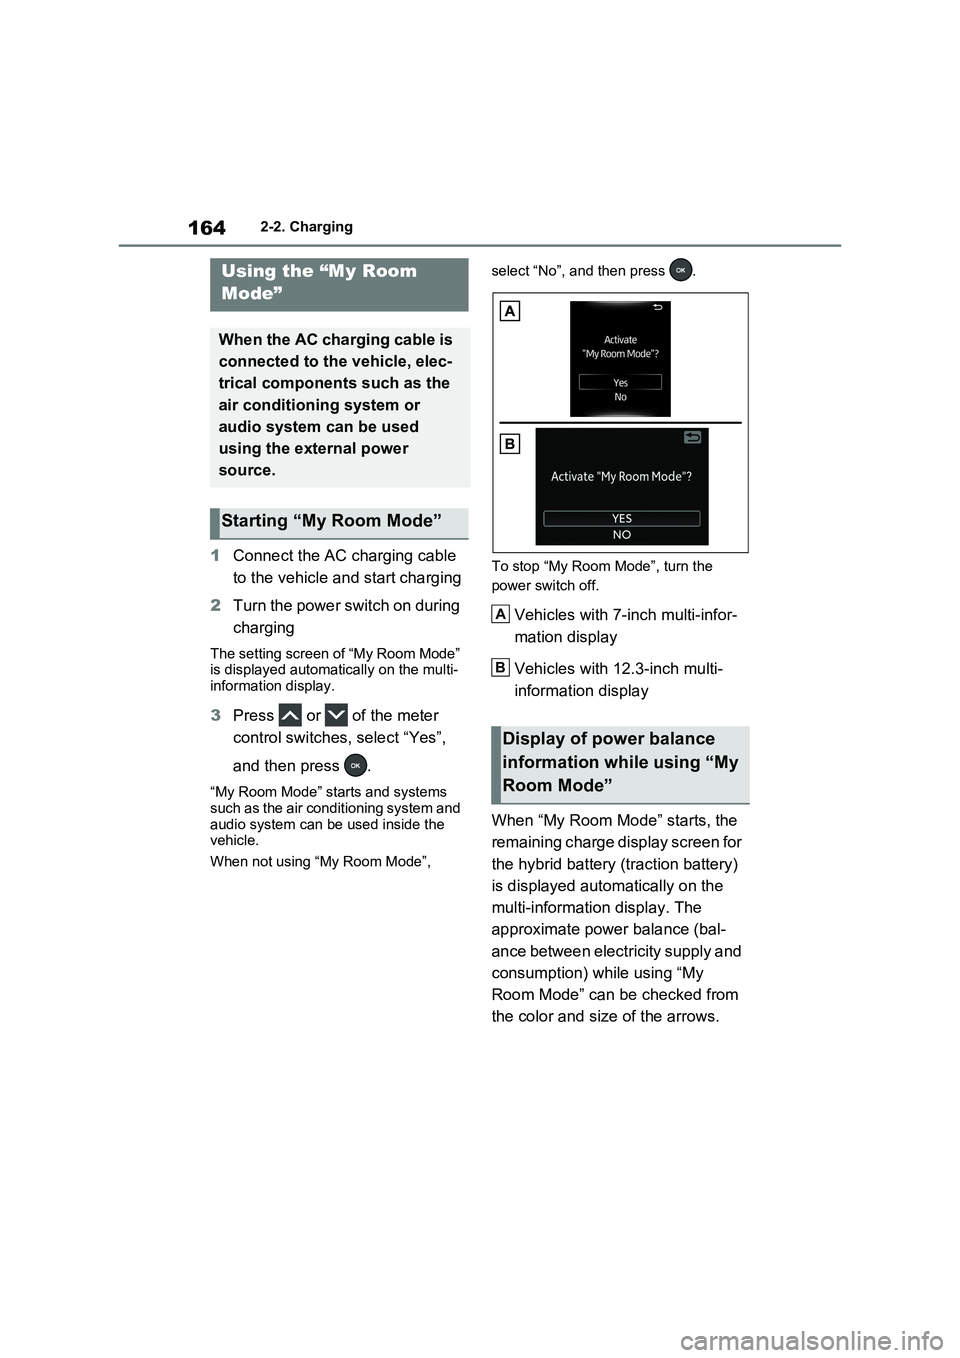
When not using “My Room Mode”, select “No”, and then press .
To stop “My Room Mode”, turn the
power switch off.
Vehicles with 7-inch multi-infor-
mation display
Vehicles with 12.3-inch multi-
information display
When “My Room Mode” starts, the
remaining charge display screen for
the hybrid battery (traction battery)
is displayed automatically on the
multi-information display. The
approximate power balance (bal-
ance between electricity supply and
consumption) while using “My
Room Mode” can be checked from
the color and size of the arrows.
Using the “My Room
Mode”
When the AC charging cable is
connected to the vehicle, elec-
trical components such as the
air conditioning system or
audio system can be used
using the external power
source.
Starting “My Room Mode”
Display of power balance
information while using “My
Room Mode”
A
B
Page 167 of 718
165
2 2-2. Charging
Plug-in hybrid system
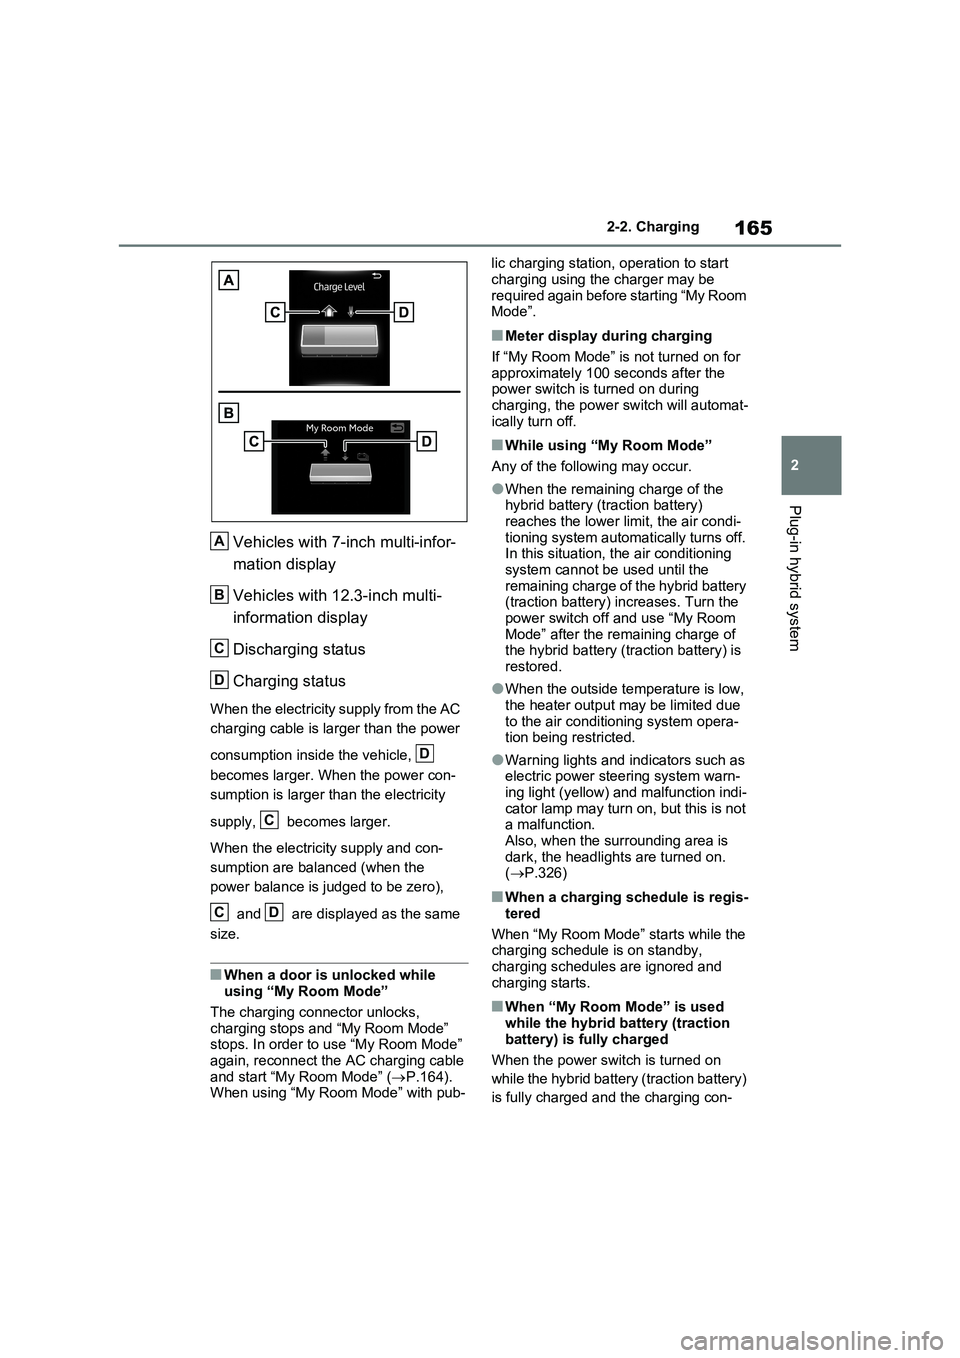
Vehicles with 7-inch multi-infor-
mation display
Vehicles with 12.3-inch multi-
information display
Discharging status
Charging status
When the electricity supply from the AC
charging cable is larger than the power
consumption inside the vehicle,
becomes larger. When the power con-
sumption is larger than the electricity
supply, becomes larger.
When the electricity supply and con-
sumption are balanced (when the
power balance is judged to be zero),
and are displayed as the same
size.
■When a door is unlocked while
using “My Room Mode”
The charging connector unlocks,
charging stops and “My Room Mode”
stops. In order to use “My Room Mode”
again, reconnect the AC charging cable
and start “My Room Mode” (P.164).
When using “My Room Mode” with pub-lic charging station, operation to start
charging using the charger may be
required again before starting “My Room
Mode”.
■Meter display during charging
If “My Room Mode” is not turned on for
approximately 100 seconds after the
power switch is turned on during
charging, the power switch will automat-
ically turn off.
■While using “My Room Mode”
Any of the following may occur.
●When the remaining charge of the
hybrid battery (traction battery)
reaches the lower limit, the air condi-
tioning system automatically turns off.
In this situation, the air conditioning
system cannot be used until the
remaining charge of the hybrid battery
(traction battery) increases. Turn the
power switch off and use “My Room
Mode” after the remaining charge of
the hybrid battery (traction battery) is
restored.
●When the outside temperature is low,
the heater output may be limited due
to the air conditioning system opera-
tion being restricted.
●Warning lights and indicators such as
electric power steering system warn-
ing light (yellow) and malfunction indi-
cator lamp may turn on, but this is not
a malfunction.
Also, when the surrounding area is
dark, the headlights are turned on.
(P.326)
■When a charging schedule is regis-
tered
When “My Room Mode” starts while the
charging schedule is on standby,
charging schedules are ignored and
charging starts.
■When “My Room Mode” is used
while the hybrid battery (traction
battery) is fully charged
When the power switch is turned on
while the hybrid battery (traction battery)
is fully charged and the charging con-
A
B
C
D
D
C
CD
Page 168 of 718
1662-2. Charging
nector that supplies power is connected,
“Charging Port Lid is Open” is displayed
on the multi-information display. In this
case, press of the meter control
switches to display the setting screen of
“My Room Mode”, and then select “My
Room Mode”.
When “My Room Mode” is used while the hybrid battery (traction battery) is
fully charged, the electric power of the hybrid battery (traction battery) may be
consumed. In this case, charging may be performed again.
■When a message related to “My Room Mode” is displayed
When a message is displayed on the multi-information display while using or attempting to start “My Room Mode”,
take the following correction proce- dures.
●“Traction battery is too low for “My Room Mode””
There is insufficient remaining charge in
the hybrid battery (traction battery) for
starting “My Room Mode”.
Wait until the charge of the hybrid bat-
tery (traction battery) increases, then
start “My Room Mode”.
●““My Room Mode” has stopped due to low traction battery”
The remaining charge in the hybrid bat-
tery (traction battery) is insufficient.
Stop using “My Room Mode” and
charge the hybrid battery (traction bat-
tery).
●““My Room Mode” will stop when trac- tion battery is too low Reduce power usage to continue using “My Room
Mode””
The power consumption inside the vehi-
cle is greater than the power being
charged to the hybrid battery (traction
battery), and the remaining charge of
the hybrid battery (traction battery) is
low.*
• “My Room Mode” will end unless the
power consumption inside the vehicle is improved.• To continue using “My Room Mode”,
turn off the power of systems such as the air conditioning system and audio system to increase the remaining
charge of the hybrid battery (traction battery).*: The power balance status during “My
Room Mode” can be checked from the
remaining charge display screen for
the hybrid battery (traction battery)
displayed on the multi-information dis-
play. ( P.164)
WARNING
■Cautions for using “My Room
Mode”
Make sure to observe the following precautions.
Failure to do so may result in serious health problems or even death.
●Do not leave children, people who need assistance, or pets inside the vehicle. The system may turn off
automatically and the interior tem- perature may become high or low, resulting in heat stroke, dehydration
or hypothermia. Devices such as the wipers can also be used, which may lead to mistaken operation and
an accident.
●Check the safety around the vehicle
carefully before use.
Page 169 of 718
167
2 2-2. Charging
Plug-in hybrid system
Refer to the following table and carry out the appropriate correction proce-
dure.
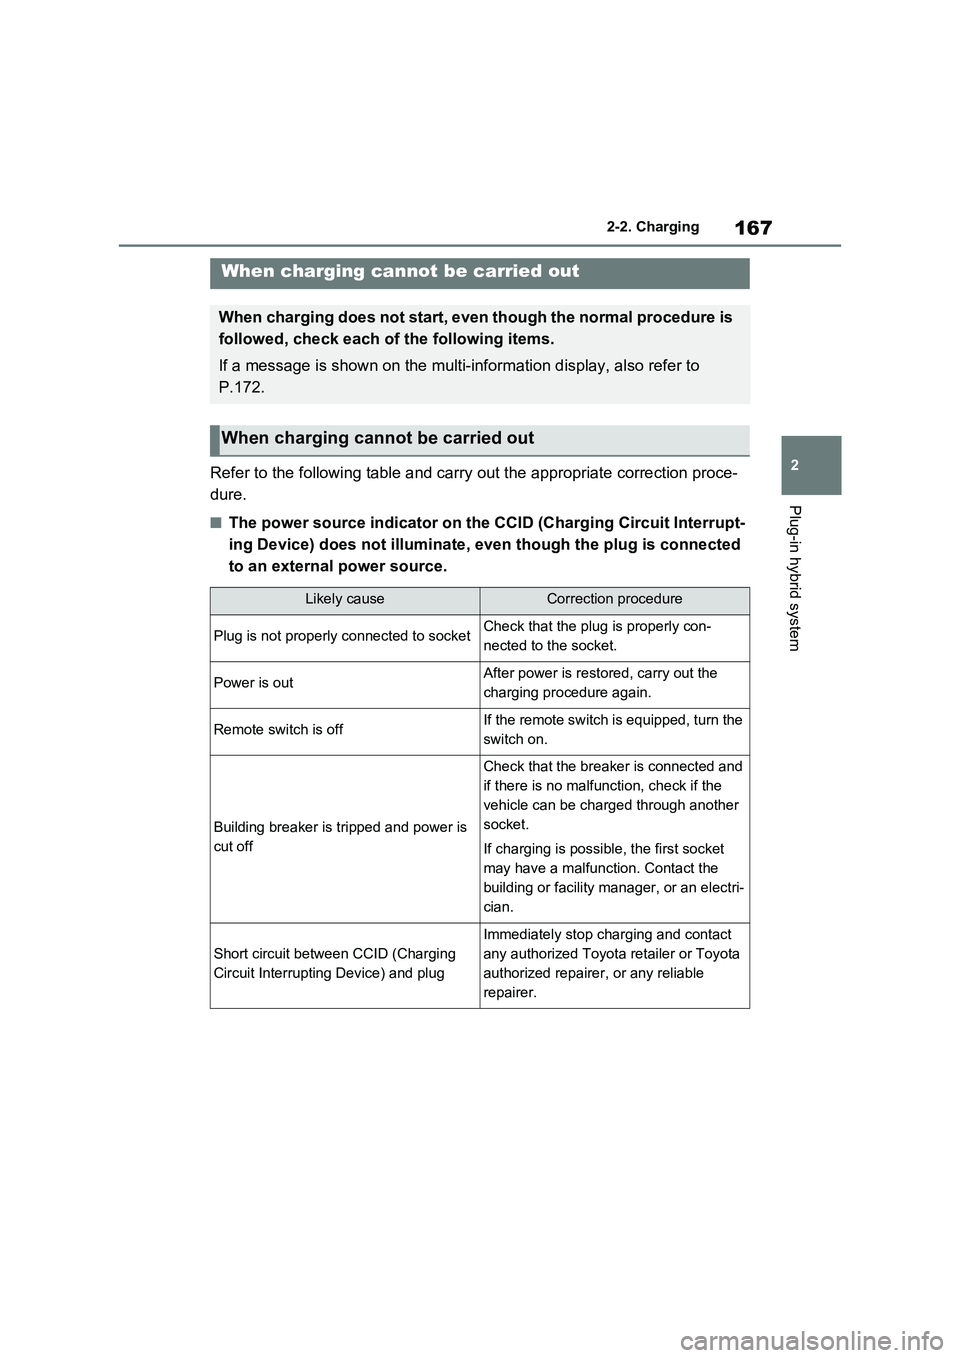
■The power source indicator on the CCID (Charging Circuit Interrupt-
ing Device) does not illuminate, even though the plug is connected
to an external power source.
When charging cannot be carried out
When charging does not start, even though the normal procedure is
followed, check each of the following items.
If a message is shown on the multi-information display, also refer to
P.172.
When charging cannot be carried out
Likely causeCorrection procedure
Plug is not properly connected to socketCheck that the plug is properly con-
nected to the socket.
Power is outAfter power is restored, carry out the
charging procedure again.
Remote switch is offIf the remote switch is equipped, turn the
switch on.
Building breaker is tripped and power is
cut off
Check that the breaker is connected and
if there is no malfunction, check if the
vehicle can be charged through another
socket.
If charging is possible, the first socket
may have a malfunction. Contact the
building or facility manager, or an electri-
cian.
Short circuit between CCID (Charging
Circuit Interrupting Device) and plug
Immediately stop charging and contact
any authorized Toyota retailer or Toyota
authorized repairer, or any reliable
repairer.
Page 171 of 718
169
2 2-2. Charging
Plug-in hybrid system
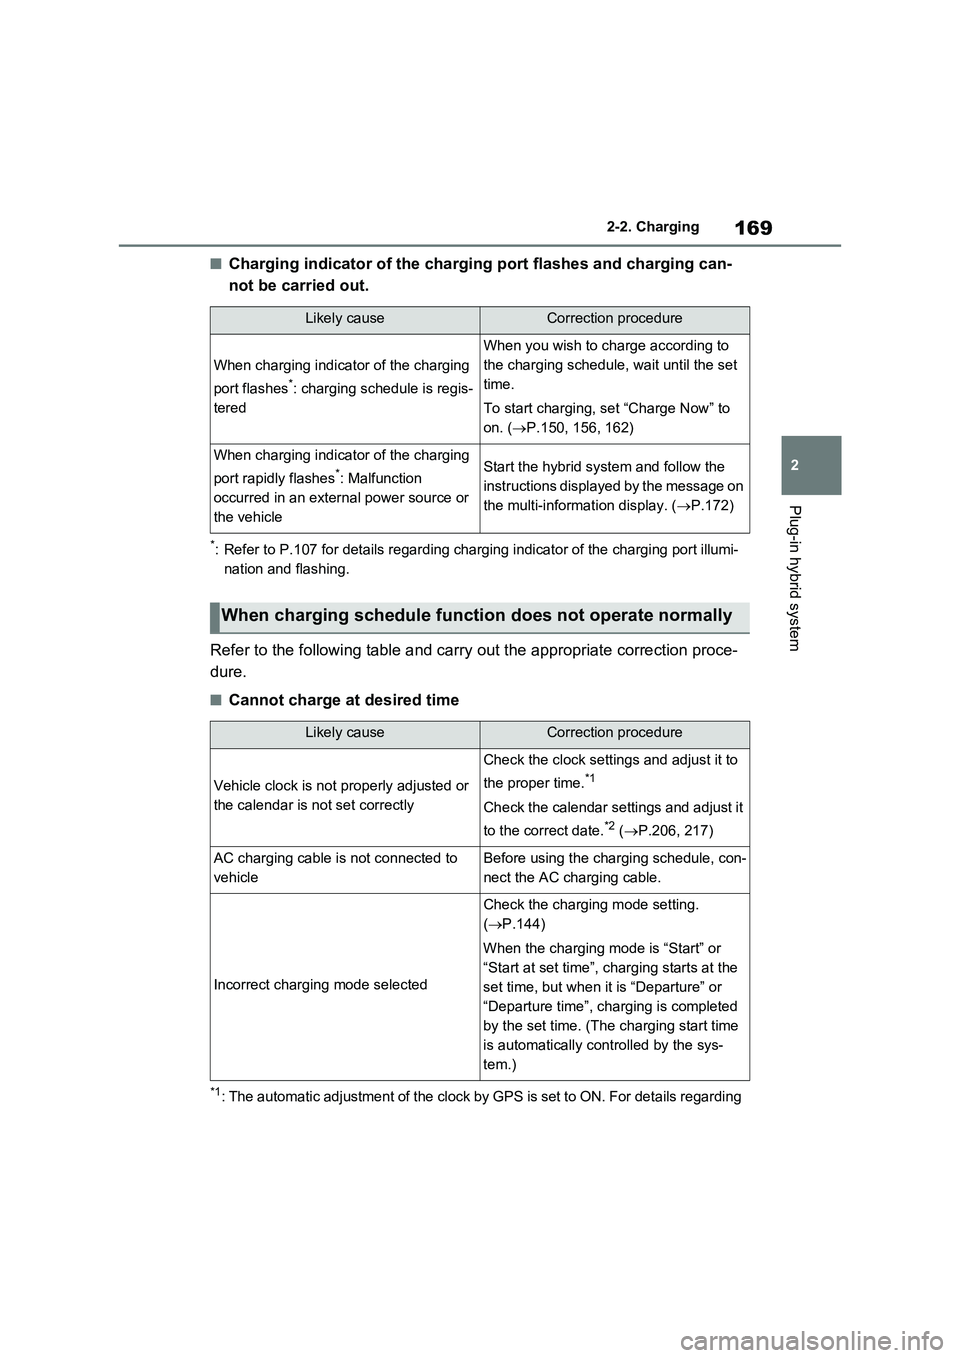
■Charging indicator of the charging port flashes and charging can-
not be carried out.
*: Refer to P.107 for details regarding charging indicator of the charging port illumi-
nation and flashing.
Refer to the following table and carry out the appropriate correction proce-
dure.
■Cannot charge at desired time
*1: The automatic adjustment of the clock by GPS is set to ON. For details regarding
Likely causeCorrection procedure
When charging indicator of the charging
port flashes
*: charging schedule is regis-
tered
When you wish to charge according to
the charging schedule, wait until the set
time.
To start charging, set “Charge Now” to
on. (P.150, 156, 162)
When charging indicator of the charging
port rapidly flashes
*: Malfunction
occurred in an external power source or
the vehicleStart the hybrid system and follow the
instructions displayed by the message on
the multi-information display. (P.172)
When charging schedule function does not operate normally
Likely causeCorrection procedure
Vehicle clock is not properly adjusted or
the calendar is not set correctly
Check the clock settings and adjust it to
the proper time.
*1
Check the calendar settings and adjust it
to the correct date.
*2 (P.206, 217)
AC charging cable is not connected to
vehicleBefore using the charging schedule, con-
nect the AC charging cable.
Incorrect charging mode selected
Check the charging mode setting.
(P.144)
When the charging mode is “Start” or
“Start at set time”, charging starts at the
set time, but when it is “Departure” or
“Departure time”, charging is completed
by the set time. (The charging start time
is automatically controlled by the sys-
tem.)
Page 174 of 718
1722-2. Charging
■Charging does not start, even though it is time set in “Start” or
“Start at set time”
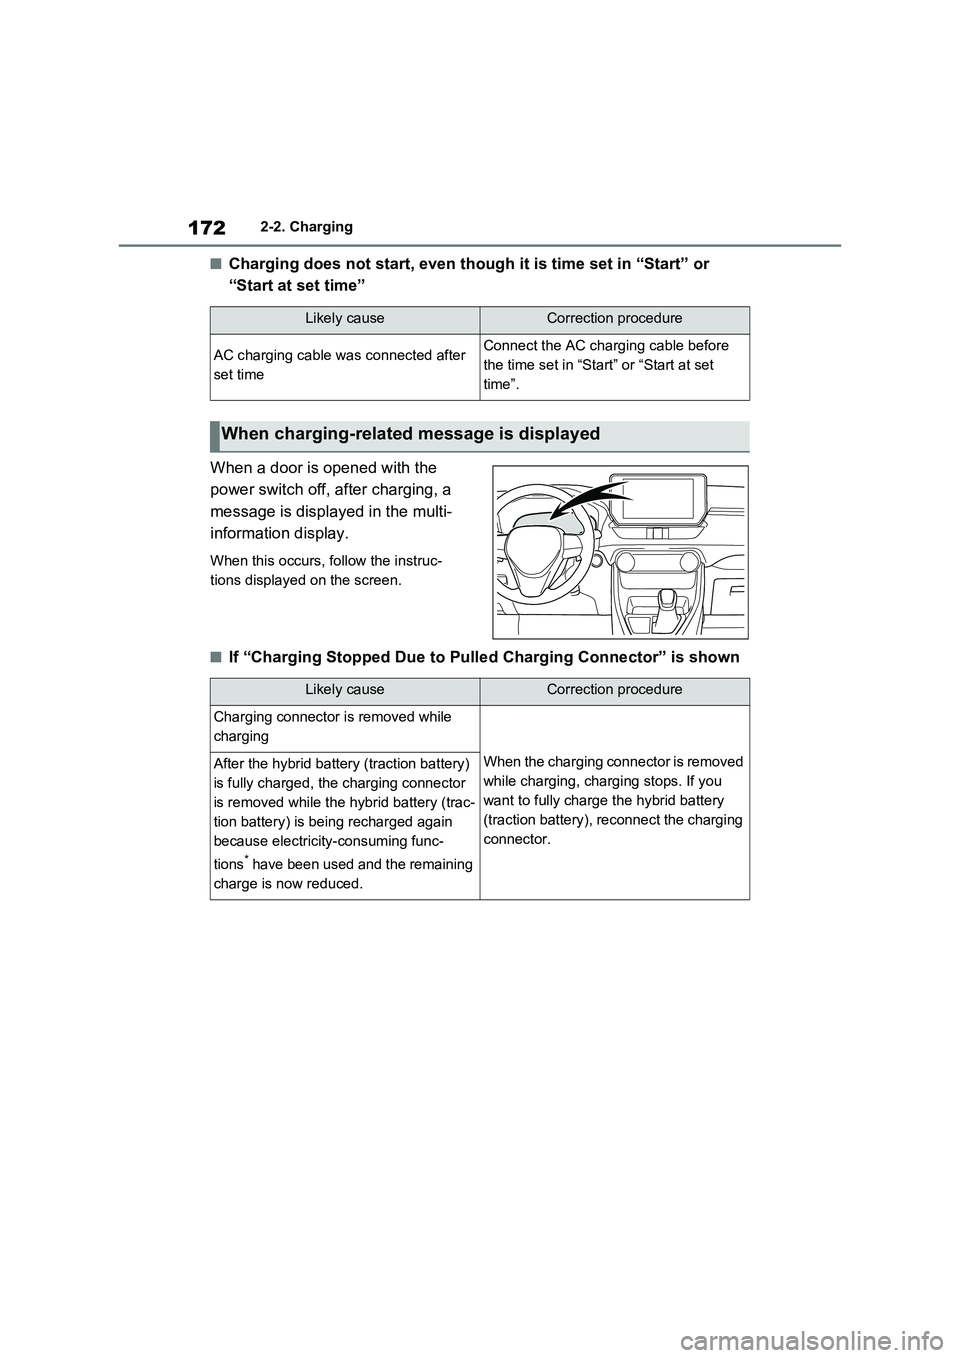
When a door is opened with the
power switch off, after charging, a
message is displayed in the multi-
information display.
When this occurs, follow the instruc-
tions displayed on the screen.
■If “Charging Stopped Due to Pulled Charging Connector” is shown
Likely causeCorrection procedure
AC charging cable was connected after
set timeConnect the AC charging cable before
the time set in “Start” or “Start at set
time”.
When charging-related message is displayed
Likely causeCorrection procedure
Charging connector is removed while
charging
When the charging connector is removed
while charging, charging stops. If you
want to fully charge the hybrid battery
(traction battery), reconnect the charging
connector.After the hybrid battery (traction battery)
is fully charged, the charging connector
is removed while the hybrid battery (trac-
tion battery) is being recharged again
because electricity-consuming func-
tions
* have been used and the remaining
charge is now reduced.
Page 181 of 718
3
179
3
Vehicle status information and indicators
Vehicle status informa-
tion and indicators
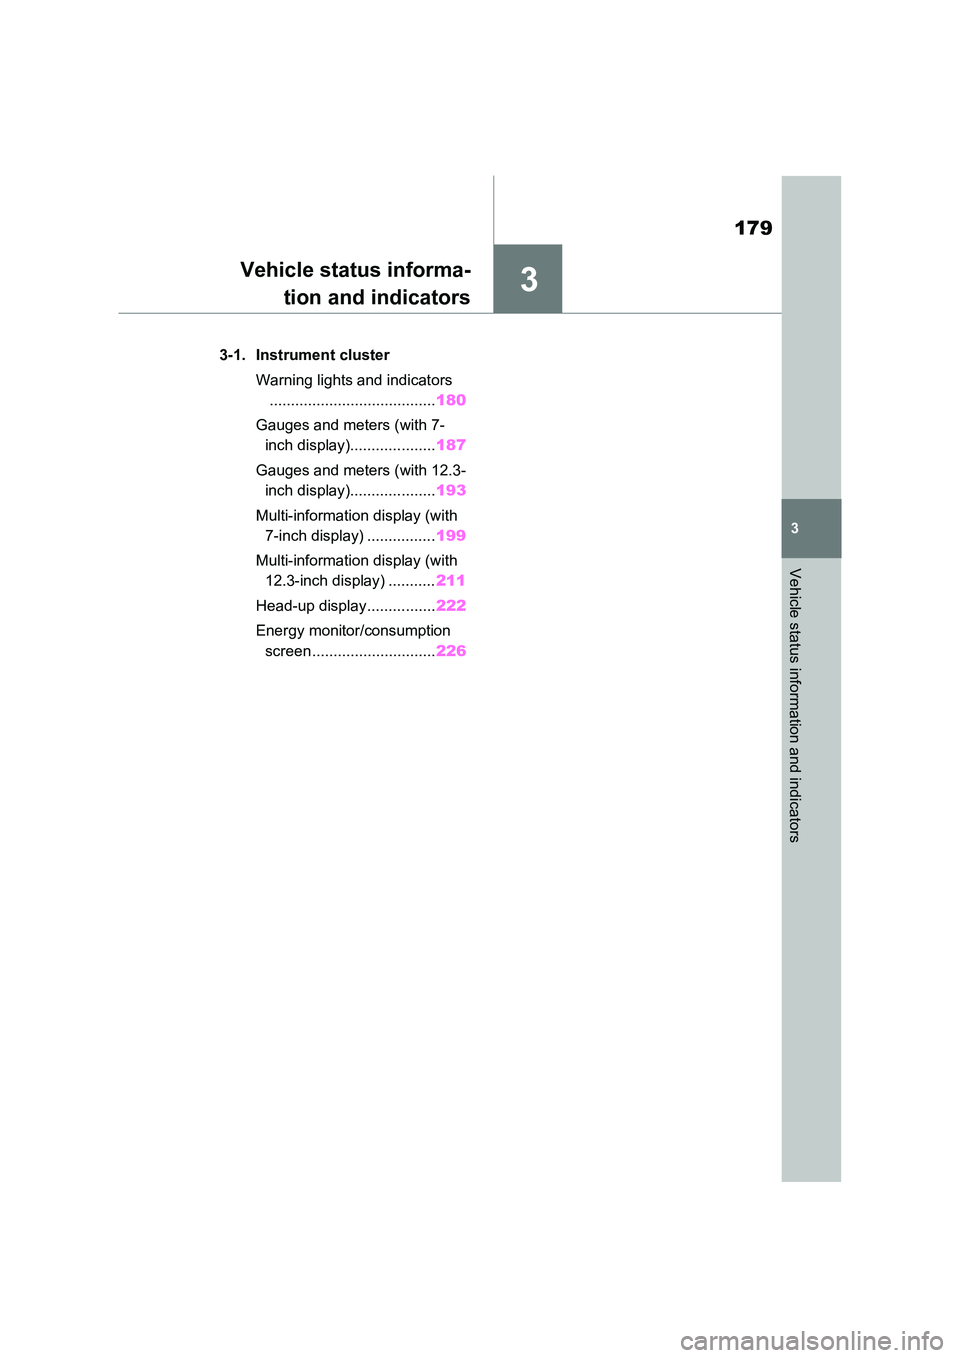
3-1. Instrument cluster
Warning lights and indicators
....................................... 180
Gauges and meters (with 7-
inch display).................... 187
Gauges and meters (with 12.3-
inch display).................... 193
Multi-information display (with
7-inch display) ................ 199
Multi-information display (with
12.3-inch display) ........... 211
Head-up display................ 222
Energy monitor/consumption
screen ............................. 226
Page 182 of 718
1803-1. Instrument cluster
3-1.In strument clu ste r
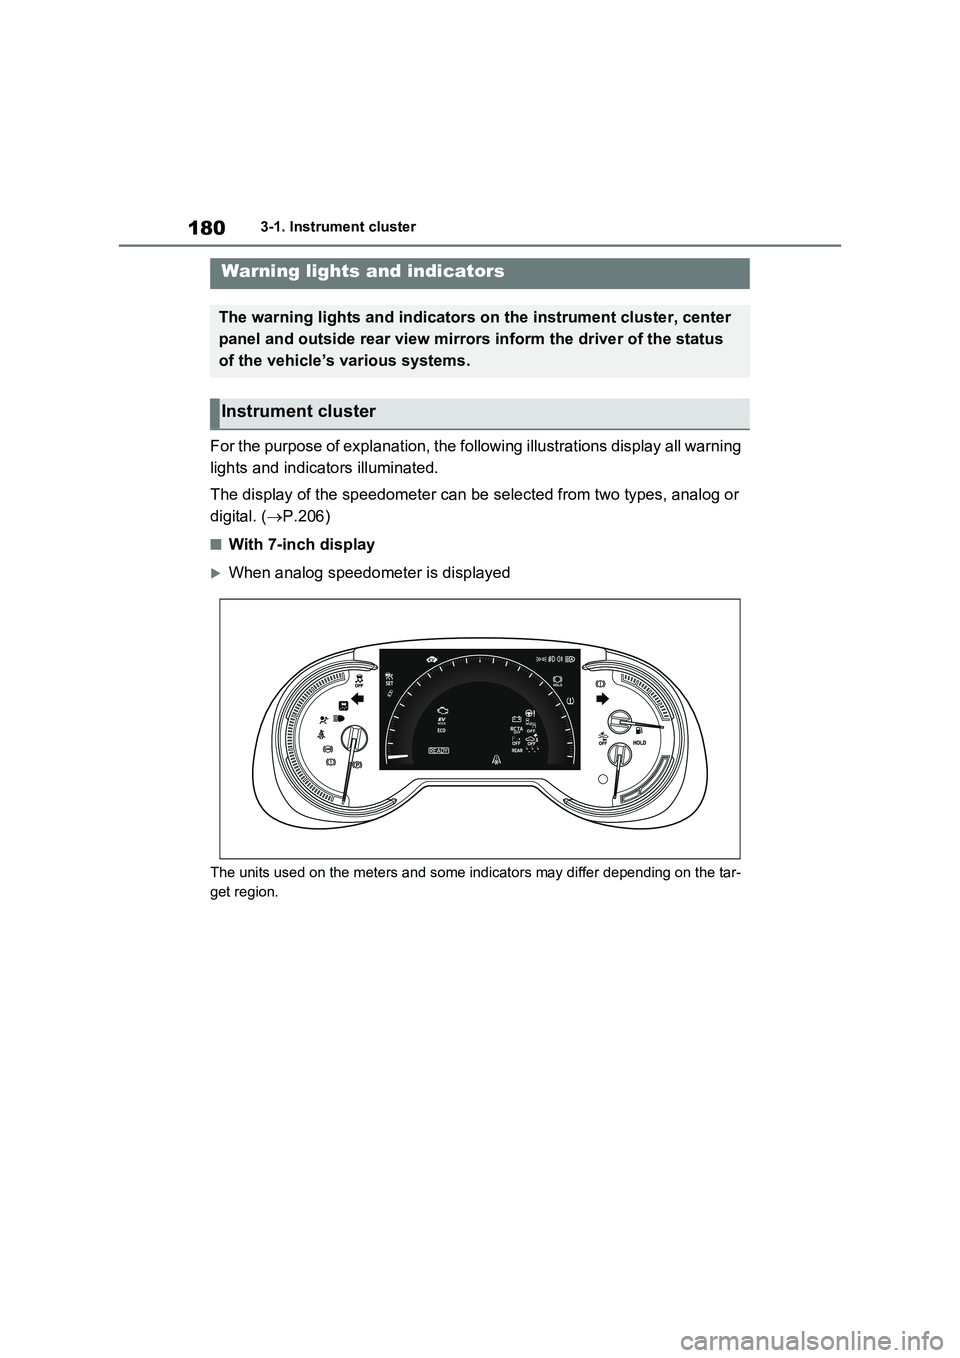
For the purpose of explanation, the following illustrations display all warning
lights and indicators illuminated.
The display of the speedometer can be selected from two types, analog or
digital. ( P.206)
■With 7-inch display
When analog speedometer is displayed
The units used on the meters and some indicators may differ depending on the tar-
get region.
Warning lights and indicators
The warning lights and indicators on the instrument cluster, center
panel and outside rear view mirrors inform the driver of the status
of the vehicle’s various systems.
Instrument cluster
Page 183 of 718
181
3 3-1. Instrument cluster
Vehicle status information and indicators
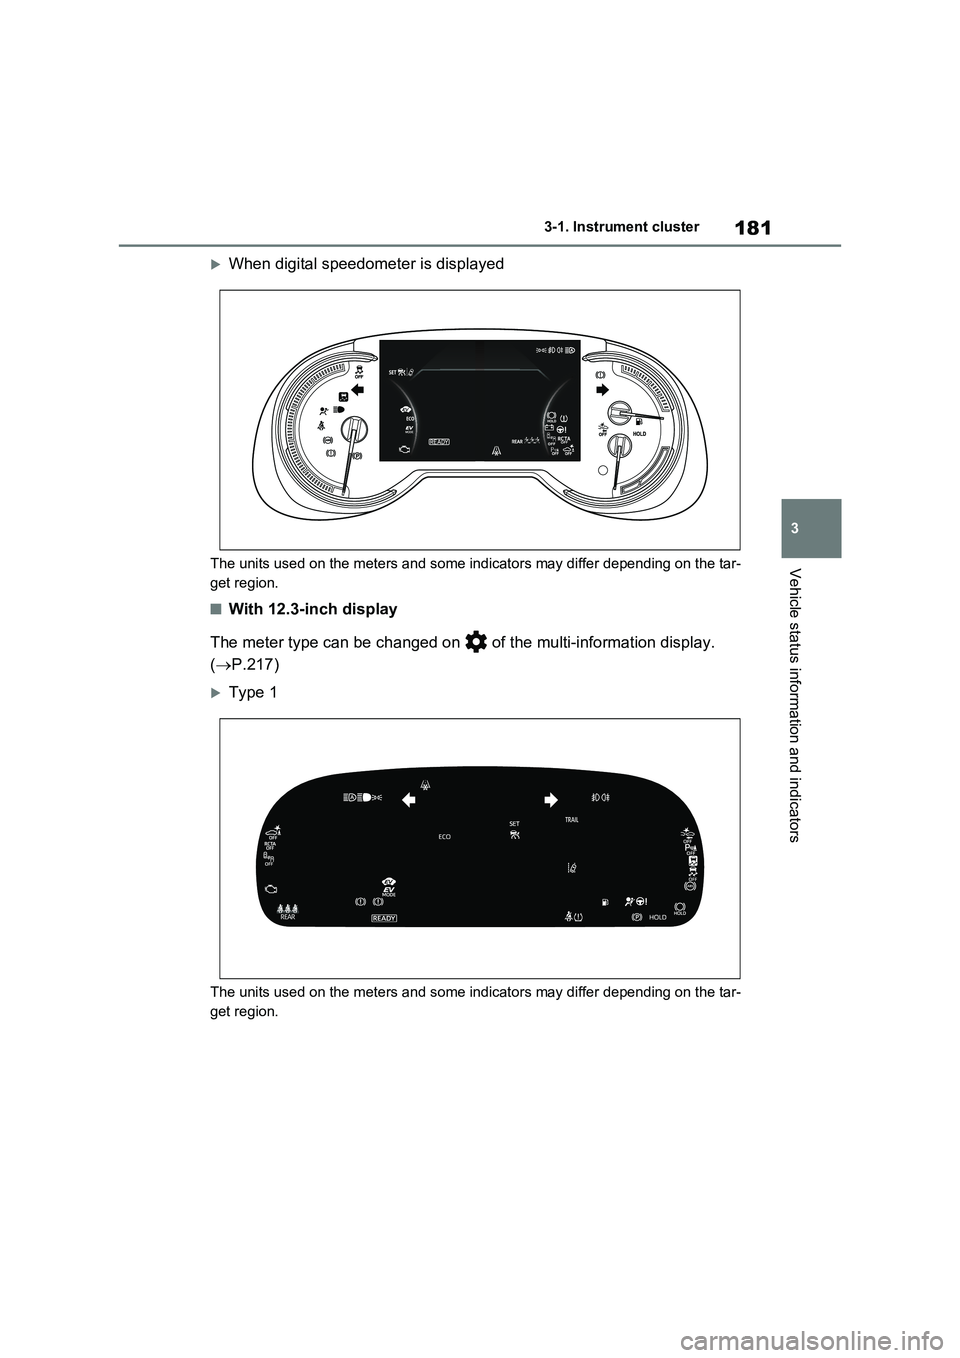
When digital speedometer is displayed
The units used on the meters and some indicators may differ depending on the tar-
get region.
■With 12.3-inch display
The meter type can be changed on of the multi-information display.
(P.217)
Type 1
The units used on the meters and some indicators may differ depending on the tar-
get region.
Page 186 of 718
1843-1. Instrument cluster
cle inspected by any authorized
Toyota retailer or Toyota authorized
repairer, or any reliable repairer.
*2: This light illuminates on the multi-
information display with a message.
*3: Toyota parking assist-sensor OFF
indicator turns on when the power
switch is turned to ON while the
Toyota parking assist-sensor func-
tion is on. It will turn off after a few
seconds.
*4: Vehicles with 12.3-inch display
The indicators inform the driver of
the operating state of the vehicle’s
various systems.
WARNING
■If a safety system warning light
does not come on
Should a safety system light such as the ABS and SRS warning light not
come on when you start the hybrid system, this could mean that these systems are not available to help pro-
tect you in an accident, which could result in death or serious injury. Have the vehicle inspected by any autho-
rized Toyota retailer or Toyota autho- rized repairer, or any reliable repairer immediately if this occurs.
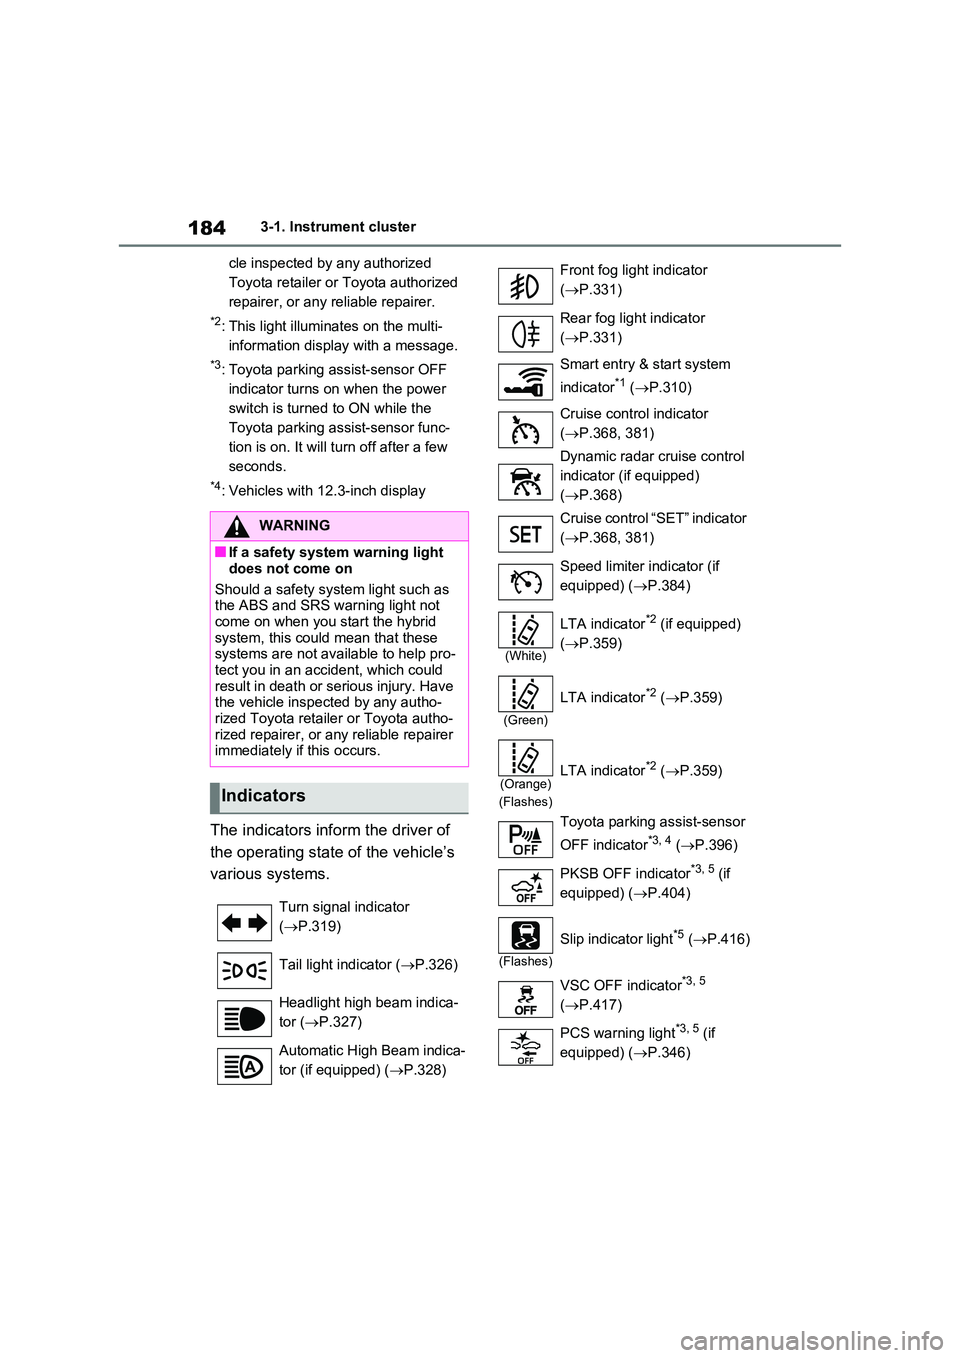
Indicators
Turn signal indicator
( P.319)
Tail light indicator ( P.326)
Headlight high beam indica-
tor ( P.327)
Automatic High Beam indica-
tor (if equipped) ( P.328)
Front fog light indicator
( P.331)
Rear fog light indicator
( P.331)
Smart entry & start system
indicator*1 ( P.310)
Cruise control indicator
( P.368, 381)
Dynamic radar cruise control
indicator (if equipped)
( P.368)
Cruise control “SET” indicator
( P.368, 381)
Speed limiter indicator (if
equipped) ( P.384)
(White)
LTA indicator*2 (if equipped)
( P.359)
(Green)
LTA indicator*2 (P.359)
(Orange)
(Flashes)
LTA indicator*2 ( P.359)
Toyota parking assist-sensor
OFF indicator*3, 4 ( P.396)
PKSB OFF indicator*3, 5 (if
equipped) ( P.404)
(Flashes)
Slip indicator light*5 (P.416)
VSC OFF indicator*3, 5
( P.417)
PCS warning light*3, 5 (if
equipped) ( P.346)