display TOYOTA RAV4 PLUG-IN HYBRID 2023 Service Manual
[x] Cancel search | Manufacturer: TOYOTA, Model Year: 2023, Model line: RAV4 PLUG-IN HYBRID, Model: TOYOTA RAV4 PLUG-IN HYBRID 2023Pages: 718, PDF Size: 167.55 MB
Page 156 of 718
1542-2. Charging
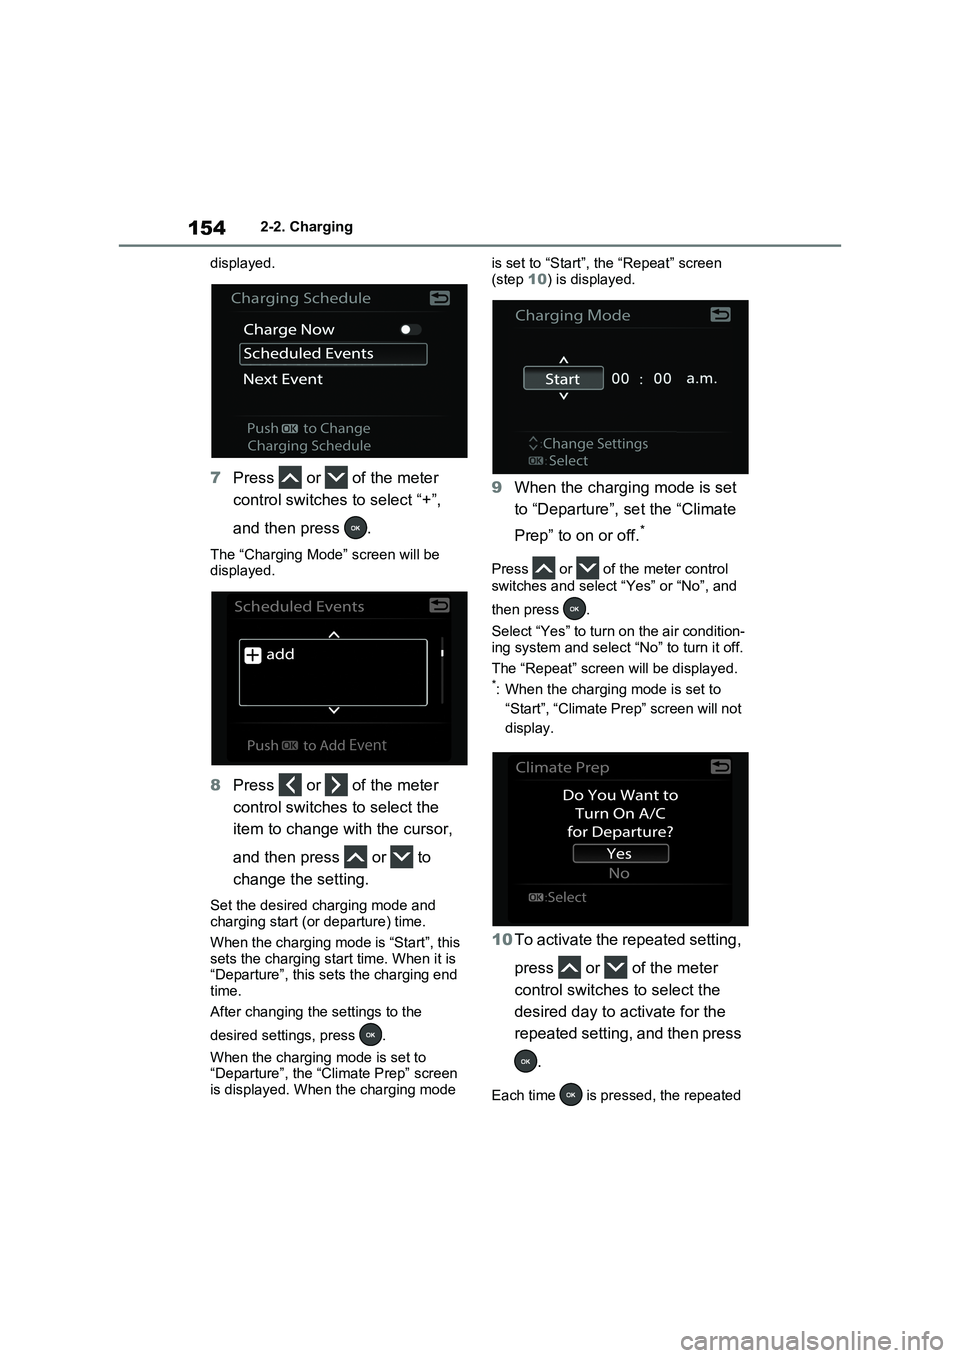
displayed.
7Press or of the meter
control switches to select “+”,
and then press .
The “Charging Mode” screen will be
displayed.
8Press or of the meter
control switches to select the
item to change with the cursor,
and then press or to
change the setting.
Set the desired charging mode and
charging start (or departure) time.
When the charging mode is “Start”, this
sets the charging start time. When it is
“Departure”, this sets the charging end
time.
After changing the settings to the
desired settings, press .
When the charging mode is set to
“Departure”, the “Climate Prep” screen
is displayed. When the charging mode is set to “Start”, the “Repeat” screen
(step 10) is displayed.
9When the charging mode is set
to “Departure”, set the “Climate
Prep” to on or off.
*
Press or of the meter control
switches and select “Yes” or “No”, and
then press .
Select “Yes” to turn on the air condition-
ing system and select “No” to turn it off.
The “Repeat” screen will be displayed.
*: When the charging mode is set to
“Start”, “Climate Prep” screen will not
display.
10To activate the repeated setting,
press or of the meter
control switches to select the
desired day to activate for the
repeated setting, and then press
.
Each time is pressed, the repeated
Page 157 of 718
155
2 2-2. Charging
Plug-in hybrid system
setting switches between on and off.
When set to on, the charging schedule
is repeated on that day. It is possible to
set more than one day to on.
If no days are set to on, charging is only
carried out once according to the
charging schedule for the next 24
hours.
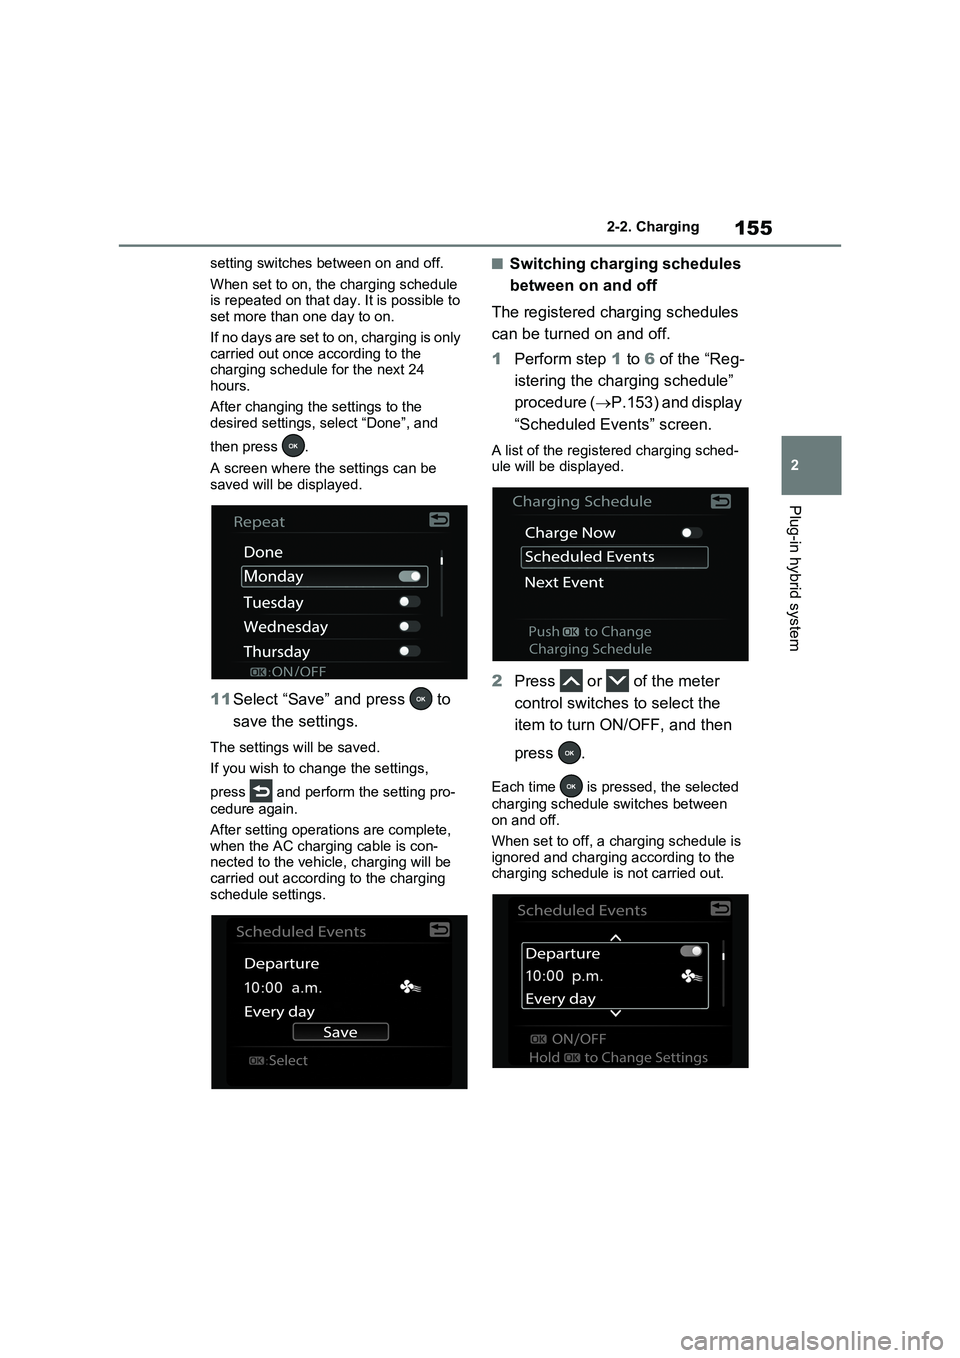
After changing the settings to the
desired settings, select “Done”, and
then press .
A screen where the settings can be
saved will be displayed.
11Select “Save” and press to
save the settings.
The settings will be saved.
If you wish to change the settings,
press and perform the setting pro-
cedure again.
After setting operations are complete,
when the AC charging cable is con-
nected to the vehicle, charging will be
carried out according to the charging
schedule settings.
■Switching charging schedules
between on and off
The registered charging schedules
can be turned on and off.
1Perform step 1 to 6 of the “Reg-
istering the charging schedule”
procedure (P.153) and display
“Scheduled Events” screen.
A list of the registered charging sched-
ule will be displayed.
2Press or of the meter
control switches to select the
item to turn ON/OFF, and then
press .
Each time is pressed, the selected
charging schedule switches between
on and off.
When set to off, a charging schedule is
ignored and charging according to the
charging schedule is not carried out.
Page 158 of 718
1562-2. Charging
■Changing the registered
charging schedules
The registered charging schedules
can be modified or deleted.
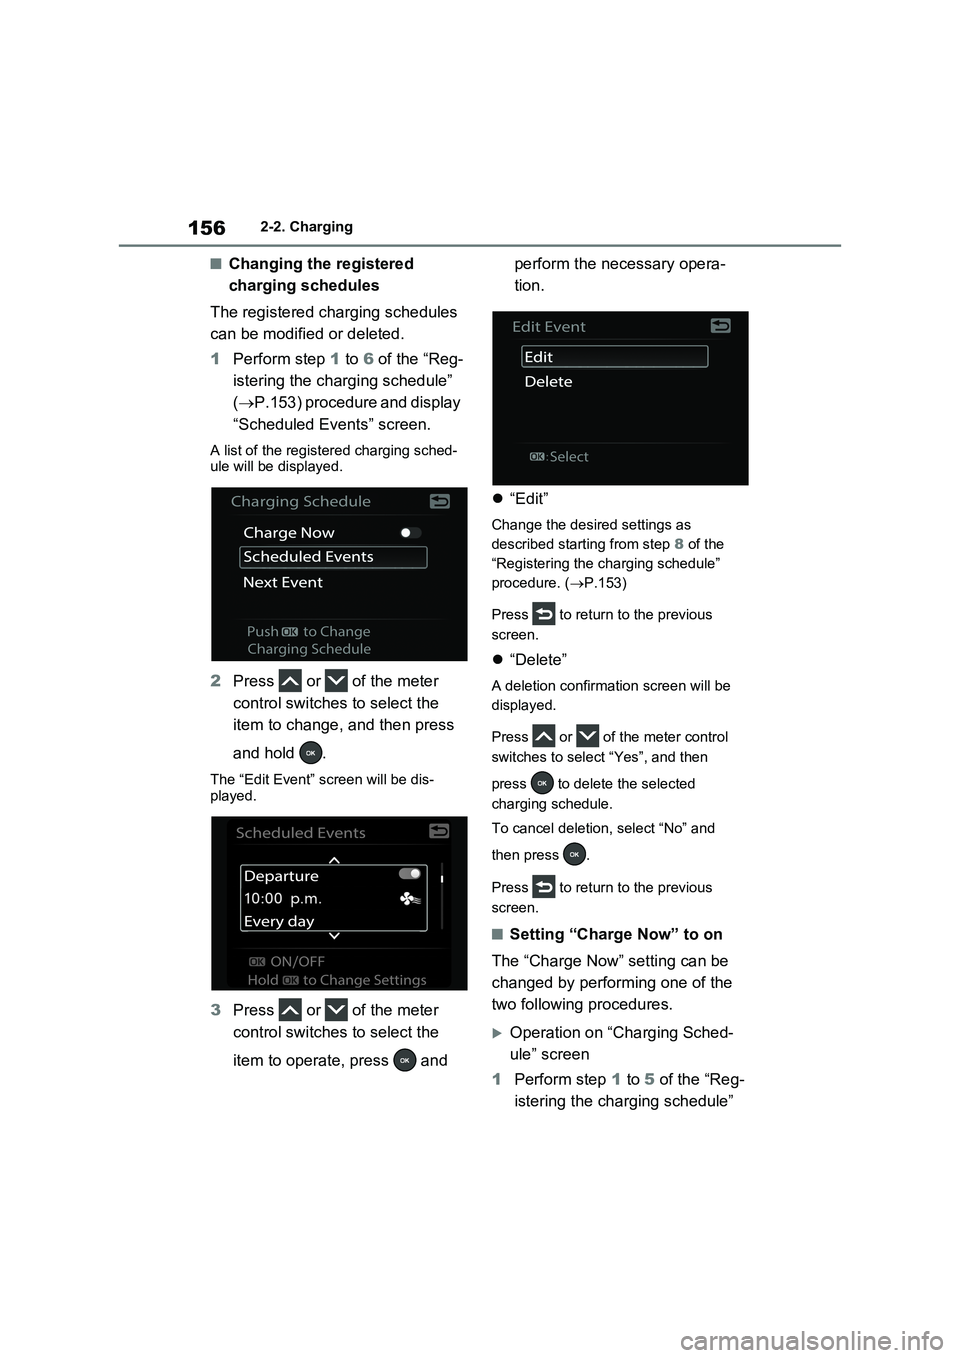
1Perform step 1 to 6 of the “Reg-
istering the charging schedule”
(P.153) procedure and display
“Scheduled Events” screen.
A list of the registered charging sched-
ule will be displayed.
2Press or of the meter
control switches to select the
item to change, and then press
and hold .
The “Edit Event” screen will be dis-
played.
3Press or of the meter
control switches to select the
item to operate, press and perform the necessary opera-
tion.
“Edit”
Change the desired settings as
described starting from step 8 of the
“Registering the charging schedule”
procedure. (P.153)
Press to return to the previous
screen.
“Delete”
A deletion confirmation screen will be
displayed.
Press or of the meter control
switches to select “Yes”, and then
press to delete the selected
charging schedule.
To cancel deletion, select “No” and
then press .
Press to return to the previous
screen.
■Setting “Charge Now” to on
The “Charge Now” setting can be
changed by performing one of the
two following procedures.
Operation on “Charging Sched-
ule” screen
1Perform step 1 to 5 of the “Reg-
istering the charging schedule”
Page 159 of 718
157
2 2-2. Charging
Plug-in hybrid system
procedure (P.153) and display
“Charging Schedule” screen.
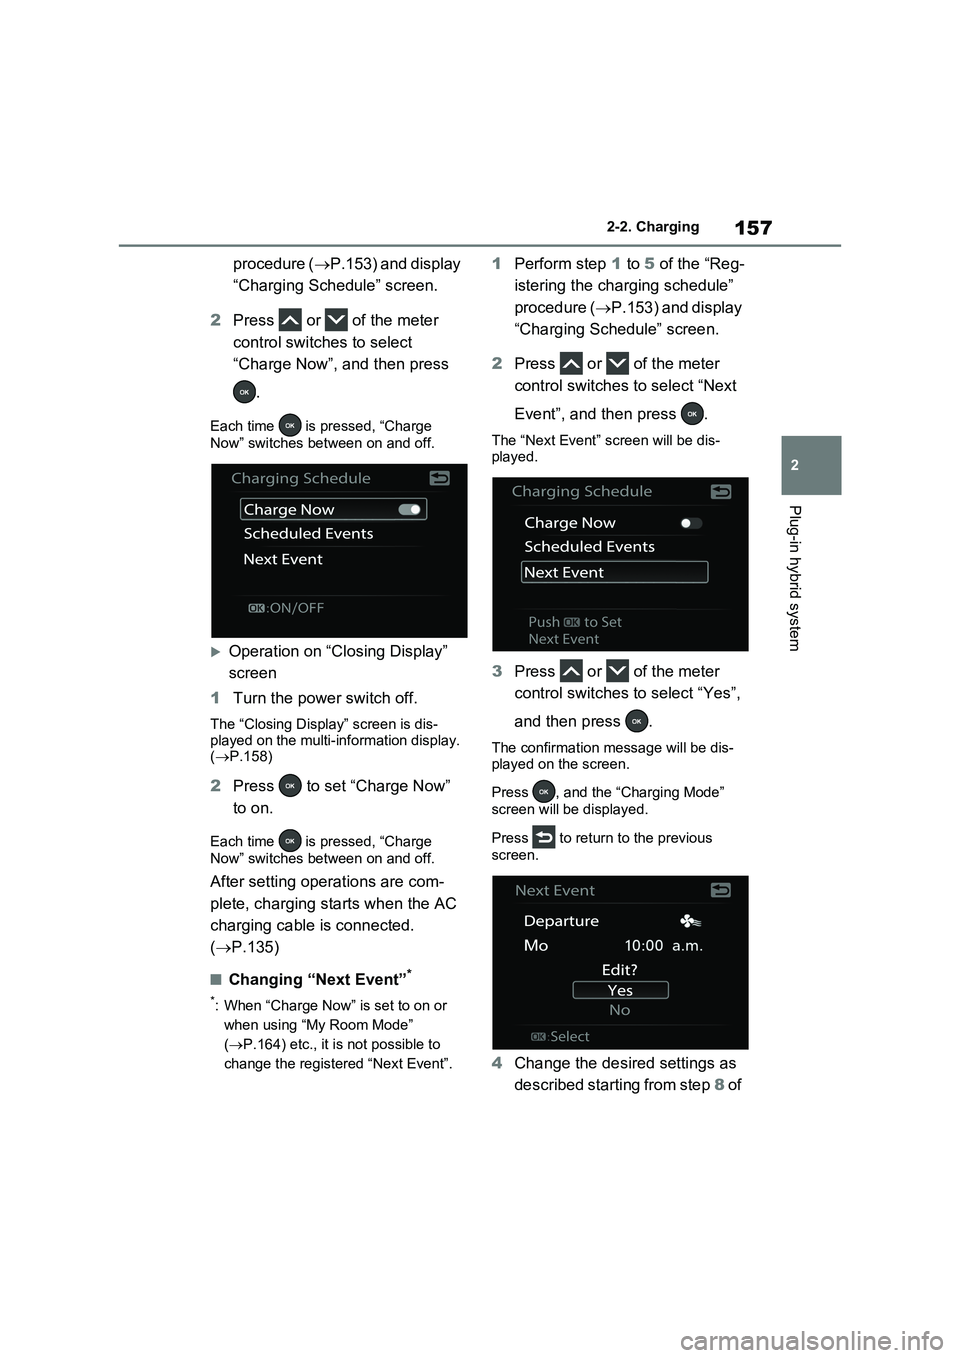
2Press or of the meter
control switches to select
“Charge Now”, and then press
.
Each time is pressed, “Charge
Now” switches between on and off.
Operation on “Closing Display”
screen
1Turn the power switch off.
The “Closing Display” screen is dis-
played on the multi-information display.
(P.158)
2Press to set “Charge Now”
to on.
Each time is pressed, “Charge
Now” switches between on and off.
After setting operations are com-
plete, charging starts when the AC
charging cable is connected.
(P.135)
■Changing “Next Event”*
*: When “Charge Now” is set to on or
when using “My Room Mode”
(P.164) etc., it is not possible to
change the registered “Next Event”.
1Perform step 1 to 5 of the “Reg-
istering the charging schedule”
procedure (P.153) and display
“Charging Schedule” screen.
2Press or of the meter
control switches to select “Next
Event”, and then press .
The “Next Event” screen will be dis-
played.
3Press or of the meter
control switches to select “Yes”,
and then press .
The confirmation message will be dis-
played on the screen.
Press , and the “Charging Mode”
screen will be displayed.
Press to return to the previous
screen.
4Change the desired settings as
described starting from step 8 of
Page 160 of 718
1582-2. Charging
the “Registering the charging
schedule” procedure. ( P.153)
Press to return to the previous
screen.
■When charging schedule setting
operations are canceled
When the vehicle is in the following con- ditions, charging schedule setting oper-
ations are canceled.
●The power switch is operated before
the settings are confirmed
●The vehicle starts off
●A display with a higher priority than that of the charging schedule setting
is shown
■“Next Event”
After charging completes, the “Next Event” displayed on the multi-informa-
tion display will not change until the AC charging cable is removed, even after charging is performed according to the
“Next Event” schedule.
■To return to original setting after changing “Next Event” setting
Turning the setting of “Charge Now” on
and then off can return the setting of “Next Event” to its original setting.
■When “Next Event” is changed while charging
●When the charging mode is “Depar-ture”, the current charging is inter-
rupted or continued depending on the remaining time until the charging is completed.
●When the charging mode is “Start”,
the current charging is interrupted, the next charging will start at the set time.
■When the power switch is turned off
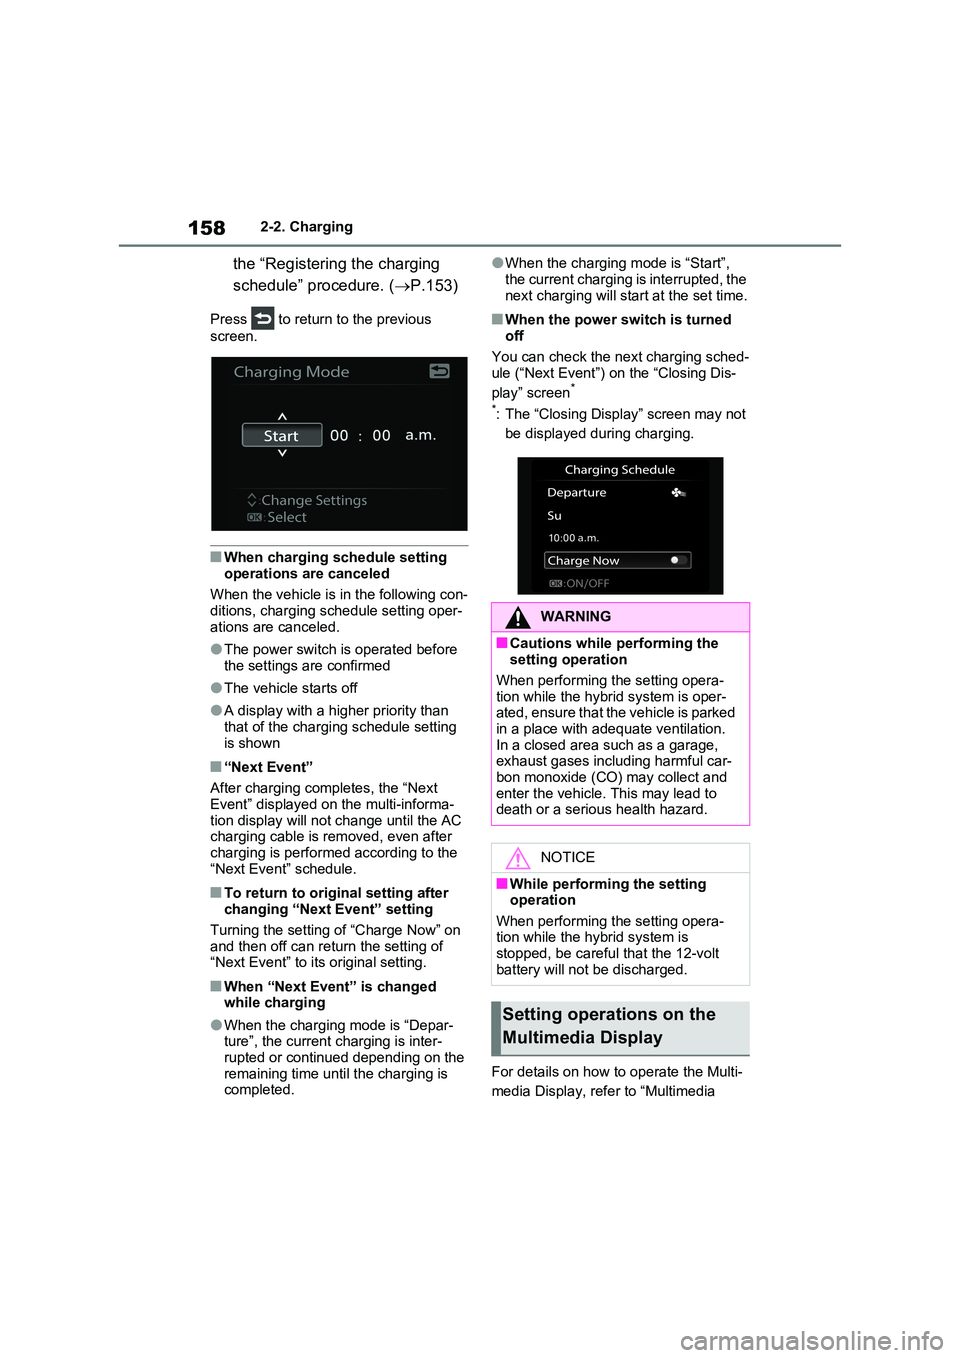
You can check the next charging sched- ule (“Next Event”) on the “Closing Dis-
play” screen*
*: The “Closing Display” screen may not
be displayed during charging.
For details on how to operate the Multi-
media Display, refer to “Multimedia
WARNING
■Cautions while performing the setting operation
When performing the setting opera-
tion while the hybrid system is oper- ated, ensure that the vehicle is parked in a place with adequate ventilation.
In a closed area such as a garage, exhaust gases including harmful car-bon monoxide (CO) may collect and
enter the vehicle. This may lead to death or a serious health hazard.
NOTICE
■While performing the setting operation
When performing the setting opera- tion while the hybrid system is stopped, be careful that the 12-volt
battery will not be discharged.
Setting operations on the
Multimedia Display
Page 161 of 718
159
2 2-2. Charging
Plug-in hybrid system
owner’s manual”.
Setting operations related to the
charging schedule are performed
on the “Charging schedule” screen.
The illustrations used in the text
may differ from the images that are
actually displayed on the Multime-
dia Display.
■Displaying the “Charging
schedule” screen
1Turn the power switch to ON
and display the menu screen.
Check that the “IGNITION ON” is dis-
played on the multi-information display.When the power switch is in ACC,
charging schedule setting operation
can not be performed.
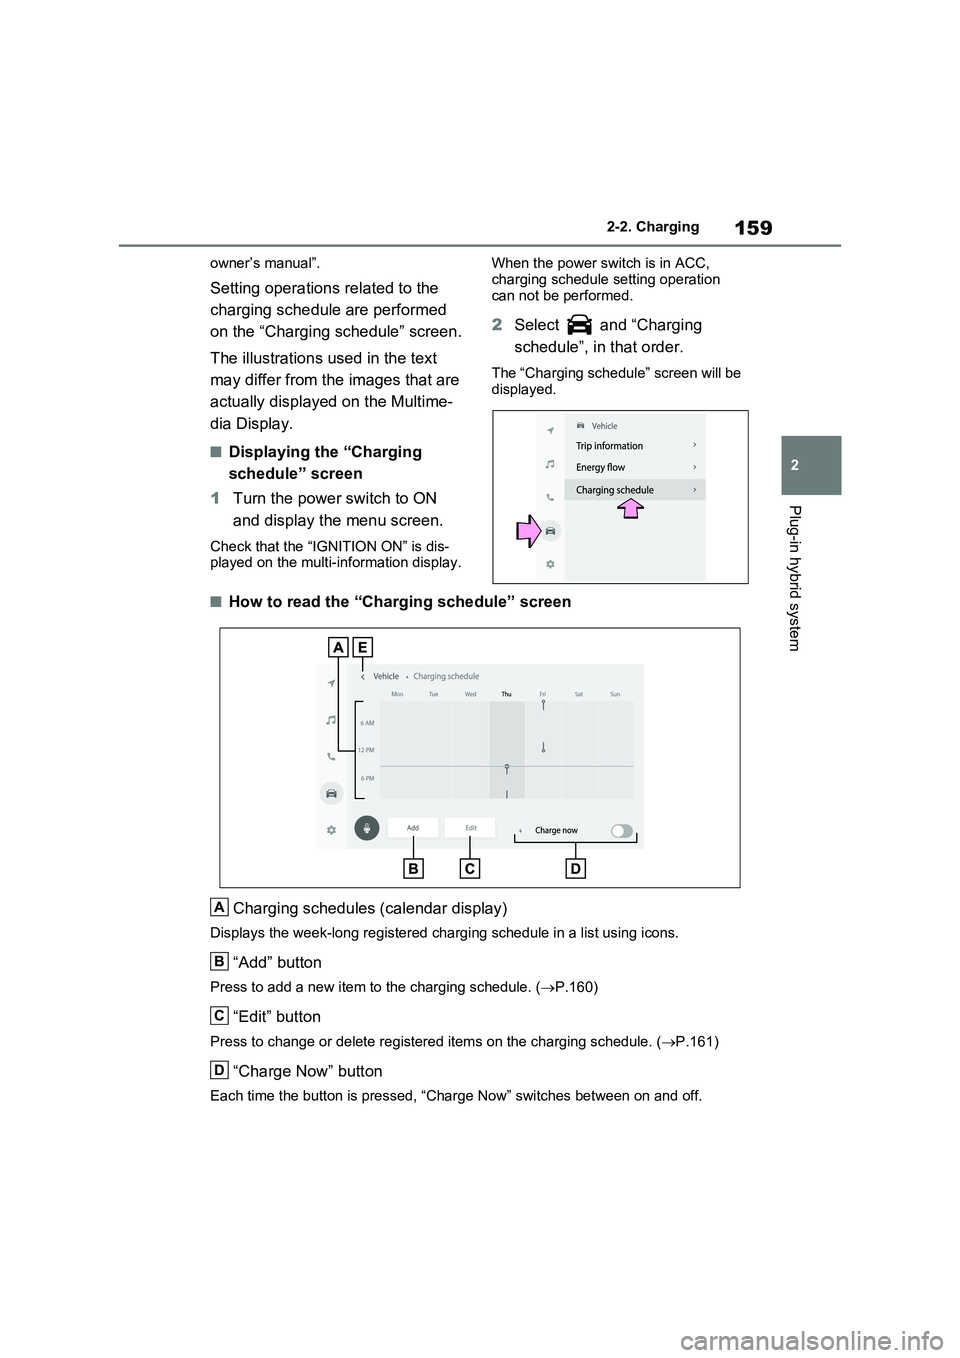
2Select and “Charging
schedule”, in that order.
The “Charging schedule” screen will be
displayed.
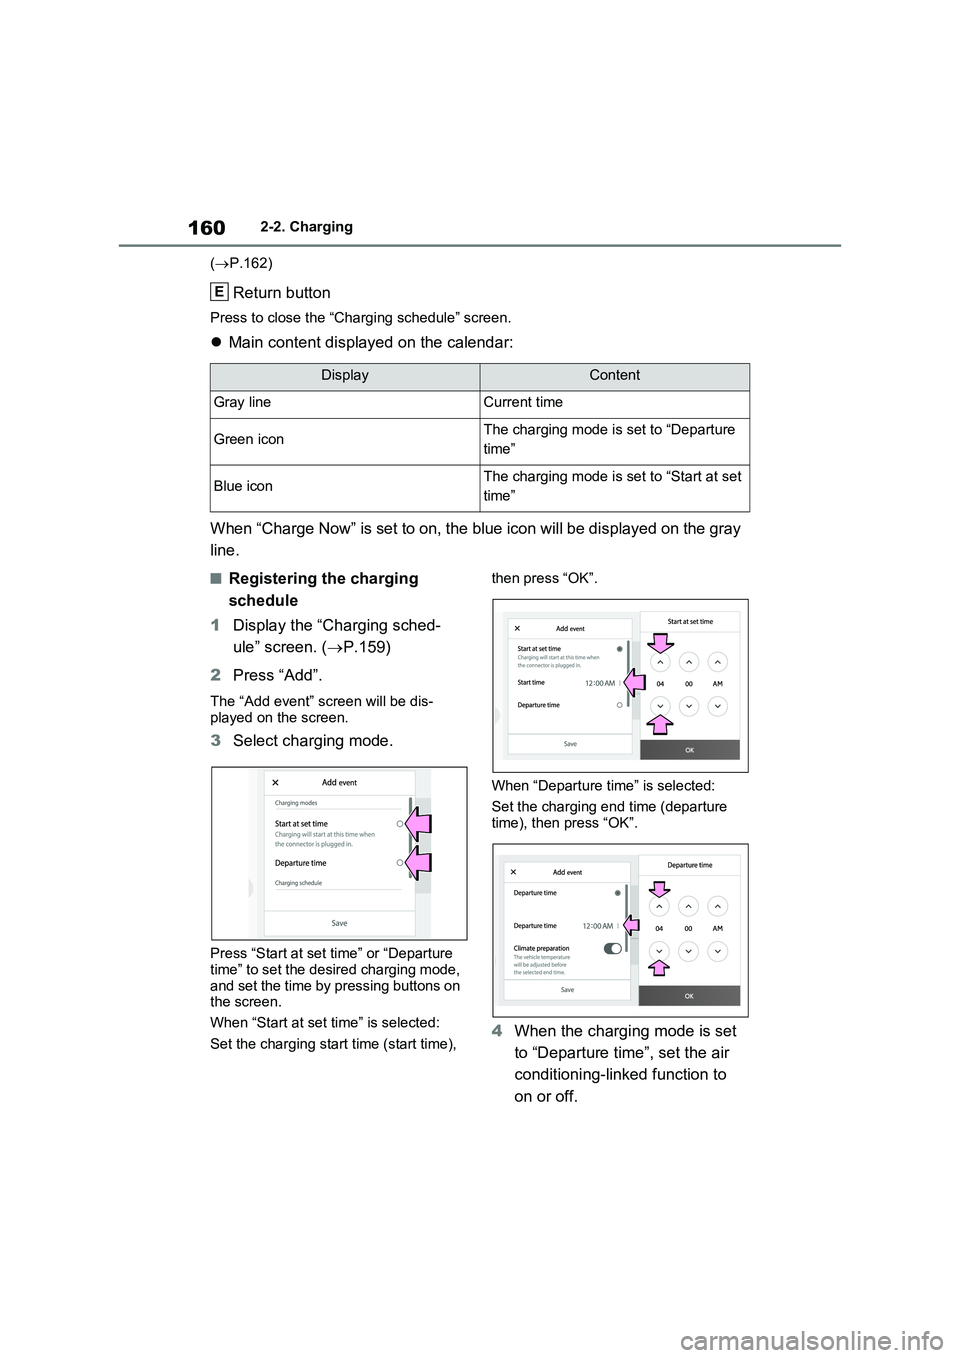
■How to read the “Charging schedule” screen
Charging schedules (calendar display)
Displays the week-long registered charging schedule in a list using icons.
“Add” button
Press to add a new item to the charging schedule. (P.160)
“Edit” button
Press to change or delete registered items on the charging schedule. (P.161)
“Charge Now” button
Each time the button is pressed, “Charge Now” switches between on and off.
A
B
C
D
Page 162 of 718
1602-2. Charging
(P.162)
Return button
Press to close the “Charging schedule” screen.
Main content displayed on the calendar:
When “Charge Now” is set to on, the blue icon will be displayed on the gray
line.
■Registering the charging
schedule
1Display the “Charging sched-
ule” screen. (P.159)
2Press “Add”.
The “Add event” screen will be dis-
played on the screen.
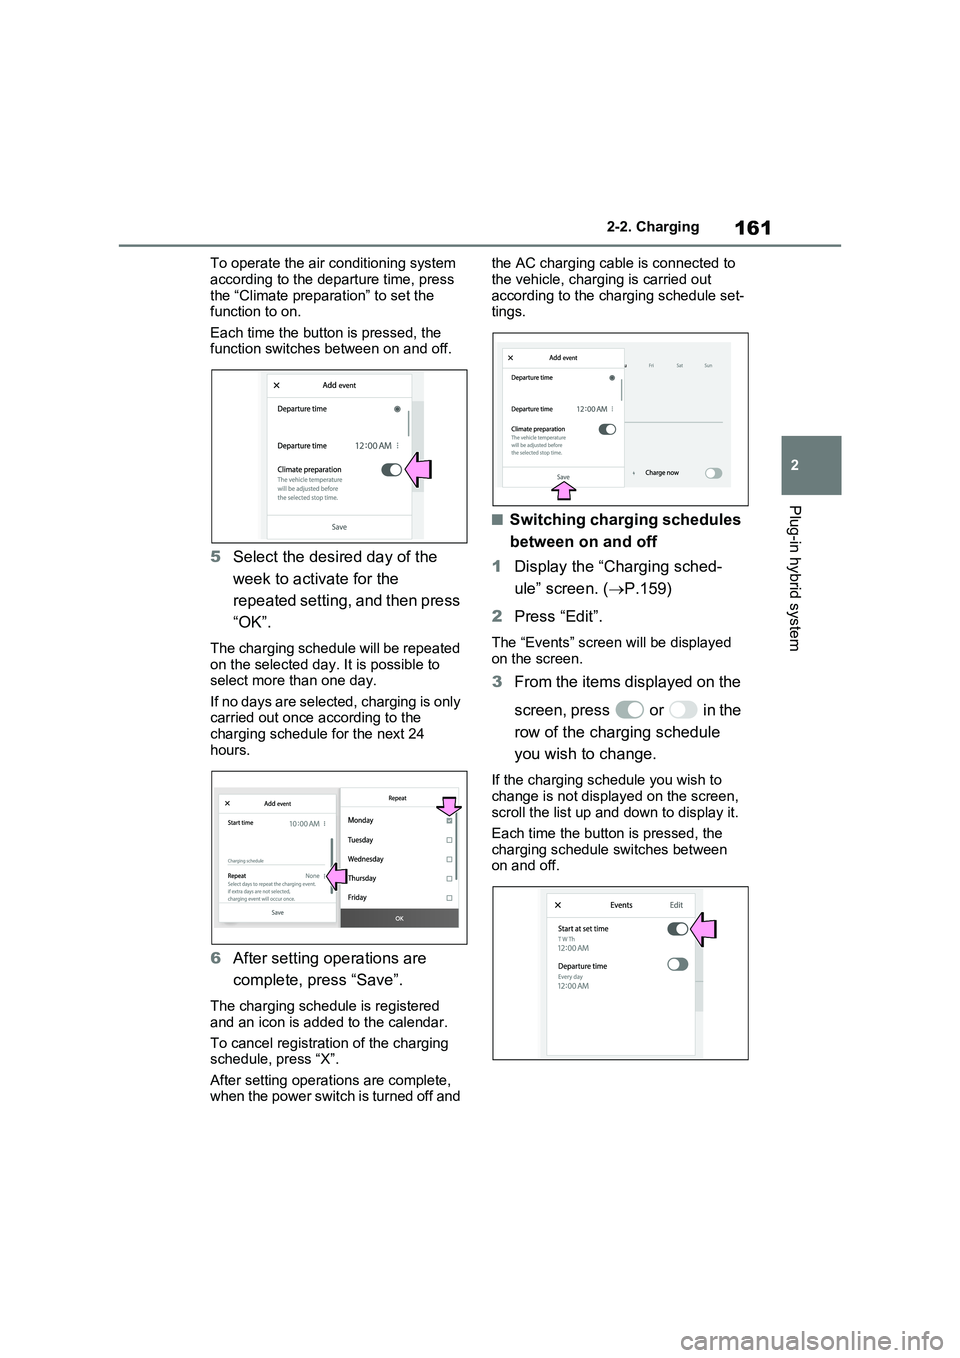
3Select charging mode.
Press “Start at set time” or “Departure
time” to set the desired charging mode,
and set the time by pressing buttons on
the screen.
When “Start at set time” is selected:
Set the charging start time (start time), then press “OK”.
When “Departure time” is selected:
Set the charging end time (departure
time), then press “OK”.
4When the charging mode is set
to “Departure time”, set the air
conditioning-linked function to
on or off.
DisplayContent
Gray lineCurrent time
Green iconThe charging mode is set to “Departure
time”
Blue iconThe charging mode is set to “Start at set
time”
E
Page 163 of 718
161
2 2-2. Charging
Plug-in hybrid system
To operate the air conditioning system
according to the departure time, press
the “Climate preparation” to set the
function to on.
Each time the button is pressed, the
function switches between on and off.
5Select the desired day of the
week to activate for the
repeated setting, and then press
“OK”.
The charging schedule will be repeated
on the selected day. It is possible to
select more than one day.
If no days are selected, charging is only
carried out once according to the
charging schedule for the next 24
hours.
6After setting operations are
complete, press “Save”.
The charging schedule is registered
and an icon is added to the calendar.
To cancel registration of the charging
schedule, press “X”.
After setting operations are complete,
when the power switch is turned off and the AC charging cable is connected to
the vehicle, charging is carried out
according to the charging schedule set-
tings.
■Switching charging schedules
between on and off
1Display the “Charging sched-
ule” screen. (P.159)
2Press “Edit”.
The “Events” screen will be displayed
on the screen.
3From the items displayed on the
screen, press or in the
row of the charging schedule
you wish to change.
If the charging schedule you wish to
change is not displayed on the screen,
scroll the list up and down to display it.
Each time the button is pressed, the
charging schedule switches between
on and off.
Page 164 of 718
1622-2. Charging
■Changing the registered
charging schedules
1Display the “Charging sched-
ule” screen. (P.159)
2Press “Edit”.
The “Events” screen will be displayed
on the screen.
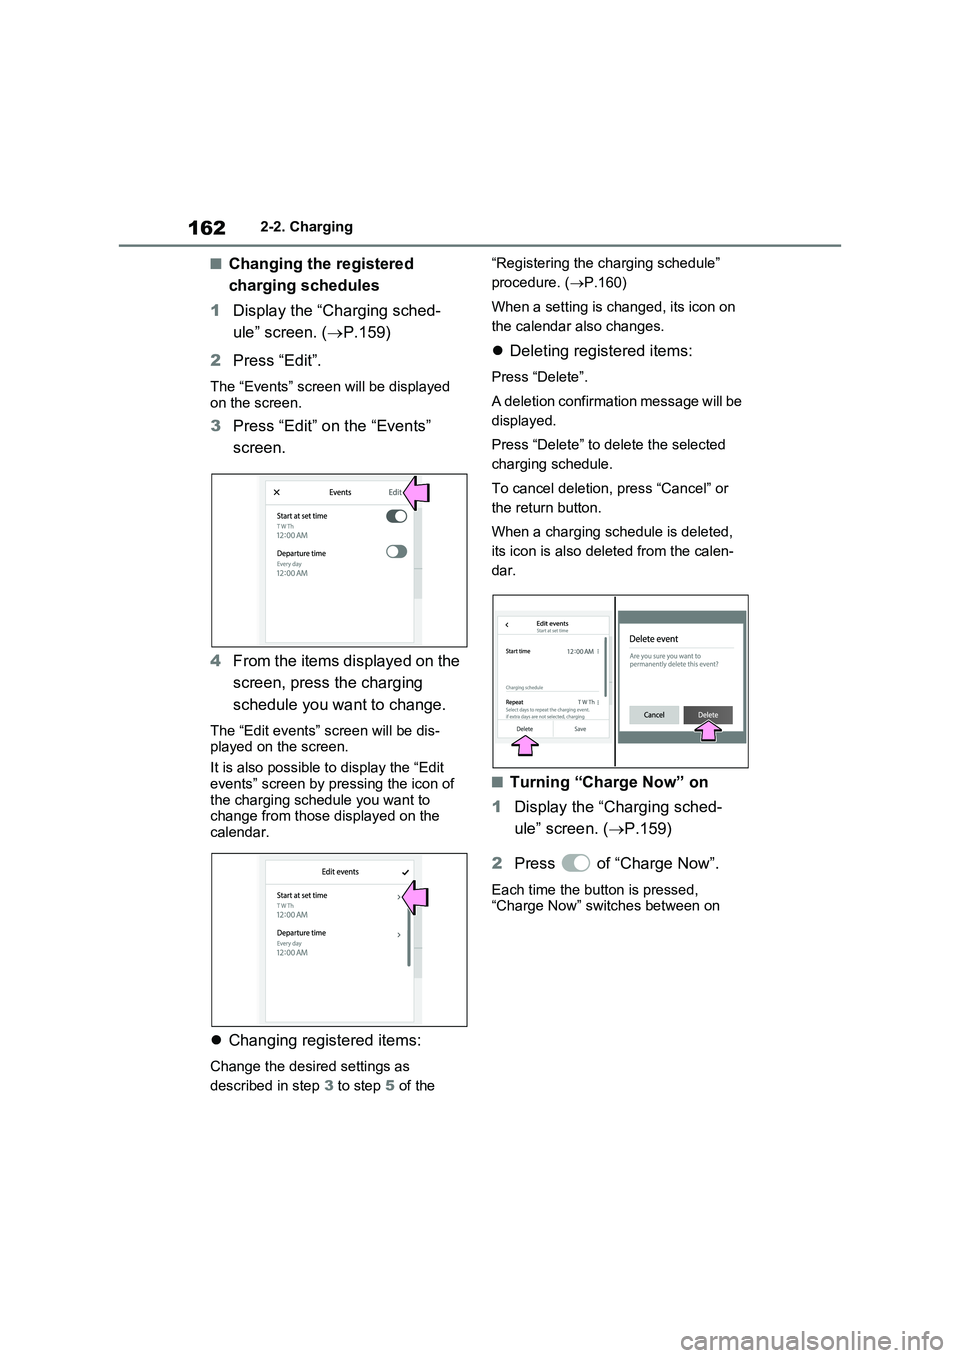
3Press “Edit” on the “Events”
screen.
4From the items displayed on the
screen, press the charging
schedule you want to change.
The “Edit events” screen will be dis-
played on the screen.
It is also possible to display the “Edit
events” screen by pressing the icon of
the charging schedule you want to
change from those displayed on the
calendar.
Changing registered items:
Change the desired settings as
described in step 3 to step 5 of the “Registering the charging schedule”
procedure. (P.160)
When a setting is changed, its icon on
the calendar also changes.
Deleting registered items:
Press “Delete”.
A deletion confirmation message will be
displayed.
Press “Delete” to delete the selected
charging schedule.
To cancel deletion, press “Cancel” or
the return button.
When a charging schedule is deleted,
its icon is also deleted from the calen-
dar.
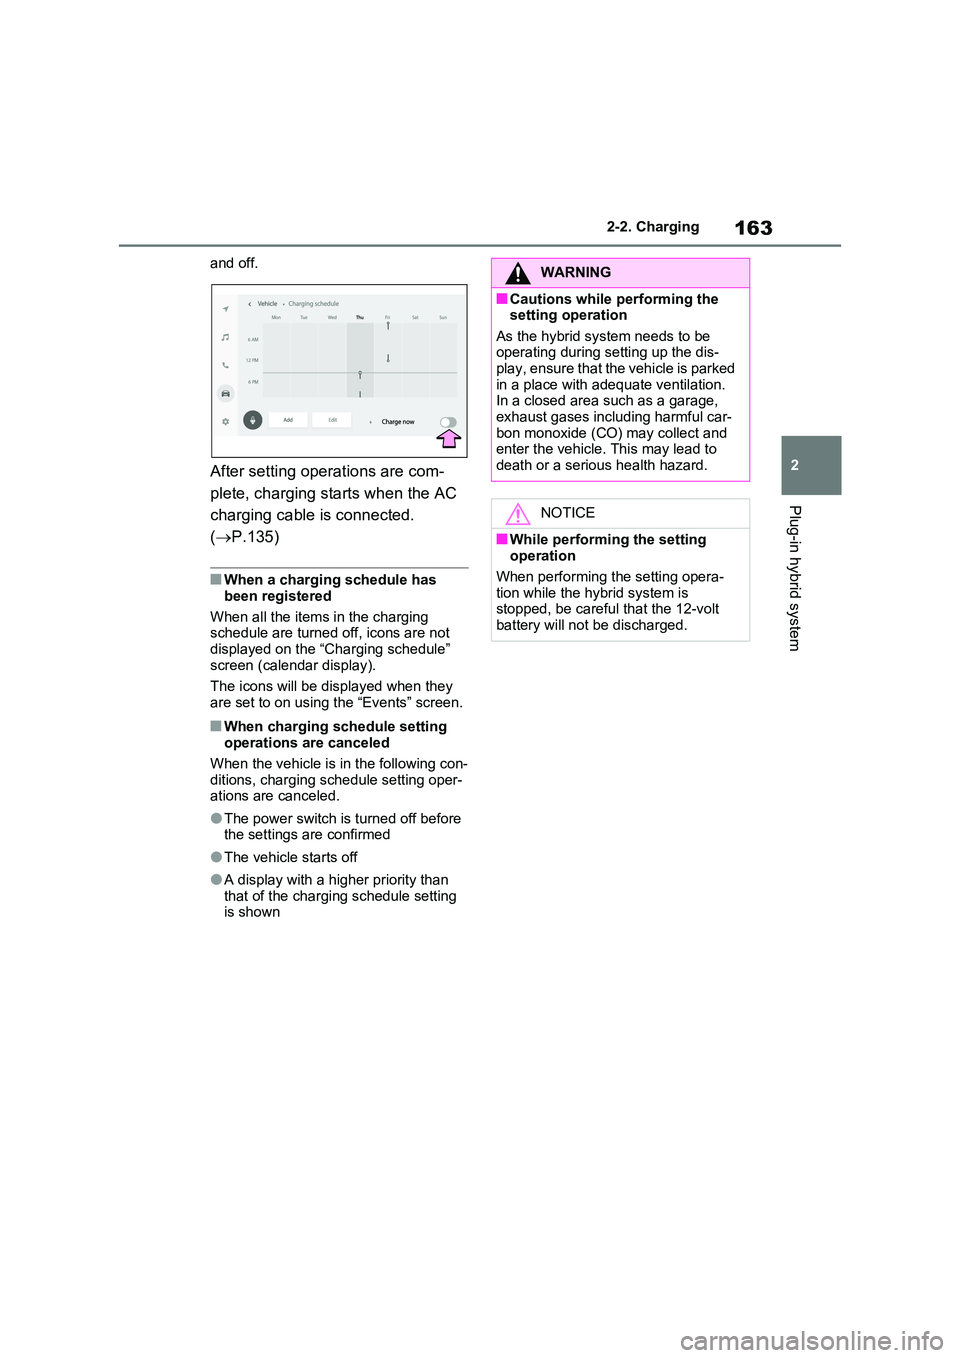
■Turning “Charge Now” on
1Display the “Charging sched-
ule” screen. (P.159)
2Press of “Charge Now”.
Each time the button is pressed,
“Charge Now” switches between on
Page 165 of 718
163
2
2-2. Charging
Plug-in hybrid system
and off.
After setting operations are com-
plete, charging starts when the AC
charging cable is connected.
( P.135)
■When a charging schedule has
been registered
When all the items in the charging schedule are turned off, icons are not
displayed on the “Charging schedule” screen (calendar display).
The icons will be displayed when they
are set to on using the “Events” screen.
■When charging schedule setting operations are canceled
When the vehicle is in the following con-
ditions, charging schedule setting oper- ations are canceled.
●The power switch is turned off before the settings are confirmed
●The vehicle starts off
●A display with a higher priority than
that of the charging schedule setting is shown
WARNING
■Cautions while performing the setting operation
As the hybrid system needs to be operating during setting up the dis-play, ensure that the vehicle is parked
in a place with adequate ventilation. In a closed area such as a garage, exhaust gases including harmful car-
bon monoxide (CO) may collect and enter the vehicle. This may lead to death or a serious health hazard.
NOTICE
■While performing the setting operation
When performing the setting opera- tion while the hybrid system is stopped, be careful that the 12-volt
battery will not be discharged.