mirror TOYOTA RAV4 PLUG-IN HYBRID 2023 Service Manual
[x] Cancel search | Manufacturer: TOYOTA, Model Year: 2023, Model line: RAV4 PLUG-IN HYBRID, Model: TOYOTA RAV4 PLUG-IN HYBRID 2023Pages: 718, PDF Size: 167.55 MB
Page 455 of 718
453
6
6-4. Using the other interior features
Interior features
6-4.Using the o ther interio r fea tures
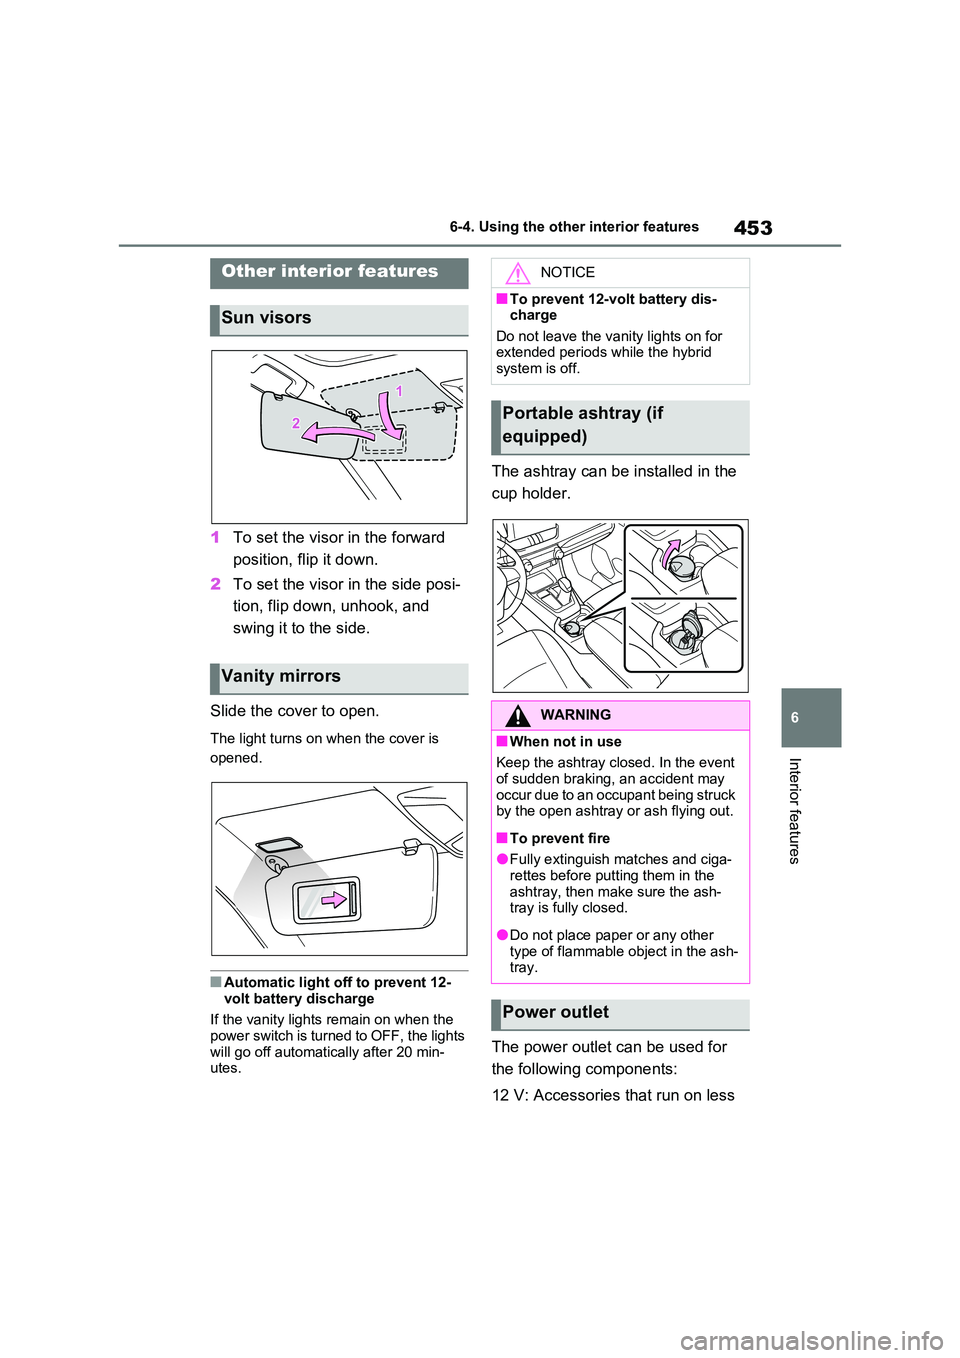
1 To set the visor in the forward
position, flip it down.
2 To set the visor in the side posi-
tion, flip down, unhook, and
swing it to the side.
Slide the cover to open.
The light turns on when the cover is
opened.
■Automatic light off to prevent 12-
volt battery discharge
If the vanity lights remain on when the power switch is turned to OFF, the lights
will go off automatically after 20 min- utes.
The ashtray can be installed in the
cup holder.
The power outlet can be used for
the following components:
12 V: Accessories that run on less
Other interior features
Sun visors
Vanity mirrors
NOTICE
■To prevent 12-volt battery dis- charge
Do not leave the vanity lights on for extended periods while the hybrid system is off.
Portable ashtray (if
equipped)
WARNING
■When not in use
Keep the ashtray closed. In the event of sudden braking, an accident may
occur due to an occupant being struck by the open ashtray or ash flying out.
■To prevent fire
●Fully extinguish matches and ciga-rettes before putting them in the
ashtray, then make sure the ash- tray is fully closed.
●Do not place paper or any other type of flammable object in the ash-tray.
Power outlet
Page 468 of 718
4667-1. Maintenance and care
7-1.Mainte nance a nd care
Working from top to bottom, lib-
erally apply water to the vehicle
body, wheel wells and underside
of the vehicle to remove any dirt
and dust.
Wash the vehicle body using a
sponge or soft cloth, such as a
chamois.
For hard-to-remove marks, use
car wash soap and rinse thor-
oughly with water.
Wipe away any water.
Wax the vehicle when the water-
proof coating deteriorates.
If water does not bead on a clean sur-
face, apply wax when the vehicle body
is cool.
■Before car washes
Check that the fuel filler door and
charging port lid on your vehicle are
closed properly.
■Automatic car washes
●Before washing the vehicle:
• Fold the mirrors
• Turn off the power back door (if
equipped)
Start washing from the front of the vehi-
cle. Make sure to extend the mirrors
before driving.
●Brushes used in automatic car
washes may scratch the vehicle sur-
face, parts (wheel, etc.) and harm
your vehicle’s paint.
●Rear spoiler may not be washable in
some automatic car washes. There
may also be an increased risk of dam-
age to vehicle.
■High pressure car washes
As water may enter the cabin, do not
bring the nozzle tip near the gaps
around the doors or perimeter of the
windows, or spray these areas continu-
ously.
■Note for a smart entry & start sys-
tem
If the door handle becomes wet while
the electronic key is within the effective
range, the door may lock and unlock
repeatedly. In that case, follow the fol-
lowing correction procedures to wash
the vehicle:
●Place the key in a position 2 m (6 ft.)
or more separate from the vehicle
while the vehicle is being washed.
(Take care to ensure that the key is
not stolen.)
●Set the electronic key to battery-sav-
ing mode to disable the smart entry &
start system. (P.254)
■Wheels and wheel ornaments
●Remove any dirt immediately by using
a neutral detergent.
●Wash detergent off with water imme-
diately after use.
●To protect the paint from damage,
make sure to observe the following
precautions.
• Do not use acidic, alkaline or abrasive
detergent.
• Do not use hard brushes.
• Do not use detergent on the wheels
when they are hot, such as after driv-
ing or parking in hot weather.
Cleaning and protecting
the vehicle exterior
Perform the following to pro-
tect the vehicle and maintain it
in prime condition:
Cleaning instructions
Page 518 of 718
5167-3. Do-it-yourself maintenance
Check the wattage of the light bulb
to be replaced. ( P.591)
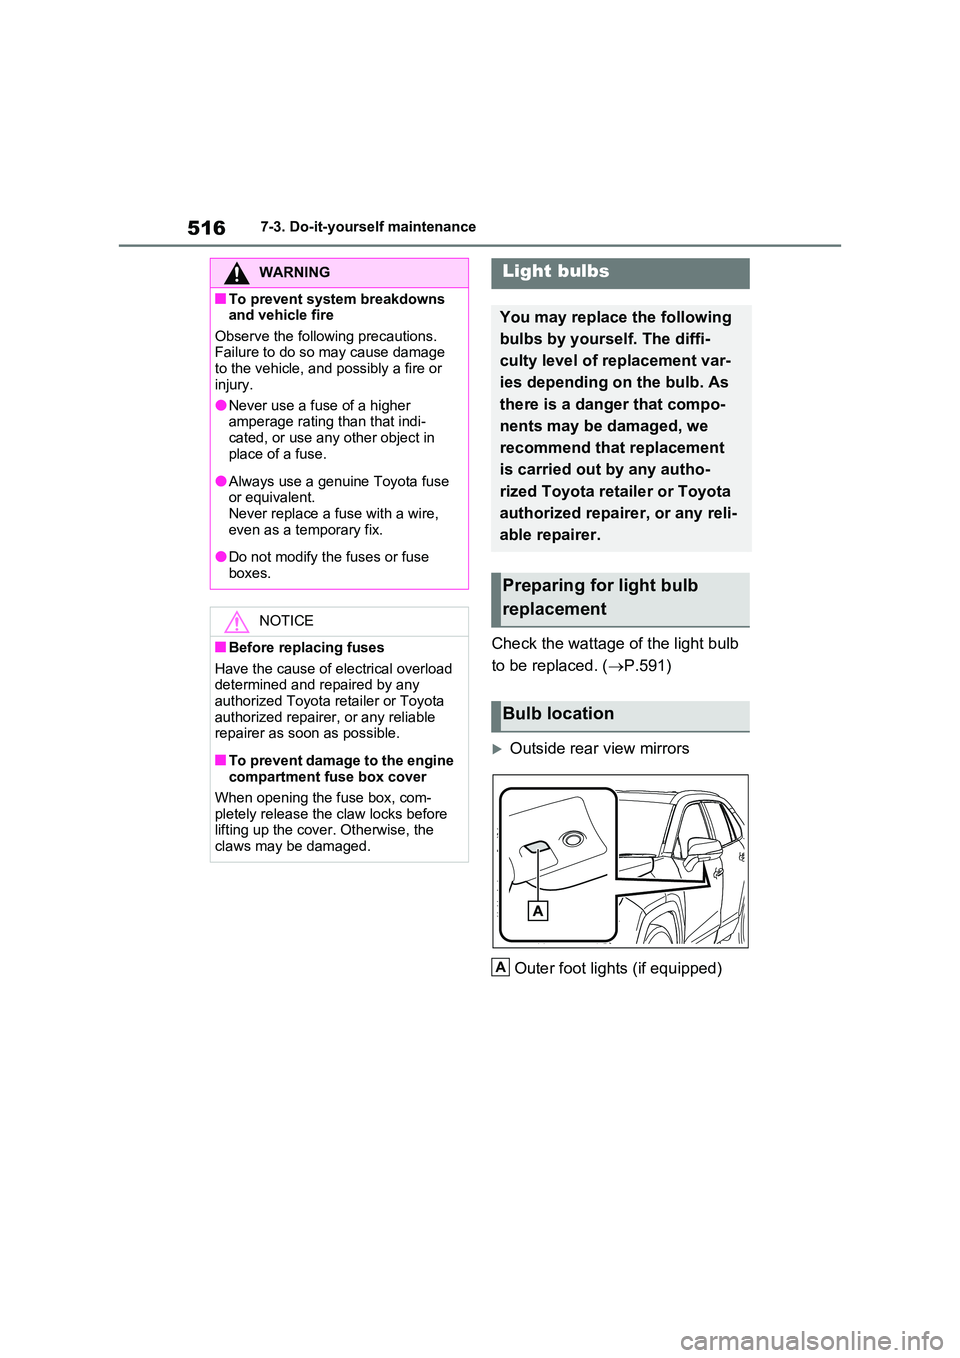
Outside rear view mirrors
Outer foot lights (if equipped)
WARNING
■To prevent system breakdowns and vehicle fire
Observe the following precautions. Failure to do so may cause damage to the vehicle, and possibly a fire or
injury.
●Never use a fuse of a higher amperage rating than that indi-
cated, or use any other object in place of a fuse.
●Always use a genuine Toyota fuse or equivalent.Never replace a fuse with a wire,
even as a temporary fix.
●Do not modify the fuses or fuse
boxes.
NOTICE
■Before replacing fuses
Have the cause of electrical overload determined and repaired by any authorized Toyota retailer or Toyota
authorized repairer, or any reliable repairer as soon as possible.
■To prevent damage to the engine compartment fuse box cover
When opening the fuse box, com- pletely release the claw locks before lifting up the cover. Otherwise, the
claws may be damaged.
Light bulbs
You may replace the following
bulbs by yourself. The diffi-
culty level of replacement var-
ies depending on the bulb. As
there is a danger that compo-
nents may be damaged, we
recommend that replacement
is carried out by any autho-
rized Toyota retailer or Toyota
authorized repairer, or any reli-
able repairer.
Preparing for light bulb
replacement
Bulb location
A
Page 522 of 718
5207-3. Do-it-yourself maintenance
after installing the bulb base.
6Reinstall the cover.
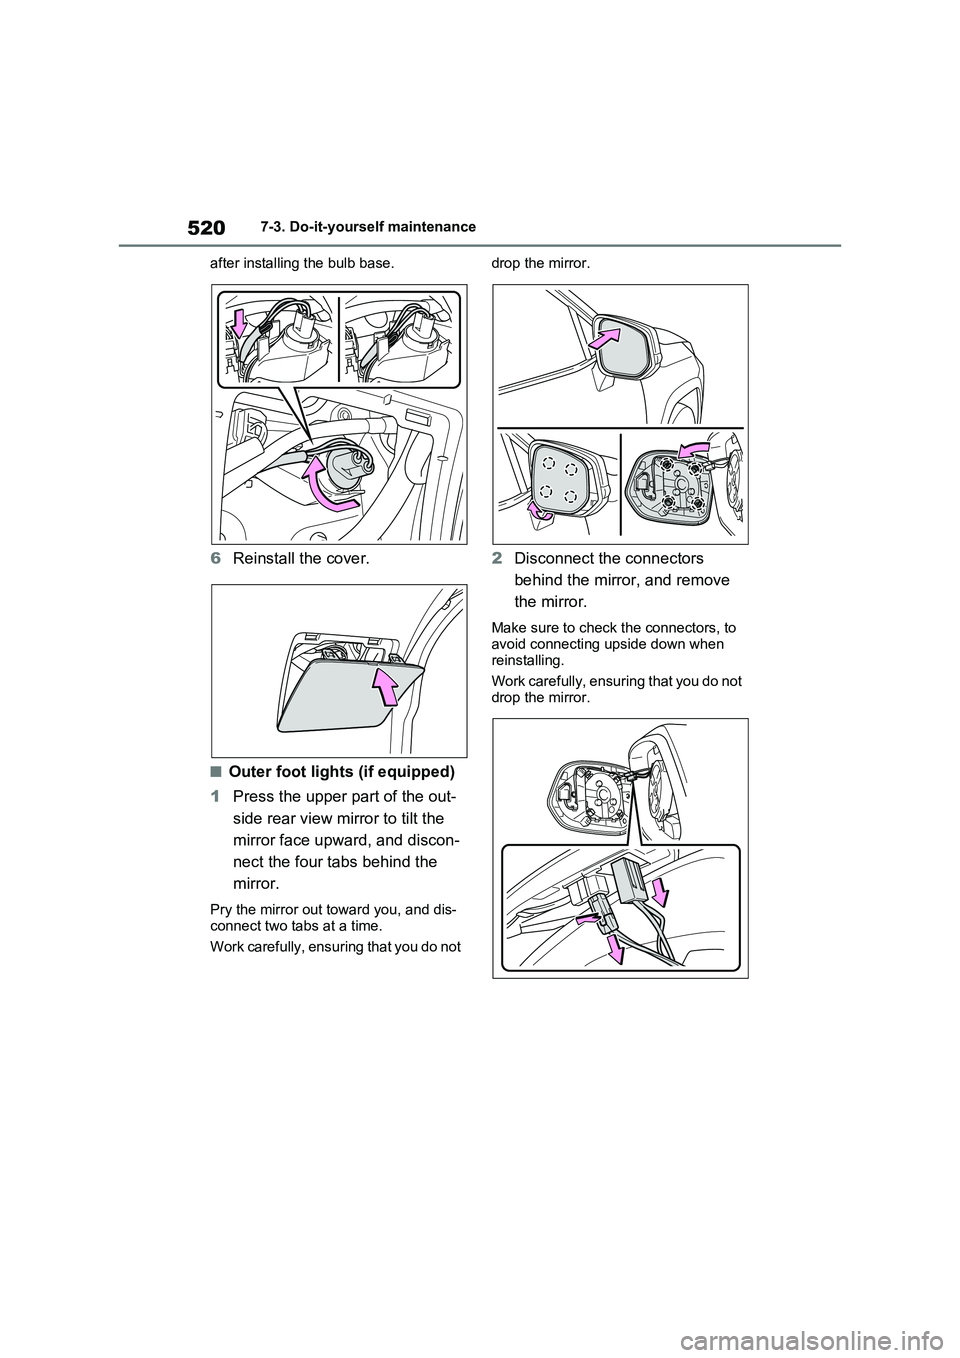
■Outer foot lights (if equipped)
1Press the upper part of the out-
side rear view mirror to tilt the
mirror face upward, and discon-
nect the four tabs behind the
mirror.
Pry the mirror out toward you, and dis-
connect two tabs at a time.
Work carefully, ensuring that you do not drop the mirror.
2Disconnect the connectors
behind the mirror, and remove
the mirror.
Make sure to check the connectors, to
avoid connecting upside down when
reinstalling.
Work carefully, ensuring that you do not
drop the mirror.
Page 523 of 718
521
7 7-3. Do-it-yourself maintenance
Maintenance and care
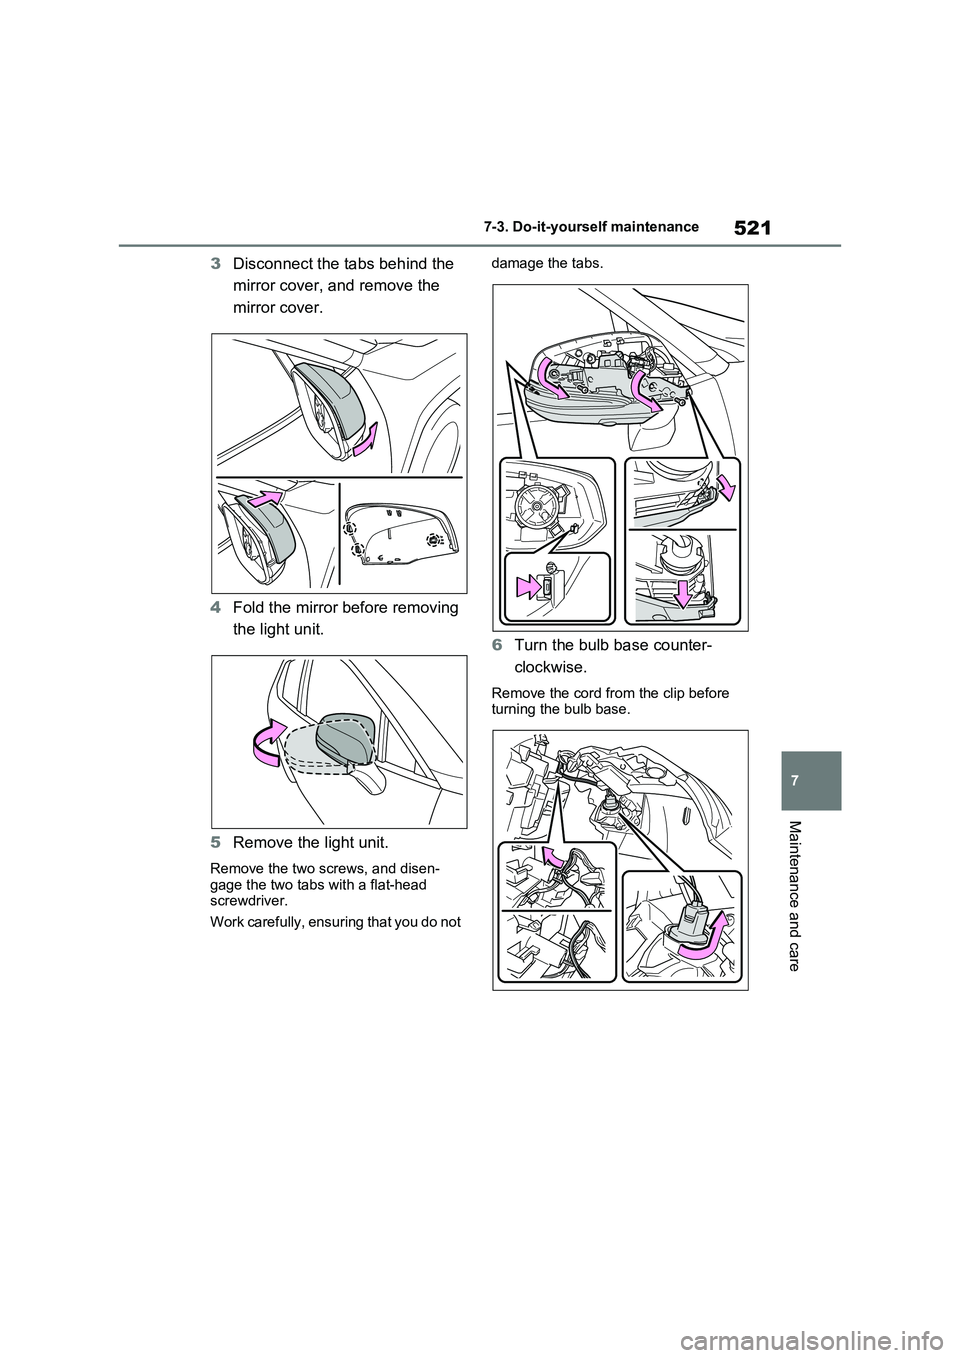
3Disconnect the tabs behind the
mirror cover, and remove the
mirror cover.
4Fold the mirror before removing
the light unit.
5Remove the light unit.
Remove the two screws, and disen-
gage the two tabs with a flat-head
screwdriver.
Work carefully, ensuring that you do not damage the tabs.
6Turn the bulb base counter-
clockwise.
Remove the cord from the clip before
turning the bulb base.
Page 524 of 718

5227-3. Do-it-yourself maintenance
7Remove the light bulb.
8Install a new light bulb then
install the bulb base to the light
unit by inserting it and turning
the bulb base clockwise.
Secure the cord with the clip back again
after installing the bulb base.
9Install the light unit.
Make sure that the two tabs of the light
unit are engaged securely, and install the two screws.
10Extend the mirror.
11Install the mirror cover.
Page 525 of 718
523
7
7-3. Do-it-yourself maintenance
Maintenance and care
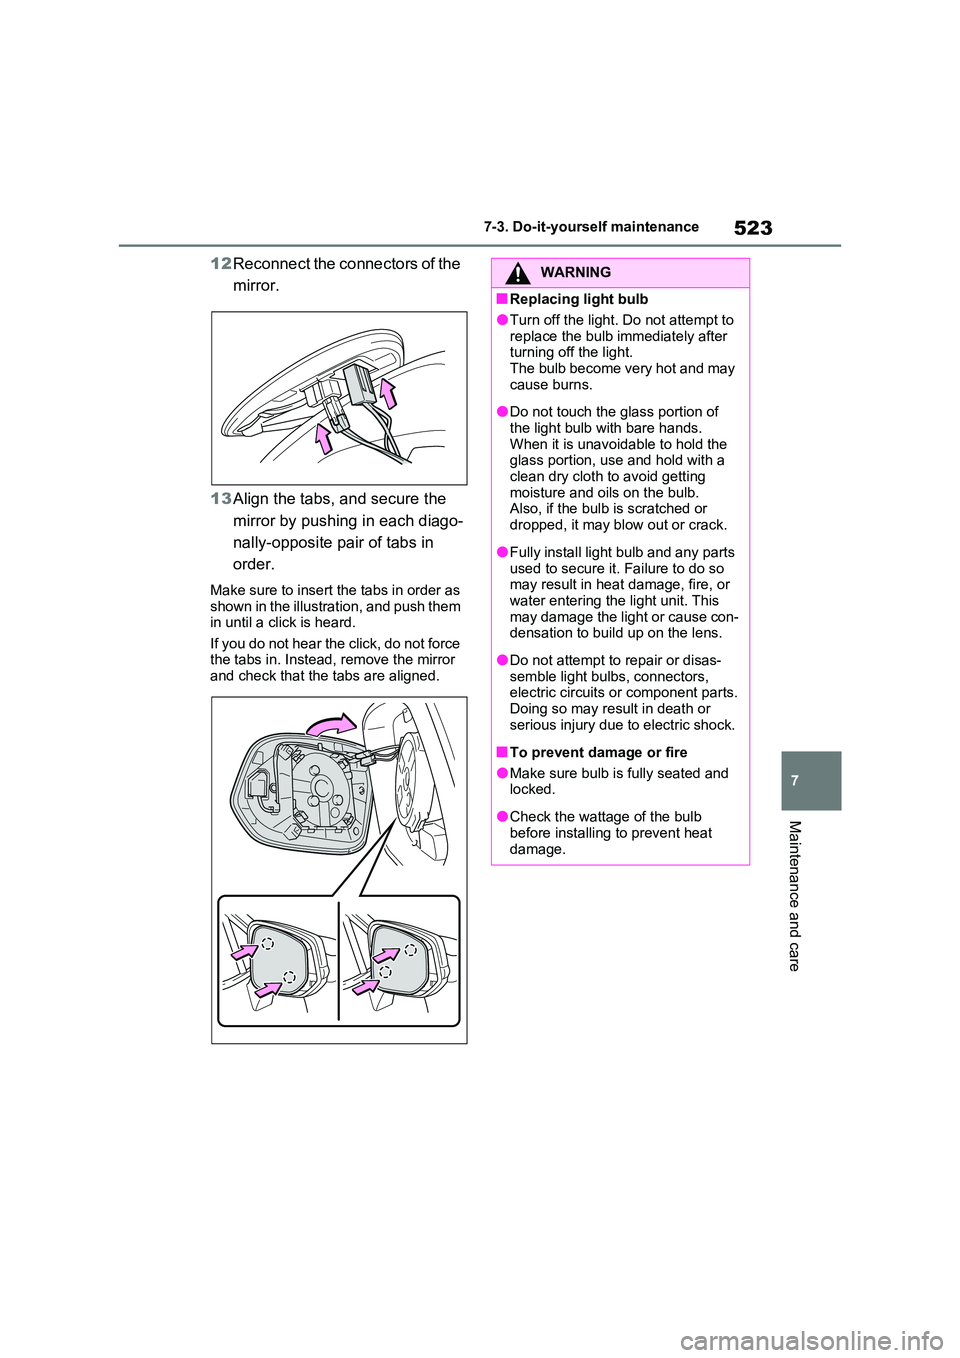
12 Reconnect the connectors of the
mirror.
13 Align the tabs, and secure the
mirror by pushing in each diago-
nally-opposite pair of tabs in
order.
Make sure to insert the tabs in order as shown in the illustration, and push them in until a click is heard.
If you do not hear the click, do not force the tabs in. Instead, remove the mirror and check that the tabs are aligned.
WARNING
■Replacing light bulb
●Turn off the light. Do not attempt to
replace the bulb immediately after turning off the light. The bulb become very hot and may
cause burns.
●Do not touch the glass portion of
the light bulb with bare hands. When it is unavoidable to hold the glass portion, use and hold with a
clean dry cloth to avoid getting moisture and oils on the bulb. Also, if the bulb is scratched or
dropped, it may blow out or crack.
●Fully install light bulb and any parts
used to secure it. Failure to do so may result in heat damage, fire, or water entering the light unit. This
may damage the light or cause con- densation to build up on the lens.
●Do not attempt to repair or disas-semble light bulbs, connectors, electric circuits or component parts.
Doing so may result in death or serious injury due to electric shock.
■To prevent damage or fire
●Make sure bulb is fully seated and locked.
●Check the wattage of the bulb before installing to prevent heat
damage.
Page 605 of 718
603
9 9-2. Customization
Vehicle specifications
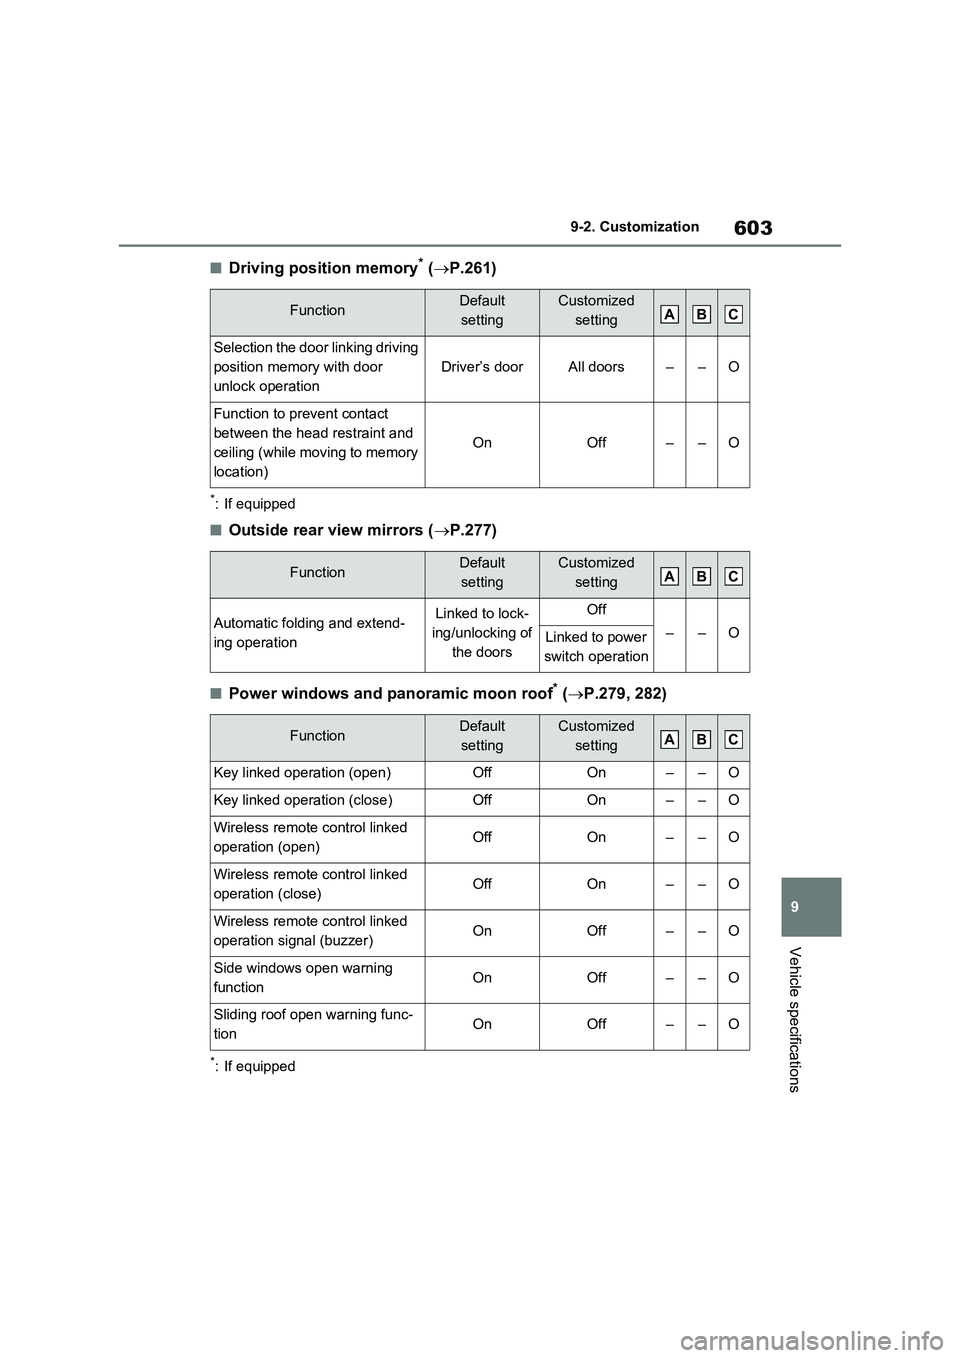
■Driving position memory* (P.261)
*: If equipped
■Outside rear view mirrors (P.277)
■Power windows and panoramic moon roof* (P.279, 282)
*: If equipped
FunctionDefault
settingCustomized
setting
Selection the door linking driving
position memory with door
unlock operation
Driver’s doorAll doors––O
Function to prevent contact
between the head restraint and
ceiling (while moving to memory
location)
OnOff––O
FunctionDefault
settingCustomized
setting
Automatic folding and extend-
ing operationLinked to lock-
ing/unlocking of
the doorsOff
––OLinked to power
switch operation
FunctionDefault
settingCustomized
setting
Key linked operation (open)OffOn––O
Key linked operation (close)OffOn––O
Wireless remote control linked
operation (open)OffOn––O
Wireless remote control linked
operation (close)OffOn––O
Wireless remote control linked
operation signal (buzzer)OnOff––O
Side windows open warning
functionOnOff––O
Sliding roof open warning func-
tion OnOff––O
ABC
ABC
ABC
Page 608 of 718
6069-2. Customization
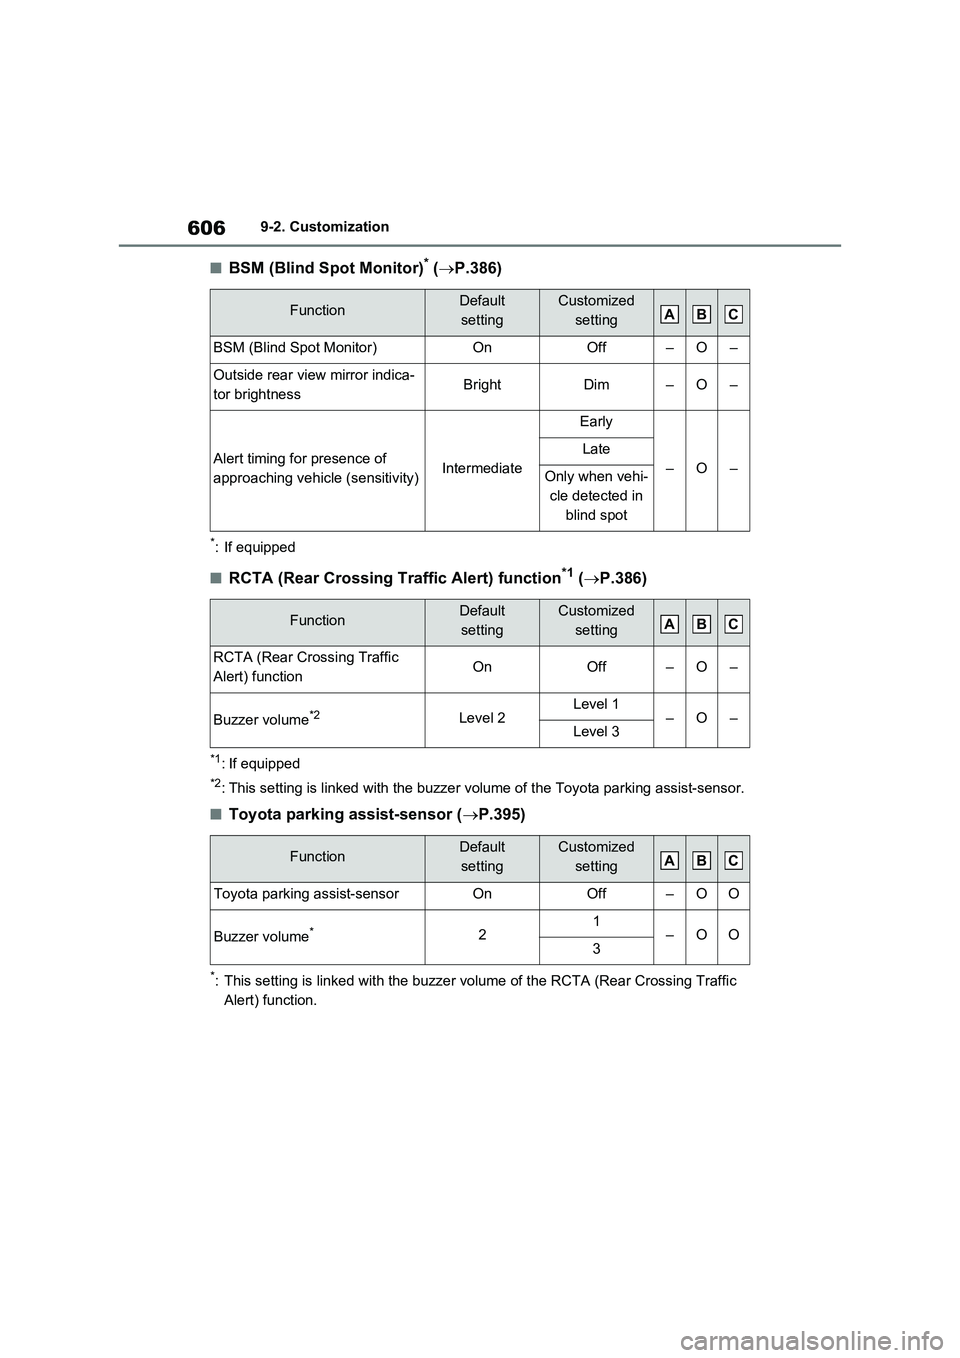
■BSM (Blind Spot Monitor)* (P.386)
*: If equipped
■RCTA (Rear Crossing Traffic Alert) function*1 (P.386)
*1: If equipped
*2: This setting is linked with the buzzer volume of the Toyota parking assist-sensor.
■Toyota parking assist-sensor (P.395)
*: This setting is linked with the buzzer volume of the RCTA (Rear Crossing Traffic
Alert) function.
FunctionDefault
settingCustomized
setting
BSM (Blind Spot Monitor)OnOff–O–
Outside rear view mirror indica-
tor brightnessBrightDim–O–
Alert timing for presence of
approaching vehicle (sensitivity)Intermediate
Early
–O–
Late
Only when vehi-
cle detected in
blind spot
FunctionDefault
settingCustomized
setting
RCTA (Rear Crossing Traffic
Alert) functionOnOff–O–
Buzzer volume*2Level 2Level 1–O–Level 3
FunctionDefault
settingCustomized
setting
Toyota parking assist-sensorOnOff–OO
Buzzer volume*21–OO3
ABC
ABC
ABC
Page 619 of 718
617Alphabetical Index
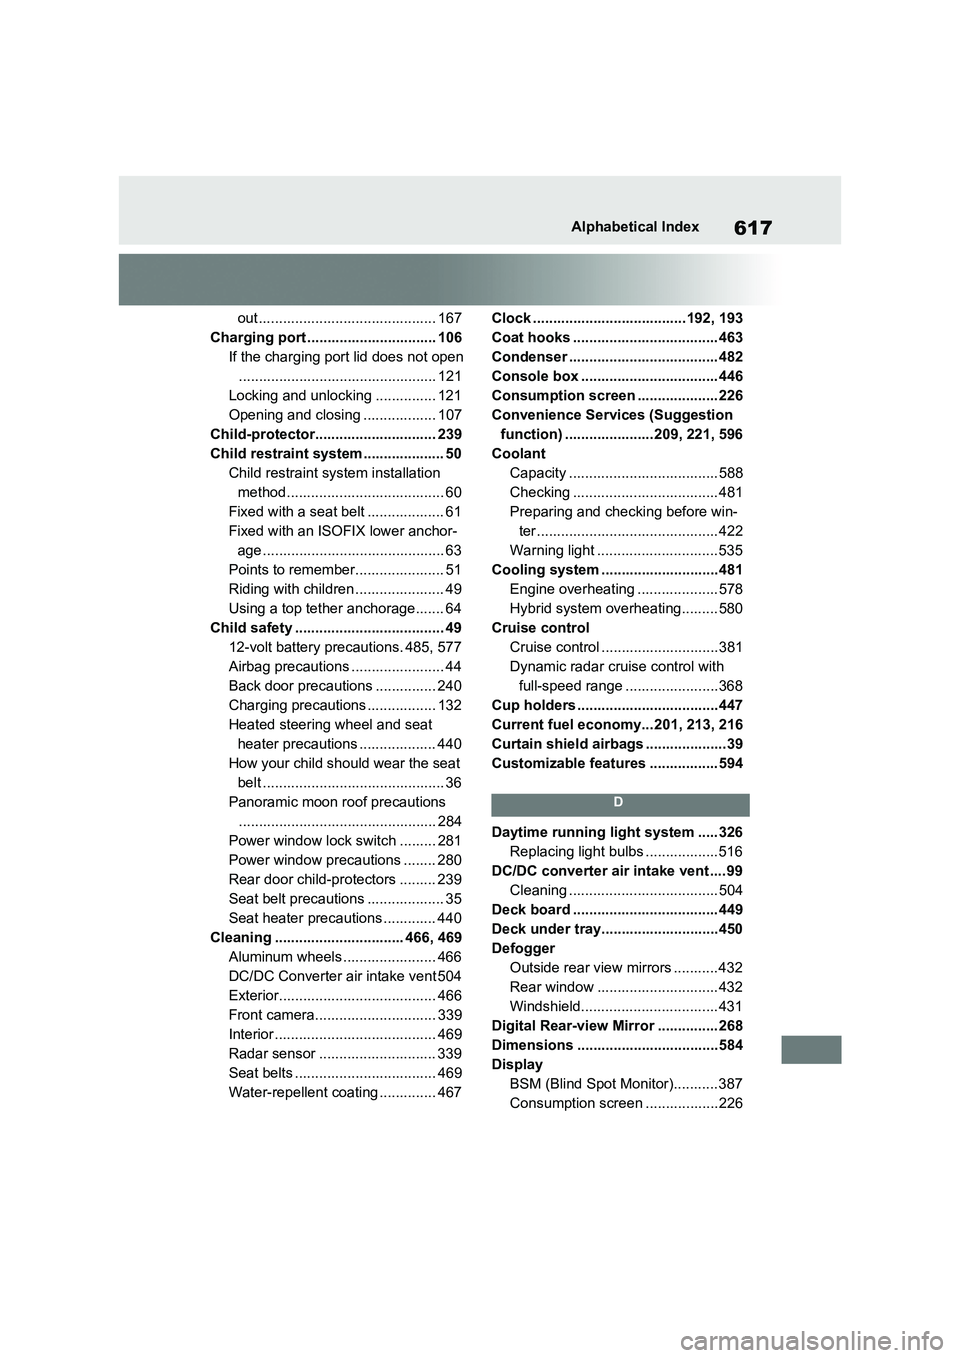
out ............................................ 167
Charging port ................................ 106
If the charging port lid does not open
................................................. 121
Locking and unlocking ............... 121
Opening and closing .................. 107
Child-protector.............................. 239
Child restraint system .................... 50
Child restraint system installation
method....................................... 60
Fixed with a seat belt ................... 61
Fixed with an ISOFIX lower anchor-
age ............................................. 63
Points to remember...................... 51
Riding with children ...................... 49
Using a top tether anchorage....... 64
Child safety ..................................... 49
12-volt battery precautions. 485, 577
Airbag precautions ....................... 44
Back door precautions ............... 240
Charging precautions ................. 132
Heated steering wheel and seat
heater precautions ................... 440
How your child should wear the seat
belt ............................................. 36
Panoramic moon roof precautions
................................................. 284
Power window lock switch ......... 281
Power window precautions ........ 280
Rear door child-protectors ......... 239
Seat belt precautions ................... 35
Seat heater precautions ............. 440
Cleaning ................................ 466, 469
Aluminum wheels ....................... 466
DC/DC Converter air intake vent 504
Exterior....................................... 466
Front camera.............................. 339
Interior ........................................ 469
Radar sensor ............................. 339
Seat belts ................................... 469
Water-repellent coating .............. 467Clock ......................................192, 193
Coat hooks .................................... 463
Condenser ..................................... 482
Console box .................................. 446
Consumption screen .................... 226
Convenience Services (Suggestion
function) ...................... 209, 221, 596
Coolant
Capacity ..................................... 588
Checking .................................... 481
Preparing and checking before win-
ter ............................................. 422
Warning light .............................. 535
Cooling system .............................481
Engine overheating .................... 578
Hybrid system overheating......... 580
Cruise control
Cruise control .............................381
Dynamic radar cruise control with
full-speed range .......................368
Cup holders ...................................447
Current fuel economy... 201, 213, 216
Curtain shield airbags ....................39
Customizable features ................. 594
D
Daytime running light system ..... 326
Replacing light bulbs ..................516
DC/DC converter air intake vent .... 99
Cleaning ..................................... 504
Deck board .................................... 449
Deck under tray.............................450
Defogger
Outside rear view mirrors ........... 432
Rear window .............................. 432
Windshield.................................. 431
Digital Rear-view Mirror ............... 268
Dimensions ...................................584
Display
BSM (Blind Spot Monitor)........... 387
Consumption screen ..................226