light TOYOTA RAV4 PLUG-IN HYBRID 2023 Workshop Manual
[x] Cancel search | Manufacturer: TOYOTA, Model Year: 2023, Model line: RAV4 PLUG-IN HYBRID, Model: TOYOTA RAV4 PLUG-IN HYBRID 2023Pages: 718, PDF Size: 167.55 MB
Page 201 of 718
199
3
3-1. Instrument cluster
Vehicle status information and indicators
■Display items
Odometer
Displays the total distance the vehicle
has been driven.
Trip meter A/trip meter B
Displays the distance the vehicle has
been driven since the meter was last
reset. Trip meters A and B can be used
to record and display different dis-
tances independently.
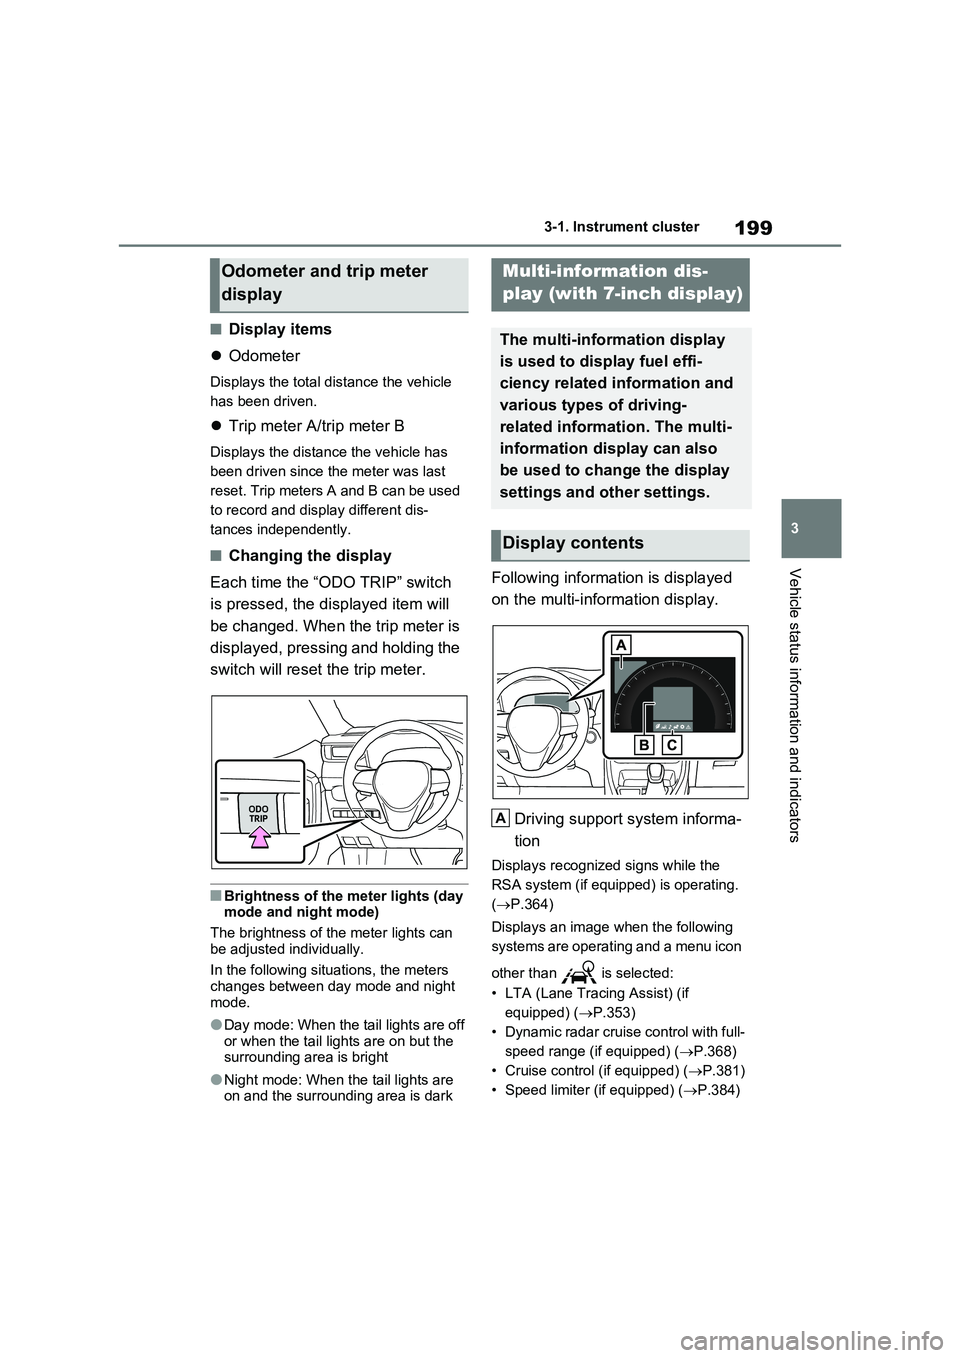
■Changing the display
Each time the “ODO TRIP” switch
is pressed, the displayed item will
be changed. When the trip meter is
displayed, pressing and holding the
switch will reset the trip meter.
■Brightness of the meter lights (day mode and night mode)
The brightness of the meter lights can
be adjusted individually.
In the following situations, the meters
changes between day mode and night mode.
●Day mode: When the tail lights are off or when the tail lights are on but the surrounding area is bright
●Night mode: When the tail lights are on and the surrounding area is dark
Following information is displayed
on the multi-information display.
Driving support system informa-
tion
Displays recognized signs while the
RSA system (if equipped) is operating.
( P.364)
Displays an image when the following
systems are operating and a menu icon
other than is selected:
• LTA (Lane Tracing Assist) (if
equipped) ( P.353)
• Dynamic radar cruise control with full-
speed range (if equipped) ( P.368)
• Cruise control (if equipped) ( P.381)
• Speed limiter (if equipped) ( P.384)
Odometer and trip meter
display
Multi-information dis-
play (with 7-inch display)
The multi-information display
is used to display fuel effi-
ciency related information and
various types of driving-
related information. The multi-
information display can also
be used to change the display
settings and other settings.
Display contents
A
Page 202 of 718
2003-1. Instrument cluster
Information display area
A variety of information can be dis-
played by selecting a menu icon.
Additionally, warning or sugges-
tion/advice pop-up displays will be dis-
played in some situations.
Menu icons ( P.200)
■The multi-information display is
displayed when
The power switch is in ON.
■When changing driving mode
●Background color of the multi-informa- tion display is changed following the selected driving mode. ( P.411)
●Background color of the multi-informa- tion display is changed following the
selected driving mode or when Trail Mode is turned on. ( P.411, 413)
■Liquid crystal display
Small spots or light spots may appear
on the display. This phenomenon is characteristic of liquid crystal displays, and there is no problem continuing to
use the display.
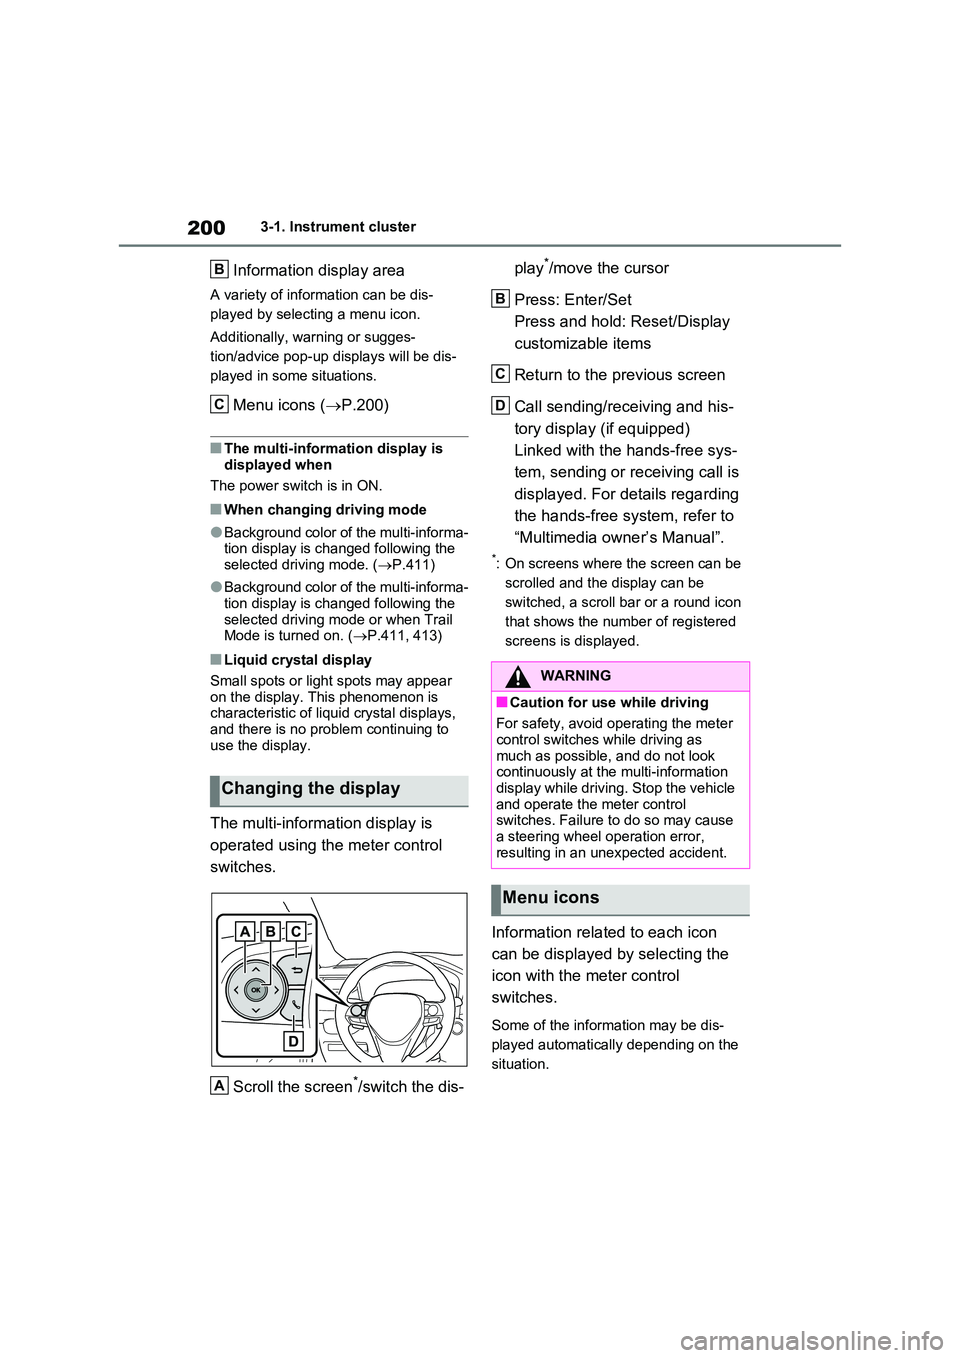
The multi-information display is
operated using the meter control
switches.
Scroll the screen*/switch the dis-
play*/move the cursor
Press: Enter/Set
Press and hold: Reset/Display
customizable items
Return to the previous screen
Call sending/receiving and his-
tory display (if equipped)
Linked with the hands-free sys-
tem, sending or receiving call is
displayed. For details regarding
the hands-free system, refer to
“Multimedia owner’s Manual”.
*: On screens where the screen can be
scrolled and the display can be
switched, a scroll bar or a round icon
that shows the number of registered
screens is displayed.
Information related to each icon
can be displayed by selecting the
icon with the meter control
switches.
Some of the information may be dis-
played automatically depending on the
situation.
Changing the display
B
C
A
WARNING
■Caution for use while driving
For safety, avoid operating the meter
control switches while driving as much as possible, and do not look continuously at the multi-information
display while driving. Stop the vehicle and operate the meter control switches. Failure to do so may cause
a steering wheel operation error, resulting in an unexpected accident.
Menu icons
B
C
D
Page 212 of 718
2103-1. Instrument cluster
■Suggestion to enable the
power back door (if equipped)
If the power back door system is
disabled on the screen and the
power back door switch on the
instrument panel is operated, a
suggestion message will be dis-
played asking if you wish to enable
the power back door system. To
enable the power back door sys-
tem, select “Yes”.
After enabling the power back door sys-
tem, press the power back door switch
again to open or close the power back
door.
■Suggestion to turn off the
headlights
If the headlights are left on for a
certain amount of time after the
power switch has been turned off, a
suggestion message will be dis-
played.
■Suggestion to close the power
windows (linked to windshield
wiper operation)
If the windshield wipers are oper-
ated with a power window open, a
suggestion message will be dis-
played asking if you wish to close
the power windows. To close all of
the power windows, select “Yes”.
■Suggestion to close the power
windows (driving at high
speeds)
If the vehicle speed exceeds a cer-
tain speed with a power window
open, a suggestion message will be displayed asking if you wish to
close the power windows. To close
all of the power windows, select
“Yes”.
■Customization
The Convenience Services (Suggestion
function) can be turned on/off. (Custom-
izable features: P.596)
Page 213 of 718
211
3 3-1. Instrument cluster
Vehicle status information and indicators
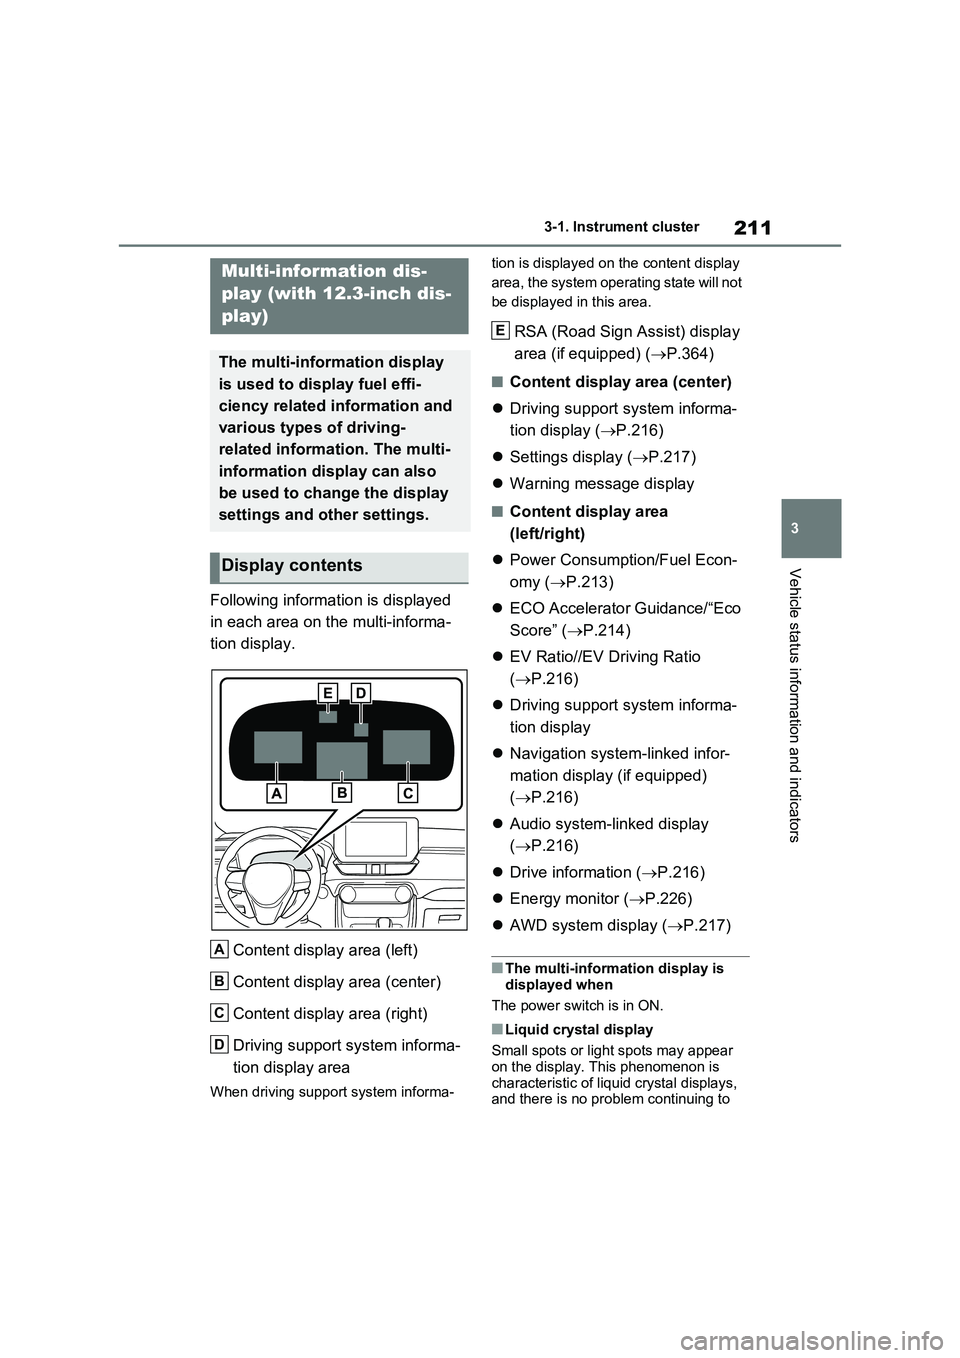
Following information is displayed
in each area on the multi-informa-
tion display.
Content display area (left)
Content display area (center)
Content display area (right)
Driving support system informa-
tion display area
When driving support system informa-tion is displayed on the content display
area, the system operating state will not
be displayed in this area.
RSA (Road Sign Assist) display
area (if equipped) (P.364)
■Content display area (center)
Driving support system informa-
tion display (P.216)
Settings display (P.217)
Warning message display
■Content display area
(left/right)
Power Consumption/Fuel Econ-
omy (P.213)
ECO Accelerator Guidance/“Eco
Score” (P.214)
EV Ratio//EV Driving Ratio
(P.216)
Driving support system informa-
tion display
Navigation system-linked infor-
mation display (if equipped)
(P.216)
Audio system-linked display
(P.216)
Drive information (P.216)
Energy monitor (P.226)
AWD system display (P.217)
■The multi-information display is
displayed when
The power switch is in ON.
■Liquid crystal display
Small spots or light spots may appear
on the display. This phenomenon is
characteristic of liquid crystal displays,
and there is no problem continuing to
Multi-information dis-
play (with 12.3-inch dis-
play)
The multi-information display
is used to display fuel effi-
ciency related information and
various types of driving-
related information. The multi-
information display can also
be used to change the display
settings and other settings.
Display contents
A
B
C
D
E
Page 219 of 718
217
3 3-1. Instrument cluster
Vehicle status information and indicators
display was reset*
• “Distance”: Displays the distance
driven since the display was
reset
*
• “Total Time”: Displays the
elapsed time since the display
was reset
*
*: To reset, display the desired item and
press and hold .
P.226
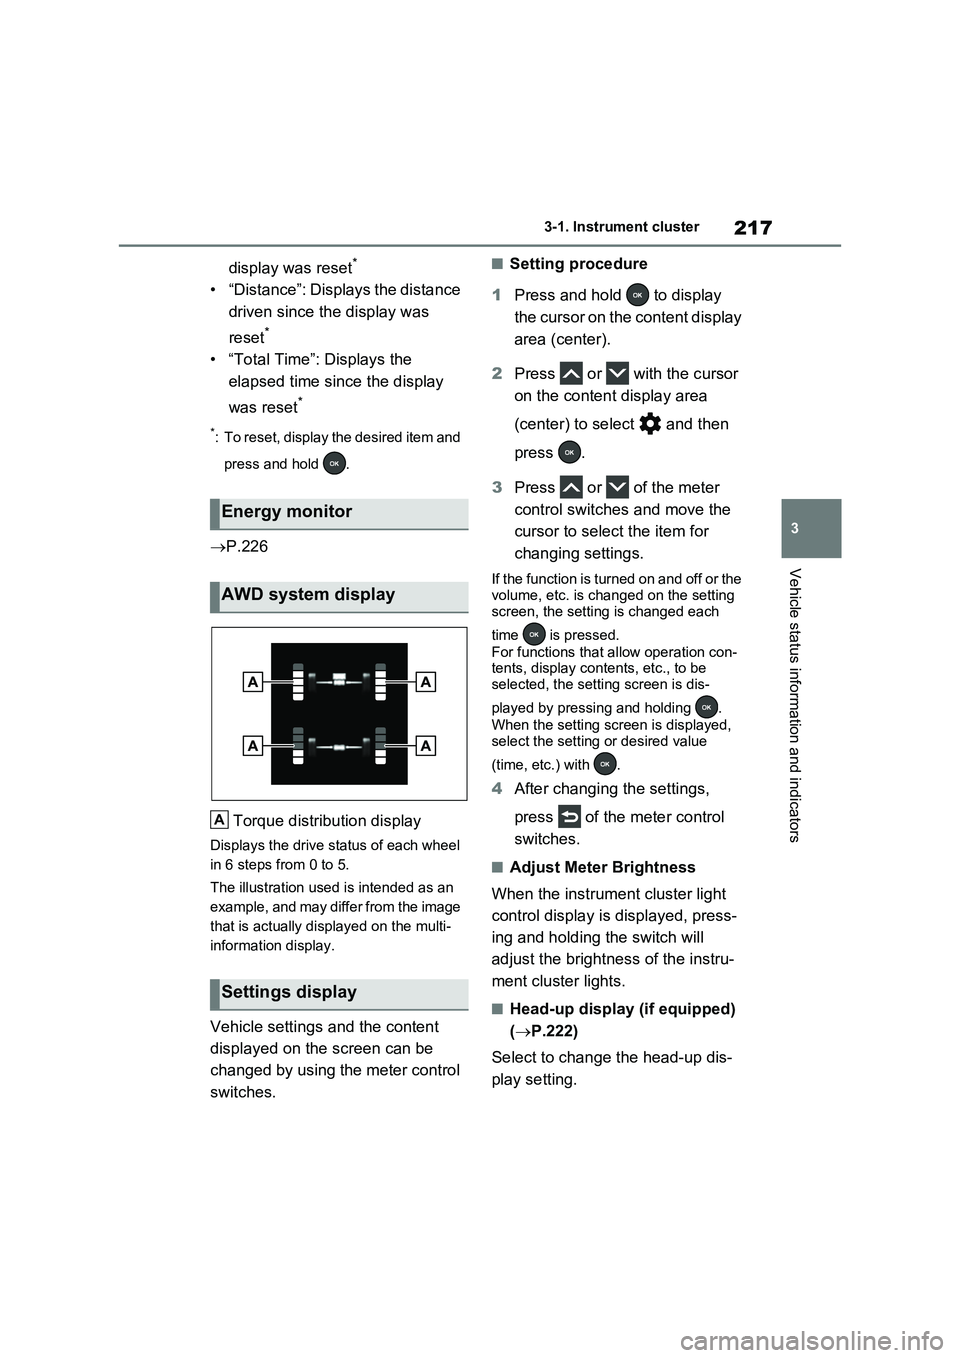
Torque distribution display
Displays the drive status of each wheel
in 6 steps from 0 to 5.
The illustration used is intended as an
example, and may differ from the image
that is actually displayed on the multi-
information display.
Vehicle settings and the content
displayed on the screen can be
changed by using the meter control
switches.
■Setting procedure
1Press and hold to display
the cursor on the content display
area (center).
2Press or with the cursor
on the content display area
(center) to select and then
press .
3Press or of the meter
control switches and move the
cursor to select the item for
changing settings.
If the function is turned on and off or the
volume, etc. is changed on the setting
screen, the setting is changed each
time is pressed.
For functions that allow operation con-
tents, display contents, etc., to be
selected, the setting screen is dis-
played by pressing and holding .
When the setting screen is displayed,
select the setting or desired value
(time, etc.) with .
4After changing the settings,
press of the meter control
switches.
■Adjust Meter Brightness
When the instrument cluster light
control display is displayed, press-
ing and holding the switch will
adjust the brightness of the instru-
ment cluster lights.
■Head-up display (if equipped)
(P.222)
Select to change the head-up dis-
play setting.
Energy monitor
AWD system display
Settings display
A
Page 223 of 718
221
3 3-1. Instrument cluster
Vehicle status information and indicators
Displays suggestions to the driver
in the following situations. To select
a response to a displayed sugges-
tion, use the meter control
switches.
■Suggestion to enable the
power back door (if equipped)
If the power back door system is
disabled on the screen and the
power back door switch on the
instrument panel is operated, a
suggestion message will be dis-
played asking if you wish to enable
the power back door system. To
enable the power back door sys-
tem, select “Yes”. After enabling
the power back door system, press
the power back door switch again
to open or close the power back
door.
■Suggestion to turn off the
headlights
If the headlights are left on for a
certain amount of time with the
headlight switch in after the
power switch has been turned off, a
suggestion message will be dis-
played asking if you wish to turn the
headlights off.
To turn the headlights off, select
“Yes”.
If a front door is opened after the power
switch is turned off, this suggestion
message will not be displayed.
■Suggestion to close the power
windows (linked to windshield
wiper operation)
If the windshield wipers are oper-
ated with a power window open, a
suggestion message will be dis-
played asking if you wish to close
the power windows.
To close all of the power windows,
select “Yes”.
■Suggestion to close the power
windows (driving at high
speeds)
If the vehicle speed exceeds a cer-
tain speed with a power window
open, a suggestion message will be
displayed asking if you wish to
close the power windows. To close
all of the power windows, select
“Yes”.
■Customization
Some functions can be customized.
(Customizable features: P.594)
Convenience Services (Sug-
gestion function)
Page 230 of 718
2283-1. Instrument cluster
Rear electric motor (traction
motor)
Rear tires
Front tires
■Color of the hybrid battery (traction
battery) on the center display
It will be green when the hybrid battery
(traction battery) is being charged, and
yellow when the hybrid battery (traction
battery) is being used.
■Remaining charge amount warning
of hybrid battery (traction battery)
●The buzzer sounds intermittently
when the hybrid battery (traction bat-
tery) remains without charging while
the shift lever is in N, or the remaining
charge amount drops below a certain
level. If the remaining charge amount
drops further, the buzzer sounds con-
tinuously.
●When a warning message is shown
on the multi-information display and
the buzzer sounds, follow the instruc-
tions displayed on the screen to per-
form troubleshooting.
■Color of the gasoline engine on the
center display
It will be blue when the engine is warm-
ing up, and it will turn to red when the
warming up is finished.
Hybrid system output may be restricted
when the gasoline engine is displayed in
blue.
■Display procedure
Press from the main menu,
then press “Trip information”.
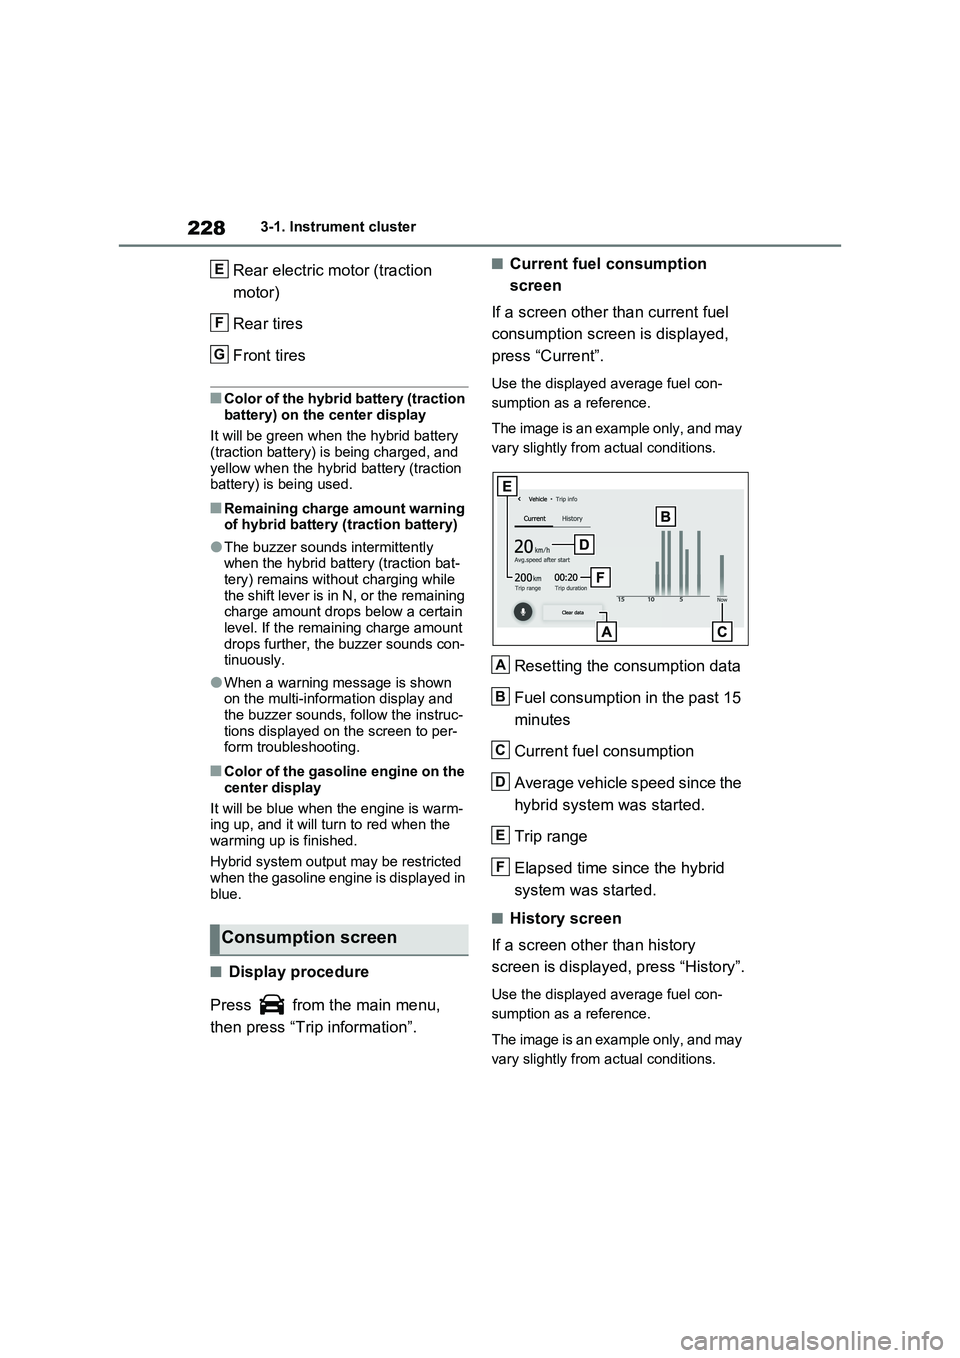
■Current fuel consumption
screen
If a screen other than current fuel
consumption screen is displayed,
press “Current”.
Use the displayed average fuel con-
sumption as a reference.
The image is an example only, and may
vary slightly from actual conditions.
Resetting the consumption data
Fuel consumption in the past 15
minutes
Current fuel consumption
Average vehicle speed since the
hybrid system was started.
Trip range
Elapsed time since the hybrid
system was started.
■History screen
If a screen other than history
screen is displayed, press “History”.
Use the displayed average fuel con-
sumption as a reference.
The image is an example only, and may
vary slightly from actual conditions.
Consumption screen
E
F
G
A
B
C
D
E
F
Page 237 of 718

235
4
4-2. Opening, closing and locking the doors
Before driving
4-2.Opening, closing and lo cking th e d oors
■Using the entry function
Carry the electronic key to enable
this function.
1 Grip the front door handle to
unlock the doors.
Make sure to touch the sensor on the
back of the handle.
The doors cannot be unlocked for 3
seconds after the doors are locked.
2 Touch the lock sensor (the
indentation on the upper part of
the door handle) to lock the
doors.
Check that the door is securely locked.
■Using the wireless remote
control
1 Locks all the doors
Check that the door is securely locked.
Press and hold to close the side win-
dows and panoramic moon roof (if
equipped).*
2 Unlocks all the doors
Press and hold to open the side win-
dows and panoramic moon roof (if
equipped).*
*: These settings must be customized
at any authorized Toyota retailer or
Toyota authorized repairer, or any
reliable repairer.
■Switching the door unlock function
It is possible to set which doors the entry function unlocks using the wireless
remote control. Operate the switching operation in the vehicle or within approx-imately 1 m (3.2 ft.) of the vehicle.
1 Turn the power switch to OFF.
2 Cancel the intrusion sensor and tilt
sensor of the alarm system to pre- vent unintended triggering of the
alarm while changing the settings. (if equipped) ( P.80)
3 When the indicator light on the key
surface is not on, press and hold
or for approximately
5 seconds while pressing and hold-
ing .
Side doors
The vehicle can be locked and
unlocked using the entry func-
tion, wireless remote control,
door lock switches or inside
lock buttons.
Charging port lid and charging
connector will also be locked and
unlocked. ( P.121)
Unlocking and locking the
doors from the outside
Page 243 of 718
241
4
4-2. Opening, closing and locking the doors
Before driving
■Using the entry function
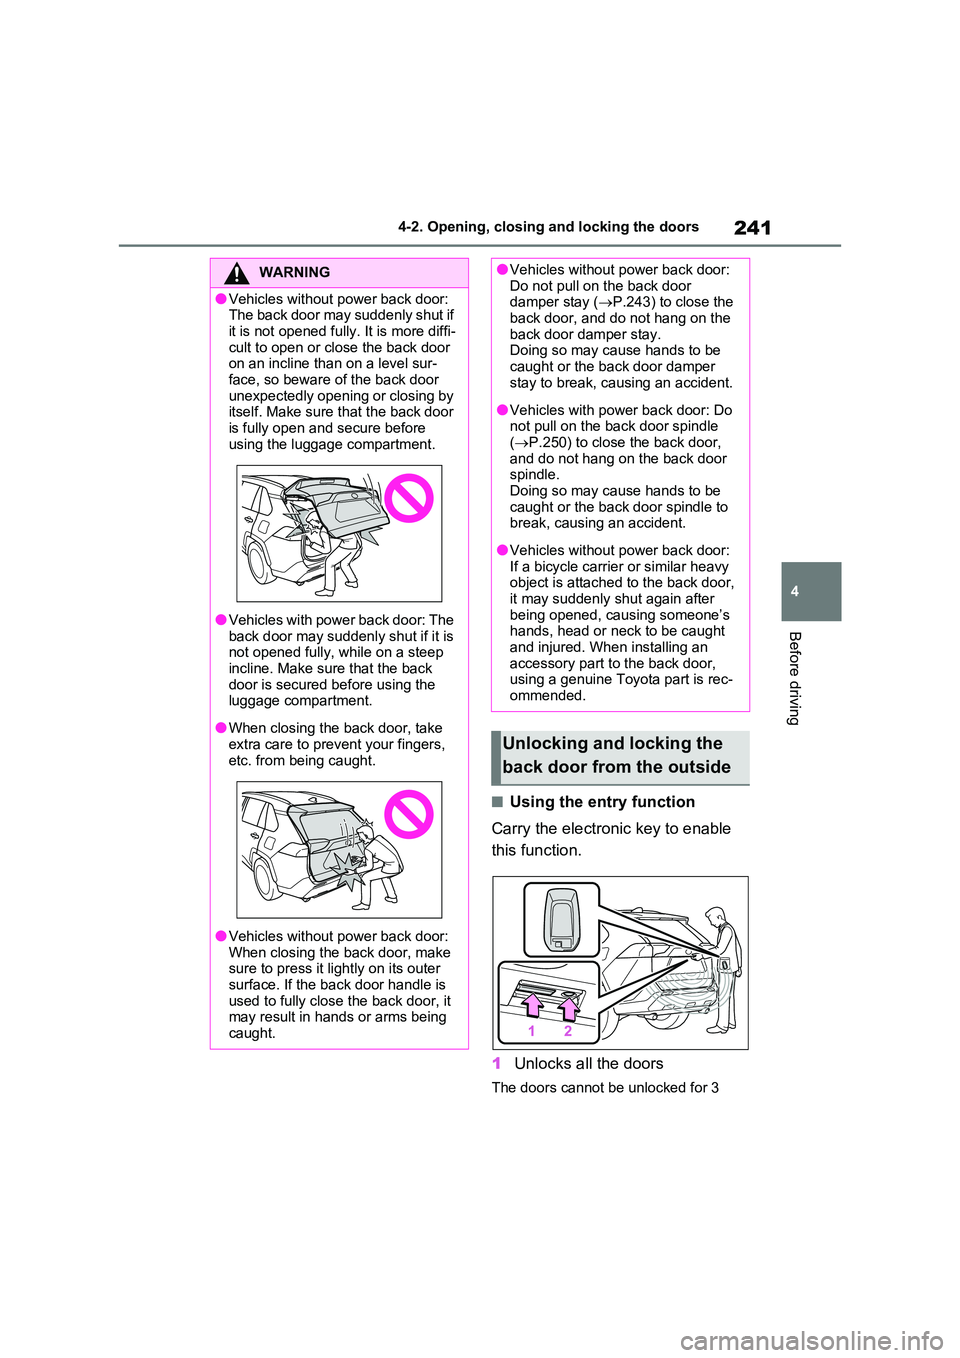
Carry the electronic key to enable
this function.
1 Unlocks all the doors
The doors cannot be unlocked for 3
WARNING
●Vehicles without power back door: The back door may suddenly shut if
it is not opened fully. It is more diffi- cult to open or close the back door on an incline than on a level sur-
face, so beware of the back door unexpectedly opening or closing by itself. Make sure that the back door
is fully open and secure before using the luggage compartment.
●Vehicles with power back door: The back door may suddenly shut if it is not opened fully, while on a steep
incline. Make sure that the back door is secured before using the luggage compartment.
●When closing the back door, take extra care to prevent your fingers,
etc. from being caught.
●Vehicles without power back door:
When closing the back door, make sure to press it lightly on its outer surface. If the back door handle is
used to fully close the back door, it may result in hands or arms being caught.
●Vehicles without power back door: Do not pull on the back door damper stay ( P.243) to close the
back door, and do not hang on the back door damper stay. Doing so may cause hands to be
caught or the back door damper stay to break, causing an accident.
●Vehicles with power back door: Do not pull on the back door spindle ( P.250) to close the back door,
and do not hang on the back door spindle. Doing so may cause hands to be
caught or the back door spindle to break, causing an accident.
●Vehicles without power back door: If a bicycle carrier or similar heavy object is attached to the back door,
it may suddenly shut again after being opened, causing someone’s hands, head or neck to be caught
and injured. When installing an accessory part to the back door, using a genuine Toyota part is rec-
ommended.
Unlocking and locking the
back door from the outside
Page 244 of 718
2424-2. Opening, closing and locking the doors
seconds after the doors are locked.
2 Locks all the doors
Check that the door is securely locked.
■Using the wireless remote
control
P.235
■Operation signals
P.236
■Security feature
P.236
■Using the door lock switches
P.238
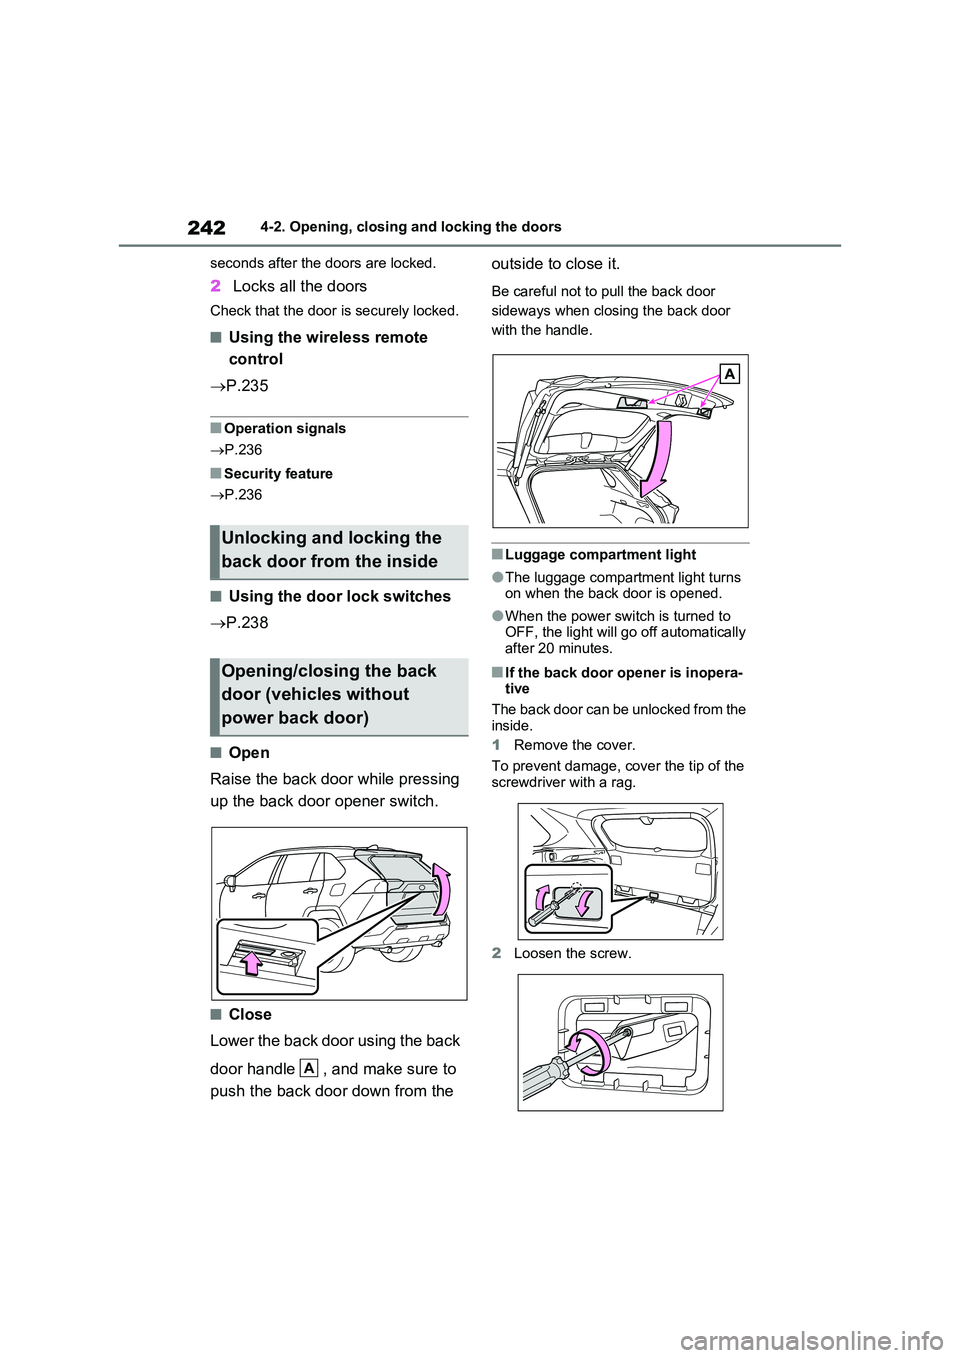
■Open
Raise the back door while pressing
up the back door opener switch.
■Close
Lower the back door using the back
door handle , and make sure to
push the back door down from the
outside to close it.
Be careful not to pull the back door
sideways when closing the back door
with the handle.
■Luggage compartment light
●The luggage compartment light turns on when the back door is opened.
●When the power switch is turned to OFF, the light will go off automatically
after 20 minutes.
■If the back door opener is inopera- tive
The back door can be unlocked from the
inside.
1 Remove the cover.
To prevent damage, cover the tip of the screwdriver with a rag.
2 Loosen the screw.
Unlocking and locking the
back door from the inside
Opening/closing the back
door (vehicles without
power back door)
A