tow TOYOTA RAV4 PLUG-IN HYBRID 2023 Workshop Manual
[x] Cancel search | Manufacturer: TOYOTA, Model Year: 2023, Model line: RAV4 PLUG-IN HYBRID, Model: TOYOTA RAV4 PLUG-IN HYBRID 2023Pages: 718, PDF Size: 167.55 MB
Page 463 of 718
461
6
6-4. Using the other interior features
Interior features
NOTICE
■Situations in which the function may not operate normally
Devices may not be charged normally in the following situations.
●The portable device is fully charged
●The portable device is being
charged with a cable connected
●There is foreign matter between the
charge area and portable device
●Charging has caused the portable
device to heat up
●The temperature around the
charging tray is 35°C (95°F) or higher, such as in extreme heat
●The portable device is placed with its charging side facing up
●When the charging coil for the por-table device is misaligned from the charge area (In particular, small
portable devices such as foldable devices may be misaligned from the charging area while driving)
●The portable device is larger than the charging tray
●The camera lens protrudes 3 mm (0.12 in) or more from the surface
of the portable device
●The vehicle is in an area where
strong electrical waves or noise are emitted, such as near a television tower, power plant, gasoline sta-
tion, broadcasting station, large dis- play, airport, etc.
●Any of the following objects that is 2 mm (0.08 in) or thicker is between the charging side of the portable
device and the charge area
• Thick cases or covers
• Thick decorations
• Accessories, such as finger rings, straps, etc.
●When the portable device is in con-tact with, or is covered by any of the following metallic objects:
• A card that has metal on it, such as aluminum foil, etc.
• A pack of cigarettes that includes aluminum foil
• A wallet or bag that is made of metal
•Coins
• A heating pad
• CDs, DVDs or other media
• A metal accessory
• A case or cover made of metal
• Casing which has magnet in it on
the charging side of the portable device
●Electric wave type wireless remote controls are being used nearby
●The electronic key is not inside the vehicle
●2 or more portable devices are placed on the charging tray at the same time
If charging is abnormal or the opera-
tion indicator light continues to flash
for any other reason, the wireless
charger may be malfunctioning. Con-
tact any authorized Toyota retailer or
Toyota authorized repairer, or any
reliable repairer as soon as possible.
Page 476 of 718
4747-3. Do-it-yourself maintenance
7-3.Do-it-y ours elf main ten ance
Do-it-yourself service
precautions
If you perform maintenance by
yourself, be sure to follow the
correct procedure as given in
these sections.
Maintenance
ItemsParts and tools
12-volt battery
condition
( P.484)
•Grease
• Conventional
wrench (for terminal
clamp bolts)
Engine/power
control unit
coolant level
( P.481)
• “Toyota Super Long
Life Coolant” or a
similar high quality
ethylene glycol-
based non-silicate,
non-amine, non-
nitrite and non-
borate coolant with
long-life hybrid
organic acid technol-
ogy
“Toyota Super Long
Life Coolant” is pre-
mixed with 50%
coolant and 50%
deionized water.
• Funnel (used only
for adding coolant)
Engine oil level
( P.479)
• “Toyota Genuine
Motor Oil” or equiva-
lent
• Rag or paper towel
• Funnel (used only
for adding engine
oil)
Fuses
( P.513)
• Fuse with same
amperage rating as
original
DC/DC Con-
verter air
intake vent
( P.504)
• Vacuum cleaner,
etc,
• Phillips screwdriver
Light bulbs
( P.516)
• Bulb with same
number and watt-
age rating as origi-
nal
• Phillips-head screw-
driver
• Flathead screw-
driver
•Wrench
Radiator and
condenser
( P.482)
Tire inflation
pressure
( P.498)
• Tire pressure gauge
• Compressed air
source
Washer fluid
( P.483)
• Water or washer
fluid containing anti-
freeze (for winter
use)
• Funnel (used only
for adding water or
washer fluid)
WARNING
The engine compartment contains many mechanisms and fluids that may move suddenly, become hot, or
become electrically energized. To avoid death or serious injury, observe the following precautions.
ItemsParts and tools
Page 483 of 718
481
7
7-3. Do-it-yourself maintenance
Maintenance and care
■Engine oil consumption
A certain amount of engine oil will be
consumed while driving. In the following situations, oil consumption may increase, and engine oil may need to be
refilled in between oil maintenance inter- vals.
●When the engine is new, for example directly after purchasing the vehicle or after replacing the engine
●If low quality oil or oil of an inappropri-ate viscosity is used
●When driving at high engine speeds or with a heavy load, when towing, or
when driving while accelerating or decelerating frequently
●When leaving the engine idling for a long time, or when driving frequently through heavy traffic
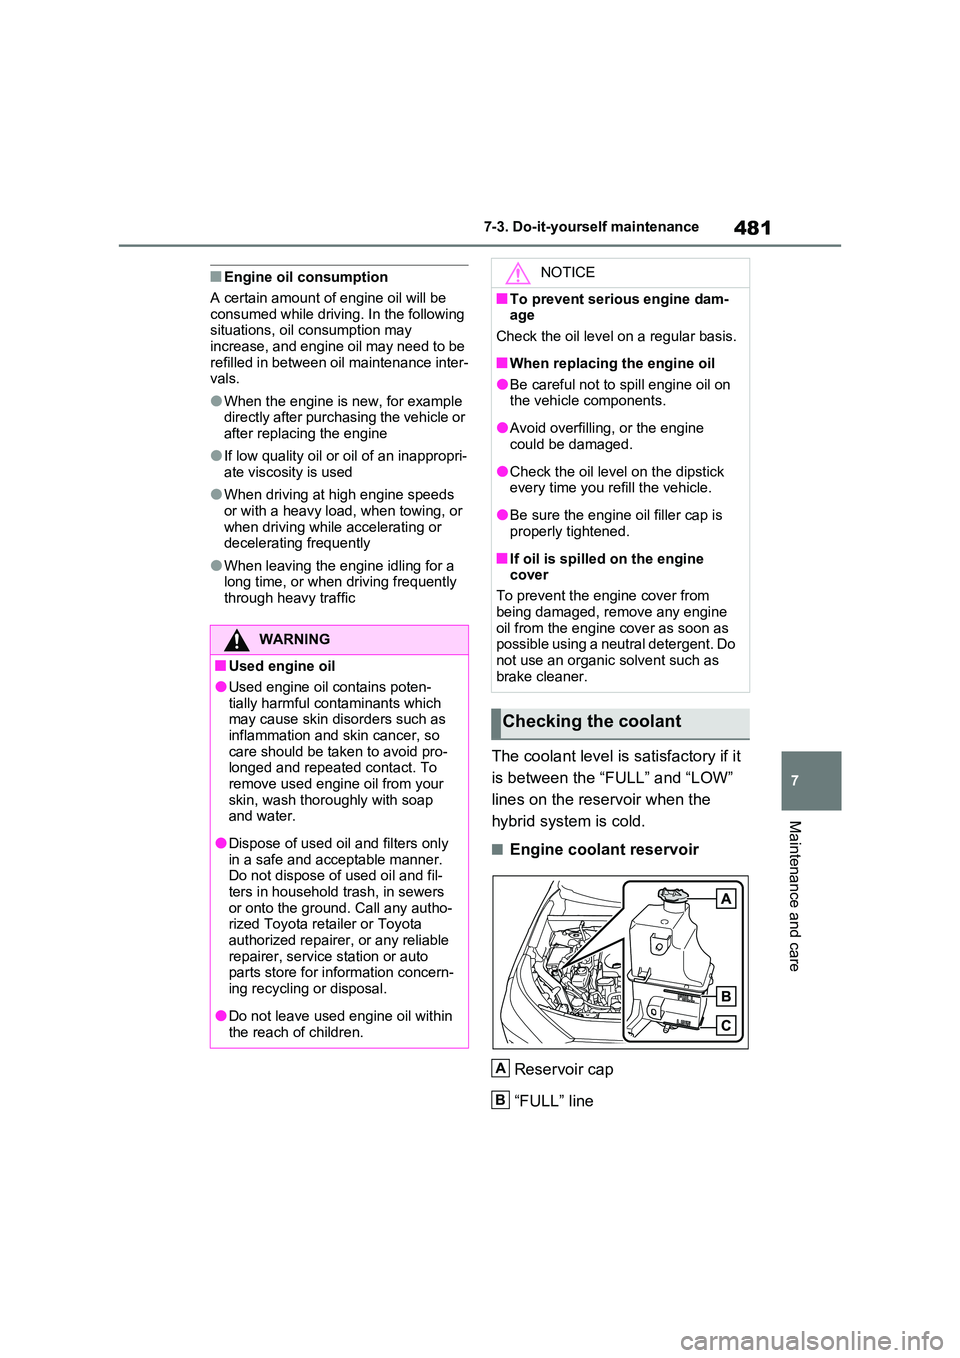
The coolant level is satisfactory if it
is between the “FULL” and “LOW”
lines on the reservoir when the
hybrid system is cold.
■Engine coolant reservoir
Reservoir cap
“FULL” line
WARNING
■Used engine oil
●Used engine oil contains poten-
tially harmful contaminants which may cause skin disorders such as inflammation and skin cancer, so
care should be taken to avoid pro- longed and repeated contact. To remove used engine oil from your
skin, wash thoroughly with soap and water.
●Dispose of used oil and filters only in a safe and acceptable manner. Do not dispose of used oil and fil-
ters in household trash, in sewers or onto the ground. Call any autho-rized Toyota retailer or Toyota
authorized repairer, or any reliable repairer, service station or auto parts store for information concern-
ing recycling or disposal.
●Do not leave used engine oil within
the reach of children.
NOTICE
■To prevent serious engine dam- age
Check the oil level on a regular basis.
■When replacing the engine oil
●Be careful not to spill engine oil on the vehicle components.
●Avoid overfilling, or the engine could be damaged.
●Check the oil level on the dipstick every time you refill the vehicle.
●Be sure the engine oil filler cap is properly tightened.
■If oil is spilled on the engine cover
To prevent the engine cover from
being damaged, remove any engine oil from the engine cover as soon as possible using a neutral detergent. Do
not use an organic solvent such as brake cleaner.
Checking the coolant
A
B
Page 490 of 718

4887-3. Do-it-yourself maintenance
Rotate the tires in the order shown.
To equalize tire wear and help extend
tire life, Toyota recommends that tire
rotation is carried out approximately
every 5000 km (3000 miles).
Do not fail to initialize the tire pressure
warning system after tire rotation.
Front
■When rotating the tires
Make sure that the power switch is OFF. If the tires are rotated while the power
switch is in ON, the tire position informa- tion will not be updated.
If this accidentally occurs, either turn the
power switch to OFF and then to ON, or
initialize the system after checking that
the tire pressure is properly adjusted.
Your vehicle is equipped with a tire
pressure warning system that uses
tire pressure warning valves and
transmitters to detect low tire infla-
tion pressure before serious prob-
lems arise.
The tire pressure warning system
of this vehicle adopts a 2-type
warning system
When “Adjust Pressure” is dis-
played (Normal Warning)
WARNING
●Do not use tire sizes other than those recommended by Toyota.
●Do not mix differently constructed tires (radial, bias-belted or bias-ply
tires).
●Do not mix summer, all season and
snow tires.
●Do not use tires that have been
used on another vehicle. Do not use tires if you do not know how they were used previously.
●Vehicles with compact spare tire: Do not tow if your vehicle has a
compact spare tire installed.
●Vehicles with emergency tire punc-
ture repair kit: Do not tow anything if a tire that has been repaired using the emergency tire puncture repair
kit is installed. The load on the tire may cause unexpected damage to the tire.
NOTICE
■Driving on rough roads
Take particular care when driving on
roads with loose surfaces or potholes. These conditions may cause losses in tire inflation pressure, reducing the
cushioning ability of the tires. In addi- tion, driving on rough roads may cause damage to the tires them-
selves, as well as the vehicle’s wheels and body.
■If tire inflation pressure of each tire becomes low while driving
Do not continue driving, or your tires
and/or wheels may be ruined.
Tire rotation
Tire pressure warning sys-
tem
A
Page 492 of 718
4907-3. Do-it-yourself maintenance
while the vehicle is moving.
2Turn the power switch to ON.
3Press and hold to display
the cursor on the content display
area (center) of the multi-infor-
mation display.
4Press or of the meter
control switches to select
and then press .
5Press or of the meter
control switches and select
“ Vehicle Settings”, and
then press and hold .
6Press or of the meter
control switches and select
“TPWS”, and then press .
7Press or to select “Pres-
sure unit setting”.
8Press or to select the
desired unit and then press .
■Routine tire inflation pressure
checks
The tire pressure warning system does
not replace routine tire inflation pressure
checks. Make sure to check tire inflation
pressure as part of your routine of daily
vehicle checks.
■Tire inflation pressure
●It may take a few minutes to display
the tire inflation pressure after the
power switch is turned to ON. It may
also take a few minutes to display the
tire inflation pressure after inflation
pressure has been adjusted.
●Tire inflation pressure changes with temperature. The displayed values
may also be different from the values
measured using a tire pressure
gauge.
■Situations in which the tire pres-
sure warning system may not oper-
ate properly
●In the following cases, the tire pres-
sure warning system may not operate
properly.
• If non-genuine Toyota wheels are
used.
• A tire has been replaced with a tire
that is not an OE (Original Equipment)
tire.
• A tire has been replaced with a tire
that is not of the specified size.
• Tire chains, etc. are equipped.
• An auxiliary-supported run-flat tire is
equipped.
• If a window tint that affects the radio
wave signals is installed.
• If there is a lot of snow or ice on the
vehicle, particularly around the wheels
or wheel housings.
• If the tire inflation pressure is
extremely higher than the specified
level.
• If wheels without tire pressure warning
valves and transmitters are used.
• If the ID code on the tire pressure
warning valves and transmitters is not
registered in the tire pressure warning
computer.
●Performance may be affected in the
following situations.
• Near a TV tower, electric power plant,
gas station, radio station, large dis-
play, airport or other facility that gen-
erates strong radio waves or electrical
noise
• When carrying a portable radio, cellu-
lar phone, cordless phone or other
wireless communication device
If tire position information is not cor-
rectly displayed due to the radio wave
conditions, the display may be cor-
rected by driving and changing the
radio wave conditions.
●When the vehicle is parked, the time
taken for the warning to start or go off
Page 503 of 718
501
7
7-3. Do-it-yourself maintenance
Maintenance and care
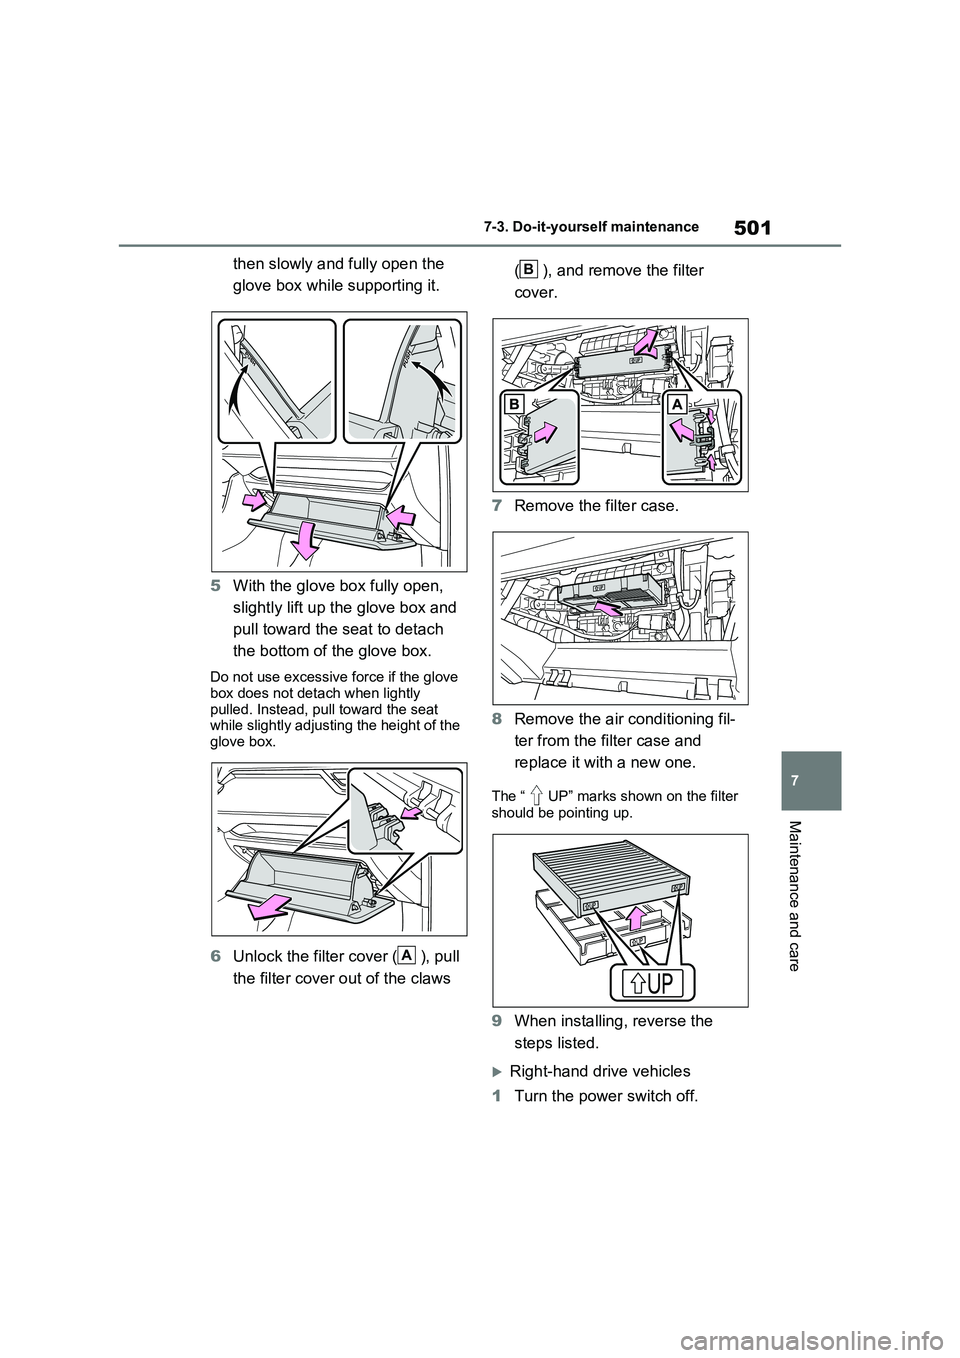
then slowly and fully open the
glove box while supporting it.
5 With the glove box fully open,
slightly lift up the glove box and
pull toward the seat to detach
the bottom of the glove box.
Do not use excessive force if the glove
box does not detach when lightly pulled. Instead, pull toward the seat while slightly adjusting the height of the
glove box.
6 Unlock the filter cover ( ), pull
the filter cover out of the claws
( ), and remove the filter
cover.
7 Remove the filter case.
8 Remove the air conditioning fil-
ter from the filter case and
replace it with a new one.
The “ UP” marks shown on the filter
should be pointing up.
9 When installing, reverse the
steps listed.
Right-hand drive vehicles
1 Turn the power switch off.
A
B
Page 504 of 718
5027-3. Do-it-yourself maintenance
Confirm that the charging connector is
not connected. Also, do not use the Remote Air Conditioning System during the procedure.
2 Open the front passenger’s
door.
By keeping the door open, unexpected operation of the Remote Air Condition-
ing System can be prevent. ( P.438)
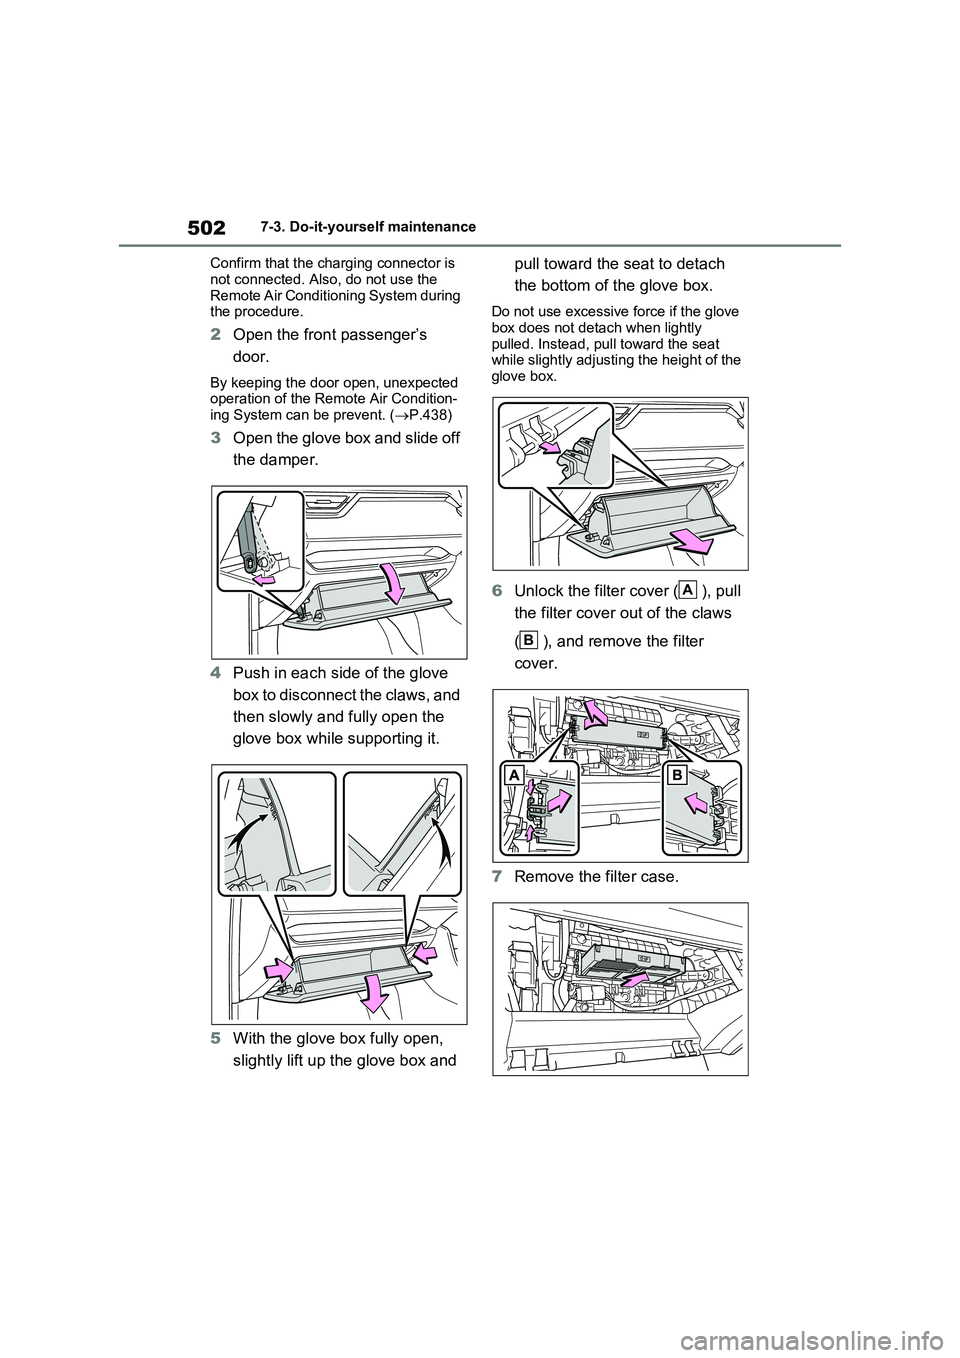
3Open the glove box and slide off
the damper.
4 Push in each side of the glove
box to disconnect the claws, and
then slowly and fully open the
glove box while supporting it.
5 With the glove box fully open,
slightly lift up the glove box and
pull toward the seat to detach
the bottom of the glove box.
Do not use excessive force if the glove
box does not detach when lightly pulled. Instead, pull toward the seat while slightly adjusting the height of the
glove box.
6 Unlock the filter cover ( ), pull
the filter cover out of the claws
( ), and remove the filter
cover.
7 Remove the filter case.
A
B
Page 507 of 718
505
7 7-3. Do-it-yourself maintenance
Maintenance and care
pletely removed with the air intake
vent cover installed, remove the
cover and clean the filter.
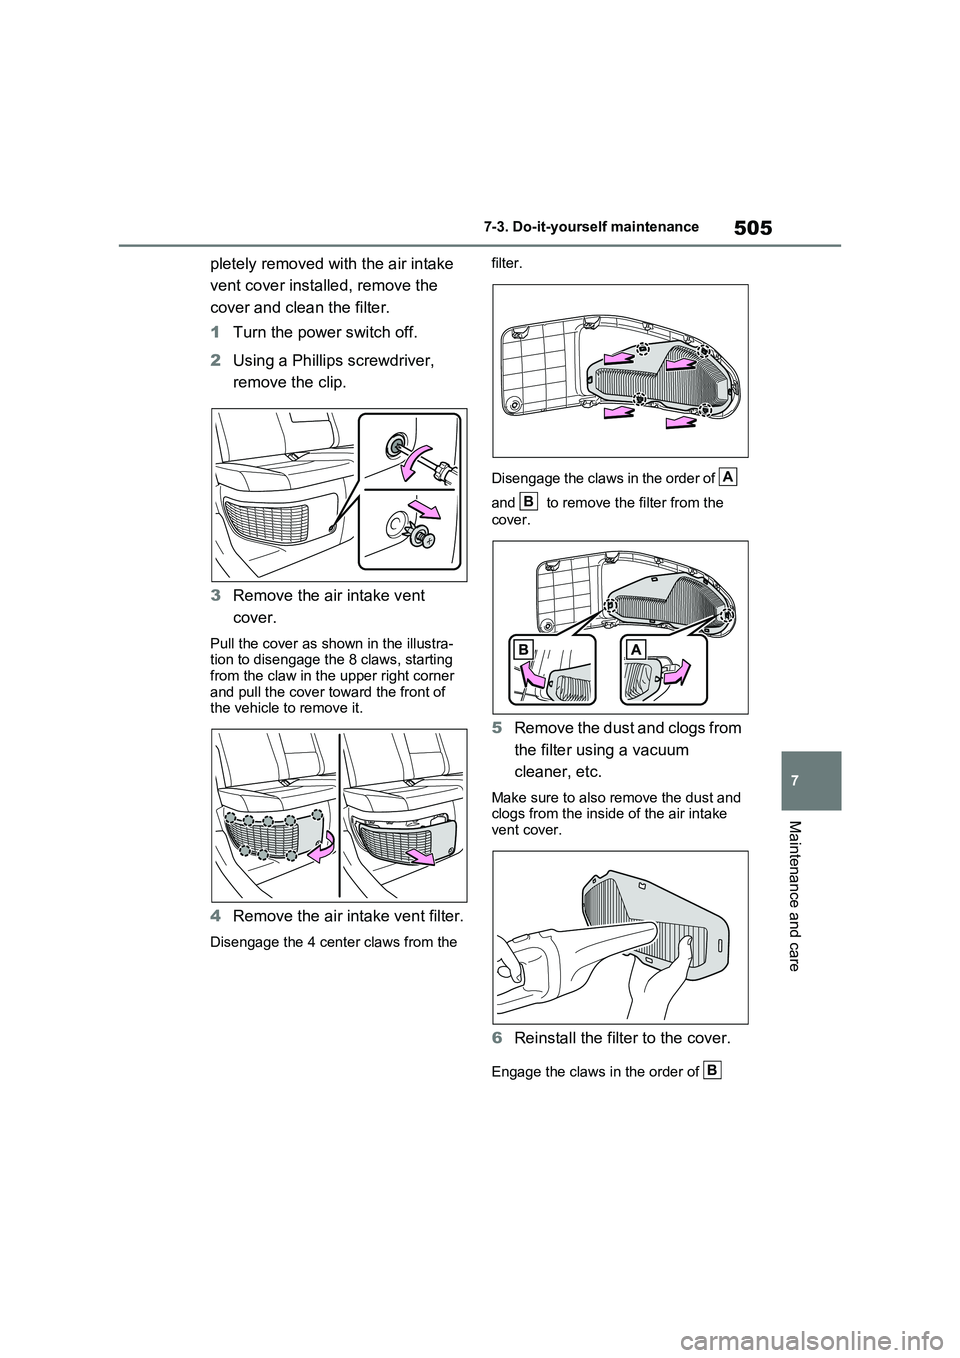
1Turn the power switch off.
2Using a Phillips screwdriver,
remove the clip.
3Remove the air intake vent
cover.
Pull the cover as shown in the illustra-
tion to disengage the 8 claws, starting
from the claw in the upper right corner
and pull the cover toward the front of
the vehicle to remove it.
4Remove the air intake vent filter.
Disengage the 4 center claws from the filter.
Disengage the claws in the order of
and to remove the filter from the
cover.
5Remove the dust and clogs from
the filter using a vacuum
cleaner, etc.
Make sure to also remove the dust and
clogs from the inside of the air intake
vent cover.
6Reinstall the filter to the cover.
Engage the claws in the order of
A
B
B
Page 514 of 718
5127-3. Do-it-yourself maintenance
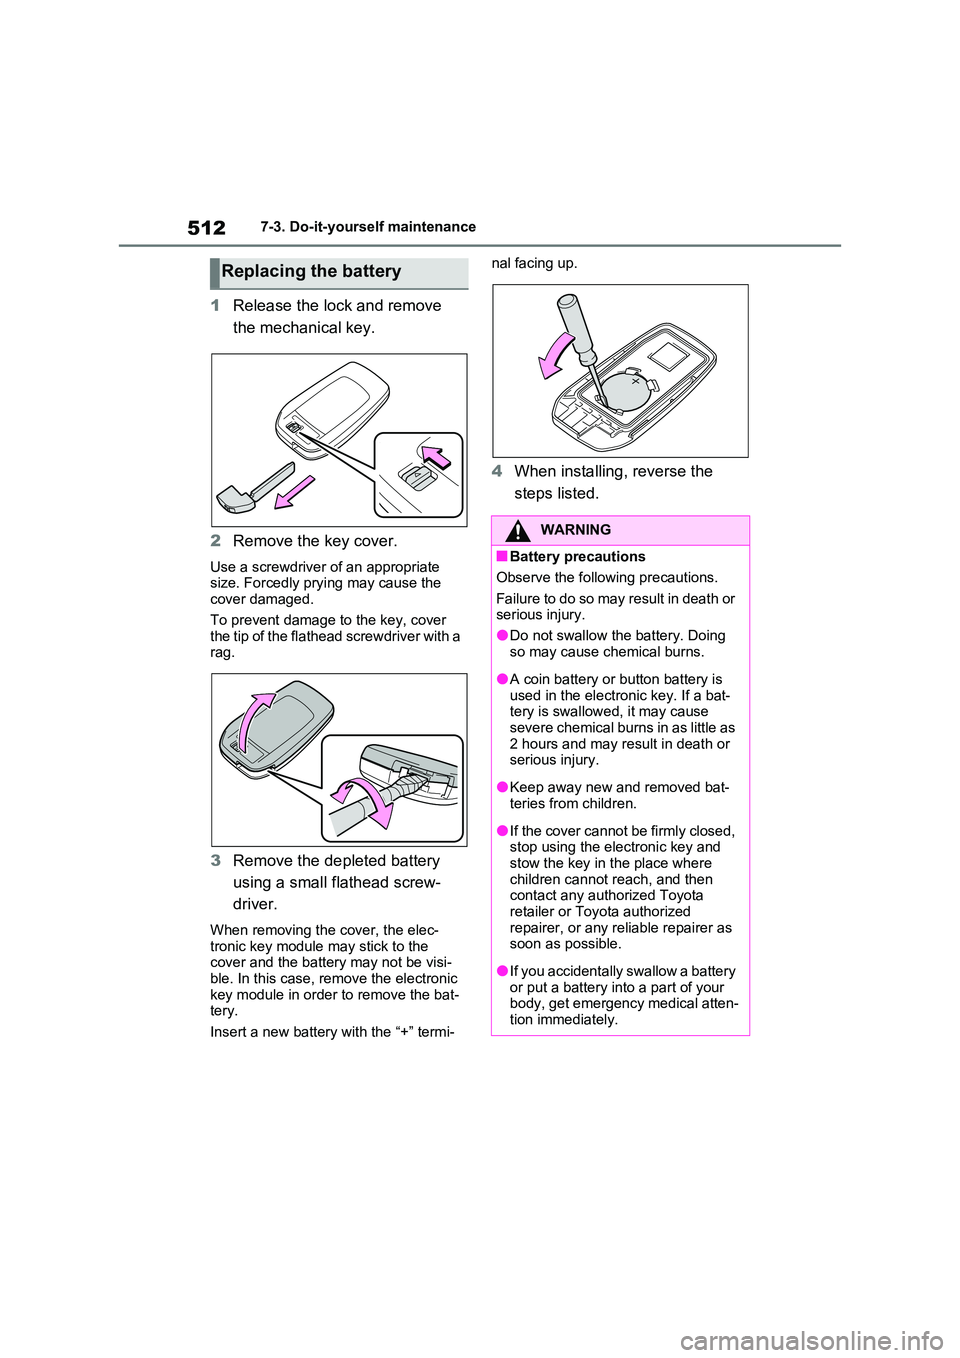
1Release the lock and remove
the mechanical key.
2 Remove the key cover.
Use a screwdriver of an appropriate size. Forcedly prying may cause the cover damaged.
To prevent damage to the key, cover the tip of the flathead screwdriver with a rag.
3 Remove the depleted battery
using a small flathead screw-
driver.
When removing the cover, the elec- tronic key module may stick to the cover and the battery may not be visi-
ble. In this case, remove the electronic key module in order to remove the bat-tery.
Insert a new battery with the “+” termi-
nal facing up.
4 When installing, reverse the
steps listed.
Replacing the battery
WARNING
■Battery precautions
Observe the following precautions.
Failure to do so may result in death or serious injury.
●Do not swallow the battery. Doing
so may cause chemical burns.
●A coin battery or button battery is
used in the electronic key. If a bat- tery is swallowed, it may cause severe chemical burns in as little as
2 hours and may result in death or serious injury.
●Keep away new and removed bat-teries from children.
●If the cover cannot be firmly closed, stop using the electronic key and stow the key in the place where
children cannot reach, and then contact any authorized Toyota retailer or Toyota authorized
repairer, or any reliable repairer as soon as possible.
●If you accidentally swallow a battery or put a battery into a part of your body, get emergency medical atten-
tion immediately.
Page 522 of 718
5207-3. Do-it-yourself maintenance
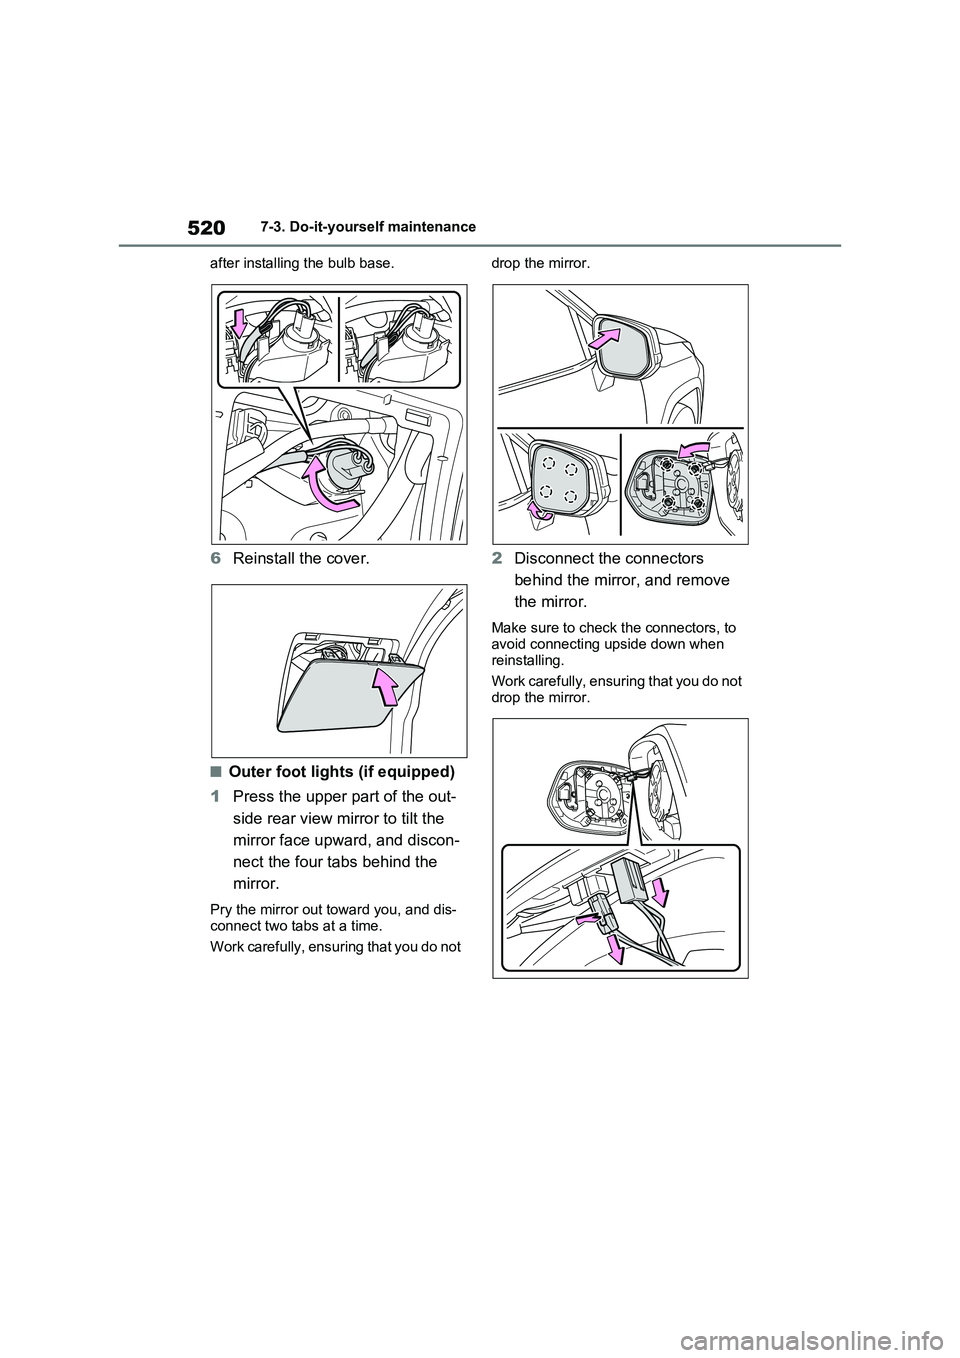
after installing the bulb base.
6Reinstall the cover.
■Outer foot lights (if equipped)
1Press the upper part of the out-
side rear view mirror to tilt the
mirror face upward, and discon-
nect the four tabs behind the
mirror.
Pry the mirror out toward you, and dis-
connect two tabs at a time.
Work carefully, ensuring that you do not drop the mirror.
2Disconnect the connectors
behind the mirror, and remove
the mirror.
Make sure to check the connectors, to
avoid connecting upside down when
reinstalling.
Work carefully, ensuring that you do not
drop the mirror.