remote control TOYOTA RAV4 PLUG-IN HYBRID 2023 Owners Manual
[x] Cancel search | Manufacturer: TOYOTA, Model Year: 2023, Model line: RAV4 PLUG-IN HYBRID, Model: TOYOTA RAV4 PLUG-IN HYBRID 2023Pages: 718, PDF Size: 167.55 MB
Page 20 of 718
18Pictorial index
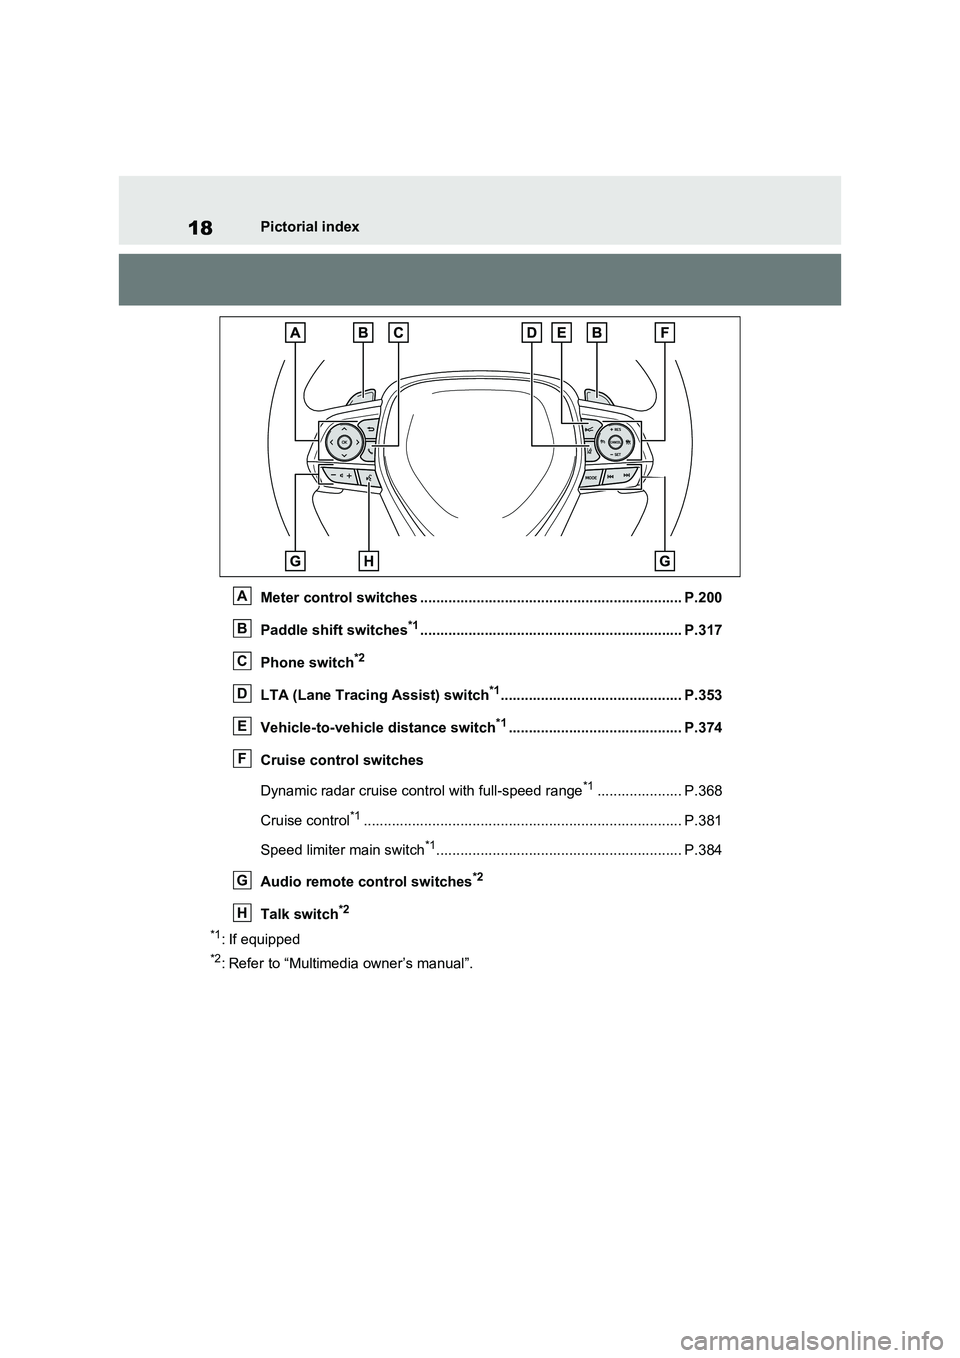
Meter control switches ................................................................. P.200
Paddle shift switches
*1................................................................. P.317
Phone switch
*2
LTA (Lane Tracing Assist) switch*1............................................. P.353
Vehicle-to-vehicle distance switch
*1........................................... P.374
Cruise control switches
Dynamic radar cruise control with full-speed range
*1..................... P.368
Cruise control
*1............................................................................... P.381
Speed limiter main switch
*1............................................................. P.384
Audio remote control switches
*2
Talk switch*2
*1
: If equipped
*2: Refer to “Multimedia owner’s manual”.
A
B
C
D
E
F
G
H
Page 28 of 718
26Pictorial index
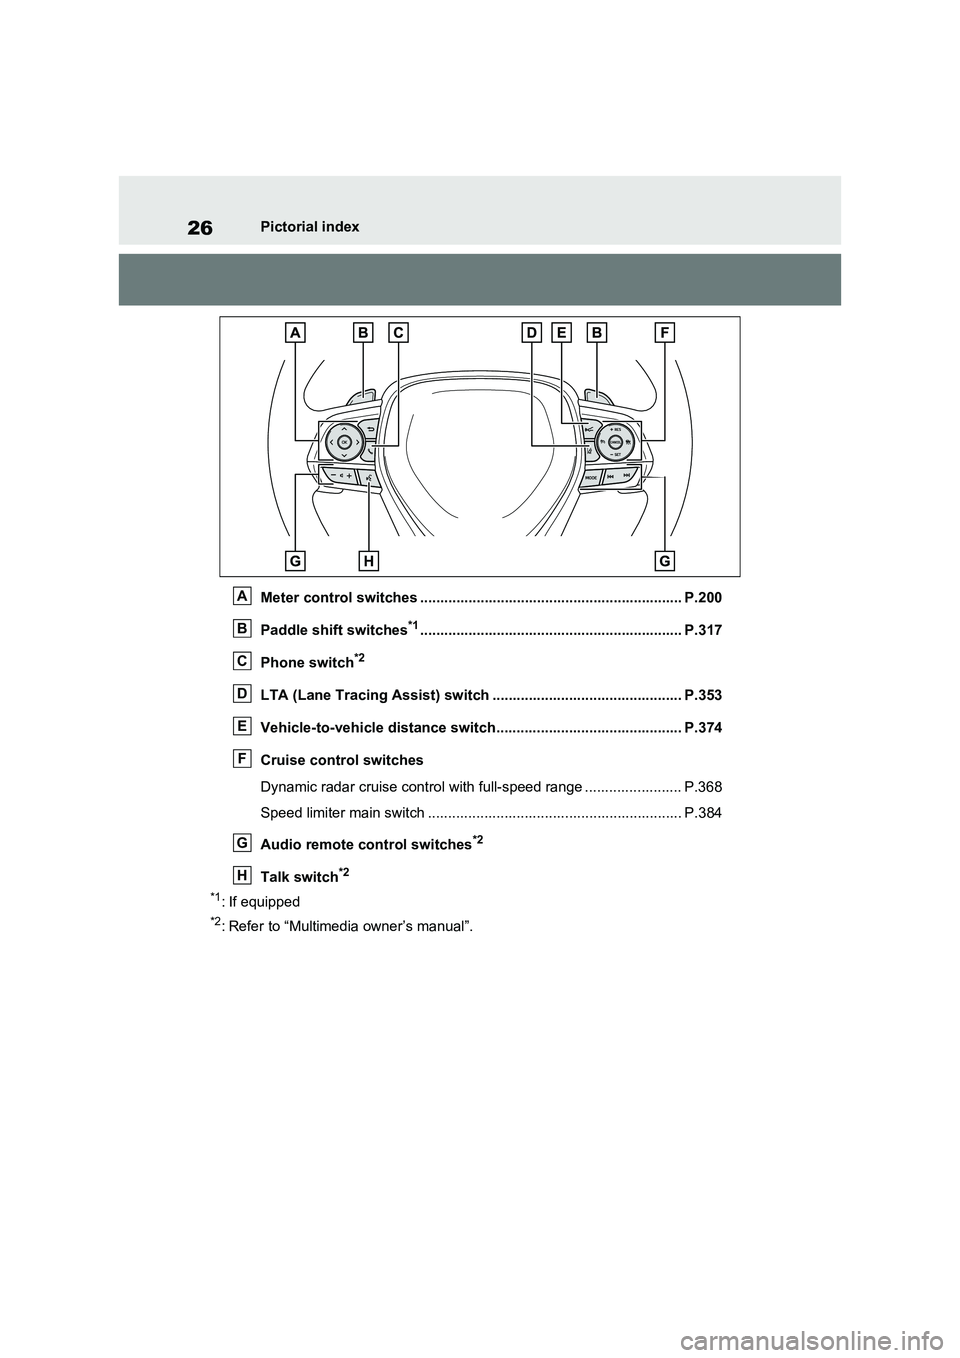
Meter control switches ................................................................. P.200
Paddle shift switches
*1................................................................. P.317
Phone switch
*2
LTA (Lane Tracing Assist) switch ............................................... P.353
Vehicle-to-vehicle distance switch.............................................. P.374
Cruise control switches
Dynamic radar cruise control with full-speed range ........................ P.368
Speed limiter main switch ............................................................... P.384
Audio remote control switches
*2
Talk switch*2
*1
: If equipped
*2: Refer to “Multimedia owner’s manual”.
A
B
C
D
E
F
G
H
Page 80 of 718
781-4. Theft deterrent system
*: If equipped
■Setting
Turn the power switch to OFF, have
all the passengers exit the vehicle
and ensure that all the doors are
closed.
Using the entry function:
Touch the sensor area on the front
outside door handle twice within 5
seconds.
Using the wireless remote control:
Press twice within 5 sec-
onds.
■Canceling
Using the entry function:
Hold the front outside door handle.
Using the wireless remote control:
Press .
Double locking system*
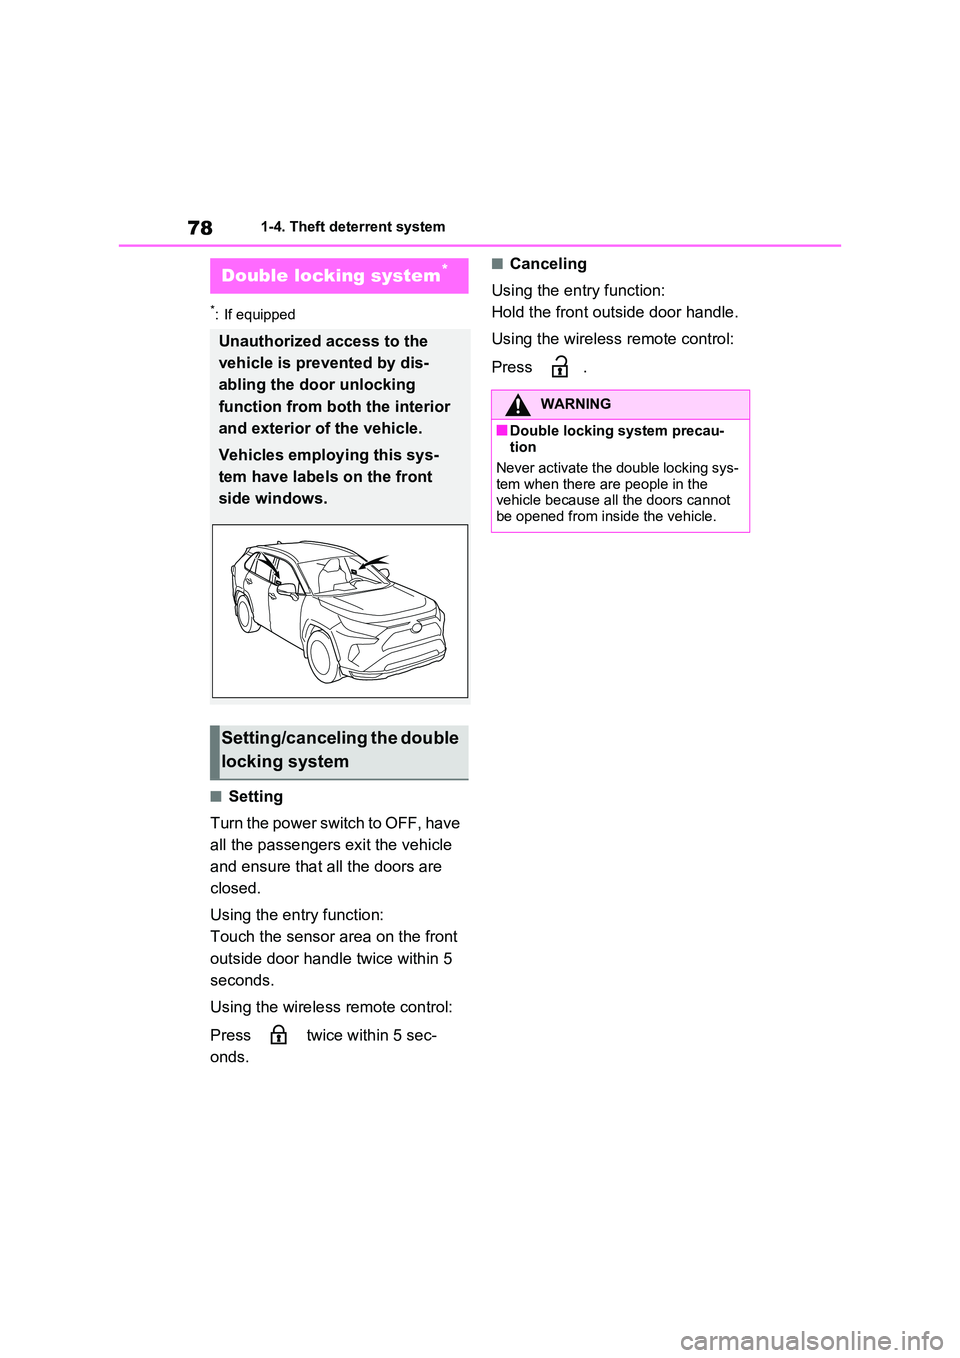
Unauthorized access to the
vehicle is prevented by dis-
abling the door unlocking
function from both the interior
and exterior of the vehicle.
Vehicles employing this sys-
tem have labels on the front
side windows.
Setting/canceling the double
locking system
WARNING
■Double locking system precau- tion
Never activate the double locking sys-
tem when there are people in the vehicle because all the doors cannot be opened from inside the vehicle.
Page 81 of 718
79
1
1-4. Theft deterrent system
For safety and security
*: If equipped
■Items to check before locking
the vehicle
To prevent unexpected triggering of
the alarm and vehicle theft, make
sure of the following:
Nobody is in the vehicle.
The side windows and pan-
oramic moon roof (if equipped)
are closed before the alarm is
set.
No valuables or other personal
items are left in the vehicle.
■Setting
Close the doors and hood, and lock
all the doors using the entry func-
tion or wireless remote control. The
system will be set automatically
after 30 seconds.
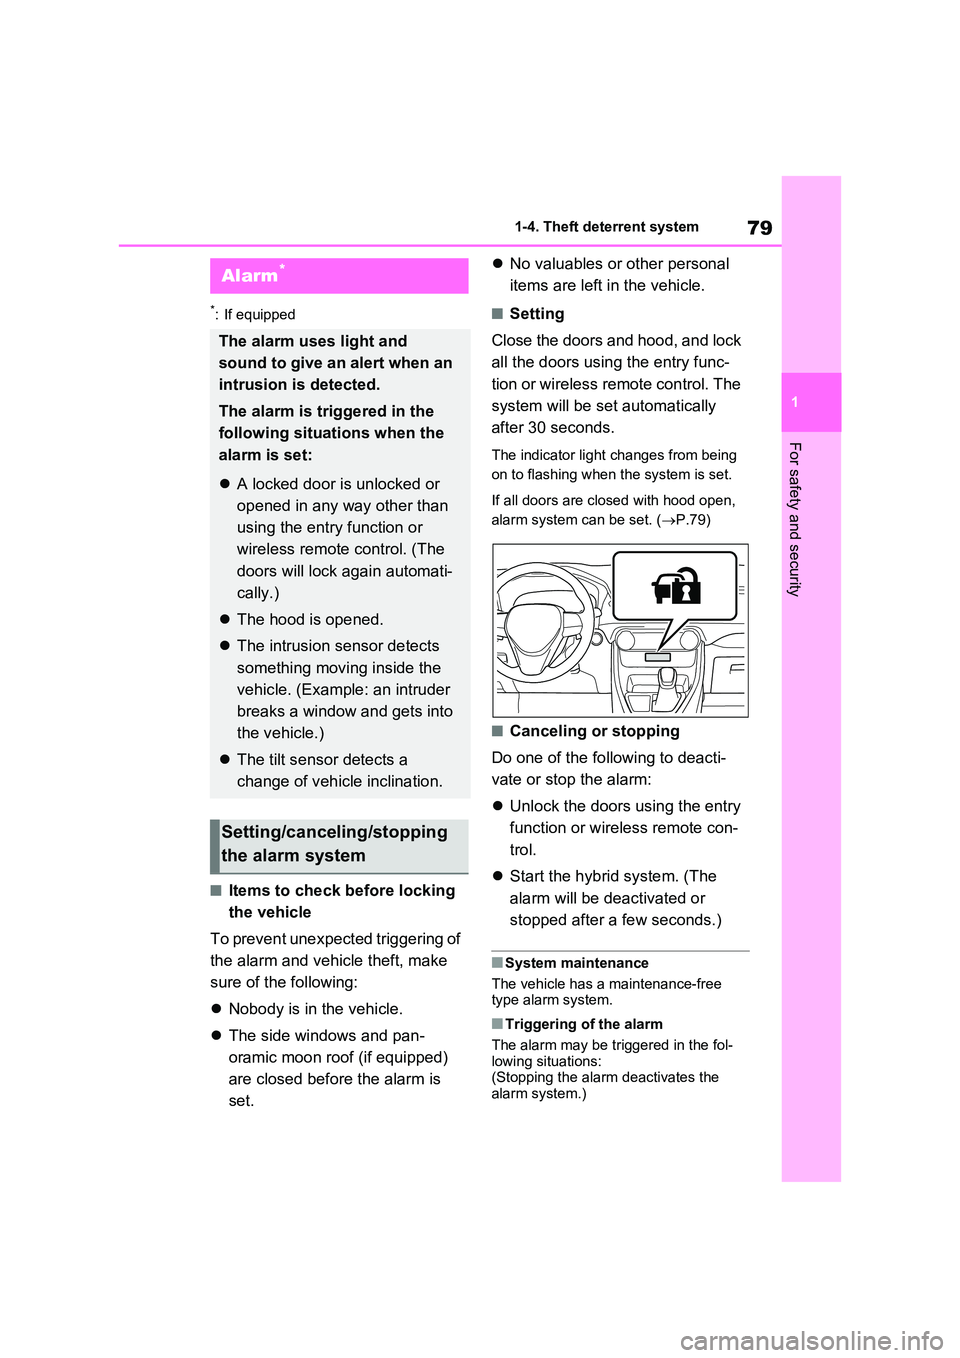
The indicator light changes from being
on to flashing when the system is set.
If all doors are closed with hood open,
alarm system can be set. ( P.79)
■Canceling or stopping
Do one of the following to deacti-
vate or stop the alarm:
Unlock the doors using the entry
function or wireless remote con-
trol.
Start the hybrid system. (The
alarm will be deactivated or
stopped after a few seconds.)
■System maintenance
The vehicle has a maintenance-free type alarm system.
■Triggering of the alarm
The alarm may be triggered in the fol- lowing situations:(Stopping the alarm deactivates the
alarm system.)
Alarm*
The alarm uses light and
sound to give an alert when an
intrusion is detected.
The alarm is triggered in the
following situations when the
alarm is set:
A locked door is unlocked or
opened in any way other than
using the entry function or
wireless remote control. (The
doors will lock again automati-
cally.)
The hood is opened.
The intrusion sensor detects
something moving inside the
vehicle. (Example: an intruder
breaks a window and gets into
the vehicle.)
The tilt sensor detects a
change of vehicle inclination.
Setting/canceling/stopping
the alarm system
Page 83 of 718
81
1
1-4. Theft deterrent system
For safety and security
the alarm, as they will respond to
movement inside the vehicle.
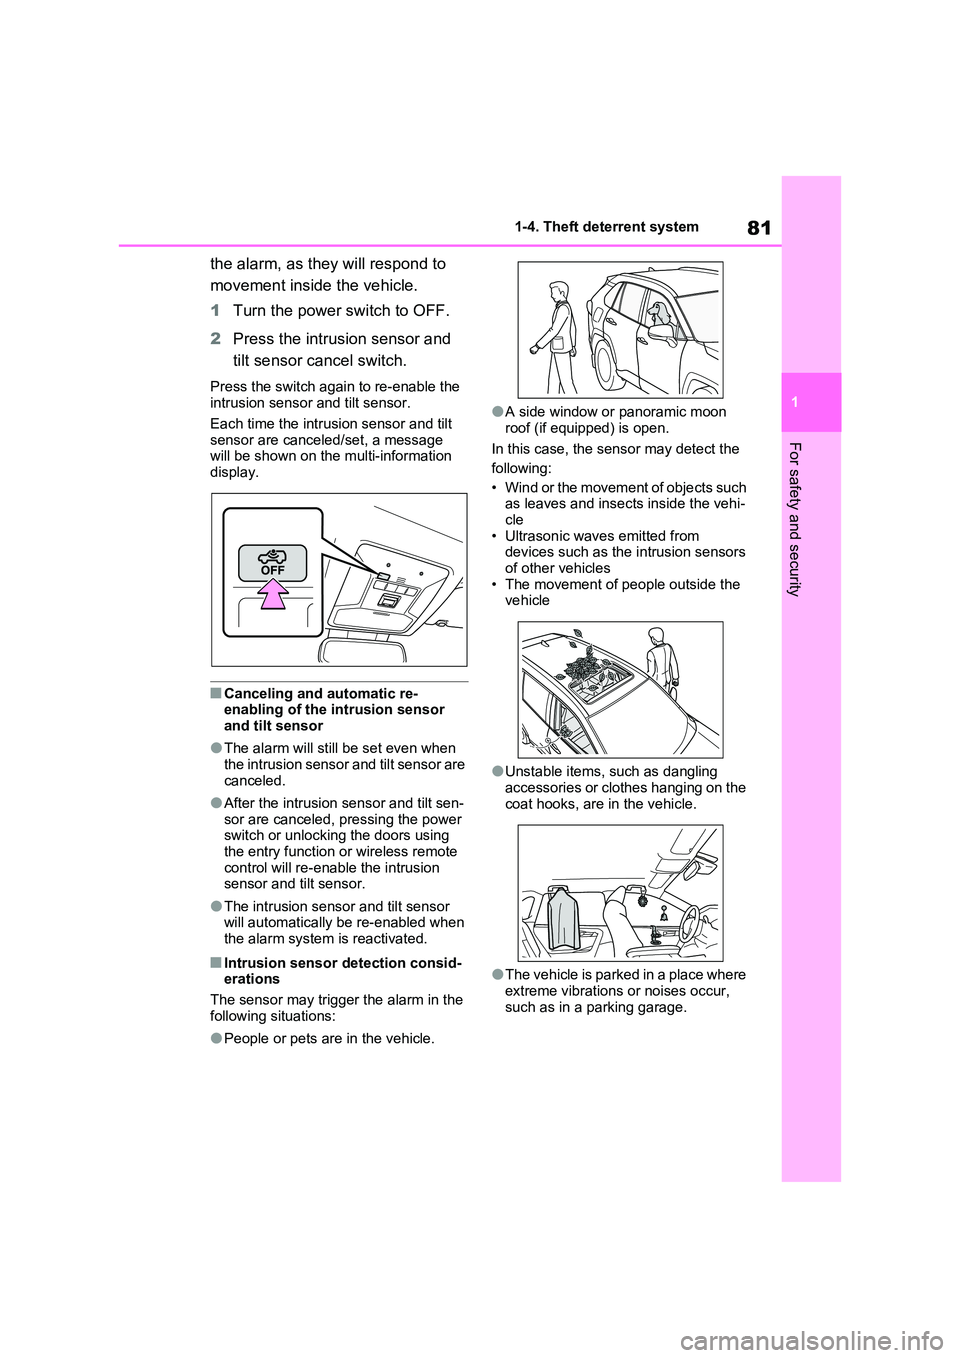
1 Turn the power switch to OFF.
2 Press the intrusion sensor and
tilt sensor cancel switch.
Press the switch again to re-enable the intrusion sensor and tilt sensor.
Each time the intrusion sensor and tilt
sensor are canceled/set, a message will be shown on the multi-information display.
■Canceling and automatic re-enabling of the intrusion sensor
and tilt sensor
●The alarm will still be set even when
the intrusion sensor and tilt sensor are canceled.
●After the intrusion sensor and tilt sen-sor are canceled, pressing the power switch or unlocking the doors using
the entry function or wireless remote control will re-enable the intrusion sensor and tilt sensor.
●The intrusion sensor and tilt sensor will automatically be re-enabled when
the alarm system is reactivated.
■Intrusion sensor detection consid- erations
The sensor may trigger the alarm in the
following situations:
●People or pets are in the vehicle.
●A side window or panoramic moon
roof (if equipped) is open.
In this case, the sensor may detect the
following:
• Wind or the movement of objects such as leaves and insects inside the vehi-
cle • Ultrasonic waves emitted from devices such as the intrusion sensors
of other vehicles • The movement of people outside the vehicle
●Unstable items, such as dangling accessories or clothes hanging on the
coat hooks, are in the vehicle.
●The vehicle is parked in a place where
extreme vibrations or noises occur, such as in a parking garage.
Page 123 of 718
121
2 2-2. Charging
Plug-in hybrid system
■Unlocking the charging port
lid
1Unlock the doors using the
smart entry & start system or
wireless remote control.
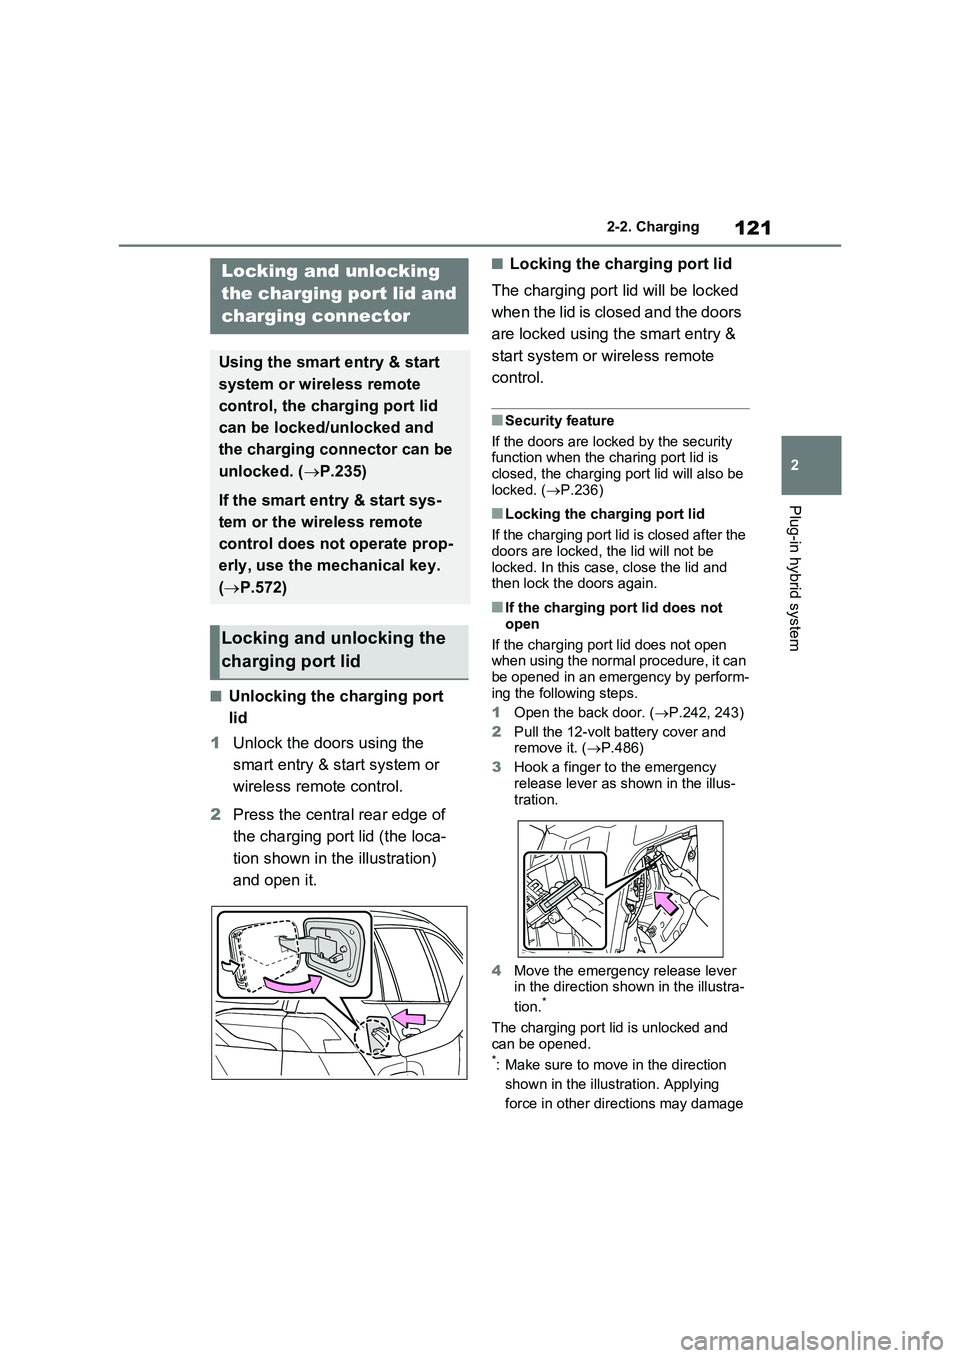
2Press the central rear edge of
the charging port lid (the loca-
tion shown in the illustration)
and open it.
■Locking the charging port lid
The charging port lid will be locked
when the lid is closed and the doors
are locked using the smart entry &
start system or wireless remote
control.
■Security feature
If the doors are locked by the security
function when the charing port lid is
closed, the charging port lid will also be
locked. (P.236)
■Locking the charging port lid
If the charging port lid is closed after the
doors are locked, the lid will not be
locked. In this case, close the lid and
then lock the doors again.
■If the charging port lid does not
open
If the charging port lid does not open
when using the normal procedure, it can
be opened in an emergency by perform-
ing the following steps.
1Open the back door. (P.242, 243)
2Pull the 12-volt battery cover and
remove it. (P.486)
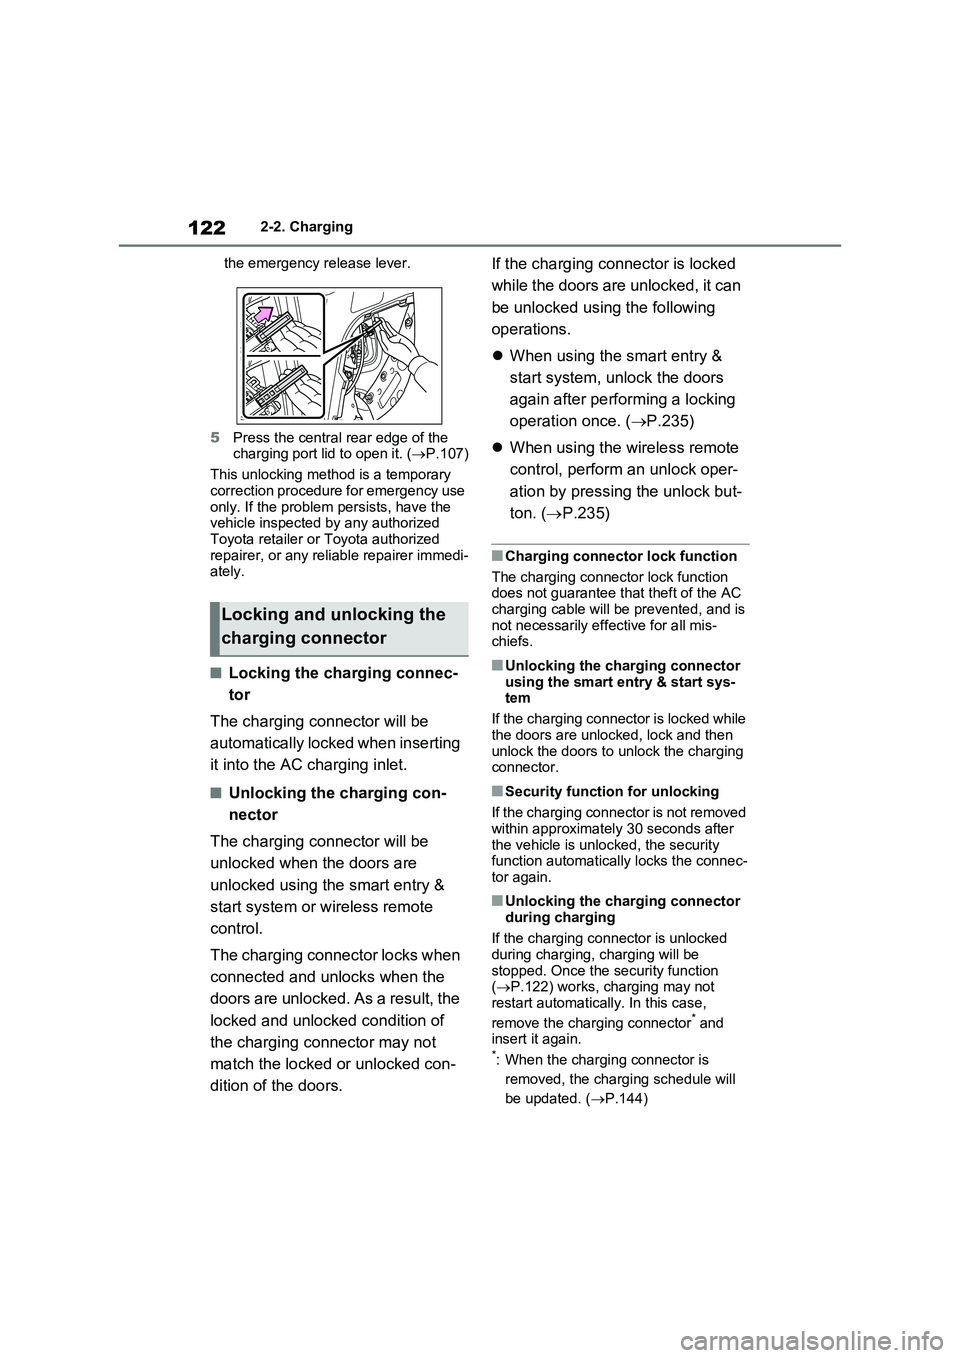
3Hook a finger to the emergency
release lever as shown in the illus-
tration.
4Move the emergency release lever
in the direction shown in the illustra-
tion.
*
The charging port lid is unlocked and
can be opened.
*: Make sure to move in the direction
shown in the illustration. Applying
force in other directions may damage
Locking and unlocking
the charging port lid and
charging connector
Using the smart entry & start
system or wireless remote
control, the charging port lid
can be locked/unlocked and
the charging connector can be
unlocked. (P.235)
If the smart entry & start sys-
tem or the wireless remote
control does not operate prop-
erly, use the mechanical key.
(P.572)
Locking and unlocking the
charging port lid
Page 124 of 718
1222-2. Charging
the emergency release lever.
5Press the central rear edge of the
charging port lid to open it. (P.107)
This unlocking method is a temporary
correction procedure for emergency use
only. If the problem persists, have the
vehicle inspected by any authorized
Toyota retailer or Toyota authorized
repairer, or any reliable repairer immedi-
ately.
■Locking the charging connec-
tor
The charging connector will be
automatically locked when inserting
it into the AC charging inlet.
■Unlocking the charging con-
nector
The charging connector will be
unlocked when the doors are
unlocked using the smart entry &
start system or wireless remote
control.
The charging connector locks when
connected and unlocks when the
doors are unlocked. As a result, the
locked and unlocked condition of
the charging connector may not
match the locked or unlocked con-
dition of the doors.If the charging connector is locked
while the doors are unlocked, it can
be unlocked using the following
operations.
When using the smart entry &
start system, unlock the doors
again after performing a locking
operation once. (P.235)
When using the wireless remote
control, perform an unlock oper-
ation by pressing the unlock but-
ton. (P.235)
■Charging connector lock function
The charging connector lock function
does not guarantee that theft of the AC
charging cable will be prevented, and is
not necessarily effective for all mis-
chiefs.
■Unlocking the charging connector
using the smart entry & start sys-
tem
If the charging connector is locked while
the doors are unlocked, lock and then
unlock the doors to unlock the charging
connector.
■Security function for unlocking
If the charging connector is not removed
within approximately 30 seconds after
the vehicle is unlocked, the security
function automatically locks the connec-
tor again.
■Unlocking the charging connector
during charging
If the charging connector is unlocked
during charging, charging will be
stopped. Once the security function
(P.122) works, charging may not
restart automatically. In this case,
remove the charging connector
* and
insert it again.
*: When the charging connector is
removed, the charging schedule will
be updated. (P.144)
Locking and unlocking the
charging connector
Page 125 of 718
123
2
2-2. Charging
Plug-in hybrid system
■When the charging connector can-
not be inserted into the AC charging inlet
Check that the connector lock pin is not
lowered.
If the connector lock pin is lowered, the
connector lock is operating. Unlock the
doors using the smart entry & start sys-
tem or wireless remote control and
unlock the charging connector lock and
check that the connector lock pin is not
lowered.
■If the charging connector cannot be unlocked
The charging connector can be
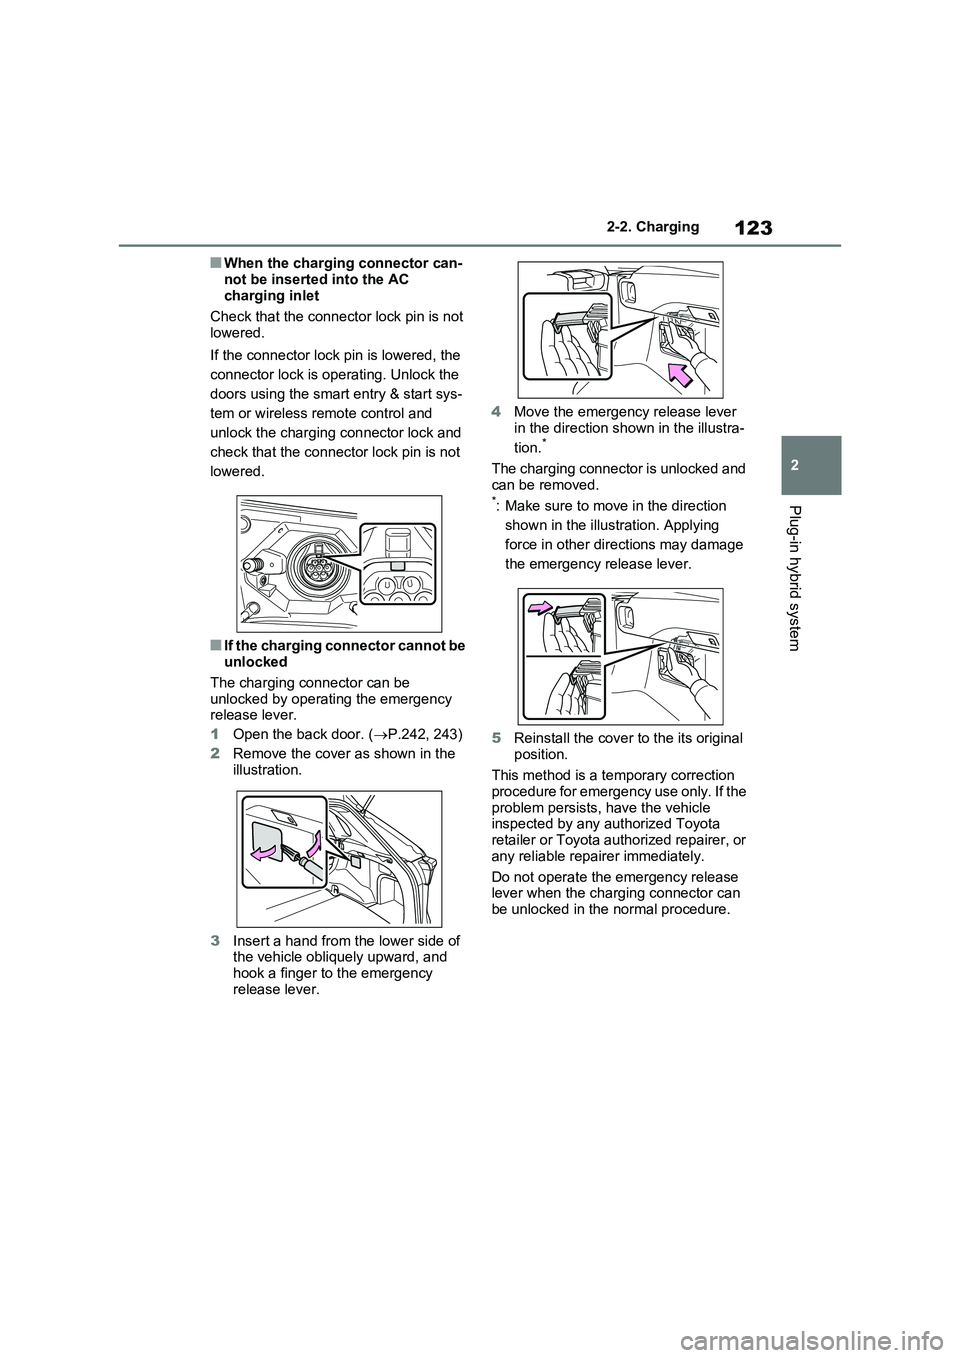
unlocked by operating the emergency release lever.
1 Open the back door. (P.242, 243)
2 Remove the cover as shown in the illustration.
3 Insert a hand from the lower side of the vehicle obliquely upward, and
hook a finger to the emergency release lever.
4 Move the emergency release lever
in the direction shown in the illustra-
tion.*
The charging connector is unlocked and
can be removed.*: Make sure to move in the direction
shown in the illustration. Applying
force in other directions may damage
the emergency release lever.
5 Reinstall the cover to the its original
position.
This method is a temporary correction procedure for emergency use only. If the
problem persists, have the vehicle inspected by any authorized Toyota retailer or Toyota authorized repairer, or
any reliable repairer immediately.
Do not operate the emergency release lever when the charging connector can
be unlocked in the normal procedure.
Page 127 of 718
125
2 2-2. Charging
Plug-in hybrid system
Ensure that the junction box is
equipped with a Residual Cur-
rent Circuit-Breaker (RCCB). If it
is not, have one installed by a
duly qualified professional.
When charging outdoors, make
sure to connect to a rain-tight
socket that is certified for outdoor
use. Checking Residual Current
Circuit-Breaker (RCCB) opera-
tion before its use is recom-
mended.
Check whether there are any
local EV-charging regulations in
place, and adhere to them.
*: For detailed information, consult an
electrician.
■The charging environment
For safe charging, the following
charging equipment and settings are
recommended.
●Rain-tight socket
When charging outdoors, connect the
plug to a rain-tight socket, and ensure
that the plug remains waterproof while
the plug is connected.
●Dedicated circuit
• To reduce the risk of fire, connect only
to an at least 13A branch circuit with
an over-current protection.
• To reduce the risk of electric shock
when working with the plug, connect
to a socket that has a Residual Cur-
rent Circuit-Breaker (RCCB) installed.
●Remote switch
Allows the electricity from the socket to
be interrupted by operating a switch,
thus allowing safe removal and insertion
of the plug on rainy days.
■When your circuit breaker trips
during charging (vehicles with 7-
inch multi-information display)
The upper limit of the charging current
can be changed in “Vehicle Settings” on
the multi-information display.
1Press or of the meter control
switches to select .
2Press or of the meter control
switches to select “Vehicle Settings”,
and then press and hold .
3Press or of the meter control
switches to select “Charging Set-
tings”, and then press .
The “Charging Settings” screen will
be displayed.
4Press or of the meter control
switches to select “Charging Cur-
rent”, and then press .
The “Charging Current” screen will
be displayed.
5Press or of the meter control
switches to select “16A”
*1 or “8A”,
and then press .
During charging, the maximum
charging current will be restricted to
the set current or lower.
*2
If the breaker still trips while charging,
even after changing the upper limit of
the charging current, check if the con-
nected power source meets the speci-
fied charging conditions. (P.124)
*1: Vehicles with 7 kW onboard traction
battery charger only
*2: Restricting the charging current will
lengthen the charging time.
■When your circuit breaker trips
during charging (vehicles with
12.3-inch multi-information display)
The upper limit of the charging current
Page 227 of 718
225
3 3-1. Instrument cluster
Vehicle status information and indicators
Brake Override System
(P.289)
Drive-Start Control (P.289)
Parking Support Brake function
(static objects) (if equipped)
(P.407)
Displayed content is the same as that
displayed on the multi-information dis-
play. For details, refer to the explana-
tions of each system.
■ / icons
Displays the following multi-infor-
mation display linked icons:
: Master warning icon
Displayed when a warning message is
displayed on the multi-information dis-
play.
: Information icon
Displayed when a suggestion/advice
pop-up display is displayed on the
multi-information display.
■Warning message
Some warning messages are dis-
played when necessary, according
to certain conditions.
Displayed content is the same as that
displayed on the multi-information dis-
play. For details, refer to the explana-
tions of each system.
■Audio system operation status
Displayed when an audio remote
control switch on the steering wheel
is operated.
■Hands-free system status (if
equipped)
Displayed when the hands-free system is operated.
■Outside temperature display
Displayed when the power switch is
turned to ON or when the low out-
side temperature indicator is flash-
ing.
■When a pop-up display is displayed
When a pop-up display is displayed, a
current display may no longer be dis-
played. In this case, the display will
return after the pop-up display disap-
pears.
■Outside temperature display
●When the ambient temperature is
approximately 3°C (37°F) or lower,
will flash for approximately 10
seconds and the outside temperature
display will turn off.
●In the following situations, the correct
outside temperature may not be dis-
played, or the display may take longer
than normal to change:
• When stopped (including when using
“My Room Mode”), or driving at low
speeds (less than 20 km/h [12 mph])
• When the outside temperature has
changed suddenly (at the
entrance/exit of a garage, tunnel, etc.)
●When “--” or “E” is displayed, the sys-
tem may be malfunctioning.
Take your vehicle to any authorized
Toyota retailer or Toyota authorized
repairer, or any reliable repairer.
Display content selected by “HUD
Driving Support” on the screen
is displayed. (P.223)
Hybrid System Indica-
tor/Tachometer