display TOYOTA tC 2016 Accessories, Audio & Navigation (in English)
[x] Cancel search | Manufacturer: TOYOTA, Model Year: 2016, Model line: tC, Model: TOYOTA tC 2016Pages: 164, PDF Size: 6.21 MB
Page 73 of 164
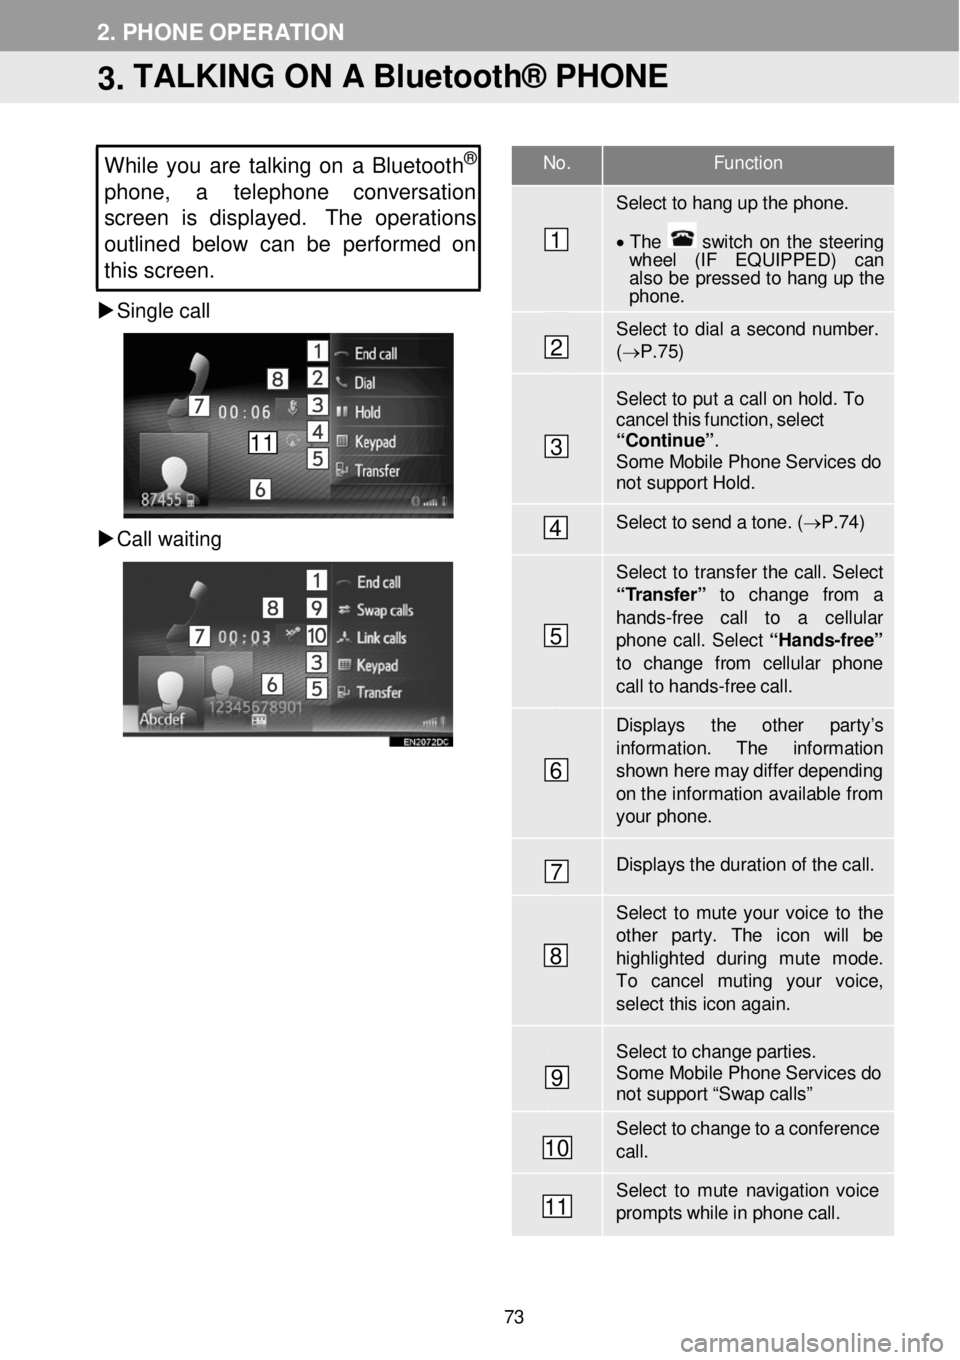
No. F unction
Select to hang up the phon e.
• T he switch on the steering wh eel (IF EQUIPPED) can also be pressed to hang up the phone .
Select to dial a second number. (→ P.7 5)
Select to put a c a ll on hold. T o cancel this functi on, select “Contin ue”. Some Mobile Phone Services do not support Hold.
Select to send a to ne. ( → P.74)
Select to transfer the call. Select “ T ransfer” to change from a
hands -fr ee call to a cellular phone call. Select “Ha nds -free”
to change f rom cellular phon e call to hands -fr ee ca ll.
Displays the other par ty’s
information . The information show n here m ay differ depending on th e infor mation available fr om your phone.
Displays the dur ation of the call.
Select to mute your voice to th e other par ty. The icon will be highlighted during mute mode. To cancel muting your voice, select this icon a gain.
Select to change parties. Some Mobile Phone Services do not support “Swap calls”
Select to change to a confer ence ca ll.
Select to mute navigation voice prompts while in p hone call.
2. PHONE OPERATION
3. TALKING ON A Bluetooth® PHONE
While you are tal king on a Bluetoot h®
phone, a telephon e conversation
s creen is displayed. The operations
outline d belo w can be performed on
this screen.
Single call
C all waitin g
1
2
3
4
5
6
7
8
9
10
11
11
73
Page 75 of 164
2. PHONE OPERATION 2. PHONE OPERATION
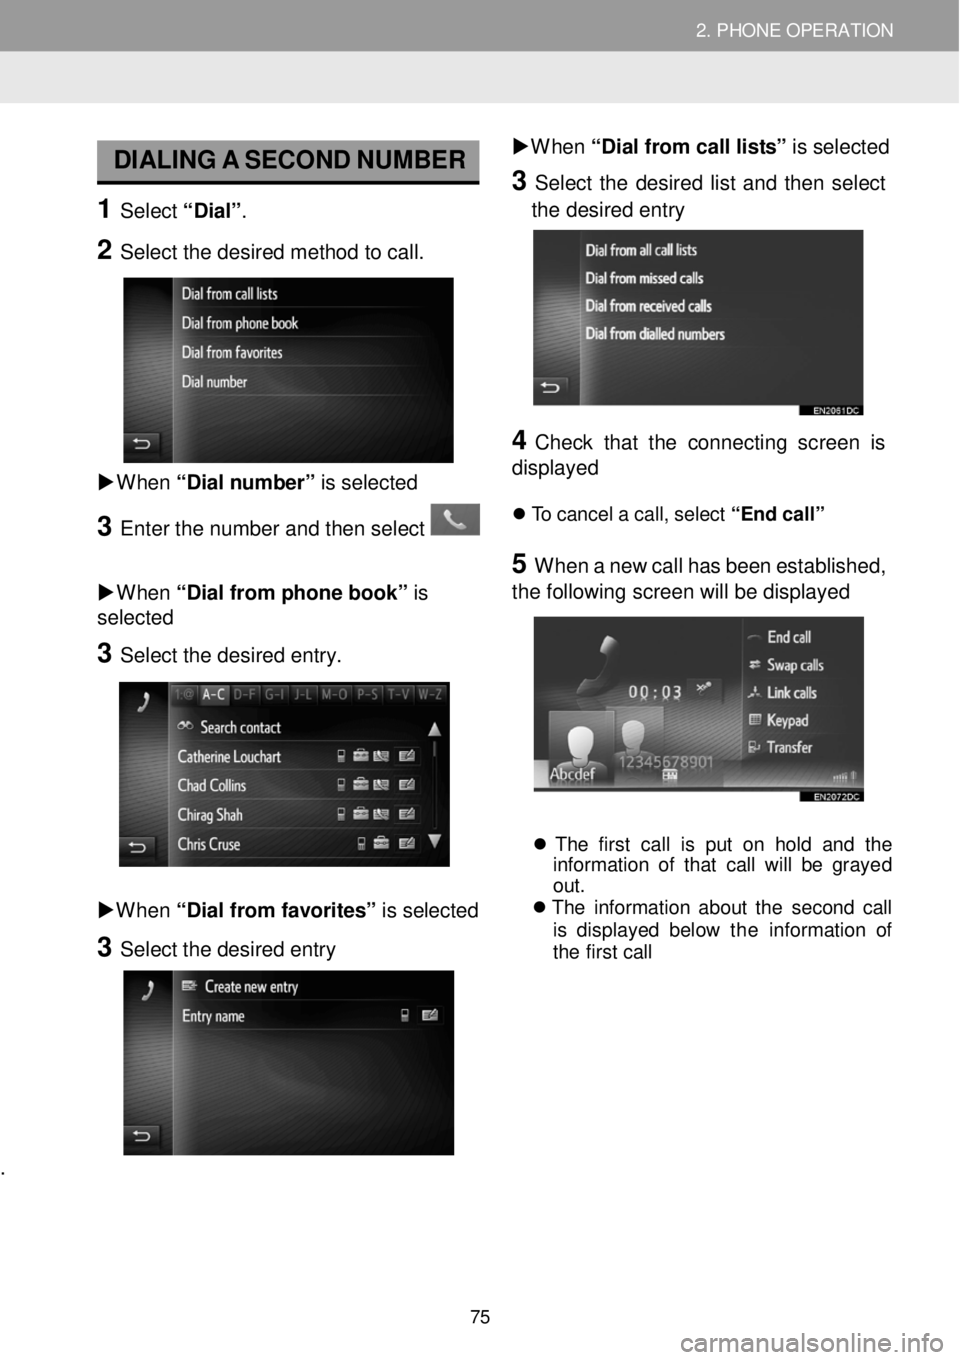
DIALING A SECO ND N UM BER
1 Select “D ia l” .
2 Select the desired method to call.
W hen “Dial n um ber” is sel ect ed
3 Enter t he numbe r and then select
W hen “Dial from phone book” is
sel ect ed
3 Se lect the de sired e ntry.
W hen “D ia l fr om fav orites ” is selected
3 Select the desired entry
.
W hen “Dial from call l is ts” is sel ect ed
3 Se lect the desired list a nd th en se lect
the desired en try
4 C heck that the con necting screen is
dis played
T o ca nce l a c a ll, se lec t “End ca ll”
5 W hen a new c a ll has b een e st ablish ed,
the fol lowi ng scr een will b e displayed
T he firs t ca ll is put o n hold an d th e
i nf orma tio n o f th at call w ill b e grayed
out.
T he in fo rm atio n a b ou t th e seco nd ca ll
is d isp laye d be lo w the in format ion of
t h e fi rs t ca ll
75
Page 77 of 164
3. SHORT MESSAGE FUNCTION
1. SHORT MESSAGE FUNCTION
3. SHORT MESSAGE FUNCTION
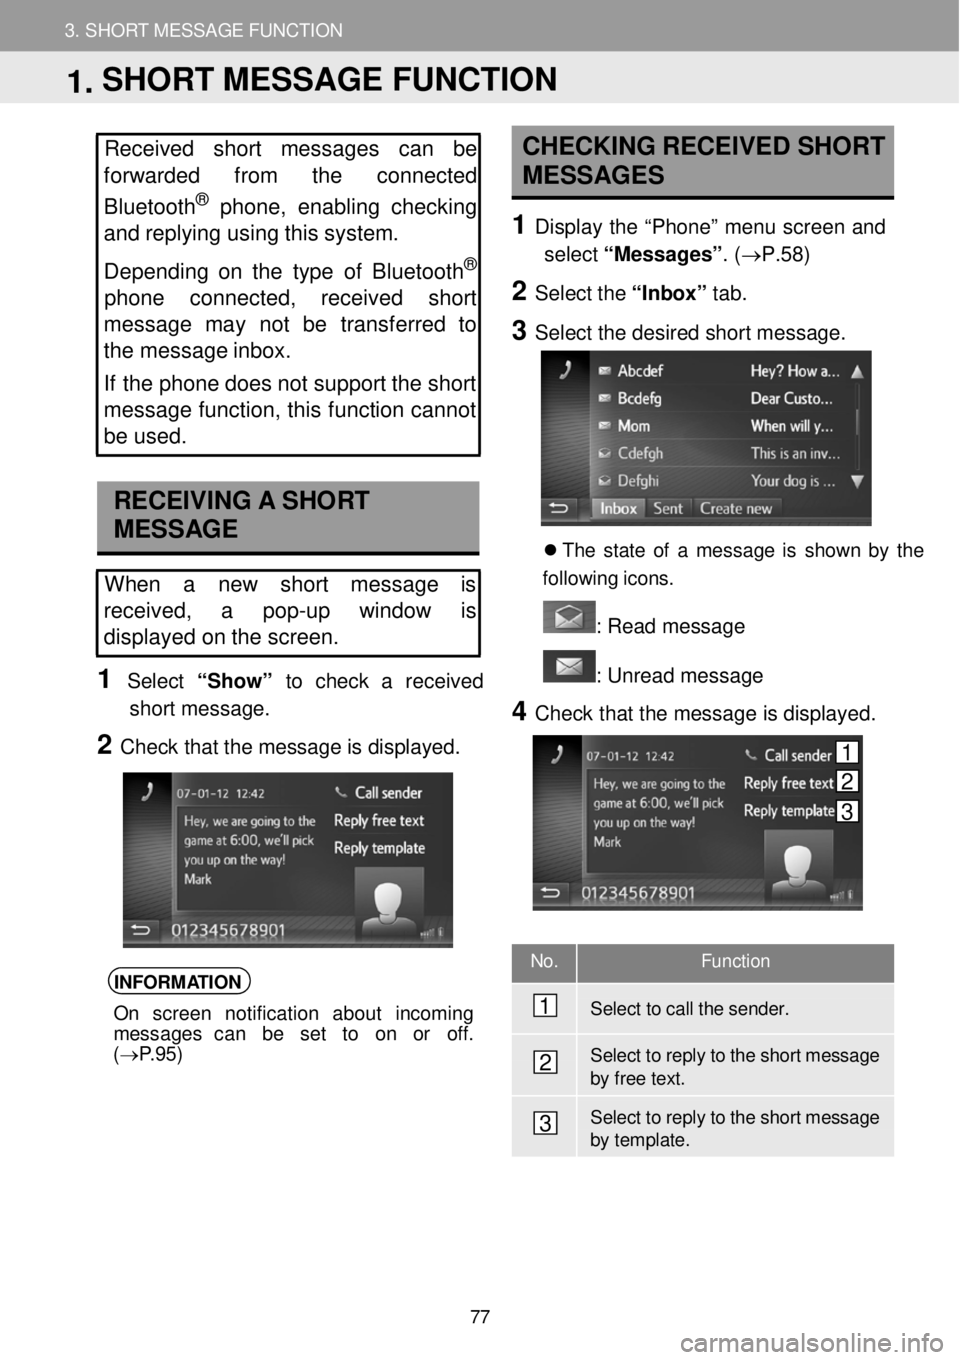
No. Function
Select to call the sender .
Select to reply to the shor t messa ge by f r ee text.
Select to reply to the shor t messa ge by t e mplate.
Received short messages can be
forwarded from the connected
Bluetooth
® phone, enabling checking
and replying us ing this system.
Depen ding on the type of Bluetooth
®
phone co nnected, received short
mes sa ge may not be transferred to
the message inbox.
If the phone does not s u pport the short
message function, th is function cannot
be used.
RECEIVING A SHORT
MESSAGE
When a new short message is
re ce ived, a pop-up window is
displayed on the screen.
1 Select “Show” to check a received
short message.
2 Check that the message is displayed.
INFORMATION
On screen notification about incoming
messages can be se t to on or off.
( → P.95)
CHECKING RECEIVED SHORT
MESSAGES
1 Displ ay the “Phon e” m enu scre en and
select “Me ssages” . (→P. 58)
2 Select the “In bo x” tab.
3 Select the de sired short m essage.
Th e s ta te o f a messag e is sh ow n b y the
f ol low in g ic ons.
: R ead message
: U nre ad message
4 Check t hat the message is d isplay ed.
1
2
3
1. SHORT MESSAGE FUNCTION
1
2
3
77
Page 79 of 164
3. SHORT MESSAGE FUNCTION 3. SHORT MESSAGE FUNCTION
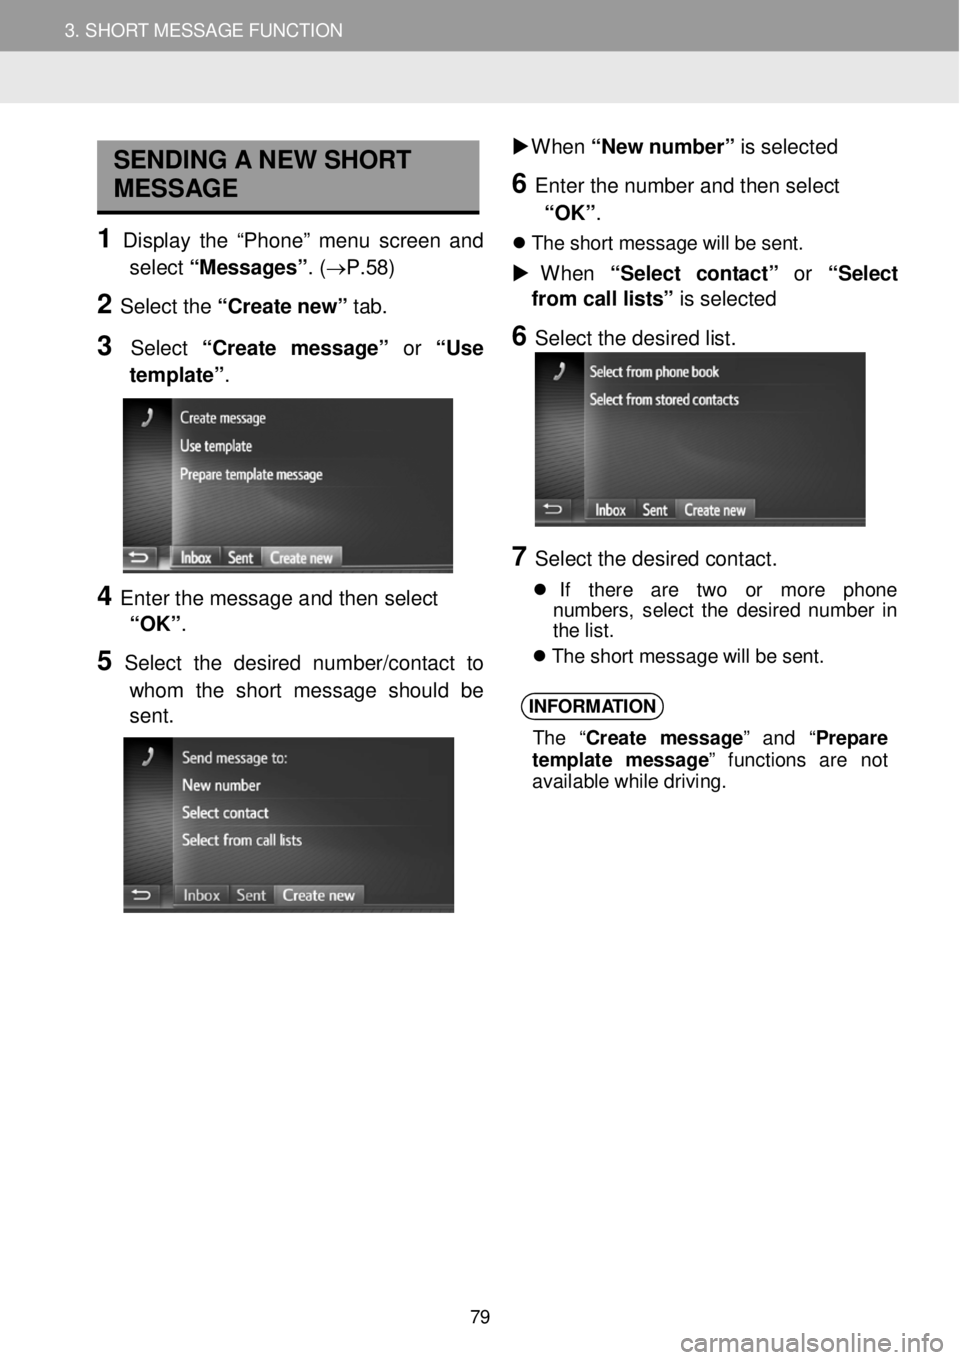
SENDING A NEW SHORT
MESSAGE
1 Display th e “Pho ne” menu scre en an d
select “Messa ges”. (→P. 58)
2 Select the “C reate n ew” tab.
3 Select “Cre ate mes sag e” or “Use
template” .
4 Enter t he message a nd then select
“OK” .
5 Select the desired num ber/c ontact to
whom the s hort messa ge should be
sent.
W hen “New n um ber” is sel ect ed
6 En te r the n umber an d then select
“OK” .
Th e shor t m essage w ill b e s ent.
W hen “Se le ct co nta ct” or “Se le c t
from call l is ts” is sel ected
6 Select the de sired list.
7 Se lect the de sired contact.
If ther e are two or mor e ph on e
numbe rs, selec t th e des ir e d numbe r in
t h e lis t.
Th e shor t m essage w ill b e s ent.
INFORM ATION
The “Cre ate m essag e” and “Pre pare
t e mpl ate mess age” funct io ns ar e not
avail able wh ile d riv ing.
79
Page 85 of 164
4. WHAT TO DO IF... 4. WHAT TO DO IF...
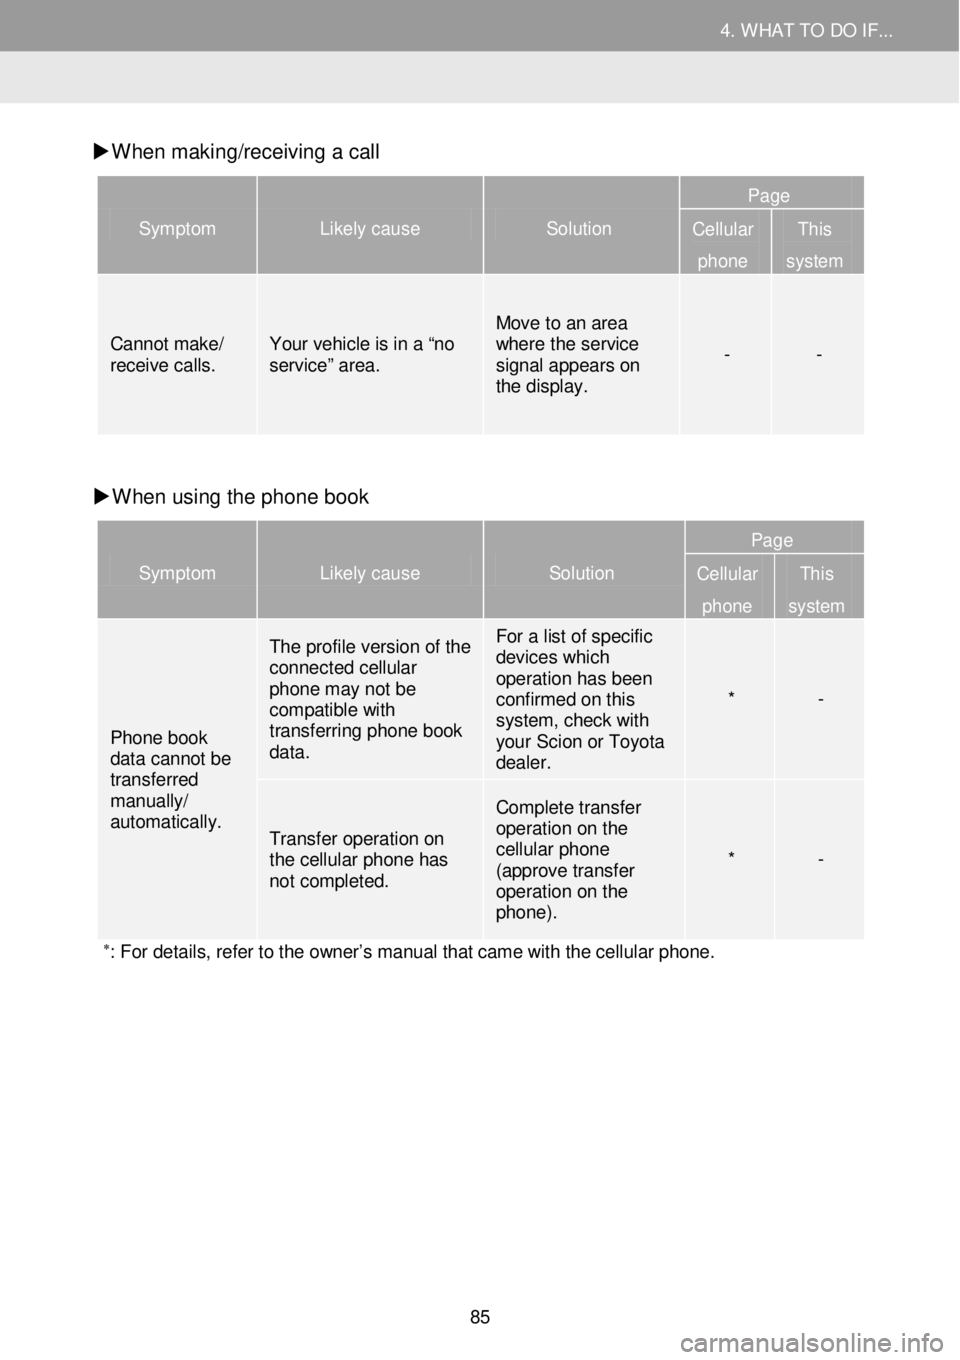
W hen mak ing/receiv ing a call
Symptom Likely cause Solution
Page
Cellular
phone
This
system
Cannot make/ receive calls . Your vehicle is in a “ no service ” area.
Move to an area where the service signal appears on the display.
- -
W hen using the pho ne book
Symptom Likely cause Solution
Page
Cellular
phone
This
system
Phone book data cannot be transferred manually/
automatically.
The profile version of the connected cellular phone may not be compatible with transferring phone book data.
For a list of specific devices which operation has been confirmed on this system, check with your Scion or Toyota dealer.
* -
Transfer operation on the cellular phone has not completed.
Complete transfer operation on the cellular phone (approve transfer operation on the phone).
* -
∗: For details, refer to the owner’s manual that came with the cellular phone.
85
Page 86 of 164
4. WHAT TO DO IF... 4. WHAT TO DO IF...
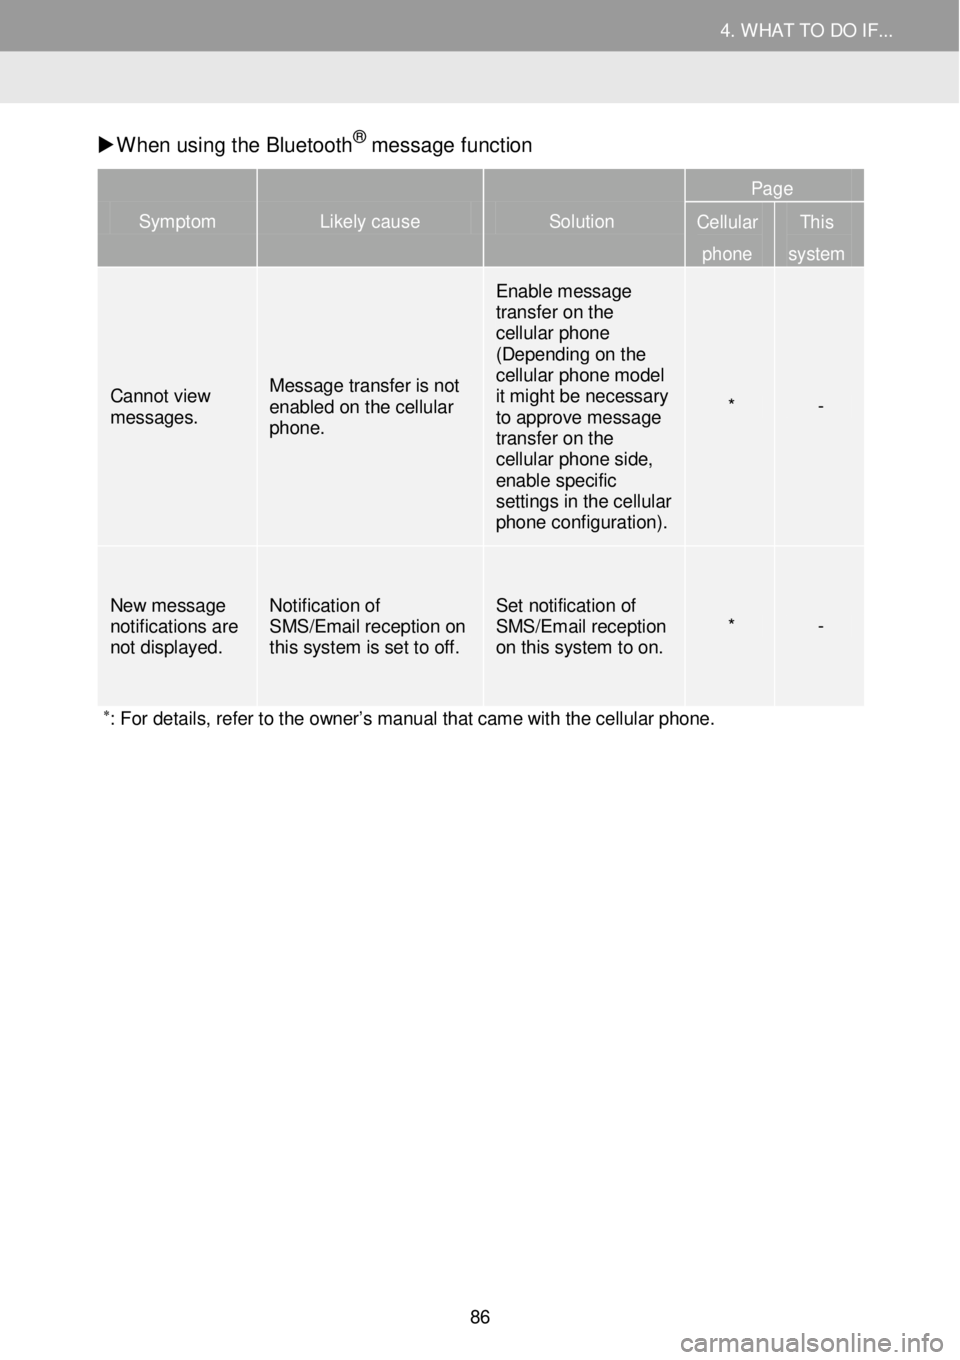
W hen us ing t he Bluetoo th® m essa ge f unction
Symptom Likely cause Solution
Page
Cellular
phone
This
system
Cannot view messages.
Message transfer is not enabled on the cellular phone.
Enable message transfer on the cellular phone (Depending on the cellular phone model it might be necessary to approve message transfer on the cellular phone side, enable specific settings in the cellular phone configuration) .
* -
New mes sage notifications are not displayed.
Notification of SMS/Email reception on this system is set to off.
Set notification of SMS/Email reception on this system to on. * -
∗: For details, refer to the owner’s manual that came with the cellular phone.
86
Page 88 of 164
4
SETUP
1 SETUP OPERATION
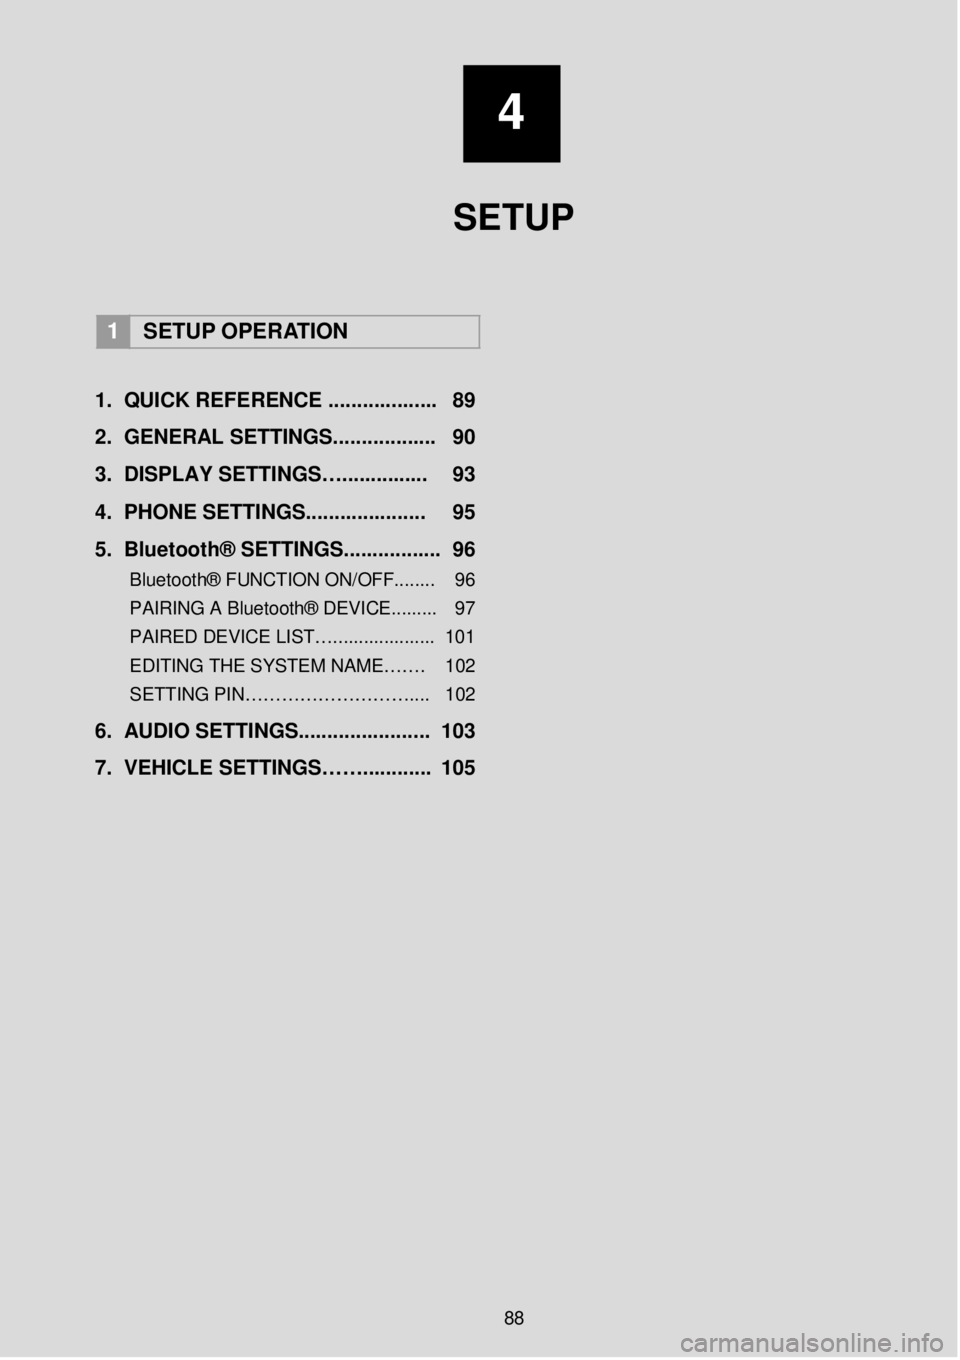
1. Q UICK REFERENCE ..... ...... ..... ... 89
2. GENERAL SETTINGS. .... .......... ... 90
3 . DISPLAY SETTINGS…. .... ... .. .. ... 93
4. PHONE SETTIN GS..... ................ 95
5 . B lu eto ot h® SETTINGS........... ..... . 96
Bluetooth® FUNCTION ON/OFF... ..... 96
PAIRING A Bluetooth® DEVICE.. .. ..... 97
PAIRED DEVICE LIST….. .................. 101
EDITING THE SYSTEM NAME……. 102
SETTING PIN……………………… .... 102
6. AUDIO SETTINGS. .................... .. 103
7. VEHICLE SETTINGS……. .... ...... . 105
88
Page 91 of 164
1. SETUP OPERATION 1. SETUP OPERATION
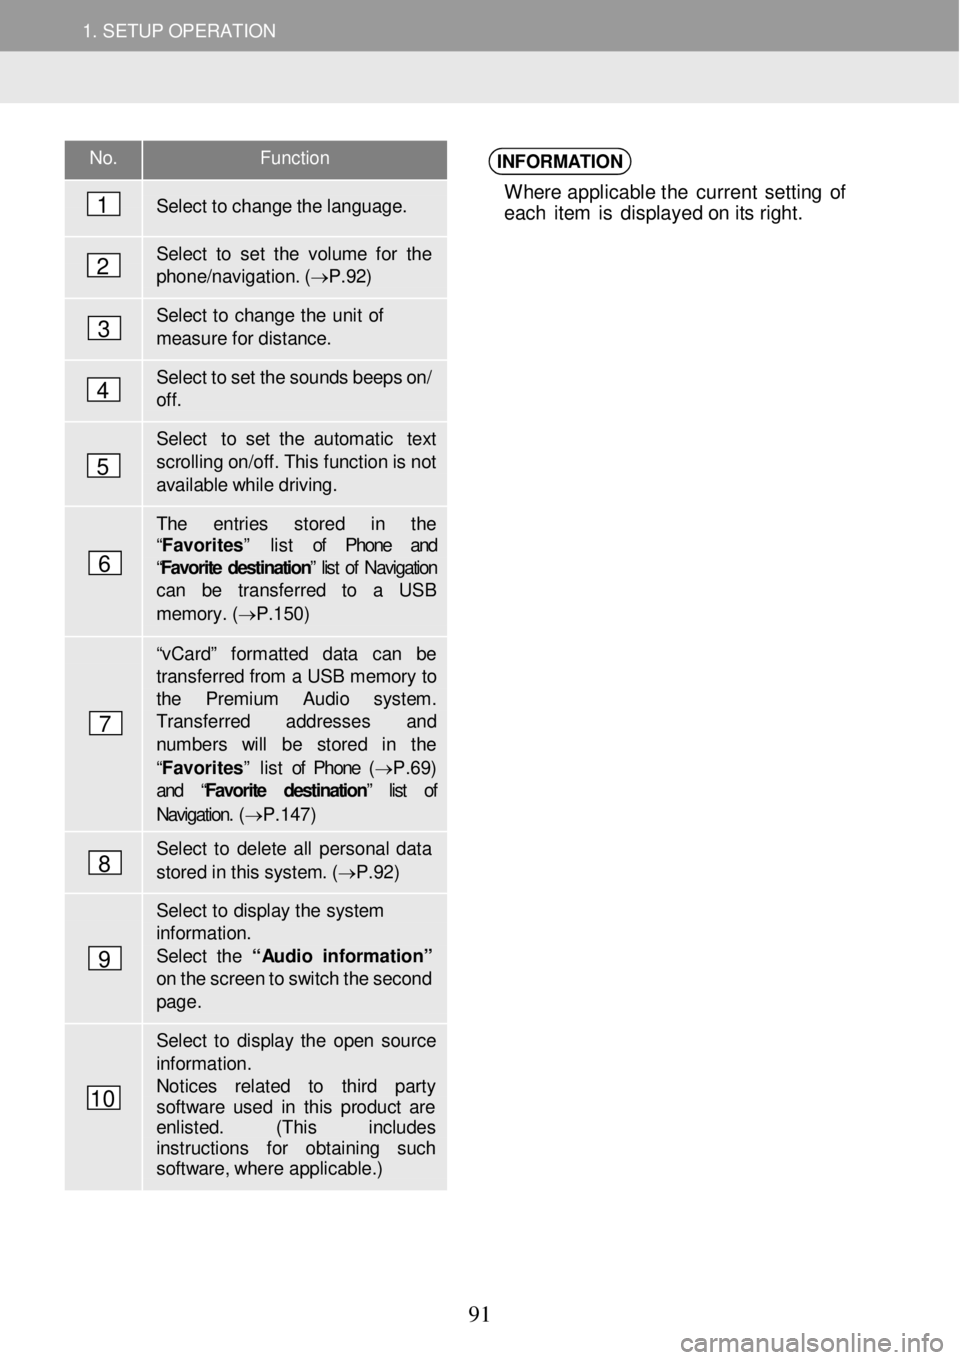
No. Function
Select to ch ange the language.
Select to set the vol ume for the phon e/navigation. ( → P.92)
Select to change the u nit of mea sure f o r dista nce.
Select to set the sounds b eeps o n/ off.
Select to set the a utomatic text
sc rolling on/of f. This functi on is n ot available while driving.
The entries s tored in the “Favorites” list of Phone and “Favorite destination ” list of Navigation can be transfer red to a USB
memor y. ( → P.1 50)
“v Ca rd” fo rmatted data can be transf erred from a USB memory to the Premium Audio syst em. Transfer red ad dresses and number s will be stored in the
“Favorites” list of Phone (→ P.69) and “ Favorite destination” list of
Navigation. ( → P.147)
Select to delet e all personal d ata
stored in this system. ( → P.92)
Select to di splay the system information. Select the “ Audio in for mati on” on the screen to switch the sec ond page .
Select to display the open so urce informat ion. Notices re lated to third party softwa re used in this p roduct ar e enlisted. (This includes instructions for obtai ning such softw are, whe re applicable.)
INFORMATION
Where applicable t he current se tting o f
eac h it e m is d isp lay ed o n i ts right.
1
2
3
4
5
6
7
8
9
10
91
Page 92 of 164
1. SETUP OPERATION 1. SETUP OPERATION
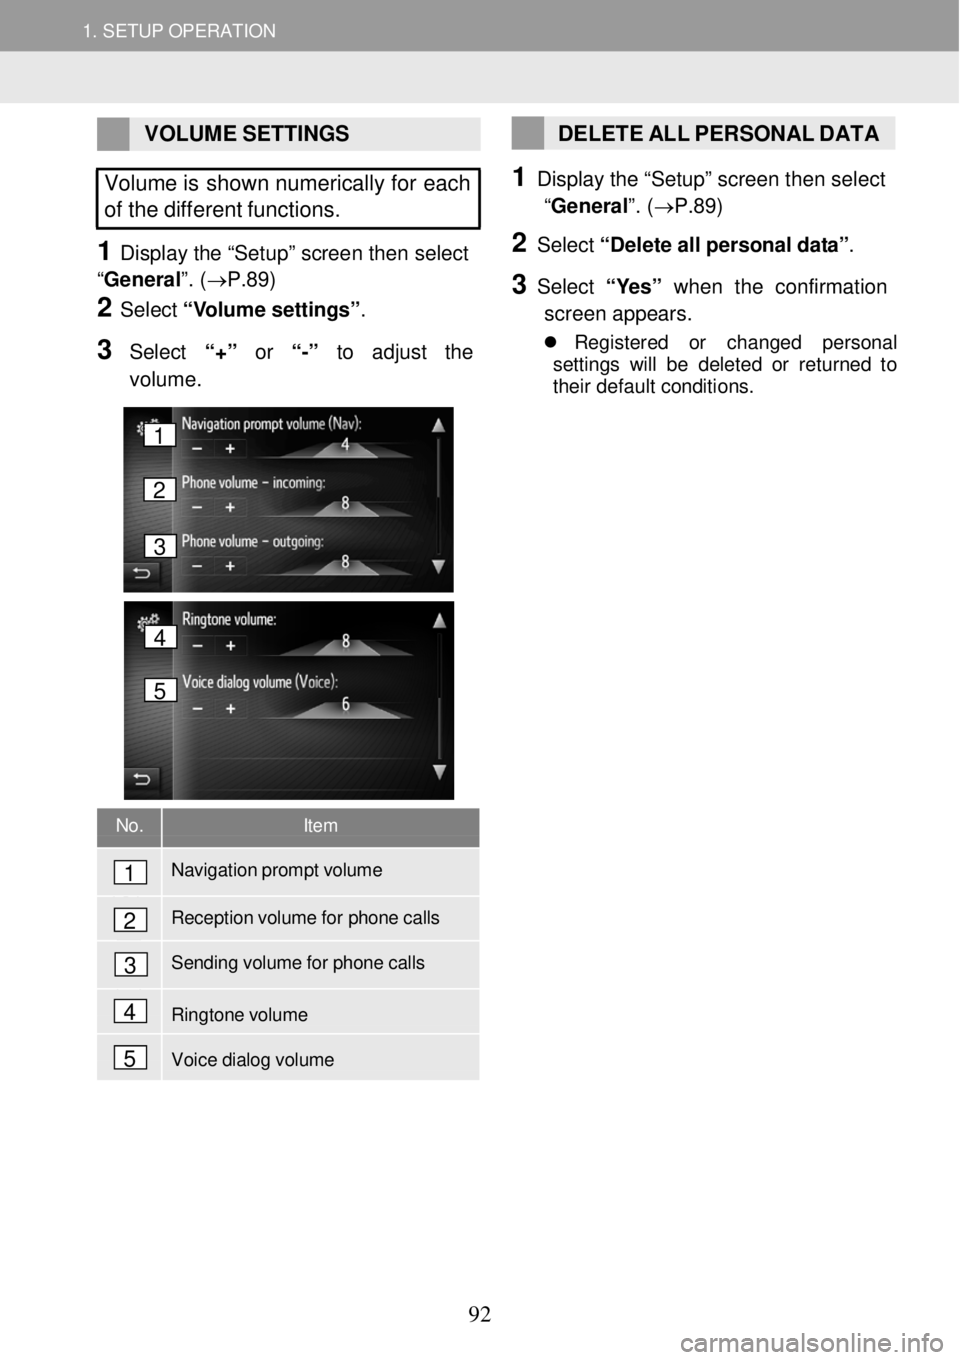
VOLUME SETTINGS
Volume is shown numerically for each
of the different functions.
1 Display the “Setu p” scree n then select
“General ”. (→P.89)
2 Select “V o lume settin gs”.
3 Select “+” or “-” to adjust the
volume.
DELETE ALL PERSONAL DATA
1 Disp lay the “Setu p” scree n then select
“General ”. (→P.89)
2 Select “ D ele te all pe rs o na l da ta ”.
3 Select “ Y es” w hen the confirmation
scre en ap pears.
Reg is tered or ch ange d perso nal
s et tings wi ll be de le te d o r ret urn ed to
t h ei r de fau lt co ndit ions .
No. Item
Navigation prompt volume
Reception volume for phone calls
Sending volume for phone calls
Ringtone volume
Voice dialog volume
1
2
3
4
5
4
5
1
2
3
92
Page 93 of 164
1. SETUP OPERATION 1. SETUP OPERATION
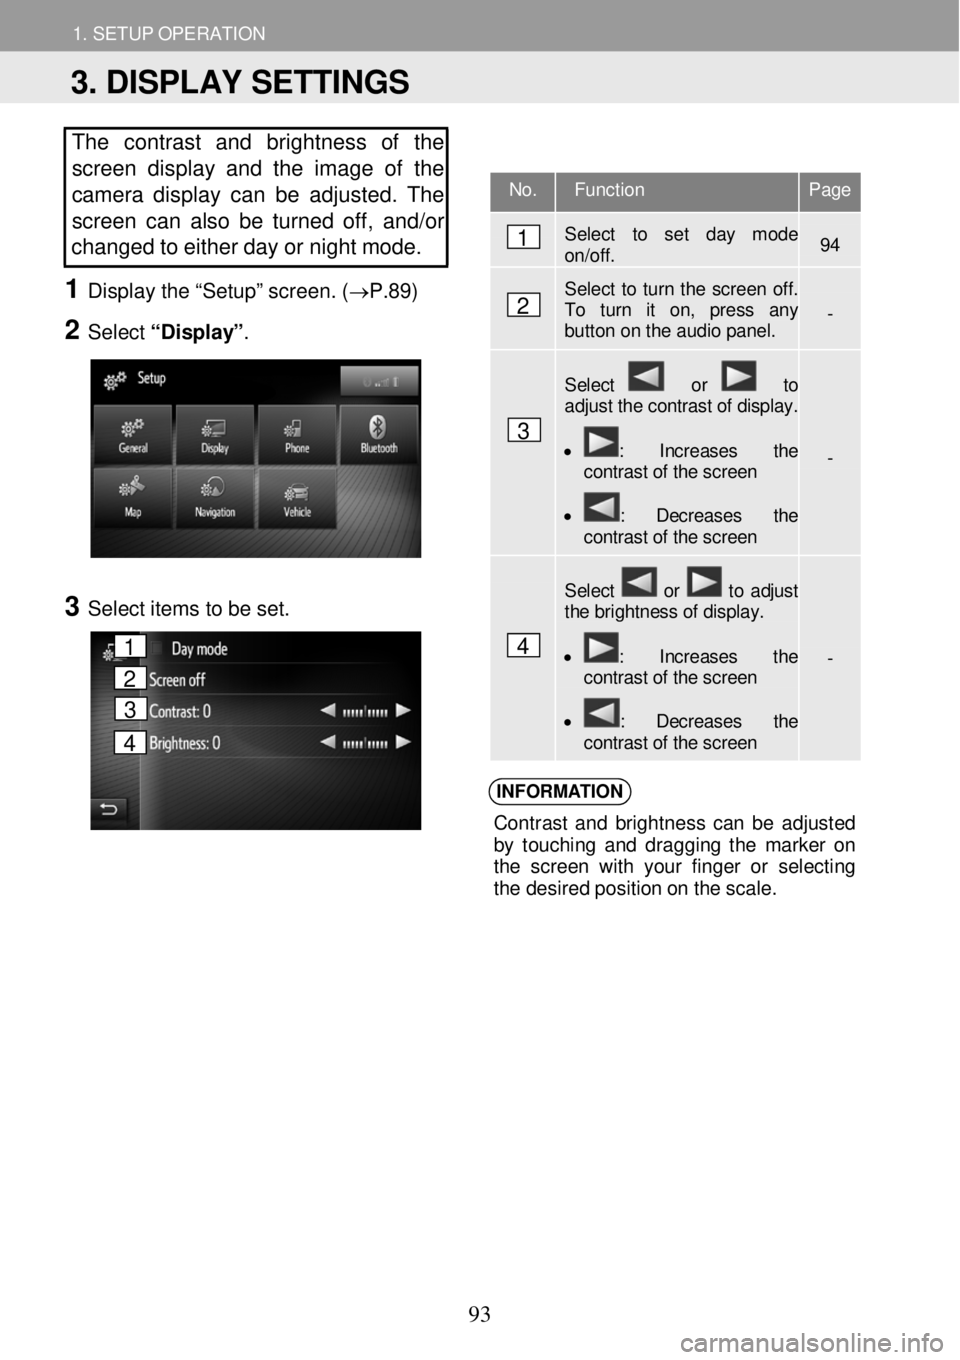
The contrast and brightness of the
screen display and the image of the
camera display can be adjusted. The
screen ca n also b e tur ned off, and/or
changed to either d ay or night mode.
1 Displ ay the “Setup” scr een. ( →P.89)
2 Select “Display” .
3 Select ite ms to be set.
INFORM ATION
Con tras t an d b righ tne ss ca n b e ad jus ted
b y to uch in g an d dragg in g th e m arke r on
t h e scre en with your fin ge r o r selecting
t h e des ired po sit io n o n t he s cal e.
No. Function Page
Select to set day mode on/off. 94
Select to turn the screen off. To turn it on, press any button on the audio panel. -
Select or to adjust the contrast of display.
• : Increases the contrast of the screen
• : Decreases the contrast of the screen
-
Select or to adjust the brightness of display.
• : Increases the contrast of the screen
• : Decreases the contrast of the screen
-
1
2
3
4
3. DISPLAY SETTINGS
1
2
3
4
93