display TOYOTA tC 2016 Accessories, Audio & Navigation (in English)
[x] Cancel search | Manufacturer: TOYOTA, Model Year: 2016, Model line: tC, Model: TOYOTA tC 2016Pages: 164, PDF Size: 6.21 MB
Page 94 of 164

1. SETUP OPERATION 1. SETUP OPERATION
CHANGING BETWEEN DAY
AND NI GHT MODE
Depending on the position of the
headlight switch, the screen changes
to day or night mod e. This feature is
available when the headlight is
s witched on.
1 Display the “Setup” screen then select
“Display ”. (→P. 89)
2 Select “D ay m ode ”.
INFORM ATION
If th e s cre en is se t to d ay mod e wi th the
head ligh t sw itc h turne d on , th is con dit ion
i s mem orize d eve n whe n th e ignition is in
t h e fo llo wi ng s ta tu s.
Ve hicl es with out a smart entry &
st art system
The eng ine swit ch is tur ned to the
“LO CK” posit ion.
Vehicles with a smart ent ry & start
s ystem
The ignition is turn ed off.
94
Page 101 of 164
1. SETUP OPERATION 1. SETUP OPERATION
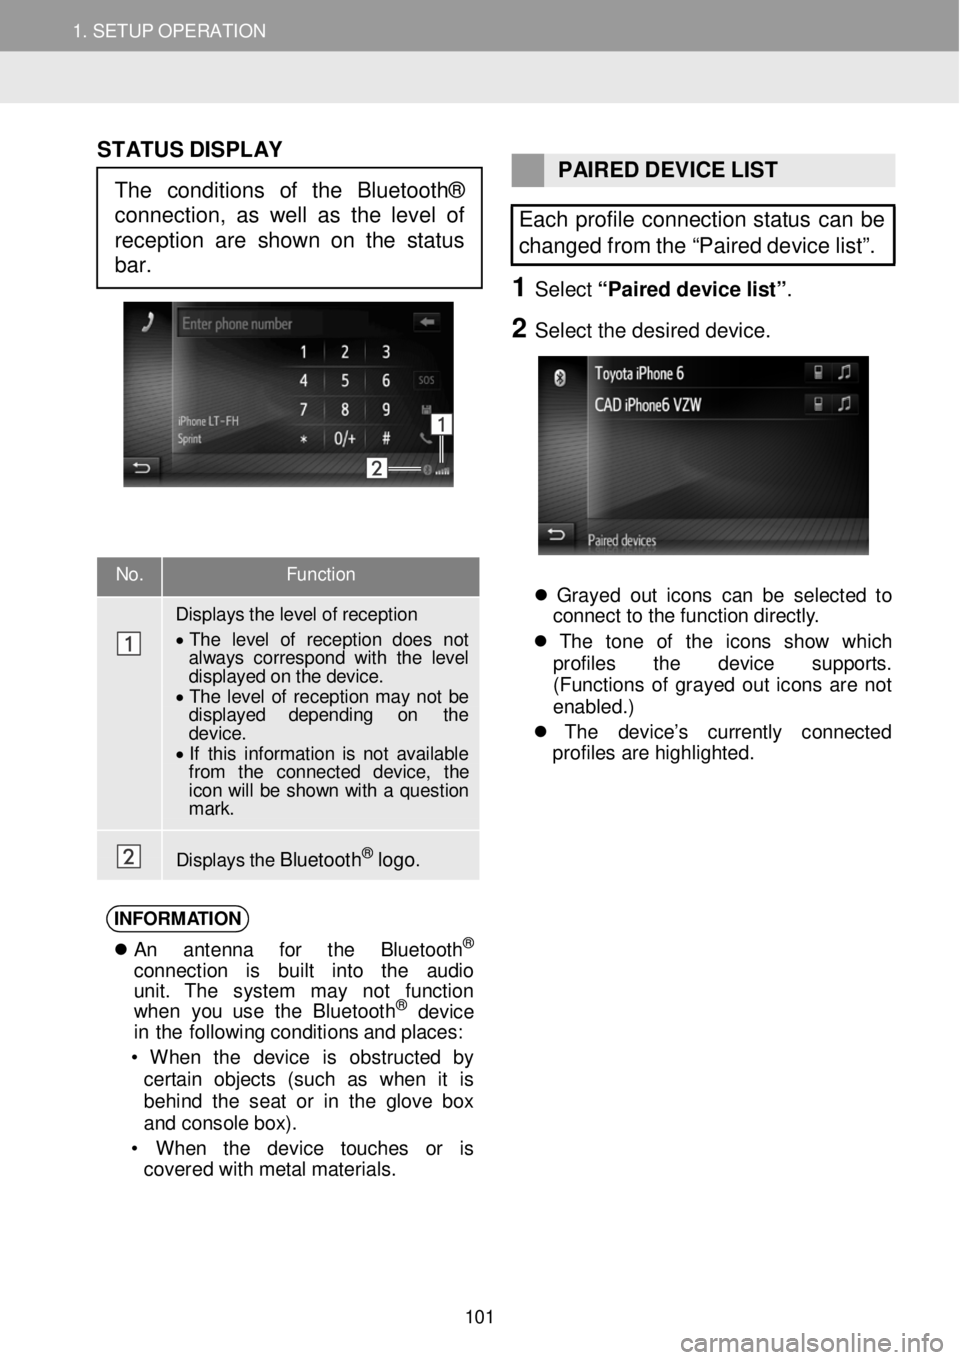
No. Function
Displays t h e level of reception
• T he level of r ecep tion does not always cor res pond with the level displayed on the device. • T he level of reception may not be displayed depending on the d evic e . • If this in formation is n ot available fr om the connected device, the icon will be show n with a question m ark.
Displays t h e B luet oot h® logo.
ST ATUS DISPLAY
PAIRED DEVICE LIST
Each profile connection status can be
changed from the “Paired device list”.
1 Select “Pair ed d evice list ”.
2 Se lect the de sired d evice.
Grayed out ico ns c a n b e se lec te d to
c onne ct to th e f un ctio n d ir e ct ly .
Th e to n e of th e icon s sh ow wh ic h
prof iles th e dev ic e su ppor ts .
( Functions of g rayed out ico ns are not
enabled .)
Th e de vi ce ’s cu rre ntly co nnec ted
prof iles ar e h igh lig ht ed.
INFORM ATIO N
A n antenn a fo r th e Bluet ooth®
conn ect io n is bu ilt into th e audio
unit . Th e system ma y not fu nct io n
w he n you us e th e B lue too th
® de vic e
i n th e fol lowin g c o ndi tion s a nd p la ces:
• W hen th e dev ice is ob struc te d by
cer tai n obj ects (su ch as w hen it is
be hind th e sea t or in th e g lo ve bo x
a nd c o nsole box ).
• W hen th e dev ic e touc hes or is
covered with me ta l ma te ri al s.
The conditions of the Bluetooth®
connection, as well as the level of
reception are shown on the status
bar.
101
Page 103 of 164
1. SETUP OPERATION 1. SETUP OPERATION
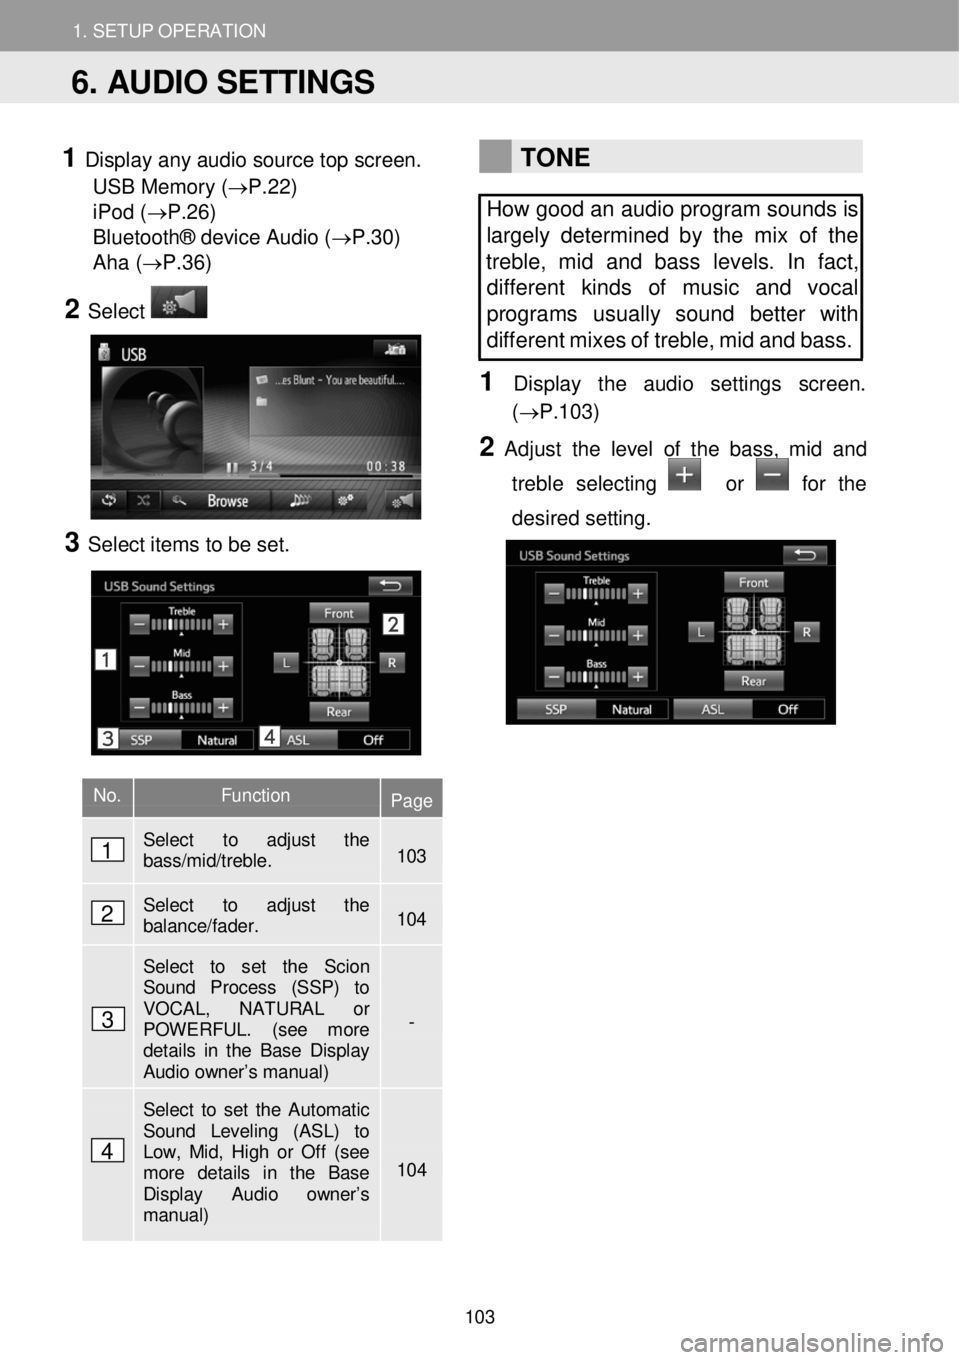
1 Display any audio sour ce top screen.
USB Memory (→P.22)
iPod ( →P.26)
Bluetooth® device Audio (→P.30)
Aha ( →P.36)
2 Select
3 Select ite ms to be set.
TONE
How good an audio program sounds is
largely determined by the mix of the
treble, mid and bass levels. In fact,
dif fere nt kinds of music and vocal
programs usually sound better with
different mi xes of treble, mid and bass.
1 Dis p lay t he audi o setti ngs scre en.
(→P.1 03)
2 Adju st th e le vel of the bass, mid and
treb le selecting
or for the
d esired setting.
No. Function Page
Select to adjust the bass/mid/treble. 103
Select to adjust the balance/fader. 104
Select to set the Scion Sound Process (SSP) to VOCAL, NATURAL or POWERFUL. (see more details in the Base Display Audio owner’s manual)
-
Select to set the Automatic Sound Leveling (ASL) to Low, Mid, High or Off (see more details in the Base Display Audio owner’s manual)
104
6. AUDIO SETTINGS
1
2
3
4
103
Page 104 of 164
1. SETUP OPERATION 1. SETUP OPERATION
BALANCE
A good balance of the le ft and right
stereo channels and of the front and
rear s ound levels is also important.
Keep in mind that when listening to a
s te reo recording or broadcast,
changing the right/left balance will
increase the volume of one group of
sounds while decreasing the volume
of another.
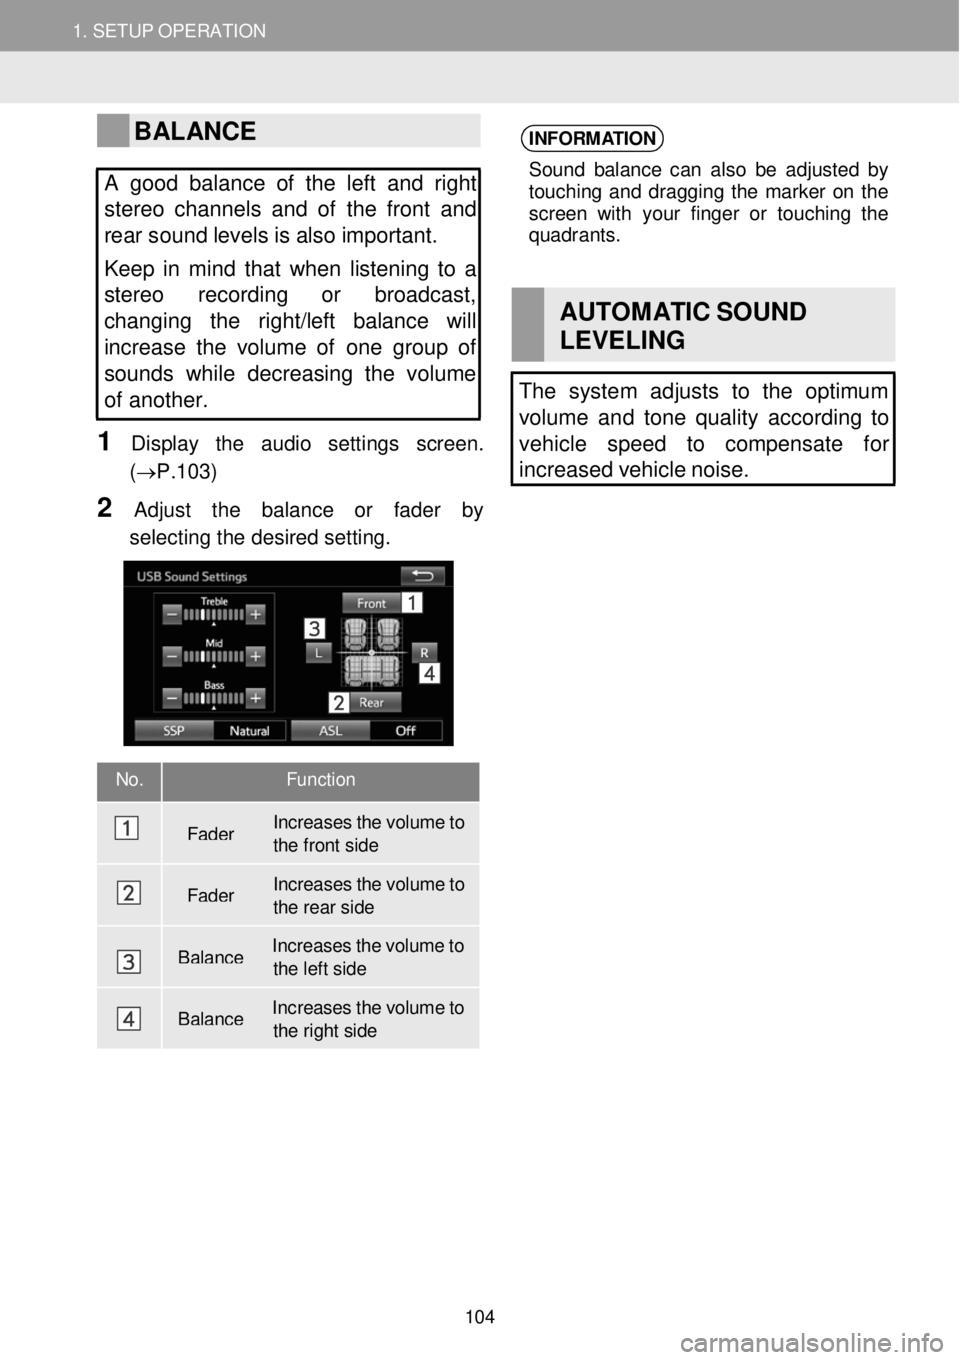
1 Display the au dio settings scr een.
(→P.1 03)
2 Adjust th e bal ance or fa der by
sel ecting the d esired sett ing.
INFORM ATION
Sound b ala nce ca n a ls o b e a dj ust ed by
t o uchi ng a n d dragg ing th e m ark e r o n the
screen wit h you r fin ger o r to u ch in g the
qu adrant s.
AUT OM ATIC SOUND
LEVE LING
The system adjusts to the optimum
volume and tone quality acc ording to
vehicle speed to compensate for
i ncreased vehicle noise.
No. Function
F ader Inc
reases the volume to the front side
Fader Inc
reases the volume to the rear side
Balance Inc
reases the volume to the le ft side
Balance I
nc reases the volume to the right side
104
Page 106 of 164
1. SETUP OPERATION
6
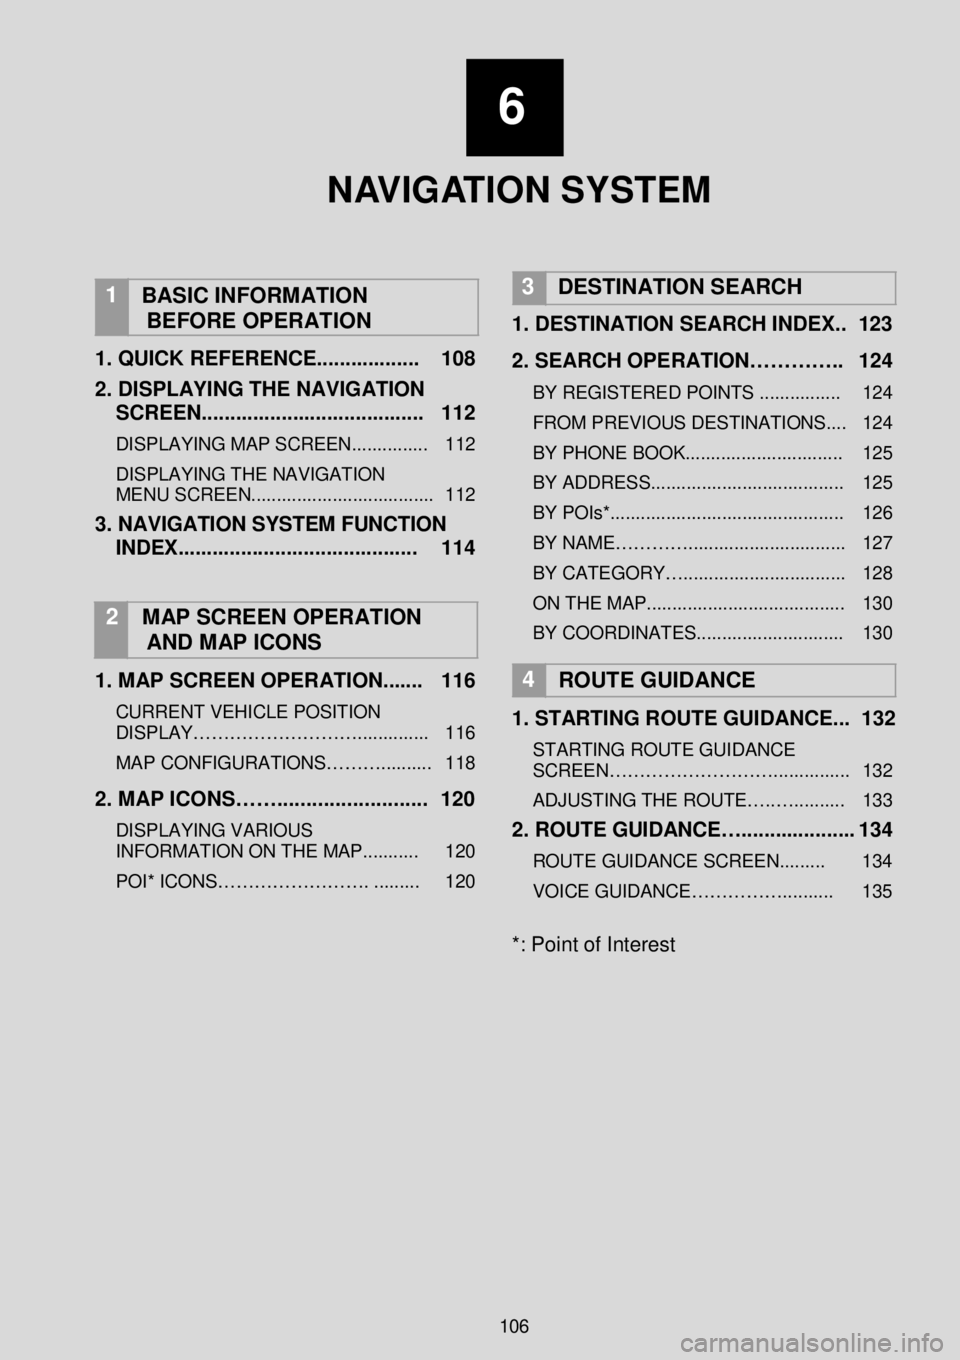
N AV I G AT I O N SYSTEM
1
BASIC INFORMATION
BEFORE OPERATION
1 . QUICK REFERENCE ...... ............ 108
2 . DISPLAYING THE NA VIGATION
SCREEN ..... .................................. 112
DISPLAYING MAP SCREEN ............... 112
DISPLAYING THE NAVIGATION
MENU SCREEN.................................... 112
3. NAVIGATION SYSTEM FUNCTION
INDEX .. ... ..................................... 114
2 MAP SCREEN OPERATION
AND MAP ICONS
1 . MAP SCREEN OPERATION ....... 116
CURRENT VEHICLE POSITION
DISPLAY……………………….. ...... ...... 116
MAP CONFIGURATIONS……… .......... 118
2. MAP ICONS……. ......................... 120
DISPLAYING VARIOUS
INFORMATION ON THE MAP ........... 120
POI* ICONS……………………. . ........ 120
3 DESTINATION SEARCH
1.
DESTINATION SEARCH INDEX. . 123
2. SEARCH OPERATION………….. 124
BY REGISTERED POINTS ............... . 124
FROM PREVIOUS DESTINATIONS.... 124
BY PHONE BOOK ........... .................... 125
BY ADDRESS.... .......................... ........ 125
BY POIs*.... .......................................... 126
BY NAME…………... ............................ 127
BY CATEGORY….... ............................ 128
ON THE MA P....................................... 130
BY COORDINATES.. ........................... 130
4
ROUTE GUIDANCE
1 . STARTING ROUTE GUIDANCE ... 132
STARTING ROUTE GUIDANCE
SCREEN………………………. .............. 132
ADJUSTING THE ROUTE….. ….......... 133
2. ROUTE GUIDANCE….. .................. 134
ROUTE GUIDANCE SCREEN. ........ 134
VOICE GUIDANCE…………….. ........ 135
*: Point of Interest
106
Page 107 of 164
6
N AV I G AT I O N SYSTEM
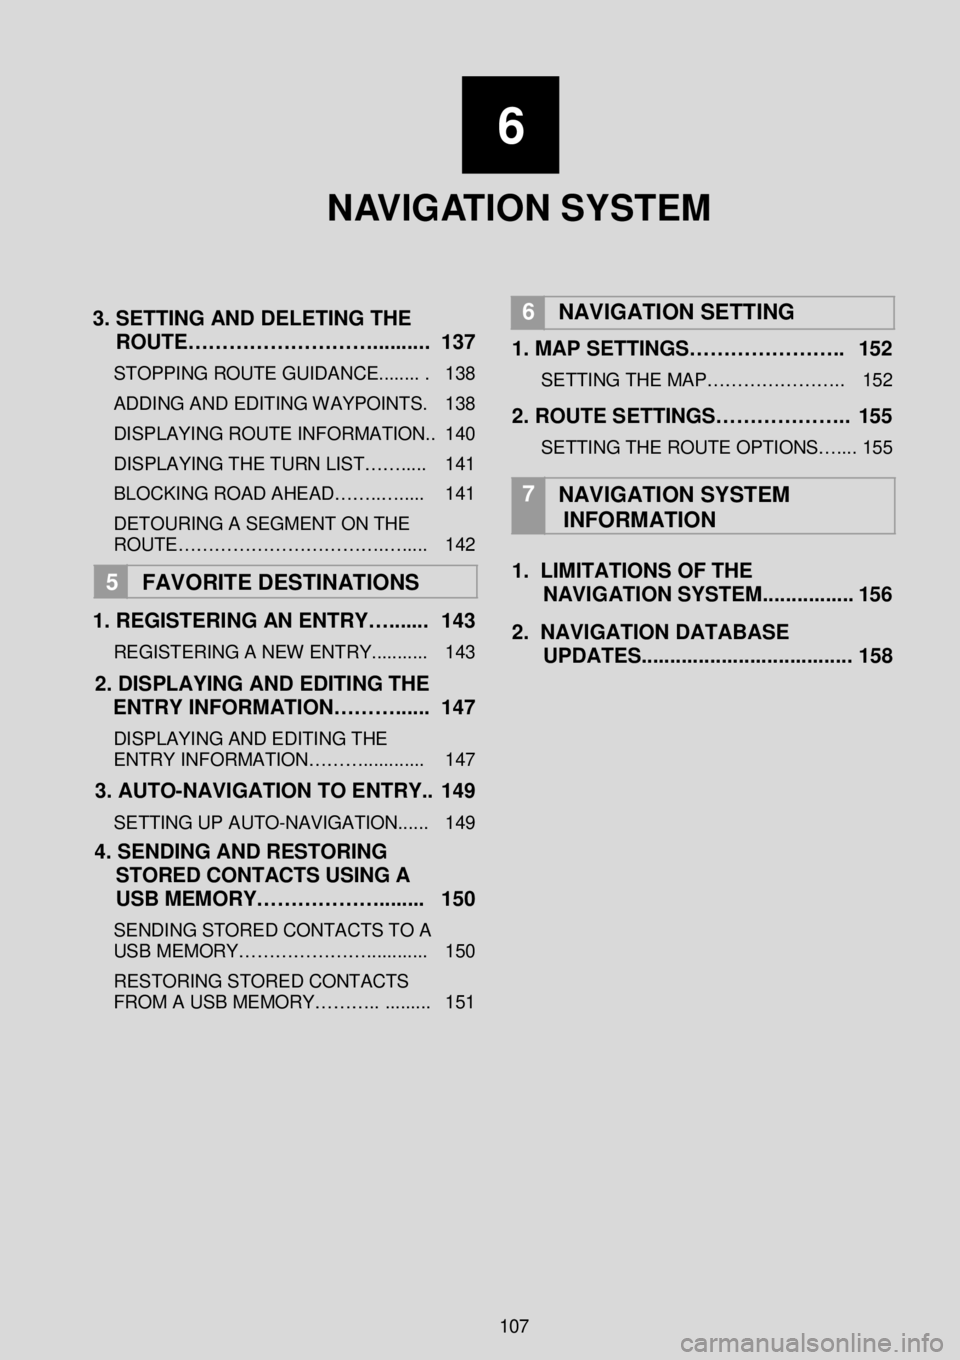
3 . SETTING AND DELETING THE
ROUTE……………………….. ....... . 1 37
STOPPING ROUTE GUIDANCE ........ . 138
ADDING AND EDITING WAY POINTS. 138
DISPLAYING ROUTE INFORMATION.. 140
DISPLAYING THE TURN LIST……..... 141
BLOCKING ROAD AHEAD……..…..... 141
DETOURING A SEGMENT O N THE
ROUTE…………………………….…..... 142
5 FAVORITE DESTINATION S
1 . REGISTERING AN ENTRY…. ...... 143
REGISTERING A NEW ENTRY ........... 143
2. DISPLAYING AND EDITING THE
ENTRY INFORMATION………. ..... 1 47
DISPLAYING AND EDITING THE
ENTRY INFORMATION………..... ....... 147
3 . AUTO -NAVIGATION TO ENTRY.. 1 49
SETTING UP AUTO -NAVIGATION...... 149
4 . SENDING AND RESTORING
STORED CONTACTS USING A
USB MEMORY……………….. ...... 150
SENDING STORED CONTACTS TO A
USB MEMORY…………………. ........... 150
RESTORING STORED CONTACTS
FROM A USB MEMORY……….. .. ....... 151
6
NAVIGATION SETTING
1. MAP SETTINGS………………….. 152
SETTING THE MAP…………………. . 152
2. ROUTE SETTINGS……………….. 155
SETTING THE ROUTE OPTIONS….... 155
7
NAVIGATION SYSTEM
INFORMATION
1. LIMITATIONS OF THE
NAVIGATION SYSTEM .... ............ 156
2 . NAVIGATION DATABASE
UPDATES. .................................... 1 58
107
Page 108 of 164
1. BASIC INFORM AT ION BEFORE OPERATION
1. QUICK REFERENCE
1. BASIC INFORMATION BEFORE OPERATION
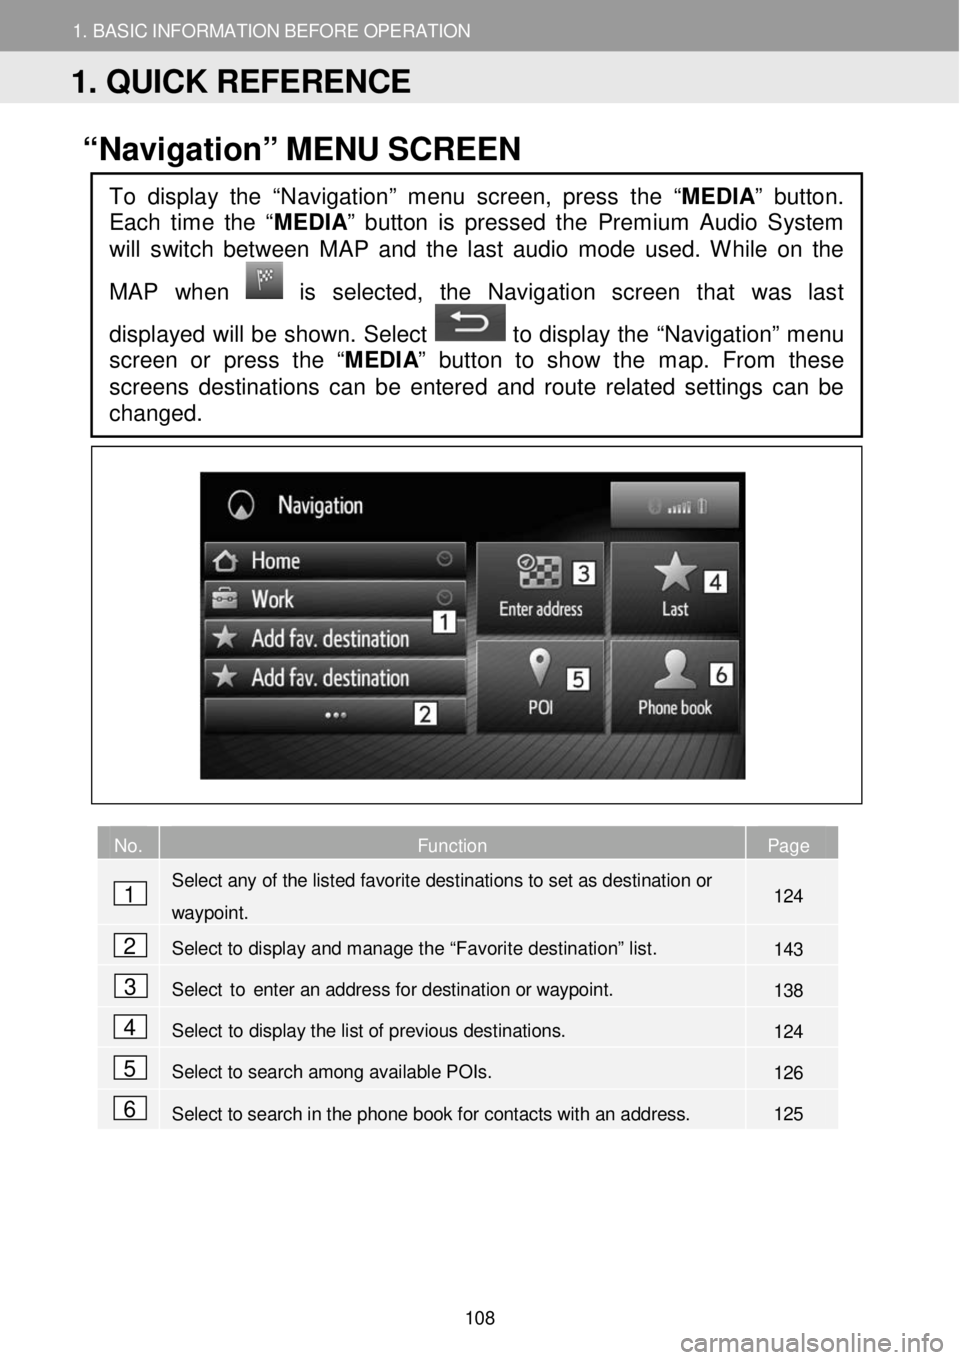
“Navigation” ME NU SC REEN
No. Function Page
Select any of the listed favorite destinations to set as destination or
waypoint. 124
Select to display and manage the “Favorite destination” list. 143
Select to enter an address for destination or way point. 138
Select to display the list of previous destinations. 124
Select to search among available POIs. 126
Select to search in the phone book for contacts with an address. 125
To display the “Navigation” menu screen, press the “MEDIA” button.
Each time the “
MEDIA” button is pressed the Premium Audio System
will switch between MAP and the last audio mode used. While on the
MAP when
is selected, the Navigation screen that was last
displayed will be shown. Select
to display the “Navigation” menu
screen or press the “ MEDIA” button to show the map. From these
screens destinations can be enter ed and route related settings can be
changed.
1
2
3
4
5
6
1. QUICK REFERENCE
108
Page 109 of 164
1. BASIC INFORM AT ION BEFORE OPERATION
1. QUICK REFERENCE
1. BASIC INFORMATION BEFORE OPERATION
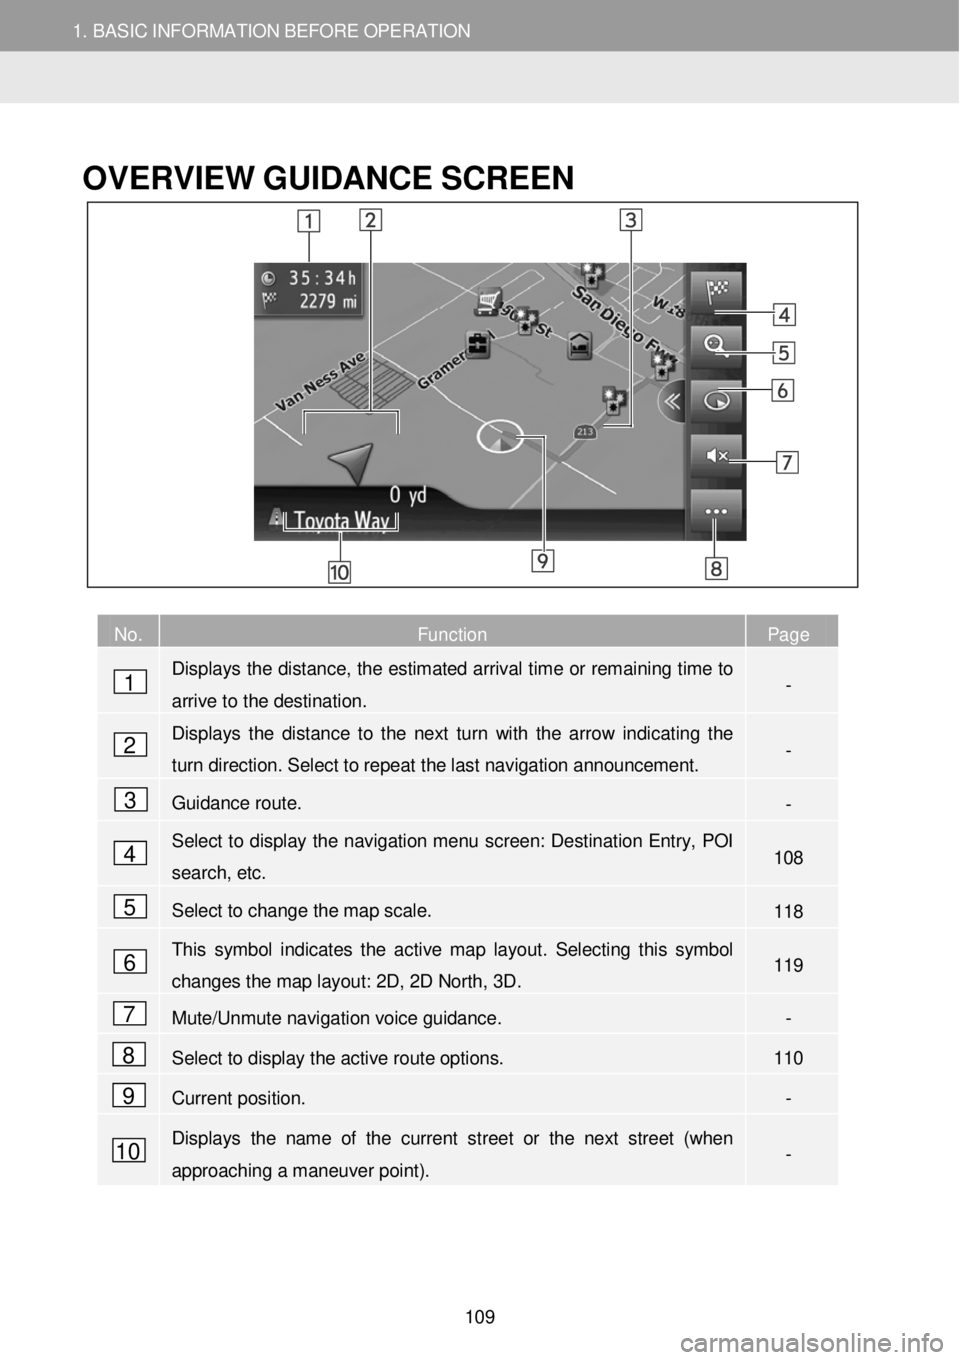
OVERVIEW GUID ANCE SC REEN
No. Function Page
Displays the distance, the estimated arrival time or remaining time to
arrive to the destination. -
Displays the distance to the next turn with the arrow indicating the
turn direction. Select to repeat the last nav igation announcement. -
Guidance route. -
Select to display the navigation menu screen: Destination Entry, POI
search, etc. 1 08
Select to change the map scale. 118
This symbol indicates the active map layout. Selecting this symbol
changes the map layout: 2D, 2D North, 3D. 119
Mute/Unmute navigation voice guidance. -
Select to display the active route options. 110
Current position. -
Displays the name of the current street or the next street (when
approaching a maneuver point). -
1
2
3
4
5
6
7
8
9
10
109
Page 110 of 164
1. BASIC INFORM AT ION BEFORE OPERATION
1. QUICK REFERENCE
1. BASIC INFORMATION BEFORE OPERATION
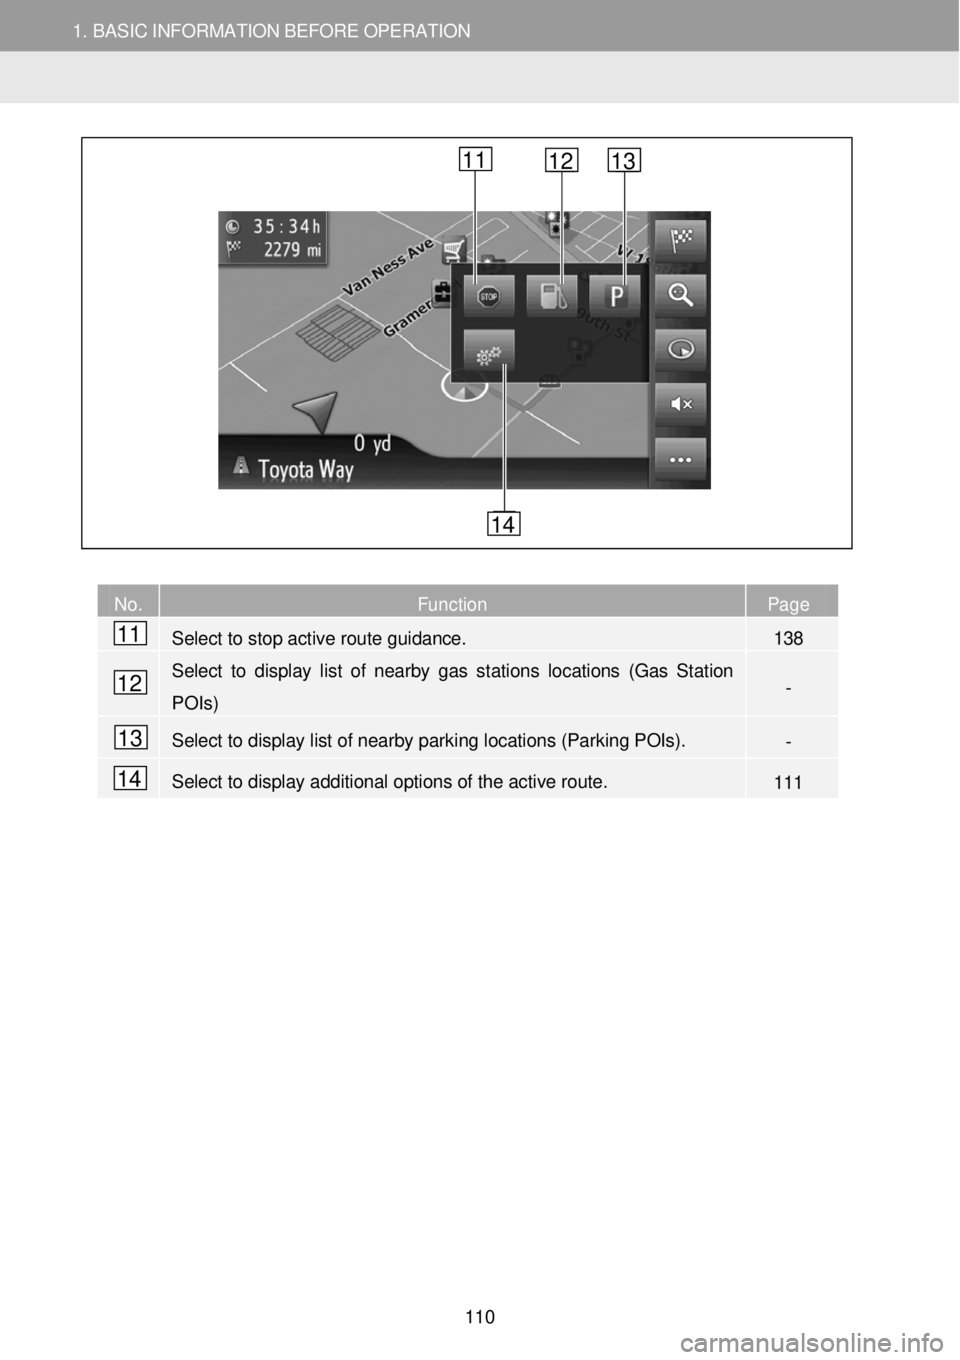
No. Function Page
Select to stop active route guidance. 138
Select to display list of nearby gas stations locations (Gas Station
POIs) -
Select to display list of nearby parking locations (Parking POIs). -
Select to display additional options of the active route. 111
11
12
13
14
11 12 13
14
110
Page 111 of 164
1. BASIC INFORMATION BEFORE OPERATION 1. BASIC INFORMATION BEFORE OPERATION
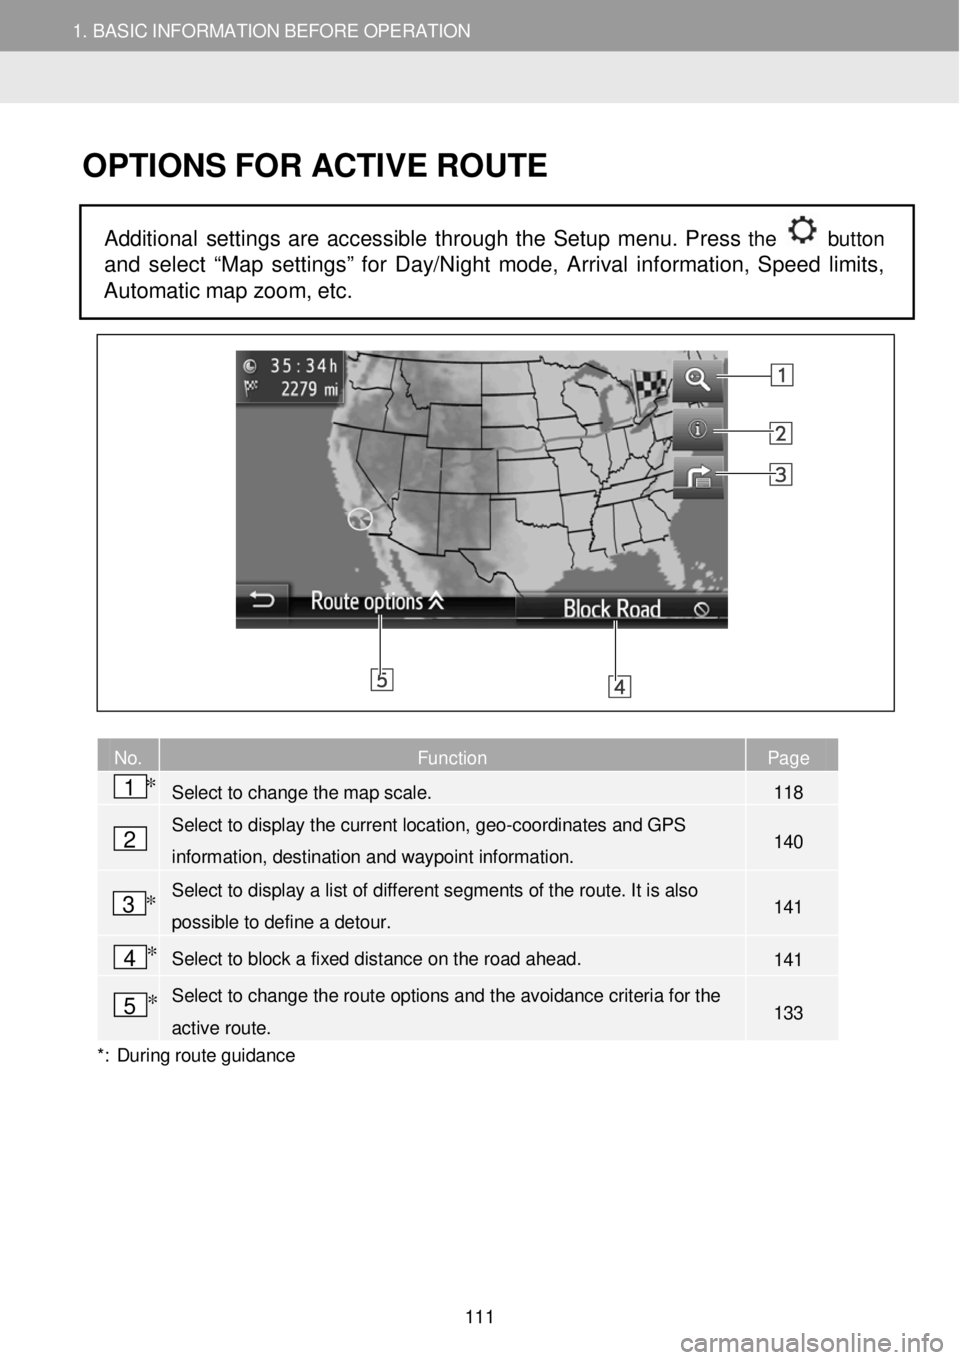
OPTIONS FOR ACTIVE R OUTE
Additional settings are accessible through the Setup menu. Press the button
and select “Map settings” for Day/Night mode, Arrival information, Speed limits,
Automatic map zoom, et c.
No. Function Page
Select to change the map scale. 118
Select to display the current location, geo- coordinates and GPS
information, destination and waypoint information. 140
Select to display a list of different segments of t he route. It is also
possible to define a detour. 141
Select to block a fixed distance on the road ahead. 141
Select to change the route options and the avoidance criteria for the
active route. 133
*: Du rin g route guidan ce
2
1 *
3 *
4 *
5 *
111