VOLKSWAGEN CORRADO 1993 Repair Manual
Manufacturer: VOLKSWAGEN, Model Year: 1993, Model line: CORRADO, Model: VOLKSWAGEN CORRADO 1993Pages: 920, PDF Size: 6.92 MB
Page 441 of 920

C - SPECIFICATIONS
Article Text
1993 Volkswagen Corrado
For Volkswagen Technical Site: http://vw.belcom.ru
Copyright © 1998 Mitchell Repair Information Company, LLC
Wednesday, March 22, 2000 08:58PM
ARTICLE BEGINNING
1993 ENGINE PERFORMANCE
Service & Adjustment Specifications
Corrado SLC
INTRODUCTION
Use this article to quickly find specifications related to
servicing and on-vehicle adjustments. This is a quick-reference
article to use when you are familiar with an adjustment procedure and
only need a specification.
CAPACITIES
BATTERY SPECIFICATIONSÄÄÄÄÄÄÄÄÄÄÄÄÄÄÄÄÄÄÄÄÄÄÄÄÄÄÄÄÄÄÄÄÄÄÄÄÄÄÄÄÄÄÄÄÄÄÄÄÄÄÄÄÄÄÄApplication Amp Hr. Rating
Corrado SLC ...................................... 63
ÄÄÄÄÄÄÄÄÄÄÄÄÄÄÄÄÄÄÄÄÄÄÄÄÄÄÄÄÄÄÄÄÄÄÄÄÄÄÄÄÄÄÄÄÄÄÄÄÄÄÄÄÄÄÄFLUID CAPACITIES
ÄÄÄÄÄÄÄÄÄÄÄÄÄÄÄÄÄÄÄÄÄÄÄÄÄÄÄÄÄÄÄÄÄÄÄÄÄÄÄÄÄÄÄÄÄÄÄÄÄÄÄÄÄÄÄApplication Quantity
Auto. Trans. (Dexron-II)
Dry Fill ...................................... (1)
Refill (Oil Change) ........................... (1)
Cooling System (Includes Heater) .... 9.1 Qts. (8.6L)
Crankcase (Includes Filter) ......... 6.3 Qts. (6.0L)
Man. Transaxle (SAE 75-80/API
GL-4 Or SAE 75W-90, G50
Synthetic Gear Oil) ............... 2.1 Qts. (2.0L)
(1) - Information is not available from manufacturer.
ÄÄÄÄÄÄÄÄÄÄÄÄÄÄÄÄÄÄÄÄÄÄÄÄÄÄÄÄÄÄÄÄÄÄÄÄÄÄÄÄÄÄÄÄÄÄÄÄÄÄÄÄÄÄÄ QUICK-SERVICE
SERVICE INTERVALS & SPECIFICATIONS
REPLACEMENT INTERVALS
ÄÄÄÄÄÄÄÄÄÄÄÄÄÄÄÄÄÄÄÄÄÄÄÄÄÄÄÄÄÄÄÄÄÄÄÄÄÄÄÄÄÄÄÄÄÄÄÄÄÄÄÄÄÄÄComponent Miles
Air Filter ................................... 30,000
Coolant ...................................... 30,000
Fuel Filter (1) .............................. 15,000
Oil & Filter ................................... 7500
Page 442 of 920

C - SPECIFICATIONS
Article Text (p. 2)
1993 Volkswagen Corrado
For Volkswagen Technical Site: http://vw.belcom.ru
Copyright © 1998 Mitchell Repair Information Company, LLC
Wednesday, March 22, 2000 08:58PM
Spark Plugs .................................. 30,000
(1) - Discard mini-fuel filter at 1000-mile maintenance
interval. Install new copper gaskets.ÄÄÄÄÄÄÄÄÄÄÄÄÄÄÄÄÄÄÄÄÄÄÄÄÄÄÄÄÄÄÄÄÄÄÄÄÄÄÄÄÄÄÄÄÄÄÄÄÄÄÄÄÄÄÄBELT ADJUSTMENT
ÄÄÄÄÄÄÄÄÄÄÄÄÄÄÄÄÄÄÄÄÄÄÄÄÄÄÄÄÄÄÄÄÄÄÄÄÄÄÄÄÄÄÄÄÄÄÄÄÄÄÄÄÄÄÄApplication Specification
Serpentine Belt ................................. (1)
(1) - Serpentine belt tension is automatically adjusted
by the tensioner.
ÄÄÄÄÄÄÄÄÄÄÄÄÄÄÄÄÄÄÄÄÄÄÄÄÄÄÄÄÄÄÄÄÄÄÄÄÄÄÄÄÄÄÄÄÄÄÄÄÄÄÄÄÄÄÄ MECHANICAL CHECKS
ENGINE COMPRESSION
COMPRESSION SPECIFICATIONS
ÄÄÄÄÄÄÄÄÄÄÄÄÄÄÄÄÄÄÄÄÄÄÄÄÄÄÄÄÄÄÄÄÄÄÄÄÄÄÄÄÄÄÄÄÄÄÄÄÄÄÄÄÄÄÄApplication Specification
Compression Ratio ............................ 10.0:1
Compression
Pressure ........... 157-186 psi (11.0-13.0 kg/cm
ý)
Minimum Compression Pressure ... 106 psi (7.5 kg/cm
ý)
Maximum Variation
Between Cylinders ............. 43 psi (3.0 kg/cm
ý)
ÄÄÄÄÄÄÄÄÄÄÄÄÄÄÄÄÄÄÄÄÄÄÄÄÄÄÄÄÄÄÄÄÄÄÄÄÄÄÄÄÄÄÄÄÄÄÄÄÄÄÄÄÄÄÄ VALVE CLEARANCE
NOTE: All models are equipped with hydraulic lifters. No
adjustments are required.
IGNITION SYSTEM
IGNITION COIL
IGNITION COIL RESISTANCE - Ohms @ 68
øF (20øC)
ÄÄÄÄÄÄÄÄÄÄÄÄÄÄÄÄÄÄÄÄÄÄÄÄÄÄÄÄÄÄÄÄÄÄÄÄÄÄÄÄÄÄÄÄÄÄÄÄÄÄÄÄÄÄÄApplication Primary Secondary
Corrado SLC (1) ........ ..... .............. .....
(1) - Ignition coil pack, new for 1993, is located on
left side of cylinder head. When ignition coil is
triggered, spark is supplied to 2 spark plugs at
one time. One spark plug fires during compression
stroke and the other plug fires during exhaust
Page 443 of 920

C - SPECIFICATIONS
Article Text (p. 3)
1993 Volkswagen Corrado
For Volkswagen Technical Site: http://vw.belcom.ru
Copyright © 1998 Mitchell Repair Information Company, LLC
Wednesday, March 22, 2000 08:58PM
stroke (waste spark). Ignition coil specifications
are not available from manufacturer.ÄÄÄÄÄÄÄÄÄÄÄÄÄÄÄÄÄÄÄÄÄÄÄÄÄÄÄÄÄÄÄÄÄÄÄÄÄÄÄÄÄÄÄÄÄÄÄÄÄÄÄÄÄÄÄ HIGH TENSION WIRE RESISTANCE
HIGH TENSION WIRE RESISTANCE
ÄÄÄÄÄÄÄÄÄÄÄÄÄÄÄÄÄÄÄÄÄÄÄÄÄÄÄÄÄÄÄÄÄÄÄÄÄÄÄÄÄÄÄÄÄÄÄÄÄÄÄÄÄÄÄApplication Ohms
Corrado SLC ..................................... (1)
(1) - Information is not available from manufacturer.
ÄÄÄÄÄÄÄÄÄÄÄÄÄÄÄÄÄÄÄÄÄÄÄÄÄÄÄÄÄÄÄÄÄÄÄÄÄÄÄÄÄÄÄÄÄÄÄÄÄÄÄÄÄÄÄ SPARK PLUGS
SPARK PLUG TYPE
ÄÄÄÄÄÄÄÄÄÄÄÄÄÄÄÄÄÄÄÄÄÄÄÄÄÄÄÄÄÄÄÄÄÄÄÄÄÄÄÄÄÄÄÄÄÄÄÄÄÄÄÄÄÄÄApplication Bosch
Corrado SLC ................................... C9MCC
ÄÄÄÄÄÄÄÄÄÄÄÄÄÄÄÄÄÄÄÄÄÄÄÄÄÄÄÄÄÄÄÄÄÄÄÄÄÄÄÄÄÄÄÄÄÄÄÄÄÄÄÄÄÄÄSPARK PLUG SPECIFICATIONS
ÄÄÄÄÄÄÄÄÄÄÄÄÄÄÄÄÄÄÄÄÄÄÄÄÄÄÄÄÄÄÄÄÄÄÄÄÄÄÄÄÄÄÄÄÄÄÄÄÄÄÄÄÄÄÄ Gap Torque
Application In. (mm) Ft. Lbs. (N.m)
Corrado SLC ..... .028-.031 (.70-.80) ..... 18 (25)
ÄÄÄÄÄÄÄÄÄÄÄÄÄÄÄÄÄÄÄÄÄÄÄÄÄÄÄÄÄÄÄÄÄÄÄÄÄÄÄÄÄÄÄÄÄÄÄÄÄÄÄÄÄÄÄ FIRING ORDER & TIMING MARKS
NOTE: To identify firing order and distributor rotation,
see Fig. 1.
Corrado SLC
Ignition coil pack, new for 1993, is located on left side of
cylinder head. When ignition coil is triggered, spark is supplied to 2
spark plugs at one time. One spark plug fires during compression
stroke and the other plug fires during exhaust stroke (waste spark).Fig. 1: Firing Order & Distributor Rotation (2.8L)
Courtesy of Volkswagen United States, Inc.
Page 444 of 920

C - SPECIFICATIONS
Article Text (p. 4)
1993 Volkswagen Corrado
For Volkswagen Technical Site: http://vw.belcom.ru
Copyright © 1998 Mitchell Repair Information Company, LLC
Wednesday, March 22, 2000 08:58PM
IGNITION TIMING
NOTE: Always refer to underhood label for latest specifications.
IGNITION TIMING (Degrees BTDC @ RPM)ÄÄÄÄÄÄÄÄÄÄÄÄÄÄÄÄÄÄÄÄÄÄÄÄÄÄÄÄÄÄÄÄÄÄÄÄÄÄÄÄÄÄÄÄÄÄÄÄÄÄÄÄÄÄÄApplication Checking Adjusting
Corrado SLC ............... (1) ............... (1)
(1) - Ignition timing is computer controlled.
Information is not available from manufacturer.
ÄÄÄÄÄÄÄÄÄÄÄÄÄÄÄÄÄÄÄÄÄÄÄÄÄÄÄÄÄÄÄÄÄÄÄÄÄÄÄÄÄÄÄÄÄÄÄÄÄÄÄÄÄÄÄIGNITION TIMING ADVANCE (Degrees BTDC @ RPM)
ÄÄÄÄÄÄÄÄÄÄÄÄÄÄÄÄÄÄÄÄÄÄÄÄÄÄÄÄÄÄÄÄÄÄÄÄÄÄÄÄÄÄÄÄÄÄÄÄÄÄÄÄÄÄÄApplication Specification
Corrado SLC ..................................... (1)
(1) - Ignition timing advance is computer controlled.
Information is not available from manufacturer.
ÄÄÄÄÄÄÄÄÄÄÄÄÄÄÄÄÄÄÄÄÄÄÄÄÄÄÄÄÄÄÄÄÄÄÄÄÄÄÄÄÄÄÄÄÄÄÄÄÄÄÄÄÄÄÄ FUEL SYSTEM
FUEL PUMP
NOTE: Fuel pump performance measures fuel pressure and volume
availability, not regulated fuel pressure.
FUEL PUMP PERFORMANCE
ÄÄÄÄÄÄÄÄÄÄÄÄÄÄÄÄÄÄÄÄÄÄÄÄÄÄÄÄÄÄÄÄÄÄÄÄÄÄÄÄÄÄÄÄÄÄÄÄÄÄÄÄÄÄÄÄÄÄÄÄÄÄÄÄÄ Pressure Min. Vol. In 30 Sec.
Application psi (kg/cm(
ý) Pts. (L)
Corrado SLC (1) .......... 58 (4.0) ....... 1.0-1.4 (0.5-0.7)
(1) - Using Adapter Cable (VAG 1348/3-2) between battery positive
terminal and terminal No. 4 of fuel pump relay socket. Fuel
pump energized, with 10-12 volts at fuel pump and engine off.
ÄÄÄÄÄÄÄÄÄÄÄÄÄÄÄÄÄÄÄÄÄÄÄÄÄÄÄÄÄÄÄÄÄÄÄÄÄÄÄÄÄÄÄÄÄÄÄÄÄÄÄÄÄÄÄÄÄÄÄÄÄÄÄÄÄREGULATED FUEL PRESSURE
ÄÄÄÄÄÄÄÄÄÄÄÄÄÄÄÄÄÄÄÄÄÄÄÄÄÄÄÄÄÄÄÄÄÄÄÄÄÄÄÄÄÄÄÄÄÄÄÄÄÄÄÄÄÄÄÄÄÄÄÄÄÄÄÄÄ At Idle At Idle
w/Vacuum w/o Vacuum
Application psi (kg/cm
ý) (1) psi (kg/cmý)
Corrado SLC ............ 50 (3.5) .................. 58 (4.0)
(1) - With vacuum hose disconnected from fuel pressure regulator.
Page 445 of 920

C - SPECIFICATIONS
Article Text (p. 5)
1993 Volkswagen Corrado
For Volkswagen Technical Site: http://vw.belcom.ru
Copyright © 1998 Mitchell Repair Information Company, LLC
Wednesday, March 22, 2000 08:58PMÄÄÄÄÄÄÄÄÄÄÄÄÄÄÄÄÄÄÄÄÄÄÄÄÄÄÄÄÄÄÄÄÄÄÄÄÄÄÄÄÄÄÄÄÄÄÄÄÄÄÄÄÄÄÄÄÄÄÄÄÄÄÄÄÄ INJECTOR RESISTANCE
INJECTOR RESISTANCE SPECIFICATIONS
ÄÄÄÄÄÄÄÄÄÄÄÄÄÄÄÄÄÄÄÄÄÄÄÄÄÄÄÄÄÄÄÄÄÄÄÄÄÄÄÄÄÄÄÄÄÄÄÄÄÄÄÄÄÄÄApplication Ohms
Corrado SLC ............................... 15.0-21.5
ÄÄÄÄÄÄÄÄÄÄÄÄÄÄÄÄÄÄÄÄÄÄÄÄÄÄÄÄÄÄÄÄÄÄÄÄÄÄÄÄÄÄÄÄÄÄÄÄÄÄÄÄÄÄÄ IDLE SPEED & MIXTURE
IDLE SPEED & CO LEVEL
ÄÄÄÄÄÄÄÄÄÄÄÄÄÄÄÄÄÄÄÄÄÄÄÄÄÄÄÄÄÄÄÄÄÄÄÄÄÄÄÄÄÄÄÄÄÄÄÄÄÄÄÄÄÄÄApplication Idle RPM CO Level %
Corrado SLC (1) ......... 650-750 ......... 0.3-1.5
(1) - Idle speed and fuel mixture (CO level) are not
adjustable.
ÄÄÄÄÄÄÄÄÄÄÄÄÄÄÄÄÄÄÄÄÄÄÄÄÄÄÄÄÄÄÄÄÄÄÄÄÄÄÄÄÄÄÄÄÄÄÄÄÄÄÄÄÄÄÄ DASHPOT SPECIFICATION
Corrado SLC
Gap between limiter (stop) screw and throttle lever must be
0.10-0.14" (2.5-3.5 mm).
END OF ARTICLE
Page 446 of 920

CLUTCH
Article Text
1993 Volkswagen Corrado
For Volkswagen Technical Site: http://vw.belcom.ru
Copyright © 1998 Mitchell Repair Information Company, LLC
Wednesday, March 22, 2000 08:58PM
ARTICLE BEGINNING
1993 CLUTCHES
Volkswagen FWD - Corrado SLC & Passat
Volkswagen; Corrado SLC & Passat
DESCRIPTION
The clutch is a single dry disc type, which uses a diaphragm
spring-type pressure plate. The clutch is hydraulically operated.
ADJUSTMENTS
CLUTCH PEDAL
Clutch is automatically adjusted and requires no manual
adjustment. If clutch pedal does not operate clutch or return
properly, check hydraulic system for leaking fluid or air in system.
GEARSHIFT LEVER CABLES
1) Place gearshift in Neutral position. Remove gearshift knob
and boot. Loosen bolt and nut (at transaxle slotted levers) of both
cables.
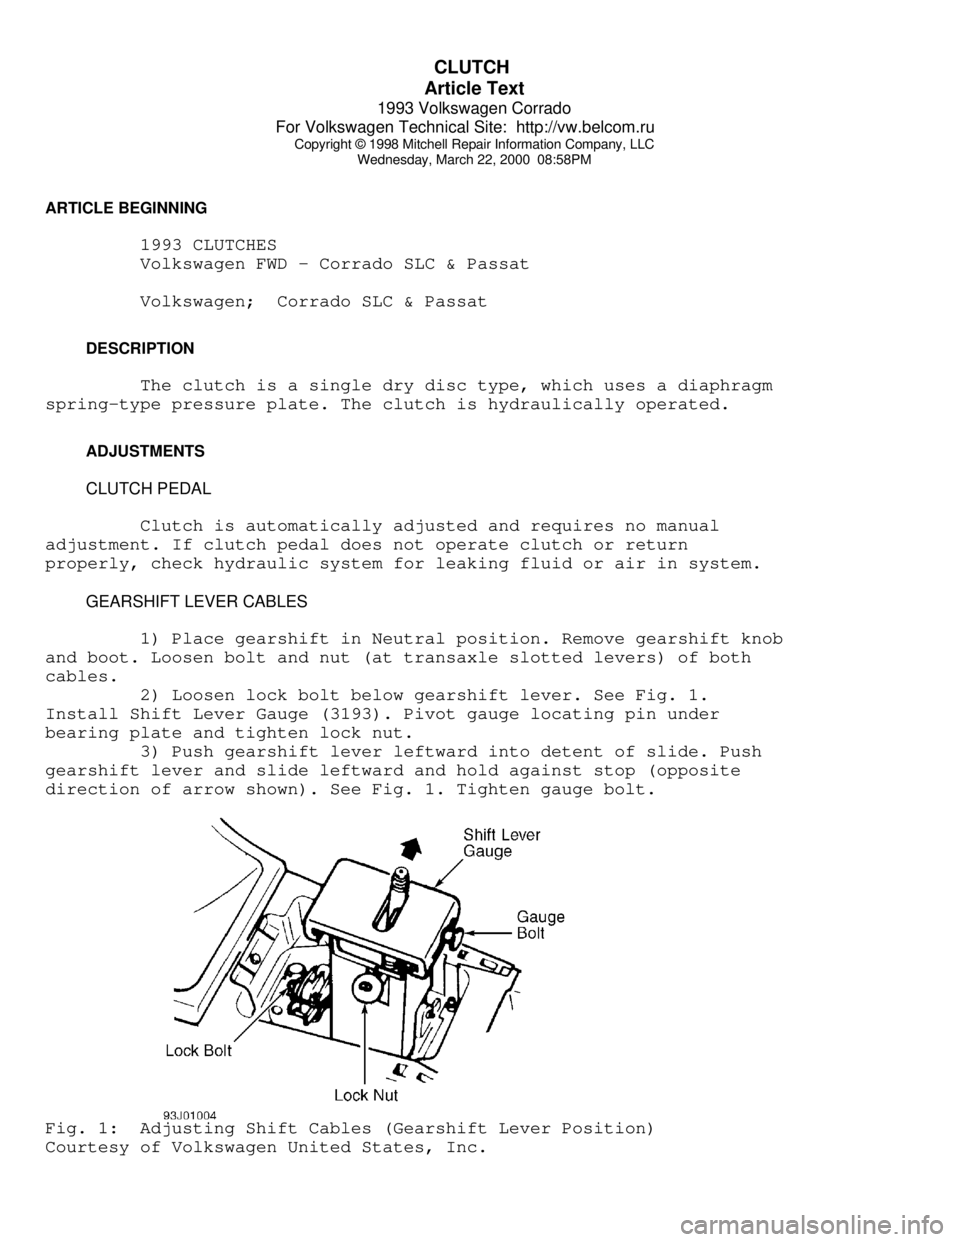
2) Loosen lock bolt below gearshift lever. See Fig. 1.
Install Shift Lever Gauge (3193). Pivot gauge locating pin under
bearing plate and tighten lock nut.
3) Push gearshift lever leftward into detent of slide. Push
gearshift lever and slide leftward and hold against stop (opposite
direction of arrow shown). See Fig. 1. Tighten gauge bolt.Fig. 1: Adjusting Shift Cables (Gearshift Lever Position)
Courtesy of Volkswagen United States, Inc.
Page 447 of 920

CLUTCH
Article Text (p. 2)
1993 Volkswagen Corrado
For Volkswagen Technical Site: http://vw.belcom.ru
Copyright © 1998 Mitchell Repair Information Company, LLC
Wednesday, March 22, 2000 08:58PM
4) Push gearshift lever rightward into right side detent
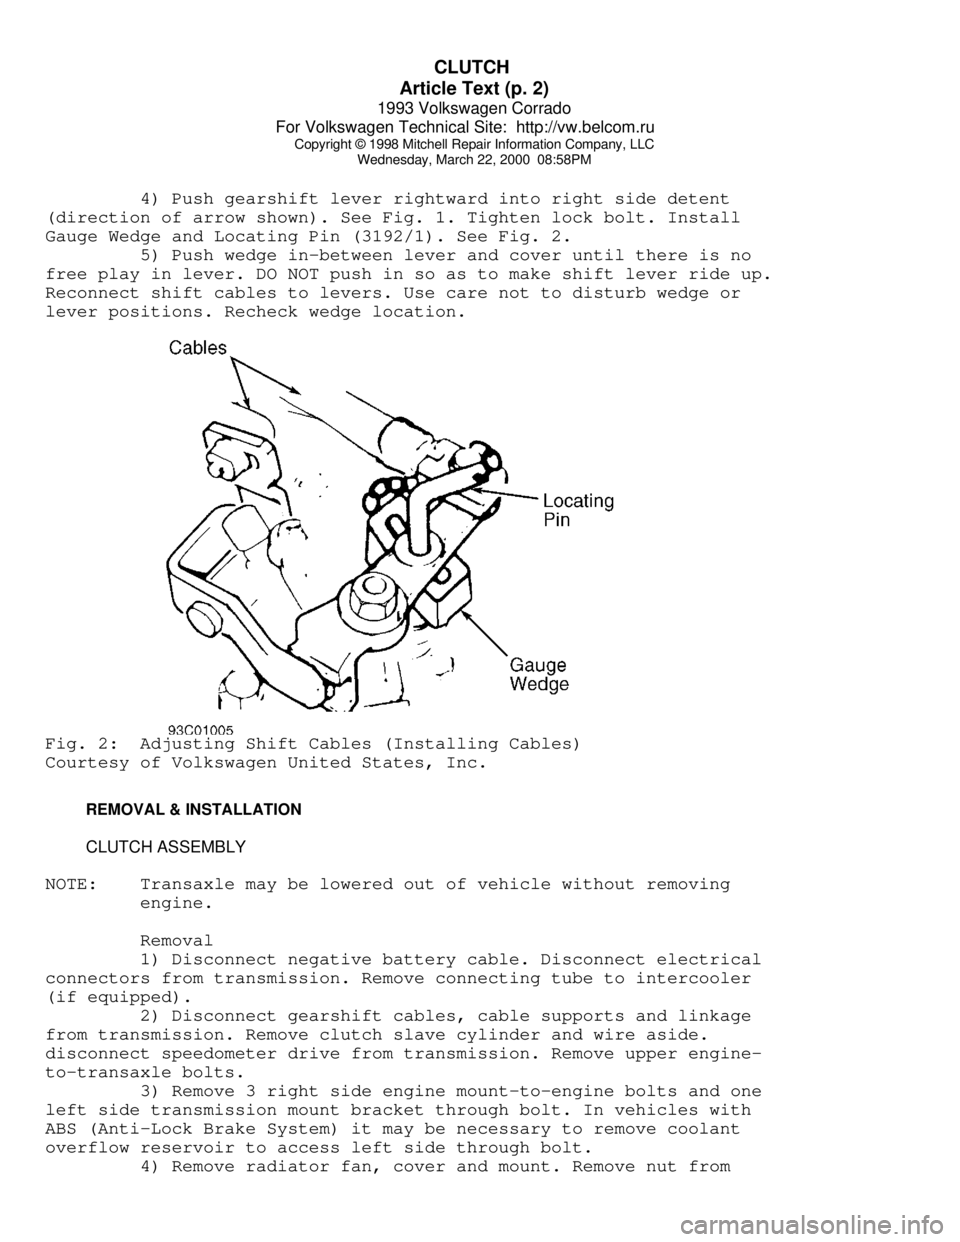
(direction of arrow shown). See Fig. 1. Tighten lock bolt. Install
Gauge Wedge and Locating Pin (3192/1). See Fig. 2.
5) Push wedge in-between lever and cover until there is no
free play in lever. DO NOT push in so as to make shift lever ride up.
Reconnect shift cables to levers. Use care not to disturb wedge or
lever positions. Recheck wedge location.Fig. 2: Adjusting Shift Cables (Installing Cables)
Courtesy of Volkswagen United States, Inc.
REMOVAL & INSTALLATION
CLUTCH ASSEMBLY
NOTE: Transaxle may be lowered out of vehicle without removing
engine.
Removal
1) Disconnect negative battery cable. Disconnect electrical
connectors from transmission. Remove connecting tube to intercooler
(if equipped).
2) Disconnect gearshift cables, cable supports and linkage
from transmission. Remove clutch slave cylinder and wire aside.
disconnect speedometer drive from transmission. Remove upper engine-
to-transaxle bolts.
3) Remove 3 right side engine mount-to-engine bolts and one
left side transmission mount bracket through bolt. In vehicles with
ABS (Anti-Lock Brake System) it may be necessary to remove coolant
overflow reservoir to access left side through bolt.
4) Remove radiator fan, cover and mount. Remove nut from
Page 448 of 920

CLUTCH
Article Text (p. 3)
1993 Volkswagen Corrado
For Volkswagen Technical Site: http://vw.belcom.ru
Copyright © 1998 Mitchell Repair Information Company, LLC
Wednesday, March 22, 2000 08:58PM
front transmission mount. Attach Engine Support (10-222A) with Bases
(10-222A/1) to engine. Slightly tighten engine support and remove
starter. Remove left transaxle mount bracket.
5) Remove long left side transmission support bracket. Remove
balance weight from mount. Remove heat shield for right side inner CV
(constant velocity) joint.
6) Disconnect axle shafts at flanges and wire aside. Remove
left side transaxle mount from transaxle. It will be necessary to push
rearward on mount for clearance to remove long transaxle mount bolt.
7) Push transaxle mount to right and pull down to remove from
vehicle. Remove small gear carrier housing cover. Support transaxle
with floor jack. Remove rear transaxle mount. Remove lower transaxle-
to-engine bolts. Carefully pry transaxle from engine and lower.
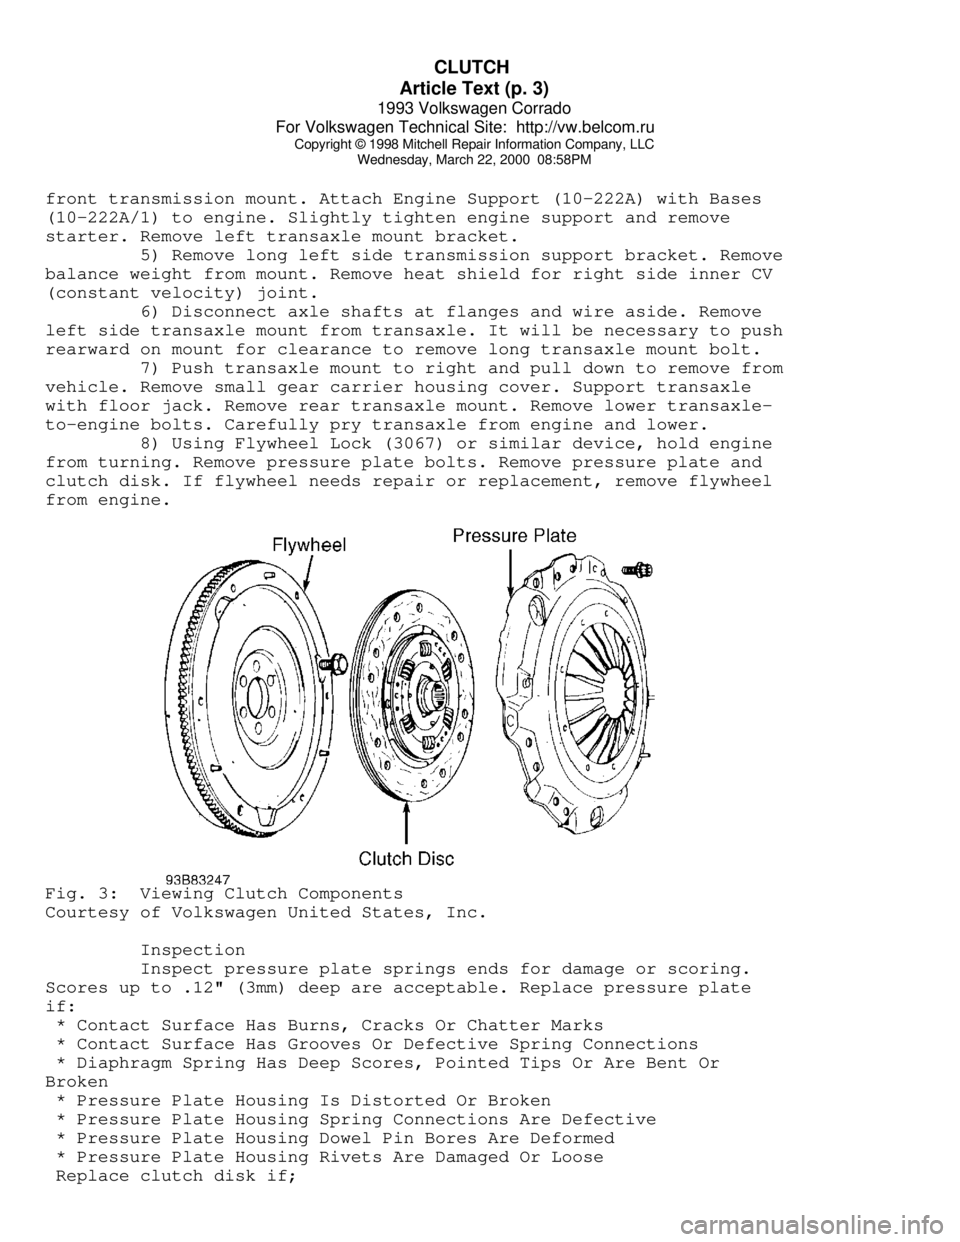
8) Using Flywheel Lock (3067) or similar device, hold engine
from turning. Remove pressure plate bolts. Remove pressure plate and
clutch disk. If flywheel needs repair or replacement, remove flywheel
from engine.Fig. 3: Viewing Clutch Components
Courtesy of Volkswagen United States, Inc.
Inspection
Inspect pressure plate springs ends for damage or scoring.
Scores up to .12" (3mm) deep are acceptable. Replace pressure plate
if:
* Contact Surface Has Burns, Cracks Or Chatter Marks
* Contact Surface Has Grooves Or Defective Spring Connections
* Diaphragm Spring Has Deep Scores, Pointed Tips Or Are Bent Or
Broken
* Pressure Plate Housing Is Distorted Or Broken
* Pressure Plate Housing Spring Connections Are Defective
* Pressure Plate Housing Dowel Pin Bores Are Deformed
* Pressure Plate Housing Rivets Are Damaged Or Loose
Replace clutch disk if;
Page 449 of 920

CLUTCH
Article Text (p. 4)
1993 Volkswagen Corrado
For Volkswagen Technical Site: http://vw.belcom.ru
Copyright © 1998 Mitchell Repair Information Company, LLC
Wednesday, March 22, 2000 08:58PM
* Worn To Surface Of Rivet Heads
* Rivets Are Loose, Missing Or Damaged
* Friction Material Is Oil Or Grease Soaked
* Friction Material Is Loose, Cracked Or Grooved
* Hub Is Rusted Or Damaged
* Springs Are Rusted Solid, Broken, Cracked Or Loose
* Torsion Damper Spring Guide Is Broken
* Torsion Damper Cover Damaged
* Torsion Damper Grooved Or Not Functioning
NOTE: Pressure plate has a protective grease coating. Remove
contact surface grease only. Service life will be shortened
if remaining portions of pressure plate protective grease
are removed.
Installation
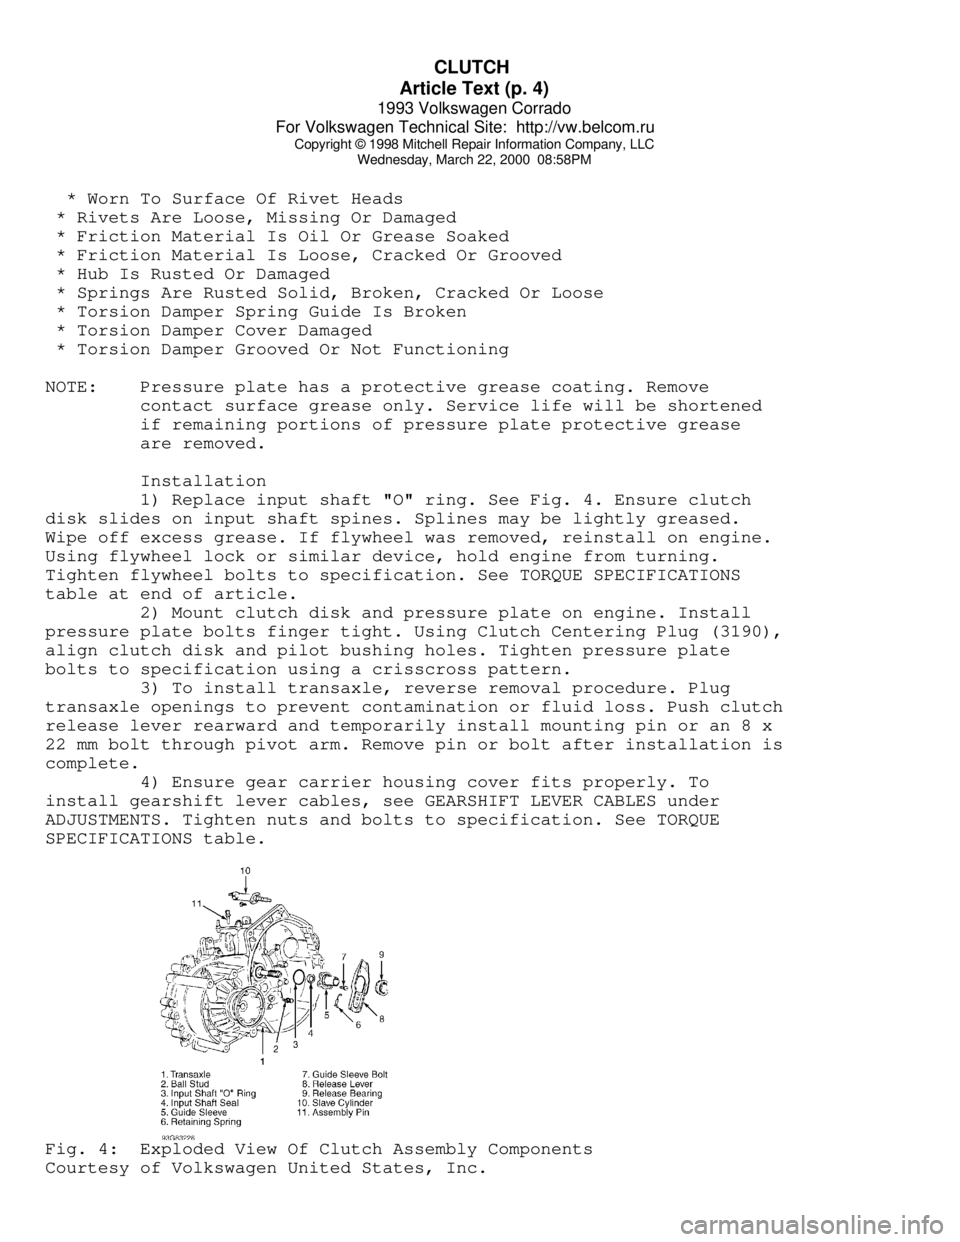
1) Replace input shaft "O" ring. See Fig. 4. Ensure clutch
disk slides on input shaft spines. Splines may be lightly greased.
Wipe off excess grease. If flywheel was removed, reinstall on engine.
Using flywheel lock or similar device, hold engine from turning.
Tighten flywheel bolts to specification. See TORQUE SPECIFICATIONS
table at end of article.
2) Mount clutch disk and pressure plate on engine. Install
pressure plate bolts finger tight. Using Clutch Centering Plug (3190),
align clutch disk and pilot bushing holes. Tighten pressure plate
bolts to specification using a crisscross pattern.
3) To install transaxle, reverse removal procedure. Plug
transaxle openings to prevent contamination or fluid loss. Push clutch
release lever rearward and temporarily install mounting pin or an 8 x
22 mm bolt through pivot arm. Remove pin or bolt after installation is
complete.
4) Ensure gear carrier housing cover fits properly. To
install gearshift lever cables, see GEARSHIFT LEVER CABLES under
ADJUSTMENTS. Tighten nuts and bolts to specification. See TORQUE
SPECIFICATIONS table.Fig. 4: Exploded View Of Clutch Assembly Components
Courtesy of Volkswagen United States, Inc.
Page 450 of 920

CLUTCH
Article Text (p. 5)
1993 Volkswagen Corrado
For Volkswagen Technical Site: http://vw.belcom.ru
Copyright © 1998 Mitchell Repair Information Company, LLC
Wednesday, March 22, 2000 08:58PM
TORQUE SPECIFICATIONS
TORQUE SPECIFICATIONS TABLEÄÄÄÄÄÄÄÄÄÄÄÄÄÄÄÄÄÄÄÄÄÄÄÄÄÄÄÄÄÄÄÄÄÄÄÄÄÄÄÄÄÄÄÄÄÄÄÄÄÄÄÄÄÄÄÄÄÄÄÄÄÄÄÄÄÄÄÄÄÄApplication Ft. Lbs. (N.m)
Balance Weight-To-Mount Bolt ............................... 22 (30)
Drive Axle-To-Flange Bolt .................................. 33 (45)
Flywheel Bolt ................................... 22 (30) + 1/4 Turn
Front Transaxle Mount Nut .................................. 44 (60)
Gearshift Cable Bolt ....................................... 18 (25)
Gearshift Cable Support Bolt ............................... 18 (25)
Left Transaxle Mount
Bracket-To-Mount Bolt ..................................... 44 (60)
Bracket-To-Transaxle Bolt ................................. 18 (25)
Pressure Plate Bolt ........................................ 15 (20)
Right Rear Transaxle Mount Bolt ............................ 18 (25)
Slave Cylinder Bolt ........................................ 18 (25)
Starter Bolt ............................................... 44 (60)
Transaxle Support-To-Transaxle Bolt ........................ 44 (60)
Transaxle-To-Engine Bolt ................................... 59 (80)
ÄÄÄÄÄÄÄÄÄÄÄÄÄÄÄÄÄÄÄÄÄÄÄÄÄÄÄÄÄÄÄÄÄÄÄÄÄÄÄÄÄÄÄÄÄÄÄÄÄÄÄÄÄÄÄÄÄÄÄÄÄÄÄÄÄÄÄÄÄÄEND OF ARTICLE