My Car VOLVO S60 2018 Owner´s Manual
[x] Cancel search | Manufacturer: VOLVO, Model Year: 2018, Model line: S60, Model: VOLVO S60 2018Pages: 396, PDF Size: 9.4 MB
Page 233 of 396
DRIVER SUPPORT
}}
231
Audible signal
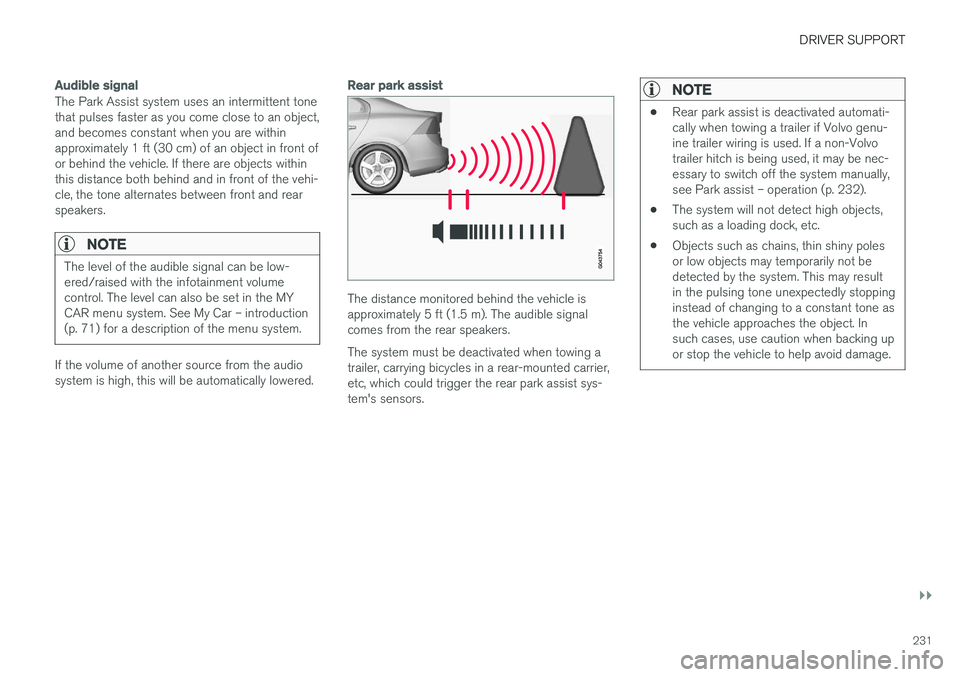
The Park Assist system uses an intermittent tone that pulses faster as you come close to an object,and becomes constant when you are withinapproximately 1 ft (30 cm) of an object in front ofor behind the vehicle. If there are objects withinthis distance both behind and in front of the vehi-cle, the tone alternates between front and rearspeakers.
NOTE
The level of the audible signal can be low- ered/raised with the infotainment volumecontrol. The level can also be set in the MYCAR menu system. See My Car – introduction(p. 71) for a description of the menu system.
If the volume of another source from the audio system is high, this will be automatically lowered.
Rear park assist
The distance monitored behind the vehicle is approximately 5 ft (1.5 m). The audible signalcomes from the rear speakers. The system must be deactivated when towing a trailer, carrying bicycles in a rear-mounted carrier,etc, which could trigger the rear park assist sys-tem's sensors.
NOTE
•Rear park assist is deactivated automati- cally when towing a trailer if Volvo genu-ine trailer wiring is used. If a non-Volvotrailer hitch is being used, it may be nec-essary to switch off the system manually,see Park assist – operation (p. 232).
• The system will not detect high objects,such as a loading dock, etc.
• Objects such as chains, thin shiny polesor low objects may temporarily not bedetected by the system. This may resultin the pulsing tone unexpectedly stoppinginstead of changing to a constant tone asthe vehicle approaches the object. Insuch cases, use caution when backing upor stop the vehicle to help avoid damage.
Page 235 of 396
DRIVER SUPPORT
233
Activating/deactivating
The system is activated automatically when the vehicle is started.
–Press the Park assist button on the center console to temporarily deactivate the sys-tem(s).
> The indicator light in the button will go outwhen the system has been deactivated.
Park assist will be automatically reactivated the next time the engine is started, or if the button ispressed (the indicator light in the button will illu-minate).
NOTE
Park assist is disengaged automatically when the parking brake is applied.
Related information
• Park assist – introduction (p. 230)
• Park assist – limitations (p. 233)
• Park assist – function (p. 230)
• Park assist – troubleshooting (p. 238)
• Rear Park Assist Camera (PAC) – function (p. 239)
Park assist – limitations
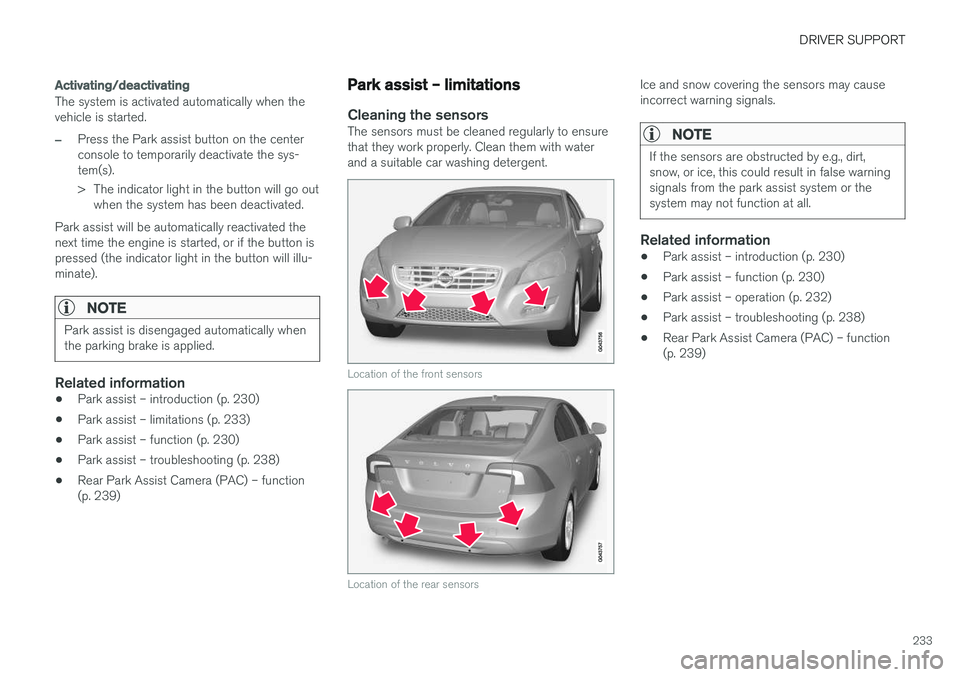
Cleaning the sensorsThe sensors must be cleaned regularly to ensure that they work properly. Clean them with waterand a suitable car washing detergent.
Location of the front sensors
Location of the rear sensors
Ice and snow covering the sensors may cause incorrect warning signals.
NOTE
If the sensors are obstructed by e.g., dirt, snow, or ice, this could result in false warningsignals from the park assist system or thesystem may not function at all.
Related information
•Park assist – introduction (p. 230)
• Park assist – function (p. 230)
• Park assist – operation (p. 232)
• Park assist – troubleshooting (p. 238)
• Rear Park Assist Camera (PAC) – function (p. 239)
Page 240 of 396
||
DRIVER SUPPORT
* Option/accessory.
238 PAP uses the same sensors as the Park assist system, see Park assist – limitations (p. 233)). The sensors must be cleaned regularly to ensure that they work properly. Clean them with waterand a suitable car washing detergent.
Related information
•
Park Assist Pilot (PAP)
* – introduction
(p. 234)
• Park Assist Pilot (PAP)
* – function (p. 234)
• Park Assist Pilot (PAP)
* – operation (p. 235)
• Park Assist Pilot (PAP)
* – symbols and mes-
sages (p. 238)
• Park assist – introduction (p. 230)
• Rear Park Assist Camera (PAC) – introduc-tion (p. 239)
Park Assist Pilot (PAP)
* – symbols
and messages
Various PAP-related combinations of symbols, graphics and text messages are displayed in theinstrument panel and sometimes also includesuitable actions. A text message can be erased by pressing briefly on the OK button on the turn signal lever.
Contact a Volvo retailer or a trained and qualified Volvo service technician If a message indicatingthat PAP is not functioning properly is displayed.
Related information
• Park Assist Pilot (PAP)
* – introduction
(p. 234)
• Park Assist Pilot (PAP)
* – function (p. 234)
• Park Assist Pilot (PAP)
* – operation (p. 235)
• Park Assist Pilot (PAP)
* – limitations (p. 237)
• Park assist – introduction (p. 230)
• Rear Park Assist Camera (PAC) – introduc-tion (p. 239)
Park assist – troubleshooting
Faults in the systemIf the information symbol illuminates and Park
assist syst Service required is shown on the
information display, this indicates that the system is not functioning properly and has been disen-gaged. Consult a trained and qualified Volvo serv-ice technician.
CAUTION
In certain circumstances, the park assist sys- tem may give unexpected warning signalsthat can be caused by external sound sourcesthat use the same ultrasound frequencies asthe system. This may include such things asthe horns of other vehicles, wet tires onasphalt, pneumatic brakes, motorcycleexhaust pipes, etc. This does not indicate afault in the system.
Related information
• Park assist – introduction (p. 230)
• Park assist – limitations (p. 233)
• Park assist – function (p. 230)
• Park assist – operation (p. 232)
• Rear Park Assist Camera (PAC) – function (p. 239)
Page 241 of 396
DRIVER SUPPORT
}}
239
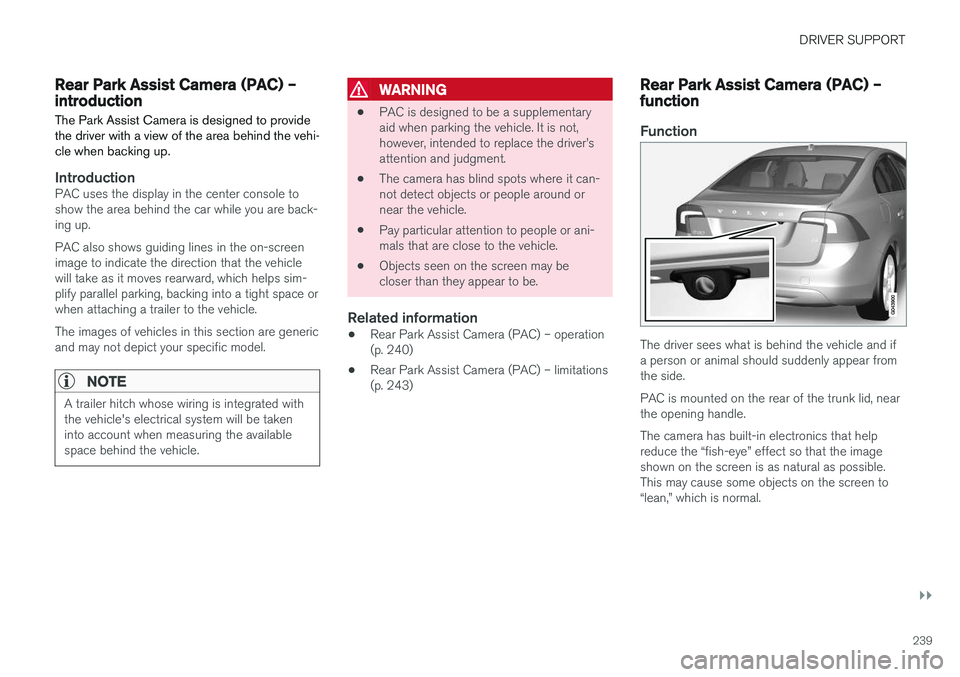
Rear Park Assist Camera (PAC) – introductionThe Park Assist Camera is designed to provide the driver with a view of the area behind the vehi-cle when backing up.
IntroductionPAC uses the display in the center console to show the area behind the car while you are back-ing up. PAC also shows guiding lines in the on-screen image to indicate the direction that the vehiclewill take as it moves rearward, which helps sim-plify parallel parking, backing into a tight space orwhen attaching a trailer to the vehicle. The images of vehicles in this section are generic and may not depict your specific model.
NOTE
A trailer hitch whose wiring is integrated with the vehicle's electrical system will be takeninto account when measuring the availablespace behind the vehicle.
WARNING
• PAC is designed to be a supplementary aid when parking the vehicle. It is not,however, intended to replace the driver
Page 242 of 396
||
DRIVER SUPPORT
240
Ambient lighting conditions
The camera automatically monitors the ambient lighting conditions behind the vehicle and con-stantly adjusts sensitivity to light. This may causethe brightness and quality of the image on thescreen to vary slightly. Sensitivity to light isincreased in dark conditions or in bad weather,which may affect image quality. If the image on the screen seems too dark, brightness can be increased with the thumbwheel on the lighting panel.
NOTE
In order to function properly, the camera lens should always be kept clean. This is particu-larly important in bad weather. Keep the lensfree of dirt, ice or snow.
Related information
•Rear Park Assist Camera (PAC) – introduc- tion (p. 239)
• Rear Park Assist Camera (PAC) – operation(p. 240)
• Rear Park Assist Camera (PAC) – limitations(p. 243)
Rear Park Assist Camera (PAC) – operation
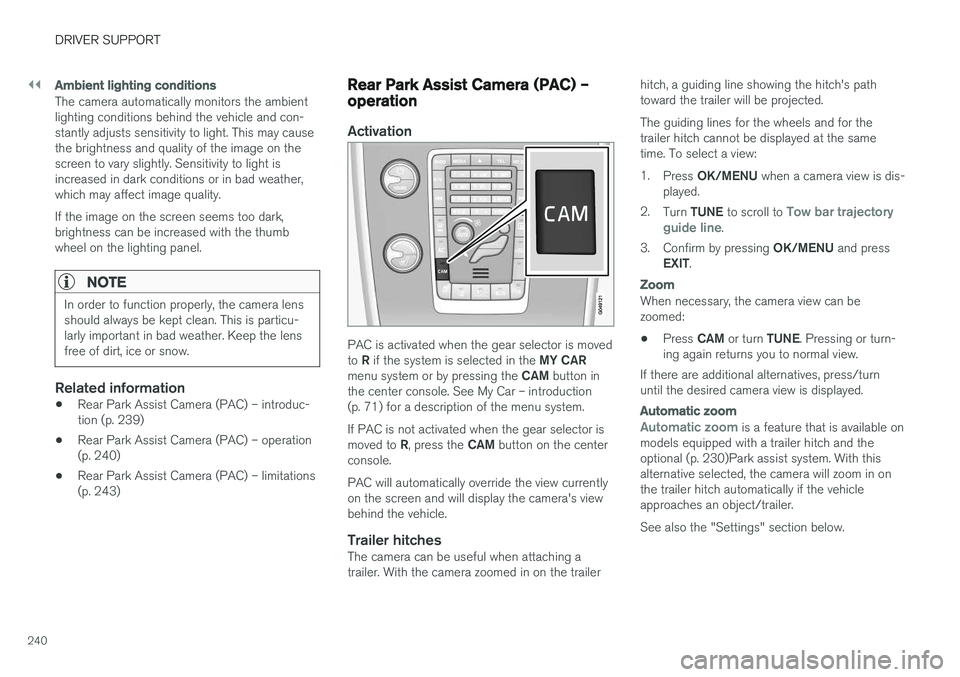
Activation
PAC is activated when the gear selector is moved to
R if the system is selected in the MY CAR
menu system or by pressing the CAM button in
the center console. See My Car – introduction (p. 71) for a description of the menu system. If PAC is not activated when the gear selector is moved to R, press the CAM button on the center
console. PAC will automatically override the view currently on the screen and will display the camera's viewbehind the vehicle.
Trailer hitchesThe camera can be useful when attaching atrailer. With the camera zoomed in on the trailer hitch, a guiding line showing the hitch's pathtoward the trailer will be projected. The guiding lines for the wheels and for the trailer hitch cannot be displayed at the sametime. To select a view: 1.
Press OK/MENU when a camera view is dis-
played.
2. Turn TUNE to scroll to
Tow bar trajectory
guide line.
3. Confirm by pressing OK/MENU and press
EXIT .
Zoom
When necessary, the camera view can be zoomed:
• Press
CAM or turn TUNE. Pressing or turn-
ing again returns you to normal view.
If there are additional alternatives, press/turnuntil the desired camera view is displayed.
Automatic zoom
Automatic zoom is a feature that is available on
models equipped with a trailer hitch and the optional (p. 230)Park assist system. With thisalternative selected, the camera will zoom in onthe trailer hitch automatically if the vehicleapproaches an object/trailer. See also the "Settings" section below.
Page 245 of 396
DRIVER SUPPORT
}}
* Option/accessory.243
Rear Park Assist Camera (PAC) – limitations
LimitationsEven if a fairly small section of the screen image appears to be obstructed, this may mean that arelatively large area behind the vehicle is hiddenand objects there may not be detected until theyare very near the vehicle.
NOTE
Bicycle carriers or other accessories mounted on the trunk may obstruct the camera's fieldof view.
Keep in mind
•Keep the camera's lens free of dirt, ice and snow. Remove ice and snow carefully toavoid scratching the lens.
• Clean the lens regularly with warm water anda suitable car washing detergent.
Related information
•
Rear Park Assist Camera (PAC) – introduc-tion (p. 239)
• Rear Park Assist Camera (PAC) – operation(p. 240)
• Park assist – introduction (p. 230)
BLIS
* – introduction
The Blind Spot Information System (BLIS) is an information system that indicates the presenceof another vehicle moving in the same directionas your vehicle on roads with several lanes.
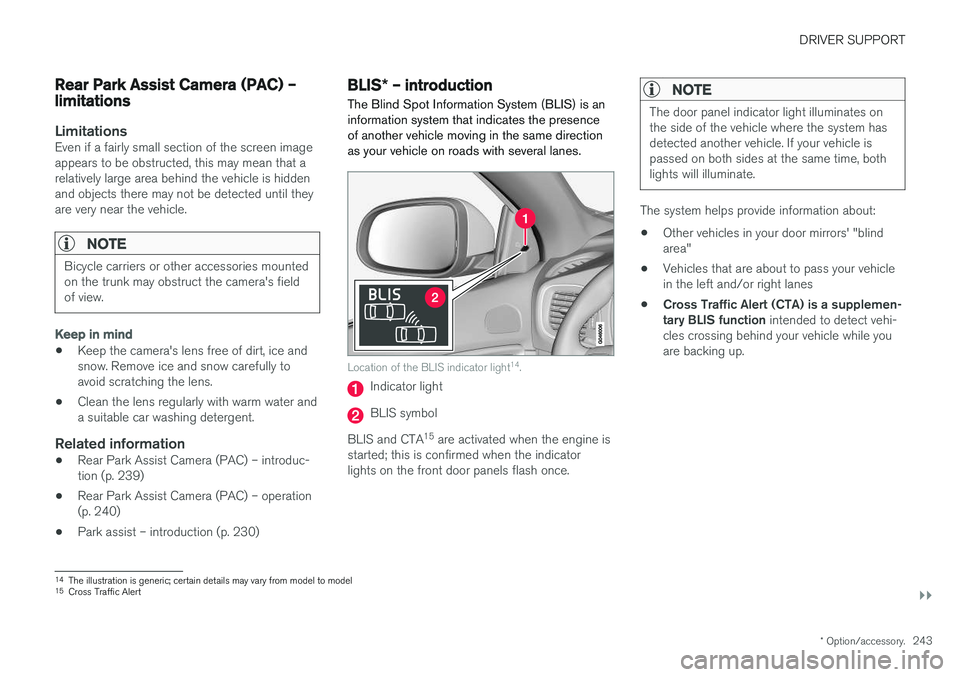
Location of the BLIS indicator light 14
.
Indicator light
BLIS symbol
BLIS and CTA 15
are activated when the engine is
started; this is confirmed when the indicator lights on the front door panels flash once.
NOTE
The door panel indicator light illuminates on the side of the vehicle where the system hasdetected another vehicle. If your vehicle ispassed on both sides at the same time, bothlights will illuminate.
The system helps provide information about:
• Other vehicles in your door mirrors' "blind area"
• Vehicles that are about to pass your vehiclein the left and/or right lanes
• Cross Traffic Alert (CTA) is a supplemen-tary BLIS function
intended to detect vehi-
cles crossing behind your vehicle while youare backing up.
14 The illustration is generic; certain details may vary from model to model
15 Cross Traffic Alert
Page 247 of 396
DRIVER SUPPORT
* Option/accessory.245
WARNING
•BLIS does not function in sharp curves.
• BLIS does not function when your vehicle is backing up.
Related information
•
BLIS
* – introduction (p. 243)
• BLIS
* – operation (p. 245)
• BLIS
* – Cross Traffic Alert (CTA) (p. 246)
• BLIS
* – limitations (p. 247)
• BLIS
* – messages (p. 248)
BLIS * – operation
Activating/deactivating BLIS
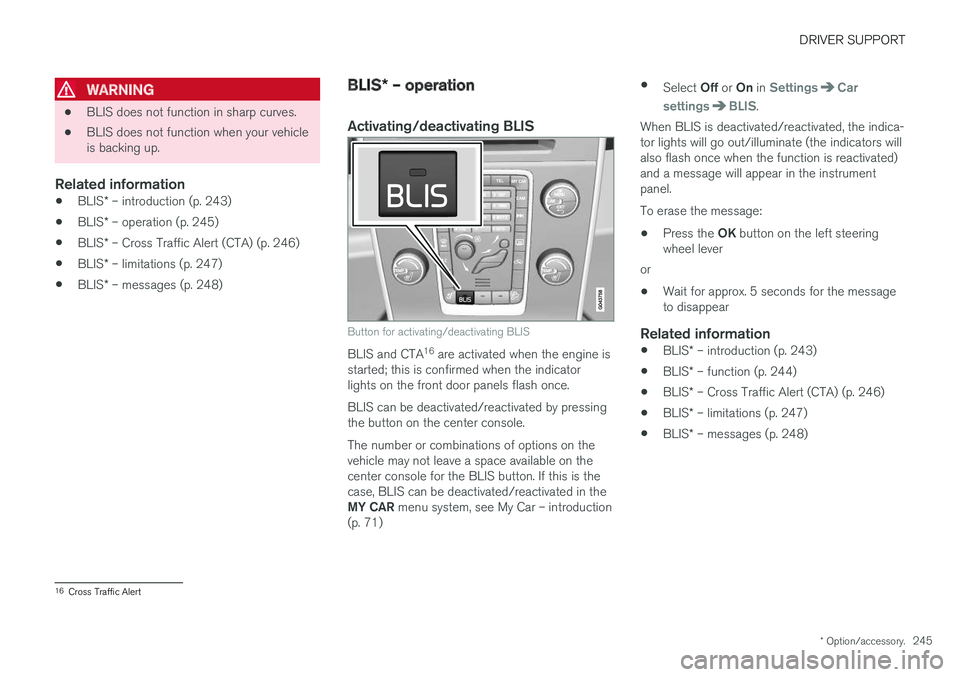
Button for activating/deactivating BLIS
BLIS and CTA 16
are activated when the engine is
started; this is confirmed when the indicator lights on the front door panels flash once. BLIS can be deactivated/reactivated by pressing the button on the center console. The number or combinations of options on the vehicle may not leave a space available on thecenter console for the BLIS button. If this is thecase, BLIS can be deactivated/reactivated in the MY CAR menu system, see My Car – introduction
(p. 71) •
Select Off or On in
SettingsCar
settings
BLIS.
When BLIS is deactivated/reactivated, the indica- tor lights will go out/illuminate (the indicators willalso flash once when the function is reactivated)and a message will appear in the instrumentpanel. To erase the message:
• Press the
OK button on the left steering
wheel lever
or
• Wait for approx. 5 seconds for the message to disappear
Related information
•
BLIS
* – introduction (p. 243)
• BLIS
* – function (p. 244)
• BLIS
* – Cross Traffic Alert (CTA) (p. 246)
• BLIS
* – limitations (p. 247)
• BLIS
* – messages (p. 248)
16
Cross Traffic Alert
Page 252 of 396
STARTING AND DRIVING
* Option/accessory.
250
Starting the engine
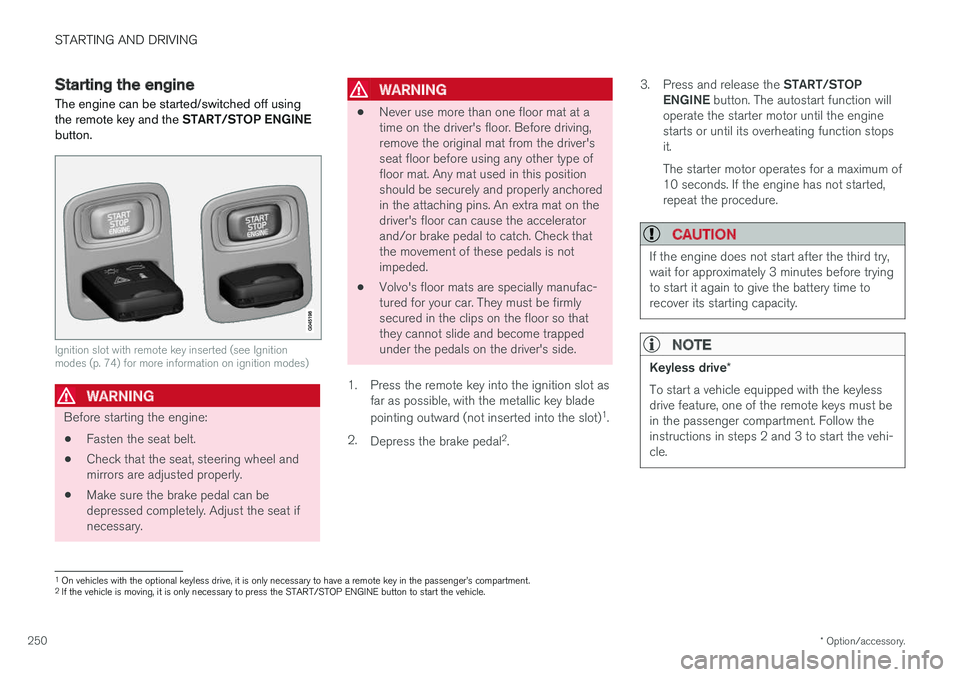
The engine can be started/switched off using the remote key and the START/STOP ENGINE
button.
Ignition slot with remote key inserted (see Ignition modes (p. 74) for more information on ignition modes)
WARNING
Before starting the engine:
• Fasten the seat belt.
• Check that the seat, steering wheel and mirrors are adjusted properly.
• Make sure the brake pedal can bedepressed completely. Adjust the seat ifnecessary.
WARNING
•Never use more than one floor mat at a time on the driver's floor. Before driving,remove the original mat from the driver'sseat floor before using any other type offloor mat. Any mat used in this positionshould be securely and properly anchoredin the attaching pins. An extra mat on thedriver's floor can cause the acceleratorand/or brake pedal to catch. Check thatthe movement of these pedals is notimpeded.
• Volvo's floor mats are specially manufac-tured for your car. They must be firmlysecured in the clips on the floor so thatthey cannot slide and become trappedunder the pedals on the driver's side.
1. Press the remote key into the ignition slot as far as possible, with the metallic key blade pointing outward (not inserted into the slot) 1
.
2. Depress the brake pedal 2
. 3.
Press and release the START/STOP
ENGINE button. The autostart function will
operate the starter motor until the engine starts or until its overheating function stopsit. The starter motor operates for a maximum of 10 seconds. If the engine has not started,repeat the procedure.
CAUTION
If the engine does not start after the third try, wait for approximately 3 minutes before tryingto start it again to give the battery time torecover its starting capacity.
NOTE
Keyless drive *
To start a vehicle equipped with the keyless drive feature, one of the remote keys must bein the passenger compartment. Follow theinstructions in steps 2 and 3 to start the vehi-cle.
1 On vehicles with the optional keyless drive, it is only necessary to have a remote key in the passenger
Page 253 of 396
STARTING AND DRIVING
251
WARNING
•Always remove the remote key from the ignition slot when leaving the vehicle and ensure that the ignition in mode
0 (see
Ignition modes (p. 74) for information about the ignition modes).
• On vehicles with the optional keylessdrive, never remove the remote key fromthe vehicle while it is being driven ortowed.
• Always place the gear selector in Parkand apply the parking brake before leav-ing the vehicle. Never leave the vehicleunattended with the engine running.
• Always open garage doors fully beforestarting the engine inside a garage toensure adequate ventilation. The exhaustgases contain carbon monoxide, which isinvisible and odorless but very poisonous.
NOTE
•
After a cold start, idle speed may be noticeably higher than normal for a shortperiod. This is done to help bring compo-nents in the emission control system totheir normal operating temperature asquickly as possible, which enables themto control emissions and help reduce the vehicle's impact on the environment 3
.
CAUTION
• When starting in cold weather, the auto- matic transmission may shift up at slightlyhigher engine speeds than normal untilthe automatic transmission fluid reachesnormal operating temperature.
• Do not race a cold engine immediatelyafter starting. Oil flow may not reachsome lubrication points fast enough toprevent engine damage.
• The engine should be idling when youmove the gear selector. Never accelerateuntil after you feel the transmissionengage. Accelerating immediately afterselecting a gear will cause harsh engage-ment and premature transmission wear.
• Selecting
P or N when idling at a stand-
still for prolonged periods of time will helpprevent overheating of the automatictransmission fluid.
Related information
• Switching off the engine (p. 252)
3
If the gear selector is in the D or R positions and the car is not moving, engine speed (rpm) will be lower and it will take longer for the engine to reach normal operating temperature.
Page 256 of 396
STARTING AND DRIVING
254
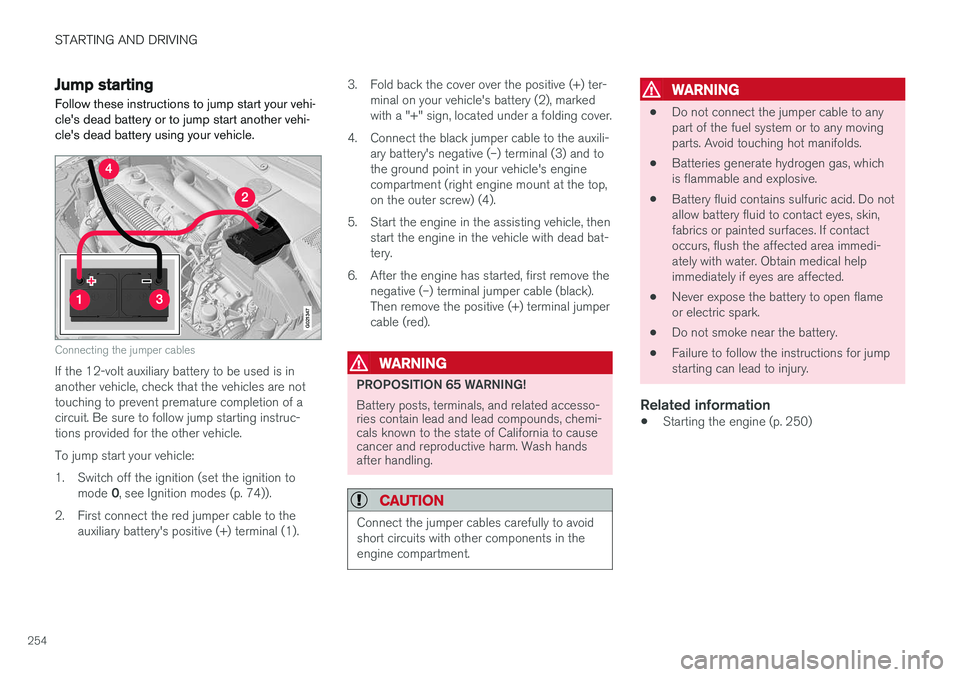
Jump startingFollow these instructions to jump start your vehi- cle's dead battery or to jump start another vehi-cle's dead battery using your vehicle.
G021347
Connecting the jumper cables
If the 12-volt auxiliary battery to be used is in another vehicle, check that the vehicles are nottouching to prevent premature completion of acircuit. Be sure to follow jump starting instruc-tions provided for the other vehicle. To jump start your vehicle:
1. Switch off the ignition (set the ignition to mode 0, see Ignition modes (p. 74)).
2. First connect the red jumper cable to the auxiliary battery's positive (+) terminal (1). 3. Fold back the cover over the positive (+) ter-
minal on your vehicle's battery (2), marked with a "+" sign, located under a folding cover.
4. Connect the black jumper cable to the auxili- ary battery's negative (–) terminal (3) and tothe ground point in your vehicle's enginecompartment (right engine mount at the top,on the outer screw) (4).
5. Start the engine in the assisting vehicle, then start the engine in the vehicle with dead bat-tery.
6. After the engine has started, first remove the negative (–) terminal jumper cable (black).Then remove the positive (+) terminal jumpercable (red).WARNING
PROPOSITION 65 WARNING! Battery posts, terminals, and related accesso- ries contain lead and lead compounds, chemi-cals known to the state of California to causecancer and reproductive harm. Wash handsafter handling.
CAUTION
Connect the jumper cables carefully to avoid short circuits with other components in theengine compartment.
WARNING
• Do not connect the jumper cable to any part of the fuel system or to any movingparts. Avoid touching hot manifolds.
• Batteries generate hydrogen gas, whichis flammable and explosive.
• Battery fluid contains sulfuric acid. Do notallow battery fluid to contact eyes, skin,fabrics or painted surfaces. If contactoccurs, flush the affected area immedi-ately with water. Obtain medical helpimmediately if eyes are affected.
• Never expose the battery to open flameor electric spark.
• Do not smoke near the battery.
• Failure to follow the instructions for jumpstarting can lead to injury.
Related information
• Starting the engine (p. 250)