ACURA NSX 1991 Service Repair Manual
Manufacturer: ACURA, Model Year: 1991,
Model line: NSX,
Model: ACURA NSX 1991
Pages: 1640, PDF Size: 60.48 MB
ACURA NSX 1991 Service Repair Manual
NSX 1991
ACURA
ACURA
https://www.carmanualsonline.info/img/32/56988/w960_56988-0.png
ACURA NSX 1991 Service Repair Manual
Trending: display, clock setting, odometer, load capacity, air condition, radiator cap, roof rack
Page 1611 of 1640
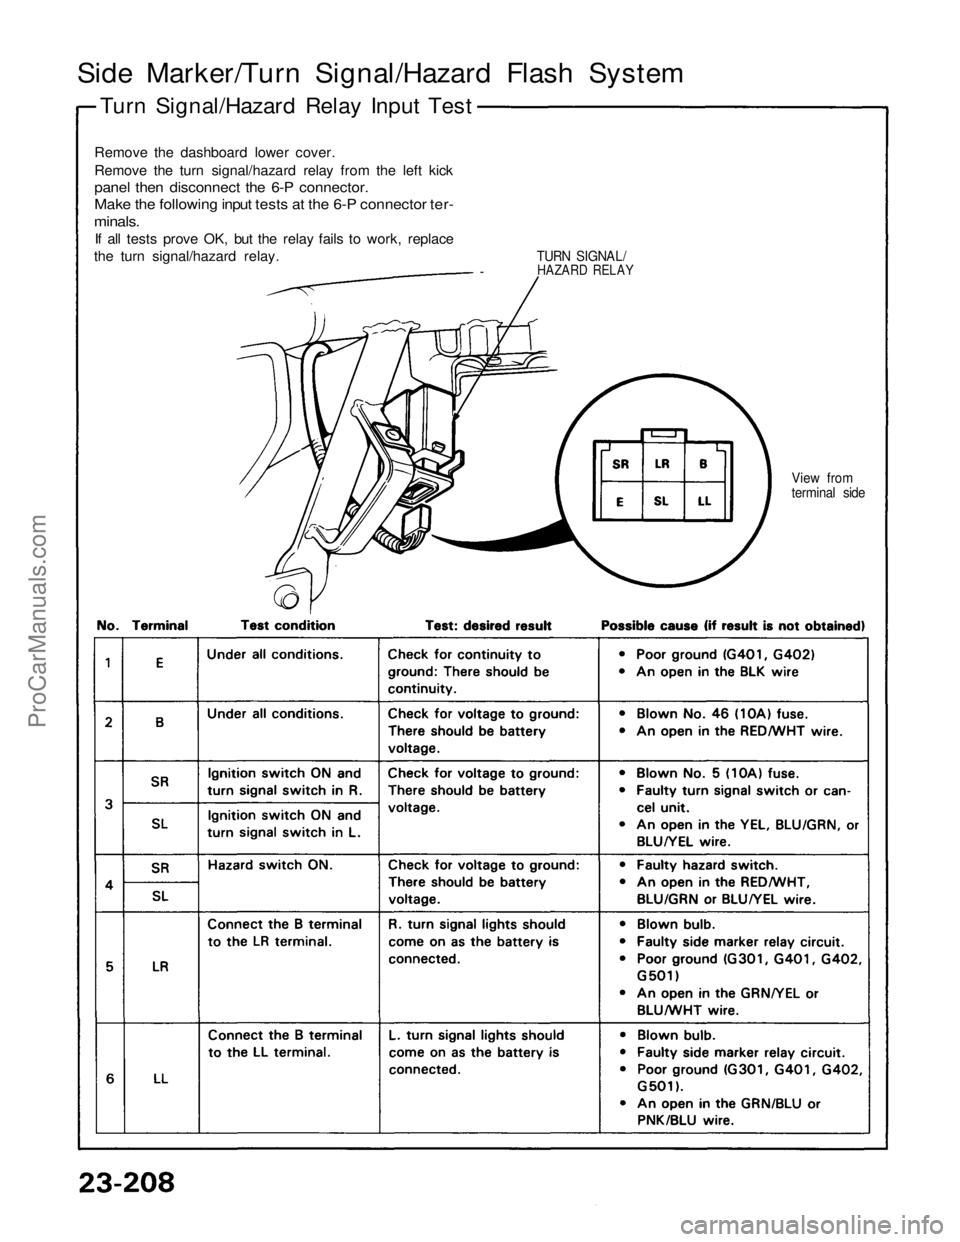
Side Marker/Turn Signal/Hazard Flash System
Turn Signal/Hazard Relay Input Test
Remove the dashboard lower cover.
Remove the turn signal/hazard relay from the left kick
panel then disconnect the 6-P connector.
Make the following input tests at the 6-P connector ter-
minals.
If all tests prove OK, but the relay fails to work, replace
the turn signal/hazard relay.
View from
terminal side
TURN SIGNAL/
HAZARD RELAYProCarManuals.com
Page 1612 of 1640
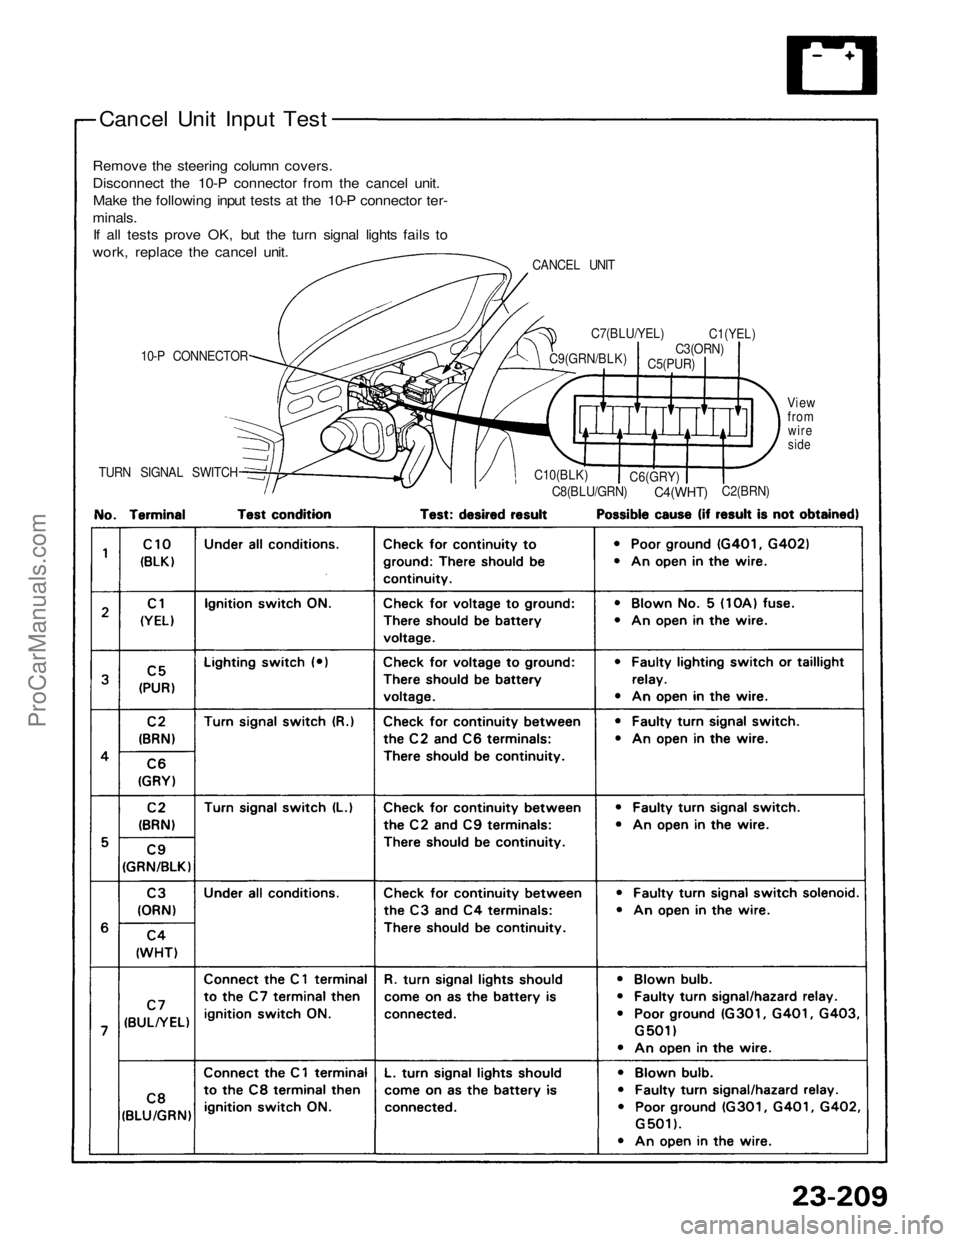
Cancel Unit Input Test
Remove the steering column covers.
Disconnect the 10-P connector from the cancel unit.
Make the following input tests at the 10-P connector ter-
minals.
If all tests prove OK, but the turn signal lights fails to
work, replace the cancel unit.
CANCEL UNIT
10-P CONNECTOR
TURN SIGNAL SWITCH
C10(BLK)
C8(BLU/GRN)
C6(GRY)
C4(WHT)
C2(BRN)
View
from
wire
side
C9(GRN/BLK)
C7(BLU/YEL)
C5(PUR)
C3(ORN)
C1(YEL)ProCarManuals.com
Page 1613 of 1640
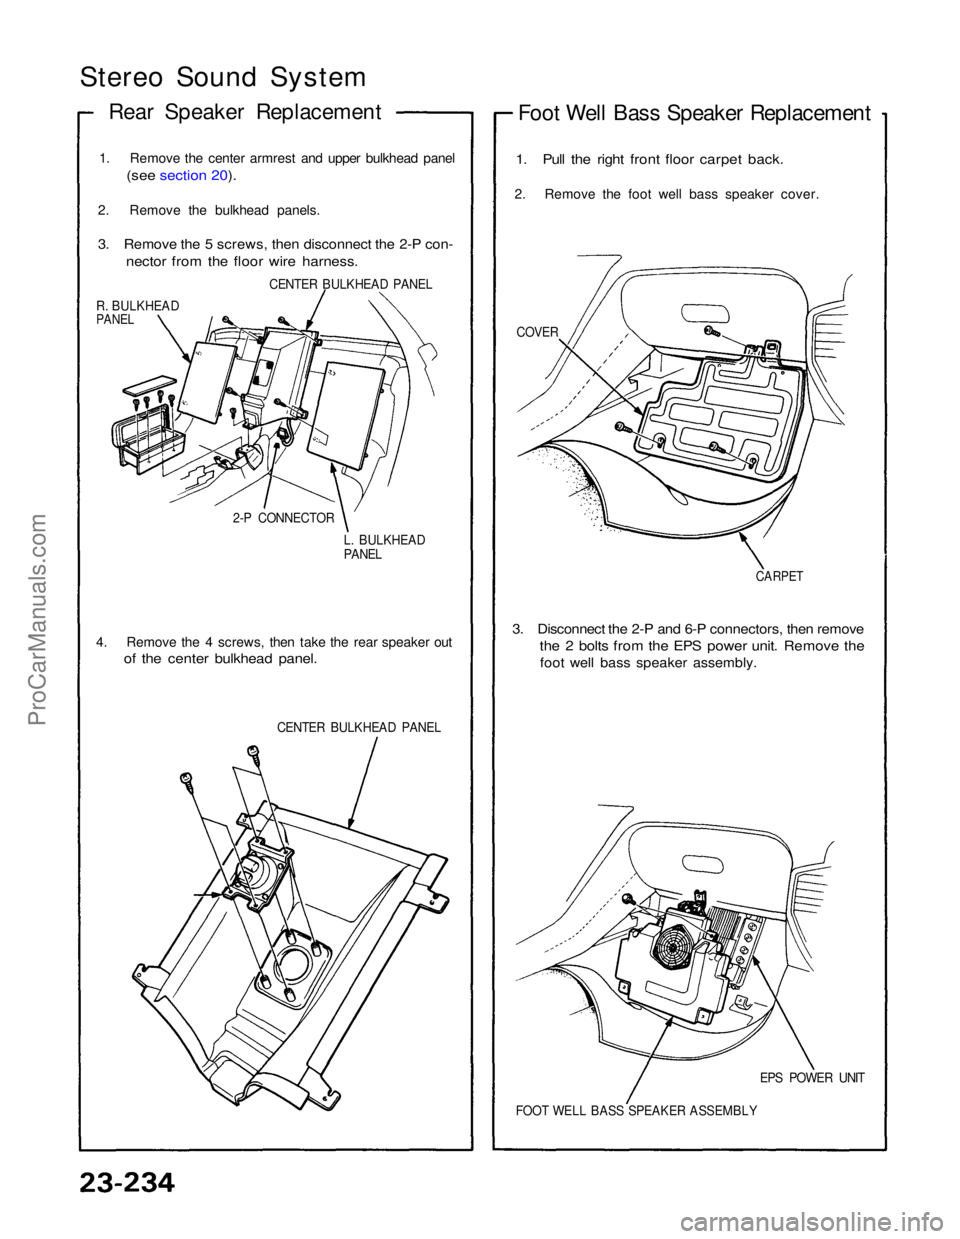
Stereo Sound System
Rear Speaker Replacement
1. Remove the center armrest and upper bulkhead panel
(see section 20).
2. Remove the bulkhead panels.
3. Remove the 5 screws, then disconnect the 2-P con-
nector from the floor wire harness.
CENTER BULKHEAD PANEL
R. BULKHEAD
PANEL
2-P CONNECTORL. BULKHEAD
PANEL
4. Remove the 4 screws, then take the rear speaker out
of the center bulkhead panel.
CENTER BULKHEAD PANEL
Foot Well Bass Speaker Replacement
1. Pull the right front floor carpet back.
2. Remove the foot well bass speaker cover.
COVER
CARPET
3. Disconnect the 2-P and 6-P connectors, then remove
the 2 bolts from the EPS power unit. Remove the
foot well bass speaker assembly.
EPS POWER UNIT
FOOT WELL BASS SPEAKER ASSEMBLYProCarManuals.com
Page 1614 of 1640
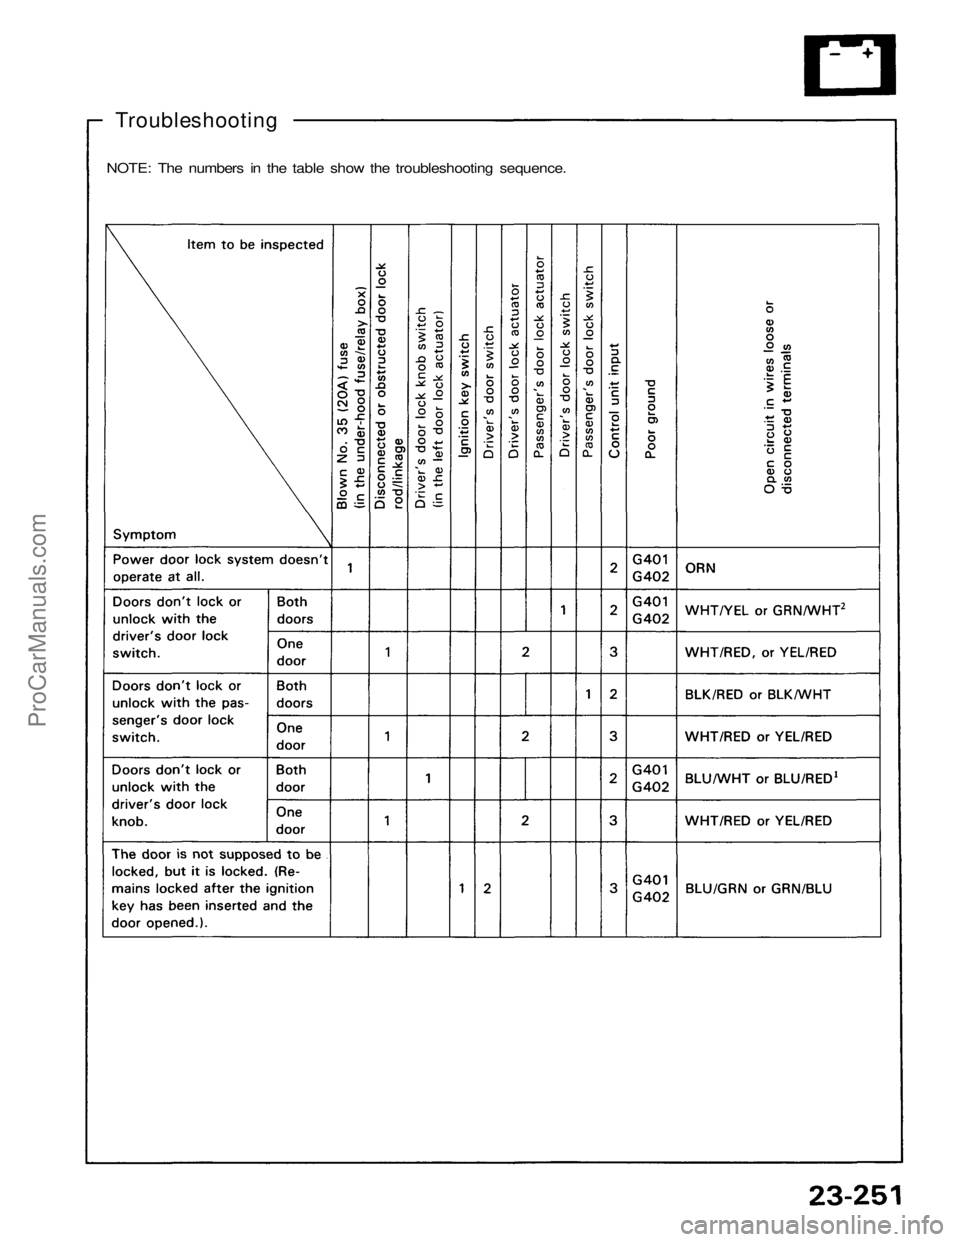
Troubleshooting
NOTE: The numbers in the table show the troubleshooting sequence.ProCarManuals.com
Page 1615 of 1640
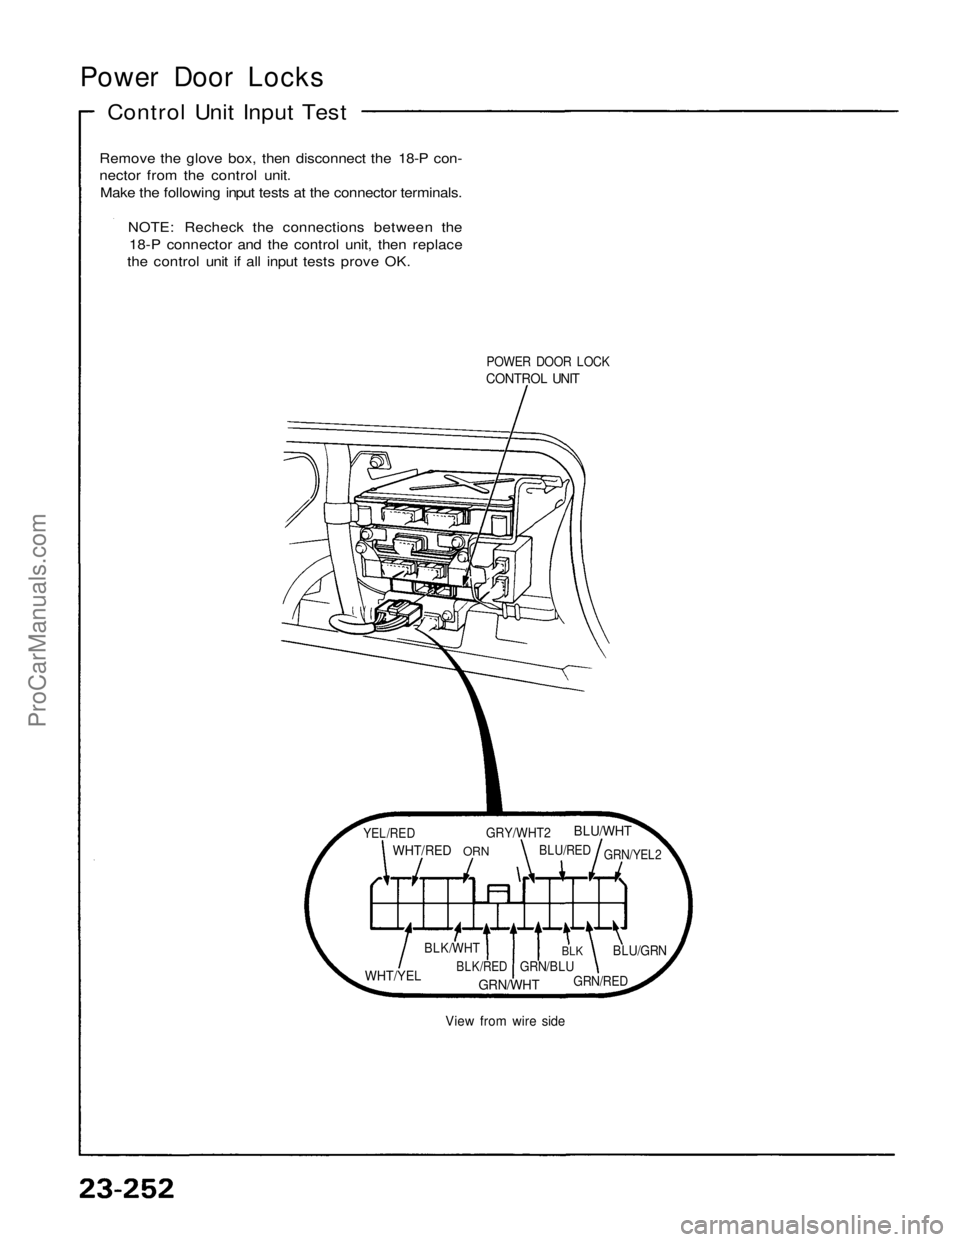
Power Door Locks
Control Unit Input Test
Remove the glove box, then disconnect the 18-P con-
nector from the control unit.
Make the following input tests at the connector terminals.
NOTE: Recheck the connections between the
18-P connector and the control unit, then replace
the control unit if all input tests prove OK.
POWER DOOR LOCK
CONTROL UNIT
YEL/RED
WHT/RED
ORN
GRY/WHT2
BLU/RED
BLU/WHT
GRN/YEL2
WHT/YEL
BLK/WHT
BLK/RED
GRN/WHT
GRN/BLU
BLK
GRN/RED
BLU/GRN
View from wire sideProCarManuals.com
Page 1616 of 1640
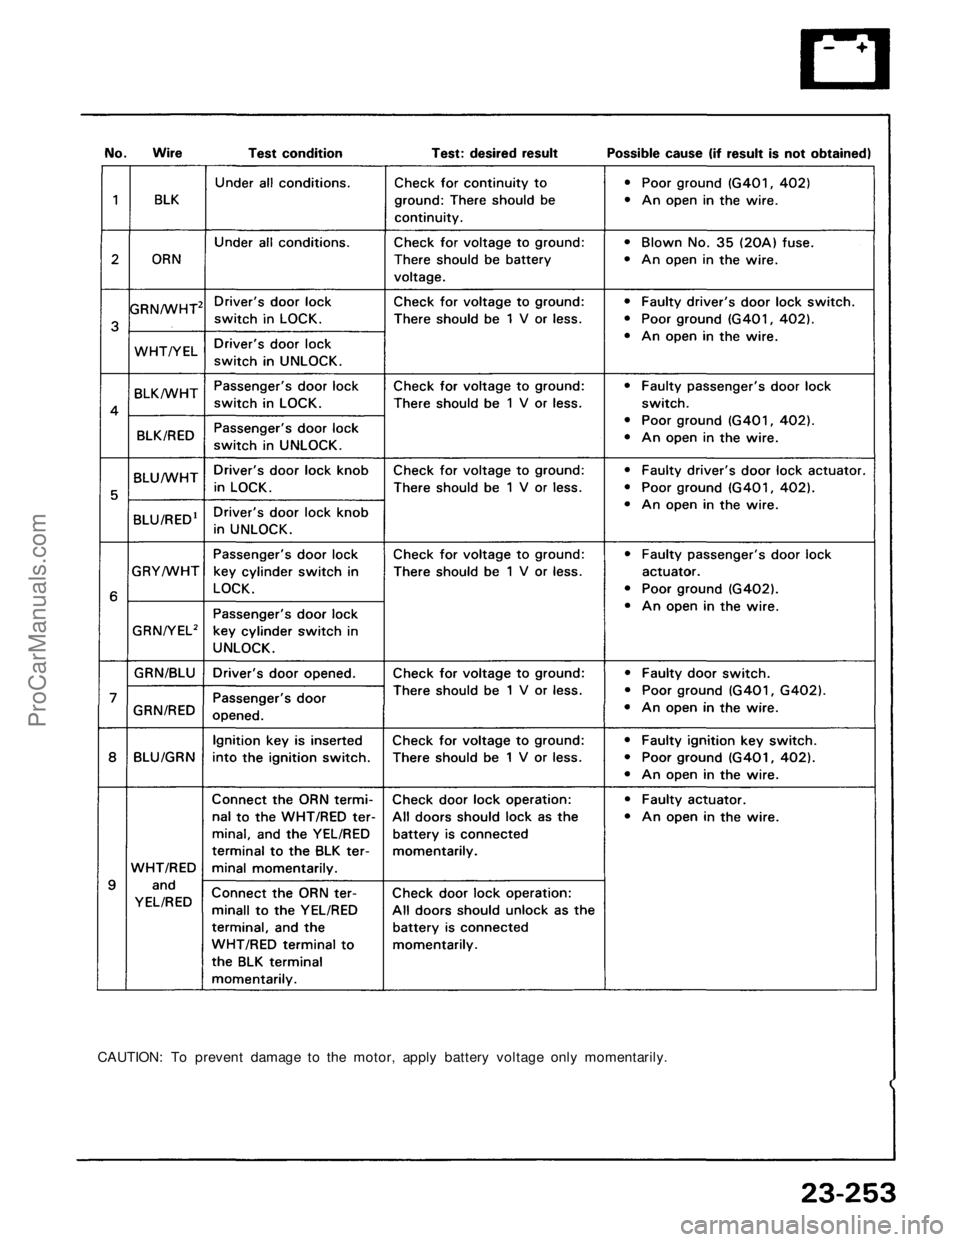
CAUTION: To prevent damage to the motor, apply battery voltage only momentarily.ProCarManuals.com
Page 1617 of 1640
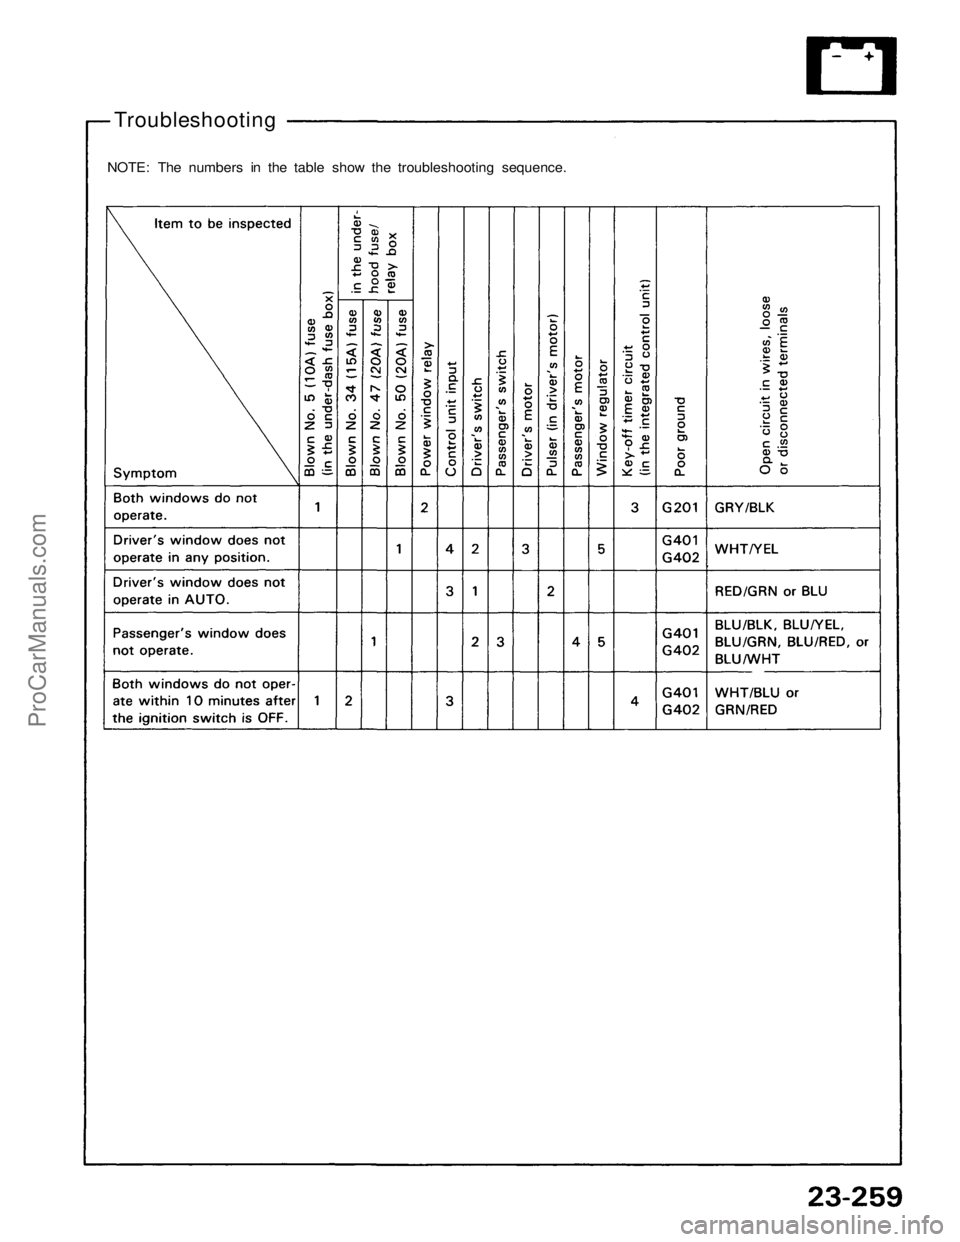
Troubleshooting
NOTE: The numbers in the table show the troubleshooting sequence.ProCarManuals.com
Page 1618 of 1640
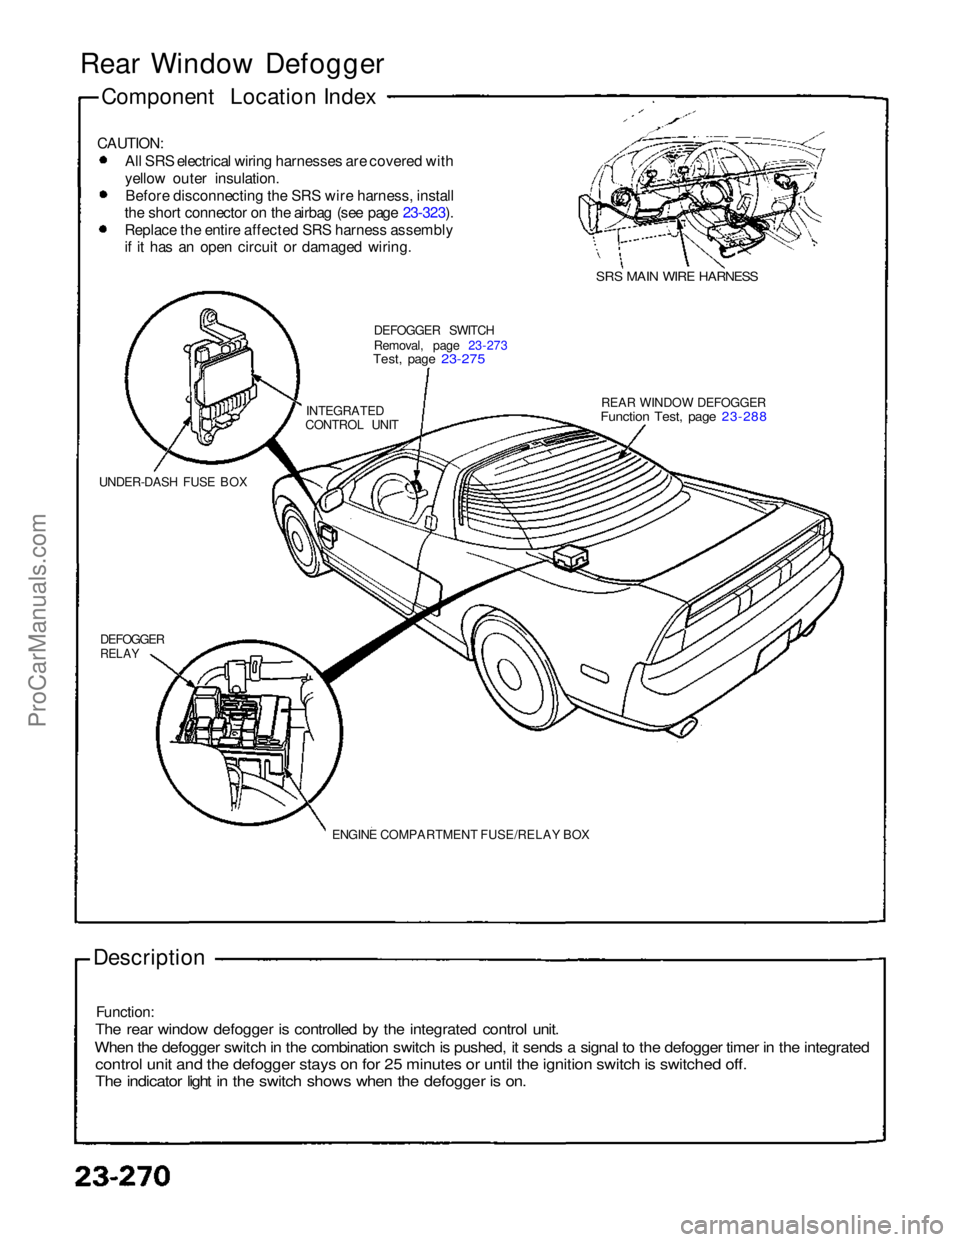
CAUTION:
All SRS electrical wiring harnesses are covered with
yellow outer insulation.
Before disconnecting the SRS wire harness, install
the short connector on the airbag (see page 23-323). Replace the entire affected SRS harness assembly
if it has an open circuit or damaged wiring.
SRS MAIN WIRE HARNESS
DEFOGGER SWITCH
Removal, page 23-273
Test, page 23-275
REAR WINDOW DEFOGGER
Function Test, page 23-288
UNDER-DASH FUSE BOX
INTEGRATED
CONTROL UNIT
DEFOGGER
RELAY
ENGINE COMPARTMENT FUSE/RELAY BOX
Description Function:
The rear window defogger is controlled by the integrated control unit.
When the defogger switch in the combination switch is pushed, it sends a signal to the defogger timer in the integrated
contro
l
unit and the defogger stays on for 25 minutes or until the ignition swi\
tch is switched off.
The indicator light in the switch shows when the defogger is on.
Rear Window Defogger
Component
Location Index
ProCarManuals.com
Page 1619 of 1640
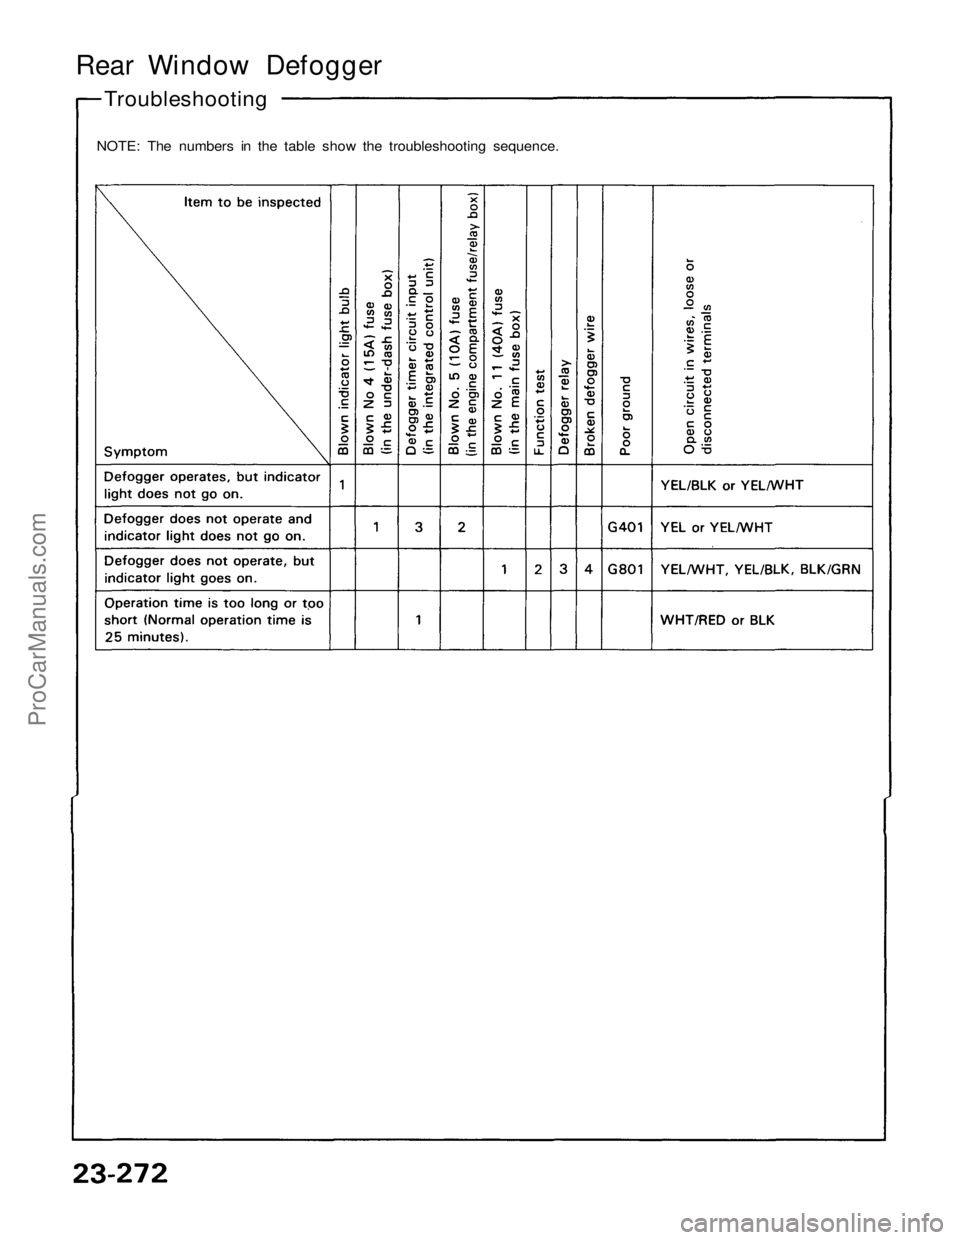
Rear Window Defogger
Troubleshooting
NOTE: The numbers in the table show the troubleshooting sequence.ProCarManuals.com
Page 1620 of 1640
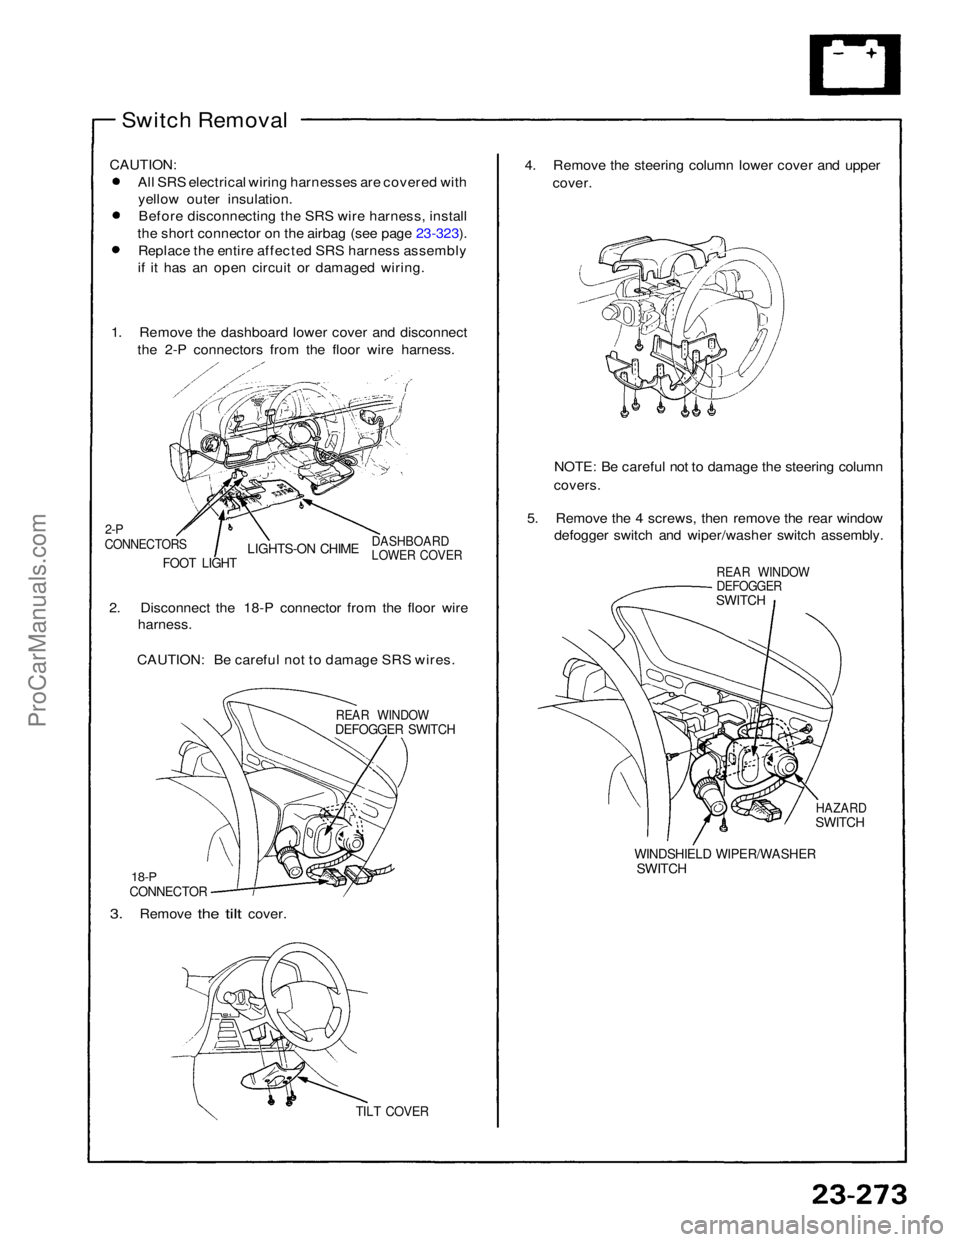
Switch Removal
CAUTION: All SRS electrical wiring harnesses are covered withyellow outer insulation.Before disconnecting the SRS wire harness, install
the short connector on the airbag (see page 23-323). Replace the entire affected SRS harness assembly
if it has an open circuit or damaged wiring.
1. Remove the dashboard lower cover and disconnect the 2-P connectors from the floor wire harness.
2-P
CONNECTORS
LIGHTS-ON CHIME
FOOT LIGHT
DASHBOARD
LOWER COVER
2. Disconnect the 18-P connector from the floor wire harness.
CAUTION: Be careful not to damage SRS wires.
REAR WINDOW
DEFOGGER SWITCH
18-P
CONNECTOR
3.
Remove
the
tilt
cover.
TILT COVER
4. Remove the steering column lower cover and upper
cover.
NOTE: Be careful not to damage the steering column
covers.
5. Remove the 4 screws, then remove the rear window defogger switch and wiper/washer switch assembly.
REAR WINDOW
DEFOGGER
SWITCH
HAZARD
SWITCH
WINDSHIELD WIPER/WASHER
SWITCHProCarManuals.com
Trending: dead battery, oil, jump cable, jump start terminals, clutch, climate control, spark plugs replace
