ACURA NSX 1991 Service Repair Manual
Manufacturer: ACURA, Model Year: 1991,
Model line: NSX,
Model: ACURA NSX 1991
Pages: 1640, PDF Size: 60.48 MB
ACURA NSX 1991 Service Repair Manual
NSX 1991
ACURA
ACURA
https://www.carmanualsonline.info/img/32/56988/w960_56988-0.png
ACURA NSX 1991 Service Repair Manual
Trending: tire size, spare tire, alternator belt, battery capacity, high beam, roof, air conditioning
Page 1621 of 1640
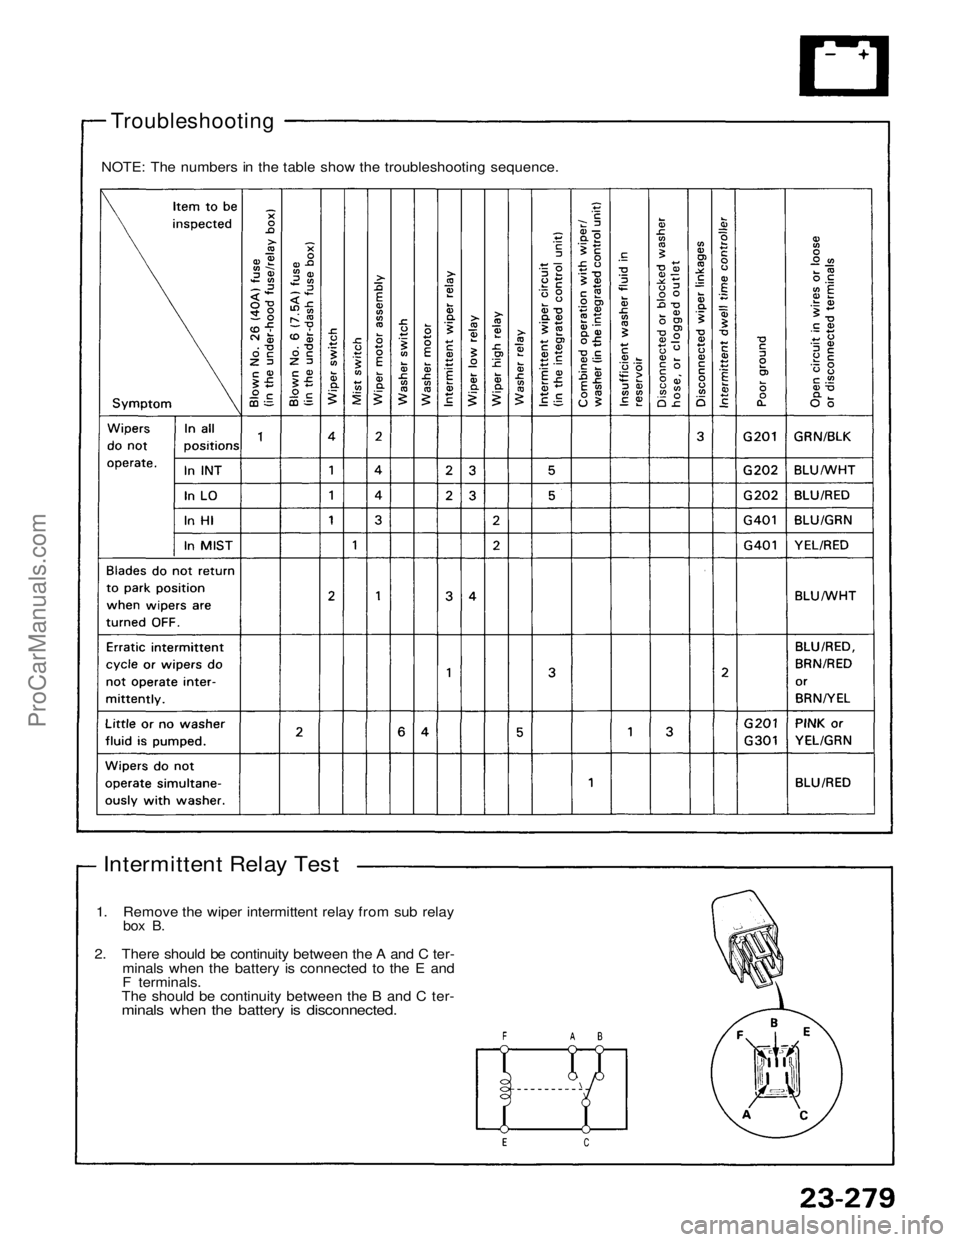
Troubleshooting
NOTE: The numbers in the table show the troubleshooting sequence.
Intermittent Relay Test
1. Remove the wiper intermittent relay from sub relay
box B.
2. There should be continuity between the A and C ter-
minals when the battery is connected to the E and
F terminals.
The should be continuity between the B and C ter-
minals when the battery is disconnected.ProCarManuals.com
Page 1622 of 1640
Wipers/Washers
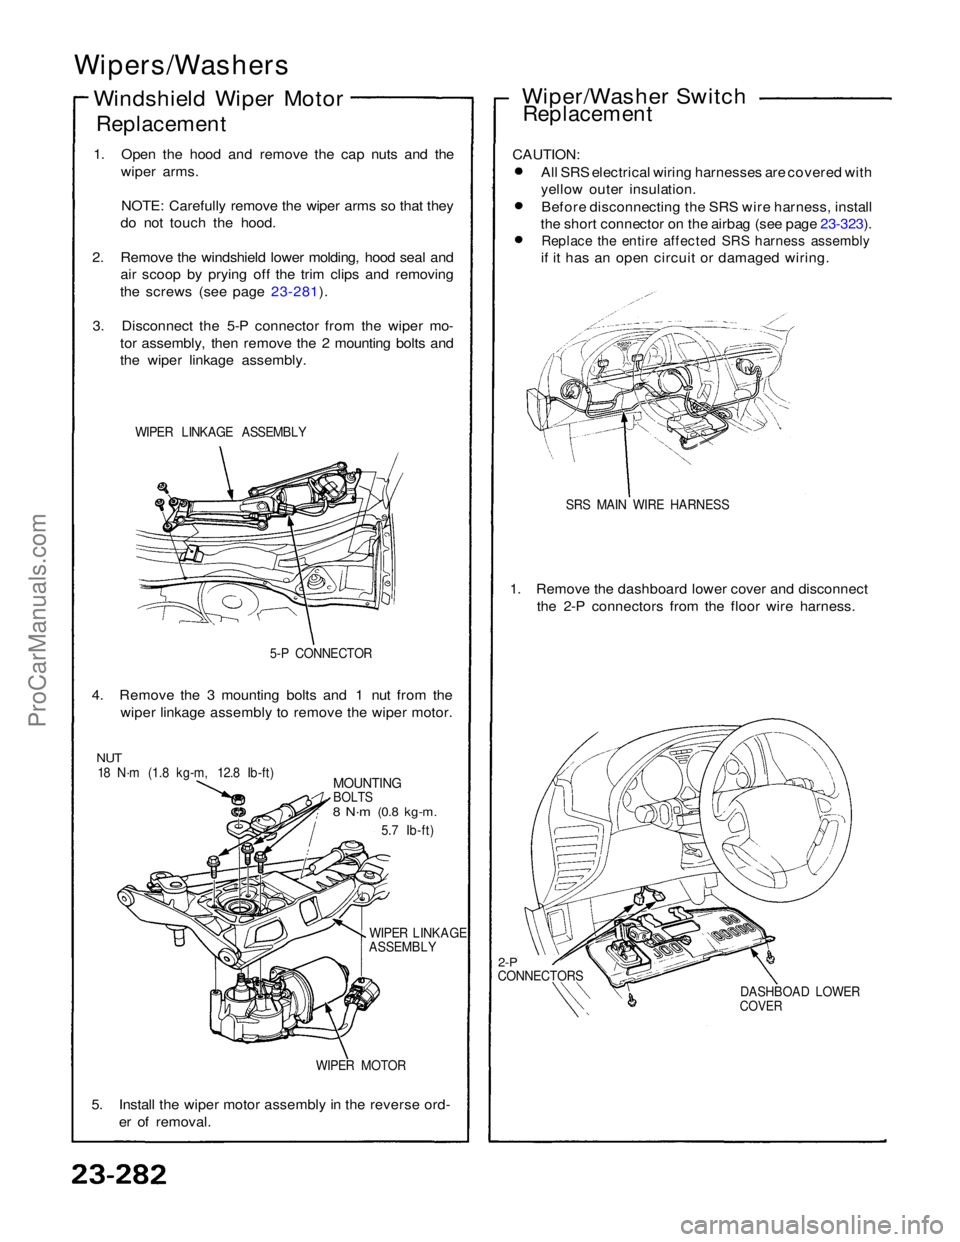
Windshield Wiper Motor
Replacement
1. Open the hood and remove the cap nuts and the wiper arms.
NOTE: Carefully remove the wiper arms so that they
do not touch the hood.
2. Remove the windshield lower molding, hood seal and air scoop by prying off the trim clips and removing
the screws (see page 23-281).
3. Disconnect the 5-P connector from the wiper mo- tor assembly, then remove the 2 mounting bolts and
the wiper linkage assembly.
WIPER LINKAGE ASSEMBLY
5-P CONNECTOR
4. Remove the 3 mounting bolts and 1 nut from the wiper linkage assembly to remove the wiper motor.
NUT
18 N·m (1.8 kg-m, 12.8 Ib-ft)
MOUNTING
BOLTS
8 N·m
(0.8 kg-m.
5.7 Ib-ft)
WIPER LINKAGE
ASSEMBLY
WIPER MOTOR
5. Install the wiper motor assembly in the reverse ord- er of removal. Wiper/Washer Switch
Replacement
CAUTION: All SRS electrical wiring harnesses are covered with
yellow outer insulation.Before disconnecting the SRS wire harness, install
the short connector on the airbag (see page 23-323).
Replace the entire affected SRS harness assembly
if it has an open circuit or damaged wiring.
SRS MAIN WIRE HARNESS
1. Remove the dashboard lower cover and disconnect the 2-P connectors from the floor wire harness.
2-P
CONNECTORS
DASHBOAD LOWER
COVERProCarManuals.com
Page 1623 of 1640
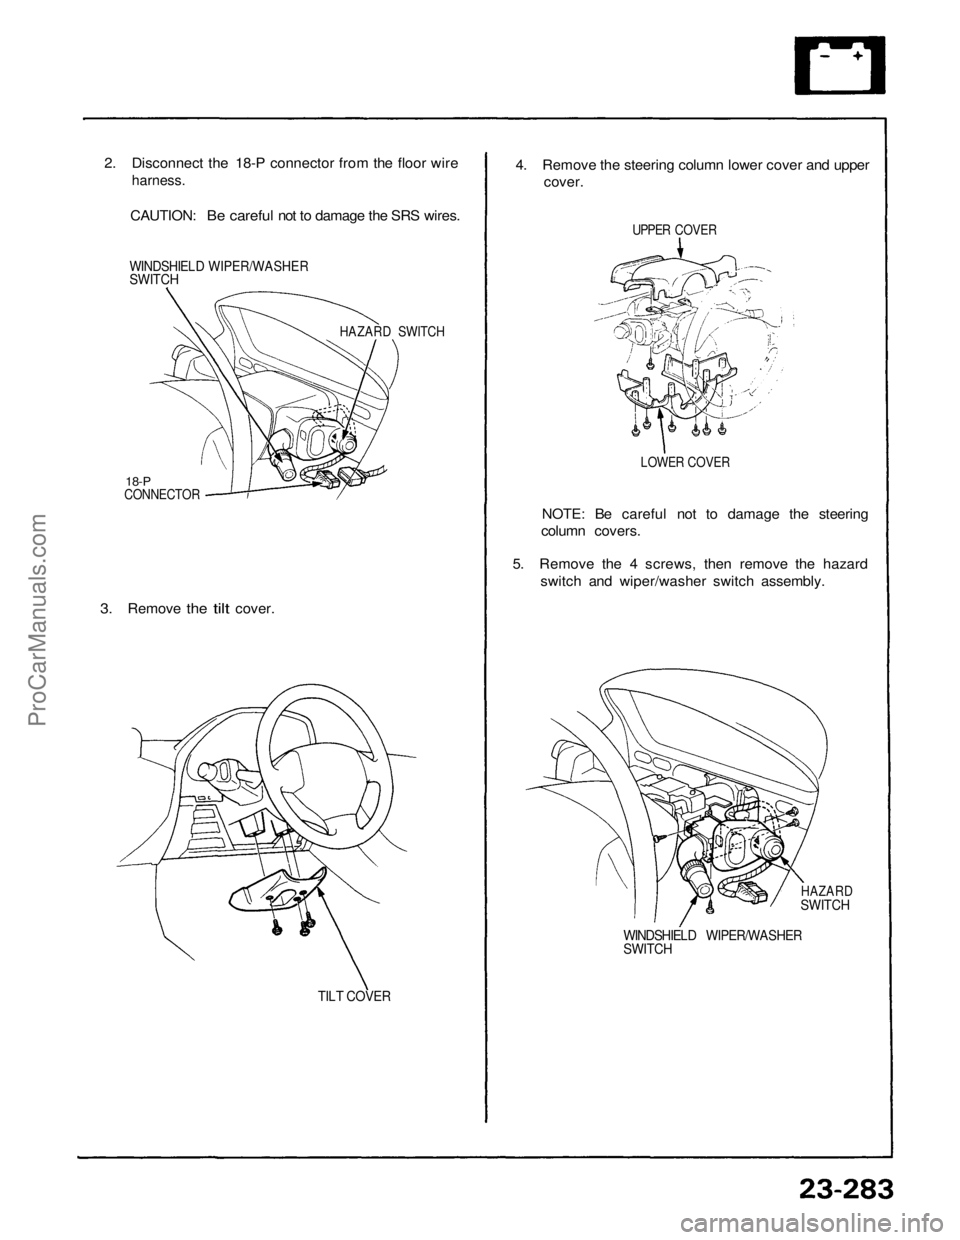
2. Disconnect the 18-P connector from the floor wire
harness.
CAUTION: Be careful not to damage the SRS wires.
WINDSHIELD WIPER/WASHER
SWITCH
HAZARD SWITCH
18-P
CONNECTOR
3.
Remove
the
tilt
cover.
TILT COVER
4. Remove the steering column lower cover and upper
cover.
UPPER COVER
LOWER COVER
NOTE: Be careful not to damage the steering
column covers.
5. Remove the 4 screws, then remove the hazard switch and wiper/washer switch assembly.
HAZARD
SWITCH
WINDSHIELD WIPER/WASHER
SWITCHProCarManuals.com
Page 1624 of 1640
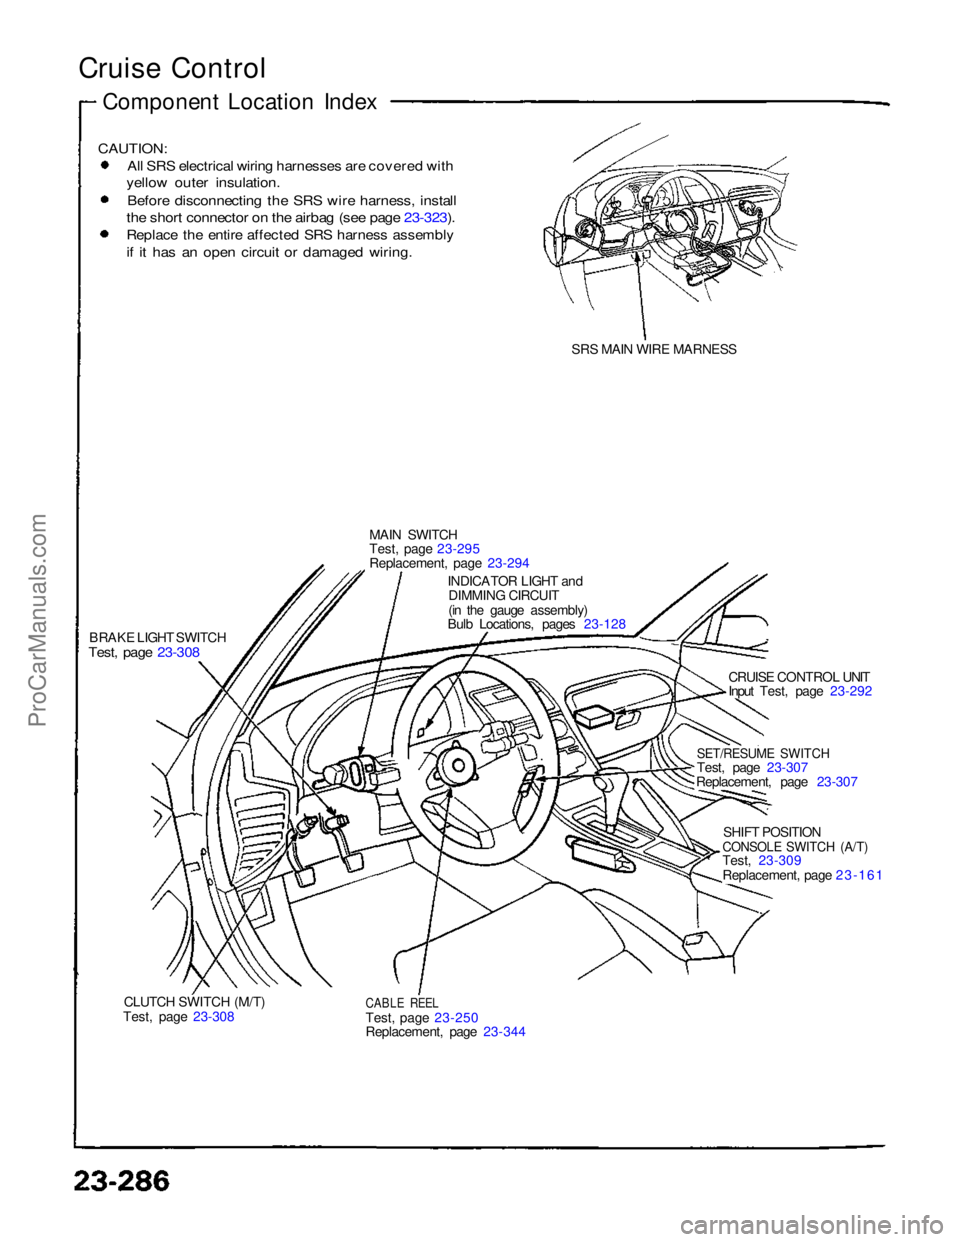
Cruise Control
CAUTION:
All SRS electrical wiring harnesses are covered with
yellow outer insulation.
Before disconnecting the SRS wire harness, install
the short connector on the airbag (see page 23-323).
Replace the entire affected SRS harness assembly
if it has an open circuit or damaged wiring.
SRS MAIN WIRE MARNESS
MAIN SWITCH
Test, page 23-295
Replacement, page 23-294
BRAKE LIGHT SWITCH
Test, page 23-308
INDICATOR LIGHT and
DIMMING CIRCUIT
(in the gauge assembly)
Bulb Locations, pages 23-128
CRUISE CONTROL UNIT
Input Test, page 23-292
SET/RESUME SWITCH
Test, page 23-307
Replacement, page 23-307
SHIFT POSITION
CONSOLE SWITCH (A/T)
Test, 23-309
Replacement, page 23-161
CLUTCH SWITCH (M/T)
Test, page 23-308
CABLE REEL
Test, page 23-250
Replacement, page 23-344
Component Location IndexProCarManuals.com
Page 1625 of 1640
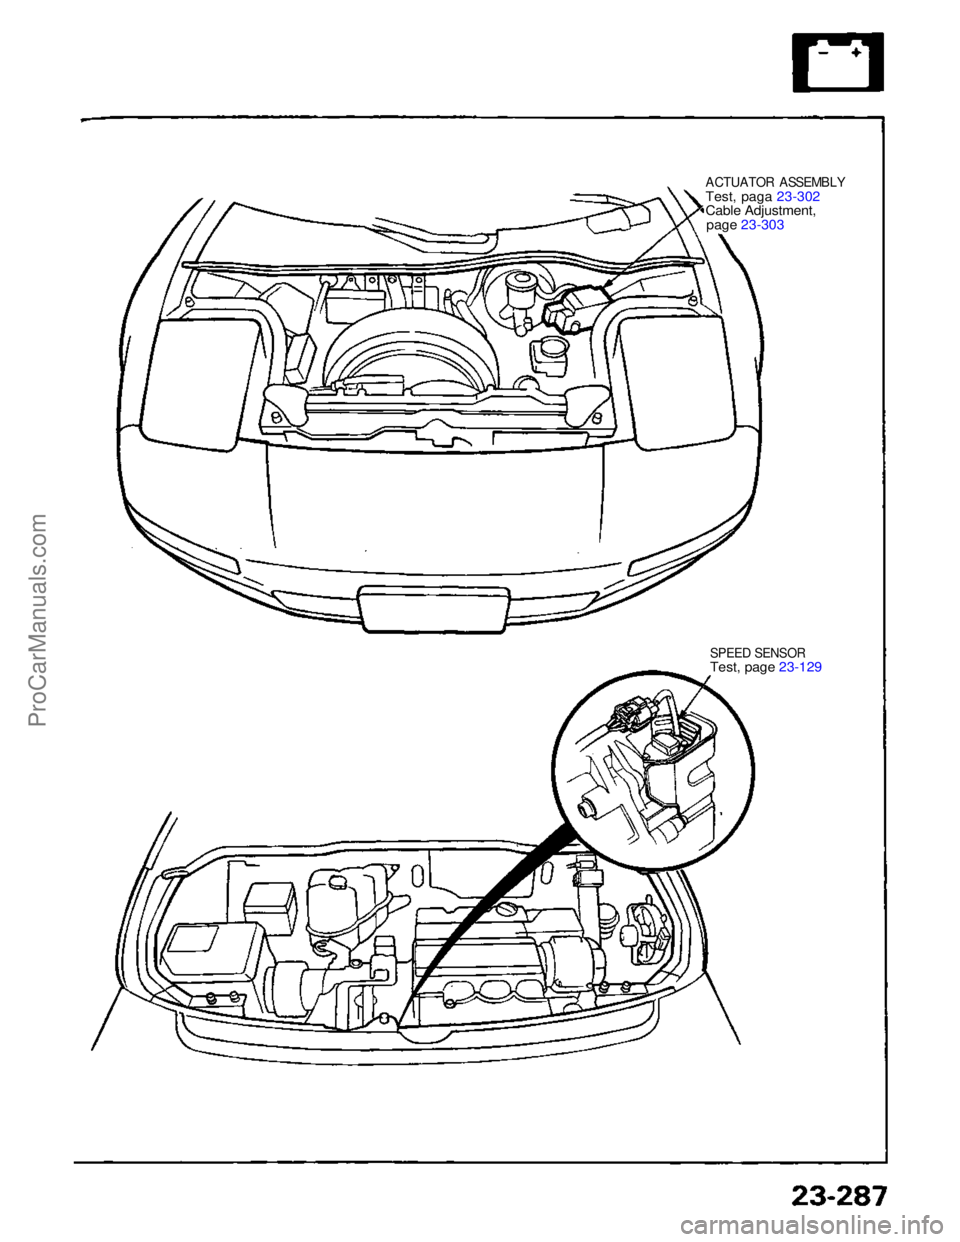
ACTUATOR ASSEMBLY
Test
,
paga 23-302
Cabl
e
Adjustment,
pag
e
23-303
SPEE
D
SENSORTest
,
page 23-129
ProCarManuals.com
Page 1626 of 1640
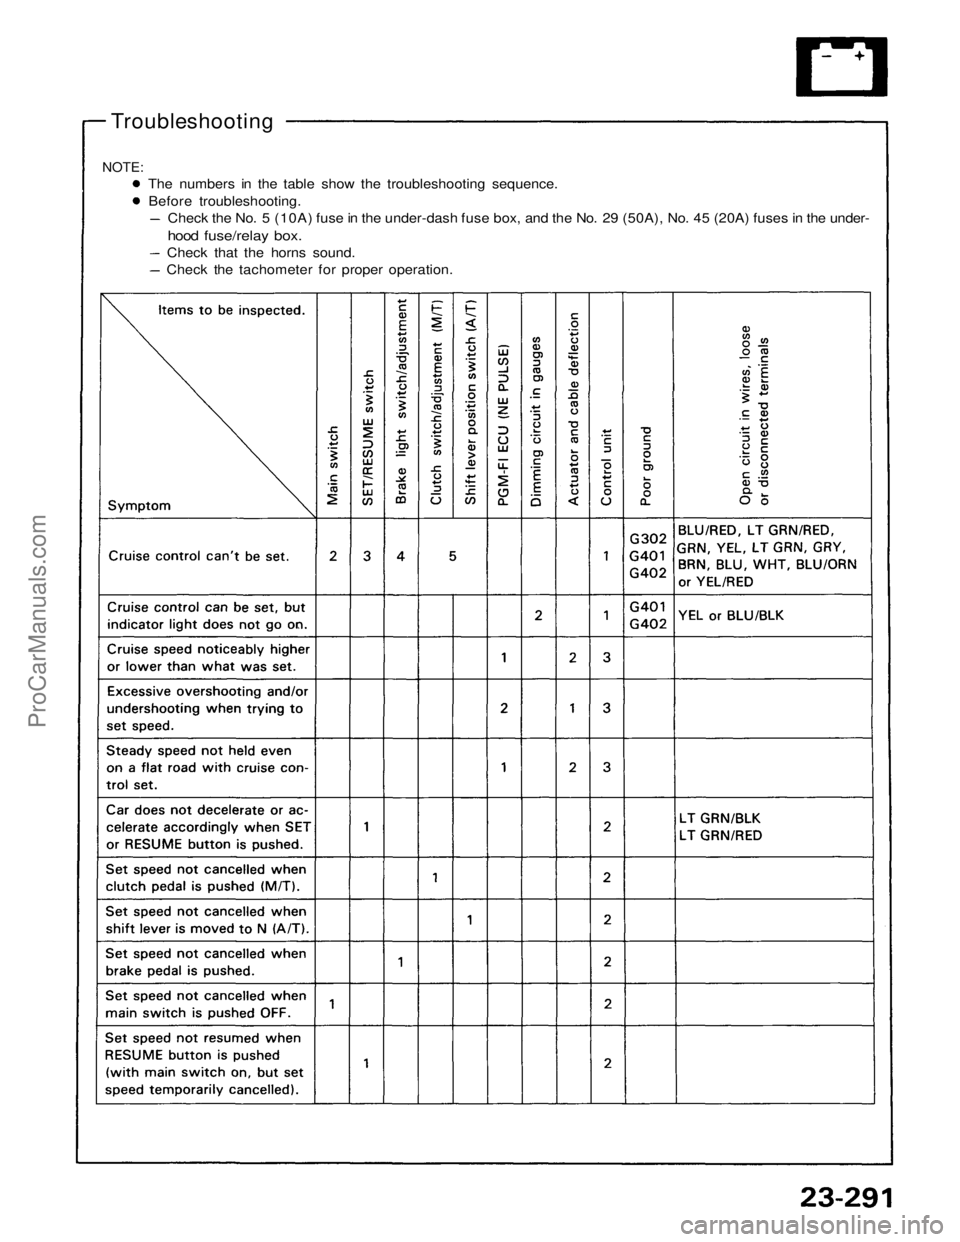
Troubleshooting
NOTE:
The numbers in the table show the troubleshooting sequence.
Before troubleshooting.
Check the No. 5 (10A) fuse in the under-dash fuse box, and the No. 29 (50A), No. 45 (20A) fuses in the under-
hood fuse/relay box.
Check that the horns sound.
Check the tachometer for proper operation.ProCarManuals.com
Page 1627 of 1640
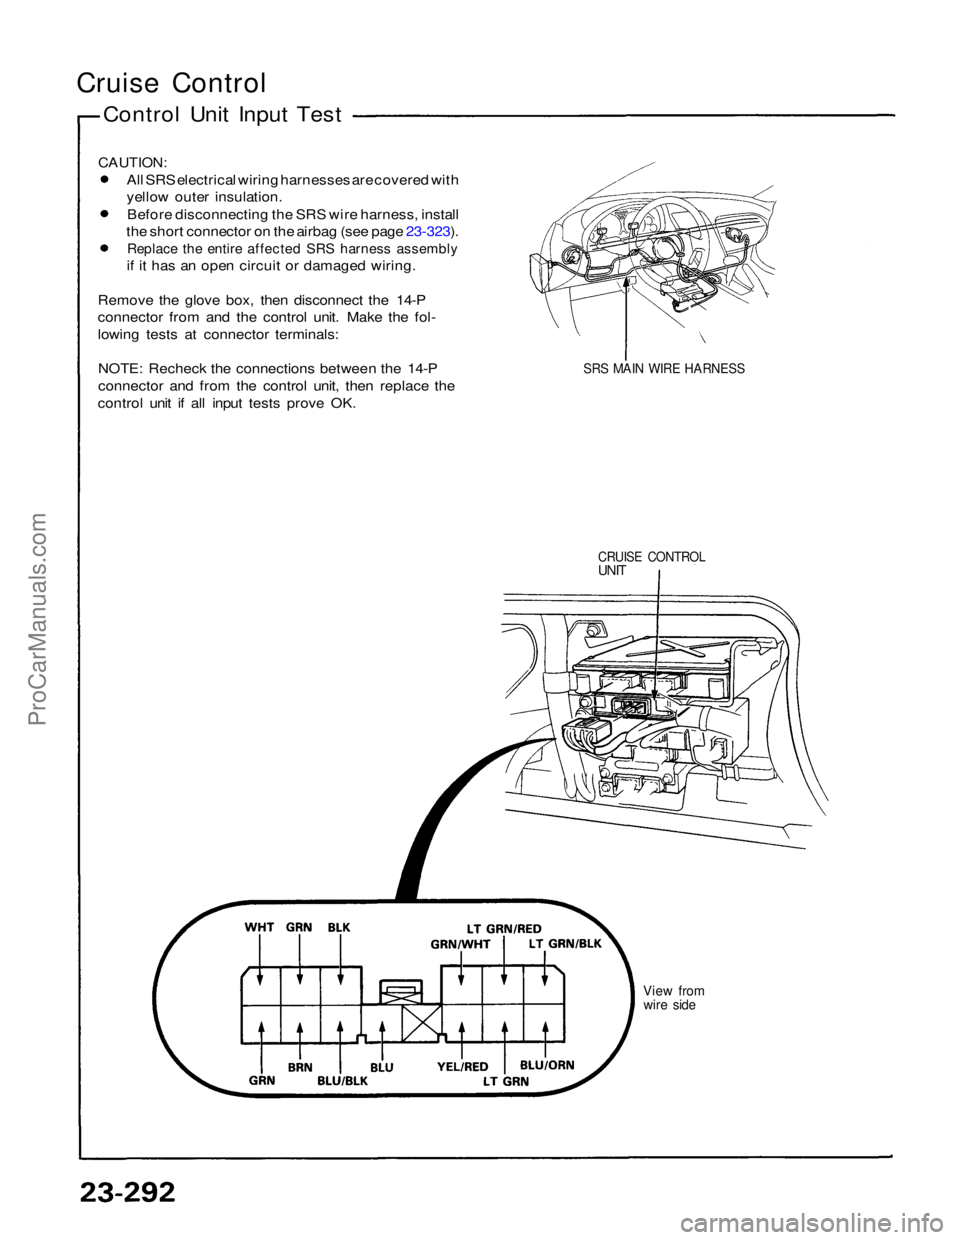
Cruise Control
Control Unit Input Test
CAUTION:
All SRS electrical wiring harnesses are covered with
yellow outer insulation.
Before disconnecting the SRS wire harness, install
the short connector on the airbag (see page 23-323).
Replace the entire affected SRS harness assembly
if it has an open circuit or damaged wiring.
Remove the glove box, then disconnect the 14-P
connector from and the control unit. Make the fol-
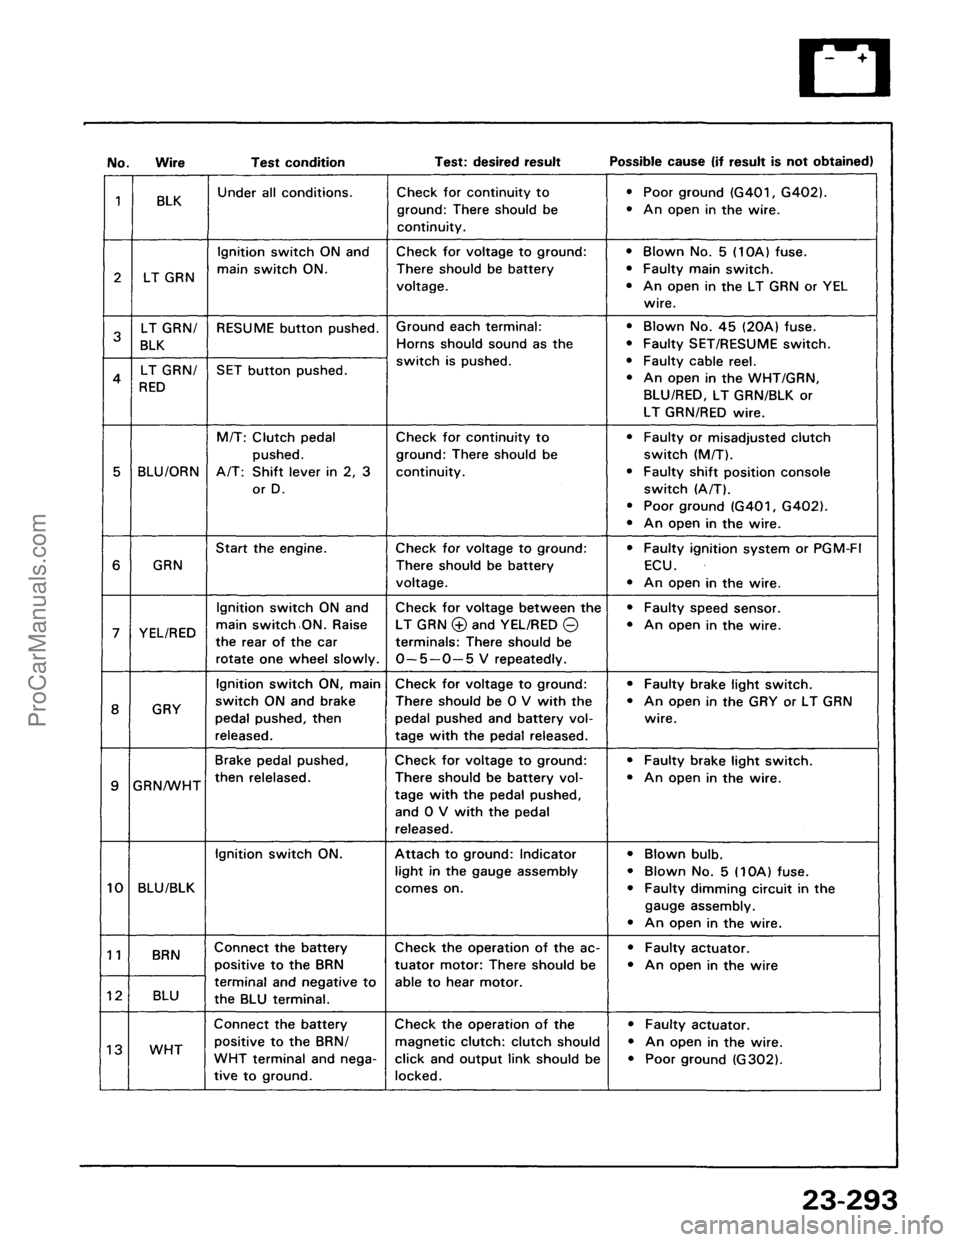
lowing tests at connector terminals: NOTE: Recheck the connections between the 14-P
connector and from the control unit, then replace the
control unit if all input tests prove OK.
SRS MAIN WIRE HARNESS
CRUISE CONTROL
UNIT
View from
wire sideProCarManuals.com
Page 1628 of 1640
Page 1629 of 1640
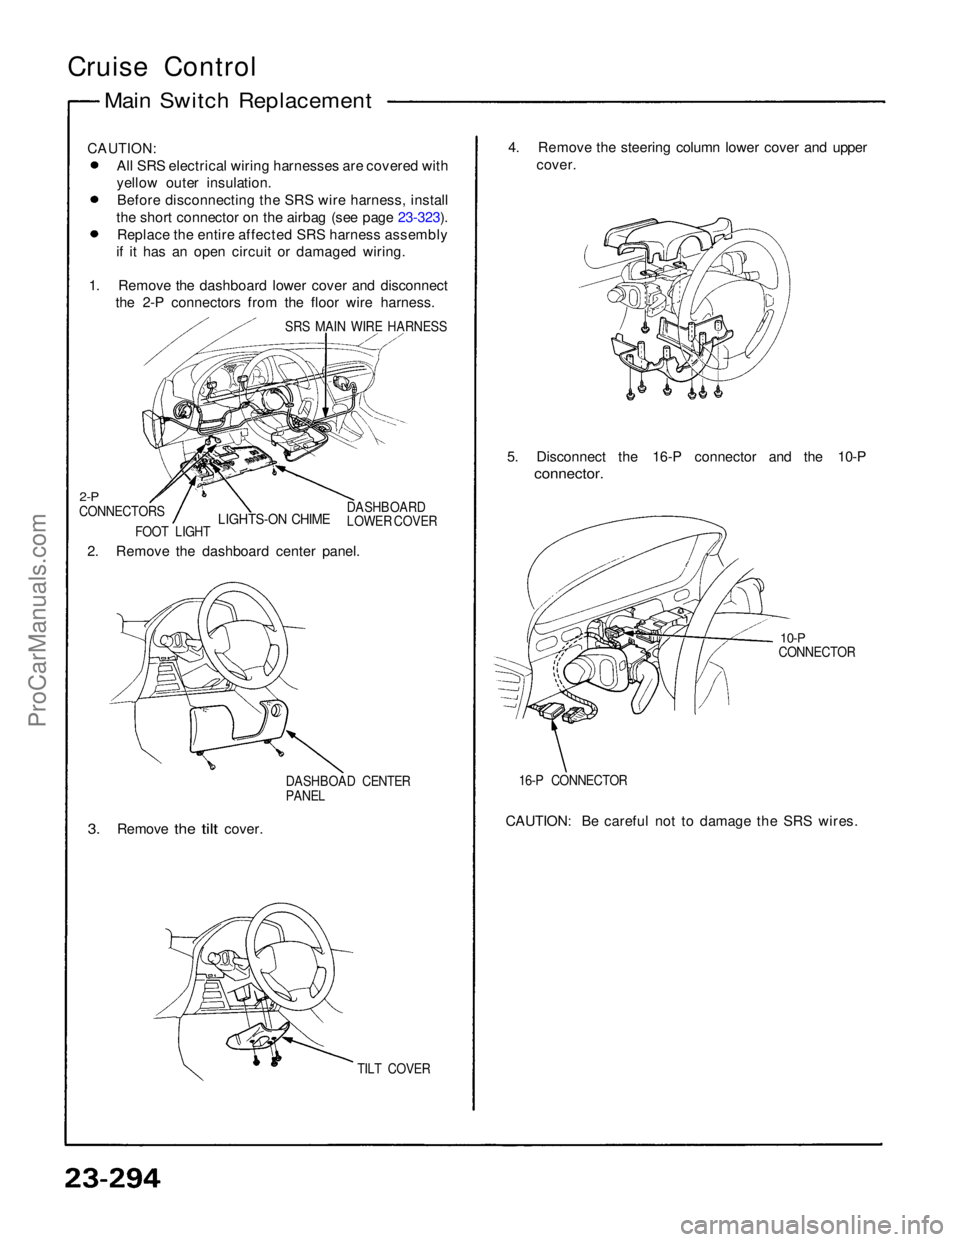
Cruise Control
Main Switch Replacement
CAUTION:
All SRS electrical wiring harnesses are covered with
yellow outer insulation.Before disconnecting the SRS wire harness, install
the short connector on the airbag (see page 23-323). Replace the entire affected SRS harness assembly if it has an open circuit or damaged wiring.
1. Remove the dashboard lower cover and disconnect the 2-P connectors from the floor wire harness.
SRS MAIN WIRE HARNESS
2-P
CONNECTORS
LIGHTS-ON CHIME
FOOT LIGHT DASHBOARD
LOWER COVER
2. Remove the dashboard center panel.
DASHBOAD CENTER
PANEL
3.
Remove
the
tilt
cover.
TILT COVER
4. Remove the steering column lower cover and upper
cover.
5. Disconnect the 16-P connector and the 10-P
connector.
10-P
CONNECTOR
16-P CONNECTOR
CAUTION: Be careful not to damage the SRS wires.ProCarManuals.com
Page 1630 of 1640
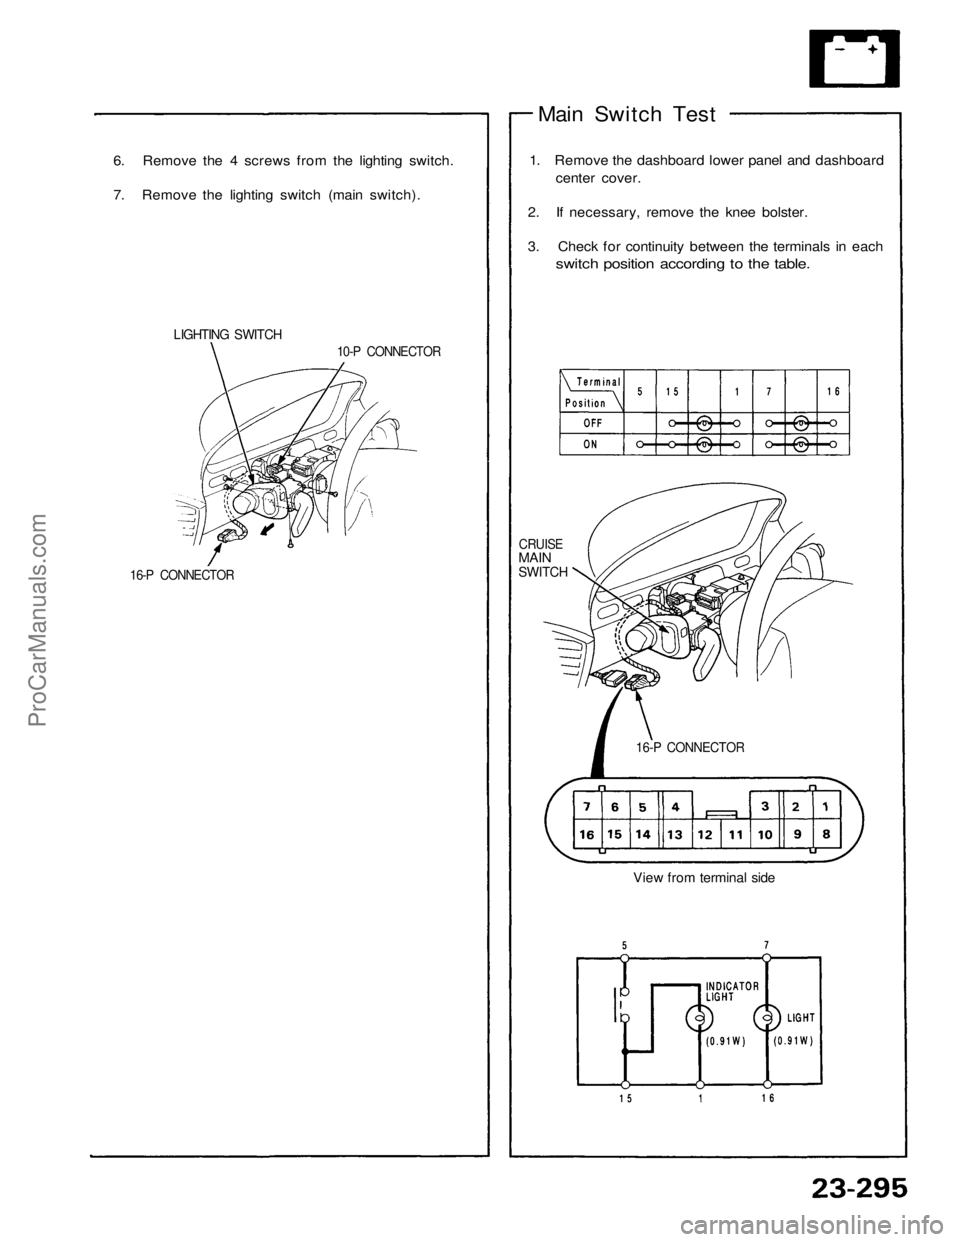
6. Remove the 4 screws from the lighting switch.
7. Remove the lighting switch (main switch).
LIGHTING SWITCH
10-P CONNECTOR
16-P CONNECTOR
Main Switch Test
1. Remove the dashboard lower panel and dashboard
center cover.
2. If necessary, remove the knee bolster.
3. Check for continuity between the terminals in each
switch position according to the table.
CRUISE
MAIN
SWITCH
16-P CONNECTOR
View from terminal sideProCarManuals.com
Trending: auxiliary battery, oil, instrument panel, set clock, catalytic converter, odometer, alarm
