ACURA NSX 1991 Service Repair Manual
Manufacturer: ACURA, Model Year: 1991, Model line: NSX, Model: ACURA NSX 1991Pages: 1640, PDF Size: 60.48 MB
Page 461 of 1640
Front Suspensio n
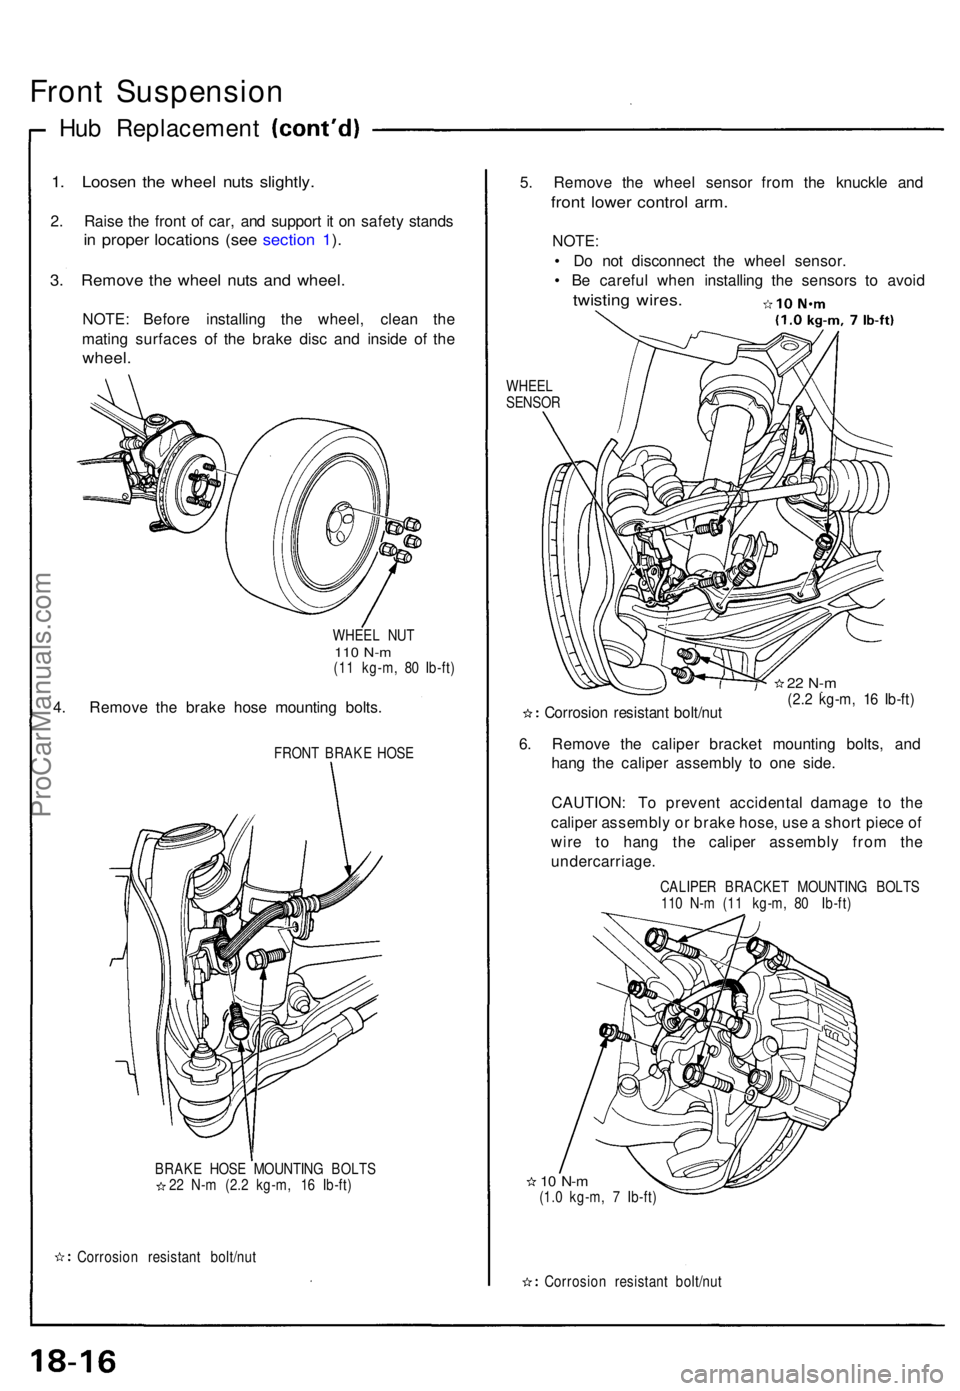
Hub Replacemen t
1. Loose n th e whee l nut s slightly .
2. Rais e th e fron t o f car , an d suppor t i t o n safet y stand s
in prope r location s (se e sectio n 1 ).
3 . Remov e th e whee l nut s an d wheel .
NOTE: Befor e installin g th e wheel , clea n th e
matin g surface s o f th e brak e dis c an d insid e o f th e
wheel .
WHEE L NU T110 N- m(11 kg-m , 8 0 Ib-ft )
4. Remov e th e brak e hos e mountin g bolts .
FRON T BRAK E HOS E
BRAK E HOS E MOUNTIN G BOLT S
2 2 N- m (2. 2 kg-m , 1 6 Ib-ft )
Corrosio n resistan t bolt/nu t
5. Remov e th e whee l senso r fro m th e knuckl e an d
fron t lowe r contro l arm .
NOTE :
• D o no t disconnec t th e whee l sensor .
• B e carefu l whe n installin g th e sensor s t o avoi d
twistin g wires .
WHEE L
SENSO R
Corrosio n resistan t bolt/nu t
22 N- m(2.2 kg-m , 1 6 Ib-ft )
6. Remov e th e calipe r bracke t mountin g bolts , an d
han g th e calipe r assembl y t o on e side .
CAUTION : T o preven t accidenta l damag e t o th e
calipe r assembl y o r brak e hose , us e a shor t piec e o f
wir e t o han g th e calipe r assembl y fro m th e
undercarriage .
CALIPER BRACKE T MOUNTIN G BOLT S
11 0 N- m (1 1 kg-m , 8 0 Ib-ft )
10 N- m(1.0 kg-m , 7 Ib-ft )
Corrosio n resistan t bolt/nu t
ProCarManuals.com
Page 462 of 1640
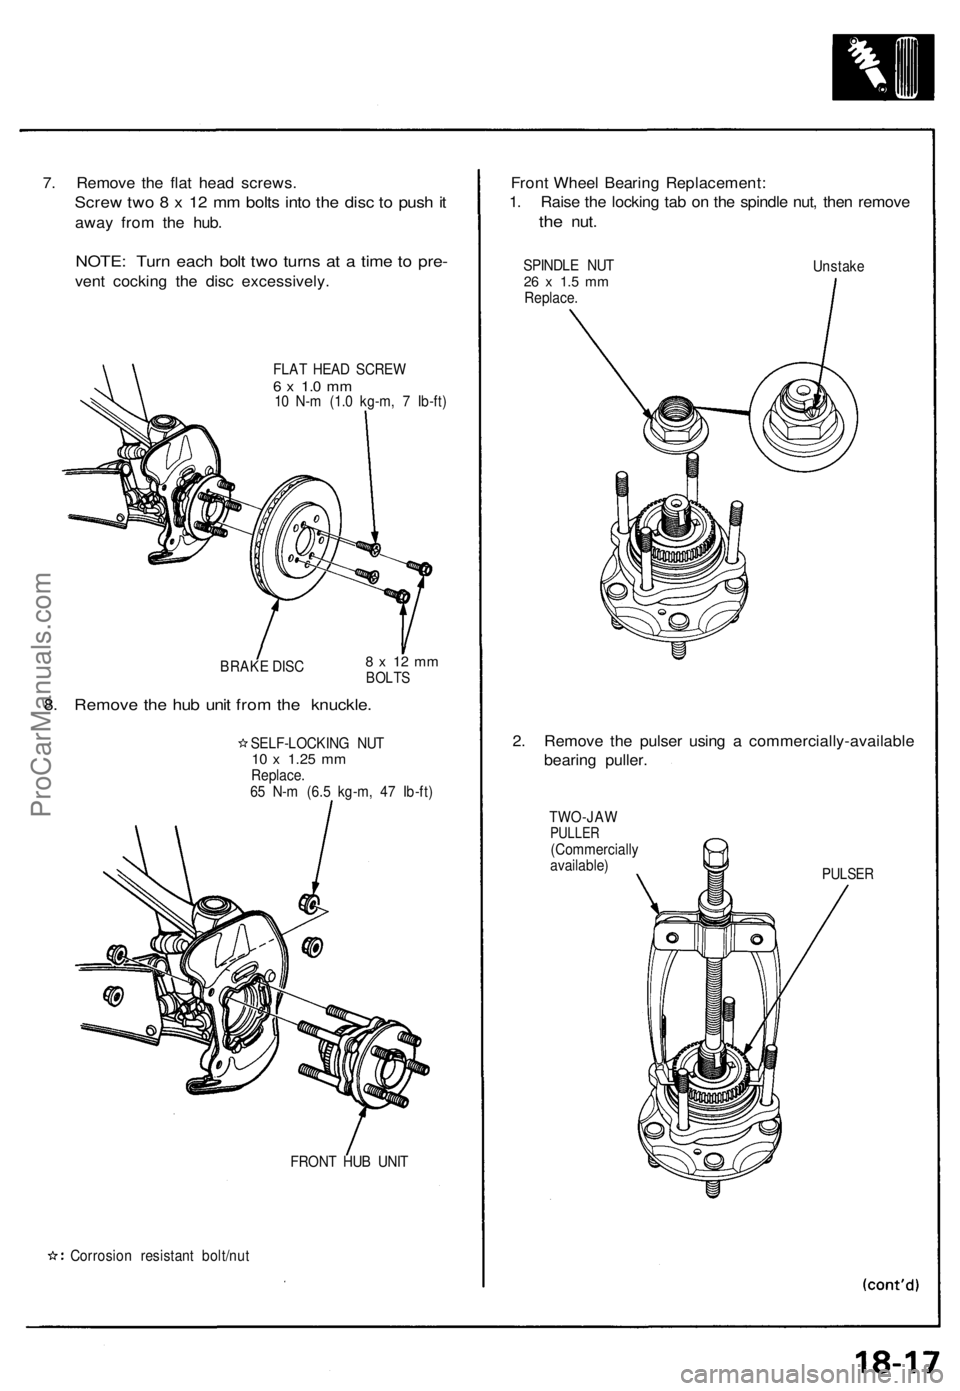
7. Remove the flat head screws.
Screw two 8 x 12 mm bolts into the disc to push it
away from the hub.
NOTE: Turn each bolt two turns at a time to pre-
vent cocking the disc excessively.
FLAT HEAD SCREW
6 x 1.0 mm
10 N-m (1.0 kg-m, 7 Ib-ft)
BRAKE DISC
8. Remove the hub unit from the knuckle.
8 x 12 mm
BOLTS
SELF-LOCKING NUT
10 x
1.25
mm
Replace.
65 N-m (6.5 kg-m, 47 Ib-ft)
FRONT HUB UNIT
Corrosion resistant bolt/nut
Front Wheel Bearing Replacement:
1. Raise the locking tab on the spindle nut, then remove
the
nut.
SPINDLE NUT
26 x 1.5 mm
Replace.
Unstake
2. Remove the pulser using a commercially-available
bearing puller.
PULSER
TWO-JAW
PULLER
(Commercially
available)ProCarManuals.com
Page 463 of 1640
Front Suspensio n
Hub Replacemen t
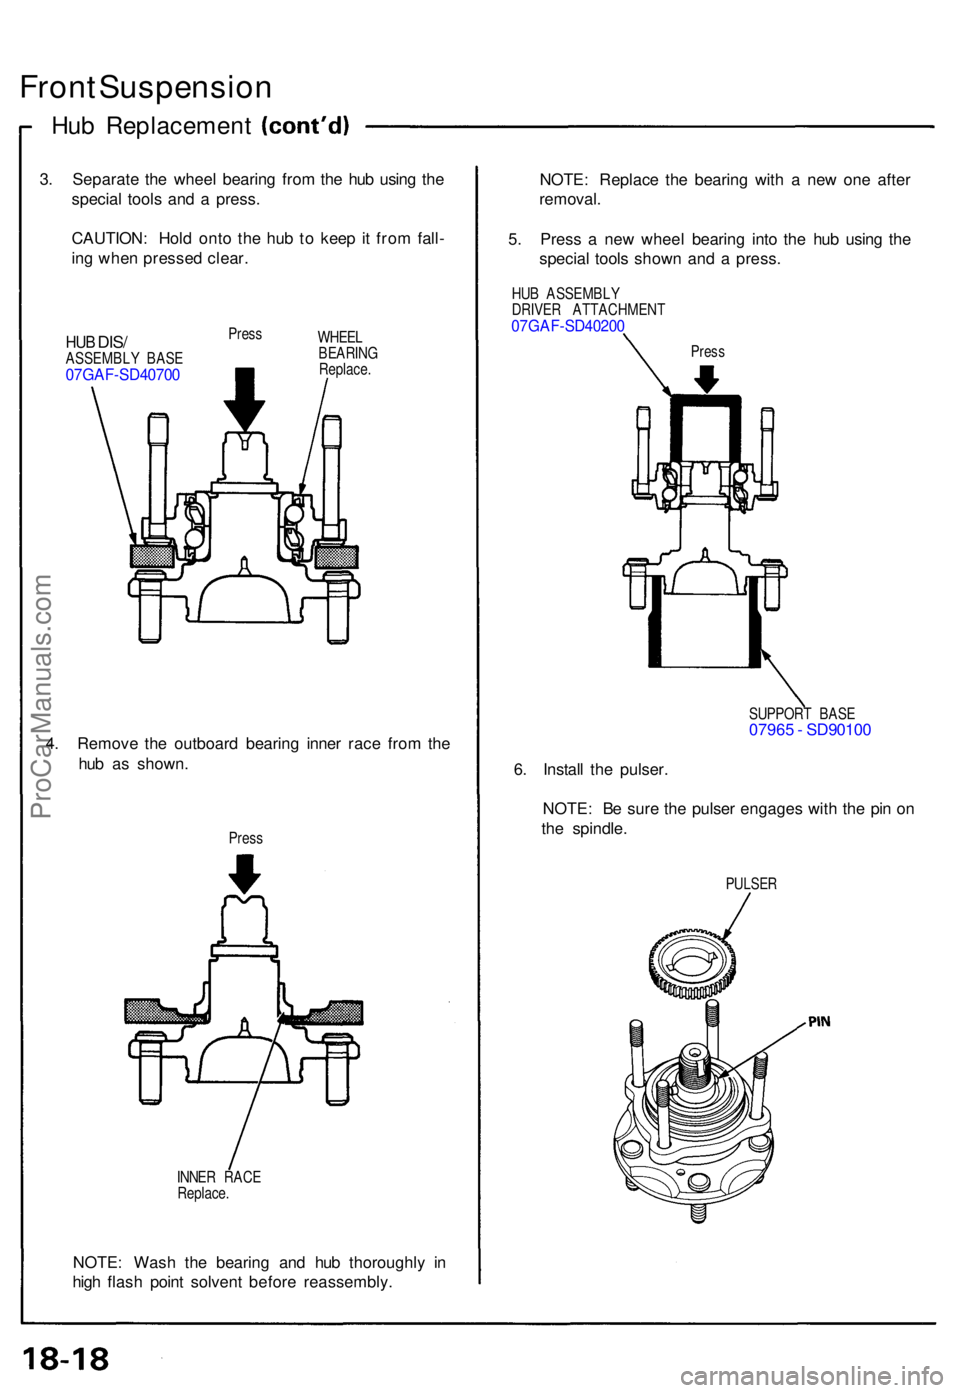
3. Separat e th e whee l bearin g fro m th e hu b usin g th e
specia l tool s an d a press .
CAUTION : Hol d ont o th e hu b t o kee p it fro m fall -
in g whe n presse d clear .
HUB DIS /ASSEMBL Y BAS E07GAF-SD4070 0
Press
WHEEL
BEARIN G
Replace .
4. Remov e th e outboar d bearin g inne r rac e fro m th e
hu b a s shown .
Press
INNE R RAC E
Replace .
NOTE: Was h th e bearin g an d hu b thoroughl y i n
hig h flas h poin t solven t befor e reassembly . NOTE
: Replac e th e bearin g wit h a ne w on e afte r
removal .
5 . Pres s a ne w whee l bearin g int o th e hu b usin g th e
specia l tool s show n an d a press .
HUB ASSEMBL Y
DRIVE R ATTACHMEN T
07GAF-SD4020 0
Press
SUPPOR T BAS E07965 - SD9010 0
6 . Instal l th e pulser .
NOTE : B e sur e th e pulse r engage s wit h th e pi n o n
th e spindle .
PULSER
ProCarManuals.com
Page 464 of 1640
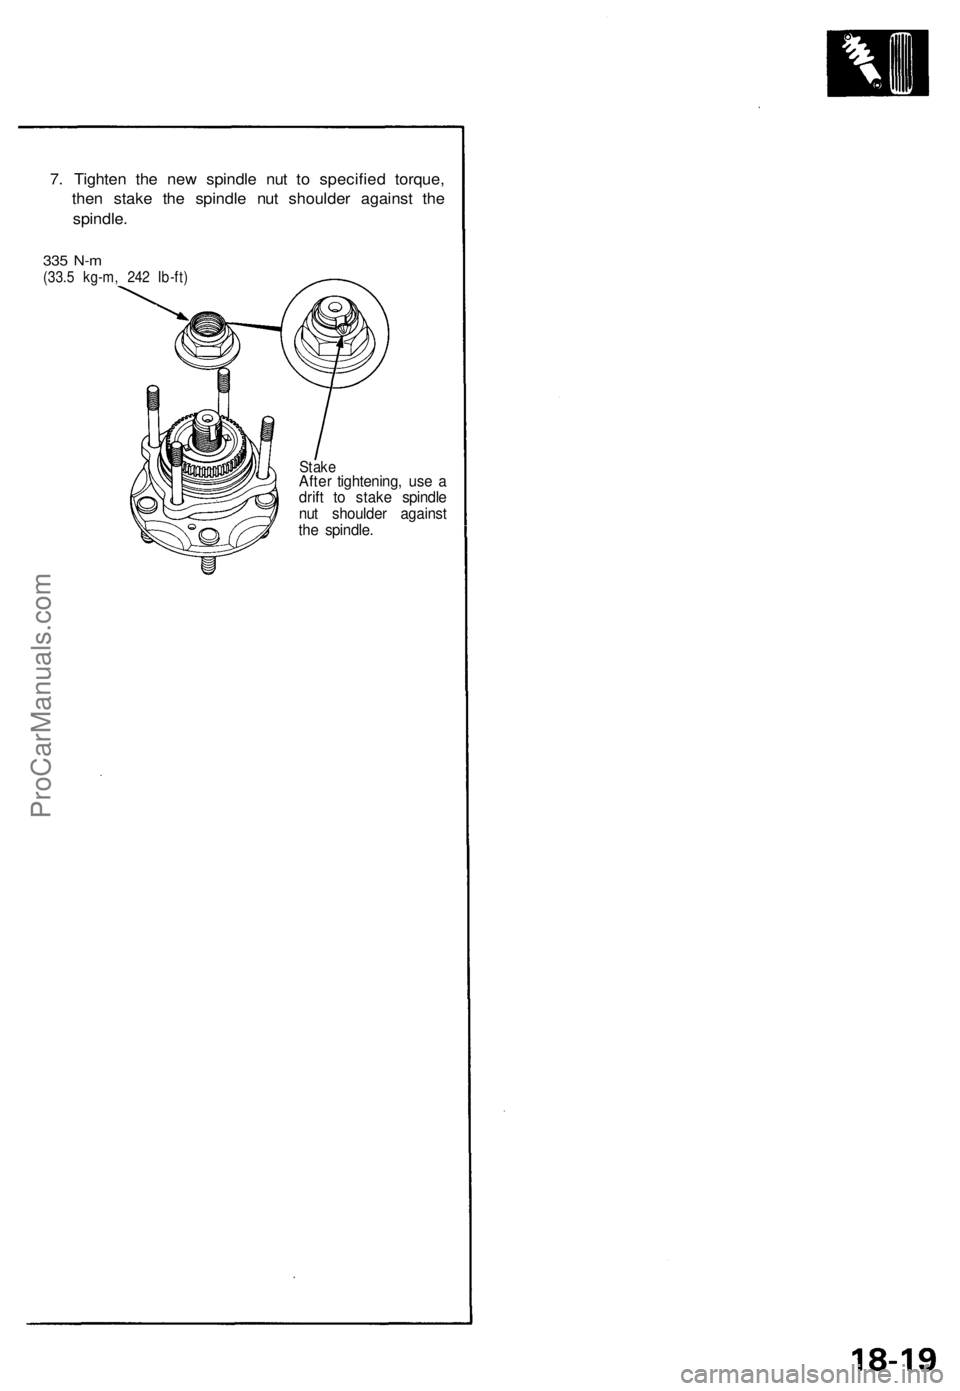
7. Tighten the new spindle nut to specified torque,
then stake the spindle nut shoulder against the
spindle.
335 N-m
(33.5 kg-m, 242 Ib-ft)
Stake
After tightening, use a
drift to stake spindle
nut shoulder against
the spindle.ProCarManuals.com
Page 465 of 1640
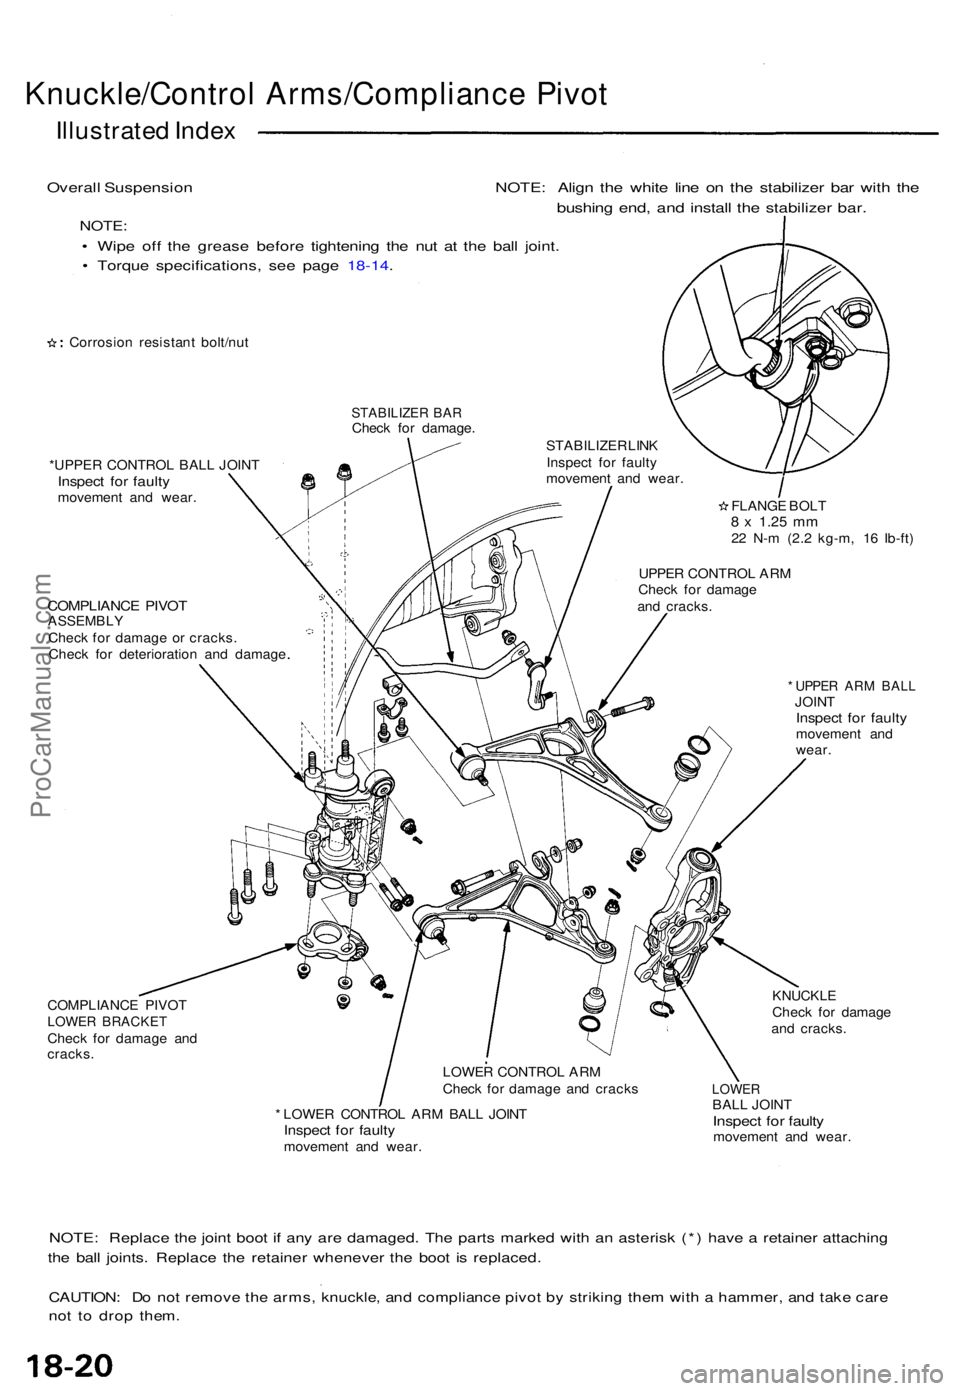
Knuckle/Control Arms/Complianc e Pivo t
Illustrate d Inde x
Overal l Suspensio n NOTE : Alig n th e whit e lin e o n th e stabilize r ba r wit h th e
bushin g end , an d instal l th e stabilize r bar .
NOTE :
• Wip e of f th e greas e befor e tightenin g th e nu t a t th e bal l joint .
• Torqu e specifications , se e pag e 18-14 .
Corrosio n resistan t bolt/nu t
STABILIZE R BA RChec k fo r damage .
*UPPE R CONTRO L BAL L JOIN T
Inspec t fo r fault ymovemen t an d wear . STABILIZE
R LIN K
Inspect for fault y
movemen t an d wear .
COMPLIANC E PIVO TASSEMBL YCheck fo r damag e o r cracks .
Chec k fo r deterioratio n an d damag e UPPE
R CONTRO L AR M
Chec k fo r damag e
an d cracks .
COMPLIANC E PIVO T
LOWE R BRACKE TCheck fo r damag e an dcracks .
FLANG E BOL T8 x 1.2 5 mm22 N- m (2. 2 kg-m , 1 6 Ib-ft )
* UPPE R AR M BAL LJOINTInspec t fo r fault ymovemen t an d
wear .
LOWE R CONTRO L AR M
Chec k fo r damag e an d crack s
* LOWE R CONTRO L AR M BAL L JOIN T
Inspec t fo r fault ymovemen t an d wear .
KNUCKL ECheck fo r damag e
an d cracks .
LOWERBALL JOIN TInspec t fo r fault ymovemen t an d wear .
NOTE: Replac e th e join t boo t i f an y ar e damaged . Th e part s marke d wit h a n asteris k (* ) hav e a retaine r attachin g
the bal l joints . Replac e th e retaine r wheneve r th e boo t i s replaced .
CAUTION: D o no t remov e th e arms , knuckle , an d complianc e pivo t b y strikin g the m wit h a hammer , an d tak e car e
not t o dro p them .
ProCarManuals.com
Page 466 of 1640
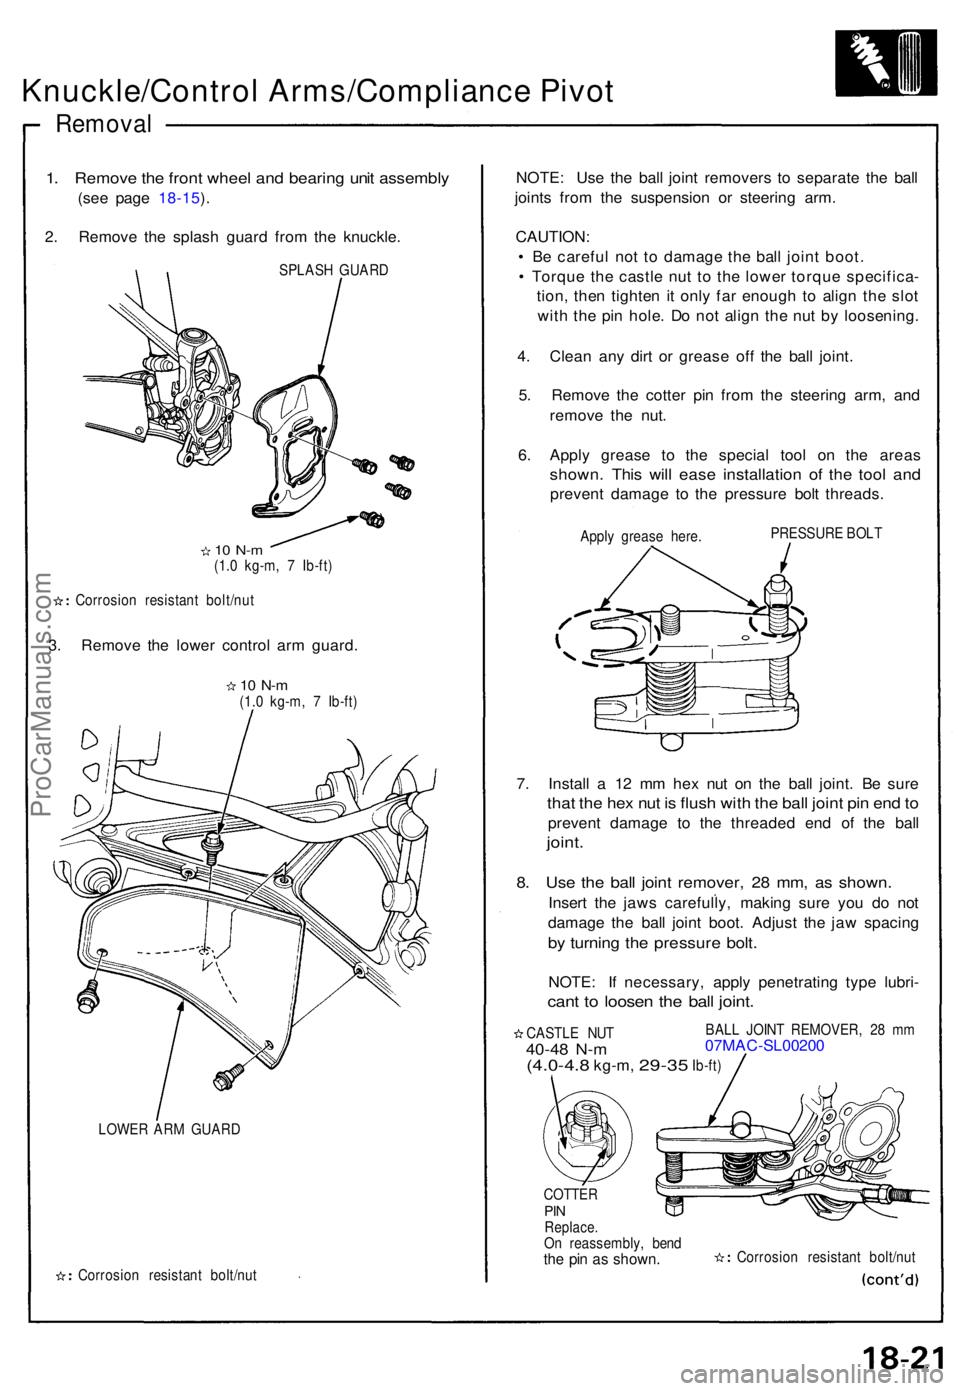
Removal
1. Remov e th e fron t whee l an d bearin g uni t assembly
(se e pag e 18-15 ).
2 . Remov e th e splas h guar d fro m th e knuckle .
SPLASH GUAR D
10 N- m(1.0 kg-m , 7 Ib-ft )
Corrosio n resistan t bolt/nu t
3. Remov e th e lowe r contro l ar m guard .
10 N- m(1.0 kg-m , 7 Ib-ft )
LOWE R AR M GUAR D
Corrosio n resistan t bolt/nu t
NOTE: Us e th e bal l join t remover s t o separat e th e bal l
joint s fro m th e suspensio n o r steerin g arm .
CAUTION :
• B e carefu l no t t o damag e th e bal l join t boot .
• Torqu e th e castl e nu t t o th e lowe r torqu e specifica -
tion , the n tighte n it onl y fa r enoug h t o alig n th e slo t
wit h th e pi n hole . D o no t alig n th e nu t b y loosening .
4 . Clea n an y dir t o r greas e of f th e bal l joint .
5 . Remov e th e cotte r pi n fro m th e steerin g arm , an d
remov e th e nut .
6 . Appl y greas e t o th e specia l too l o n th e area s
shown . Thi s wil l eas e installatio n o f th e too l an d
preven t damag e t o th e pressur e bol t threads .
Apply greas e here . PRESSUR
E BOL T
7. Instal l a 1 2 m m he x nu t o n th e bal l joint . B e sur e
that th e he x nu t i s flus h wit h th e bal l join t pi n en d to
preven t damag e t o th e threade d en d o f th e bal l
joint.
8. Us e th e bal l join t remover , 2 8 mm , a s shown .
Insert th e jaw s carefully , makin g sur e yo u d o no t
damag e th e bal l join t boot . Adjus t th e ja w spacin g
by turnin g th e pressur e bolt .
NOTE : I f necessary , appl y penetratin g typ e lubri -
cant t o loose n th e bal l joint .
CASTL E NU T40-4 8 N- m
BAL L JOIN T REMOVER , 2 8 m m07MA C-SL0020 0
(4.0-4.8 kg-m, 29-35 Ib-ft)
COTTE R
PINReplace .On reassembly , ben dthe pi n a s shown .Corrosio n resistan t bolt/nu t
Knuckle/Control Arms/Compliance Pivot
ProCarManuals.com
Page 467 of 1640
Knuckle/Control Arms/Complianc e Pivo t
Remova l
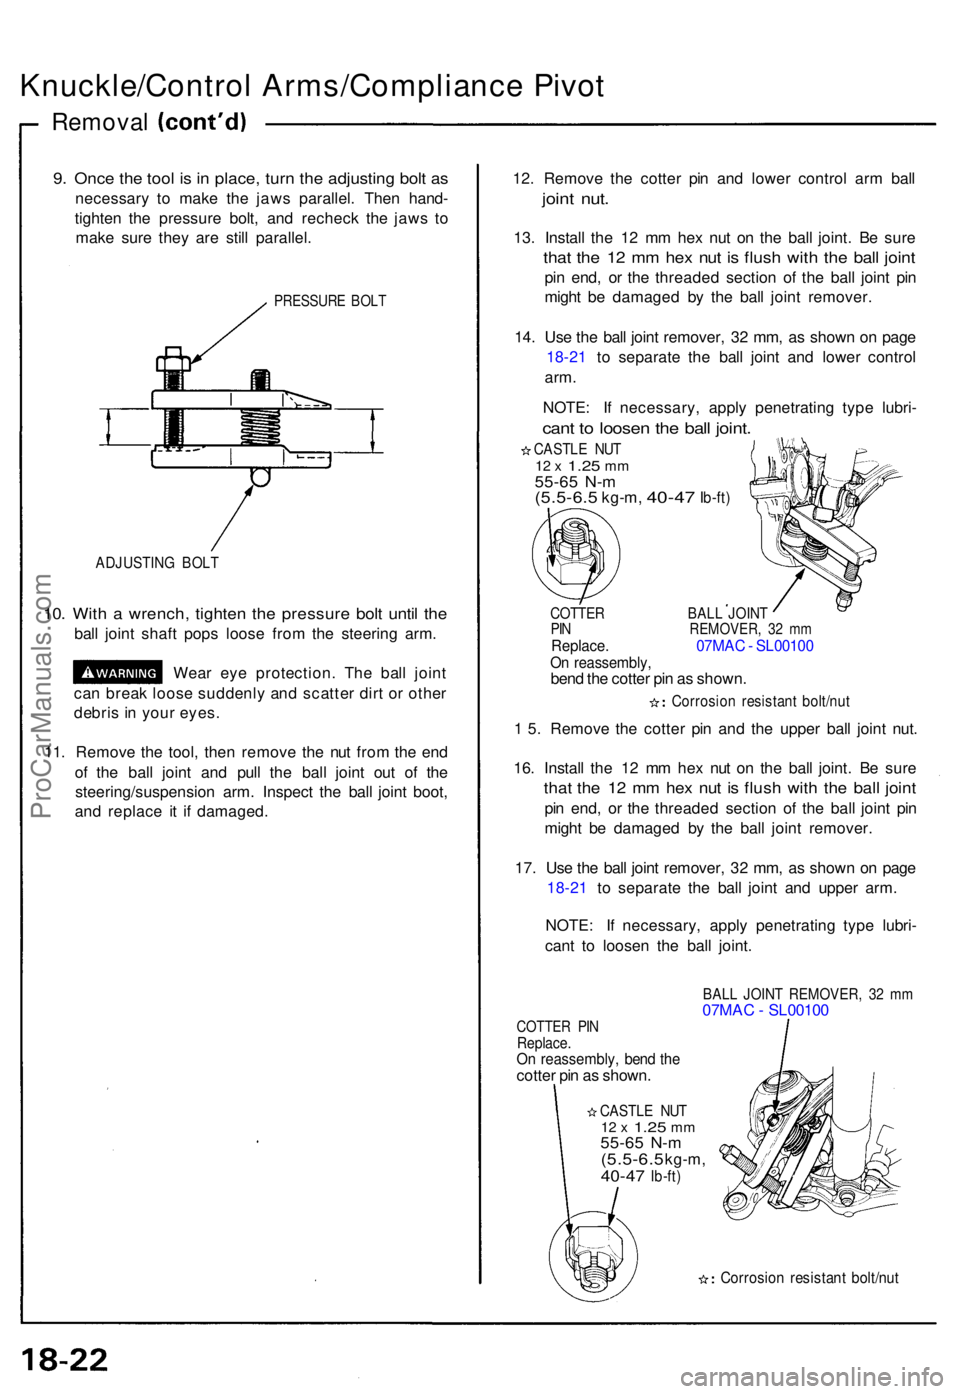
9. Onc e th e too l i s i n place , tur n th e adjustin g bol t a s
necessar y t o mak e th e jaw s parallel . The n hand -
tighte n th e pressur e bolt , an d rechec k th e jaw s t o
mak e sur e the y ar e stil l parallel .
PRESSUR E BOL T
ADJUSTIN G BOL T
10. Wit h a wrench , tighte n th e pressur e bol t unti l th e
bal l join t shaf t pop s loos e fro m th e steerin g arm .
Wea r ey e protection . Th e bal l join t
ca n brea k loos e suddenl y an d scatte r dir t o r othe r
debri s in you r eyes .
11 . Remov e th e tool , the n remov e th e nu t fro m th e en d
o f th e bal l join t an d pul l th e bal l join t ou t o f th e
steering/suspensio n arm . Inspec t th e bal l join t boot ,
an d replac e i t i f damaged . 12
. Remov e th e cotte r pi n an d lowe r contro l ar m bal l
joint nut .
13. Instal l th e 1 2 m m he x nu t o n th e bal l joint . B e sur e
that th e 1 2 m m he x nu t i s flus h wit h th e bal l join t
pin end , o r th e threade d sectio n o f th e bal l join t pi n
migh t b e damage d b y th e bal l join t remover .
14 . Us e th e bal l join t remover , 3 2 mm , a s show n o n pag e
18-2 1 t o separat e th e bal l join t an d lowe r contro l
arm.
NOTE : I f necessary , appl y penetratin g typ e lubri -
cant t o loose n th e bal l joint .
CASTL E NU T12 x 1.2 5 mm55-6 5 N- m(5.5-6. 5 kg-m, 40-47 Ib-ft)
COTTE R BAL L JOIN TPIN REMOVER , 3 2 m mReplace . 07MAC - SL0010 0On reassembly ,bend th e cotte r pi n a s shown .
Corrosio n resistan t bolt/nu t
1 5 . Remov e th e cotte r pi n an d th e uppe r bal l join t nut .
16 . Instal l th e 1 2 m m he x nu t o n th e bal l joint . B e sur e
that th e 1 2 m m he x nu t i s flus h wit h th e bal l join t
pin end , o r th e threade d sectio n o f th e bal l join t pi n
migh t b e damage d b y th e bal l join t remover .
17 . Us e th e bal l join t remover , 3 2 mm , a s show n o n pag e
18-2 1 t o separat e th e bal l join t an d uppe r arm .
NOTE : I f necessary , appl y penetratin g typ e lubri -
can t t o loose n th e bal l joint .
BALL JOIN T REMOVER , 3 2 m m07MA C - SL0010 0COTTER PI NReplace .On reassembly , ben d th ecotte r pi n a s shown .
CASTL E NU T12 x 1.2 5 mm55-6 5 N- m(5.5-6. 5 kg-m,40-47 Ib-ft )
Corrosio n resistan t bolt/nu t
ProCarManuals.com
Page 468 of 1640
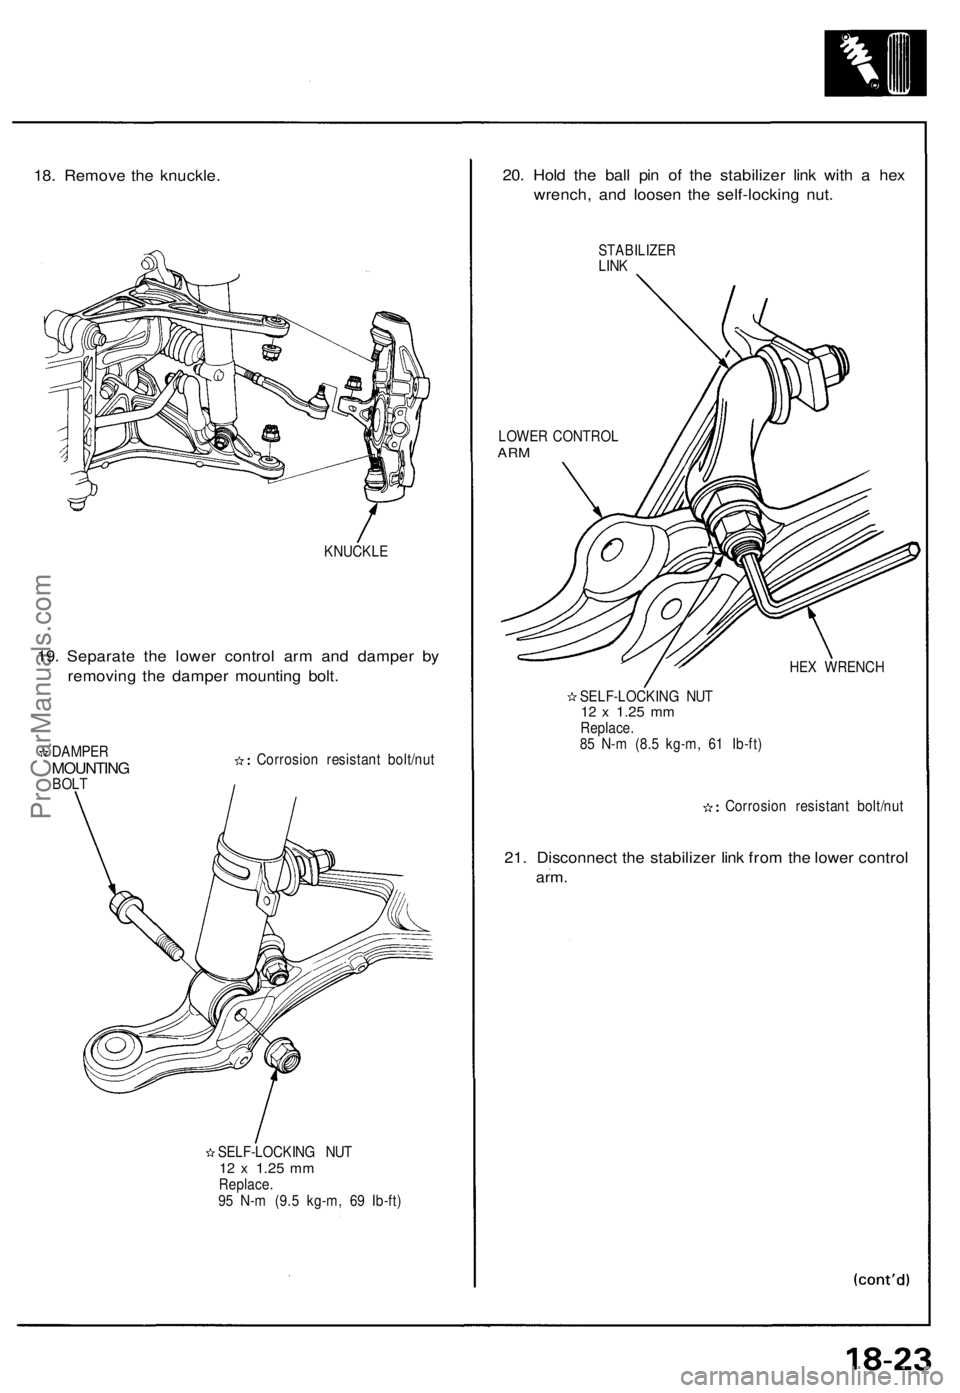
18. Remove the knuckle.
KNUCKLE
19. Separate the lower control arm and damper by
removing the damper mounting bolt.
DAMPER
MOUNTING
BOLT
Corrosion resistant bolt/nut
SELF-LOCKING NUT
12 x
1.25
mm
Replace.
95 N-m (9.5 kg-m, 69 Ib-ft)
20. Hold the ball pin of the stabilizer link with a hex
wrench, and loosen the self-locking nut.
STABILIZER
LINK
LOWER CONTROL
ARM
HEX WRENCH
SELF-LOCKING NUT
12 x
1.25
mm
Replace.
85 N-m (8.5 kg-m, 61 Ib-ft)
Corrosion resistant bolt/nut
21. Disconnect the stabilizer link from the lower control
arm.ProCarManuals.com
Page 469 of 1640
Knuckle/Control Arms/Complianc e Pivo t
Remova l
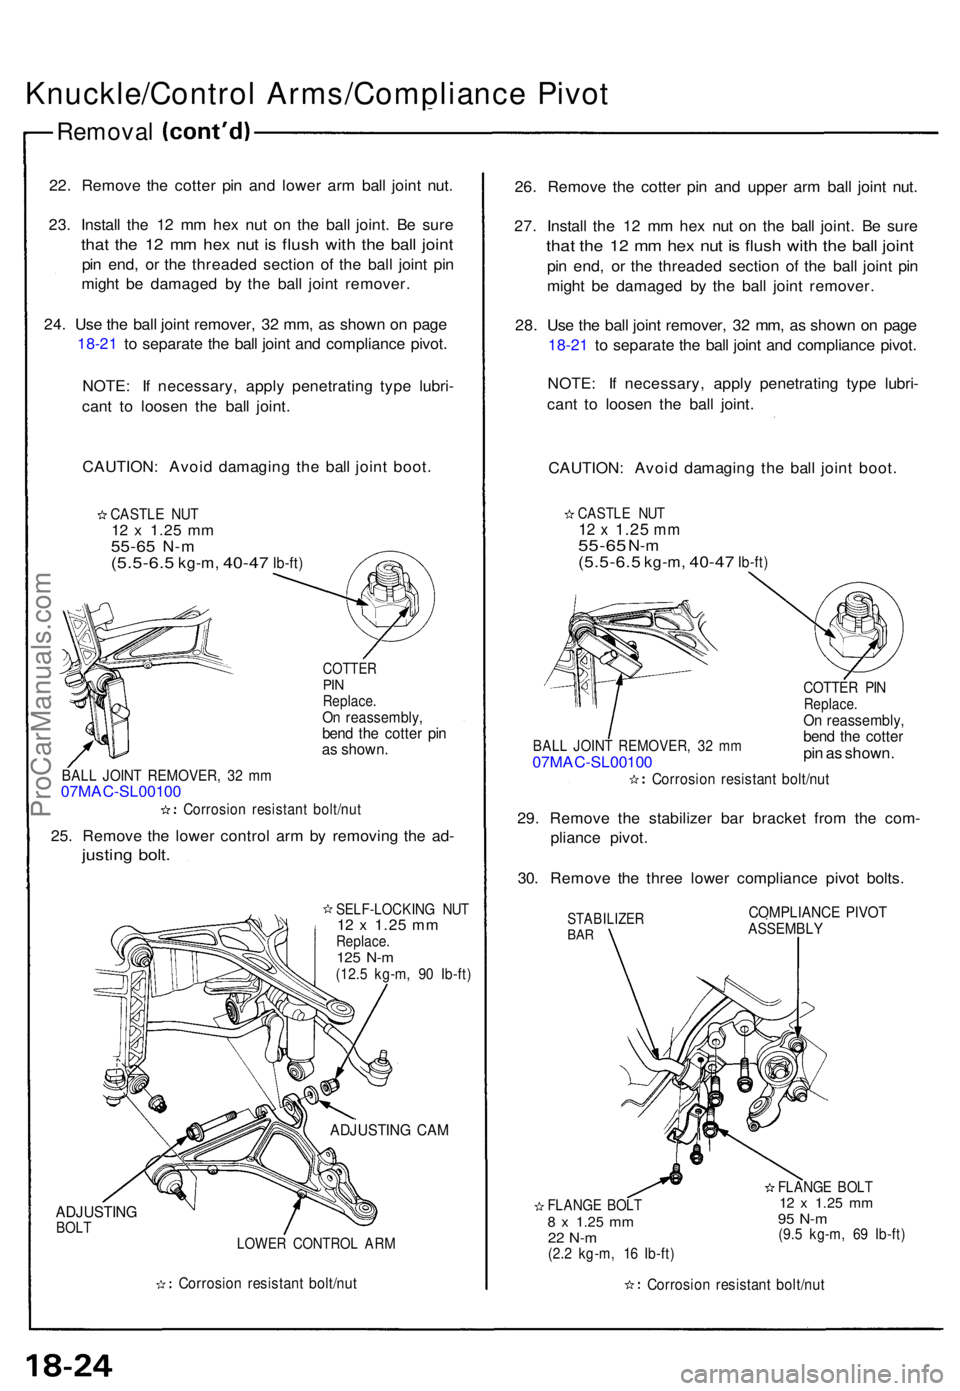
22. Remov e th e cotte r pi n an d lowe r ar m bal l join t nut .
23 . Instal l th e 1 2 m m he x nu t o n th e bal l joint . B e sur e
that th e 1 2 m m he x nu t i s flus h wit h th e bal l join t
pin end , o r th e threade d sectio n o f th e bal l join t pi n
migh t b e damage d b y th e bal l join t remover .
24 . Us e th e bal l join t remover , 3 2 mm , a s show n o n pag e
18-2 1 t o separat e th e bal l join t an d complianc e pivot .
NOTE : I f necessary , appl y penetratin g typ e lubri -
can t t o loose n th e bal l joint .
CAUTION : Avoi d damagin g th e bal l join t boot .
CASTL E NU T12 x 1.2 5 mm55-6 5 N-m(5.5-6. 5 kg-m, 40-47 Ib-ft)
COTTE RPINReplace .On reassembly ,bend th e cotte r pi nas shown .
BALL JOIN T REMOVER , 3 2 m m07MAC -SL0010 0Corrosio n resistan t bolt/nu t
25. Remov e th e lowe r contro l ar m b y removin g th e ad -
justin g bolt .
SELF-LOCKIN G NU T12 x 1.2 5 mmReplace .125 N- m(12. 5 kg-m , 9 0 Ib-ft )
ADJUSTIN GBOLT
ADJUSTIN G CA M
LOWE R CONTRO L AR M
Corrosio n resistan t bolt/nu t
26. Remov e th e cotte r pi n an d uppe r ar m bal l join t nut .
27 . Instal l th e 1 2 m m he x nu t o n th e bal l joint . B e sur e
that th e 1 2 m m he x nu t i s flus h wit h th e bal l join t
pin end , o r th e threade d sectio n o f th e bal l join t pi n
migh t b e damage d b y th e bal l join t remover .
28 . Us e th e bal l join t remover , 3 2 mm , a s show n o n pag e
18-2 1 t o separat e th e bal l join t an d complianc e pivot .
NOTE : I f necessary , appl y penetratin g typ e lubri -
can t t o loose n th e bal l joint .
CAUTION : Avoi d damagin g th e bal l join t boot .
CASTL E NU T12 x 1.2 5 mm55-6 5 N-m(5.5-6. 5 kg-m, 40-47 Ib-ft )
BALL JOIN T REMOVER , 3 2 m m07MA C-SL0010 0Corrosio n resistan t bolt/nu t
COTTER PI NReplace .On reassembly ,bend th e cotte rpin a s shown .
29 . Remov e th e stabilize r ba r bracke t fro m th e com -
plianc e pivot .
30 . Remov e th e thre e lowe r complianc e pivo t bolts .
STABILIZE RBAR
COMPLIANC E PIVO TASSEMBL Y
FLANGE BOL T8 x 1.2 5 mm22 N- m(2.2 kg-m , 1 6 Ib-ft )
FLANG E BOL T12 x 1.2 5 mm95 N- m(9.5 kg-m , 6 9 Ib-ft )
Corrosio n resistan t bolt/nu t
ProCarManuals.com
Page 470 of 1640
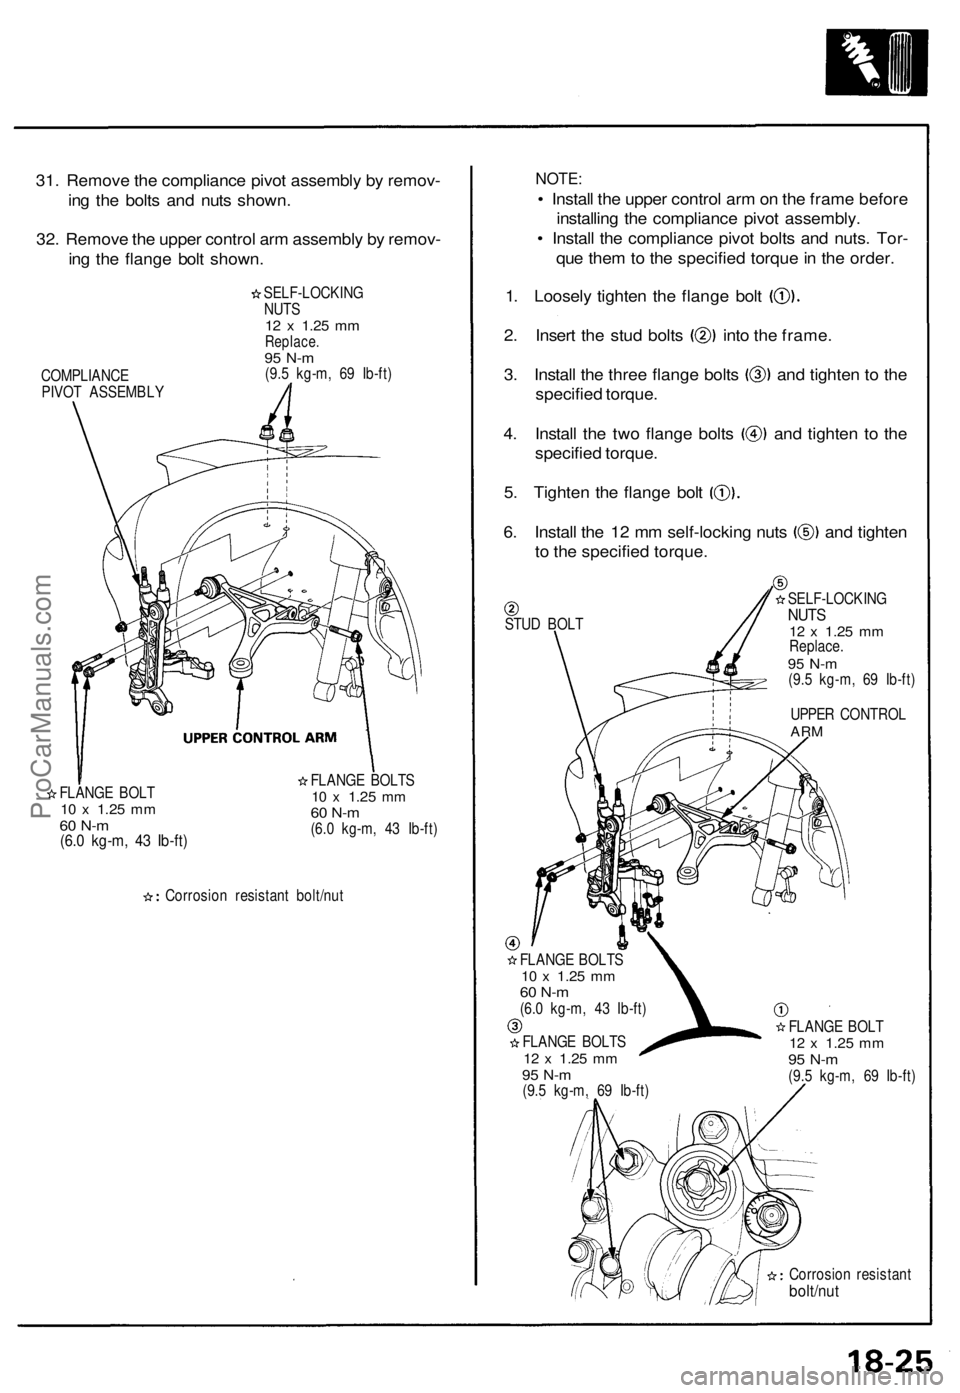
31. Remove the compliance pivot assembly by remov-
ing the bolts and nuts shown.
32. Remove the upper control arm assembly by remov-
ing the flange bolt shown.
SELF-LOCKING
NUTS
12 x
1.25
mm
Replace.
95 N-m
(9.5 kg-m, 69 Ib-ft)
FLANGE BOLT
10 x
1.25
mm
60 N-m
(6.0 kg-m, 43 Ib-ft)
FLANGE BOLTS
10 x
1.25
mm
60 N-m
(6.0 kg-m, 43 Ib-ft)
Corrosion resistant bolt/nut
NOTE:
• Install the upper control arm on the frame before
installing the compliance pivot assembly.
• Install the compliance pivot bolts and nuts. Tor-
que them to the specified torque in the order.
1. Loosely tighten the flange bolt
2. Insert the stud bolts into the frame.
3. Install the three flange bolts and tighten to the
specified torque.
4. Install the two flange bolts and tighten to the
specified torque.
5. Tighten the flange bolt
6. Install the 12 mm self-locking nuts and tighten
to the specified torque.
STUD BOLT
FLANGE BOLTS
10 x
1.25
mm
60 N-m
(6.0 kg-m, 43 Ib-ft)
FLANGE BOLTS
12 x
1.25
mm
95 N-m
(9.5 kg-m, 69 Ib-ft)
SELF-LOCKING
NUTS
12 x
1.25
mm
Replace.
95 N-m
(9.5 kg-m, 69 Ib-ft)
UPPER CONTROL
ARM
FLANGE BOLT
12 x
1.25
mm
95 N-m
(9.5 kg-m, 69 Ib-ft)
Corrosion resistant
bolt/nut
COMPLIANCE
PIVOT ASSEMBLYProCarManuals.com