ACURA NSX 1991 Service Repair Manual
Manufacturer: ACURA, Model Year: 1991, Model line: NSX, Model: ACURA NSX 1991Pages: 1640, PDF Size: 60.48 MB
Page 481 of 1640
Knuckle/Control Arm s
Remova l
1. Remove , th e rea r whee l an d bearin g uni t assembl y
(se e pag e 18-31 ).
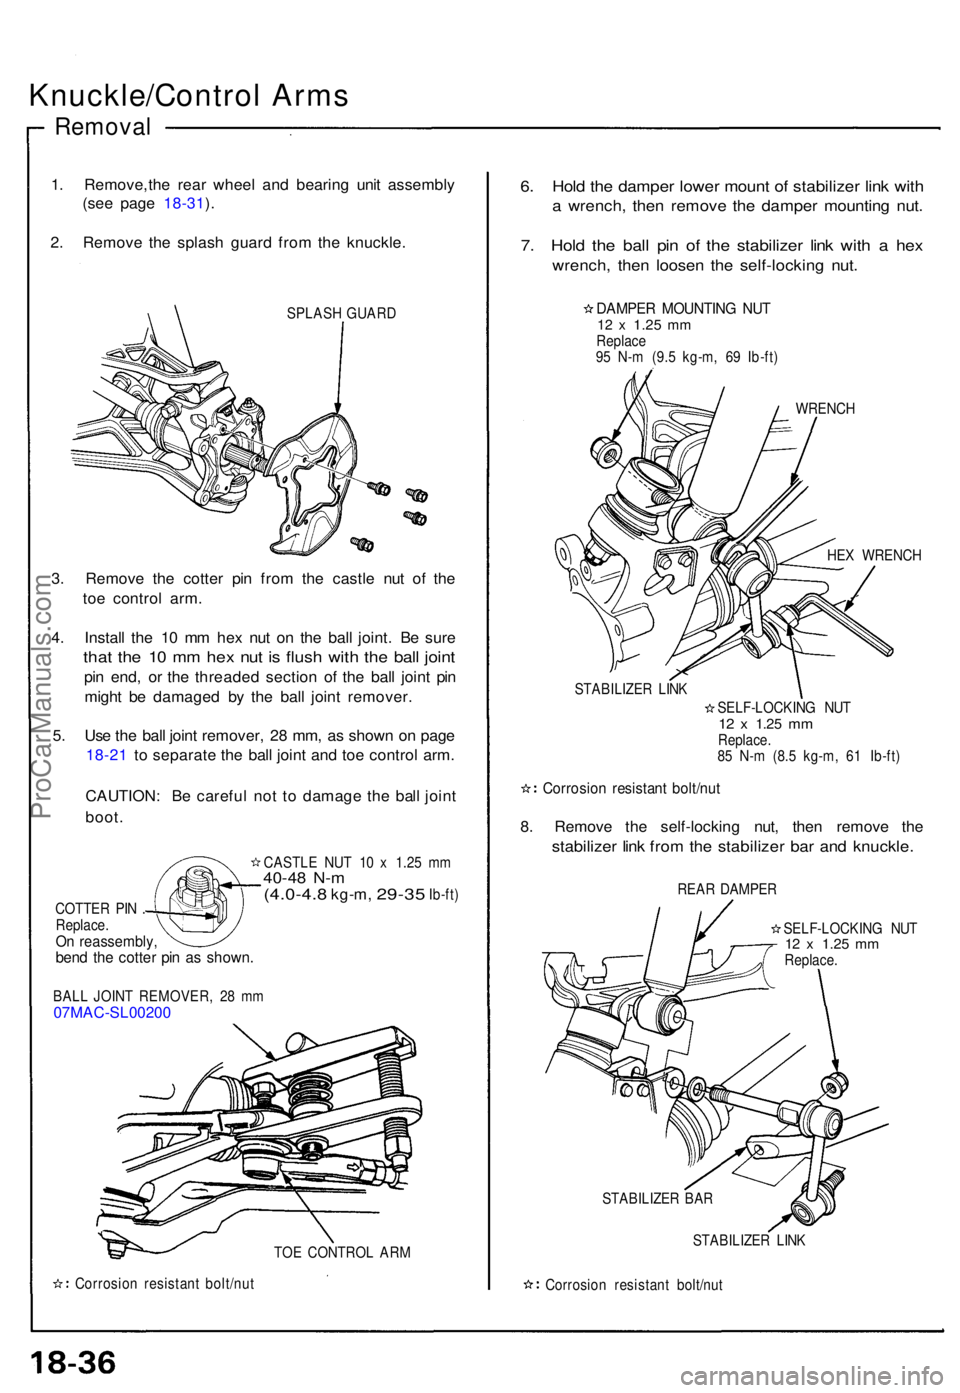
2 . Remov e th e splas h guar d fro m th e knuckle .
SPLASH GUAR D
3. Remov e th e cotte r pi n fro m th e castl e nu t o f th e
to e contro l arm .
4 . Instal l th e 1 0 m m he x nu t o n th e bal l joint . B e sur e
that th e 1 0 m m he x nu t i s flus h wit h th e bal l join t
pin end , o r th e threade d sectio n o f th e bal l join t pi n
migh t b e damage d b y th e bal l join t remover .
5 . Us e th e bal l join t remover , 2 8 mm , a s show n o n pag e
18-2 1 to separat e th e bal l join t an d to e contro l arm .
CAUTION : B e carefu l no t t o damag e th e bal l join t
boot .
CASTL E NU T 1 0 x 1.2 5 m m40-4 8 N- m(4.0-4. 8 kg-m, 29-35 Ib-ft)
COTTE R PI N .
Replace .
On reassembly ,bend th e cotte r pi n a s shown .
BALL JOIN T REMOVER , 2 8 m m07MAC-SL00200
TO E CONTRO L AR M
Corrosio n resistan t bolt/nu t
6. Hol d th e dampe r lowe r moun t of stabilize r lin k wit h
a wrench , the n remov e th e dampe r mountin g nut .
7. Hol d th e bal l pi n of the stabilize r lin k wit h a he x
wrench , the n loose n th e self-lockin g nut .
DAMPE R MOUNTIN G NU T12 x 1.2 5 mmReplac e
9 5 N- m (9. 5 kg-m , 6 9 Ib-ft )
WRENC H
HE X WRENC H
SELF-LOCKIN G NU T
12 x 1.2 5 mmReplace .
8 5 N- m (8. 5 kg-m , 6 1 Ib-ft )
Corrosio n resistan t bolt/nu t
8. Remov e th e self-lockin g nut , the n remov e th e
stabilize r lin k fro m th e stabilize r ba r an d knuckle .
REAR DAMPE R
SELF-LOCKIN G NU T
12 x 1.2 5 mmReplace .
STABILIZE R BA R
STABILIZE R LIN K
Corrosio n resistan t bolt/nu t
STABILIZE
R LIN K
ProCarManuals.com
Page 482 of 1640
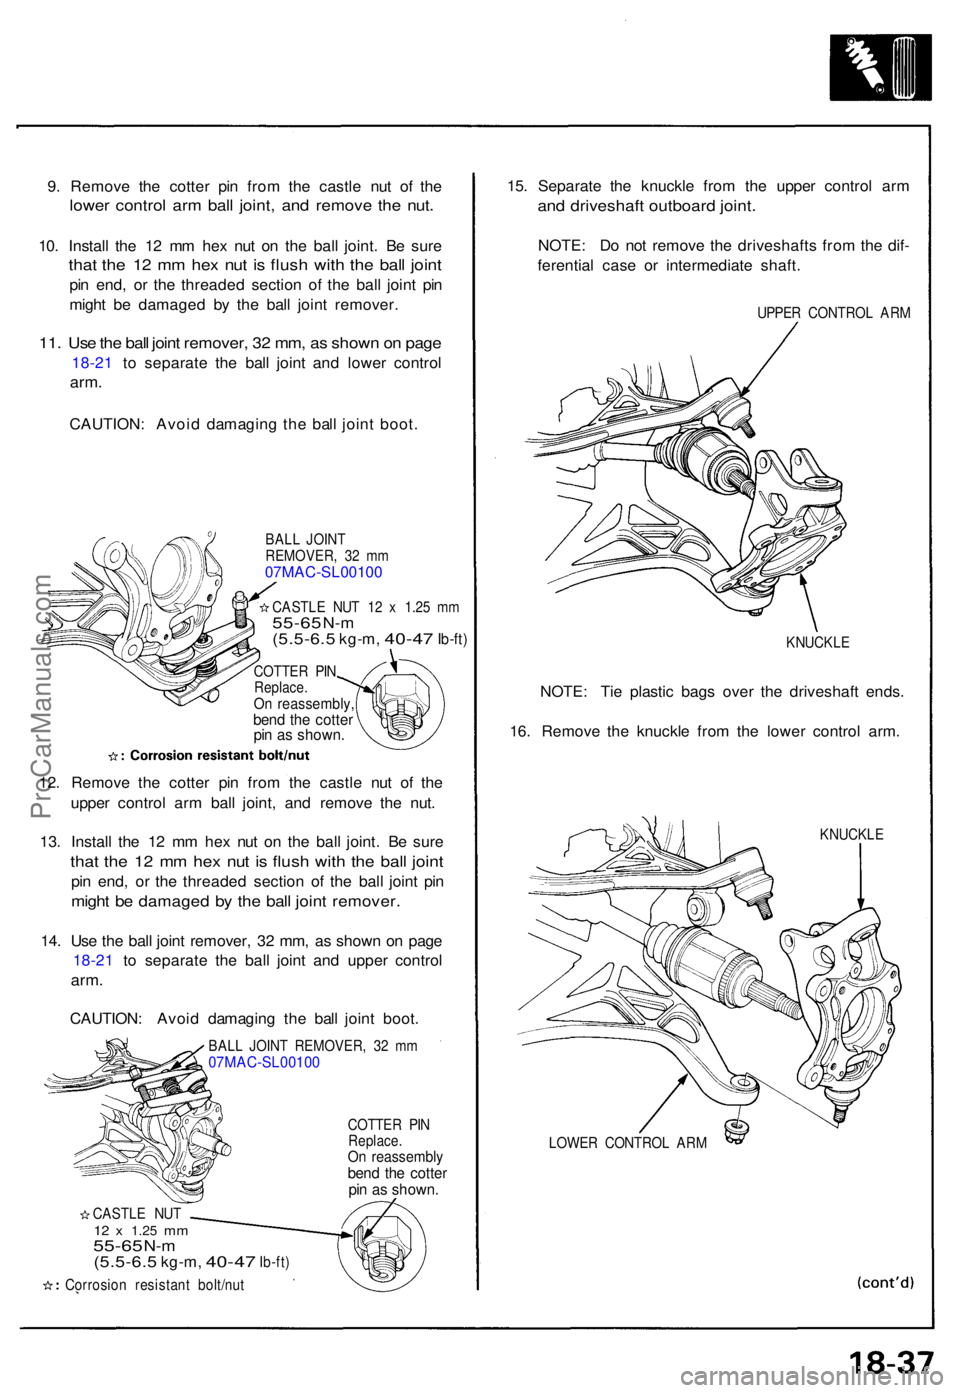
9. Remov e th e cotte r pi n fro m th e castl e nu t o f th e
lowe r contro l ar m bal l joint , an d remov e th e nut .
10. Instal l th e 1 2 m m he x nu t o n th e bal l joint . B e sur e
that th e 1 2 m m he x nu t i s flus h wit h th e bal l join t
pin end , o r th e threade d sectio n o f th e bal l join t pi n
migh t b e damage d b y th e bal l join t remover .
11. Us e th e bal l join t remover , 3 2 mm , a s show n o n pag e
18-2 1 to separat e th e bal l join t an d lowe r contro l
arm.
CAUTION : Avoi d damagin g th e bal l join t boot .
COTTE R PI N
Replace .
On reassembl ybend th e cotte rpin a s shown .
CASTL E NU T12 x 1.2 5 mm55-6 5 N-m(5.5-6. 5 kg-m, 40-47 Ib-ft)
Corrosio n resistan t bolt/nu t
15. Separat e th e knuckl e fro m th e uppe r contro l ar m
and driveshaf t outboar d joint .
NOTE : D o no t remov e th e driveshaft s fro m th e dif -
ferentia l cas e o r intermediat e shaft .
UPPER CONTRO L AR M
KNUCKL E
NOTE: Ti e plasti c bag s ove r th e driveshaf t ends .
16 . Remov e th e knuckl e fro m th e lowe r contro l arm .
KNUCKL E
LOWE R CONTRO L AR M
BAL
L JOIN T
REMOVER , 3 2 m m
07MAC-SL00100
CASTL E NU T 1 2 x 1.2 5 m m55-6 5 N-m(5.5-6. 5 kg-m, 40-47 Ib-ft)
COTTE R PI N
Replace .
On reassembly ,bend th e cotte rpin a s shown .
12. Remov e th e cotte r pi n fro m th e castl e nu t o f th e
uppe r contro l ar m bal l joint , an d remov e th e nut .
13 . Instal l th e 1 2 m m he x nu t o n th e bal l joint . B e sur e
that th e 1 2 m m he x nu t i s flus h wit h th e bal l join t
pin end , o r th e threade d sectio n o f th e bal l join t pi n
migh t b e damage d b y th e bal l join t remover .
14. Us e th e bal l join t remover , 3 2 mm , a s show n o n pag e
18-2 1 to separat e th e bal l join t an d uppe r contro l
arm.
CAUTION : Avoi d damagin g th e bal l join t boot .
BALL JOIN T REMOVER , 3 2 m m07MAC-SL00100
ProCarManuals.com
Page 483 of 1640
Knuckle/Control Arms
Removal
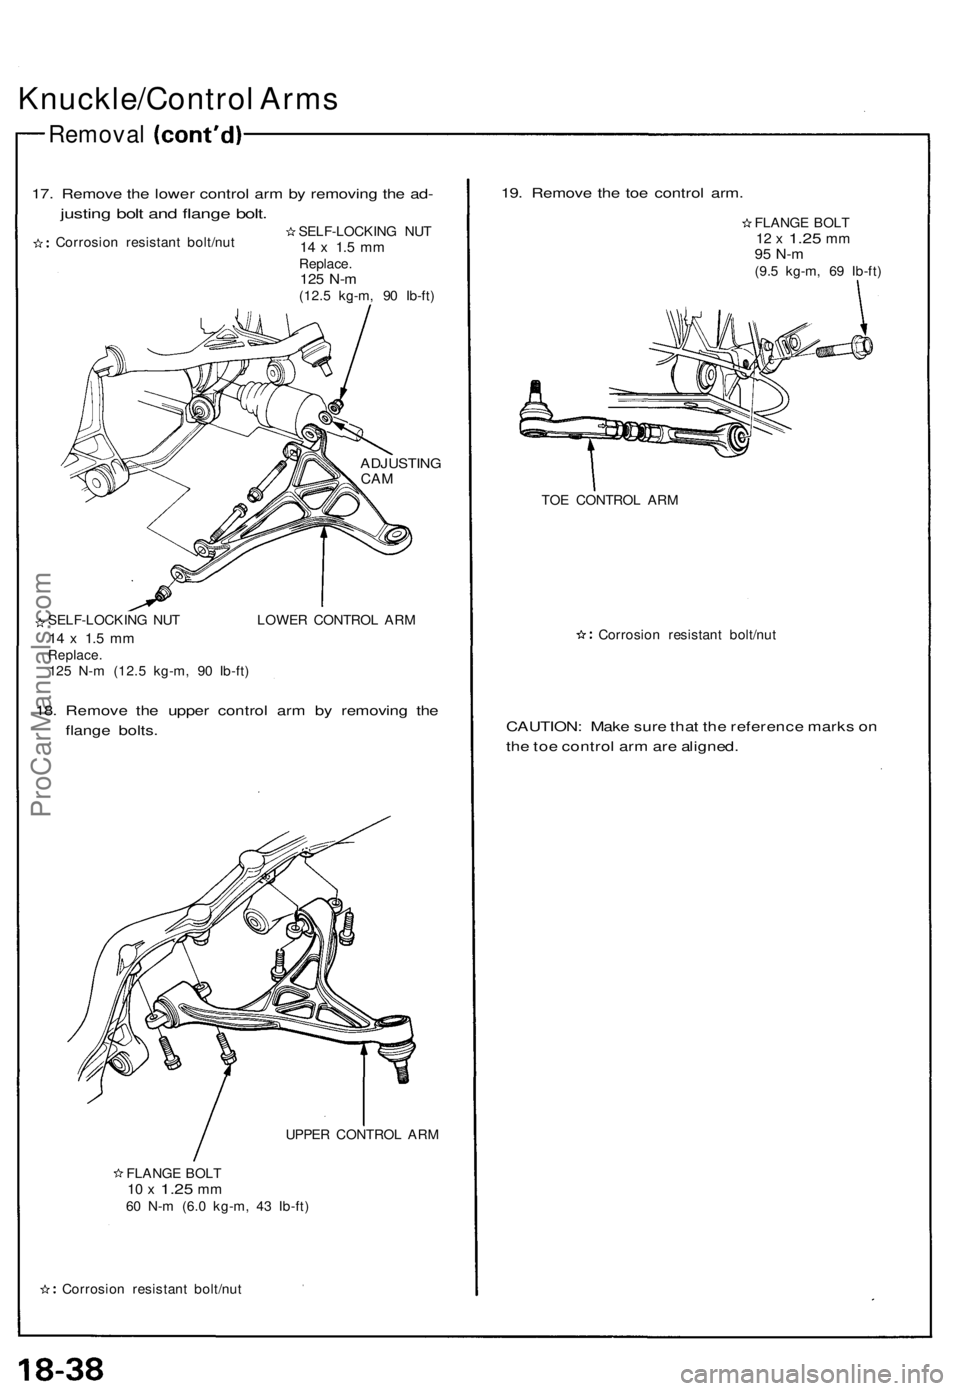
17. Remove the lower control arm by removing the ad-
justing bolt and flange bolt.
SELF-LOCKING NUT
14 x 1.5 mm
Replace.
125 N-m
(12.5 kg-m, 90 Ib-ft)
Corrosion resistant bolt/nut
ADJUSTING
CAM
SELF-LOCKING NUT LOWER CONTROL ARM
14 x 1.5 mm
Replace.
125 N-m (12.5 kg-m, 90 Ib-ft)
18. Remove the upper control arm by removing the
flange bolts.
UPPER CONTROL ARM
FLANGE BOLT
10 x
1.25
mm
60 N-m (6.0 kg-m, 43 Ib-ft)
Corrosion resistant bolt/nut
19. Remove the toe control arm.
FLANGE BOLT
12 x
1.25
mm
95 N-m
(9.5 kg-m, 69 Ib-ft)
TOE CONTROL ARM
Corrosion resistant bolt/nut
CAUTION: Make sure that the reference marks on
the toe control arm are aligned.ProCarManuals.com
Page 484 of 1640
Ball Join t Boo t Replacemen t
NOTE: Th e uppe r contro l ar m bal l join t i s attache d wit h
the boo t retaine r t o improv e th e sealin g efficienc y o f th e
boot .
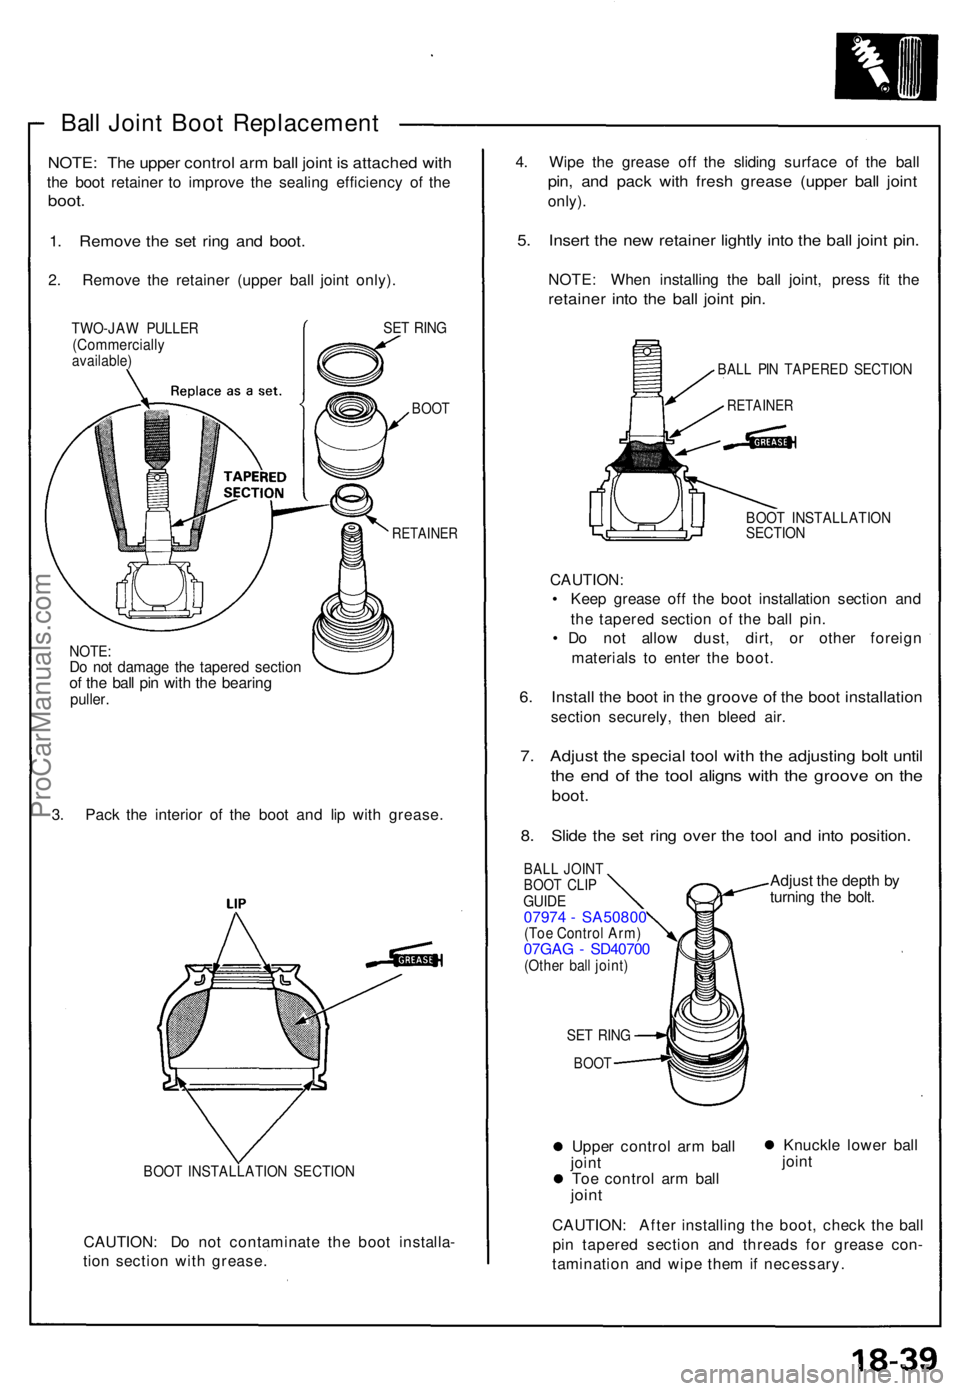
1. Remov e th e se t rin g an d boot .
2. Remov e th e retaine r (uppe r bal l join t only) .
TWO-JA W PULLE R(Commerciall yavailable)
SET RIN G
BOO T
RETAINE R
NOTE:Do no t damag e th e tapere d sectio nof th e bal l pi n wit h th e bearin gpuller.
3. Pack the interio r o f th e boo t an d li p wit h grease .
BOOT INSTALLATIO N SECTIO N
CAUTION : D o no t contaminat e th e boo t installa -
tio n sectio n wit h grease . 4
. Wip e th e greas e of f th e slidin g surfac e of the bal l
pin, an d pac k wit h fres h greas e (uppe r bal l join t
only) .
5. Inser t th e ne w retaine r lightl y int o th e bal l join t pin .
NOTE : Whe n installin g th e bal l joint , pres s fi t th e
retaine r int o th e bal l join t pin .
BAL L PI N TAPERE D SECTIO N
RETAINE R
BOOT INSTALLATIO NSECTION
CAUTION :
• Kee p greas e of f th e boo t installatio n sectio n an d
th e tapere d sectio n o f th e bal l pin .
• D o no t allo w dust , dirt , o r othe r foreig n
material s t o ente r th e boot .
6. Instal l th e boo t i n th e groov e o f th e boo t installatio n
section securely , the n blee d air .
7. Adjus t th e specia l too l wit h th e adjustin g bol t unti l
the en d o f th e too l align s wit h th e groov e o n th e
boot .
8. Slid e th e se t rin g ove r th e too l an d int o position .
BALL JOIN TBOOT CLI PGUID E07974 - SA5080 0(Toe Contro l Arm )07GA G - SD4070 0(Other bal l joint )
SET RIN G
BOO T
Uppe r contro l ar m bal l
join t
To e contro l ar m bal l
joint
Adjus t th e dept h b y
turnin g th e bolt .
Knuckl e lowe r bal l
join t
CAUTION : Afte r installin g th e boot , chec k th e bal l
pi n tapere d sectio n an d thread s fo r greas e con -
taminatio n an d wip e the m if necessary .
ProCarManuals.com
Page 485 of 1640
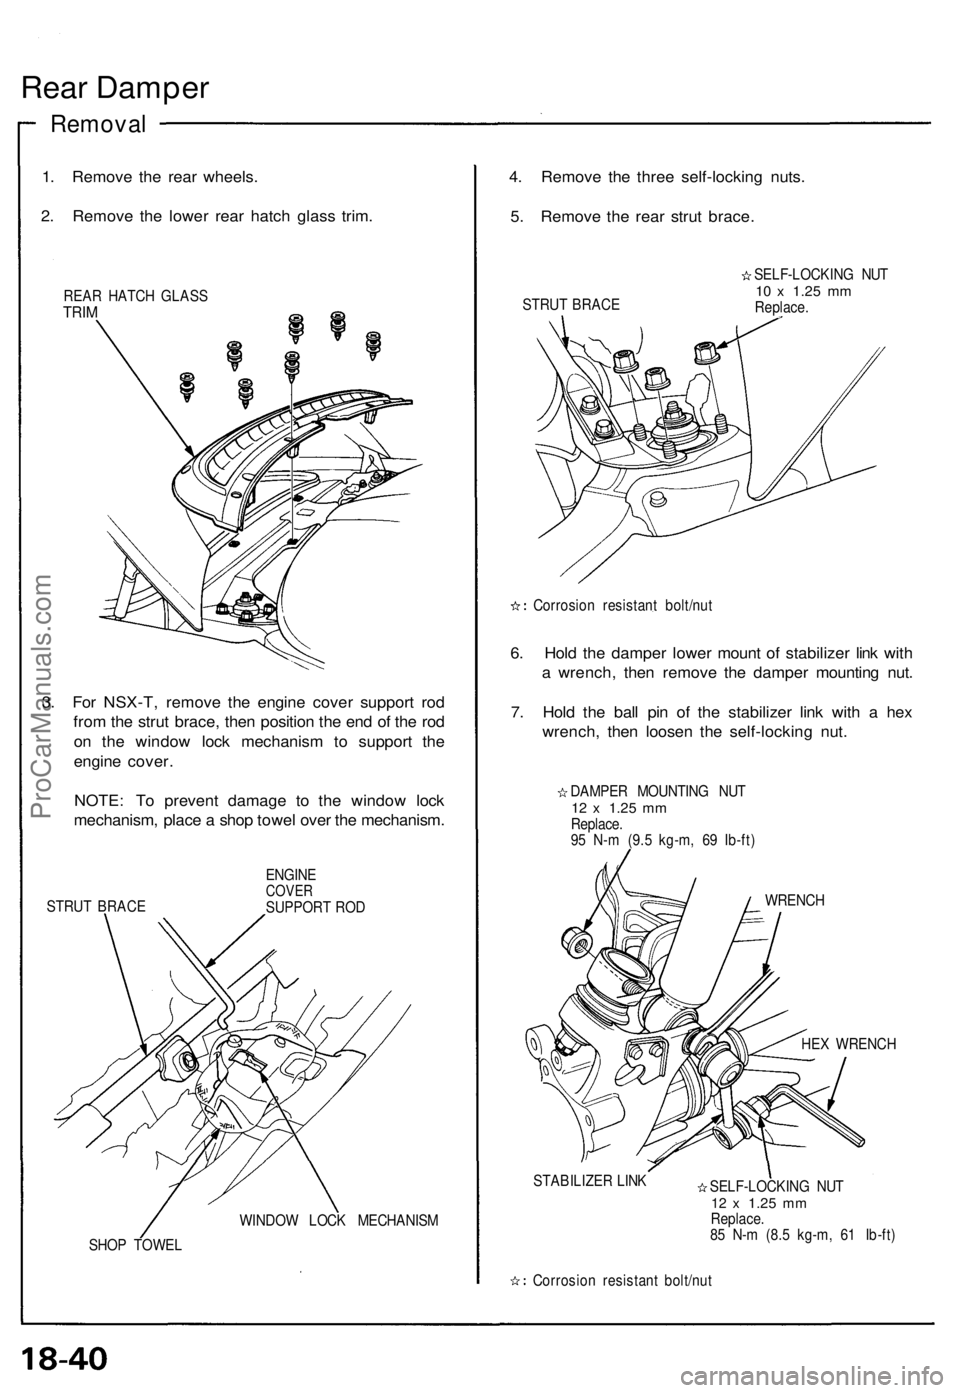
Rear Damper
Removal
1. Remove the rear wheels.
2. Remove the lower rear hatch glass trim.
REAR HATCH GLASS
TRIM
3. For NSX-T, remove the engine cover support rod
from the strut brace, then position the end of the rod
on the window lock mechanism to support the
engine cover.
NOTE: To prevent damage to the window lock
mechanism, place a shop towel over the mechanism.
STRUT BRACE
ENGINE
COVER
SUPPORT ROD
WINDOW LOCK MECHANISM
SHOP TOWEL
4. Remove the three self-locking nuts.
5. Remove the rear strut brace.
STRUT BRACE
SELF-LOCKING NUT
10 x
1.25
mm
Replace.
Corrosion resistant bolt/nut
6. Hold the damper lower mount of stabilizer link with
a wrench, then remove the damper mounting nut.
7. Hold the ball pin of the stabilizer link with a hex
wrench, then loosen the self-locking nut.
DAMPER MOUNTING NUT
12 x
1.25
mm
Replace.
95 N-m (9.5 kg-m, 69 Ib-ft)
WRENCH
HEX WRENCH
STABILIZER LINK
SELF-LOCKING NUT
12 x
1.25
mm
Replace.
85 N-m (8.5 kg-m, 61 Ib-ft)
Corrosion resistant bolt/nutProCarManuals.com
Page 486 of 1640
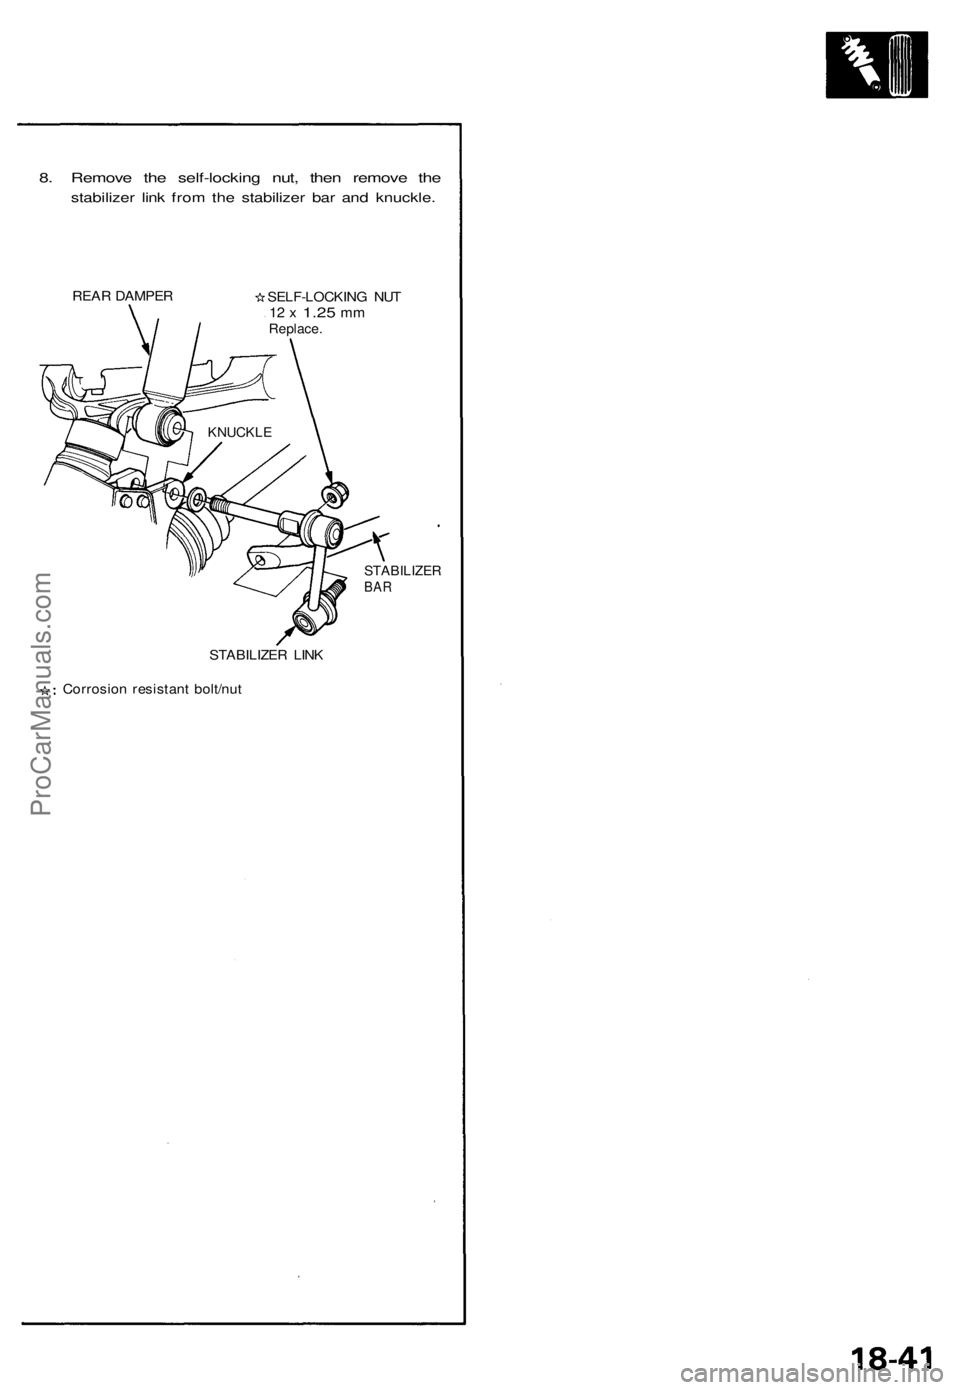
8. Remove the self-locking nut, then remove the
stabilizer link from the stabilizer bar and knuckle.
REAR DAMPER
SELF-LOCKING NUT
12 x
1.25
mm
Replace.
STABILIZER
BAR
STABILIZER LINK
Corrosion resistant bolt/nut
KNUCKLEProCarManuals.com
Page 487 of 1640
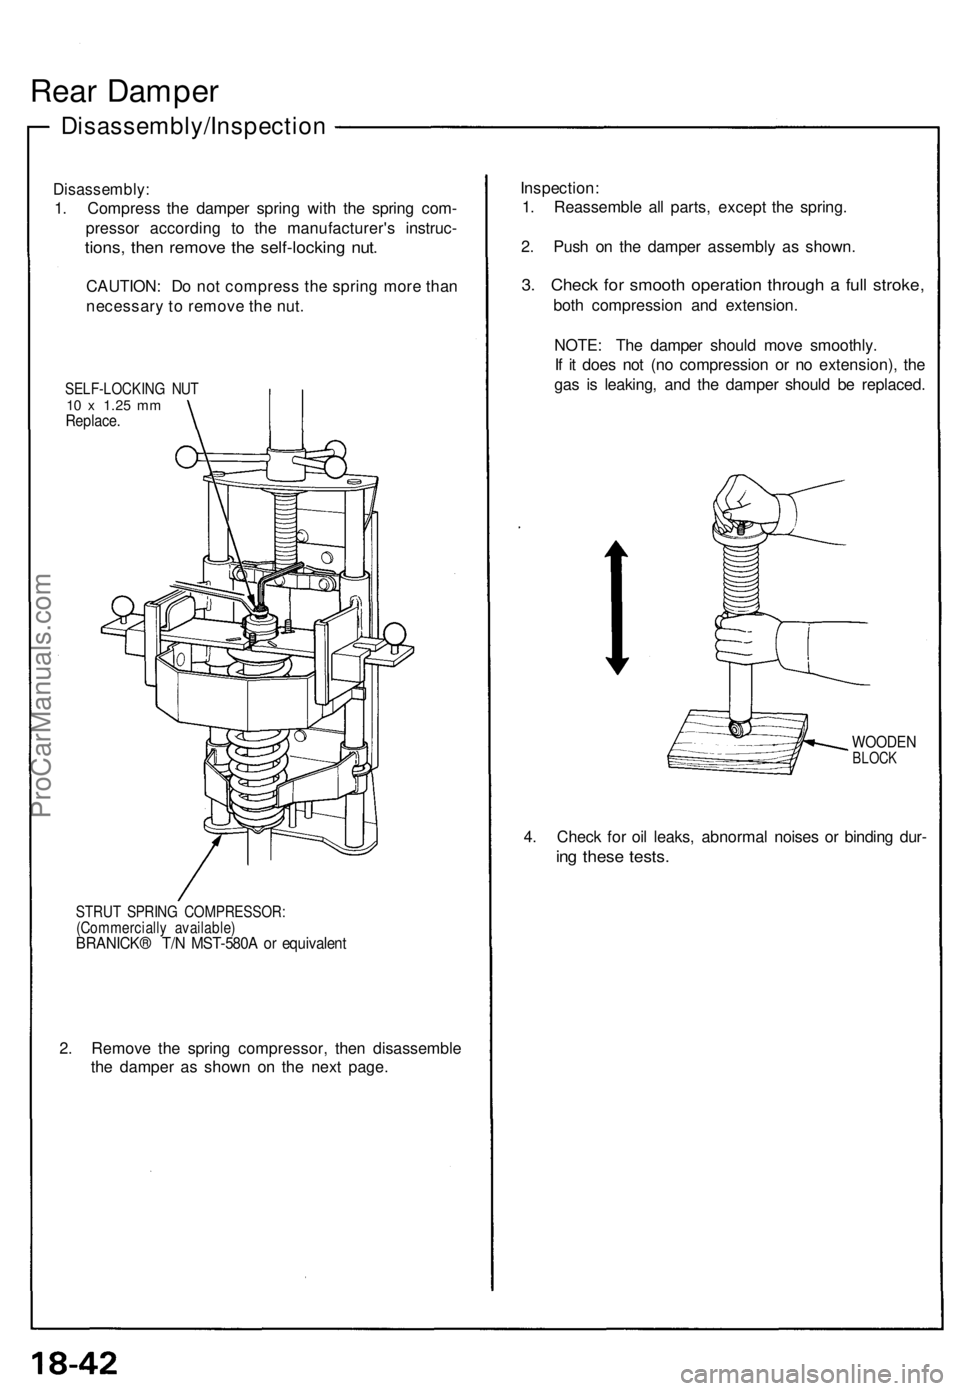
Rear Damper
Disassembly/Inspection
Disassembly:
1. Compress the damper spring with the spring com-
pressor according to the manufacturer's instruc-
tions, then remove the self-locking nut.
CAUTION: Do not compress the spring more than
necessary to remove the nut.
SELF-LOCKING NUT
10 x
1.25
mm
Replace.
STRUT SPRING COMPRESSOR:
(Commercially available)
BRANICK® T/N MST-580A or equivalent
2. Remove the spring compressor, then disassemble
the damper as shown on the next page.
Inspection:
1. Reassemble all parts, except the spring.
2. Push on the damper assembly as shown.
3. Check for smooth operation through a full stroke,
both compression and extension.
NOTE: The damper should move smoothly.
If it does not (no compression or no extension), the
gas is leaking, and the damper should be replaced.
WOODEN
BLOCK
4. Check for oil leaks, abnormal noises or binding dur-
ing these tests.ProCarManuals.com
Page 488 of 1640
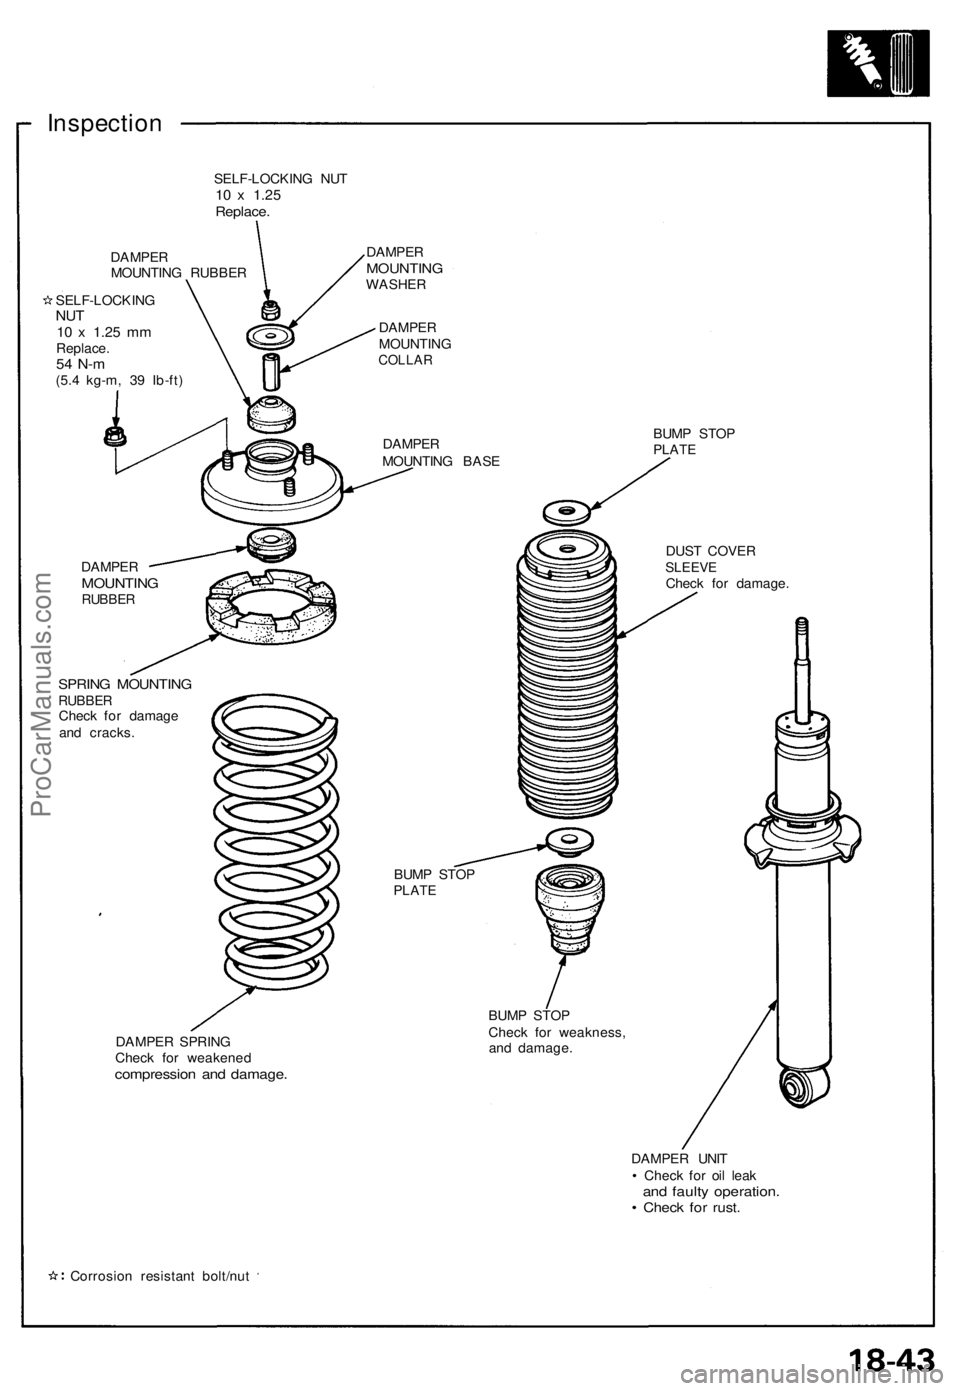
Inspection
SELF-LOCKING NUT
10 x
1.25
Replace.
DAMPER
MOUNTING RUBBER
SELF-LOCKING
NUT
10 x
1.25
mm
Replace.
54 N-m
(5.4 kg-m, 39 Ib-ft)
DAMPER
MOUNTING
WASHER
DAMPER
MOUNTING
COLLAR
DAMPER
MOUNTING BASE
BUMP STOP
PLATE
DAMPER
MOUNTING
RUBBER
SPRING MOUNTING
RUBBER
Check for damage
and cracks.
BUMP STOP
PLATE
DUST COVER
SLEEVE
Check for damage.
DAMPER SPRING
Check for weakened
compression and damage.
BUMP STOP
Check for weakness,
and damage.
DAMPER UNIT
• Check for oil leak
and faulty operation.
• Check for rust.
Corrosion resistant bolt/nutProCarManuals.com
Page 489 of 1640
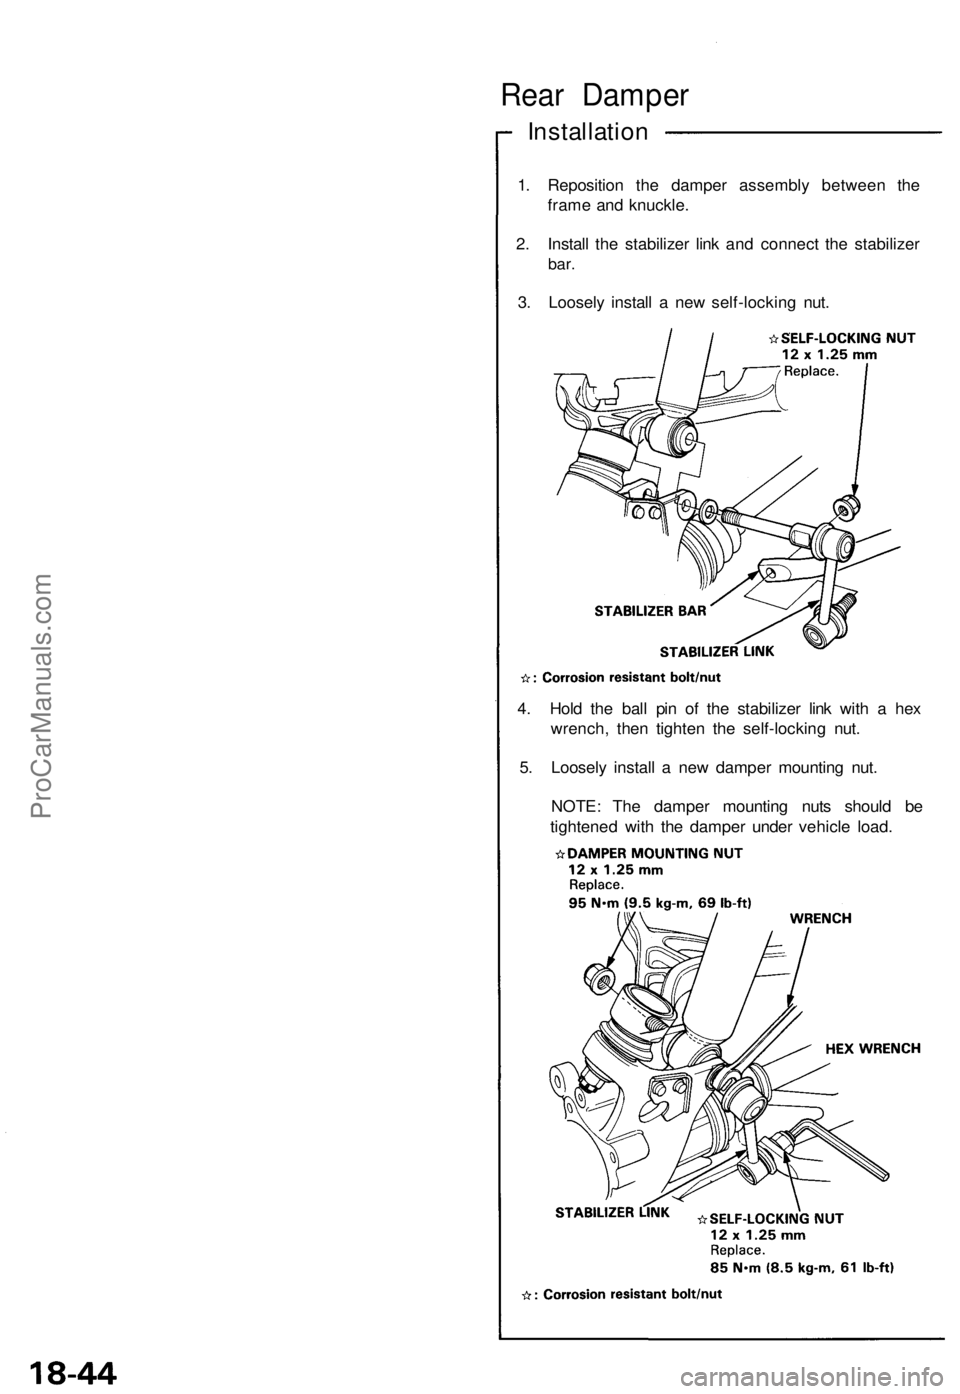
Rear Dampe r
Installatio n
1. Repositio n th e dampe r assembl y betwee n th e
fram e an d knuckle .
2 . Instal l th e stabilize r lin k an d connec t th e stabilize r
bar.
3. Loosel y instal l a ne w self-lockin g nut .
4 . Hol d th e bal l pi n o f th e stabilize r lin k wit h a he x
wrench , the n tighte n th e self-lockin g nut .
5 . Loosel y instal l a ne w dampe r mountin g nut .
NOTE : Th e dampe r mountin g nut s shoul d b e
tightene d wit h th e dampe r unde r vehicl e load .
ProCarManuals.com
Page 490 of 1640
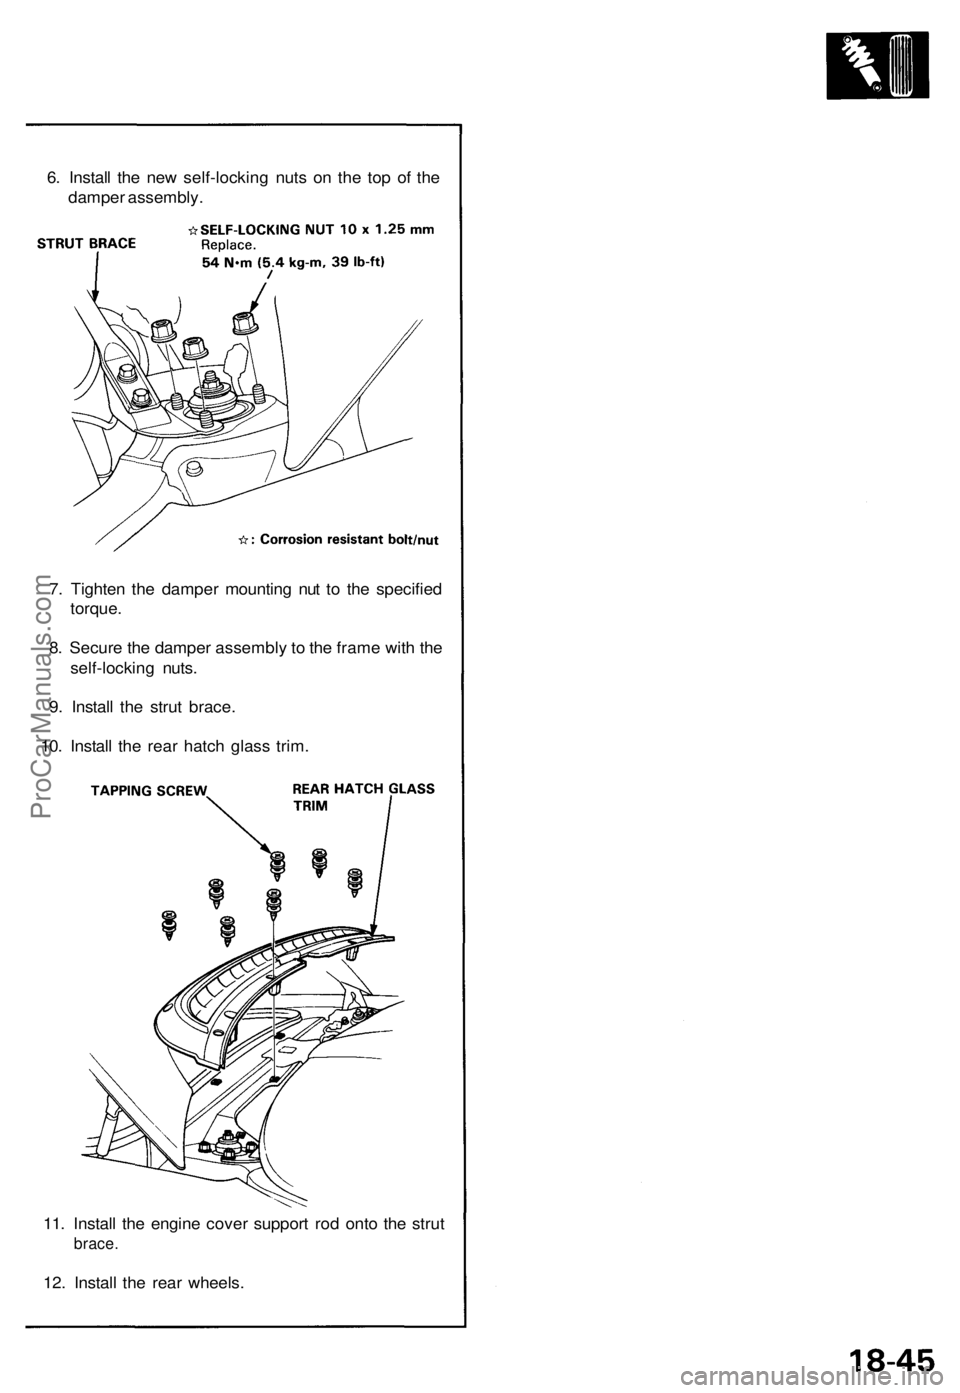
6. Install the new self-locking nuts on the top of the
damper assembly.
7. Tighten the damper mounting nut to the specified
torque.
8. Secure the damper assembly to the frame with the
self-locking nuts.
9. Install the strut brace.
10. Install the rear hatch glass trim.
11. Install the engine cover support rod onto the strut
brace.
12. Install the rear wheels.ProCarManuals.com