ACURA NSX 1991 Service Repair Manual
Manufacturer: ACURA, Model Year: 1991, Model line: NSX, Model: ACURA NSX 1991Pages: 1640, PDF Size: 60.48 MB
Page 471 of 1640
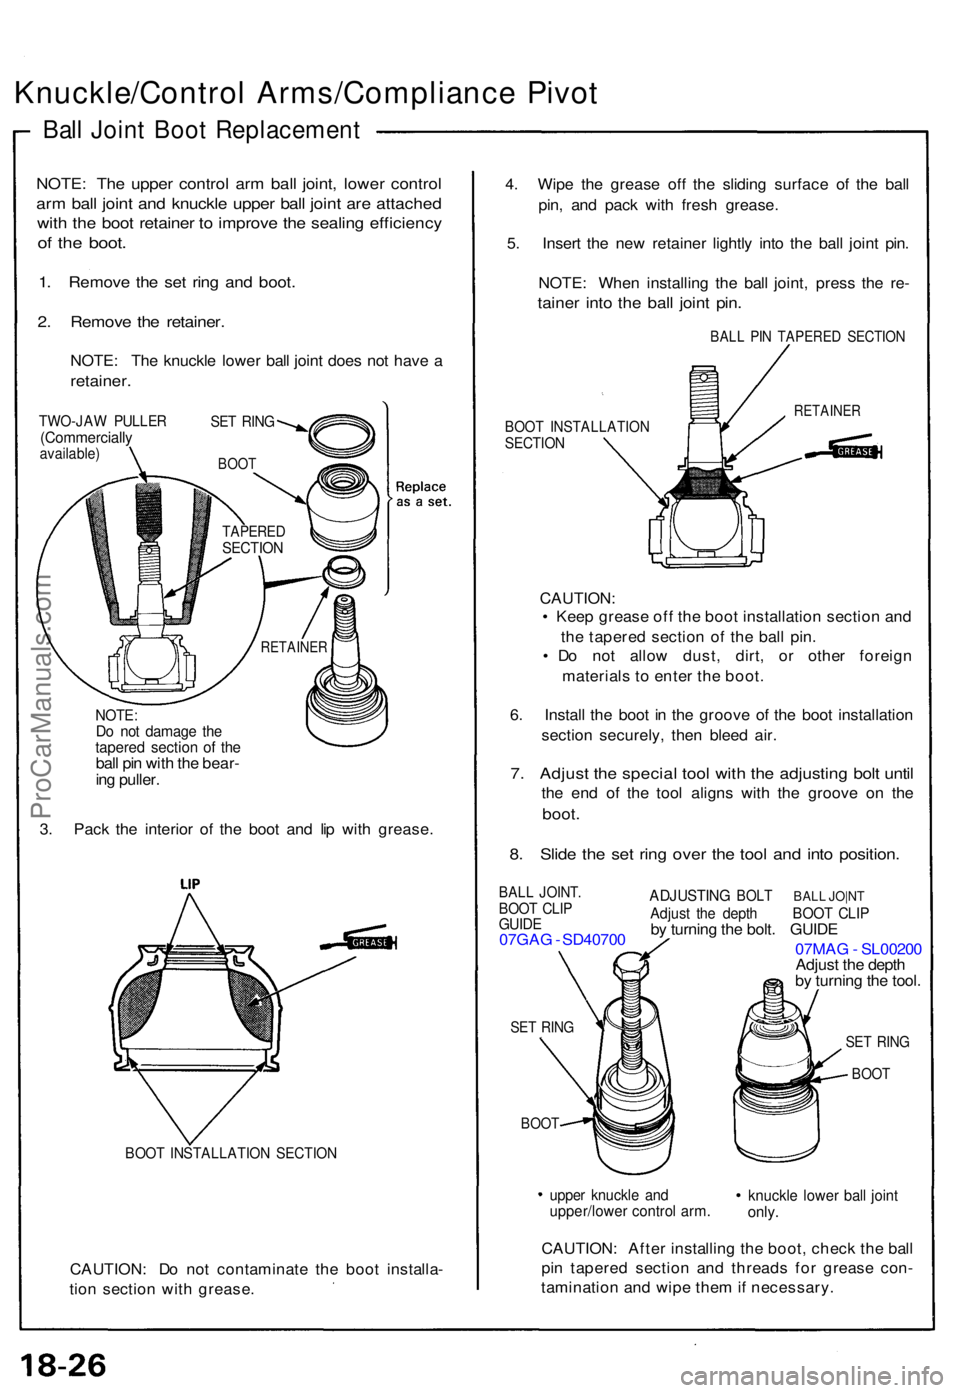
Knuckle/Control Arms/Complianc e Pivo t
Ball Join t Boo t Replacemen t
NOTE:Do no t damag e th etapere d section of th ebal l pi n wit h th e bear -
in g puller .
3 . Pac k th e interio r of the boo t an d li p wit h grease .
BOOT INSTALLATIO N SECTIO N
CAUTION : D o no t contaminat e th e boo t installa -
tio n sectio n wit h grease . 4
. Wip e th e greas e of f th e slidin g surfac e o f th e bal l
pin , an d pac k wit h fres h grease .
5 . Inser t th e ne w retaine r lightl y int o th e bal l join t pin .
NOTE : Whe n installin g th e bal l joint , pres s th e re -
taine r int o th e bal l join t pin .
BAL L PI N TAPERE D SECTIO N
BOOT INSTALLATIO NSECTION
CAUTION :
• Kee p greas e of f th e boo t installatio n sectio n an d
th e tapere d sectio n o f th e bal l pin .
• D o no t allo w dust , dirt , o r othe r foreig n
material s t o ente r th e boot .
6 . Instal l th e boo t i n th e groov e o f th e boo t installatio n
sectio n securely , the n blee d air .
7. Adjus t th e specia l too l wit h th e adjustin g bol t unti l
the en d o f th e too l align s wit h th e groov e o n th e
boot .
8. Slid e th e se t rin g ove r th e too l an d int o position .
BALL JOINT .BOOT CLI PGUID E07GA G - SD4070 0
SET RIN G
BOO T
ADJUSTIN G BOLT BALL JO|N TAdjus t th e dept h BOO T CLI Pby turnin g th e bolt . GUID E
07MA G - SL0020 0
Adjus t th e dept h
b y turnin g th e tool .
uppe r knuckl e an dupper/lowe r contro l arm .knuckl e lowe r bal l join tonly.
CAUTION : Afte r installin g th e boot , chec k th e bal l
pi n tapere d sectio n an d thread s fo r greas e con -
taminatio n an d wip e the m if necessary .
NOTE: Th e uppe r contro l ar m bal l joint , lowe r contro l
arm bal l join t an d knuckl e uppe r bal l join t ar e attache d
with the boo t retaine r t o improv e th e sealin g efficienc y
of th e boot .
1. Remov e th e se t rin g an d boot .
2. Remov e th e retainer .
NOTE: Th e knuckl e lowe r bal l join t doe s no t hav e a
retainer .
TWO-JA W PULLE R(Commerciall yavailable)
SET RIN G
BOO T
TAPERE DSECTION
RETAINE R
RETAINER
SET RIN G
BOO T
ProCarManuals.com
Page 472 of 1640
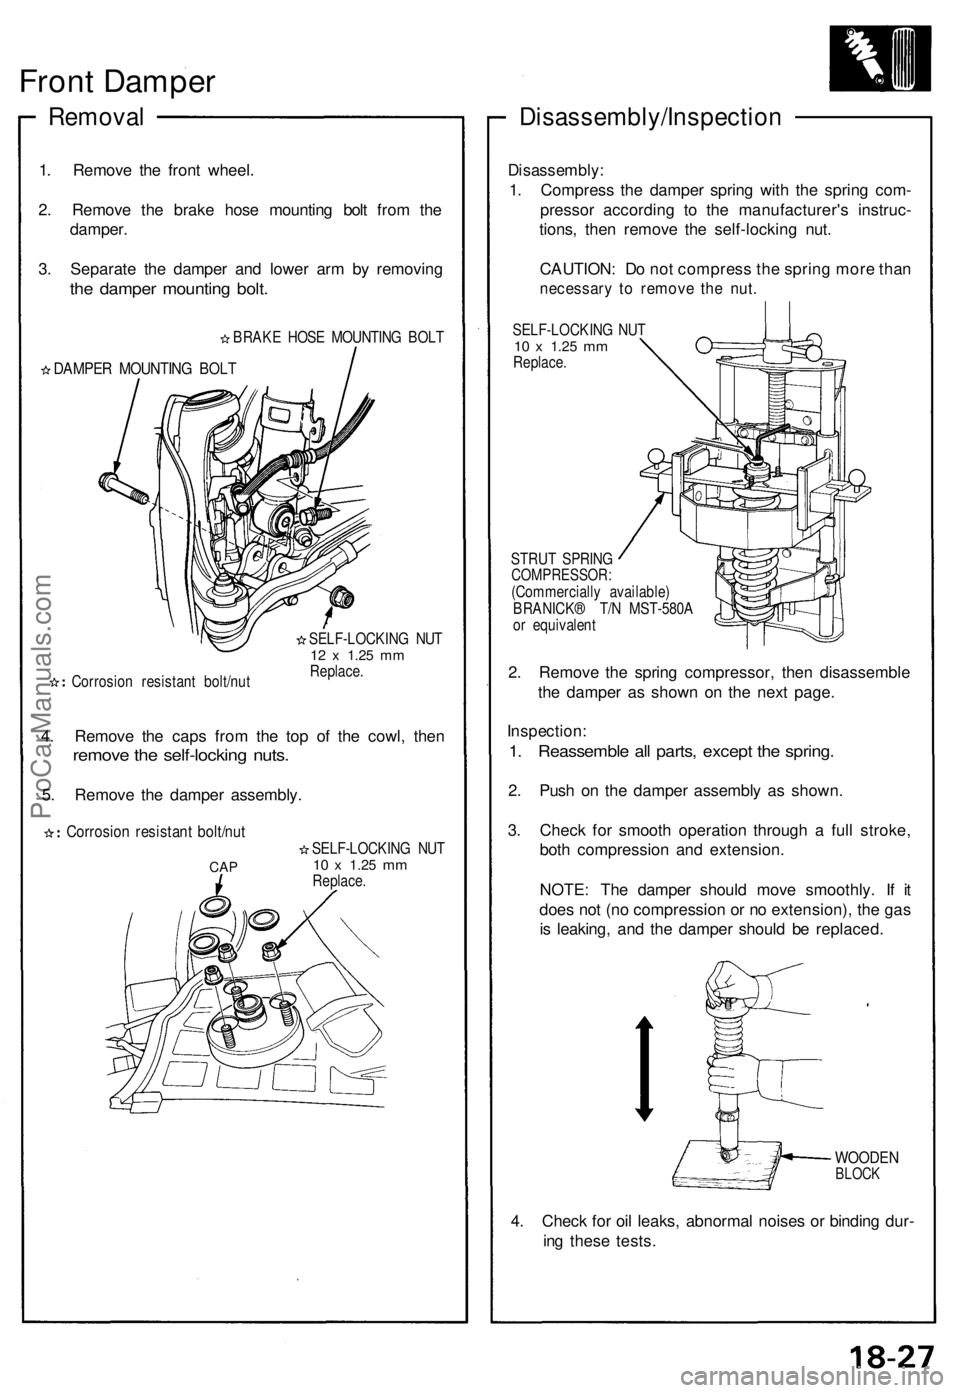
Front Damper
Removal
1. Remove the front wheel.
2. Remove the brake hose mounting bolt from the
damper.
3. Separate the damper and lower arm by removing
the damper mounting bolt.
BRAKE HOSE MOUNTING BOLT
DAMPER MOUNTING BOLT
Corrosion resistant bolt/nut
SELF-LOCKING NUT
12 x
1.25
mm
Replace.
4. Remove the caps from the top of the cowl, then
remove the self-locking nuts.
5. Remove the damper assembly.
Corrosion resistant bolt/nut
CAP
SELF-LOCKING NUT
10 x
1.25
mm
Replace.
Disassembly/Inspection
Disassembly:
1. Compress the damper spring with the spring com-
pressor according to the manufacturer's instruc-
tions, then remove the self-locking nut.
CAUTION: Do not compress the spring more than
necessary to remove the nut.
SELF-LOCKING NUT
10 x
1.25
mm
Replace.
STRUT SPRING
COMPRESSOR:
(Commercially available)
BRANICK® T/N MST-580A
or equivalent
2. Remove the spring compressor, then disassemble
the damper as shown on the next page.
Inspection:
1. Reassemble all parts, except the spring.
2. Push on the damper assembly as shown.
3. Check for smooth operation through a full stroke,
both compression and extension.
NOTE: The damper should move smoothly. If it
does not (no compression or no extension), the gas
is leaking, and the damper should be replaced.
WOODEN
BLOCK
4. Check for oil leaks, abnormal noises or binding dur-
ing these tests.ProCarManuals.com
Page 473 of 1640
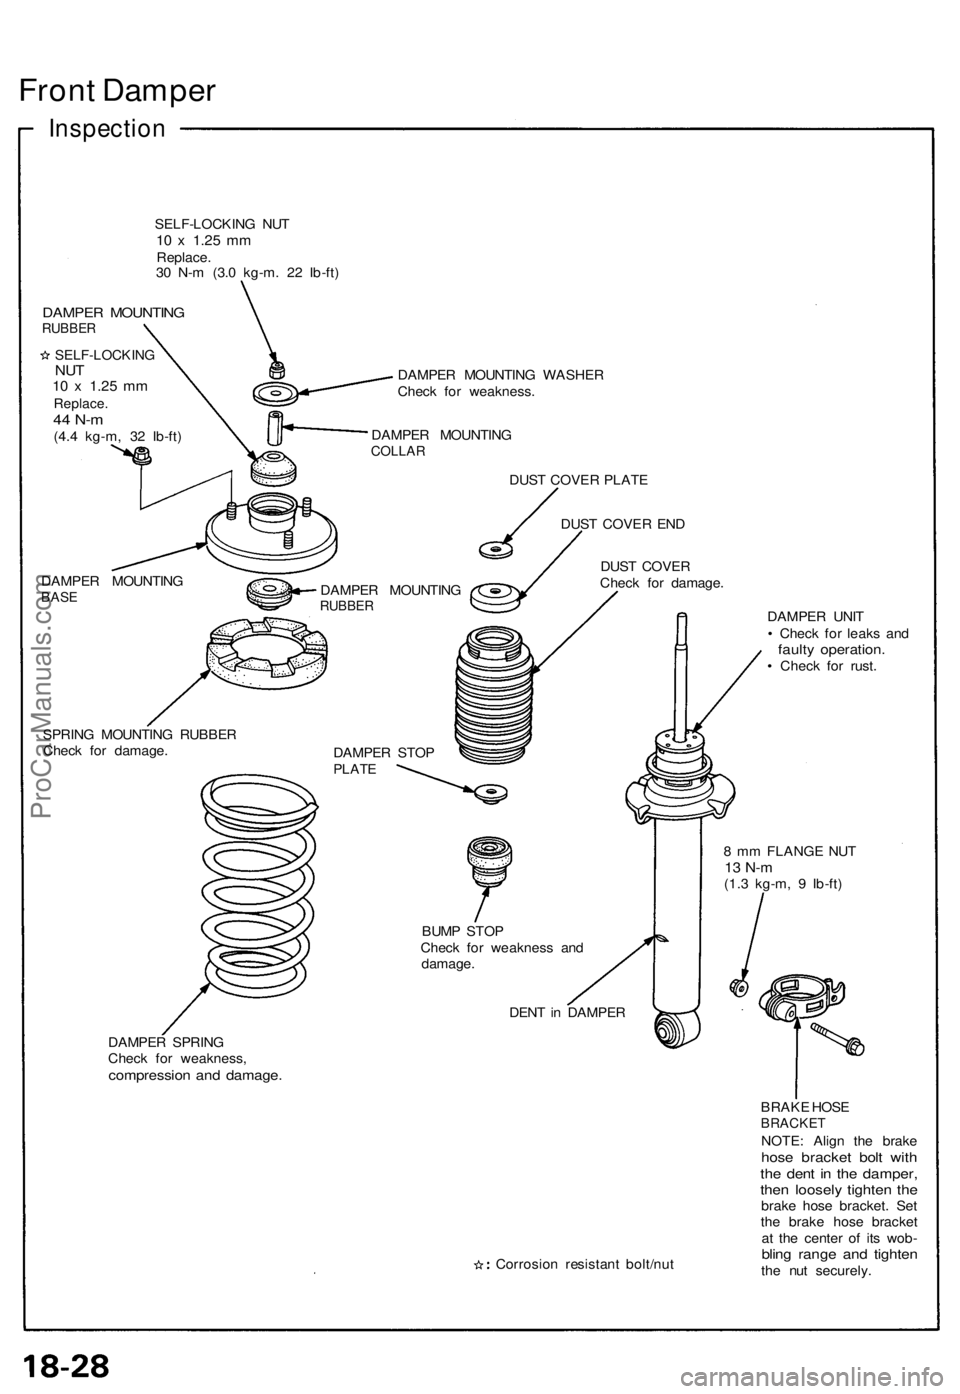
Front Dampe r
Inspectio n
SELF-LOCKIN G NU T10 x 1.2 5 mmReplace .
3 0 N- m (3. 0 kg-m . 2 2 Ib-ft )
DAMPE R MOUNTIN GRUBBER
SELF-LOCKIN GNUT10 x 1.2 5 mmReplace .44 N- m(4.4 kg-m , 3 2 Ib-ft )
DAMPE R MOUNTIN G
BASE
DAMPE R MOUNTIN G WASHE R
Chec k fo r weakness .
DAMPE R MOUNTIN G
COLLAR
DAMPE R MOUNTIN GRUBBER
DUST COVE R PLAT E
DUS T COVE R EN D
DUS T COVE R
Chec k fo r damage .
SPRIN G MOUNTIN G RUBBE R
Chec k fo r damage .
DAMPER STO P
PLAT E
BUMP STO P
Chec k fo r weaknes s an d
damage .
DENT in DAMPE R
DAMPE R SPRIN G
Chec k fo r weakness ,
compression an d damage .
DAMPER UNI T
• Chec k fo r leak s an d
fault y operation .• Chec k fo r rust .
8 m m FLANG E NU T
13 N- m(1.3 kg-m , 9 Ib-ft )
Corrosio n resistan t bolt/nu t BRAK
E HOS E
BRACKE TNOTE: Alig n th e brak ehose bracke t bol t wit hthe den t i n th e damper ,then loosel y tighte n th ebrak e hos e bracket . Se t
th e brak e hos e bracke t
a t th e cente r o f it s wob -
bling rang e an d tighte nthe nu t securely .
ProCarManuals.com
Page 474 of 1640
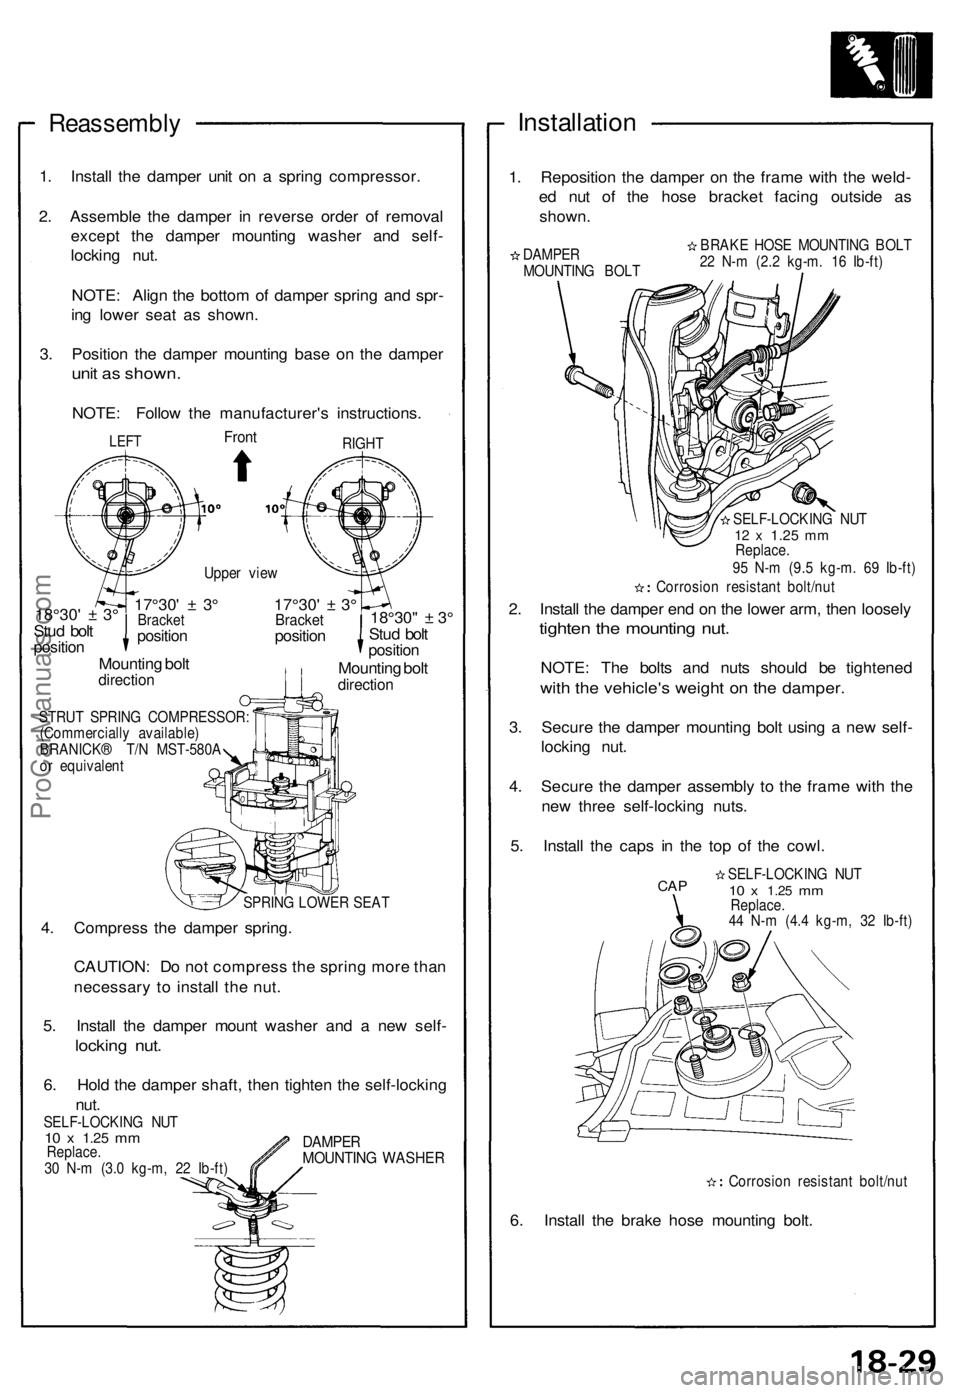
Reassembly
1. Instal l th e dampe r uni t o n a sprin g compressor .
2 . Assembl e th e dampe r i n revers e orde r o f remova l
excep t th e dampe r mountin g washe r an d self -
lockin g nut .
NOTE : Alig n th e botto m o f dampe r sprin g an d spr -
in g lowe r sea t a s shown .
3 . Positio n th e dampe r mountin g bas e o n th e dampe r
unit a s shown .
NOTE: Follo w th e manufacturer' s instructions .
LEFTFron tRIGH T
Uppe r vie w
17°30 ' ± 3°Bracke tposition
18°30' ± 3°
Stu d bol t
positio n
17°30' ± 3 °Bracke tposition
Mountin g bol tdirectio n
STRUT SPRIN G COMPRESSOR :
(Commerciall y available )
BRANICK ® T/ N MST-580 A
o r equivalen t
18°30" ± 3 °
Stu d bol t
positio n
Mountin g bol tdirectio n
SPRING LOWE R SEA T
4. Compres s th e dampe r spring .
CAUTION : D o no t compres s th e sprin g mor e tha n
necessar y t o instal l th e nut .
5 . Instal l th e dampe r moun t washe r an d a ne w self -
lockin g nut .
6. Hol d th e dampe r shaft , the n tighte n th e self-lockin g
nut.SELF-LOCKIN G NU T10 x 1.2 5 mmReplace .
3 0 N- m (3. 0 kg-m , 2 2 Ib-ft )
Installatio n
1. Repositio n th e dampe r o n th e fram e wit h th e weld -
e d nu t o f th e hos e bracke t facin g outsid e a s
shown .
DAMPE R
MOUNTIN G BOL T BRAK
E HOS E MOUNTIN G BOL T
2 2 N- m (2. 2 kg-m . 1 6 Ib-ft )
SELF-LOCKIN G NU T
12 x 1.2 5 mmReplace .
9 5 N- m (9. 5 kg-m . 6 9 Ib-ft )
Corrosio n resistan t bolt/nu t
2. Instal l th e dampe r en d o n th e lowe r arm , the n loosel y
tighten th e mountin g nut .
NOTE : Th e bolt s an d nut s shoul d b e tightene d
with the vehicle' s weigh t o n th e damper .
3. Secur e th e dampe r mountin g bol t usin g a ne w self -
lockin g nut .
4 . Secur e th e dampe r assembl y t o th e fram e wit h th e
ne w thre e self-lockin g nuts .
5 . Instal l th e cap s i n th e to p o f th e cowl .
CAPSELF-LOCKIN G NU T10 x 1.2 5 mmReplace .44 N- m (4. 4 kg-m , 3 2 Ib-ft )
Corrosio n resistan t bolt/nu t
6. Instal l th e brak e hos e mountin g bolt .
DAMPE RMOUNTIN G WASHE R
ProCarManuals.com
Page 475 of 1640
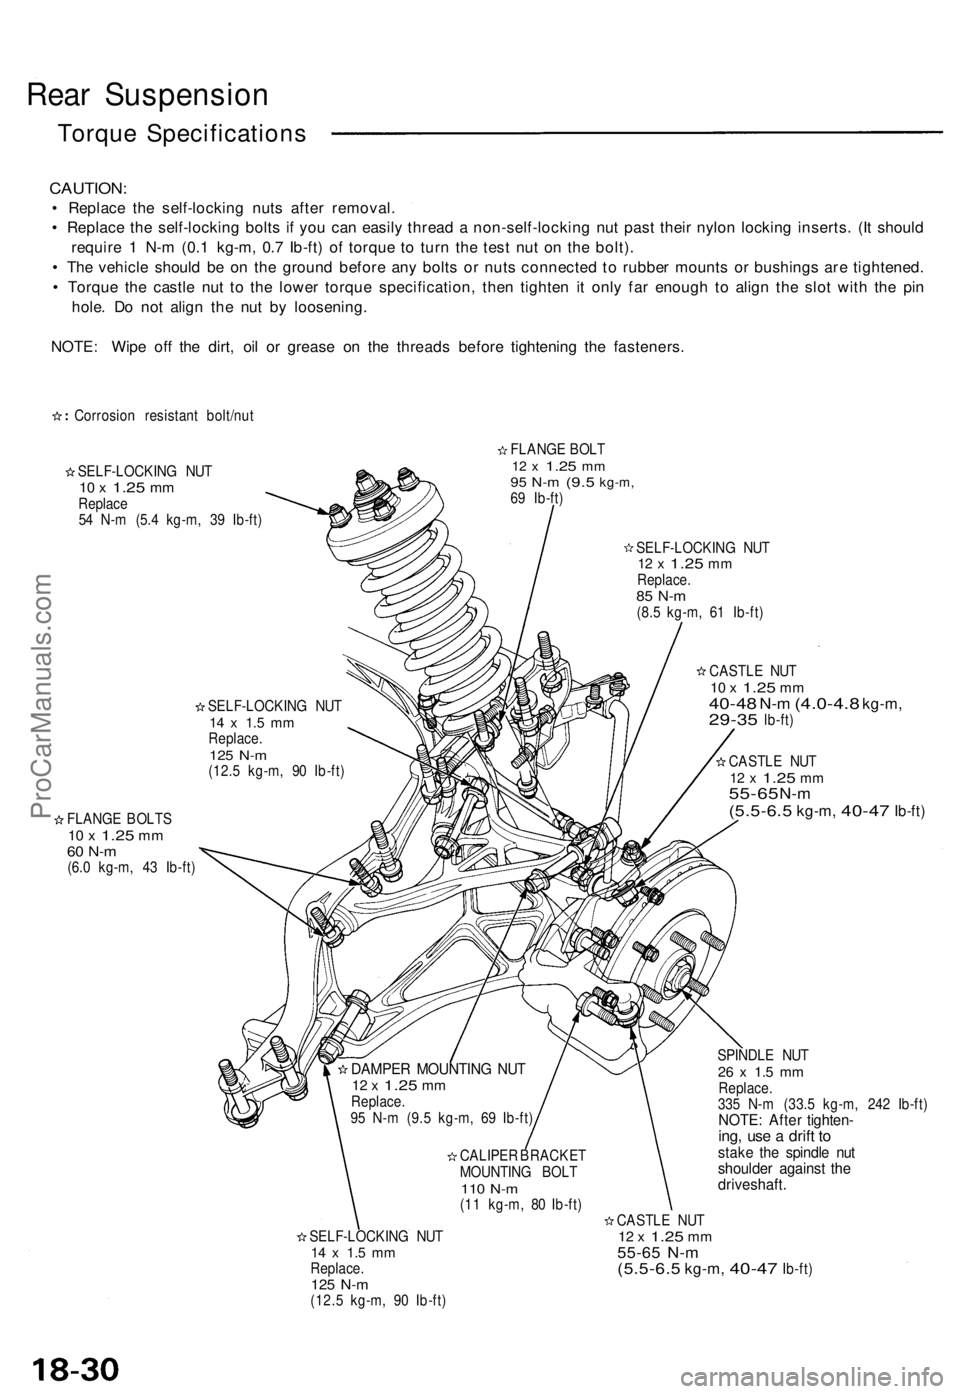
Rear Suspension
Torque Specifications
CAUTION:
• Replace the self-locking nuts after removal.
• Replace the self-locking bolts if you can easily thread a non-self-locking nut past their nylon locking inserts. (It should
require 1 N-m (0.1 kg-m, 0.7 Ib-ft) of torque to turn the test nut on the bolt).
• The vehicle should be on the ground before any bolts or nuts connected to rubber mounts or bushings are tightened.
• Torque the castle nut to the lower torque specification, then tighten it only far enough to align the slot with the pin
hole. Do not align the nut by loosening.
NOTE: Wipe off the dirt, oil or grease on the threads before tightening the fasteners.
Corrosion resistant bolt/nut
SELF-LOCKING NUT
10 x
1.25
mm
Replace
54 N-m (5.4 kg-m, 39 Ib-ft)
FLANGE BOLT
12 x
1.25
mm
95 N-m
(9.5
kg-m,
69 Ib-ft)
SELF-LOCKING NUT
12 x
1.25
mm
Replace.
85 N-m
(8.5 kg-m, 61 Ib-ft)
SELF-LOCKING NUT
14 x 1.5 mm
Replace.
125 N-m
(12.5 kg-m, 90 Ib-ft)
FLANGE BOLTS
10 x
1.25
mm
60 N-m
(6.0 kg-m, 43 Ib-ft)
CASTLE NUT
10 x
1.25
mm
40-48
N-m
(4.0-4.8
kg-m,
29-35
lb-ft)
CASTLE NUT
12 x
1.25
mm
55-65
N-m
(5.5-6.5
kg-m,
40-47
Ib-ft)
SPINDLE NUT
26 x 1.5 mm
Replace.
335 N-m (33.5 kg-m, 242 Ib-ft)
NOTE: After tighten-
ing, use a drift to
stake the spindle nut
shoulder against the
driveshaft.
SELF-LOCKING NUT
14 x 1.5 mm
Replace.
125 N-m
(12.5 kg-m, 90 Ib-ft)
CASTLE NUT
12 x
1.25
mm
55-65 N-m
(5.5-6.5
kg-m,
40-47
Ib-ft)
DAMPER MOUNTING NUT
12 x
1.25
mm
Replace.
95 N-m (9.5 kg-m, 69 Ib-ft)
CALIPER BRACKET
MOUNTING BOLT
110 N-m
(11 kg-m, 80 Ib-ft)ProCarManuals.com
Page 476 of 1640
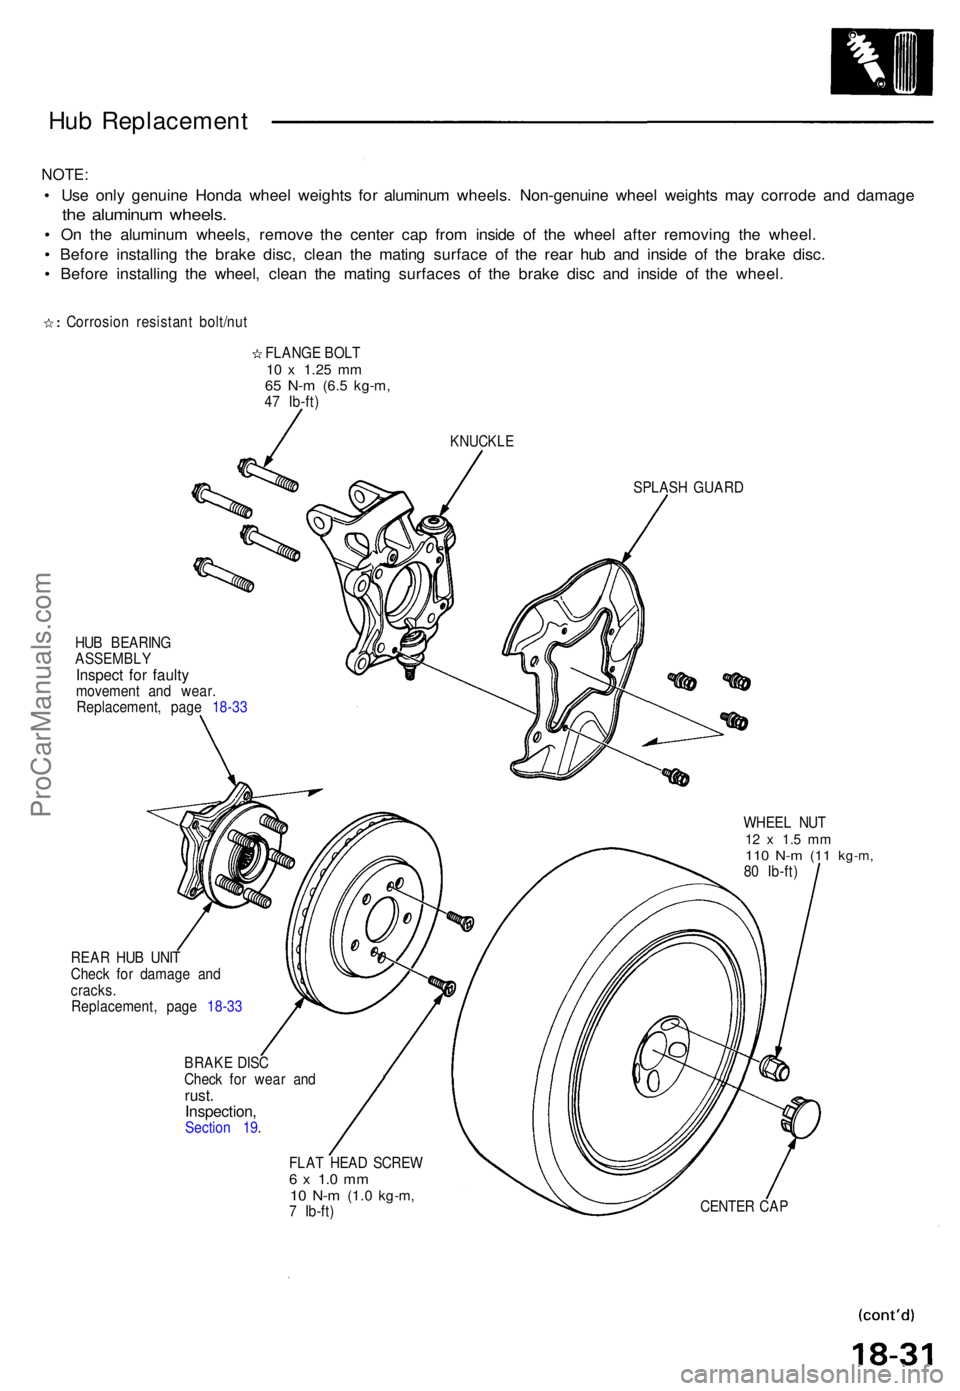
Hub Replacemen t
NOTE:
• Us e onl y genuin e Hond a whee l weight s fo r aluminu m wheels . Non-genuin e whee l weight s ma y corrod e an d damag e
the aluminu m wheels .
• O n th e aluminu m wheels , remov e th e cente r cap from insid e o f th e whee l afte r removin g th e wheel .
• Befor e installin g th e brak e disc , clea n th e matin g surfac e o f th e rea r hu b an d insid e o f th e brak e disc .
• Befor e installin g th e wheel , clea n th e matin g surface s o f th e brak e dis c an d insid e o f th e wheel .
Corrosio n resistan t bolt/nu t
FLANG E BOL T
10 x 1.2 5 mm65 N- m (6. 5 kg-m ,47 Ib-ft )
KNUCKL E
SPLASH GUAR D
HU B BEARIN G
ASSEMBL YInspect fo r fault ymovemen t an d wear .
Replacement , pag e 18-3 3
WHEEL NU T
12 x 1. 5 m m110 N- m (1 1 kg-m ,80 Ib-ft )
REA R HU B UNI T
Chec k fo r damag e an d
cracks .
Replacement , pag e 18-3 3
BRAK E DIS C
Chec k fo r wea r an d
rust .Inspection ,Section 19 .
FLAT HEA D SCRE W
6 x 1. 0 m m10 N- m (1. 0 kg-m ,7 Ib-ft ) CENTE
R CA P
ProCarManuals.com
Page 477 of 1640
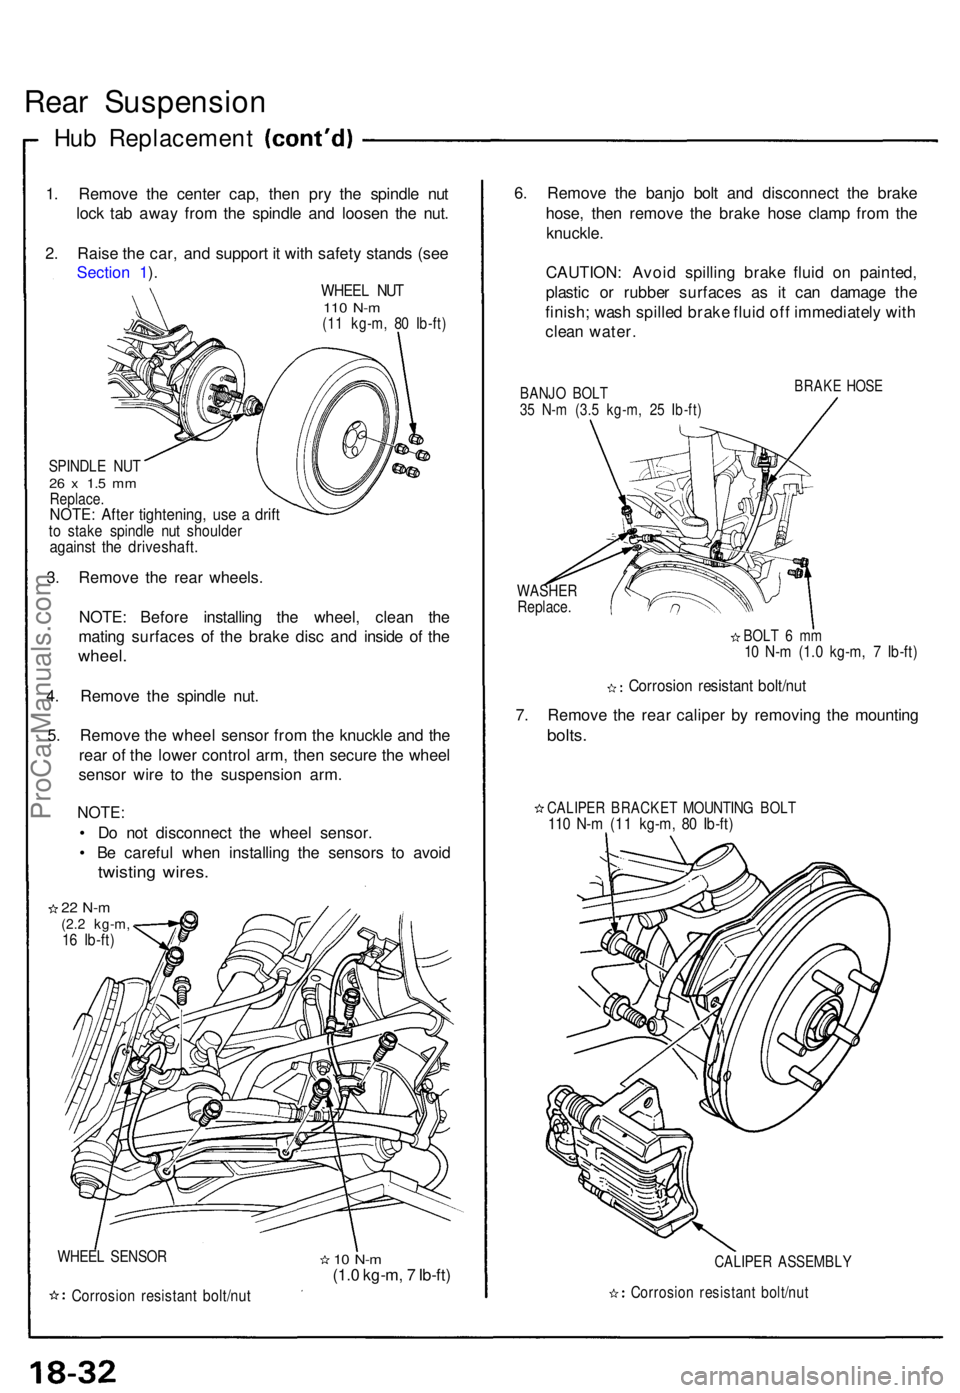
Rear Suspensio n
Hub Replacemen t
1. Remov e th e cente r cap , the n pr y th e spindl e nu t
loc k ta b awa y fro m th e spindl e an d loose n th e nut .
2 . Rais e th e car , an d suppor t i t wit h safet y stand s (se e
Sectio n 1 ).
WHEE L NU T110 N- m(11 kg-m , 8 0 Ib-ft )
SPINDL E NU T26 x 1. 5 m mReplace .NOTE: Afte r tightening , us e a drif tto stak e spindl e nu t shoulde ragainst th e driveshaft .
3. Remov e th e rea r wheels .
NOTE : Befor e installin g th e wheel, clean th e
matin g surface s o f th e brak e dis c an d insid e o f th e
wheel .
4. Remov e th e spindl e nut .
5 . Remov e th e whee l senso r fro m th e knuckl e an d th e
rea r o f th e lowe r contro l arm , the n secur e th e whee l
senso r wir e t o th e suspensio n arm .
NOTE :
• D o no t disconnec t th e whee l sensor .
• B e carefu l whe n installin g th e sensor s t o avoi d
twistin g wires .
22 N- m(2.2 kg-m ,16 Ib-ft )
WHEE L SENSO R
Corrosio n resistan t bolt/nu t
10 N- m(1.0 kg-m , 7 Ib-ft ) 6
. Remov e th e banj o bol t an d disconnec t th e brak e
hose , the n remov e th e brak e hos e clam p fro m th e
knuckle .
CAUTION : Avoi d spillin g brak e flui d o n painted ,
plasti c o r rubbe r surface s a s i t ca n damag e th e
finish ; was h spille d brak e flui d of f immediatel y wit h
clea n water .
BANJO BOL T35 N- m (3. 5 kg-m , 2 5 Ib-ft )
BRAK E HOS E
WASHE RReplace.
BOLT 6 m m10 N- m (1. 0 kg-m , 7 Ib-ft )
Corrosio n resistan t bolt/nu t
7. Remov e th e rea r calipe r b y removin g th e mountin g
bolts.
CALIPE R BRACKE T MOUNTIN G BOL T110 N- m (1 1 kg-m , 8 0 Ib-ft )
CALIPE R ASSEMBL Y
Corrosion resistan t bolt/nu t
ProCarManuals.com
Page 478 of 1640
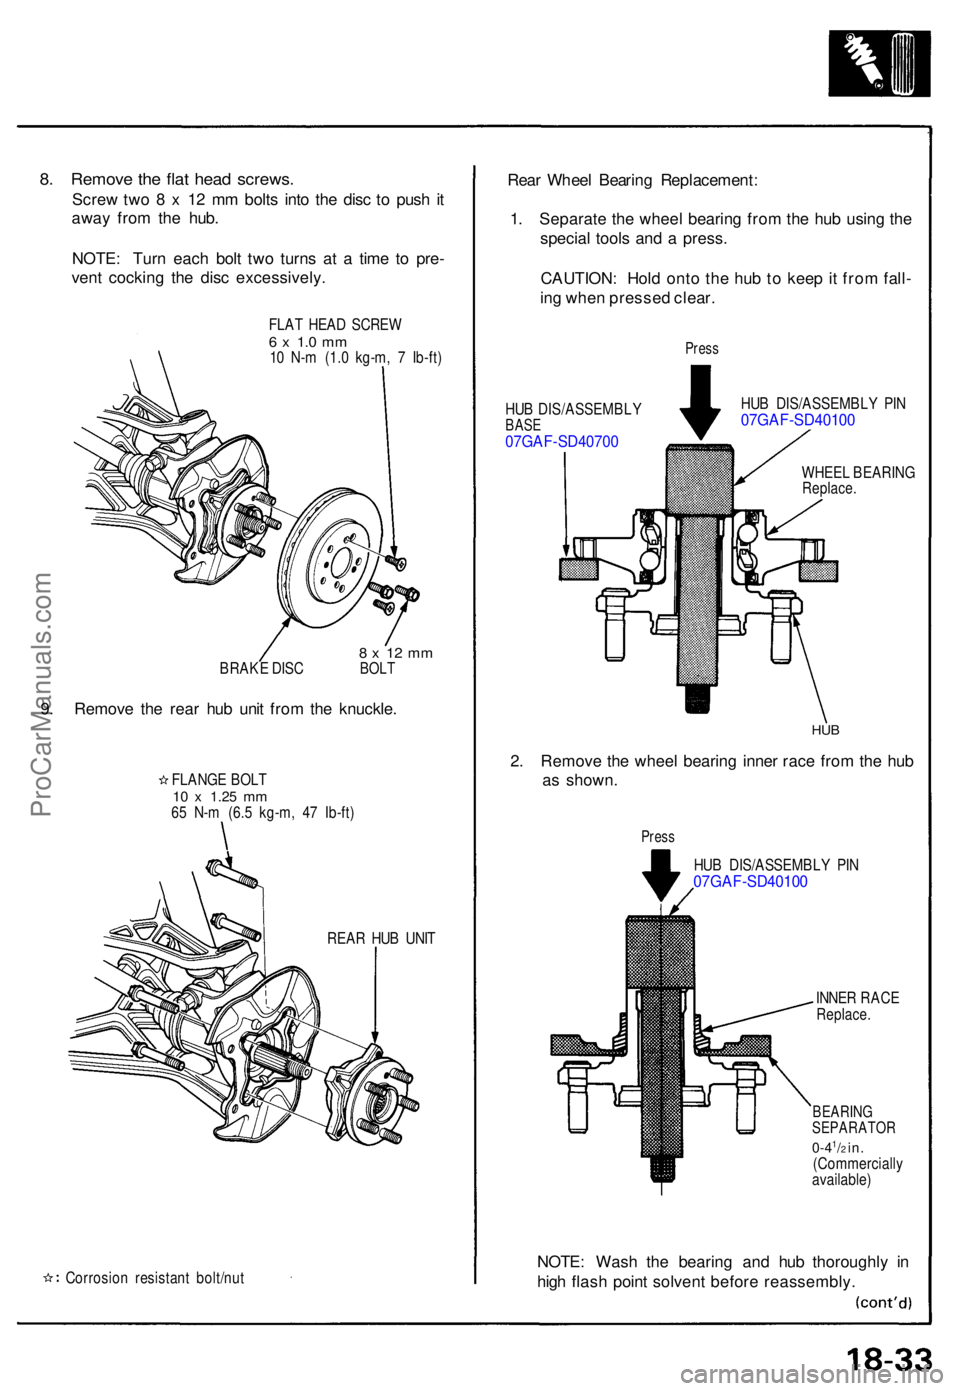
8. Remov e th e fla t hea d screws .
Screw tw o 8 x 12 m m bolt s int o th e dis c t o pus h i t
awa y fro m th e hub .
NOTE : Tur n eac h bol t tw o turn s a t a tim e t o pre -
ven t cockin g th e dis c excessively .
FLAT HEA D SCRE W6 x 1. 0 m m10 N- m (1. 0 kg-m , 7 Ib-ft )
BRAK E DIS C
9. Remov e th e rea r hu b uni t fro m th e knuckle .
FLANGE BOL T10 x 1.2 5 mm65 N- m (6. 5 kg-m , 4 7 Ib-ft )
8 x 1 2 m mBOL T
REA R HU B UNI T
Corrosio n resistan t bolt/nu t
Rear Whee l Bearin g Replacement :
1 . Separat e th e whee l bearin g fro m th e hu b usin g th e
specia l tool s an d a press .
CAUTION : Hol d ont o th e hu b t o kee p it fro m fall -
in g whe n presse d clear .
Press
HUB DIS/ASSEMBL YBASE07GA F-SD4070 0
HUB DIS/ASSEMBL Y PI N07GA F-SD4010 0
WHEEL BEARIN GReplace.
HUB
2. Remov e th e whee l bearin g inne r rac e fro m th e hu b
a s shown .
Press
HUB DIS/ASSEMBL Y PI N07GA F-SD4010 0
INNER RAC EReplace .
BEARINGSEPARATO R
0-41/2 in.(Commerciall y
available )
NOTE: Was h th e bearin g an d hu b thoroughl y i n
hig h flas h poin t solven t befor e reassembly .
ProCarManuals.com
Page 479 of 1640
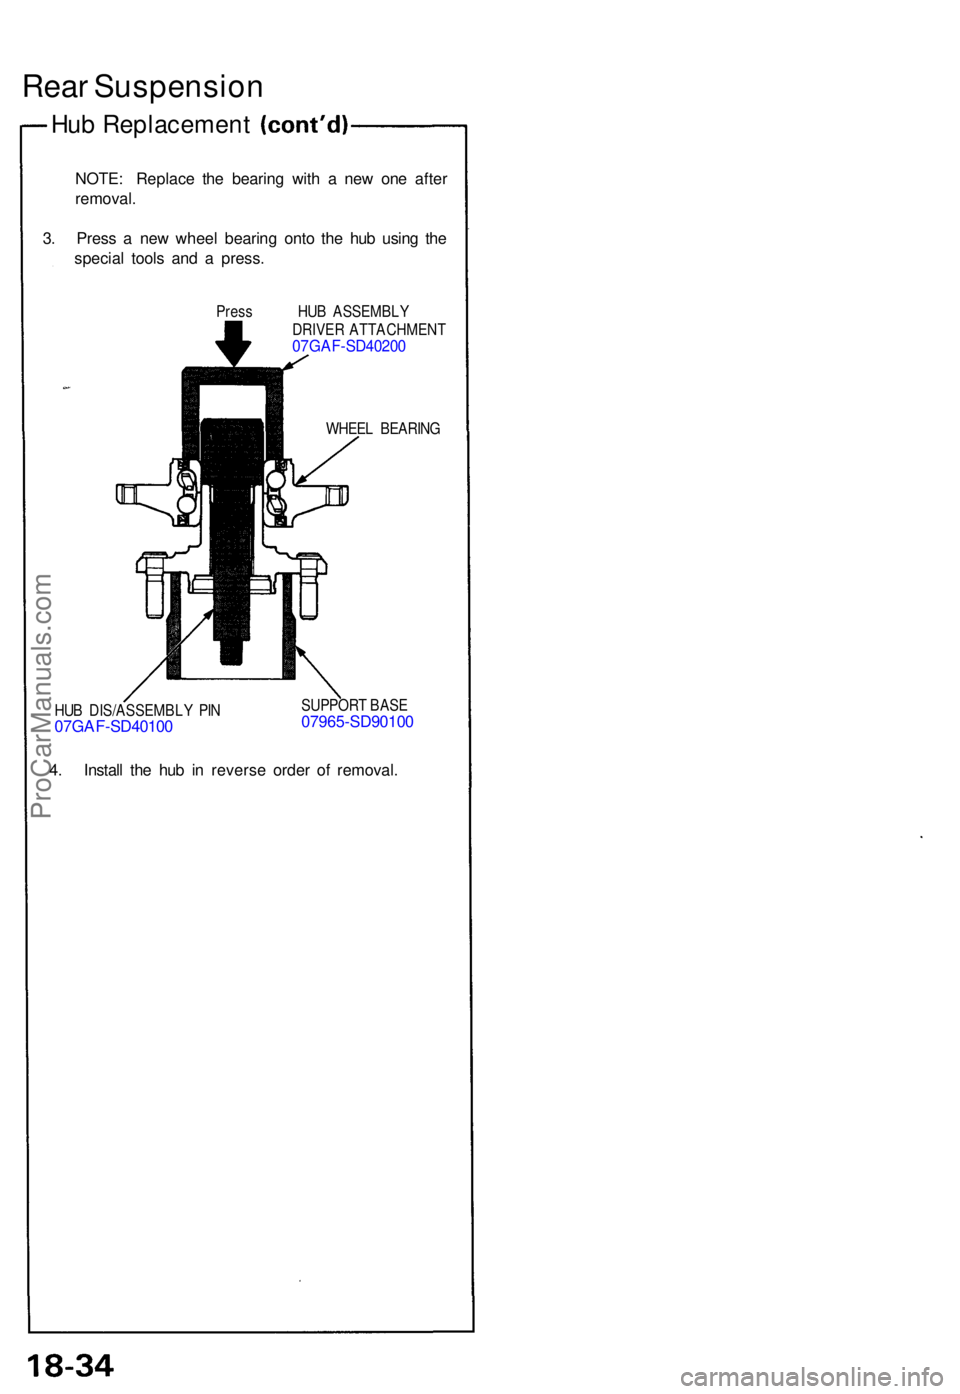
Rear Suspensio n
Hub Replacemen t
NOTE: Replac e th e bearin g wit h a ne w on e afte r
removal .
3 . Pres s a ne w whee l bearin g ont o th e hu b usin g th e
specia l tool s an d a press .
Press HUB ASSEMBL Y
DRIVE R ATTACHMEN T
07GAF-SD4020 0
WHEEL BEARIN G
HU B DIS/ASSEMBL Y PI N
07GA F-SD4010 0
SUPPOR T BAS E07965-SD9010 0
4 . Instal l th e hu b i n revers e orde r of removal .
ProCarManuals.com
Page 480 of 1640
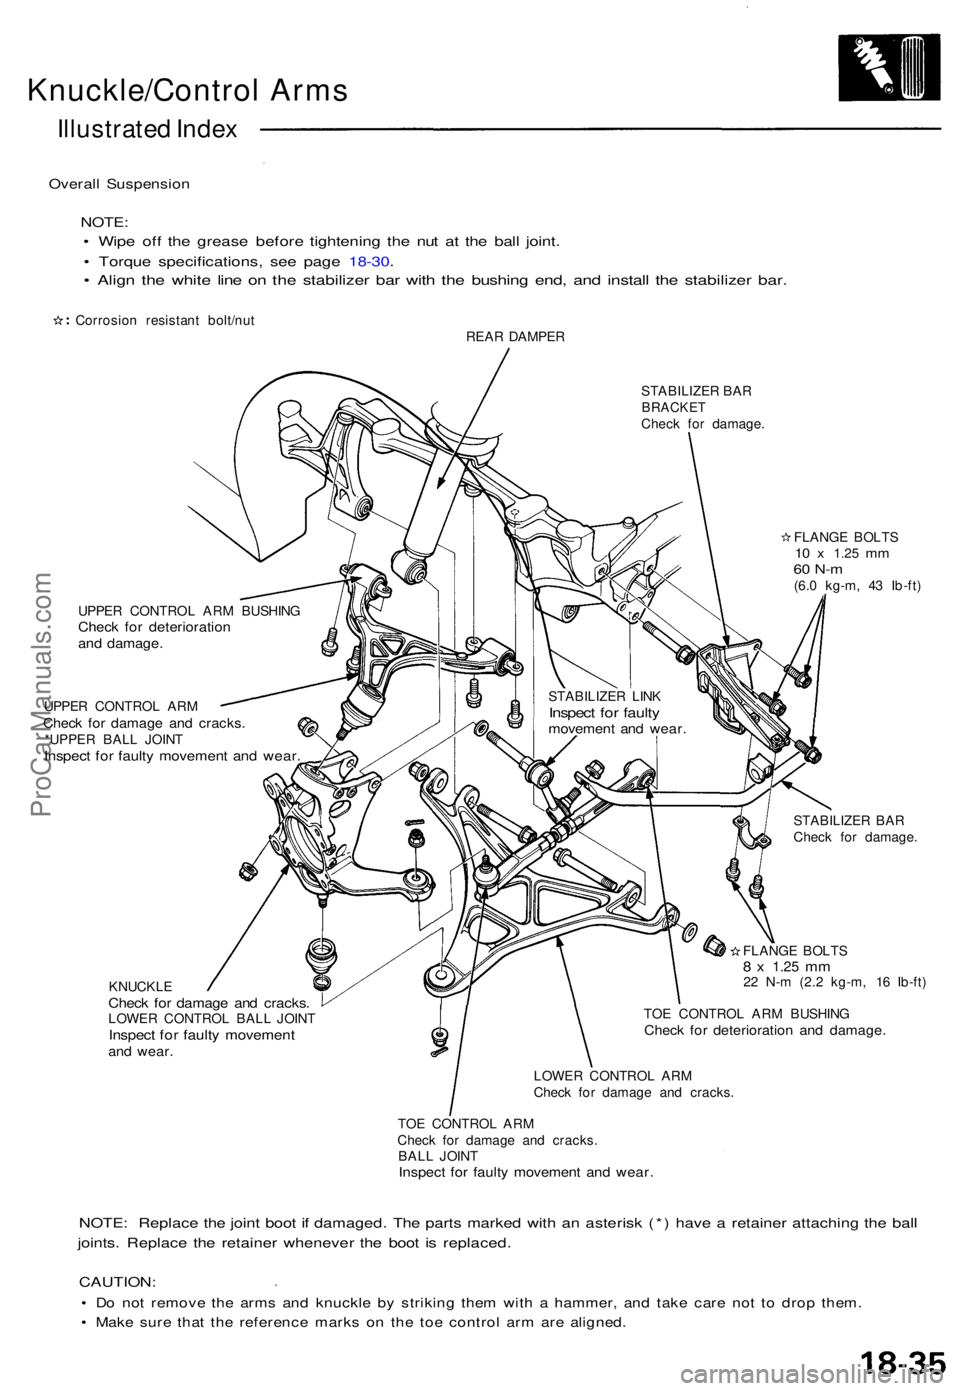
Knuckle/Control Arm s
Illustrate d Inde x
Overal l Suspensio n
NOTE:
• Wip e of f th e greas e befor e tightenin g th e nu t a t th e bal l joint .
• Torqu e specifications , se e pag e 18-30 .
• Alig n th e whit e lin e o n th e stabilize r ba r wit h th e bushin g end , an d instal l th e stabilize r bar .
Corrosio n resistan t bolt/nu t
REAR DAMPE R
STABILIZER BA R
BRACKE TCheck fo r damage .
UPPE R CONTRO L AR M BUSHIN G
Check fo r deterioratio nand damage .
UPPER CONTRO L AR MChec k fo r damag e an d cracks .*UPPE R BAL L JOIN TInspec t fo r fault y movemen t an d wear .
KNUCKL ECheck for damag e an d cracks .LOWER CONTRO L BAL L JOIN TInspec t fo r faulty movemen tand wear .
FLANG E BOLT S10 x 1.2 5 mm60 N- m(6.0 kg-m , 4 3 Ib-ft )
STABILIZE R BA R
Chec k fo r damage .
FLANG E BOLT S
8 x 1.2 5 mm22 N- m (2. 2 kg-m , 1 6 Ib-ft )
TO E CONTRO L AR M BUSHIN G
Check fo r deterioratio n an d damage .
LOWER CONTRO L AR M
Chec k fo r damag e an d cracks .
TO E CONTRO L AR M
Chec k fo r damag e an d cracks .
BAL L JOIN T
Inspec t fo r fault y movemen t an d wear .
NOTE : Replac e th e join t boo t i f damaged . Th e part s marke d wit h a n asteris k (* ) hav e a retaine r attachin g th e bal l
joints . Replac e th e retaine r wheneve r th e boo t i s replaced .
CAUTION :
• D o no t remov e th e arm s an d knuckl e b y strikin g the m wit h a hammer , an d tak e car e no t t o dro p them .
• Mak e sur e tha t th e referenc e mark s o n th e to e contro l ar m ar e aligned .
STABILIZE R LIN KInspec t fo r fault ymovemen t an d wear .
ProCarManuals.com