sensor ACURA NSX 1997 Service Owners Manual
[x] Cancel search | Manufacturer: ACURA, Model Year: 1997, Model line: NSX, Model: ACURA NSX 1997Pages: 1503, PDF Size: 57.08 MB
Page 1202 of 1503
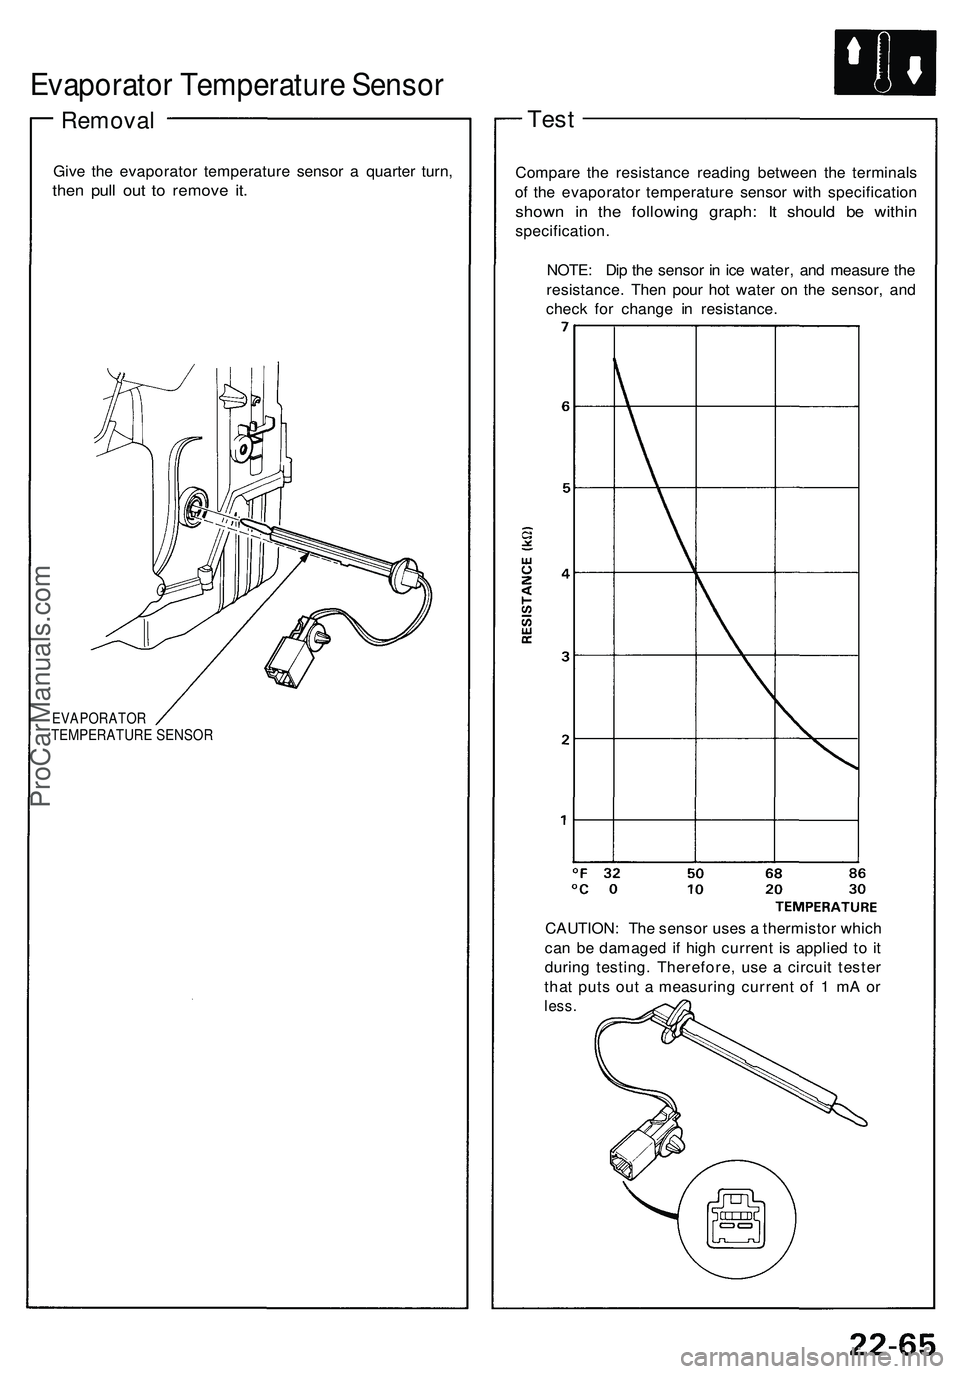
Evaporator Temperature Sensor
Removal
Give th e evaporato r temperatur e senso r a quarte r turn ,
then pul l ou t t o remov e it .
EVAPORATO RTEMPERATUR E SENSO R
Test
Compar e th e resistanc e readin g betwee n th e terminal s
of th e evaporato r temperatur e senso r wit h specificatio n
shown i n th e followin g graph : I t shoul d b e withi n
specification .
NOTE : Di p th e senso r i n ic e water , an d measur e th e
resistance . The n pou r ho t wate r o n th e sensor , an d
chec k fo r chang e i n resistance .
CAUTION : Th e senso r use s a thermisto r whic h
ca n b e damage d if hig h curren t i s applie d t o it
durin g testing . Therefore , us e a circui t teste r
tha t put s ou t a measurin g curren t o f 1 m A o r
less .
ProCarManuals.com
Page 1212 of 1503

11. Disconnec t th e connector s fro m al l th e contro l
motors an d sensor s attache d t o th e heater -
evaporato r unit .
1 2 . Remov e th e tw o mountin g bolt s an d tw o nuts , the n
remov e th e heater-evaporato r uni t throug h th e
passenge r door .
CORROSIO N RESISTAN TBOLTHEATER-EVAPORATO R UNIT
NUT S29 N- m (3. 0 kgf-m ,
2 2 Ibf-ft )
6 x 1. 0 m m9.8 N- m (1. 0 kgf-m , 7. 2 Ibf-ft )
13. Instal l th e heater-evaporato r uni t i n th e revers e
orde r of removal , and :
• I f you'r e installin g a ne w evaporator , ad d
refrigeran t oi l (ND-OI L 8 ) se e pag e 22-69 ).
• Replac e O-ring s wit h ne w one s a t eac h fitting ,
and appl y refrigeran t oi l t o them .
NOTE : B e sur e t o us e th e righ t O-ring s fo r
R-134 a t o avoi d leakage .
14. Fil l th e radiato r an d reservoi r tan k wit h th e prope r
engine coolan t mixture . Blee d th e ai r fro m th e cool -
in g syste m (se e sectio n 10 ).
CAUTION : Follo w th e sequenc e describe d in th e ai r
blee d procedure . I f you don't , yo u ma y leav e ai r i n
th e syste m whic h coul d damag e th e engine .
15. I f necessary , adjus t th e heate r valv e cable :
• Se t th e ai r mi x contro l moto r a t COO L positio n
(se e pag e 22-57 ).
• Connec t th e en d o f th e heate r valv e cabl e t o th e
heate r valv e arm .
• Gentl y slid e th e cabl e oute r housin g bac k fro m
the en d enoug h to tak e u p an y slac k in th e cable ,
but no t enoug h t o mak e th e othe r en d mov e th e
ar m o n th e ai r mi x contro l motor . The n sna p th e
clam p dow n ove r th e cabl e housing .
CLAMP
HEATE R VALV EARM
HEATE R VALV ECABLE
16. Tur n th e blowe r on , an d mak e sur e tha t ther e is n o
air leakage .
1 7 . Charg e th e syste m (se e pag e 22-91 ), an d tes t per -
formanc e (se e pag e 22-70 ).
SR S UNI T
ProCarManuals.com
Page 1261 of 1503
Description ——————————————————\
——————————————————\
———
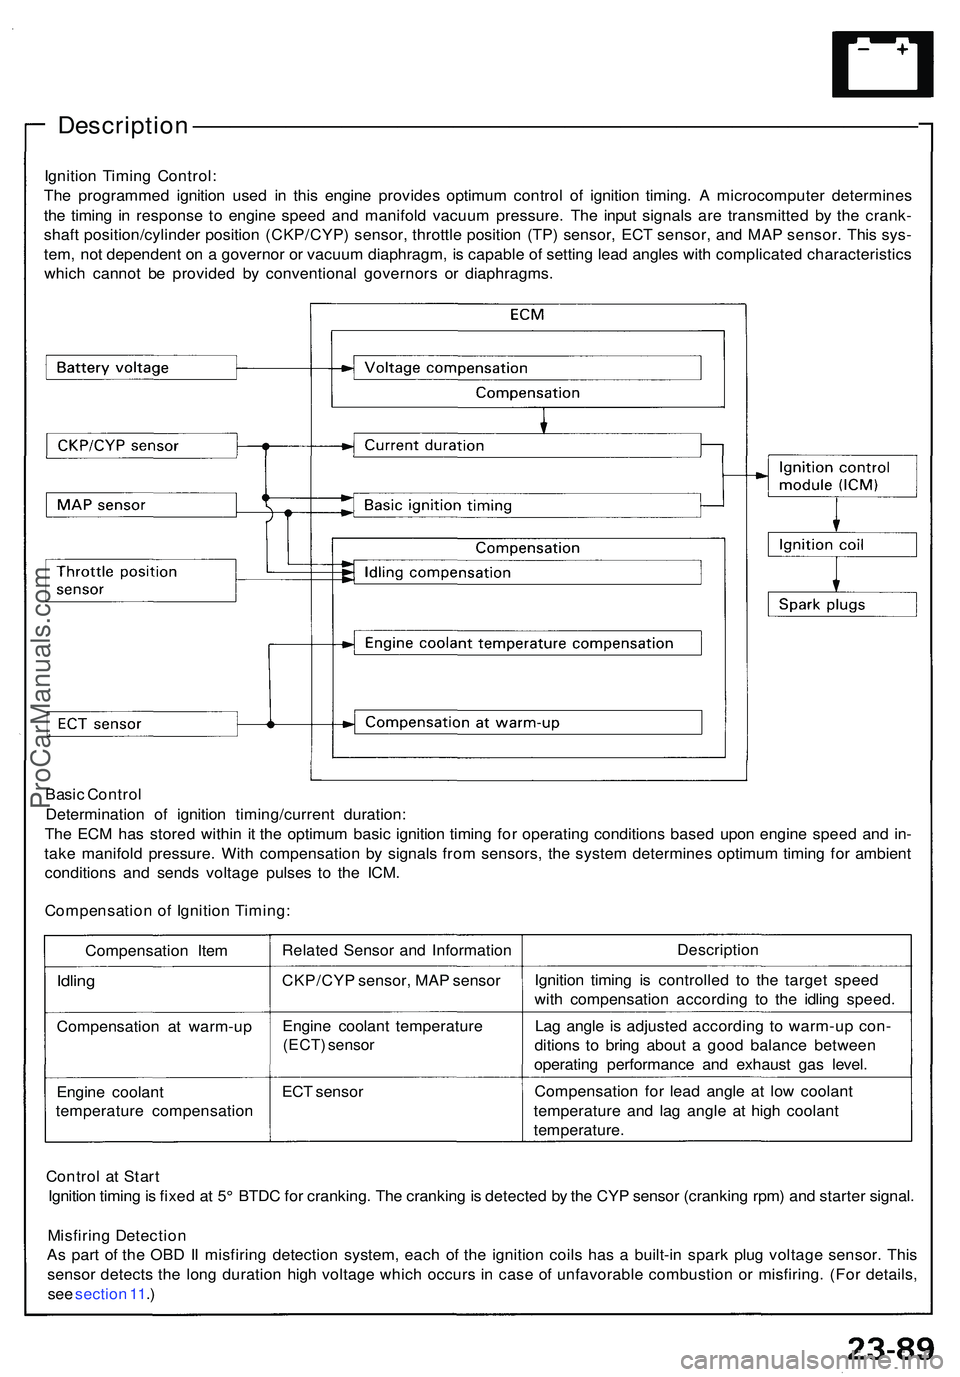
Ignition Timin g Control :
Th e programme d ignitio n use d i n thi s engin e provide s optimu m contro l o f ignitio n timing . A microcompute r determine s
th e timin g i n respons e t o engin e spee d an d manifol d vacuu m pressure . Th e inpu t signal s ar e transmitte d b y th e crank -
shaf t position/cylinde r positio n (CKP/CYP ) sensor , throttl e positio n (TP ) sensor , EC T sensor , an d MA P sensor . Thi s sys -
tem , no t dependen t o n a governo r o r vacuu m diaphragm , i s capabl e o f settin g lea d angle s wit h complicate d characteristic s
whic h canno t b e provide d b y conventiona l governor s o r diaphragms .
Basi c Contro l
Determinatio n of ignitio n timing/curren t duration :
Th e EC M ha s store d withi n i t th e optimu m basi c ignitio n timin g fo r operatin g condition s base d upo n engin e spee d an d in -
tak e manifol d pressure . Wit h compensatio n b y signal s fro m sensors , th e syste m determine s optimu m timin g fo r ambien t
condition s an d send s voltag e pulse s t o th e ICM .
Compensatio n o f Ignitio n Timing :
Compensatio n Ite m
Idlin g
Compensatio n a t warm-u p
Engin e coolan t
temperatur e compensatio nRelate
d Senso r an d Informatio n
CKP/CY P sensor , MA P senso r
Engin e coolan t temperatur e
(ECT) senso r
ECT senso r Descriptio
n
Ignitio n timin g i s controlle d t o th e targe t spee d
wit h compensatio n accordin g t o th e idlin g speed .
La g angl e i s adjuste d accordin g t o warm-u p con -
dition s t o brin g abou t a goo d balanc e betwee n
operatin g performanc e an d exhaus t ga s level .
Compensatio n fo r lea d angl e a t low coolan t
temperatur e an d la g angl e a t hig h coolan t
temperature .
Contro l a t Star t
Ignitio n timin g is fixe d a t 5 ° BTD C fo r cranking . Th e crankin g is detecte d b y th e CY P senso r (crankin g rpm ) an d starte r signal .
Misfirin g Detectio n
A s par t o f th e OB D II misfirin g detectio n system , eac h o f th e ignitio n coil s ha s a built-i n spar k plu g voltag e sensor . Thi s
senso r detect s th e lon g duratio n hig h voltag e whic h occur s i n cas e o f unfavorabl e combustio n o r misfiring . (Fo r details ,
se e sectio n 11 .)
ProCarManuals.com
Page 1282 of 1503
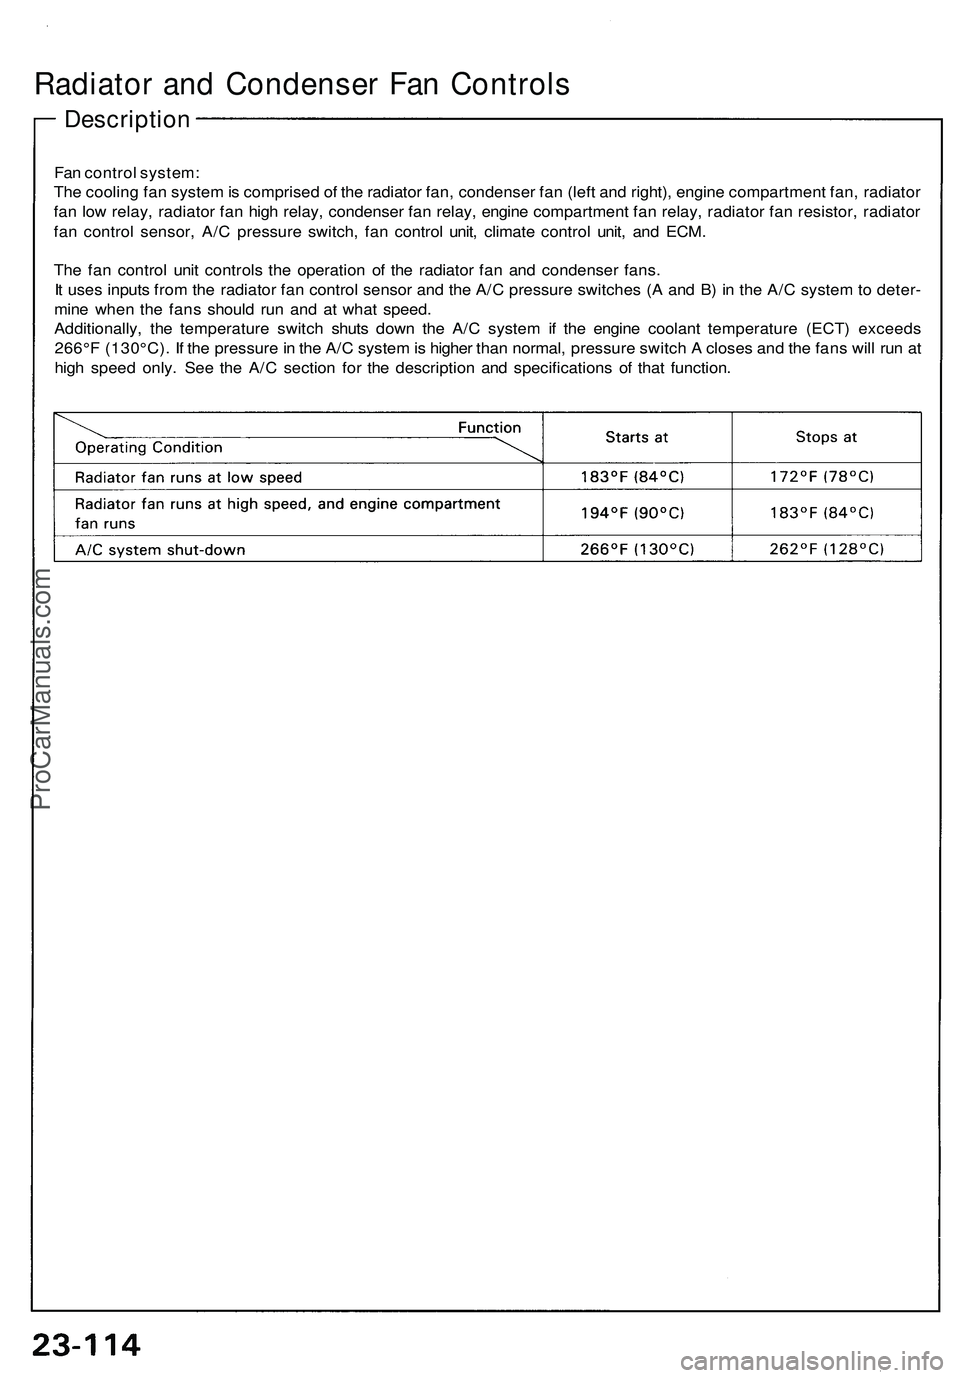
Radiator and Condenser Fan Controls
Description
Fan control system:
The cooling fan system is comprised of the radiator fan, condenser fan (left and right), engine compartment fan, radiator
fan low relay, radiator fan high relay, condenser fan relay, engine compartment fan relay, radiator fan resistor, radiator
fan control sensor, A/C pressure switch, fan control unit, climate control unit, and ECM.
The fan control unit controls the operation of the radiator fan and condenser fans.
It uses inputs from the radiator fan control sensor and the A/C pressure switches (A and B) in the A/C system to deter-
mine when the fans should run and at what speed.
Additionally, the temperature switch shuts down the A/C system if the engine coolant temperature (ECT) exceeds
266°F (130°C). If the pressure in the A/C system is higher than normal, pressure switch A closes and the fans will run at
high speed only. See the A/C section for the description and specifications of that function.ProCarManuals.com
Page 1284 of 1503
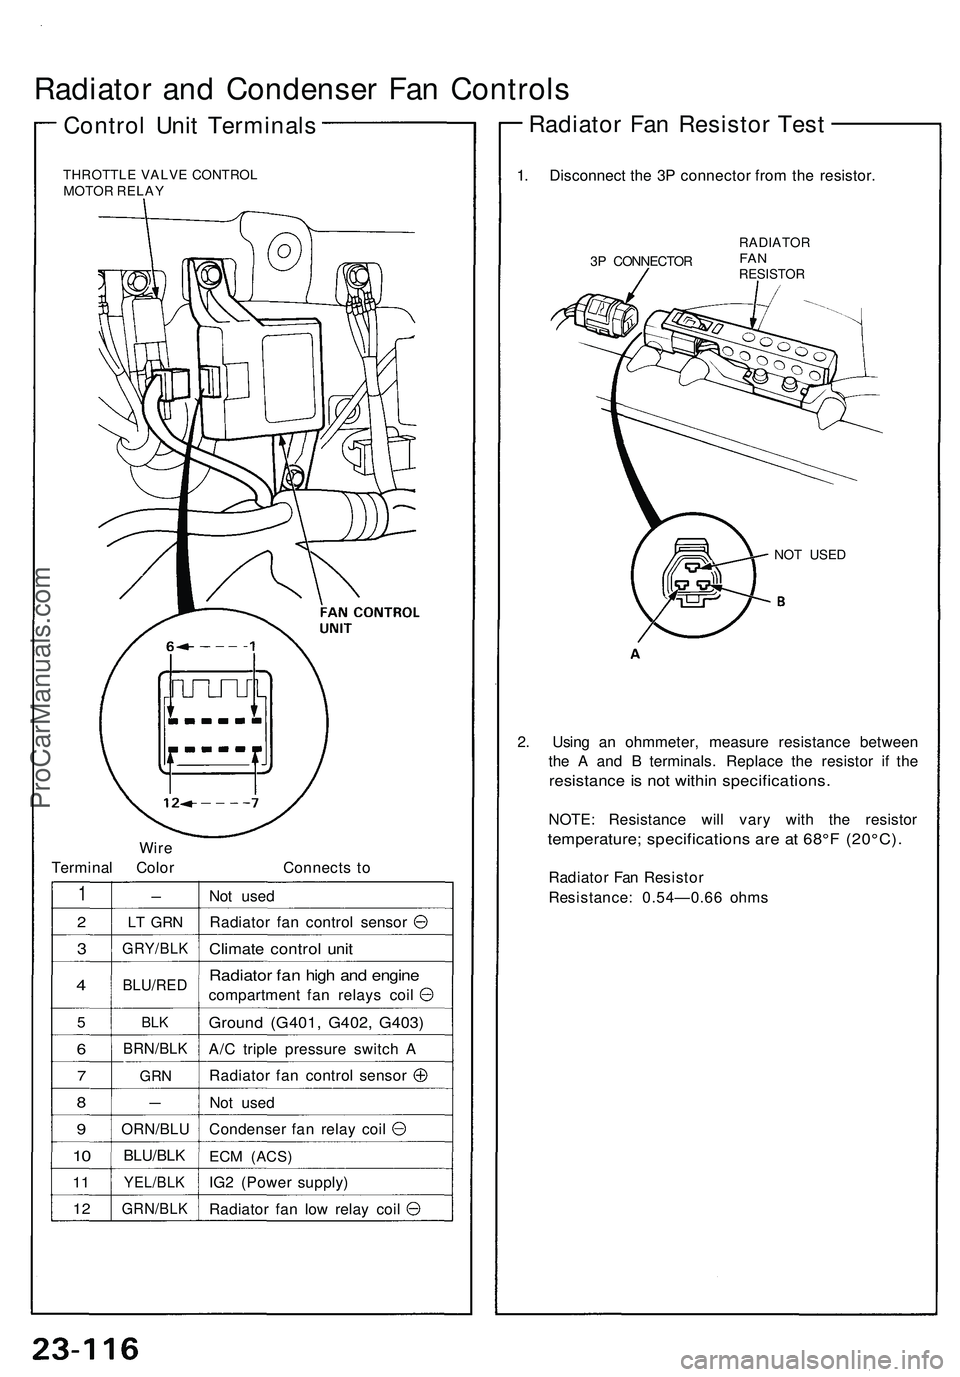
Radiator and Condenser Fan Controls
Control Unit Terminals
THROTTLE VALVE CONTROL
MOTOR RELAY
Wire
Terminal Color
Connects to
1
2
3
4
5
6
7
8
9
10
11
12
-
LT GRN
GRY/BLK
BLU/RED
BLK
BRN/BLK
GRN
—
ORN/BLU
BLU/BLK
YEL/BLK
GRN/BLK
Not used
Radiator fan control sensor
Climate control unit
Radiator fan high and engine
compartment fan relays coil
Ground (G401, G402, G403)
A/C triple pressure switch A
Radiator fan control sensor
Not used
Condenser fan relay coil
ECM
(ACS)
IG2 (Power supply)
Radiator fan low relay coil
1. Disconnect the 3P connector from the resistor.
3P CONNECTOR
RADIATOR
FAN
RESISTOR
NOT USED
2. Using an ohmmeter, measure resistance between
the A and B terminals. Replace the resistor if the
resistance is not within specifications.
NOTE: Resistance will vary with the resistor
temperature; specifications are at 68°F (20°C).
Radiator Fan Resistor
Resistance: 0.54—0.66 ohms
Radiator Fan Resistor TestProCarManuals.com
Page 1288 of 1503
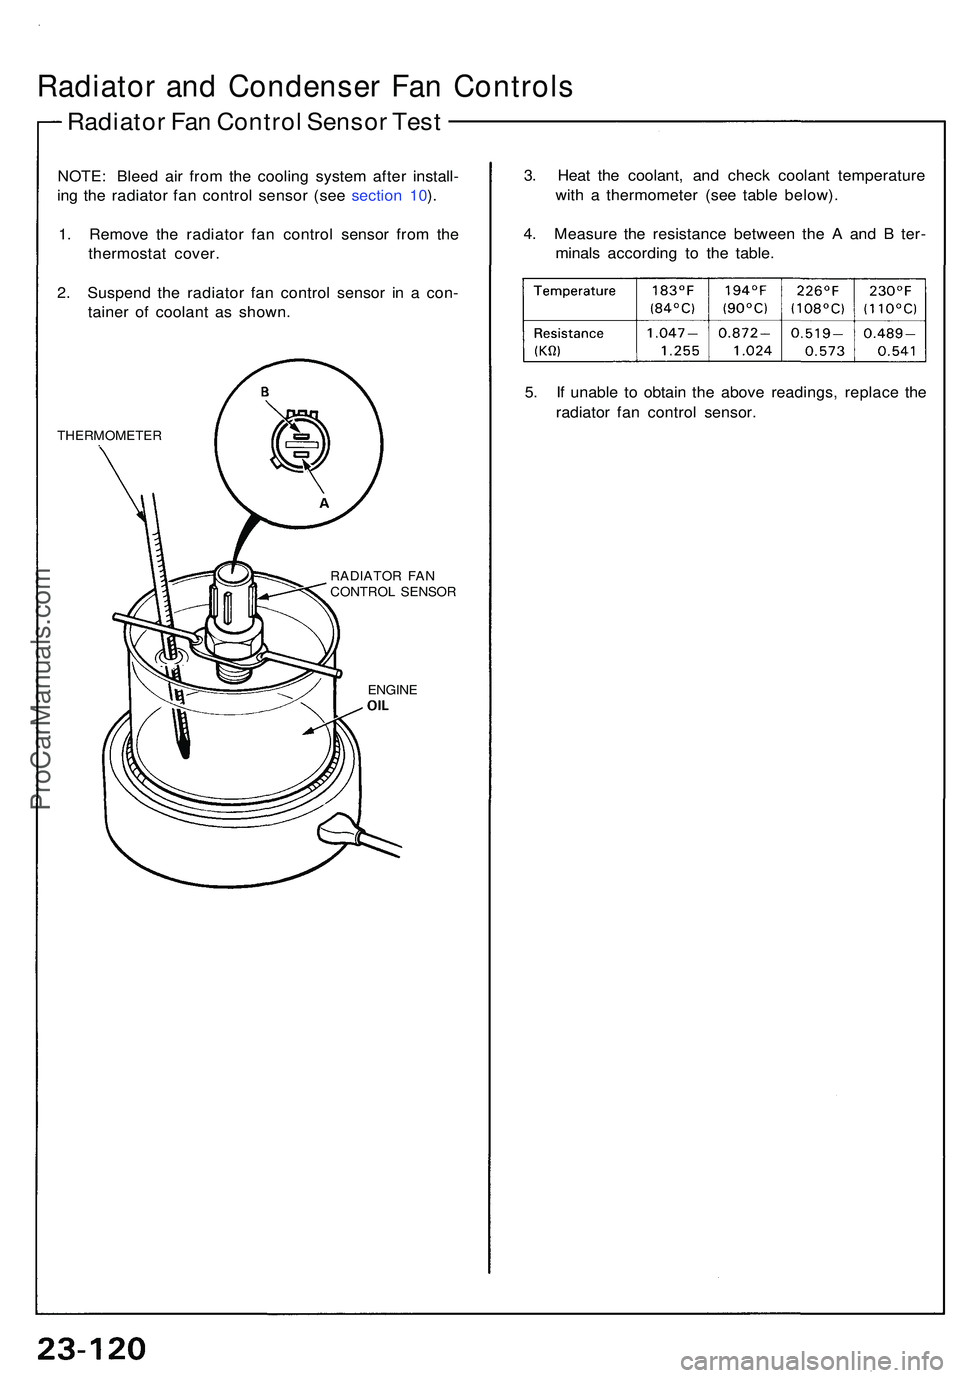
Radiator an d Condense r Fa n Control s
Radiator Fa n Contro l Senso r Tes t
NOTE : Blee d ai r fro m th e coolin g syste m afte r install -
in g th e radiato r fa n contro l senso r (se e sectio n 10 ).
1 . Remov e th e radiato r fa n contro l senso r fro m th e
thermosta t cover .
2 . Suspen d th e radiato r fa n contro l senso r i n a con -
taine r o f coolan t a s shown .
THERMOMETE R
RADIATOR FA N
CONTRO L SENSO R
ENGIN E
3. Hea t th e coolant , an d chec k coolan t temperatur e
wit h a thermomete r (se e tabl e below) .
4 . Measur e th e resistanc e betwee n th e A an d B ter -
minal s accordin g t o th e table .
5 . I f unabl e t o obtai n th e abov e readings , replac e th e
radiato r fa n contro l sensor .
ProCarManuals.com
Page 1295 of 1503
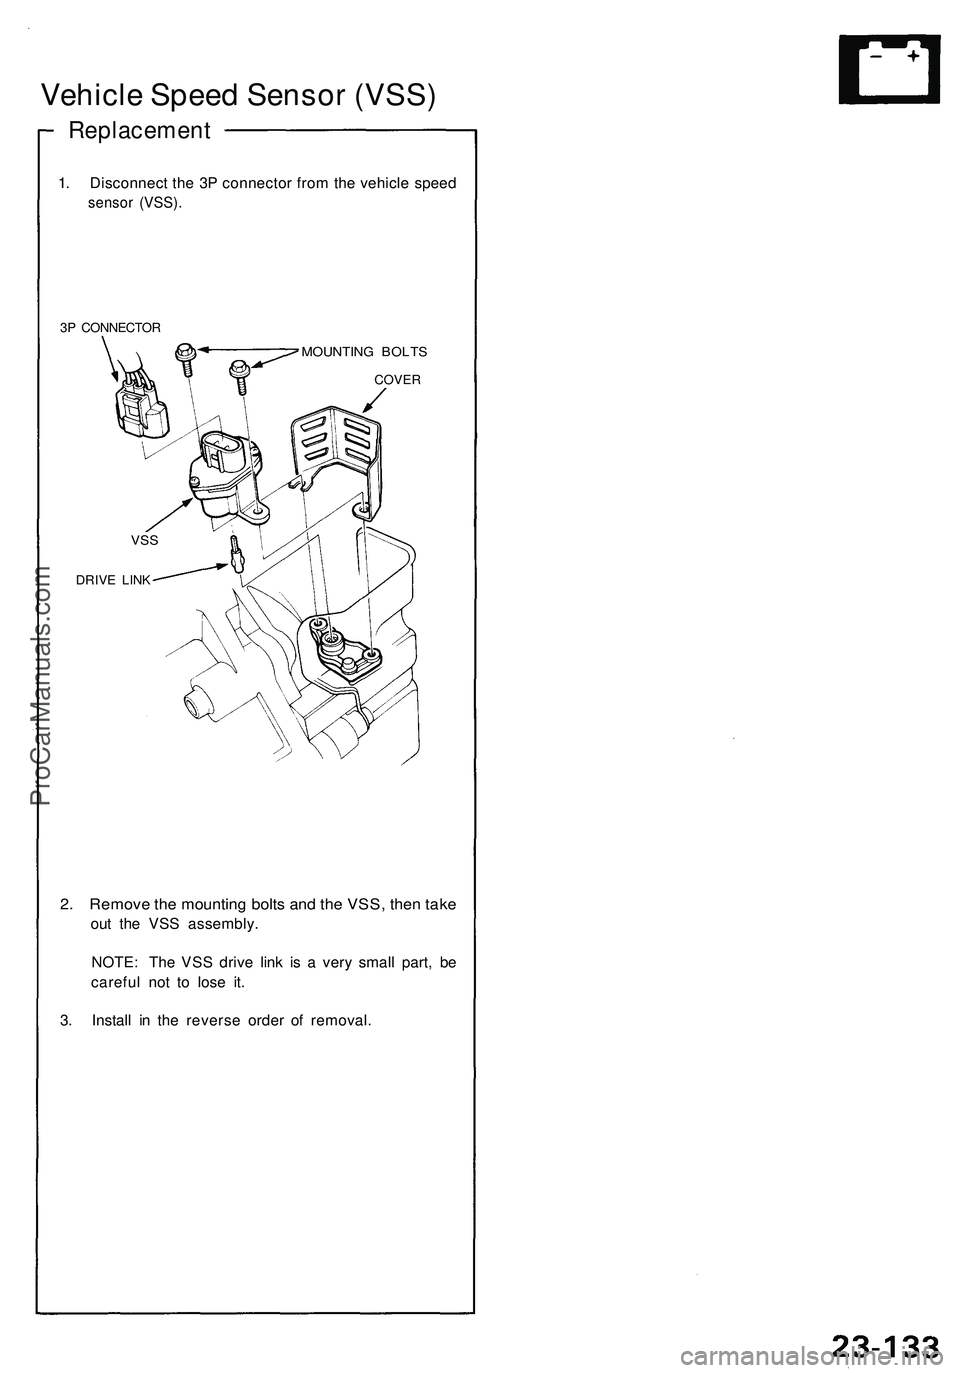
Vehicle Speed Sensor (VSS)
Replacement
1. Disconnect the 3P connector from the vehicle speed
sensor (VSS).
3P CONNECTOR
MOUNTING BOLTS
2. Remove the mounting bolts and the VSS, then take
out the VSS assembly.
NOTE: The VSS drive link is a very small part, be
careful not to lose it.
3. Install in the reverse order of removal.
VSS
DRIVE LINK
COVERProCarManuals.com
Page 1308 of 1503
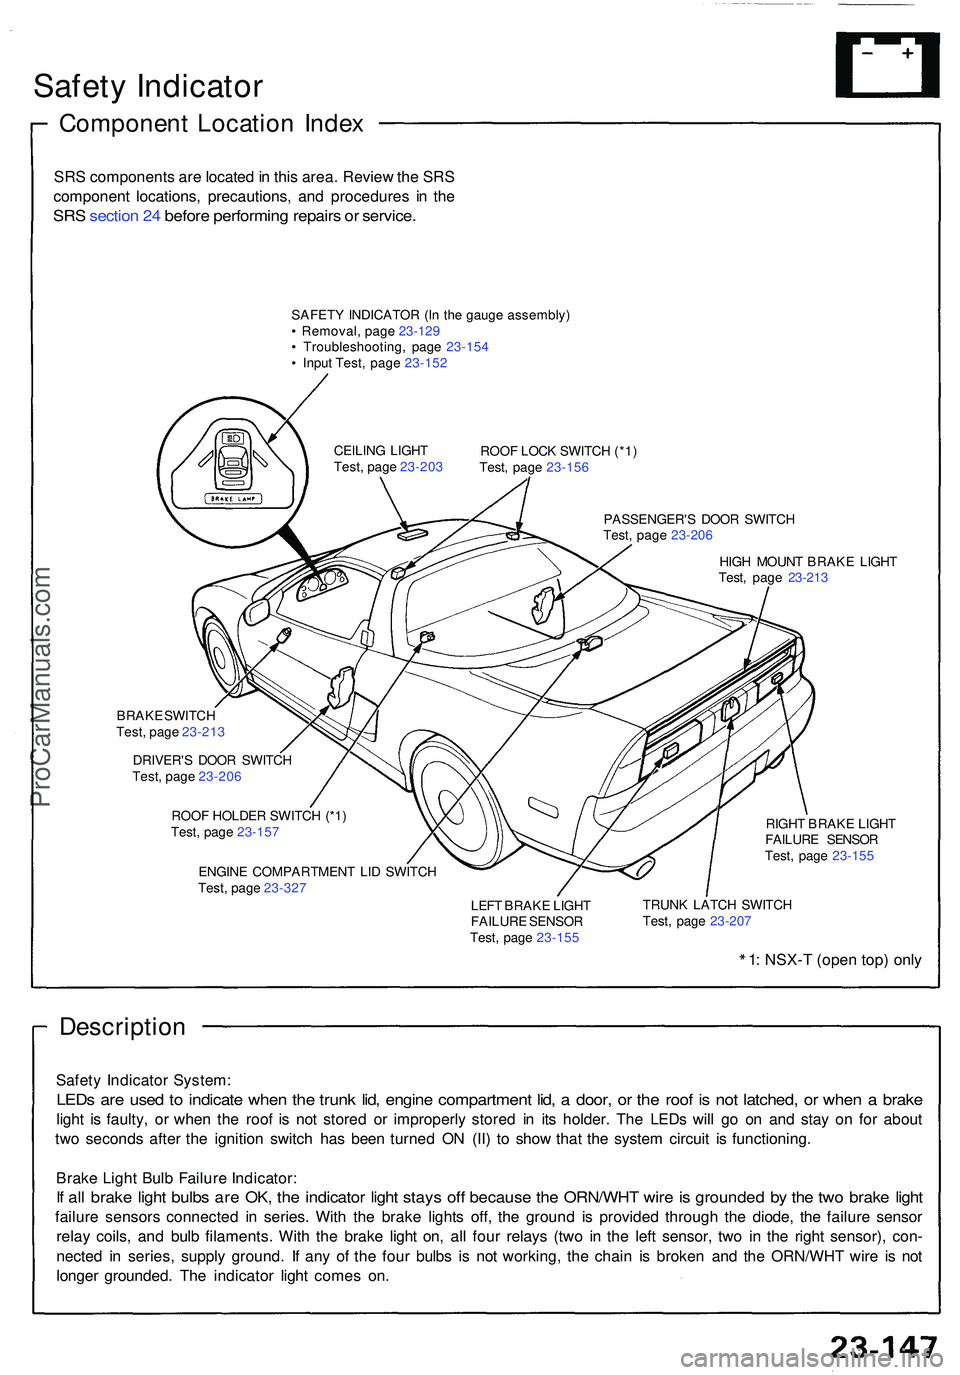
Safety Indicato r
Componen t Locatio n Inde x
SRS component s ar e locate d in thi s area . Revie w th e SR S
componen t locations , precautions , an d procedure s i n th e
SR S sectio n 24 befor e performin g repair s o r service .
SAFET Y INDICATO R (I n th e gaug e assembly )
• Removal , pag e 23-12 9
• Troubleshooting , pag e 23-15 4
• Inpu t Test , pag e 23-15 2
ROOF LOC K SWITC H (*1 )
Test , pag e 23-15 6
PASSENGER' S DOO R SWITC H
Test , pag e 23-20 6
HIG H MOUN T BRAK E LIGH T
Test , pag e 23-21 3
CEILIN
G LIGH T
Test , pag e 23-20 3
BRAK E SWITC H
Test , pag e 23-21 3
DRIVER' S DOO R SWITC H
Test , pag e 23-20 6
ROO F HOLDE R SWITC H (*1 )
Test , pag e 23-15 7
ENGIN E COMPARTMEN T LI D SWITC H
Test , pag e 23-32 7 RIGH
T BRAK E LIGH T
FAILUR E SENSO R
Test , pag e 23-15 5
LEF T BRAK E LIGH T
FAILUR E SENSO R
Test , pag e 23-15 5 TRUN
K LATC H SWITC H
Test , pag e 23-20 7
1: NSX- T (ope n top ) onl y
Descriptio n
Safety Indicato r System :
LEDs ar e use d t o indicat e whe n th e trun k lid , engin e compartmen t lid , a door , o r th e roo f i s no t latched , o r whe n a brak e
light i s faulty , o r whe n th e roo f i s no t store d o r improperl y store d i n it s holder . Th e LED s wil l g o o n an d sta y o n fo r abou t
tw o second s afte r th e ignitio n switc h ha s bee n turne d O N (II ) t o sho w tha t th e syste m circui t i s functioning .
Brak e Ligh t Bul b Failur e Indicator :
If al l brak e ligh t bulb s ar e OK , th e indicato r ligh t stay s of f becaus e th e ORN/WH T wir e is grounde d b y th e tw o brak e ligh t
failur e sensor s connecte d i n series . Wit h th e brak e light s off , th e groun d i s provide d throug h th e diode , th e failur e senso r
rela y coils , an d bul b filaments . Wit h th e brak e ligh t on , al l fou r relay s (tw o i n th e lef t sensor , tw o i n th e righ t sensor) , con -
necte d i n series , suppl y ground . I f an y o f th e fou r bulb s i s no t working , th e chai n i s broke n an d th e ORN/WH T wir e i s no t
longe r grounded . Th e indicato r ligh t come s on .
ProCarManuals.com
Page 1310 of 1503
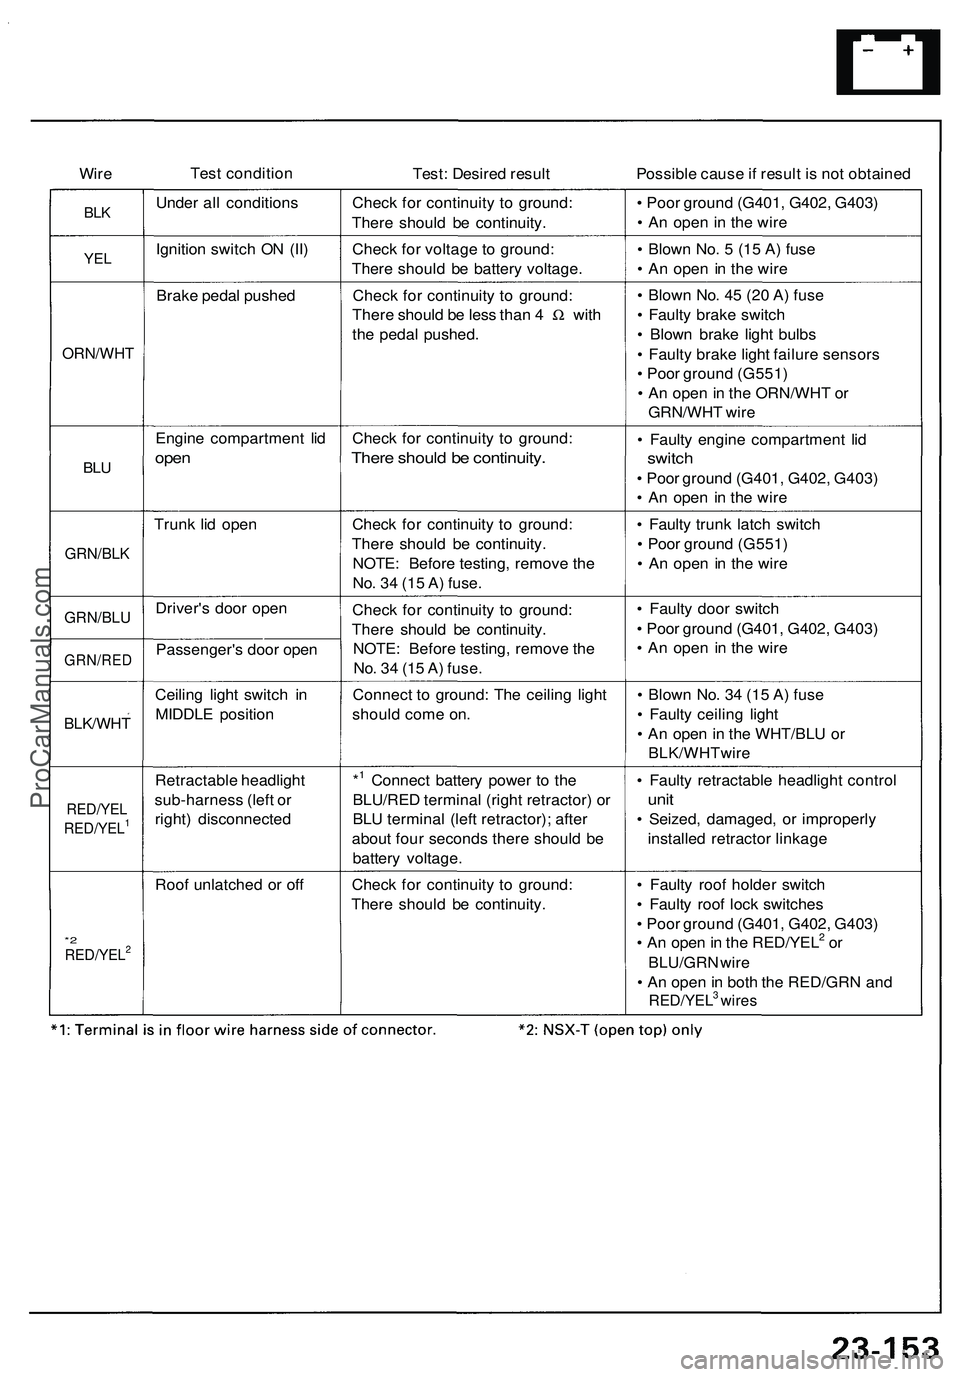
Wire Tes
t conditio n
Test: Desire d resul t Possible caus e if resul t i s no t obtaine d
BLKUnde r al l condition sCheck fo r continuit y t o ground :
Ther e shoul d b e continuity . •
Poo r groun d (G401 , G402 , G403 )
• A n ope n in th e wir e
YELIgnitio n switc h O N (II ) Check fo r voltag e t o ground :
Ther e shoul d b e batter y voltage . •
Blow n No . 5 (1 5 A ) fus e
• A n ope n i n th e wir e
Brak e peda l pushe d Check fo r continuit y t o ground :
Ther e shoul d b e les s tha n 4 W wit h
th e peda l pushed .
ORN/WH T
• Blow n No . 4 5 (2 0 A ) fus e
• Fault y brak e switc h
• Blow n brak e ligh t bulb s
• Fault y brak e ligh t failur e sensor s
• Poo r groun d (G551 )
• A n ope n in th e ORN/WH T o r
GRN/WH T wir e
BLU
Engin e compartmen t li d
ope n
Chec k fo r continuit y t o ground :
There shoul d b e continuity .
• Fault y engin e compartmen t li d
switc h
• Poo r groun d (G401 , G402 , G403 )
• A n ope n i n th e wir e
Trun k li d ope n
GRN/BL K
Check fo r continuit y t o ground :
Ther e shoul d b e continuity .
NOTE : Befor e testing , remov e th e
No . 3 4 (1 5 A ) fuse . •
Fault y trun k latc h switc h
• Poo r groun d (G551 )
• A n ope n in th e wir e
GRN/BL UDriver's doo r ope n
GRN/RE DPassenger' s doo r ope n Chec
k fo r continuit y t o ground :
Ther e shoul d b e continuity .
NOTE : Befor e testing , remov e th e
No . 3 4 (1 5 A ) fuse . •
Fault y doo r switc h
• Poo r groun d (G401 , G402 , G403 )
• A n ope n i n th e wir e
BLK/WH T
Ceiling ligh t switc h i n
MIDDL E positio n Connec
t t o ground : Th e ceilin g ligh t
shoul d com e on . •
Blow n No . 3 4 (1 5 A ) fus e
• Fault y ceilin g ligh t
• A n ope n in th e WHT/BL U o r
BLK/WHTwir e
RED/YEL
RED/YEL1
Retractabl e headligh t
sub-harnes s (lef t o r
right ) disconnecte d*1 Connec
t batter y powe r t o th e
BLU/RE D termina l (righ t retractor ) o r
BL U termina l (lef t retractor) ; afte r
abou t fou r second s ther e shoul d b e
batter y voltage . •
Fault y retractabl e headligh t contro l
unit
• Seized , damaged , o r improperl y
installe d retracto r linkag e
Roo f unlatche d o r of f Check fo r continuit y t o ground :
Ther e shoul d b e continuity .
*2RED/YEL2
• Fault y roo f holde r switc h
• Fault y roo f loc k switche s
• Poo r groun d (G401 , G402 , G403 )
• A n ope n in th e RED/YEL
2 o r
BLU/GR N wir e
• A n ope n in bot h th e RED/GR N an d
RED/YEL3 wire s
ProCarManuals.com
Page 1312 of 1503
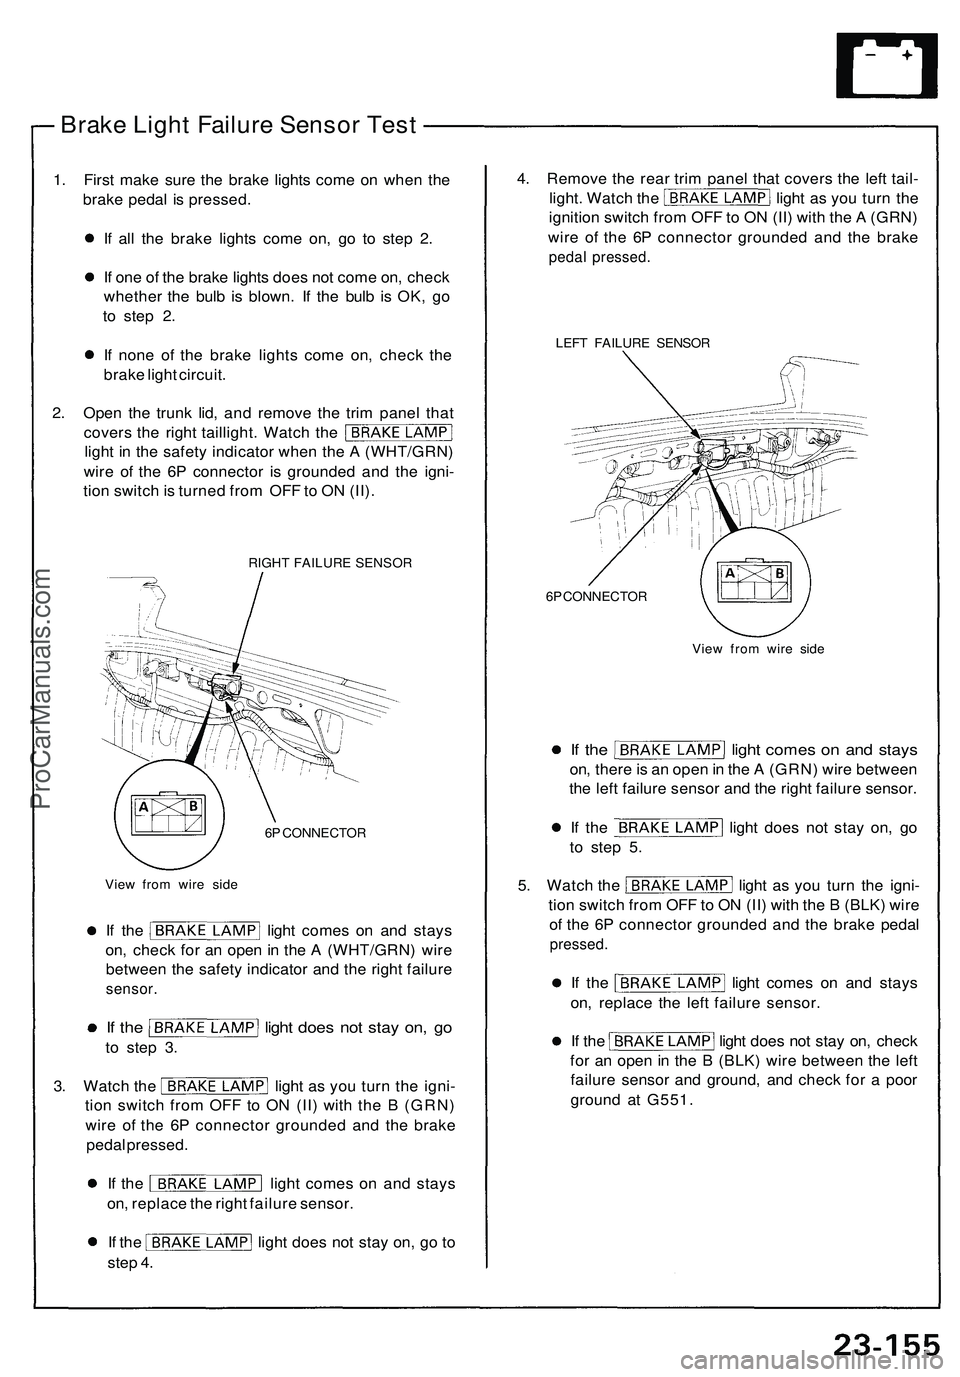
Brake Ligh t Failur e Senso r Tes t
1. Firs t mak e sur e th e brak e light s com e o n whe n th e
brak e peda l i s pressed .
I f al l th e brak e light s com e on , g o t o ste p 2 .
I f on e o f th e brak e light s doe s no t com e on , chec k
whethe r th e bul b i s blown . I f th e bul b i s OK , g o
t o ste p 2 .
I f non e o f th e brak e light s com e on , chec k th e
brak e ligh t circui t.
2 . Ope n th e trun k lid , an d remov e th e tri m pane l tha t
cover s th e righ t taillight . Watc h th e
ligh t i n th e safet y indicato r whe n th e A (WHT/GRN )
wir e o f th e 6 P connecto r i s grounde d an d th e igni -
tio n switc h is turne d fro m OF F to O N (II) .
RIGH T FAILUR E SENSO R
6 P CONNECTO R
Vie w fro m wir e sid e LEF
T FAILUR E SENSO R
6 P CONNECTO R
View fro m wir e sid e
If th e ligh t come s o n an d stay s
on, ther e is a n ope n in th e A (GRN ) wir e betwee n
th e lef t failur e senso r an d th e righ t failur e sensor .
If th e ligh t doe s no t sta y on , g o
t o ste p 5 .
5. Watc h th e ligh t a s yo u tur n th e igni -
tio n switc h fro m OF F to O N (II ) wit h th e B (BLK ) wir e
o f th e 6 P connecto r grounde d an d th e brak e peda l
pressed .
If th e ligh t come s o n an d stay s
on , replac e th e lef t failur e sensor .
If th e ligh t doe s no t sta y on , chec k
fo r a n ope n in th e B (BLK ) wir e betwee n th e lef t
failur e senso r an d ground , an d chec k fo r a poo r
groun d a t G551 .
If th e ligh t come s o n an d stay s
on , chec k fo r a n ope n in th e A (WHT/GRN ) wir e
betwee n th e safet y indicato r an d th e righ t failur e
sensor .
If th e ligh t doe s no t sta y on , g o
to ste p 3 .
3. Watc h th e ligh t a s yo u tur n th e igni -
tio n switc h fro m OF F t o O N (II ) wit h th e B (GRN )
wir e o f th e 6 P connecto r grounde d an d th e brak e
peda l pressed .
If th e ligh t come s o n an d stay s
on , replac e th e righ t failur e sensor .
If th e ligh t doe s no t sta y on , g o t o
ste p 4 . 4
. Remov e th e rea r tri m pane l tha t cover s th e lef t tail -
light . Watc h th e ligh t a s yo u tur n th e
ignitio n switc h fro m OF F to O N (II ) wit h th e A (GRN )
wir e o f th e 6 P connecto r grounde d an d th e brak e
pedal pressed .
ProCarManuals.com