sensor ACURA NSX 1997 Service Manual PDF
[x] Cancel search | Manufacturer: ACURA, Model Year: 1997, Model line: NSX, Model: ACURA NSX 1997Pages: 1503, PDF Size: 57.08 MB
Page 901 of 1503
System Description
Function and Operation (cont'd)
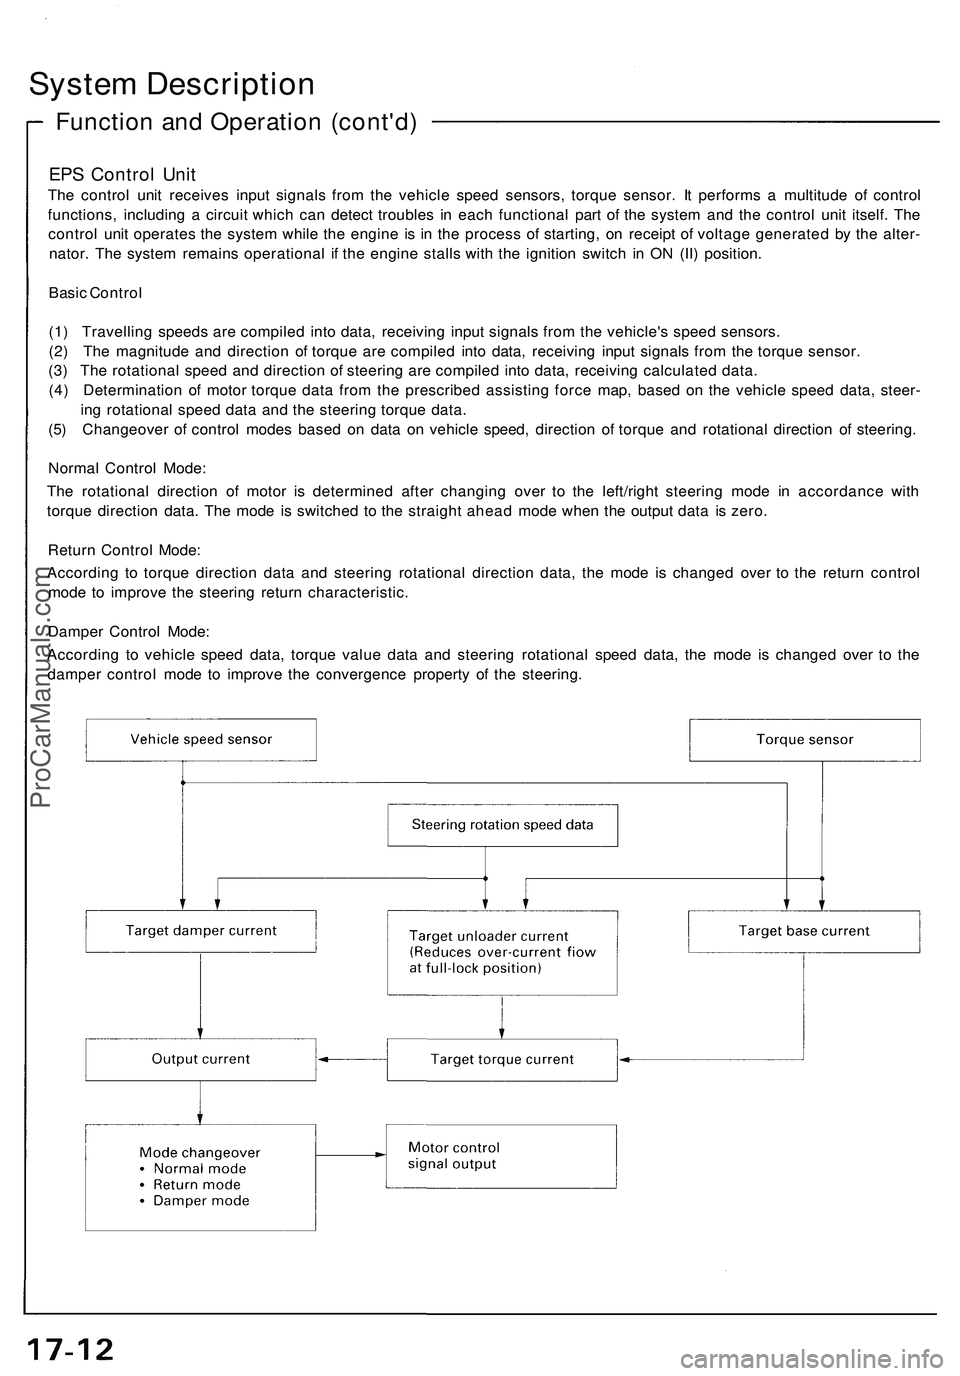
EPS Control Unit
The control unit receives input signals from the vehicle speed sensors, torque sensor. It performs a multitude of control
functions, including a circuit which can detect troubles in each functional part of the system and the control unit itself. The
control unit operates the system while the engine is in the process of starting, on receipt of voltage generated by the alter-
nator. The system remains operational if the engine stalls with the ignition switch in ON (II) position.
Basic Control
(1) Travelling speeds are compiled into data, receiving input signals from the vehicle's speed sensors.
(2) The magnitude and direction of torque are compiled into data, receiving input signals from the torque sensor.
(3) The rotational speed and direction of steering are compiled into data, receiving calculated data.
(4) Determination of motor torque data from the prescribed assisting force map, based on the vehicle speed data, steer-
ing rotational speed data and the steering torque data.
(5) Changeover of control modes based on data on vehicle speed, direction of torque and rotational direction of steering.
Normal Control Mode:
The rotational direction of motor is determined after changing over to the left/right steering mode in accordance with
torque direction data. The mode is switched to the straight ahead mode when the output data is zero.
Return Control Mode:
According to torque direction data and steering rotational direction data, the mode is changed over to the return control
mode to improve the steering return characteristic.
Damper Control Mode:
According to vehicle speed data, torque value data and steering rotational speed data, the mode is changed over to the
damper control mode to improve the convergence property of the steering.ProCarManuals.com
Page 902 of 1503
Self-Diagnosis Function
The EPS control unit monitors the system inputs and outputs, and the driving current of the motor. If there is a problem in
the system, the control unit turns the system off by actuating the relay. Power assist stops and normal manual steering
operation resumes. The control unit also turns the EPS indicator light on to alert the driver, and memorizes the problem in
the form of a code. Connecting the terminals of the service check connector with the SCS service connector (special tool)
enables the EPS indicator light to blink the problem code when the ignition switch is turned on (II).
Unloader Control
If the steering wheel is turned fully and held in the full-lock position, the steering torque reaches the maximum point, and
an over-current flows to the motor. The control unit detects this and reduces the current flow to the motor.
Average Moving Current Control
The electric current flow to the motor is estimated from the current values detected by the current sensor, and the average
current is obtained at two second intervals. The motor driving current is suppressed when the average current value
exceeds a predetermined marginal value. The control unit regulates the motor current during continuous loading to sup-
press any excessive temperature rise in the motor.ProCarManuals.com
Page 903 of 1503
System Description
Function and Operation (cont'd)
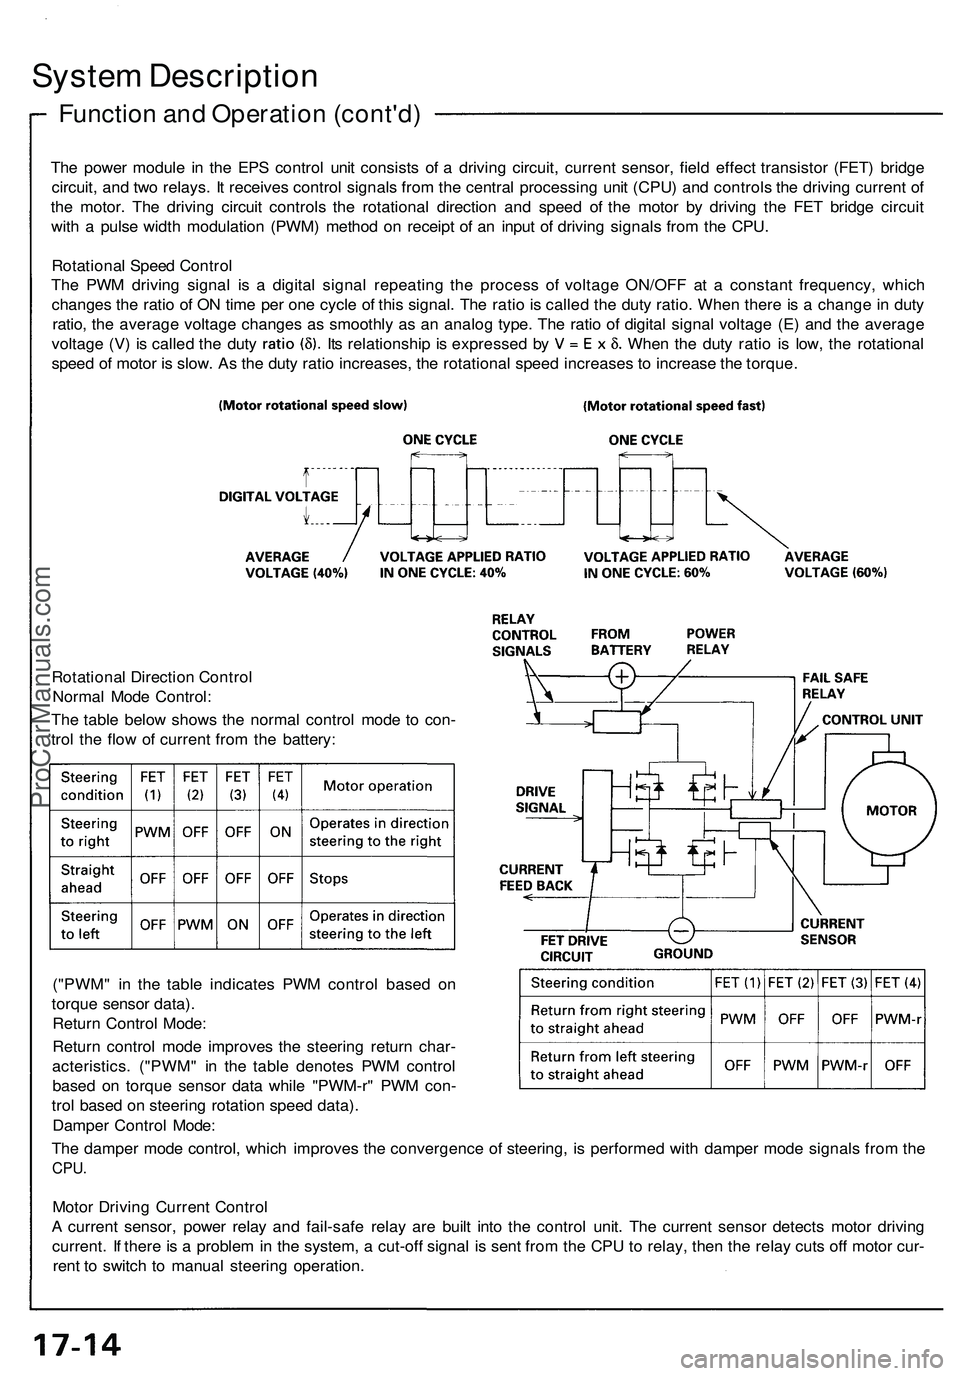
The power module in the EPS control unit consists of a driving circuit, current sensor, field effect transistor (FET) bridge
circuit, and two relays. It receives control signals from the central processing unit (CPU) and controls the driving current of
the motor. The driving circuit controls the rotational direction and speed of the motor by driving the FET bridge circuit
with a pulse width modulation (PWM) method on receipt of an input of driving signals from the CPU.
Rotational Speed Control
The PWM driving signal is a digital signal repeating the process of voltage ON/OFF at a constant frequency, which
changes the ratio of ON time per one cycle of this signal. The ratio is called the duty ratio. When there is a change in duty
ratio, the average voltage changes as smoothly as an analog type. The ratio of digital signal voltage (E) and the average
voltage (V) is called the duty Its relationship is expressed by When the duty ratio is low, the rotational
speed of motor is slow. As the duty ratio increases, the rotational speed increases to increase the torque.
Rotational Direction Control
Normal Mode Control:
The table below shows the normal control mode to con-
trol the flow of current from the battery:
("PWM" in the table indicates PWM control based on
torque sensor data).
Return Control Mode:
Return control mode improves the steering return char-
acteristics. ("PWM" in the table denotes PWM control
based on torque sensor data while "PWM-r" PWM con-
trol based on steering rotation speed data).
Damper Control Mode:
The damper mode control, which improves the convergence of steering, is performed with damper mode signals from the
CPU.
Motor Driving Current Control
A current sensor, power relay and fail-safe relay are built into the control unit. The current sensor detects motor driving
current. If there is a problem in the system, a cut-off signal is sent from the CPU to relay, then the relay cuts off motor cur-
rent to switch to manual steering operation.ProCarManuals.com
Page 904 of 1503
Steering Gearbox
Motor and Power Assist Mechanism
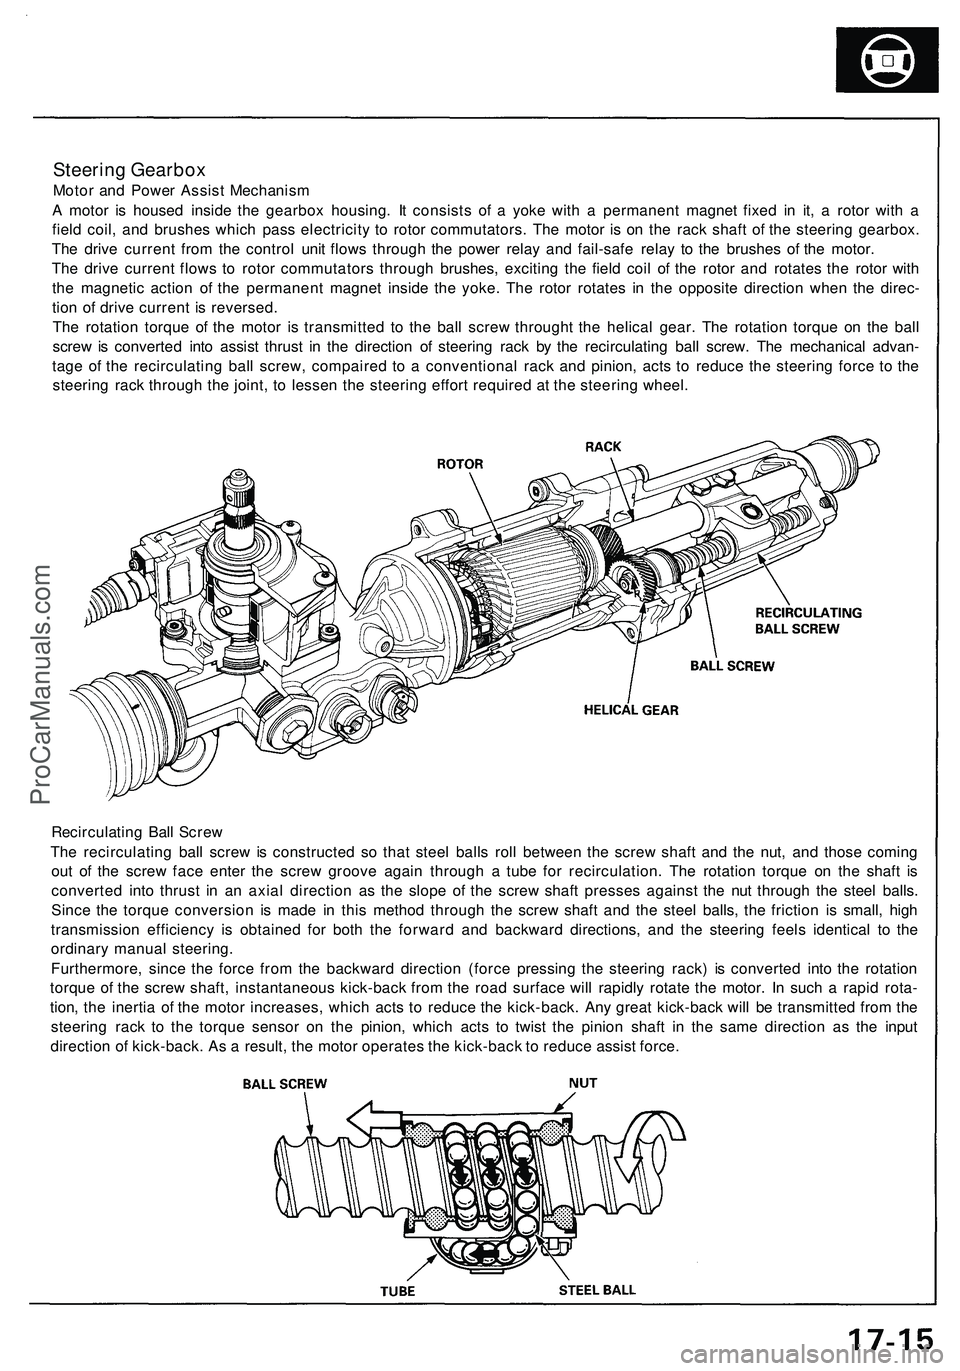
A motor is housed inside the gearbox housing. It consists of a yoke with a permanent magnet fixed in it, a rotor with a
field coil, and brushes which pass electricity to rotor commutators. The motor is on the rack shaft of the steering gearbox.
The drive current from the control unit flows through the power relay and fail-safe relay to the brushes of the motor.
The drive current flows to rotor commutators through brushes, exciting the field coil of the rotor and rotates the rotor with
the magnetic action of the permanent magnet inside the yoke. The rotor rotates in the opposite direction when the direc-
tion of drive current is reversed.
The rotation torque of the motor is transmitted to the ball screw throught the helical gear. The rotation torque on the ball
screw is converted into assist thrust in the direction of steering rack by the recirculating ball screw. The mechanical advan-
tage of the recirculating ball screw, compaired to a conventional rack and pinion, acts to reduce the steering force to the
steering rack through the joint, to lessen the steering effort required at the steering wheel.
Recirculating Ball Screw
The recirculating ball screw is constructed so that steel balls roll between the screw shaft and the nut, and those coming
out of the screw face enter the screw groove again through a tube for recirculation. The rotation torque on the shaft is
converted into thrust in an axial direction as the slope of the screw shaft presses against the nut through the steel balls.
Since the torque conversion is made in this method through the screw shaft and the steel balls, the friction is small, high
transmission efficiency is obtained for both the forward and backward directions, and the steering feels identical to the
ordinary manual steering.
Furthermore, since the force from the backward direction (force pressing the steering rack) is converted into the rotation
torque of the screw shaft, instantaneous kick-back from the road surface will rapidly rotate the motor. In such a rapid rota-
tion, the inertia of the motor increases, which acts to reduce the kick-back. Any great kick-back will be transmitted from the
steering rack to the torque sensor on the pinion, which acts to twist the pinion shaft in the same direction as the input
direction of kick-back. As a result, the motor operates the kick-back to reduce assist force.ProCarManuals.com
Page 920 of 1503
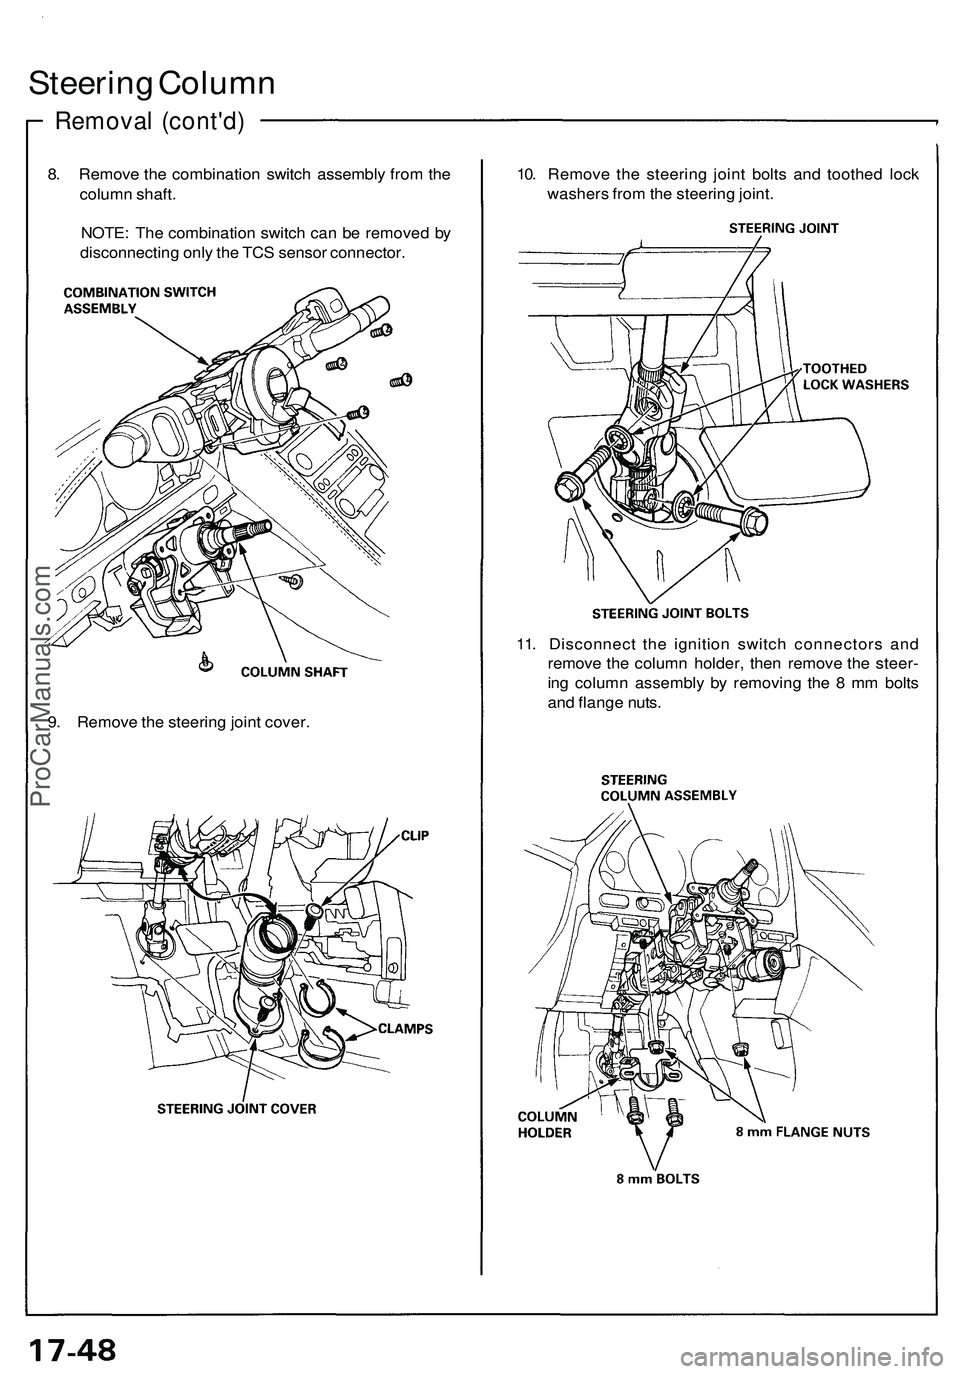
Steering Column
Removal (cont'd)
8. Remove the combination switch assembly from the
column shaft.
NOTE: The combination switch can be removed by
disconnecting only the TCS sensor connector.
10. Remove the steering joint bolts and toothed lock
washers from the steering joint.
9. Remove the steering joint cover.
11. Disconnect the ignition switch connectors and
remove the column holder, then remove the steer-
ing column assembly by removing the 8 mm bolts
and flange nuts.ProCarManuals.com
Page 921 of 1503
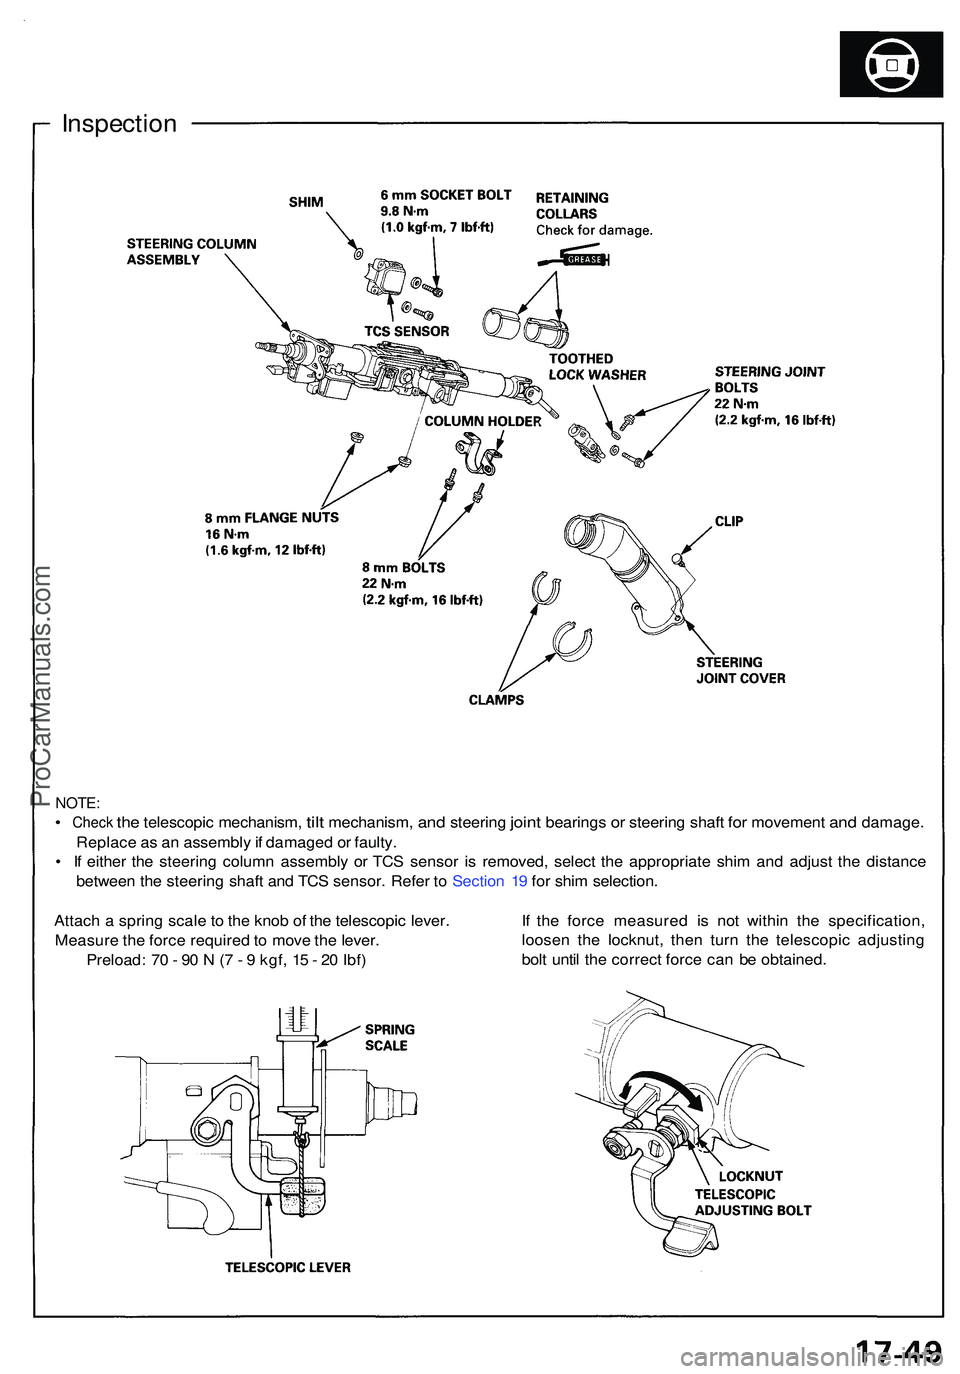
Inspection
NOTE:
• Chec k the telescopi c mechanism , tilt mechanism , and steerin g joint bearing s or steerin g shaf t for movemen t and damage .
Replac e a s a n assembl y if damage d o r faulty .
• I f eithe r th e steerin g colum n assembl y o r TC S senso r i s removed , selec t th e appropriat e shi m an d adjus t th e distanc e
betwee n th e steerin g shaf t an d TC S sensor . Refe r t o Sectio n 1 9 fo r shi m selection .
I f th e forc e measure d i s no t withi n th e specification ,
loose n th e locknut , the n tur n th e telescopi c adjustin g
bol t unti l th e correc t forc e ca n b e obtained .
Attac
h a sprin g scal e to th e kno b o f th e telescopi c lever .
Measur e th e forc e require d to mov e th e lever .
Preload : 7 0 - 9 0 N (7 - 9 kgf , 1 5 - 2 0 Ibf )
ProCarManuals.com
Page 923 of 1503
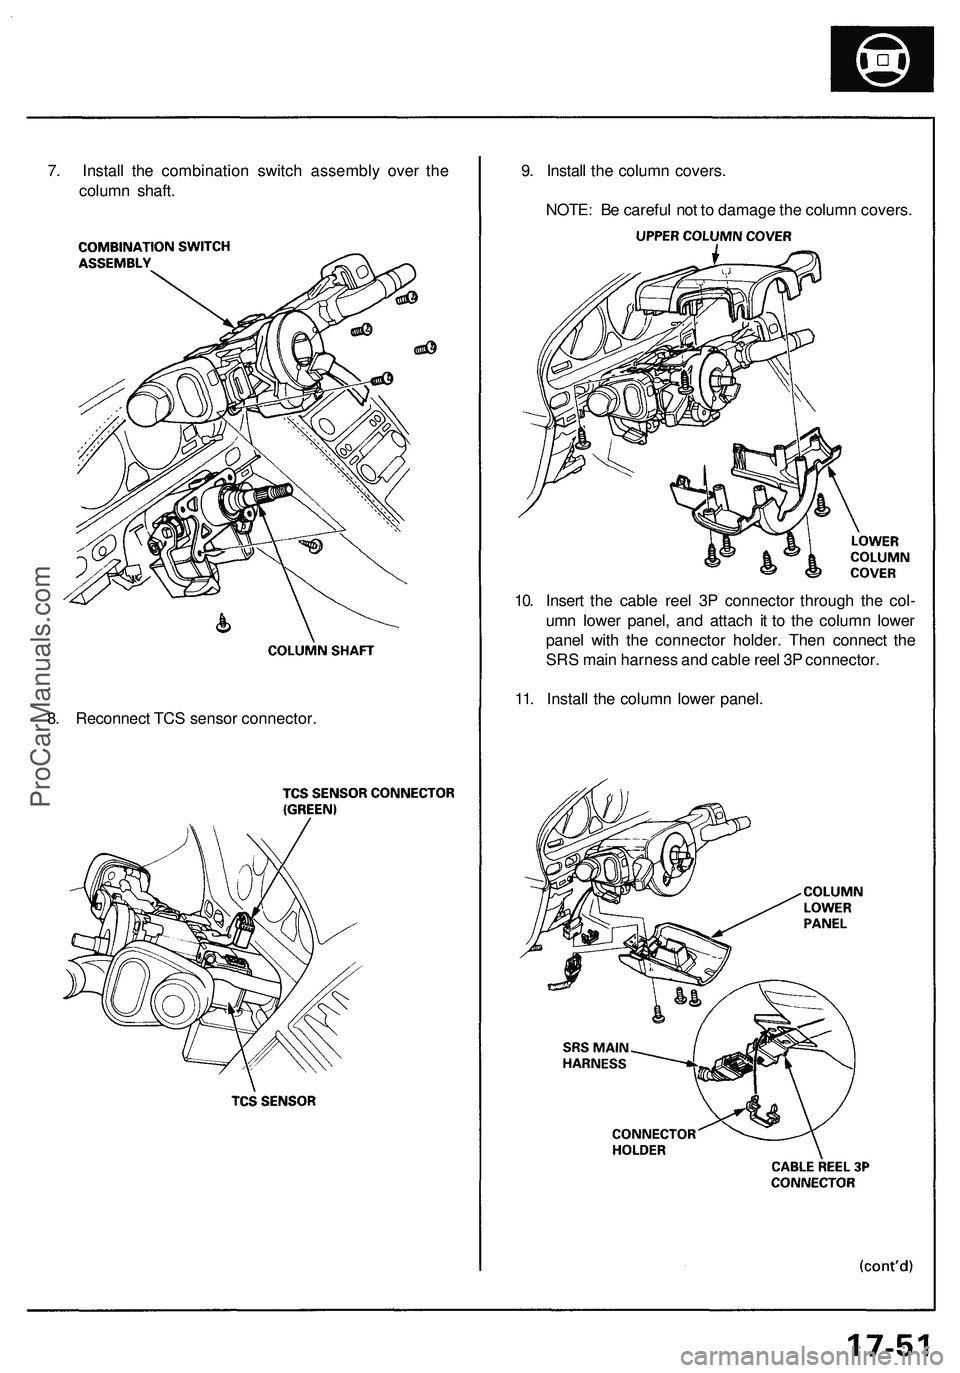
9. Install the column covers.
NOTE: Be careful not to damage the column covers.
10. Insert the cable reel 3P connector through the col-
umn lower panel, and attach it to the column lower
panel with the connector holder. Then connect the
SRS main harness and cable reel 3P connector.
11. Install the column lower panel.
7. Install the combination switch assembly over the
column shaft.
8. Reconnect TCS sensor connector.ProCarManuals.com
Page 949 of 1503
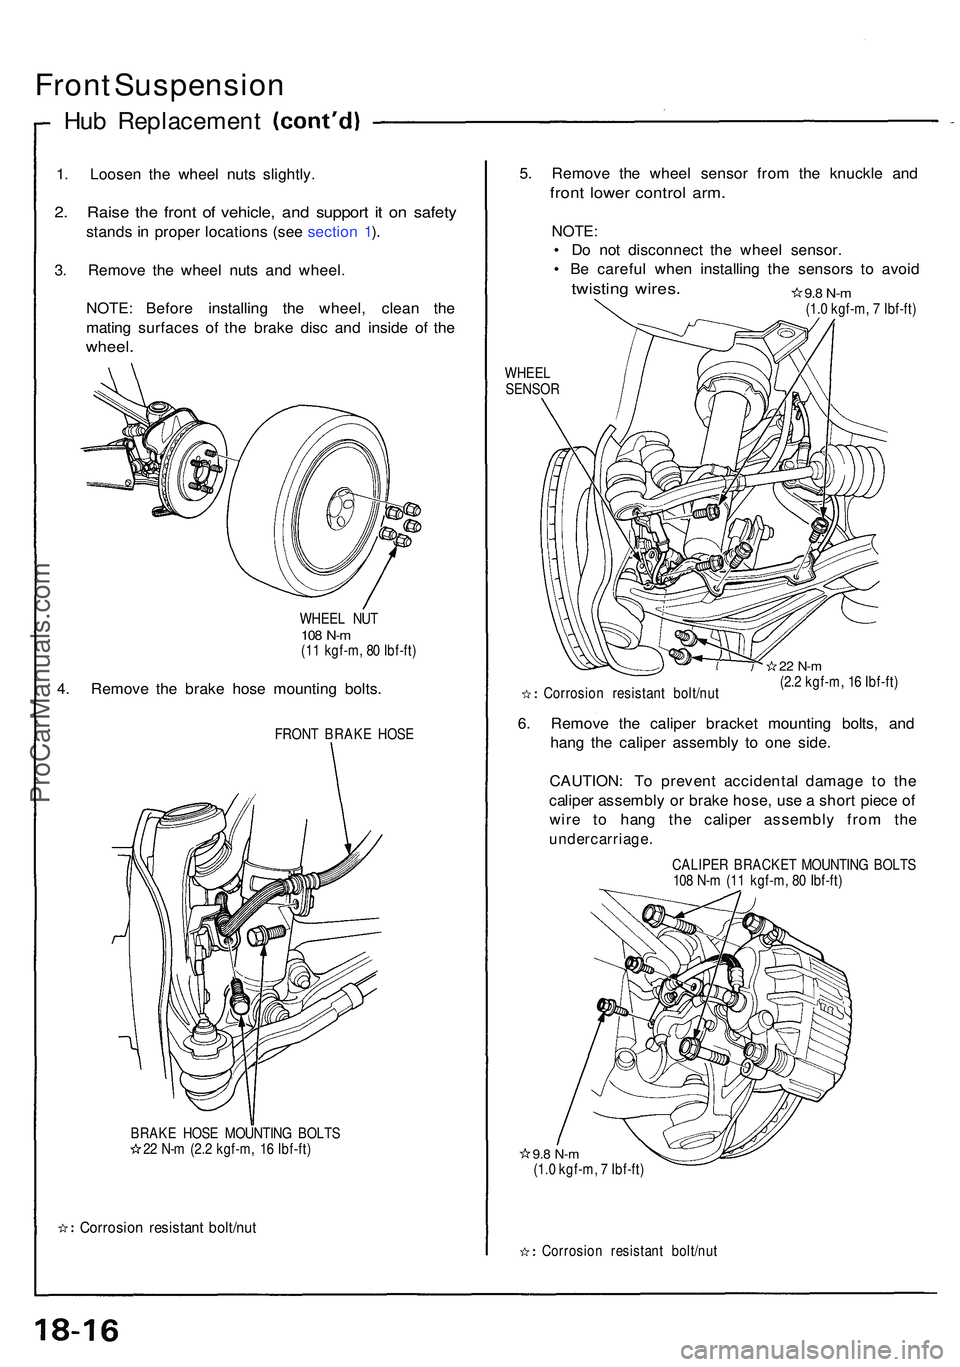
Front Suspensio n
Hub Replacemen t
1. Loose n th e whee l nut s slightly .
2. Rais e th e fron t o f vehicle , an d suppor t i t o n safet y
stands i n prope r location s (se e sectio n 1 ).
3 . Remov e th e whee l nut s an d wheel .
NOTE : Befor e installin g th e wheel , clea n th e
matin g surface s o f th e brak e dis c an d insid e of the
wheel .
WHEE L NU T108 N- m(11 kgf-m , 8 0 Ibf-ft )
4. Remov e th e brak e hos e mountin g bolts .
FRON T BRAK E HOS E
BRAK E HOS E MOUNTIN G BOLT S
2 2 N- m (2. 2 kgf-m , 1 6 Ibf-ft )
Corrosio n resistan t bolt/nu t
5. Remov e th e whee l senso r fro m th e knuckl e an d
fron t lowe r contro l arm .
NOTE :
• D o no t disconnec t th e whee l sensor .
• B e carefu l whe n installin g th e sensor s t o avoi d
twistin g wires .
WHEE L
SENSO R
Corrosio n resistan t bolt/nu t
22 N- m(2.2 kgf-m , 1 6 Ibf-ft )
6. Remov e th e calipe r bracke t mountin g bolts , an d
han g th e calipe r assembl y t o on e side .
CAUTION : T o preven t accidenta l damag e t o th e
calipe r assembl y o r brak e hose , us e a shor t piec e o f
wir e t o han g th e calipe r assembl y fro m th e
undercarriage .
CALIPER BRACKE T MOUNTIN G BOLT S
10 8 N- m (1 1 kgf-m , 8 0 Ibf-ft )
9.8 N- m(1.0 kgf-m , 7 Ibf-ft )
Corrosio n resistan t bolt/nu t
9.8 N- m(1.0 kgf-m , 7 Ibf-ft )
ProCarManuals.com
Page 965 of 1503
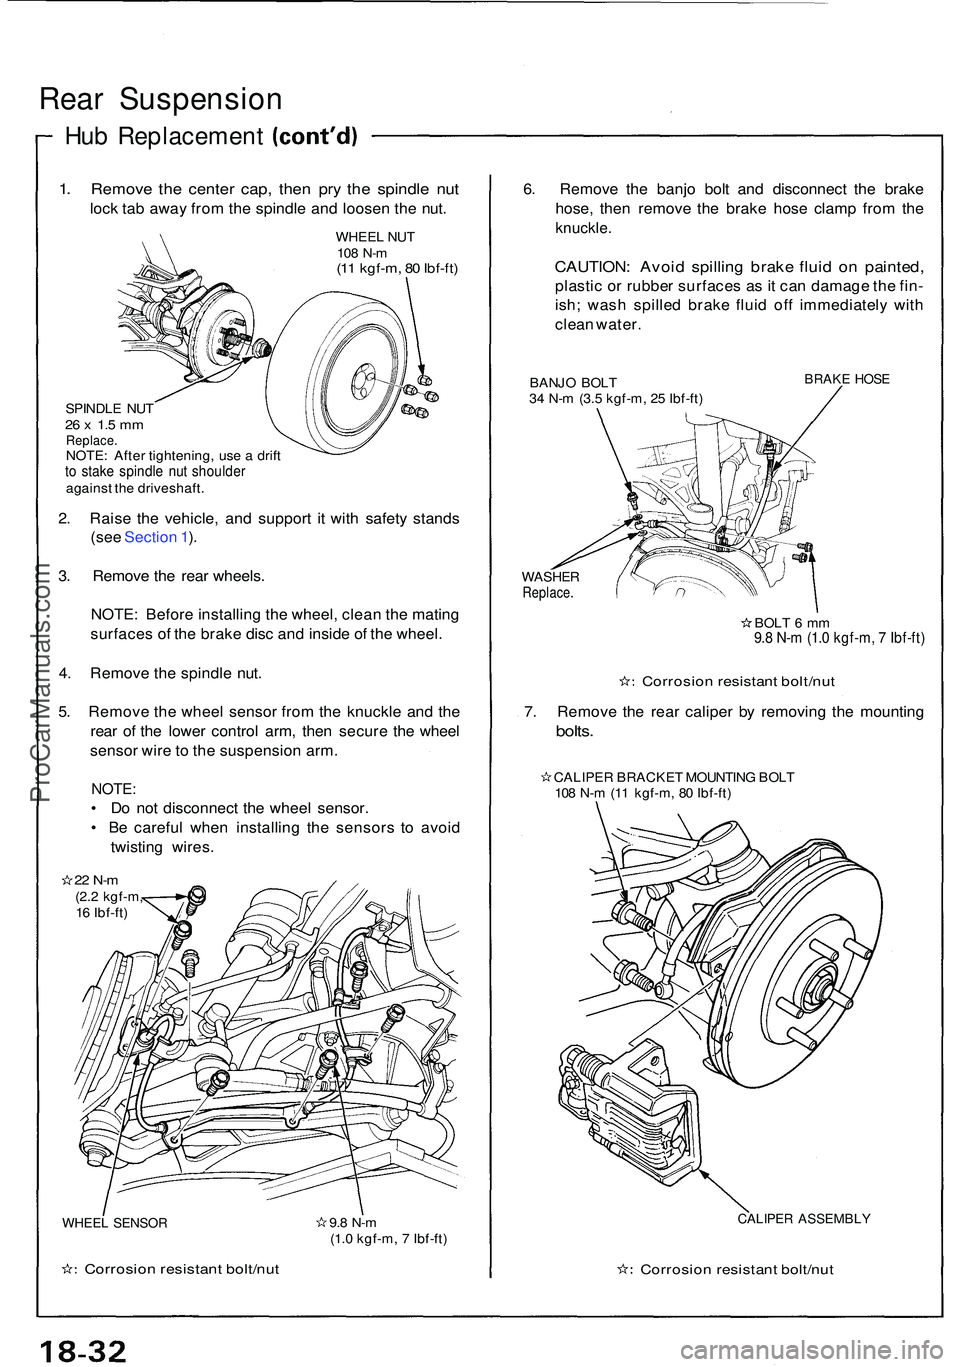
Rear Suspensio n
Hub Replacemen t
1. Remov e th e cente r cap , the n pr y th e spindl e nu t
lock ta b awa y fro m th e spindl e an d loose n th e nut .
WHEE L NU T108 N- m(11 kgf-m , 8 0 Ibf-ft )
SPINDL E NU T26 x 1. 5 m mReplace .NOTE: Afte r tightening , us e a drif tto stak e spindl e nu t shoulde ragainst th e driveshaft .
2. Rais e th e vehicle , an d suppor t i t wit h safet y stand s
(se e Sectio n 1 ).
3 . Remov e th e rea r wheels .
NOTE : Befor e installin g th e wheel , clea n th e matin g
surface s o f th e brak e dis c an d insid e o f th e wheel .
4 . Remov e th e spindl e nut .
5 . Remov e th e whee l senso r fro m th e knuckl e an d th e
rea r o f th e lowe r contro l arm , the n secur e th e whee l
senso r wir e to th e suspensio n arm .
NOTE :
• D o no t disconnec t th e whee l sensor .
• B e carefu l whe n installin g th e sensor s t o avoi d
twistin g wires .
22 N- m(2.2 kgf-m ,
1 6 Ibf-ft )
WHEE L SENSO R
Corrosio n resistan t bolt/nu t
9.8 N- m(1.0 kgf-m , 7 Ibf-ft )
6. Remov e th e banj o bol t an d disconnec t th e brak e
hose , the n remov e th e brak e hos e clam p fro m th e
knuckle .
CAUTION : Avoi d spillin g brak e flui d o n painted ,
plastic o r rubbe r surface s a s it ca n damag e th e fin -
ish ; was h spille d brak e flui d of f immediatel y wit h
clea n water .
BANJO BOL T
3 4 N- m (3. 5 kgf-m , 2 5 Ibf-ft )BRAK E HOS E
WASHE RReplace .
BOLT 6 m m9.8 N- m (1. 0 kgf-m , 7 Ibf-ft )
Corrosio n resistan t bolt/nu t
7. Remov e th e rea r calipe r b y removin g th e mountin g
bolts.
CALIPE R BRACKE T MOUNTIN G BOL T
10 8 N- m (1 1 kgf-m , 8 0 Ibf-ft )
CALIPE R ASSEMBL Y
Corrosion resistan t bolt/nu t
ProCarManuals.com
Page 1010 of 1503
Features/Construction/Operation
Anti-lock Brake System (ABS) Description
General
In a conventional brake system, if the brake pedal is depressed excessively, the wheels can lock before the vehicle comes
to a stop. In such a case, the stability of the vehicle is reduced if the rear wheels are locked, and maneuverability of the
vehicle is reduced if the front wheels are locked, creating an extremely unstable condition.
The Anti-lock Brake System (ABS) modulates the pressure of the brake fluid applied to each caliper, thereby preventing
the locking of the wheels, whenever the wheels are likely to locked due to be excessive braking. It then restores normal
hydraulic pressure when there is no longer any possibility of wheel locking.
4-Channel Anti-lock Brake System (ABS) Features
• Increased braking stability can be achieved regardless of changing driving conditions.
• The maneuverability of the vehicle is improved as the system prevents the front wheels from locking.
• When the anti-lock brake system goes into action, kickback is felt on the brake pedal.
• The anti-lock brake system is equipped with a self-diagnosis function. When an abnormality is detected, the ABS indi-
cator light comes on. The location of the abnormality can be diagnosed from the frequency of the system indicator
light display blinks.
• This system has individual control of the front and rear wheels. Braking force is controlled on each of the four wheels
independently, resulting in optimum braking efects on the four wheels.
The system has a fail-safe function that allows normal braking if there's a problem with the anti-lock brake system.
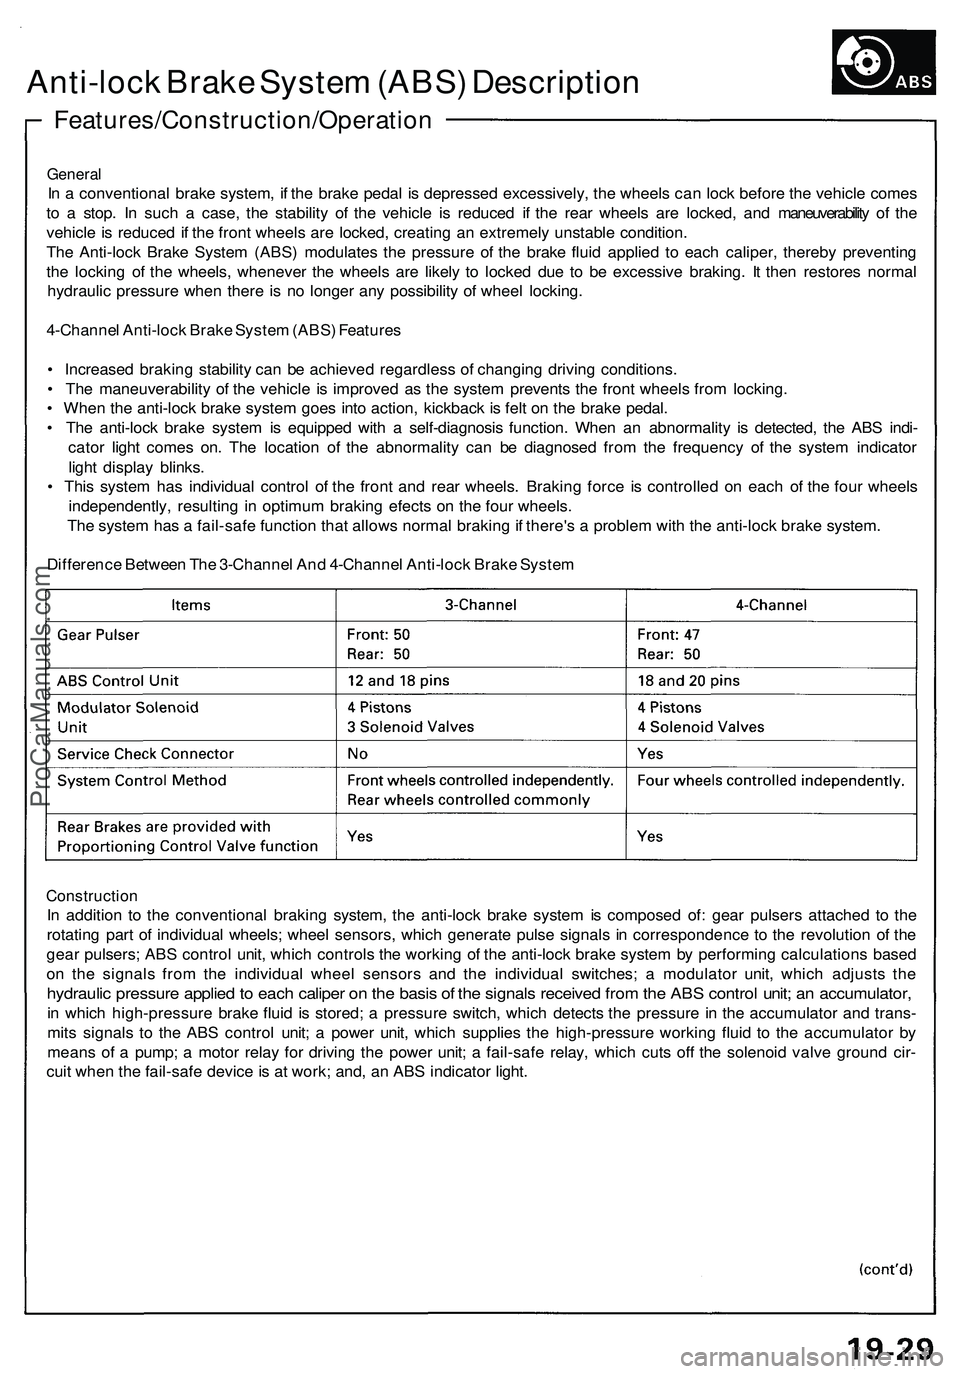
Difference Between The 3-Channel And 4-Channel Anti-lock Brake System
Construction
In addition to the conventional braking system, the anti-lock brake system is composed of: gear pulsers attached to the
rotating part of individual wheels; wheel sensors, which generate pulse signals in correspondence to the revolution of the
gear pulsers; ABS control unit, which controls the working of the anti-lock brake system by performing calculations based
on the signals from the individual wheel sensors and the individual switches; a modulator unit, which adjusts the
hydraulic pressure applied to each caliper on the basis of the signals received from the ABS control unit; an accumulator,
in which high-pressure brake fluid is stored; a pressure switch, which detects the pressure in the accumulator and trans-
mits signals to the ABS control unit; a power unit, which supplies the high-pressure working fluid to the accumulator by
means of a pump; a motor relay for driving the power unit; a fail-safe relay, which cuts off the solenoid valve ground cir-
cuit when the fail-safe device is at work; and, an ABS indicator light.ProCarManuals.com