ACURA NSX 1997 Service Repair Manual
Manufacturer: ACURA, Model Year: 1997, Model line: NSX, Model: ACURA NSX 1997Pages: 1503, PDF Size: 57.08 MB
Page 1181 of 1503
ProCarManuals.com
Page 1182 of 1503
Description
Outline
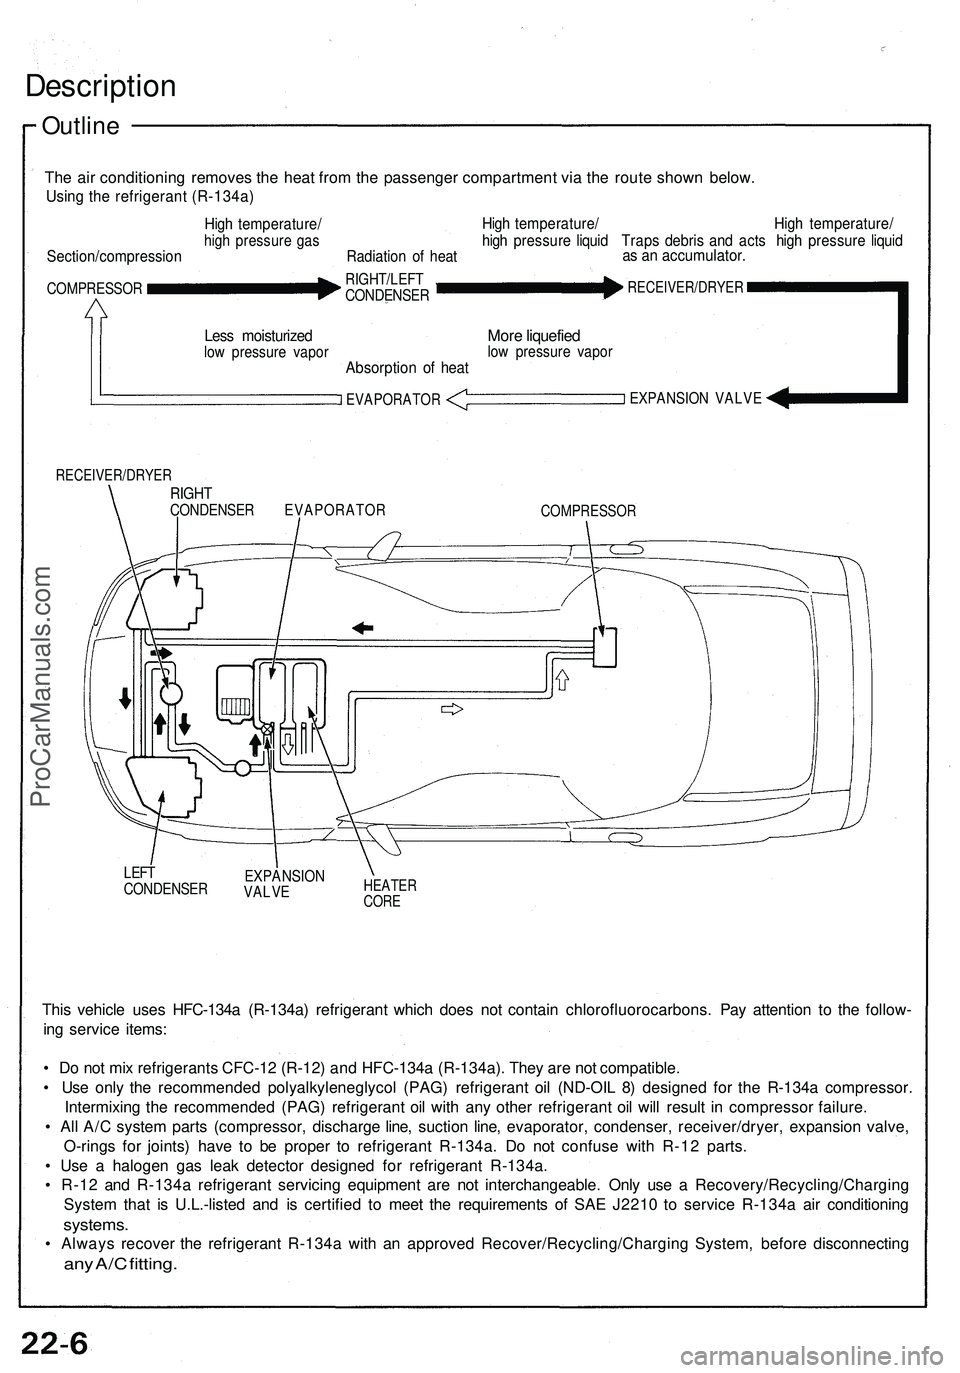
The ai r conditionin g remove s th e hea t fro m th e passenge r compartmen t vi a th e rout e show n below .
Using th e refrigeran t (R-134a )
Section/compressio n
High temperature /high pressur e ga s
COMPRESSO R
Less moisturize dlow pressur e vapo r
Radiatio n o f hea t
High temperature / Hig h temperature /high pressur e liqui d Trap s debris and act s hig h pressur e liqui das a n accumulator .
RIGHT/LEFTCONDENSE RRECEIVER/DRYE R
Absorption o f hea t
EVAPORATO R
More liquefie dlow pressur e vapo r
EXPANSIO N VALV E
RECEIVER/DRYE R
COMPRESSOR
LEFTCONDENSE REXPANSIONVALVEHEATE RCORE
This vehicl e use s HFC-134 a (R-134a ) refrigeran t whic h doe s no t contai n chlorofluorocarbons . Pa y attentio n t o th e follow -
in g servic e items :
• D o no t mi x refrigerant s CFC-1 2 (R-12 ) an d HFC-134 a (R-134a) . The y ar e no t compatible .
• Us e onl y th e recommende d polyalkyleneglyco l (PAG ) refrigeran t oi l (ND-OI L 8 ) designe d fo r th e R-134 a compressor .
Intermixin g th e recommende d (PAG ) refrigeran t oi l wit h an y othe r refrigeran t oi l wil l resul t i n compresso r failure .
• Al l A/ C syste m part s (compressor , discharg e line , suctio n line , evaporator , condenser , receiver/dryer , expansio n valve ,
O-ring s fo r joints ) hav e t o b e prope r t o refrigeran t R-134a . D o no t confus e wit h R-1 2 parts .
• Us e a haloge n ga s lea k detecto r designe d fo r refrigeran t R-134a .
• R-1 2 an d R-134 a refrigeran t servicin g equipmen t ar e no t interchangeable . Onl y us e a Recovery/Recycling/Chargin g
Syste m tha t i s U.L.-liste d an d i s certifie d t o mee t th e requirement s o f SA E J221 0 t o servic e R-134 a ai r conditionin g
systems.
• Alway s recove r th e refrigeran t R-134 a wit h a n approve d Recover/Recycling/Chargin g System , befor e disconnectin g
any A/ C fitting .
RIGHTCONDENSE R EVAPORATO R
ProCarManuals.com
Page 1183 of 1503
A/C Triple Pressure Switch
Construction
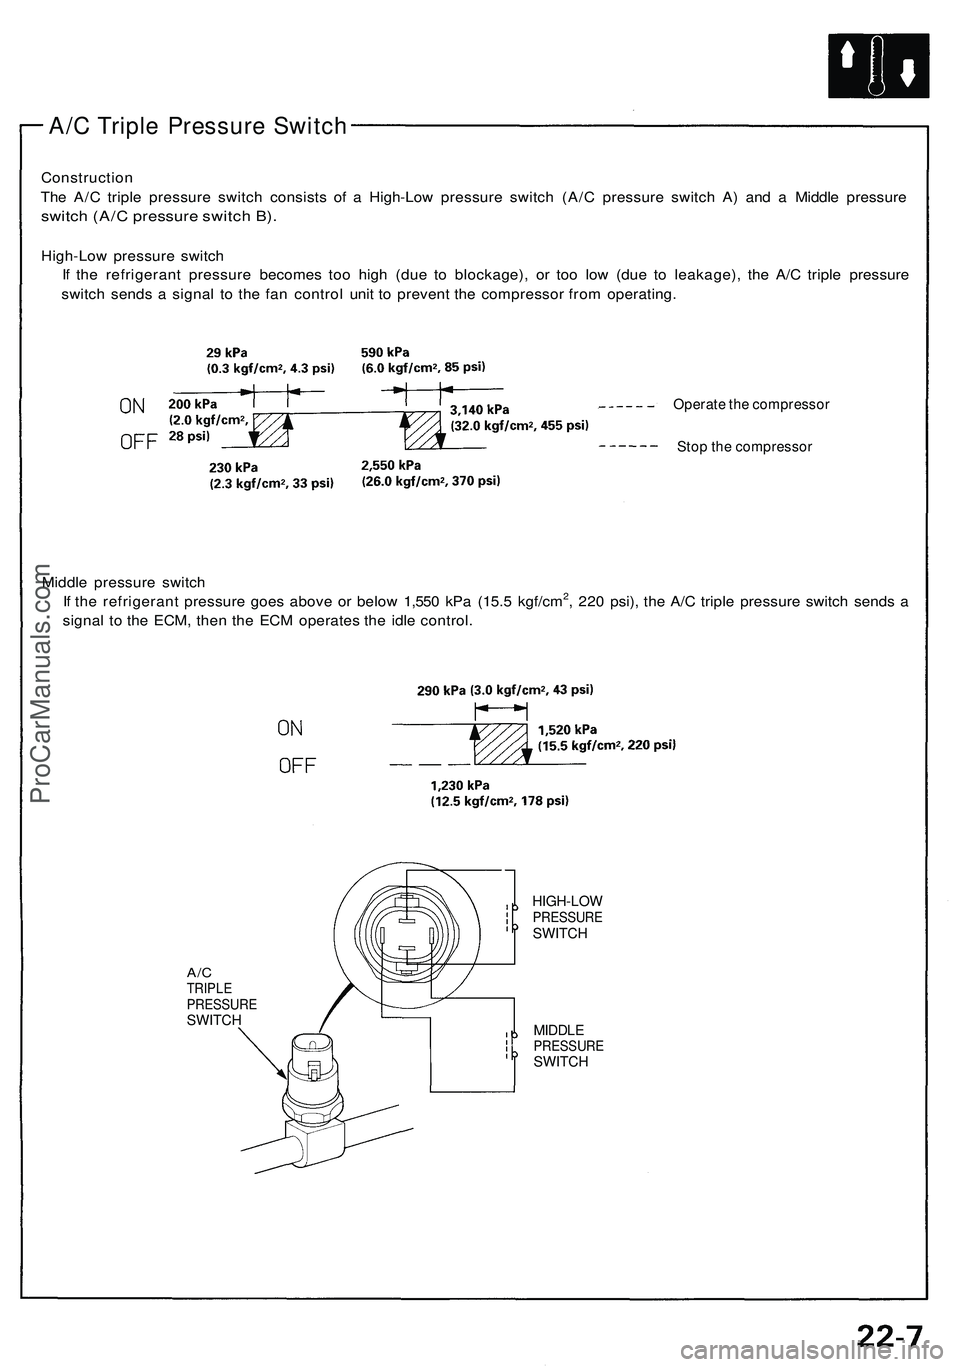
The A/C triple pressure switch consists of a High-Low pressure switch (A/C pressure switch A) and a Middle pressure
switch (A/C pressure switch B).
High-Low pressure switch
If the refrigerant pressure becomes too high (due to blockage), or too low (due to leakage), the A/C triple pressure
switch sends a signal to the fan control unit to prevent the compressor from operating.
Operate the compressor
Stop the compressor
Middle pressure switch
If the refrigerant pressure goes above or below 1,550 kPa (15.5 kgf/cm2, 220 psi), the A/C triple pressure switch sends a
signal to the ECM, then the ECM operates the idle control.
A/C
TRIPLE
PRESSURE
SWITCH
HIGH-LOW
PRESSURE
SWITCH
MIDDLE
PRESSURE
SWITCHProCarManuals.com
Page 1184 of 1503
Description
Fan Control Unit
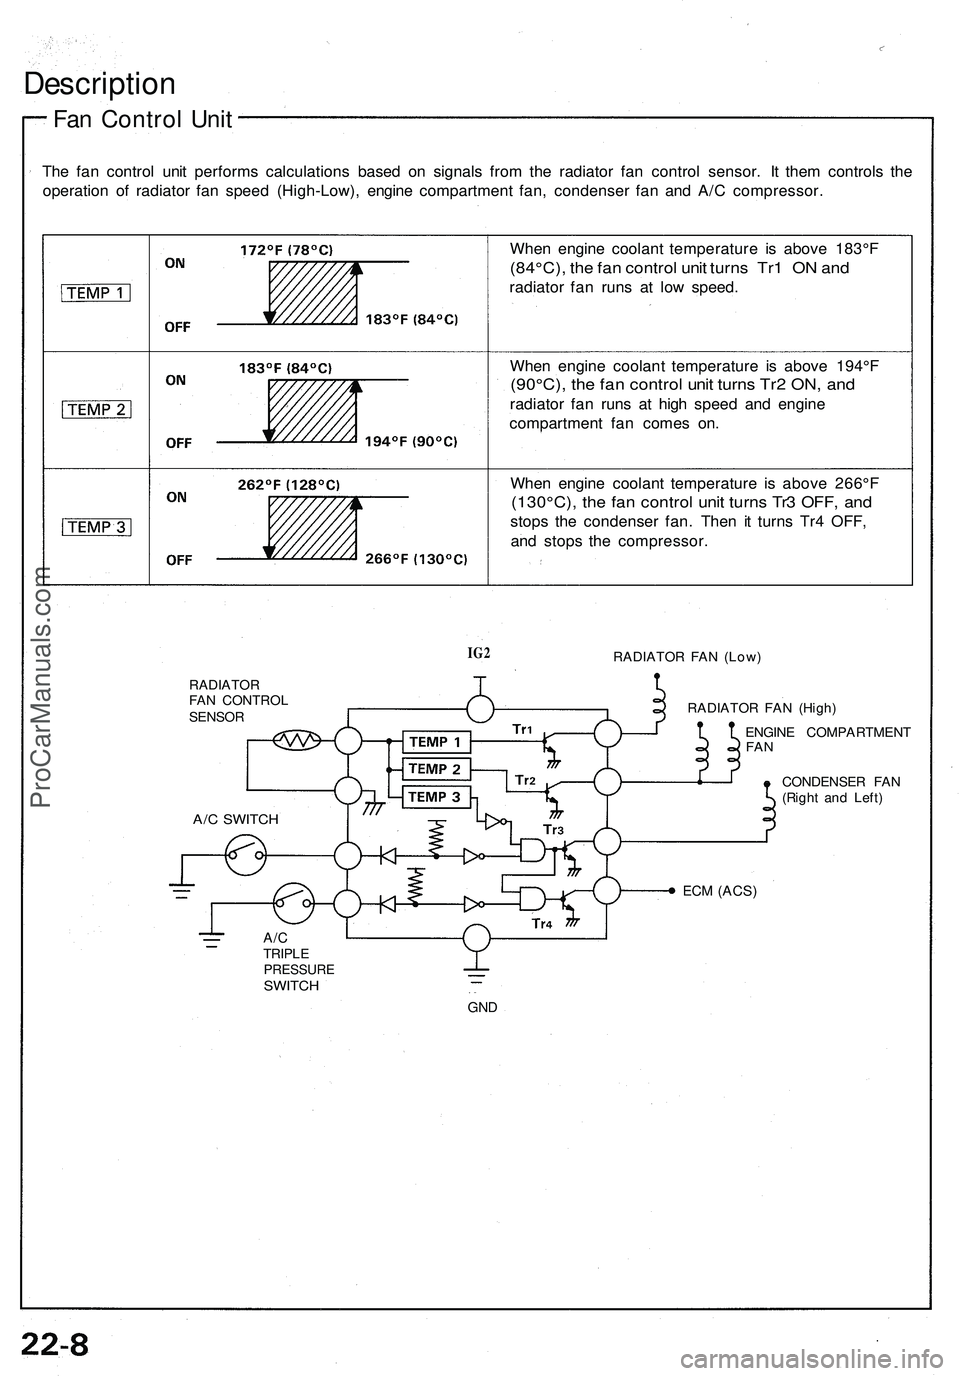
The fan control unit performs calculations based on signals from the radiator fan control sensor. It them controls the
operation of radiator fan speed (High-Low), engine compartment fan, condenser fan and A/C compressor.
When engine coolant temperature is above 183°F
(84°C), the fan control unit turns Tr1 ON and
radiator fan runs at low speed.
When engine coolant temperature is above 194°F
(90°C), the fan control unit turns Tr2 ON, and
radiator fan runs at high speed and engine
compartment fan comes on.
When engine coolant temperature is above 266°F
(130°C), the fan control unit turns Tr3 OFF, and
stops the condenser fan. Then it turns Tr4 OFF,
and stops the compressor.
IG2
RADIATOR FAN (Low)
RADIATOR
FAN CONTROL
SENSOR
RADIATOR FAN (High)
ENGINE COMPARTMENT
FAN
CONDENSER FAN
(Right and Left)
ECM
(ACS)
A/C
TRIPLE
PRESSURE
SWITCH
GND
A/C SWITCHProCarManuals.com
Page 1185 of 1503
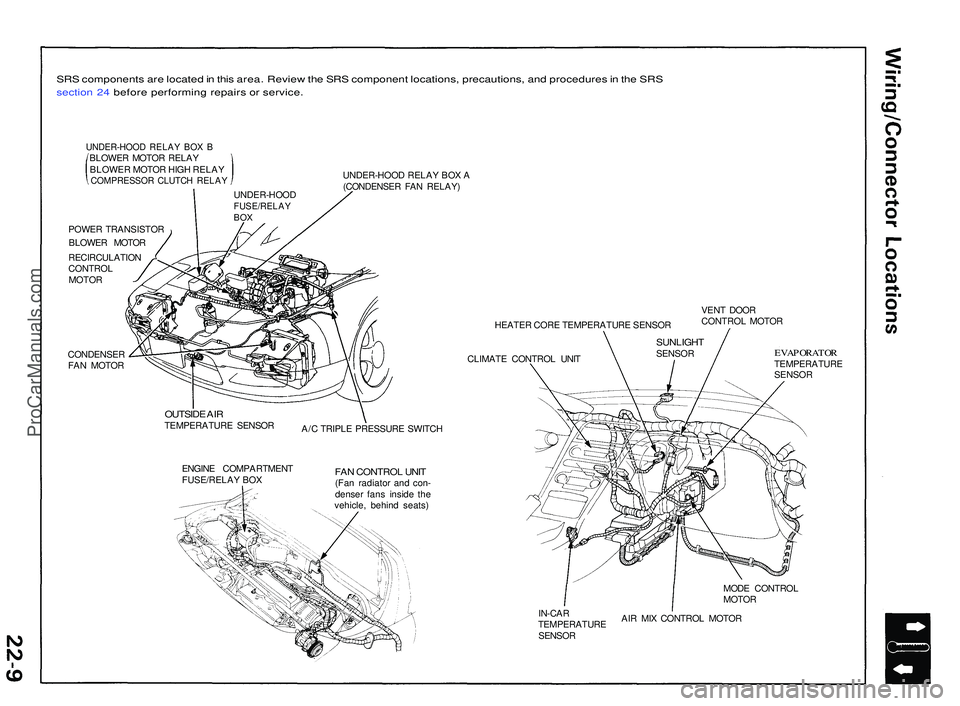
SRS component s ar e locate d in thi s area . Revie w th e SR S componen t locations , precautions , an d procedure s in th e SR S
sectio n 24 befor e performin g repair s o r service .
UNDER-HOO D RELA Y BO X BBLOWE R MOTO R RELA Y
BLOWE R MOTO R HIG H RELA Y
COMPRESSO R CLUTC H RELA Y
POWER TRANSISTO R
BLOWE R MOTO R
RECIRCULATIO N
CONTRO L
MOTO R
CONDENSE R
FA N MOTO R UNDER-HOO
D RELA Y BO X A
(CONDENSE R FA N RELAY )
HEATER COR E TEMPERATUR E SENSO R
CLIMAT E CONTRO L UNI T VEN
T DOO R
CONTRO L MOTO R
OUTSID E AI RTEMPERATUR E SENSO R
A/C TRIPL E PRESSUR E SWITC H
ENGIN E COMPARTMEN T
FUSE/RELA Y BO X
FAN CONTRO L UNI T(Fan radiato r an d con -
dense r fan s insid e th e
vehicle , behin d seats )
EVAPORATO RTEMPERATUR E
SENSO R
MOD E CONTRO L
MOTO R
IN-CA R
TEMPERATUR E
SENSO R AI
R MI X CONTRO L MOTO R
UNDER-HOO
D
FUSE/RELAYBOX
SUNLIGH TSENSOR
ProCarManuals.com
Page 1186 of 1503
Troubleshooting
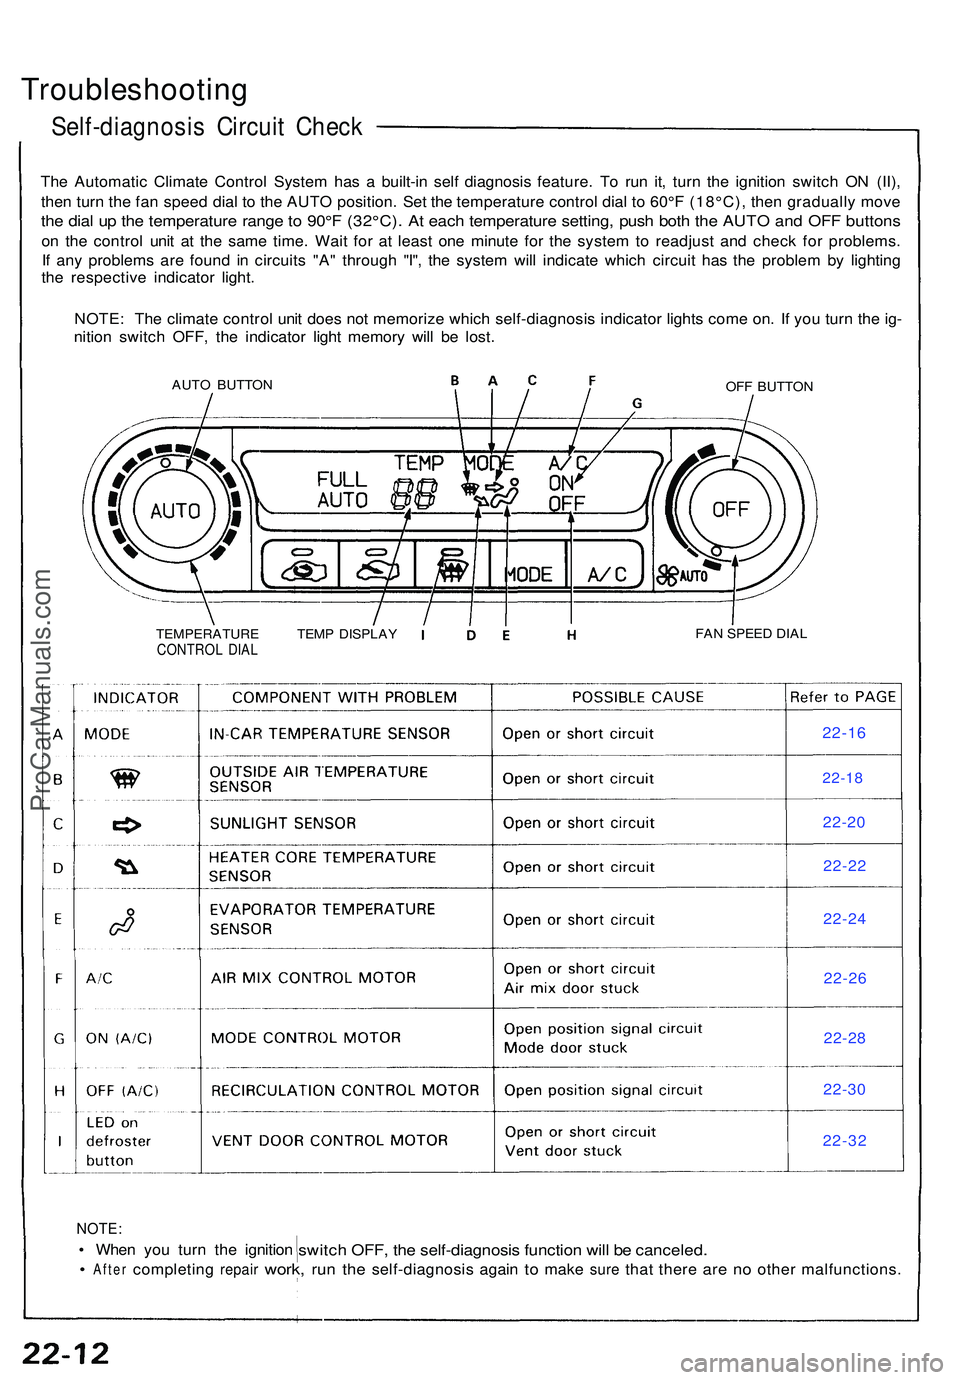
Self-diagnosis Circui t Chec k
The Automati c Climat e Contro l Syste m ha s a built-i n sel f diagnosi s feature . T o ru n it , tur n th e ignitio n switc h O N (II) ,
the n tur n th e fa n spee d dia l t o th e AUT O position . Se t th e temperatur e contro l dia l t o 60° F (18°C) , the n graduall y mov e
the dia l u p th e temperatur e rang e to 90° F (32°C) . A t eac h temperatur e setting , pus h bot h th e AUT O an d OF F button s
on th e contro l uni t a t th e sam e time . Wai t fo r a t leas t on e minut e fo r th e syste m to readjus t an d chec k fo r problems .
I f an y problem s ar e foun d i n circuit s "A " throug h "I" , th e syste m wil l indicat e whic h circui t ha s th e proble m b y lightin g
th e respectiv e indicato r light .
NOTE : Th e climat e contro l uni t doe s no t memoriz e whic h self-diagnosi s indicato r light s com e on . I f yo u tur n th e ig -
nitio n switc h OFF , th e indicato r ligh t memor y wil l b e lost .
AUT O BUTTO NOFF BUTTO N
TEMPERATUR E TEM P DISPLA Y
CONTRO L DIA LFAN SPEE D DIA L
NOTE :
• Whe n yo u tur n th e ignitio nswitch OFF , th e self-diagnosi s functio n wil l b e canceled .
• After completin g repair work, run th e self-diagnosi s agai n to mak e sure that ther e are n o othe r malfunctions .
22-16
22-18
22-2 0
22-2 2
22-2 4
22-2 6
22-2 8
22-3 0
22-3 2
ProCarManuals.com
Page 1187 of 1503
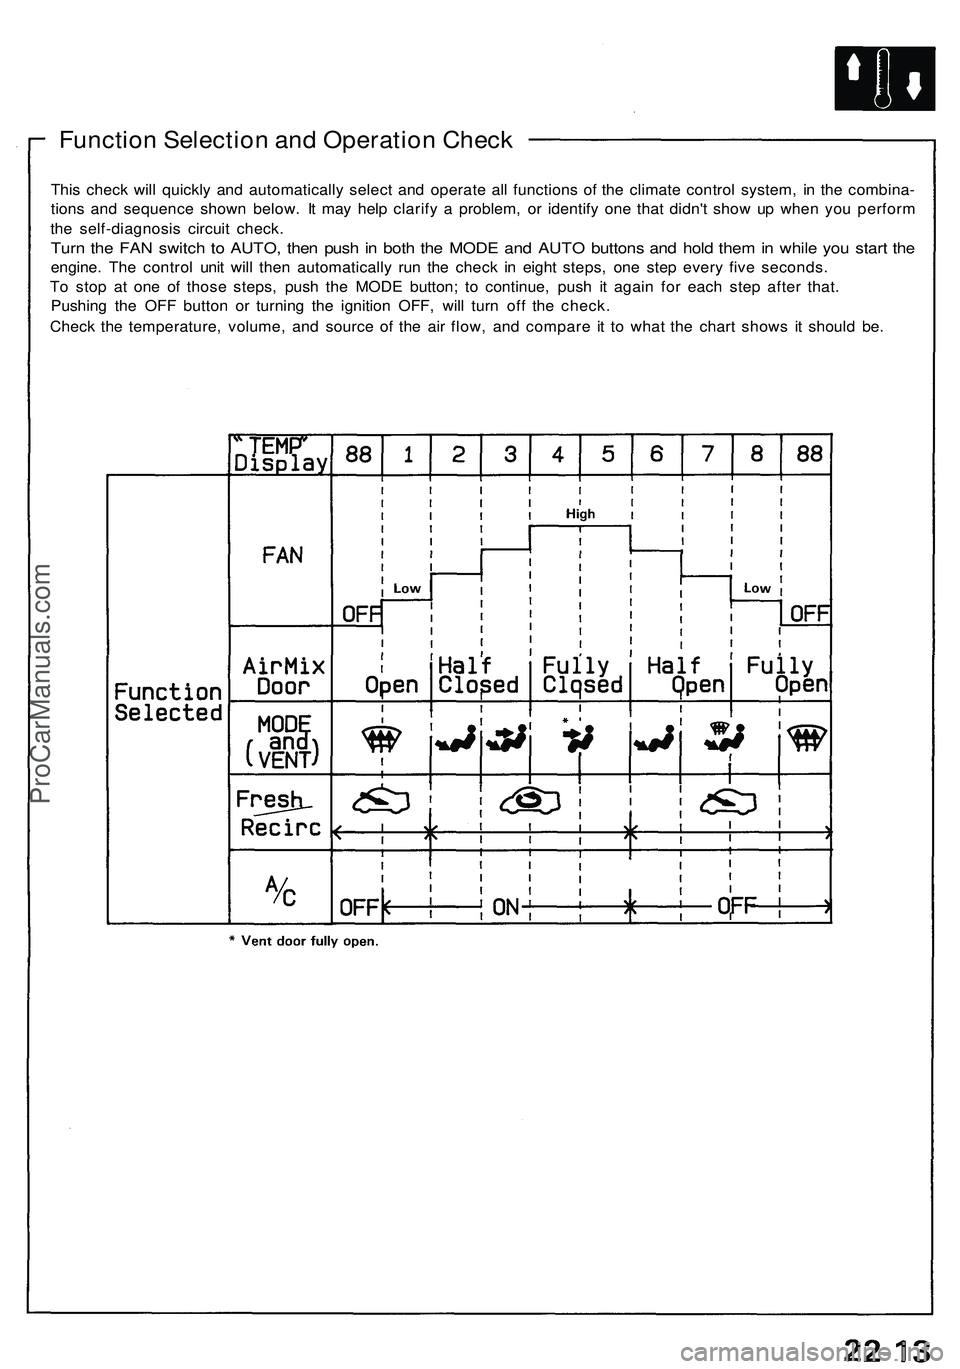
Function Selection and Operation Check
This check will quickly and automatically select and operate all functions of the climate control system, in the combina-
tions and sequence shown below. It may help clarify a problem, or identify one that didn't show up when you perform
the self-diagnosis circuit check.
Turn the FAN switch to AUTO, then push in both the MODE and AUTO buttons and hold them in while you start the
engine. The control unit will then automatically run the check in eight steps, one step every five seconds.
To stop at one of those steps, push the MODE button; to continue, push it again for each step after that.
Pushing the OFF button or turning the ignition OFF, will turn off the check.
Check the temperature, volume, and source of the air flow, and compare it to what the chart shows it should be.ProCarManuals.com
Page 1188 of 1503
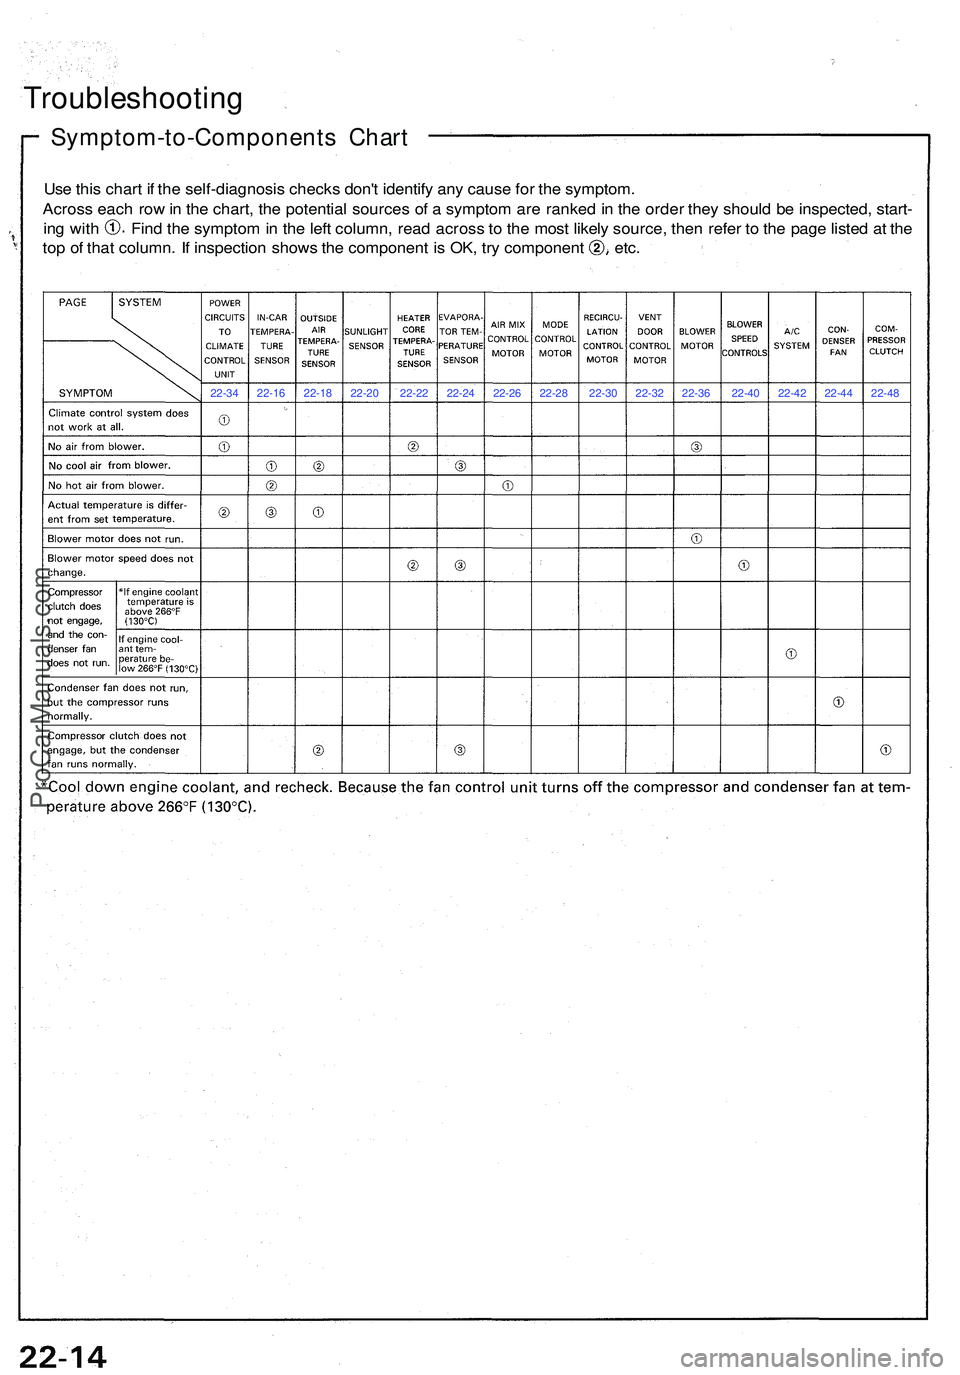
Use thi s char t i f th e self-diagnosi s check s don' t identif y an y caus e fo r th e symptom .
Acros s eac h ro w in th e chart , th e potentia l source s o f a sympto m ar e ranke d in th e orde r the y shoul d b e inspected , start -
ing wit h Fin d th e sympto m in th e lef t column , rea d acros s t o th e mos t likel y source , the n refe r t o th e pag e liste d a t th e
top o f tha t column . I f inspectio n show s th e componen t i s OK , tr y componen t etc .
Symptom-to-Component s Char t
Troubleshootin g
22-34 22-16 22-18 22-20 22-22 22-24 22-26 22-28 22-30 22-32 22-36 22-40 22-42 22-44 22-48
ProCarManuals.com
Page 1189 of 1503
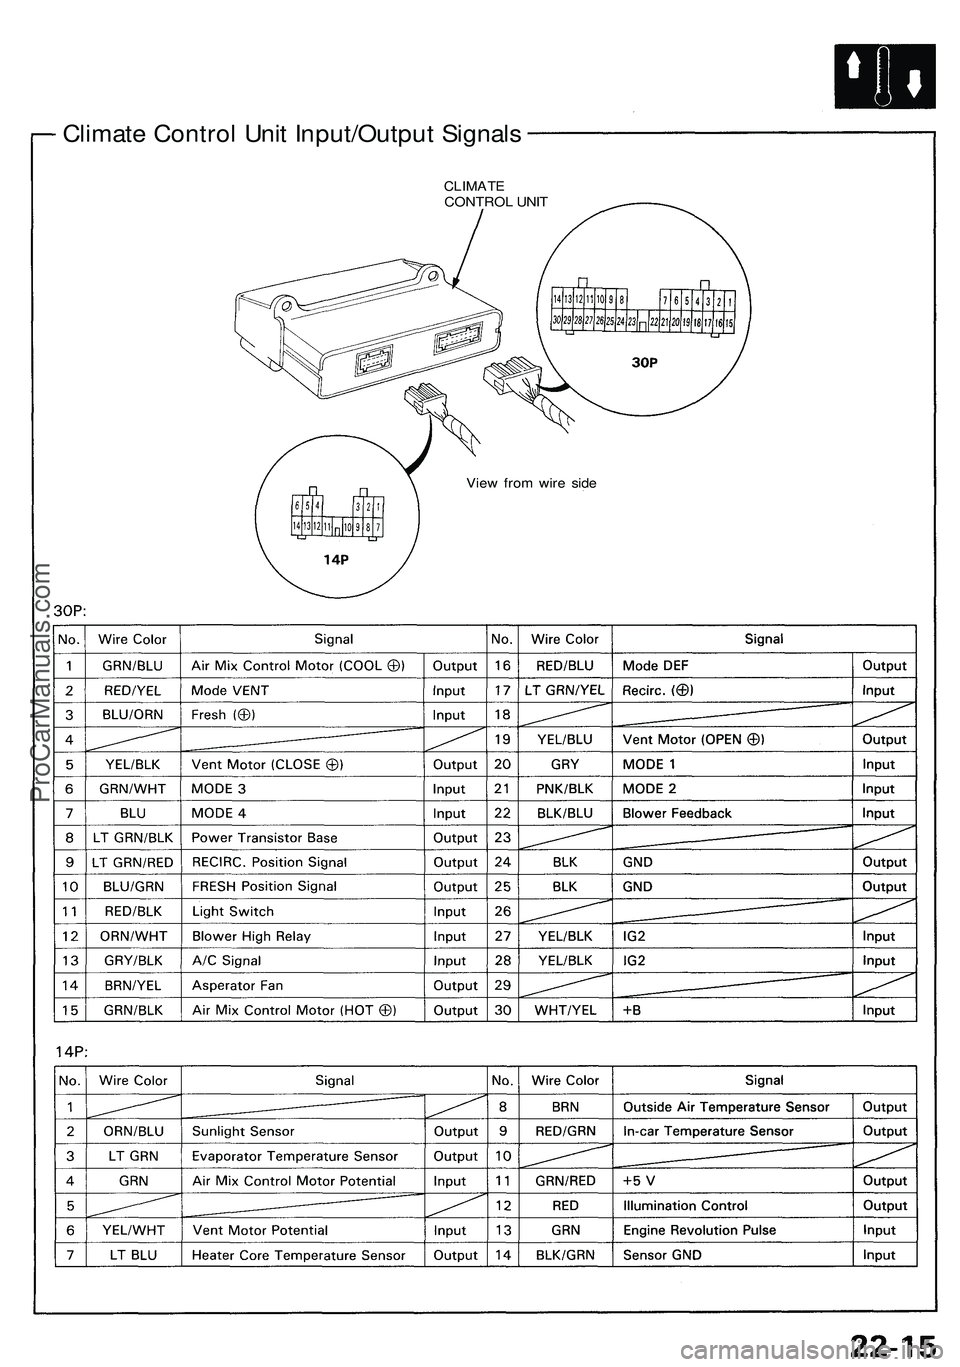
Climate Control Unit Input/Output Signals
CLIMATE
CONTROL UNIT
View from wire sideProCarManuals.com
Page 1190 of 1503
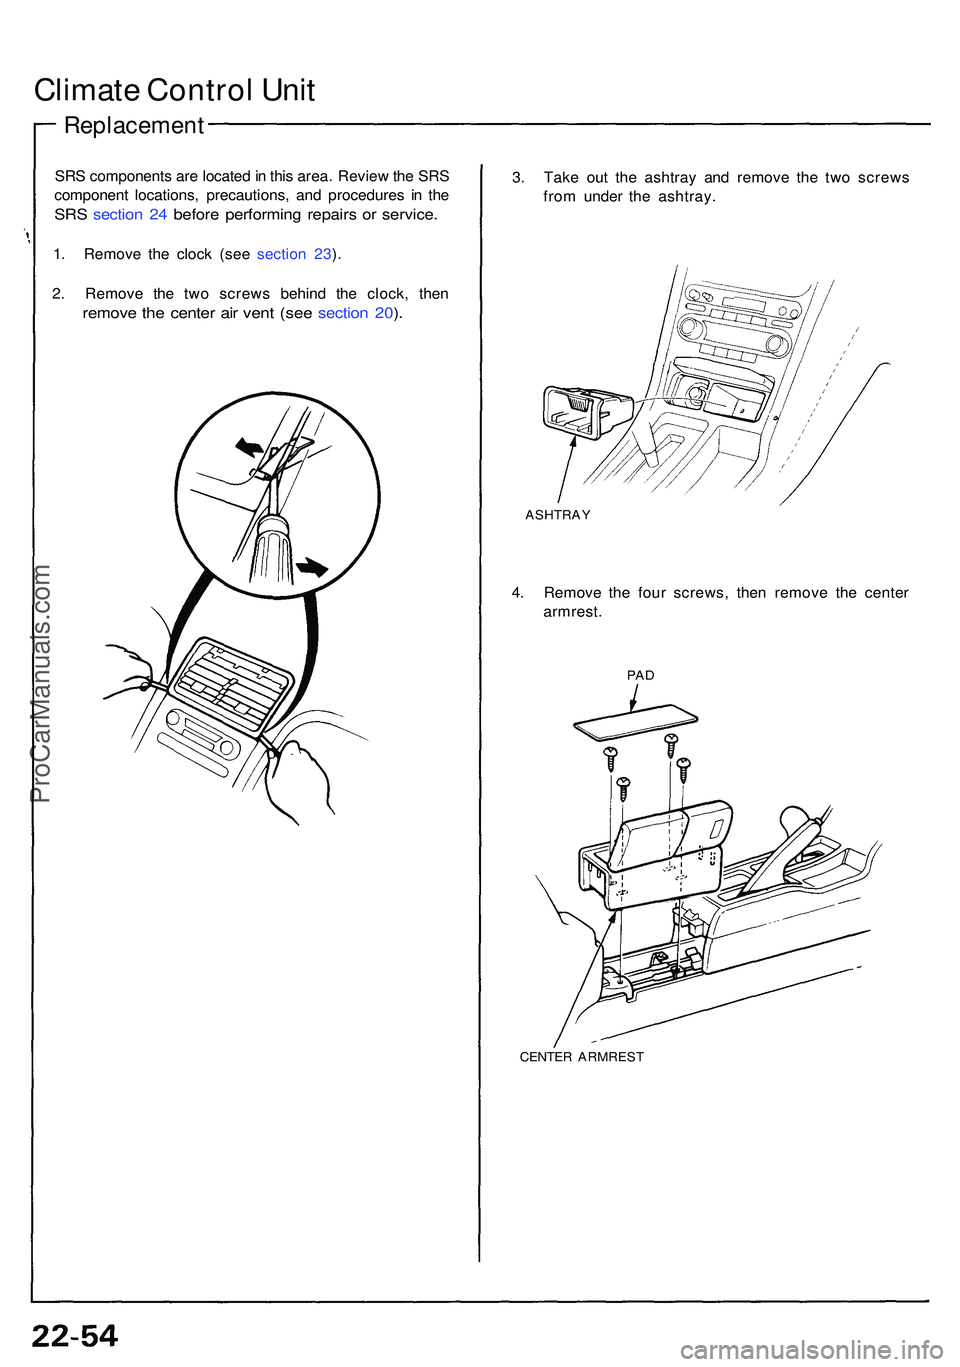
Climate Contro l Uni t
Replacemen t
SRS component s ar e locate d in thi s area . Revie w th e SR S
componen t locations , precautions , an d procedure s i n th e
SR S sectio n 24 befor e performin g repair s o r service .
1. Remov e th e cloc k (se e sectio n 23 ).
2 . Remov e th e tw o screw s behin d th e clock , the n
remov e th e cente r ai r ven t (se e sectio n 20 ).
3 . Tak e ou t th e ashtra y an d remov e th e tw o screw s
fro m unde r th e ashtray .
ASHTRA Y
4. Remov e th e fou r screws , the n remov e th e cente r
armrest .
PAD
CENTE R ARMRES T
ProCarManuals.com